4VeniceF16/VeniceF16R/VeniceF24/VeniceF32 Quick Start Guide 5VeniceF16/VeniceF16R/VeniceF24/VeniceF32 Quick Start Guide
Using your VeniceF as a
FireWire audio interface
IMPORTANT! Do not connect or disconnect the
FireWire cable to your VeniceF when the console
is powered up, as this may result in damage to
sensitive components. Always switch o the
console before co nnecting or disconnecting the
FireWire cable!
PC version
This is the Quick Start Guide for the VeniceF consoles.
It shows you how to get your console and Windows PC
ready to use the FireWire serial bus. For full details, see the
VeniceF Operator Manual.
It is strongly recommended that when
connecting or disconnecting the VeniceF to a PC/Mac/
Laptop computer you do so in the following manner:
When Connecting the VeniceF
• Ensure that the computer is turned OFF
• Ensure that the VeniceF is turned OFF
• Connect your VeniceF FireWire port to your
computer’s FireWire port
• Turn ON your VeniceF
• Turn ON your Computer
• Turn ON your Monitor Speakers
When disconnecting the VeniceF
• Shut down record software
• Turn OFF your monitor speakers
• Turn OFF your VeniceF
• Disconnect your VeniceF
Step A — Installing the device driver
Do not connect the FireWire cable to your
PC before installing the device driver.
(1) Visit www.midasconsoles.com to download the
latest drivers.
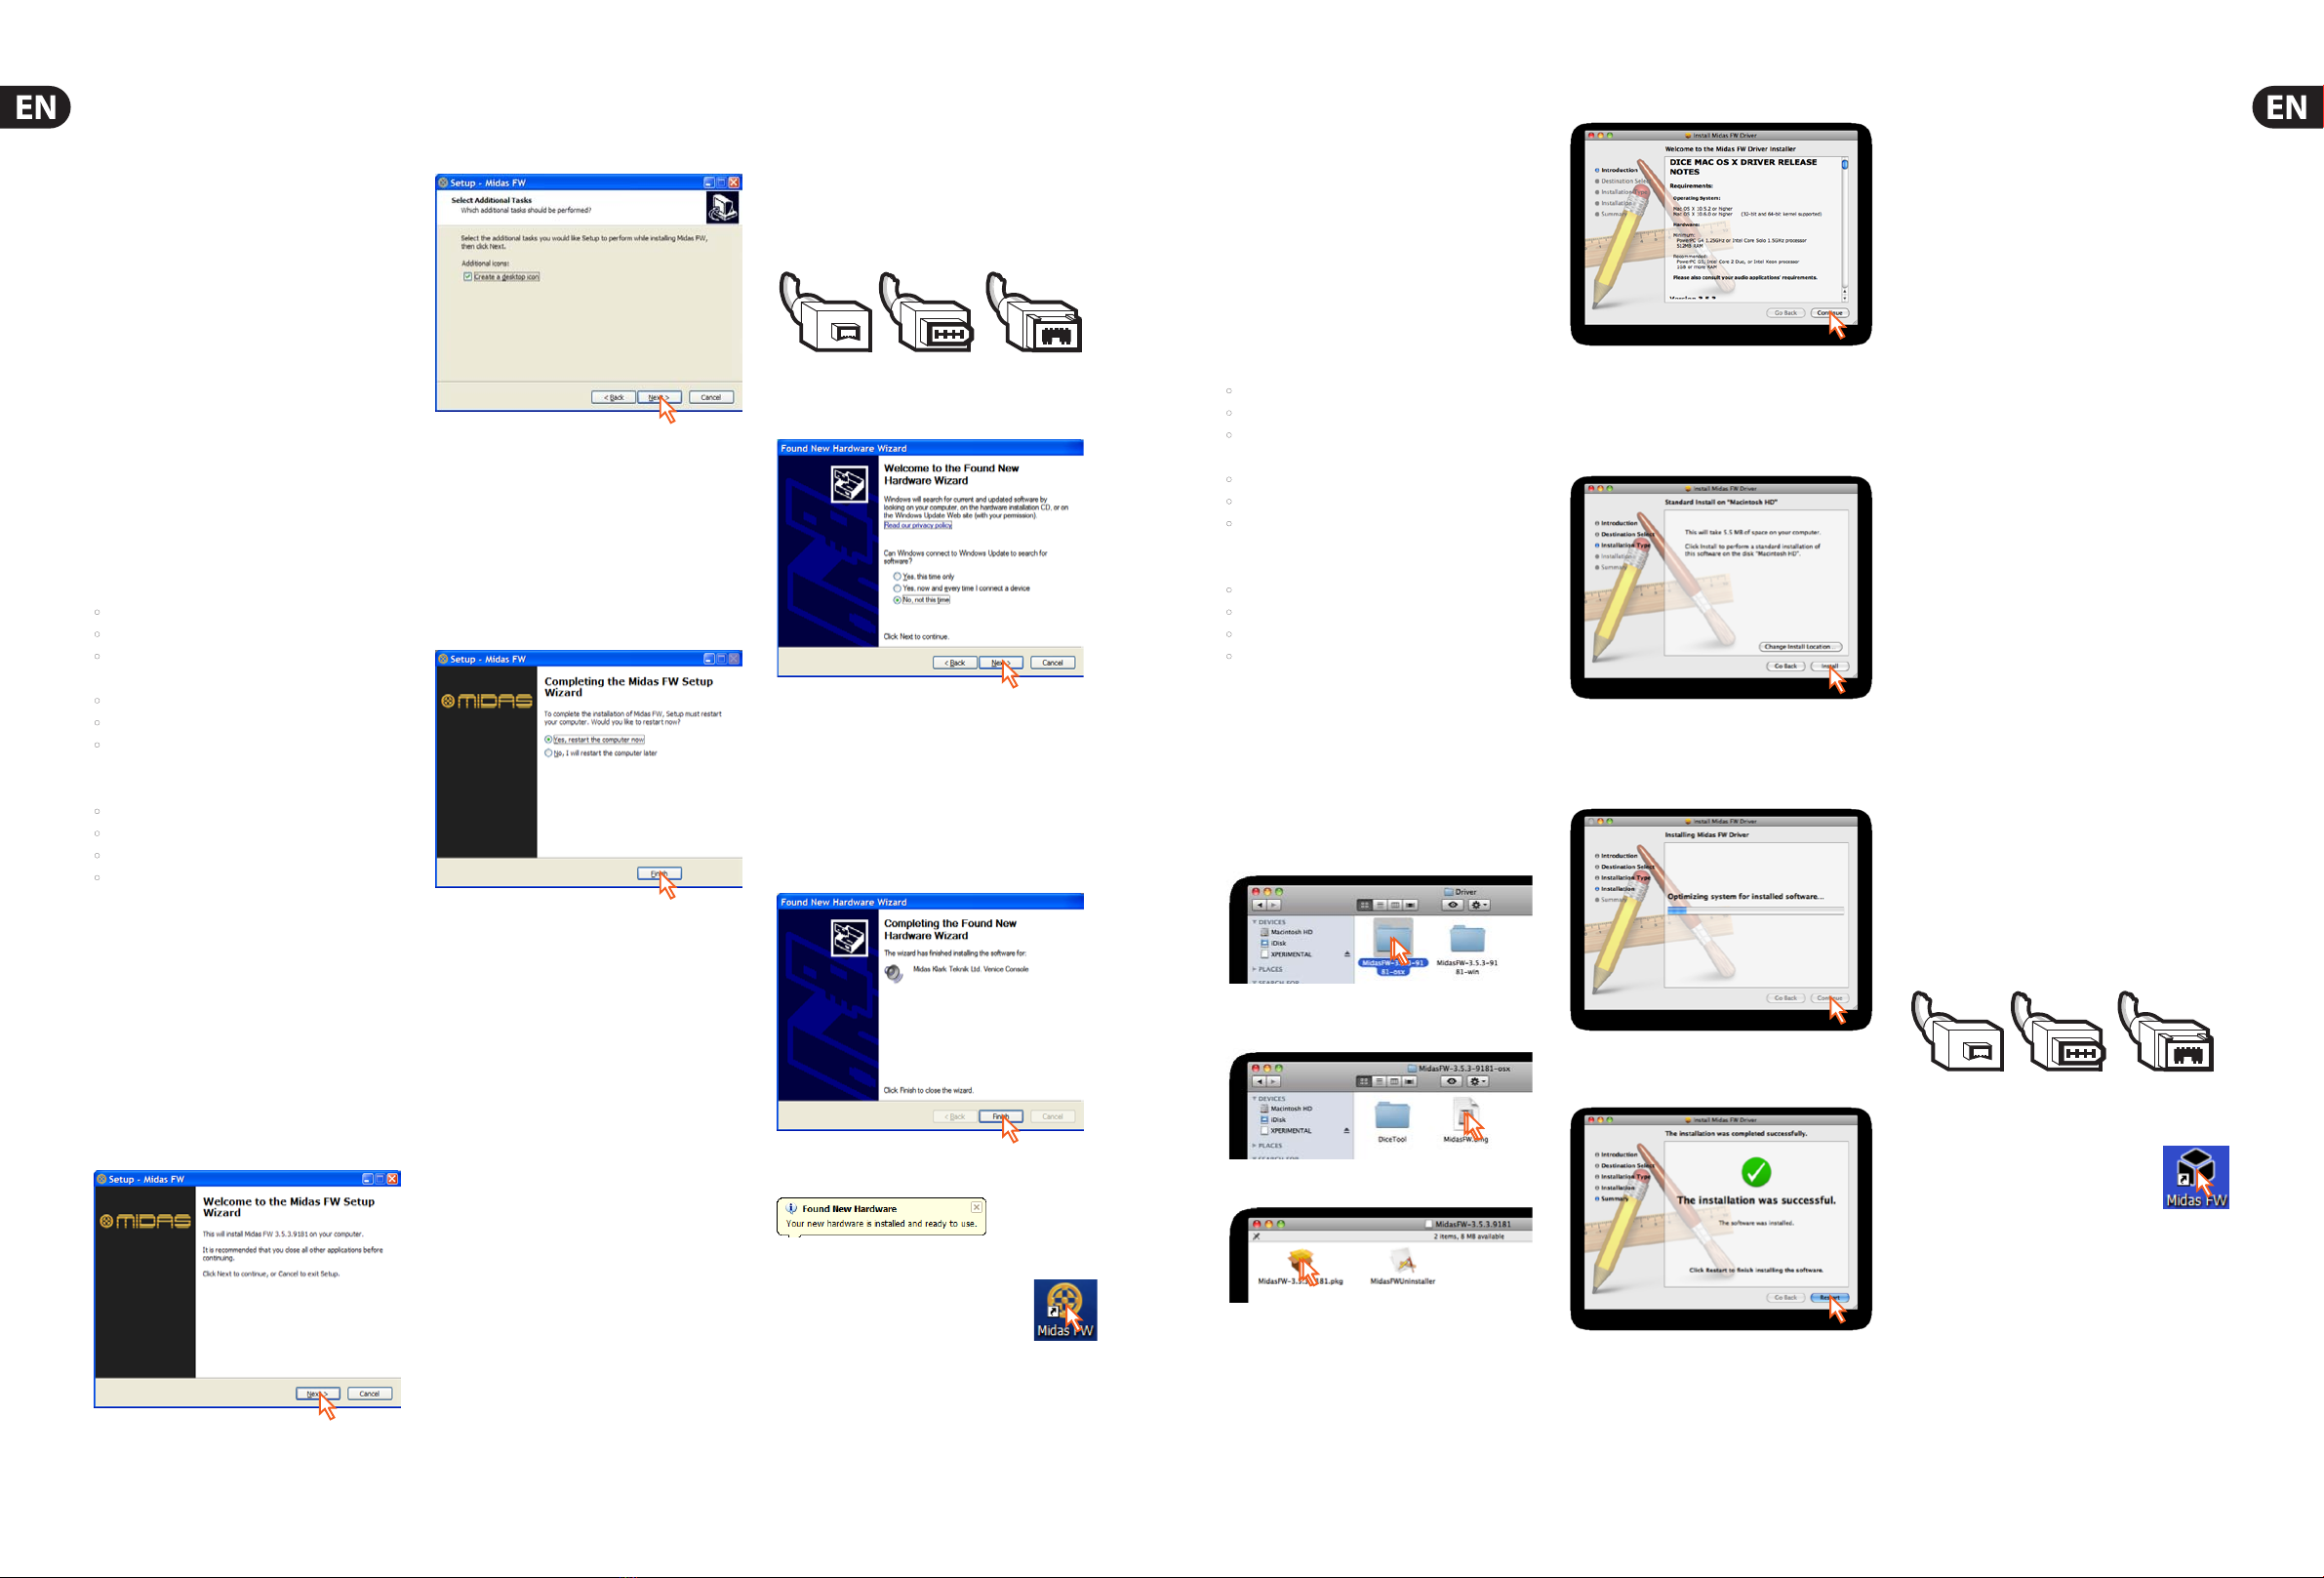
(2) Launch MidasFWInstaller.exe to start the setup
wizard. In the Setup - Midas FW window,
click Next.
(3) In the Select Destination Location window,
click Next.
(4) Click Next.
(5) In the Ready to Install window, click Install.
(If a release notes Window opens, close it.) The
Installing window of the Setup - Midas FW
window will display the installation progress.
(6) If the Windows “Logo testing” compatibility window
appears, click Continue Anyway.
(7)
To complete the installation, select the Yes, restart
the computer now option and then click Finish.
You must restart your PC before using
the VeniceF driver you have just installed.
After your PC has restarted, go to Step B.
Step B — Installing the hardware device
Do not attempt the following procedure
until you have completed Step A.
The VeniceF must be switched o before the FireWire cable
is connected to it.
(1) Switch o the VeniceF.
(2) Connect the VeniceF to your PC using the appropriate
FireWire cable, while observing the following
precautions. Plug the 6-pin connector into the
FireWire socket of the FireWire section on the rear
of the console. Connect the other end of the cable
into the PC.
Make sure you use the correct FireWire
cable connector with your PC.
When plugging the FireWire connector
into your PC, make sure the connector is the correct
way up and take great care not to exert too much force.
Some typical examples of FireWire connectors are
shown below.
(3) In the Found New Hardware Wizard window,
select the No, not this time option and then
click Next.
(4) Select the Install the software automatically
(Recommended) option, and then click Next. The
wizard will perform a search.
(5) When the Windows “Logo testing” compatibility
window appears, click Continue Anyway.
(6) After the wizard has nished installing the device
hardware, click Finish.
You should see the following balloon on your desktop.
You are now ready to use FireWire with the VeniceF console.
The default settings of the Midas FW
software you have just installed should be
adequate for use. However, if you want to
change these settings, open the settings
window by clicking the Midas FW desktop icon. For full
details, refer to the VeniceF Operator Manual.
If you encounter unwanted audio artefacts, such as
humming, this is probably an indication of ground loop
problems—refer to the Operator Manual for details.
4-pin
6-pin
(VeniceF)
9-pin
Mac computer version
This is the Quick Start Guide for the VeniceF consoles.
It shows you how to get your console and Mac computer
ready to use FireWire. For full details, see the VeniceF
Operator Manual.
It is strongly recommended that when
connecting or disconnecting the VeniceF to a PC/Mac/
Laptop computer you do so in the following manner:
When Connecting the VeniceF
• Ensure that the computer is turned OFF
• Ensure that the VeniceF is turned OFF
• Connect your VeniceF FireWire port to your
computer’s FireWire port
• Turn ON your VeniceF
• Turn ON your Computer
• Turn ON your Monitor Speakers
When disconnecting the VeniceF
• Shut down record software
• Turn OFF your monitor speakers
• Turn OFF your VeniceF
• Disconnect your VeniceF
Step A — Installing the device driver
Do not connect the FireWire cable to your
Mac computer before installing the device driver.
(1) Visit www.midasconsoles.com to download the
latest drivers.
(2) Launch MidasFWInstaller.exe to start the setup
wizard. In the Setup - Midas FW window, click Next.
(3) Double-click the “MidasFW-x.x.x.xxxx.pkg” le.
(4) At the Introduction stage, click Continue.
(If your Mac computer has another hard drive connected,
the Destination Select stage will let you select another
install location.)
(5) At the Installation Type stage, click Install.
(If a password message appears, enter your password
and continue.)
(6) At the Installation stage, click Continue.
(7) After the driver has been installed successfully,
click Restart.
Your Mac computer should switch o and on again
automatically to nish the installation procedure.
Your Mac computer must restart before
you can use the device driver you have just installed.
After your Mac computer has restarted, go to Step B.
Step B — Connecting the VeniceF to
your Mac computer
Do not attempt the following procedure
until you have completed Step A.
The VeniceF must be switched o before the FireWire cable
is connected to it.
(1) Switch o the VeniceF.
(2) Connect the VeniceF to your Mac computer using
the appropriate FireWire cable, while observing the
following precautions. Plug the 6-pin connector
into the FireWire socket of the FireWire section on
the rear of the console. Connect the other end of the
cable into the Mac computer.
Make sure you use the correct FireWire
cable connector with your Mac computer.
When plugging the FireWire connector
into your Mac computer, make sure the connector is
the correct way up and take great care not to exert too
much force.
Some typical examples of FireWire connectors are
shown below.
You are now ready to use FireWire with the
VeniceF console.
The default settings of the Midas FW
software you have just installed should be
adequate for use. However, if you want to
change these settings, open the settings
window by clicking the Midas FW desktop icon. For full
details, refer to the VeniceF Operator Manual.
If you encounter unwanted audio artefacts, such as
humming, this is probably an indication of ground loop
problems—refer to the Operator Manual for details.
4-pin
6-pin
(VeniceF)
9-pin
FireWire and Mac are trademarks of Apple Inc. Windows is a registered trademark of Microsoft Corporation in the United States and other countries.