Midea MDRW111FGG User manual

MDRW111FGG
MDRW150FGG
Wine Cooler
USER MANUAL
Warning notices: Before using this product, please read this manual carefully and keep it for future reference.
The design and specifications are subject to change without prior notice for product improvement.
Consult with your dealer or manufacturer for details.
The diagram above is just for reference. Please take the appearance of the actual product as the standard.


LANGUAGES
EN English
DE Deutsch
IT Italian
FR French
ES Spanish
PT Portuguese
GR Greek
PL Polish
LV Latvian
SR Serbian
HR Republika Hrvatska
HU Hungary
SL Slovenia
RO Romania
BG Bulgaria
LT Lithuania
AL Albanian
CZ Czech
SK Slovak


01
EN
THANK YOU LETTER
Thank you for choosing Midea! Before using your new Midea product, please read
this manual thoroughly to ensure that you know how to operate the features and
functions that your new appliance offers in a safe way.
CONTENTS
THANK YOU LETTER ----------------------------------------------------- 01
SPECIFICATIONS ---------------------------------------------------------- 02
PRODUCT OVERVIEW --------------------------------------------------- 03
PRODUCT INSTALLATION ---------------------------------------------- 04
OPERATION INSTRUCTIONS------------------------------------------- 07
CLEANING AND MAINTENANCE-------------------------------------- 09
TROUBLESHOOTING ----------------------------------------------------- 10

02
EN
SPECIFICATIONS
Product model MDRW111FGG
Rated Voltage / Frequency 220-240V~/50Hz
Rated Current 0.7A
Total Volume 66L
Rated Bottle Capacity 24B
Overall Dimension (WxDxH) 470x440x640mm
Product model MDRW150FGG
Rated Voltage / Frequency 220-240V~/50Hz
Rated Current 0.7A
Total Volume 93L
Rated Bottle Capacity 34B
Overall Dimension (WxDxH) 470x440x845mm

03
EN
PRODUCT OVERVIEW
Names of components
1LED lamp 4Steel column strip
2Refrigerator rollbond evaporator 5Levelling foot
3Shelf 6Glass door
ATTENTION
The picture above is only for reference. The actual conguration will depend on the physical
product or statement by the distributor.
MDRW111FGG
MDRW150FGG

04
EN
PRODUCT INSTALLATION
Install Instruction
For refrigerating appliances with climate class
• Depending on the climate class, This refrigerating appliance is intended to be
used at ambient temperatures range as specied following table.
• The climate class can be found on the rating plate. The product may not
operate properly at temperatures outside of the specic range.
• You can nd the climate class on the product label.
Effective temperature range
• The product is designed to operate normally in the temperature range
specied by its class rating.
Class Symbol Ambient temperature range °C
IEC 62552 (ISO 15502) ISO 8561
Extended temperate SN + 10 to + 32 + 10 to + 32
Temperate N + 16 to + 32 + 16 to + 32
Subtropical ST + 16 to + 38 + 18 to + 38
Tropical T + 16 to + 43 + 18 to + 43
Dimensions and Clearances
• Too small of a distance from adjacent items may result in the degradation
of freezing capability and increased electricity costs. Allow over 100 mm of
clearance from each adjacent wall when installing the appliance.
ATTENTION
The picture above is only for reference. The actual conguration will depend on the physical
product or statement by the distributor
>100mm
>100mm
>100mm
>100mm
>100mm
>100mm
Top View
Required space
for air circulation

05
EN
Start to use
• After transportation, please let the cooler stay for more than 2 hours before
turning on the power, otherwise it will lead to a decrease in cooling capacity
or a damage to the cooler. The cooler shall stay for half an hour before
connecting power when it is rstly started. Clean up the inner chamber before
put into use for rst time .
• Please pull out plug in case of power failure or cleaning. Do not connect
the cooler to power supply within ve minutes to prevent damages to the
compressor due to successive starts.
• In the process of compressor work, water droplets or frost will be formed on
the back wall of the refrigerated compartment, which is a normal phenomenon.
After a period of time, the frost will melt into water and ow into the water
tray to evaporate away.
• Do not connect cooler to electronic energy saving plug and converter that can
convert DC into AC (e.g.: solar energy system, ship grid).
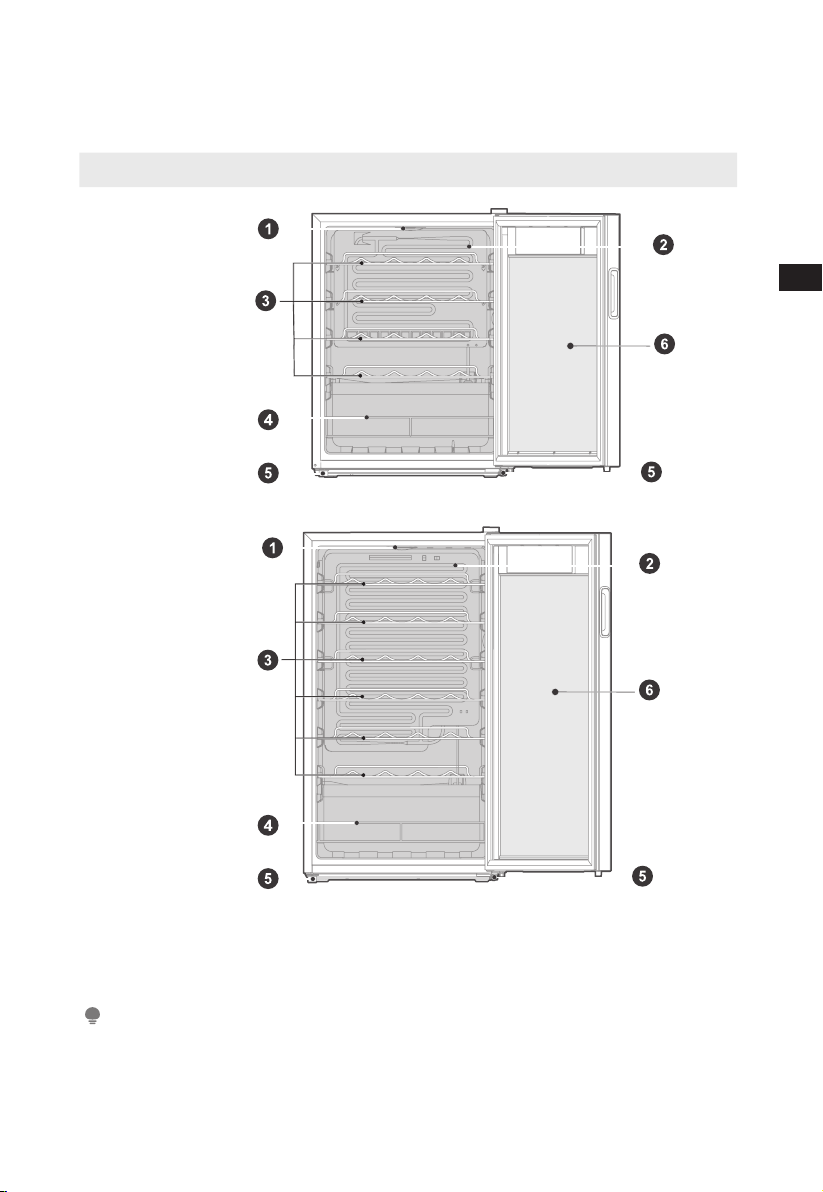
Recommended layout for beverage can in the cabinet
• Do not let bottle touch the back side of cooler in order to maintain good air
circulation in the cooler.
• The capacity for bottle storage in the wine cabinet (MDRW111FGG shown
as Fig.2, MDRW150FGG shown as Fig.3 ) is based on the following marked
bottle size (Fig.1) . Oversized bottle may have impact on the number of bottle
storage in the wine cabinet.
• For model MDRW111FGG: The recommended maximum bottling volume is 24
bottles, as Fig.2
• For model MDRW150FGG: The recommended maximum bottling volume is 34
bottles, as Fig.3
The picture above is only for reference. The actual conguration will depend on the physical
product or statement by the distributor.
Fig.2 Fig.3
Fig.1
215mm
300.5mm
27.5mm
76.1mm
ATTENTION

06
EN
Practical skills for grape wine’s storage
• Do not store bottled wine by box or case in refrigerator.
• The cork of the old bottle shall always be soaked in the wine putting into wine
cooler. Air space is not allowed between wine and cork.
• Open-type bottle shelf is helpful, as it does not cut on air circulation. The air
moisture that condensed on bottle can be dried out swiftly.
• The wine shall before drinking: such as put pink red wine onto the table 2-5
hours before drinking and red wine 4-5 hours, then can reach suitable serving
temp. White wine, on the contray, can be served right on the table. champagne
shall always be stored in cooler and taken out only before drinking.
• Please notice that wine’s temperature is always lower than ideal serving temp,
as the temperature will immediately rise 1 to 2°C when pouring into tumbler.
Serving temperature
• The wine’s taste depends on right pouring temperature; therefore it determines
its avor.
• We suggests the wine’s temperature reaches the following degree when pouring:
Wine Kinds Serving Temp
Bordeaux red 18°C
Louis Family dry red wine/Barolo 17°C
Burgundy red/Bordeaux red 16°C
Port 15°C
Young Burgundy red 14°C
Young red wine 12°C
Young Beaujolais/all white wines with little residual sugar 11°C
Old white wines/Chardonnay 10°C
Sherry 9°C
Young white wines from late vintage 8°C
White wines Loire/Entre-deux-Mers 7°C

07
EN
OPERATION INSTRUCTIONS
Control panal
Display
1Locking and unlocking 4Temperature-rise key
2Lighting key 5Temperature-drop key
3Display area
* The actual control panel may differ from model to model.
Display Control
• When power-on the cooler, the display screen will display in full last for 3
seconds,and the start-up tone will ring, and then enter into the display of
normal operation;
• Normal operation display: In case of no failure, set temperature is displayed; In
case of failure, error code is displayed;
This cooler adopts the touch control of the glass door. Touch slightly when pressing the keys.
It is to be avoided that the area of the display panel is scratched by the sharp things and it
shall be kept away from the environment of high magnetic eld and high humidity. Otherwise
the cooler is possible not to be set and operate normally.
Locking and unlocking
• Under the locked state, long press the “Lock key ( )” continuously for 3
seconds, the locking will be relieved; the display area will blink;
• Under the unlocked state, long press the “Lock key ( )” continuously for 3
seconds to enter into the locked state.
Except the lighting function, the following operations only be able to carried out under the
unlock state.
ATTENTION

08
EN
Lighting mode
• Press the lighting key until the buzzer rings to turn on/off the internal lamp.
Super cool mode
Mode entry :
• Continuously press the “locking and unlocking” and the “lighting key” mode
button for 3 seconds to enter, the display area shows “FC” and the mode takes
effect.
Mode exit :
• It lasts for 24 hours at most and will exit the mode automatically.
• Press the “locking and unlocking” and the “lighting key” mode button
continuously for 3 seconds again in this mode, or power off, also can exit the
mode.
Switching of the Fahrenheit temperature and Celsius temperature
• Press the Temperature-rise key and the Temperature-drop key continuously
for 3 seconds to nish the switch of the Celsius temperature and Fahrenheit
temperature; the display area will show the setting Fahrenheit temperature or
Celsius temperature under the existing mode.
Temperature setting
• Press the “Temperature-rise key” , the temperature will increase 1 ℃(or ℉).
After locking, the cooler will operate according to the setting value;
• Press the “Temperature-drop key” , the temperature will decrease 1 ℃(or ℉).
After locking, the cooler will operate according to the setting value.
Setting range of the Celsius temperature:5 ℃~18 ℃; setting range of the Fahrenheit
temperature: 41 ℉ ~64 ℉.
Memory function
• The cooler has the power off memory function. After the power is on again,
the cooler will work according to the setting before the power-off.
Error code
• If the failure happens, the display area will show corresponding error codes as
shown as below table, the user shall contact a specialist for maintenance, so as
to make sure the normal use of beverage cooler.
Fault Code Fault Description
E1 Temperature sensor fault
E6 Communication fault
E7 Ambient temperature sensor fault
Storing too many cans or bottles in the cooler may cause the temperature in the cooler to
rise temporarily.
ATTENTION
ATTENTION

09
EN
CLEANING AND MAINTENANCE
Stop using the wine cooler
If the cooler left unused for a long time, please:
1. Unplug the cooler;
2. Clean the cooler;
3. Keep the cooler door open.
Clean the wine cooler
• Dusts behind the wine cooler and on the ground shall be timely cleaned to improve
the cooling effect and energy saving.
• Check the door gasket regularly to make sure there are no debris.Clean the door
gasket with a soft cloth dampened with soapy water or diluted detergent.
• The interior of the wine cooler should be cleaned regularly to avoid odor.
• Please turn off the power before cleaning, remove drinks ,shelves,etc.
• Use a soft cloth or sponge to clean the inside of the wine cooler, with two
tablespoons of baking soda and a quart of warm water. Then rinse with water and
dry with a soft cloth. After cleaning, open the door and let it dry naturally before
turning on the power.
• For areas that are difcult to clean in the wine cooler (such as narrow sandwiches,
gaps or corners), it is recommended to wipe them regularly with a soft rag, soft
brush, etc. and when necessary, combined with some auxiliary tools (such as thin
sticks) to ensure no contaminants or bacterials accumulation in these areas.
• Do not use soaps, detergents, spray cleaners, etc. to clean the inside of your cooler
as these may create odors or contamination.
• Clean the shelves with a soft cloth dampened with soapy water or diluted detergent.
Then rinse with water and dry with a soft cloth or dry naturally.
• The wooden wine rack should not be directly immersed in liquid to prevent cracking
or mold after moisture. The wooden wine rack is cleaned with a dry soft cloth. The
heavily contaminated wooden wine rack should be cleaned with a soft cloth that has
been wrung out, and dry naturally.
• Wipe the outer surface of the wine cooler with a soft cloth dampened with soap
water,detergent, etc., and then wipe dry. Do not rub or scratch the surface of the
glass door to prevent the door from being broken or scratched.
• Do not use hard brushes, clean steel balls, wire brushes, abrasives(such as
toothpastes),organic solvents (such as alcohol, acetone, banana oil, etc.), boiling
water, acid or alkaline items, which may damage the wine cooler surface and
interior. Boiling water and organic solvents such as benzene may deform or damage
plastic parts.
• Do not rinse directly with water or other liquids during cleaning to avoid short
circuits or affect electrical insulation after immersion. Water should not soak the
operating control elements and lighting system in the glass door.

10
EN
TROUBLESHOOTING
The following simple issues can be handled by the user. Please call the after-sale
service department if the issues are not solved.
Problem Possible reason
Not work
• Whether the cooler is plugged and connected to power
• Low voltage
• Failure power or tripping circuit.
Long-time operation
of the compressor
• It is normal that cooler operates for longer time in summer
when the ambient temperature is higher
• Do not put too much beverage s in the cooler at one time;
• Frequent opening of cooler door.
Light not work • Whether the cooler is connected to power, whether the
indicator light is damaged.
Loud noises
• Whether the oor is at, whether the placement of cooler is
stable;
• Whether the cooler accessories are properly placed.
Over heat on
sidewall
• The cooler enclosure may emit heat during running specially
in summer, this is caused by the radiation of the condenser,
and it is a normal phenomenon.
Surface
condensation
• Condensation: condensation phenomenon will be detected
on the exterior surface and door seals of the cooler when the
ambient humidity is high, this is a normal phenomenon, and
after wiping with towel, turns up the set temperature of the
appliance properly.
Airow sound
Buzz
Clatter
• Refrigerants circulating in the refrigerant lines will produce
eruption of sound and grunts which is normal does not affect
the cooling effect.
• Buzz will be generated by running compressor specially when
starting up or shutting down.
• The solenoid valve or electric switch valve will clatter which is
a normal phenomenon and does not affect the operation.

01
DE
DANKE
Vielen Dank, dass Sie sich für Midea entschieden haben! Bevor Sie Ihr neues
Midea-Produkt in Betrieb nehmen, lesen Sie bitte dieses Handbuch aufmerk-
sam durch, damit Sie wissen, wie Sie die Funktionen Ihres neuen Geräts auf
sichere Weise nutzen können.
INHALT
DANKE ------------------------------------------------------------------------ 01
TECHNISCHE DATEN ---------------------------------------------------- 02
ÜBERBLICK ÜBER DAS PRODUKT ---------------------------------- 03
INSTALLATION------------------------------------------------------------- 04
BEDIENUNGSANLEITUNG---------------------------------------------- 07
REINIGUNG UND PFLEGE ---------------------------------------------- 09
FEHLERSUCHE ------------------------------------------------------------- 10

02
DE
TECHNISCHE DATEN
Produktmodell MDRW111FGG
Nennspannung/-frequenz 220 - 240 V~, 50 Hz
Nennstrom 0,7A
Gesamtvolumen 66 L
Fassungsvermögen Flaschen 24B
Gesamtabmessungen (B x T x H) 470 x 440 x 640 mm
Produktmodell MDRW150FGG
Nennspannung/-frequenz 220 - 240 V~, 50 Hz
Nennstrom 0,7A
Gesamtvolumen 93 L
Fassungsvermögen Flaschen 34B
Gesamtabmessungen (B x T x H) 470 x 440 x 845 mm

03
DE
ÜBERBLICK ÜBER DAS PRODUKT
Komponenten
1LED-Lampe 4Stahlstrebe
2Kühlschrank Rollbond-Verdampfer 5Nivellierfuß
3Ablage 6Glastür
ACHTUNG
Die vorstehende Abbildung dient lediglich als Referenz. Die vorhandene Konguration ist
vom tatsächlichen Produkt oder den Angaben des Lieferanten abhängig.
MDRW111FGG
MDRW150FGG

04
DE
INSTALLATION
Installationsanleitung
Für Kühlgeräte mit Klimaklasse
• In Abhängigkeit von der Klimaklasse ist dieser Kühlschrank für den Einsatz in
dem Temperaturbereich bestimmt, der in nachstehender Tabelle angegeben
ist.
• Die Klimaklasse nden Sie auf dem Typenschild. Außerhalb des angegebenen
Temperaturbereiches arbeitet das Gerät u. U. nicht ordnungsgemäß.
• Sie können die Klimaklasse am Typenschild des Produktes nden.
Effektiver Temperaturbereich
• Das Produkt wurde entwickelt, um in dem bei seiner Klimaklasse angegebenen
Temperaturbereich normal zu arbeiten.
Klasse Symbol Umgebungstemperaturbereich °C
IEC 62552 (ISO 15502) ISO 8561
Kaltgemäßigt SN +10 bis +32 +10 bis +32
Kühlgemäßigt N +16 bis +32 +16 bis +32
Subtropisch ST +16 bis +38 +18 bis +38
Tropisch T +16 bis +43 +18 bis +43
Abmessungen und Abstände
• Ein zu geringer Abstand zu Gegenständen kann die Kühlfähigkeit herabsetzen
und die Stromkosten erhöhen. Halten Sie bei der Installation des Gerätes
mindestens 100 mm Abstand zur Wand ein.
>100mm
>100mm
>100mm
>100mm
>100mm
>100mm
Top View
Required space
for air circulation
Erforderlicher Raum
für die Luftzirkulation
Draufsicht
ACHTUNG
Die vorstehende Abbildung dient lediglich als Referenz. Die vorhandene Konguration ist
vom tatsächlichen Produkt oder den Angaben des Lieferanten abhängig.

05
DE
Reinigung starten
• Lassen Sie den Kühlschrank nach dem Transport mindestens 2 Stunden stehen,
bevor Sie ihn einschalten. Anderenfalls kann die Kühlleistung nachlassen
oder der Kühlschrank beschädigt werden. Das Gerät muss eine halbe Stunde
still stehen, bevor Sie den Netzstecker für die erstmalige Benutzung in die
Netzsteckdose stecken können. Reinigen Sie den Geräteinnenraum, bevor Sie
das Gerät das erste Mal am Stromnetz anschließen.
• Ziehen Sie den Netzstecker bei Stromausfall oder für die Reinigung der
Gefriertruhe aus der Netzsteckdose. Schließen Sie das Gerät nach der Trennung
vom Stromnetz nicht innerhalb von fünf Minuten wieder am Stromnetz an,
um Beschädigungen des Kompressors und der mit diesem in Verbindung
stehenden Teile vorzubeugen.
• Während der Kompressor arbeitet, bilden sich auf der Rückwand des
gekühlten Faches Wassertröpfchen oder Frost, was eine normale Erscheinung
ist. Der Frost schmilzt nach einer Weile und das Schmelzwasser ießt in den
Schmelzwasserauffangbehälter, wo es verdunstet.
• Schließen Sie das Gerät weder an Energiesparsteckdosen noch an DC/AC-
Wandler (z. B. eine Solaranlage, Landstrom) an.
Empfohlene Anordnung für Getränkedosen im Kühlschrank
• Achten Sie darauf, dass die Flaschen nicht die Rückseite des Kühlschranks
berühren, um eine gute Luftzirkulation zu gewährleisten.
• Das Fassungsvermögen für die Lagerung von Flaschen im Weinkühlschrank
(MDRW111FGG wie in Abb. 2 gezeigt, MDRW150FGG wie in Abb. 3 gezeigt)
basiert auf der folgenden Flaschengröße (Abb. 1). Bei größeren Flaschen kann
sich die Anzahl der Flaschen verringern, die im Weinkühler gelagert werden
können.
• Für das Modell MDRW111FGG: Die empfohlene maximale anzahl Flaschen ist 24,
wie in Abb. 2 dargestellt.
• Für das Modell MDRW150FGG: Die empfohlene maximale Anzahl von Flaschen
ist 34, wie in Abb. 3 dargestellt.
Fig.2 Fig.3
Fig.1
215mm
300.5mm
27.5mm
76.1mm
Abb. 1 Abb. 2 Abb. 3
ACHTUNG
Die vorstehende Abbildung dient lediglich als Referenz. Die vorhandene Konguration ist
vom tatsächlichen Produkt oder den Angaben des Lieferanten abhängig.

06
DE
Praktische Hinweise für die Lagerung von Wein
• Lagern Sie in Flaschen abgefüllten Wein im Weinkühler nicht in Kisten oder
Verpackungen.
• Der Korken der alten Flasche sollte immer in den Wein getaucht werden, der
in den Weinkühler kommt. Zwischen Wein und Korken darf sich keine Luft
benden.
• Ein offenes Flaschenregal ist hilfreich, da es die Luftzirkulation nicht
einschränkt. Hier kann auch die an den Flaschen kondensierte Luftfeuchtigkeit
schnell abtrocknen.
• Der Wein sollte vor dem Trinken wie folgt aufbewahrt werden: Stellen Sie
z. B. Roséwein 2 - 5 Stunden vor dem Trinken auf den Tisch und Rotwein
4- 5 Stunden, damit erreicht er die geeignete Serviertemperatur. Weißwein
hingegen kann direkt serviert werden. Champagner sollte immer im Kühler
gelagert und erst vor dem Trinken herausgenommen werden.
• Bitte beachten Sie, dass die Weintemperatur immer niedriger als die ideale
Serviertemperatur sein sollte, weil sich die Temperatur des Weins beim
Einschenken in das Weinglas sofort um 1 bis 2 °C erhöht.
Serviertemperatur
• Der Geschmack des Weins hängt von der richtigen Einschenktemperatur ab;
sie bestimmt also seinen Geschmack.
• Wir empfehlen Ihnen die nachstehenden Weineinschenktemperaturen:
Weinsorte Serviertemperatur
Bordeaux-Rotweine 18 °C
Trockene Rotweine aus dem Haus Louis/Barolo 17 °C
Burgunder-Rotwein/Bordeaux-Rotwein 16 °C
Portwein 15 °C
Junger Burgunder-Rotwein 14 °C
Junger Rotwein 12 °C
Junger Beaujolais/alle Weißweine mit wenig Restsüße 11 °C
Alte Weißweine/Chardonnay 10 °C
Sherry 9 °C
Junge Weißweine (Spätlese) 8 °C
Loire-Weißweine/Entre-deux-Mers 7 °C
This manual suits for next models
1
Table of contents
Languages:
Other Midea Wine Cooler manuals