Miele CVA 6401 User manual

Operating and installation instructions
Built-in coffee machine
CVA 6401 (C)
To avoid the risk of accidents
or damage to the machine,
it is essential to read these
instructions before it is installed
and used for the first time. M.-Nr. 09 549 660
en-GB

Disposal of the packing
material
The packaging is designed to protect
the appliance from damage during
transportation. The packaging materials
used are selected from materials which
are environmentally friendly for disposal
and should be recycled.
Recycling the packaging reduces the
use of raw materials in the
manufacturing process and also
reduces the amount of waste in landfill
sites.
Disposal of your old machine
Electrical and electronic machines
often contain valuable materials. They
also contain materials which, if handled
or disposed of incorrectly, could be
potentially hazardous to human health
and to the environment. They are,
however, essential for the correct
functioning of your machine. Please do
not therefore dispose of it with your
household waste.
Please dispose of it at your local
community waste collection/recycling
centre, or contact your Dealer for
advice. Ensure that it presents no
danger to children while being stored
for disposal.
Caring for the environment
2

Caring for the environment..........................................2
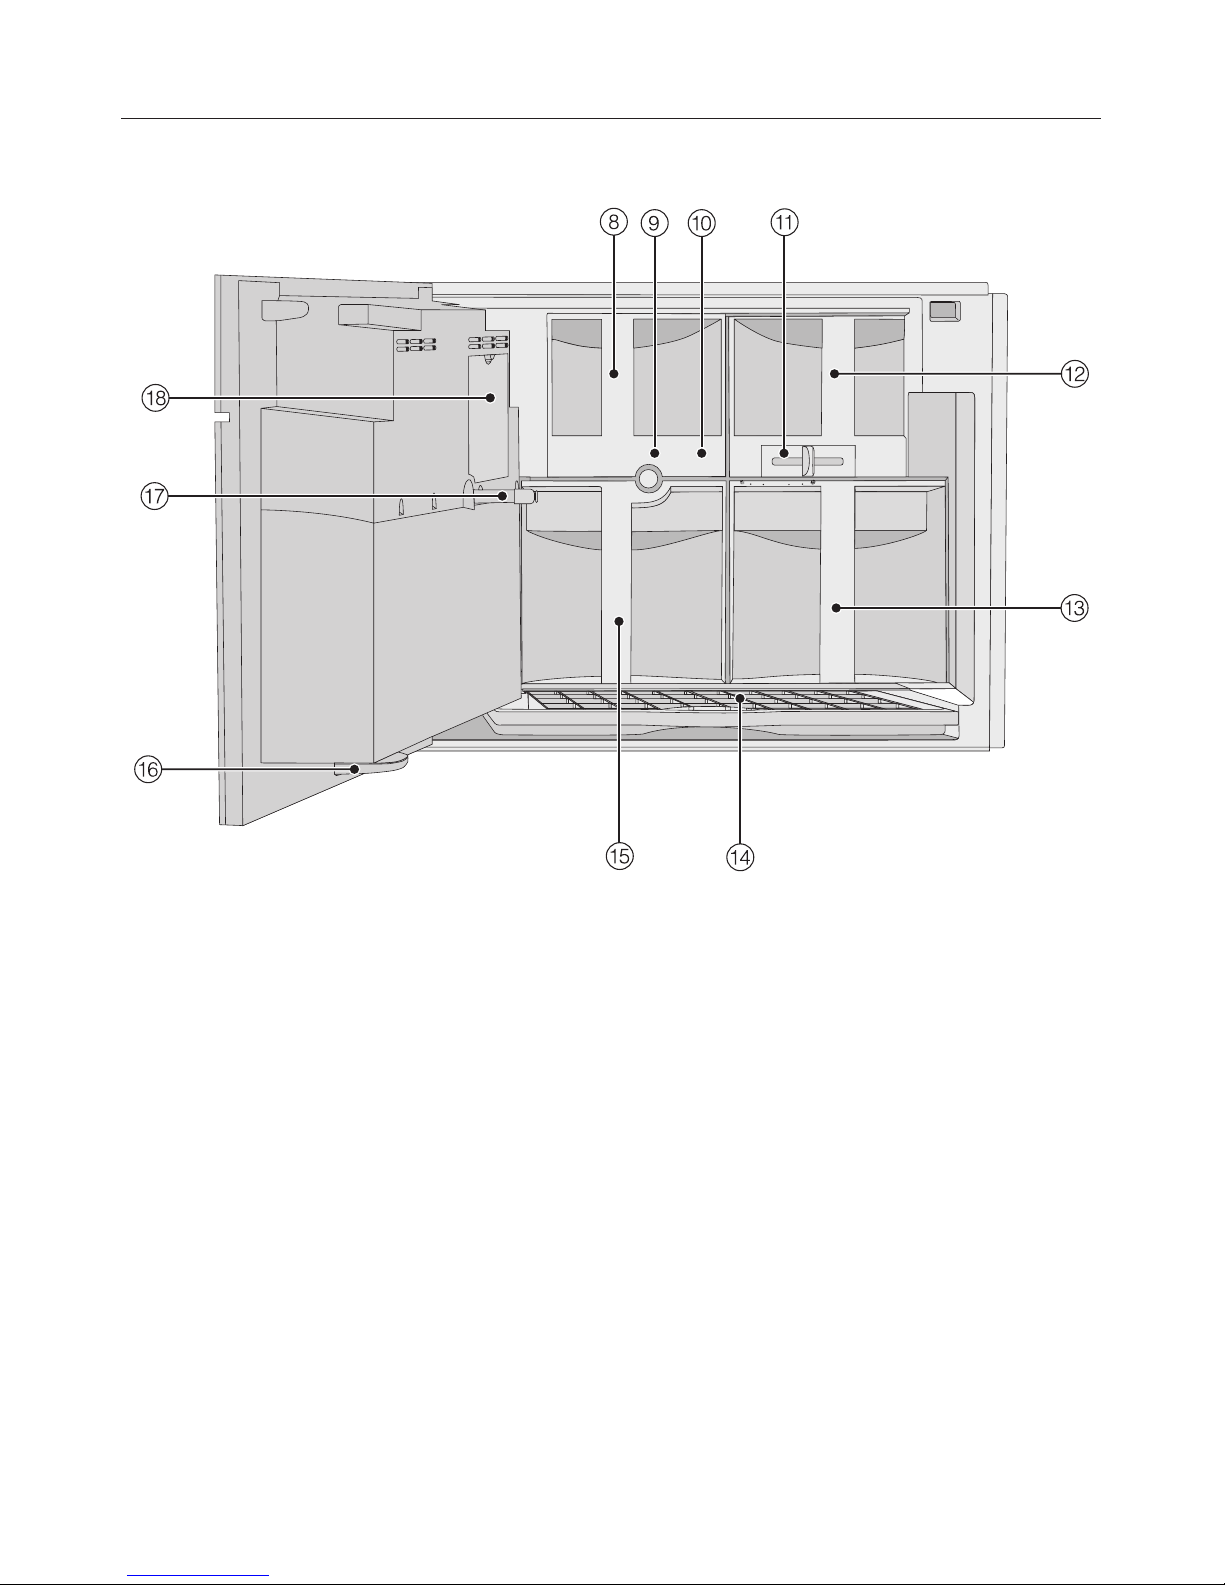
Guide to the machine ..............................................6
Guide to the machine ..............................................8
Display and controls ................................................8
Accessories ......................................................9
Warning and Safety instructions ....................................10
Using for the first time.............................................17
Before using for the first time.........................................17
Switching on for the first time.........................................17
Water hardness ...................................................18
Operation .......................................................20
Filling the water container .........................................21
Filling the coffee bean container ....................................22
Switching the coffee machine on and off .............................23
Adjusting the central spout to the correct cup height ...................24
Making drinks....................................................25
Espresso, Coffee or Long coffee ......................................25
Making two portions................................................25
Cancelling preparation .............................................26
Dispensing several cups of coffee one after the other (Coffee pot) ...........26
Making espresso and coffee using ready ground coffee ...................26
Drinks with milk ...................................................28
Milk flask ......................................................28
Making drinks with milk...........................................29
Dispensing hot water ...............................................29
Making drinks using a profile.........................................29
After making drinks ................................................29
Coffee the way you like it ..........................................30
Grinder setting ....................................................30
Displaying and altering the parameters for a drink ........................31
Amount of coffee ..................................................31
Brewing temperature ...............................................31
Pre-brewing the coffee .............................................32
Contents
3

Setting the portion size ............................................33
Setting the portion size when making a drink ............................33
Calling up portion sizes from the menu "Parameter" ,.....................35
Setting the portion sizes for different profiles ............................35
Setting up profiles ................................................36
Calling up a profile.................................................36
Creating a profile ..................................................36
Selecting a profile .................................................37
Changing the name ................................................37
Deleting a profile ..................................................37
Changing a profile .................................................38
Settings ........................................................39
Calling up the "Settings" menu........................................39
Changing and saving settings........................................39
Possible setting options.............................................40
Language........................................................42
Time ...........................................................42
Date ............................................................42
Timer ...........................................................42
Eco mode........................................................44
Lighting .........................................................44
Info (Display information)............................................45
Locking the coffee machine (System lock 0)............................45
Water hardness ...................................................45
Display brightness .................................................45
Setting the volume .................................................45
Factory default ....................................................45
Demo mode (Showroom programme) ..................................46
Contents
4

Cleaning and care ................................................47
Quick guide ......................................................47
Rinsing the coffee machine ..........................................49
Milk pipework.....................................................49
Milk flask and lid ..................................................51
Central spout .....................................................52
Water container ...................................................54
Waste container ...................................................54
Drip tray ........................................................55
Drip tray cover ....................................................55
Coffee bean container ..............................................56
Central spout connector ............................................56
Interior and machine front ...........................................57
Brew unit ........................................................57
Removing the brew unit and washing by hand ........................57
Degreasing the brew unit .........................................58
Machine front .....................................................59
Descaling .......................................................60
Problem solving guide ............................................62
Cleaning blockages from the milk pipework...........................70
After Sales / Guarantee ............................................73
Saving energy ...................................................74
Electrical connection U.K., ZA, IRL ..................................75
Installation ......................................................76
Building-in and combination options ...................................76
Ventilation .....................................................77
Installation.....................................................77
Adjusting the hinges .............................................79
Contents
5

Exterior view
aOn/Off sensor K
bControls and display
cHandle
dHot water spout
eDrip tray cover
fHeight-adjustable central spout with lighting
gMilk flask and lid
Guide to the machine
6

Interior view
hGround coffee chute cover
iBrew unit
jGround coffee chute
kSlide control to select fineness of ground coffee
lCoffee bean container
mWater container with inlet device
nDrip tray with grid
oWaste container
pDrip catcher
qCentral spout connector
rMaintenance panel
Guide to the machine
7

Display and controls
aOn/Off sensor KFor switching the coffee machine on and off
bDrinks sensors For dispensing
.Espresso
/Coffee
HCappuccino
kLatte macchiato
cFurther programmes xOther drinks such as Long coffee, Caffè latte, hot
milk, milk froth and hot water
Maintenance menu
dDisplay Shows information about the current action or status
eBack #For returning to the previous menu, cancelling
unwanted actions
fArrow sensors Y X For displaying further options and highlighting a
selection
gOK sensor For confirming display messages and saving
settings
hProfiles {For saving and editing profiles
iSettings XFor altering settings, displaying information or
checking which settings are currently active
jTwo portions °For making two portions of a drink
kParameters ,Settings for checking or altering coffee preparation
lOptical interface (for service technician use only)
Guide to the machine
8

Accessories supplied
–Measuring spoon
for ready ground coffee
–Milk flask with lid
for storing and heating/frothing milk
–Milk pipework cleaner
for cleaning the milk system
(Starter set)
–2 containers (large and small)
for cleaning and maintenance
–Descaling tablets
for descaling the water pipework
(Starter set)
–Cleaning tablets
for degreasing the brew unit
(Starter set)
–Test strips
for determining the water hardness
level
–Cleaning brush
for cleaning the milk pipework
–Silcone grease
for lubricating the cap on the central
spout connector
–Central spout connector cap
–Angled connector for milk
pipework
Replacement part
These products and other useful
accessories can be ordered via the
internet, from Miele (see back cover for
contact details) or from your Miele
dealer.
Optional accessories
Miele accessories and cleaning and
conditioning products are available for
your coffee machine.
–Microfibre cloth
for removing finger marks and light
soiling
–Milk flask with lid
for storing and heating/frothing milk
–Small lid
for storing the milk flask in the fridge
–Milk pipework cleaner
for cleaning the milk system
–Descaling tablets
for descaling the water pipework
–Cleaning tablets
for degreasing the brew unit
–Silcone grease
for lubricating the cap on the central
spout connector
Accessories
9

This coffee machine complies with all statutory safety
requirements. Improper use can, however, lead to personal injury
and damage to property.
To avoid the risk of accidents and damage to the machine,
please read these instructions carefully before using it for the first
time. They contain important information on installation, safety,
use and maintenance.
Miele cannot be held liable for damage caused by
non-compliance with these instructions.
Keep these instructions in a safe place and ensure that new users
are familiar with the content. Pass them on to any future owner.
Correct application
~This coffee machine is intended for use in domestic households
and similar working and residential environments. It is not intended
for outdoor use.
~It must be used as a domestic appliance and only to make
espresso, cappuccino, latte macchiato etc.
Any other use is not permitted.
~The coffee machine can only be used by people with reduced
physical, sensory or mental capabilities, or lack of experience and
knowledge, if they are supervised whilst using it, or have been
shown how to use it in a safe way and recognise and understand the
consequences of incorrect operation.
Warning and Safety instructions
10

Safety with children
,The spouts present a danger of burning or scalding.
Children's skin is very sensitive and reacts to hot temperatures.
Do not allow them to touch hot components of the coffee machine
or to place any part of their body under the spouts.
~Install the coffee machine where it is out of the reach of children.
~Children under 8 years of age must be kept away from the
machine unless they are constantly supervised.
~Children 8 years and older may only use the machine
unsupervised if they have been shown how to use it in a safe way
and recognise and understand the consequences of incorrect
operation.
~Children must not be allowed to clean the coffee machine
unsupervised.
~Please supervise children in the vicinity of the coffee machine
and do not allow them to play with it.
Remember that coffee and espresso are not suitable drinks for
children.
~Danger of suffocation. Packaging, e.g. plastic wrappings, must
be kept out of the reach of babies and children. Whilst playing,
children could become entangled in packaging or pull it over their
head and suffocate.
Warning and Safety instructions
11

Technical safety
~Installation and repairs may only be carried out by a Miele
authorised service technician. Installation, repairs and other work by
unqualified persons can cause considerable danger to users. The
manufacturer cannot be held liable for unauthorised work.
~A damaged coffee machine could be dangerous. Before building
in the machine, check it for any externally visible damage. Do not
use a damaged machine.
~To avoid the risk of damage to the machine, make sure the
connection data (fuse rating,voltage and frequency) on the data
plate corresponds to the household supply, before connecting the
machine to the mains supply. Consult a qualified electrician if in any
doubt.
~The electrical safety of this machine can only be guaranteed if
correctly earthed. It is essential that this standard safety requirement
is met. If in any doubt, please have the electrical installation tested
by a qualified electrician.
~Do not connect the coffee machine to the mains electricity supply
by a multi-socket adapter or an extension lead. These are a fire
hazard and do not guarantee the required safety of the machine.
~For safety reasons, this machine may only be used when it has
been built in.
~If the coffee machine is to be built in above another appliance,
there must be a full-width, closed shelf between them.
~The coffee machine must not be used in a non-stationary location
(e.g. on a ship).
Warning and Safety instructions
12

~Only use the coffee machine in rooms where the ambient
temperature is between +10 °C and +38 °C.
~Ensure that there is sufficient ventilation around the coffee
machine. The ventilation gaps in the furniture housing unit and the
gap between the top of the housing unit and the ceiling must be at
least 200 cm2. Otherwise condensation can build up and damage
the machine or the housing unit.
~If the coffee machine is installed behind a kitchen furniture door,
it may only be used with the furniture door open. Do not close the
furniture door while the coffee machine is in use.
~While the machine is under guarantee, repairs should only be
undertaken by a Miele authorised service technician. Otherwise the
guarantee is invalidated.
~Miele can only guarantee the safety of the machine when original
Miele replacement parts are used. Faulty components must only be
replaced by genuine Miele original spare parts.
~The machine must be disconnected from the electrical supply
during installation and repair work.
Warning and Safety instructions
13

~Do not open the outer casing of the machine. Tampering with
electrical connections or components and mechanical parts is
highly dangerous to the user and can cause operational faults.
~Only use genuine original Miele accessories with this machine.
Using spare parts or accessories from other manufacturers will
invalidate the guarantee, and Miele cannot accept liability.
Correct use
,The spouts present a danger of burning or scalding.
The liquids and steam dispensed are very hot.
Water in the drip tray can also be very hot. Take great care when
emptying it.
Please note:
– Keep well away from the area underneath the spouts when hot
liquids and steam are being dispensed.
– Do not touch hot components.
– The spouts can spray hot liquid or steam. Make sure that the
central spout is clean and that it is fitted correctly.
,Never look directly at the lighting or use optical instruments to
look at it.
~The machine must not be used for cleaning objects.
~Clean the coffee machine and the milk flask before using for the
first time (see "Cleaning and care").
Warning and Safety instructions
14

~Please note the following regarding water:
–Only use cold, fresh tap water to fill the water container. Hot water
and other liquids could damage the machine.
–Change the water every day to prevent a build-up of bacteria.
–Do not use mineral water. Mineral water will cause serious
limescale deposits to build up in your machine and damage it.
–Do not use water from a reverse osmosis unit in this machine. This
would damage it.
~Only fill the bean container with roasted espresso/coffee beans.
Do not fill the bean container with coffee beans which have been
treated with additives or with ground coffee.
~Sugar will damage the machine. Only use pure coffee beans. Do
not use coffee beans which have been treated with anything
containing caramel, any kind of sugar or other substances. Do not
put liquids containing sugar in the coffee machine.
~Only add ground coffee or the Miele cleaning tablets for
degreasing the brew unit to the ground coffee chute.
~Do not use milk with additives. Sugar additives will stick to the
milk pipework and damage the machine.
~If using animal milk, use only pasteurised milk.
~Do not place any alcohol mixtures which are alight underneath
the central spout. The flames could ignite plastic components and
cause them to melt.
~Do not swing from or hang anything on the machine front when it
is open as this could damage the machine.
Warning and Safety instructions
15

~Please note the following with regard to cleaning the coffee
machine:
–Always disconnect the coffee machine from the electrical supply
before cleaning.
–Clean the coffee machine and the milk flask daily (see "Cleaning
and care").
–Do not use a steam cleaning appliance to clean the coffee
machine. Steam could reach electrical components and cause a
short circuit.
–Descale the coffee machine regularly using the appropriate
number of Miele descaling tablets for the water hardness level in
your area. Descale the machine more frequently in areas with very
hard water. Miele cannot be held liable for damage arising from
insufficient descaling.
– Degrease the brew unit regularly with Miele cleaning tablets.
Depending on the natural oil content of the coffee used, the brew
unit can become blocked quite quickly.
For machines with stainless steel surfaces:
~Do not use sticky notes, transparent adhesive tape, masking tape
or other types of adhesive on stainless steel surfaces. These
damage the surface, causing it to lose its dirt repellent protective
coating.
~The finish on stainless steel surfaces is susceptible to scratching.
Even magnets can cause scratching.
Warning and Safety instructions
16

Please read the operating
instructions and take the time to
familiarise yourself with the coffee
machine before using it for the first
time.
Before using for the first time
^The machine must be correctly
installed and connected (see
"Electrical connection" and
"Installation") before it is used for the
first time.
^Remove any protective foil.
Clean the coffee machine thoroughly
(see "Cleaning and Care") before
filling it with water and coffee beans.
Switching on for the first time
When you switch the coffee machine on
for the first time, after the welcome
screen has appeared you will be
prompted to set the following:
–Language
–Date
–Time
–Display (Time of day display)
^Touch the On/Off sensor K.
The welcome message "Miele -
Willkommen" will appear in the display
briefly.
Selecting the language
^Touch the arrow sensors until the
language you want is highlighted.
Touch the OK sensor.
^Touch the arrow sensors until the
country you want is highlighted.
Touch the OK sensor.
The setting is now saved.
Setting the date
^Touch the arrow sensors until the
current year appears. Touch the OK
sensor.
^Repeat this for "Month" and "Day",
until the current date has been set.
The setting is now saved.
Setting the Time of day
^Touch the arrow sensors until the
current time appears. Touch the OK
sensor.
The setting is now saved.
Using for the first time
17

Display
You can choose from the following
options:
–On: the display will always show the
date and time (even when the
machine is switched off).
–Off: the display is dark when the
machine is switched off.
–Night dimming: the date and time
are only displayed between the
hours of 5:00 and 23:00.
^Touch the arrow sensors until the
option you want is highlighted.
Touch the OK sensor.
The coffee machine will use more
energy depending on the option you
choose for the display. Information
about this will appear in the display.
"Set-up successfully completed" will
appear in the display.
"Fill and replace the water container"
will appear in the display.
^Fill the water container with fresh,
cold tap water.
Tip: Please continue to work though the
further steps outlined in the operating
instructions so that you can familiarise
yourself with the coffee machine and
set it up for your specific requirements.
Water hardness
The water hardness level indicates how
much calcium is dissolved in the water.
The higher the calcium content, the
harder the water, and the harder the
water, the more often the coffee
machine will need to be descaled.
The coffee machine measures the
quantity of water and steam used. The
number of drinks which can be
dispensed before the machine needs to
be descaled will depend on the water
hardness level set.
Set the water hardness level on the
coffee machine to the water hardness
level for the local area to ensure that
the machine functions correctly and is
not damaged. This will ensure that the
reminder to descale the machine will
appear in the display at the correct
time.
The machine has four programmable
levels:
Water hardness Local water
hardness
level
Setting
(Hardness
level)
0 - 8.4 °dH
(0 -1.5 mmol/l)
Soft Soft 1
8.4 - 14 °dH
(1.5 - 2.5 mmol/l)
Medium Medium 2
14-21°dH
(2.5 - 3.7 mmol/l)
Hard Hard 3
more than 21 °dH
(more than
3.7 mmol/l)
Hard Very hard 4
Using for the first time
18

Checking the water hardness level
You can use the test strip supplied to
check the water hardness level, or your
local water supplier will be able to
advise you on the hardness of the water
in your area.
^Dip the test strip in your drinking
water for a second, then shake off
any excess water. The result will be
evident after about a minute.
You can now set the water hardness
level for the coffee machine.
Setting the water hardness level
^Touch X.
^Touch the arrow sensors until "Water
hardness" is highlighted. Touch the
OK sensor.
^Touch the arrow sensors until the
hardness level you want is
highlighted. Touch the OK sensor.
The setting is now saved.
Using for the first time
19

The coffee machine is operated by
touching the sensors.
You are in the drinks menu when the
display shows:
{Miele
Select drink
To make a drink, touch one of the
drinks sensors
Other drinks are available in the
"Further programmes" xmenu.
Calling up and navigating in a
menu
To call up a menu, touch the relevant
sensor. You will be able to start actions
or alter settings in the selected menu.
Settings
Language F
Time of day
Timer
A scroll bar on the right hand side of
the display indicates more options or
text. These can be displayed using the
arrow sensors.
The setting which is currently selected
will have a tick (beside it.
To select an option, touch the Xand Y
arrow sensors to highlight the option
you want.
Touch the OK sensor to confirm your
selection.
Exiting a menu or cancelling
an action
Touch #to exit the current menu.
If none of the sensors has been
touched for a while, the coffee machine
will revert to the drinks menu.
Operation
20
Other manuals for CVA 6401
3
Table of contents
Other Miele Coffee Maker manuals

Miele
Miele CM 6363 User manual

Miele
Miele CM 7750 User manual

Miele
Miele CVA 4070 EN-CA User manual

Miele
Miele CVA 7775 User manual

Miele
Miele CM6350 User manual

Miele
Miele CVA 7370 User manual

Miele
Miele CVA 615 User manual

Miele
Miele CVA 26x2 User manual

Miele
Miele CVA 6805 User manual

Miele
Miele CVA 4070 EN-CA User manual

Miele
Miele CoffeeSelect CM7750OBS User manual

Miele
Miele CVA 5068 Specification sheet

Miele
Miele CVA 615 User guide

Miele
Miele CVA 30xx User manual

Miele
Miele CVA 6401 User manual

Miele
Miele CM 5000 User manual

Miele
Miele CVA 615 User manual

Miele
Miele DGC 6800 User manual

Miele
Miele CVA7445CSS User manual

Miele
Miele CVA 6401 User manual