Miele PG 8059 User manual

Operating instructions
Commercial dishwasher
PG 8059
To avoid the risk of accidents or damage
to the appliance, it is essential to read
these instructions before it is installed
and used for the first time.
en - GB
M.-Nr. 10 438 010

Contents
2
Notes about these instructions..........................................................................................5
Operating steps..................................................................................................................... 5
Guide to the appliance........................................................................................................6
Overview................................................................................................................................ 6
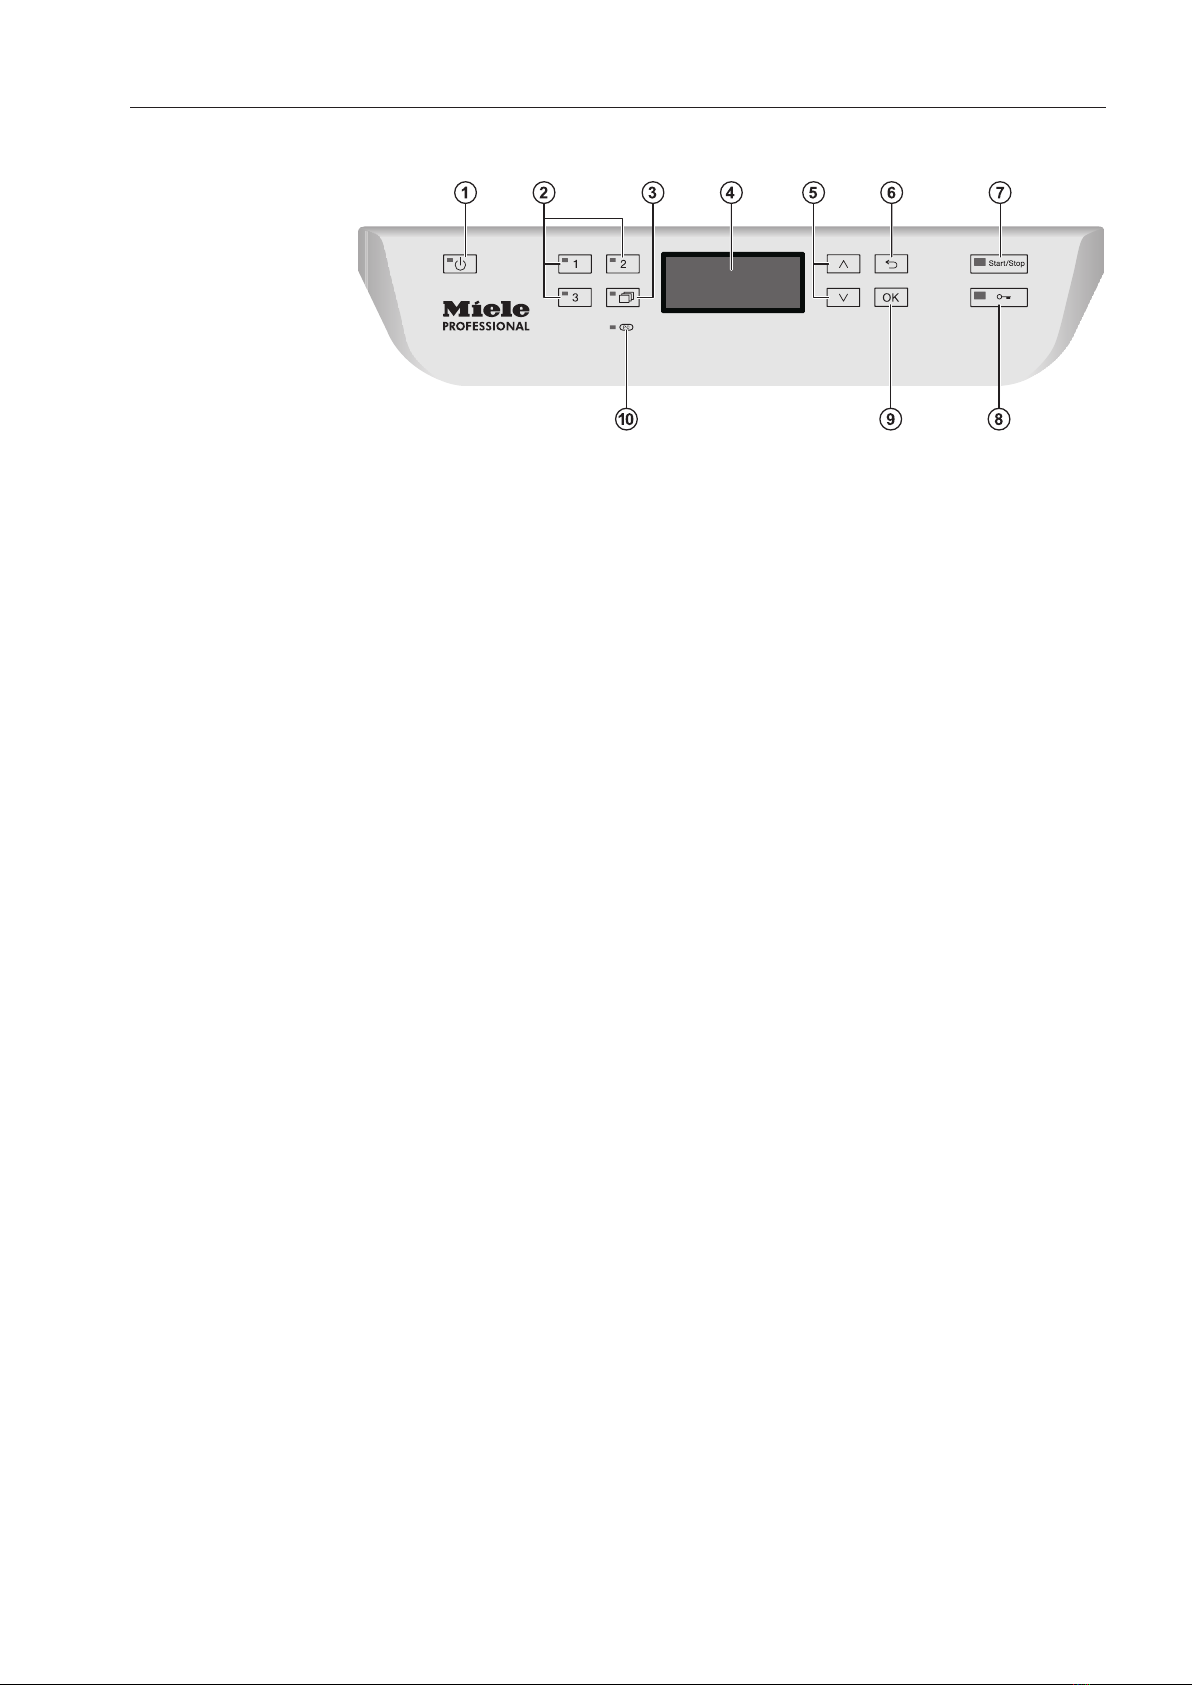
Control panel......................................................................................................................... 7
Correct application .............................................................................................................8
Warning and Safety instructions......................................................................................10
Correct installation .............................................................................................................. 10
Technical safety................................................................................................................... 10
Correct use.......................................................................................................................... 12
Safety with children............................................................................................................. 13
Accessories ......................................................................................................................... 13
Symbols used...................................................................................................................... 14
Disposal of your old dishwasher ........................................................................................ 14
Caring for the environment ..............................................................................................15
Disposal of the packing material ........................................................................................ 15
Disposing of your old machine............................................................................................ 15
User profiles.......................................................................................................................16
User groups......................................................................................................................... 16
Daily operators ............................................................................................................... 16
Experienced operators ................................................................................................... 16
Operation tips ....................................................................................................................17
Display................................................................................................................................. 17
Menus.................................................................................................................................. 18
Symbols in the display ....................................................................................................... 20
Commissioning..................................................................................................................21
Opening and closing the door..........................................................................................25
Comfort door locking mechanism....................................................................................... 25
Opening the door .......................................................................................................... 25
Closing the door.................................................................................................................. 26
Opening the door using the emergency release ................................................................ 27
Filling the salt reservoir ....................................................................................................28
Reactivation......................................................................................................................... 28
Setting the water hardness level ......................................................................................... 29
Add salt reminder ................................................................................................................ 31
Machine lock-out in case of lack of salt.............................................................................. 31
Filling the salt reservoir........................................................................................................ 32
Adding rinsing agent .........................................................................................................34
Rinsing agent....................................................................................................................... 34
Add rinsing agent reminder ................................................................................................. 34
Adding rinsing agent ........................................................................................................... 35
Areas of application ..........................................................................................................36
Loading the dishwasher ...................................................................................................... 36
Upper basket....................................................................................................................... 38
Adjusting the upper basket ................................................................................................. 39

Contents
3
Lower basket....................................................................................................................... 41
Loading plastic trays ........................................................................................................... 43
Operation............................................................................................................................45
Adding cleaning agent......................................................................................................... 45
Tips for the Super short programme ................................................................................... 46
DOS module........................................................................................................................ 47
LEDs in the buttons............................................................................................................. 50
Switching on........................................................................................................................ 51
Selecting a programme ....................................................................................................... 51
Starting a programme ......................................................................................................... 53
At the end of the programme .............................................................................................. 54
Switching off........................................................................................................................ 54
Unloading the dishwasher................................................................................................... 54
Interrupting a programme.................................................................................................... 55
Cancelling a programme ..................................................................................................... 56
Additional functions ..........................................................................................................57
Delay start ........................................................................................................................... 57
Drying assistance ................................................................................................................ 58
Settings ...........................................................................................................................60
Menu structure .................................................................................................................... 61
Delay start ........................................................................................................................... 62
Drying .................................................................................................................................. 63
Setting the language........................................................................................................ 64
Venting DOS modules ......................................................................................................... 65
Setting the date................................................................................................................... 66
Date format..................................................................................................................... 66
Set .................................................................................................................................. 66
Setting the time ................................................................................................................... 67
Set .................................................................................................................................. 67
Display............................................................................................................................ 68
Clock display.................................................................................................................. 68
Regulating the volume......................................................................................................... 69
Keypad tone ................................................................................................................... 69
Buzzer tones................................................................................................................... 69
Settingthe volume .......................................................................................................... 70
Further settings .................................................................................................................71
Opening the "Further settings" menu.................................................................................. 71
Menu structure .................................................................................................................... 73
Code.................................................................................................................................... 75
Release........................................................................................................................... 75
Change code.................................................................................................................. 75
Log book ............................................................................................................................. 77
Temperature unit.................................................................................................................. 78
Move programme ................................................................................................................ 79

Contents
4
Additional functions............................................................................................................. 80
Reset .............................................................................................................................. 80
Increased water level...................................................................................................... 81
Interim rinse.................................................................................................................... 81
DOS dispensing system................................................................................................. 82
Temperature / Time ........................................................................................................ 85
Releasing programmes ....................................................................................................... 88
Water hardness ................................................................................................................... 89
Display view ........................................................................................................................ 89
Display................................................................................................................................. 90
Contrast.......................................................................................................................... 90
Brightness ...................................................................................................................... 90
Switch off after .................................................................................................................... 91
Factory default setting......................................................................................................... 92
Software version.................................................................................................................. 93
Cleaning and care .............................................................................................................94
Periodic checks ................................................................................................................... 94
Cleaning the control panel .................................................................................................. 95
Cleaning the door front ....................................................................................................... 95
Cleaning the wash cabinet .................................................................................................. 95
Cleaning the door and the door seal................................................................................... 96
Cleaning the filters in the wash cabinet .............................................................................. 96
Cleaning the spray arms...................................................................................................... 98
Problem solving guide ....................................................................................................100
Technical problems ........................................................................................................... 100
Door................................................................................................................................... 102
General problems with the dishwasher............................................................................. 103
Noises................................................................................................................................ 104
Unsatisfactory cleaning result ........................................................................................... 105
Maintenance ....................................................................................................................107
Clean the water intake filters ............................................................................................. 107
Cleaning the drain pump and non-return valve................................................................. 108
Programme chart ............................................................................................................110
After sales service...........................................................................................................114
Installation........................................................................................................................115
Installation ......................................................................................................................... 115
Building under .............................................................................................................. 115
Levelling and securing the dishwasher ........................................................................ 116
Floor anchoring ............................................................................................................ 117
Moving the dishwasher ..................................................................................................... 117
Electrical connection ......................................................................................................118
Plumbing ..........................................................................................................................119
Connection to the water supply ........................................................................................ 119
Connecting the drain hose ................................................................................................ 121
Technical data..................................................................................................................122

Notes about these instructions
5
Important warnings
Information which is important for safety is highlighted in a thick
framed box with a warning symbol. This alerts you to the potential
danger of injury to people or damage to property.
Read these warning notes carefully and observe the procedural
instructions and codes of practice they describe.
Notes
Information of particular importance that must be observed is
highlighted in a thick framed box.
Additional information and comments
Additional information and comments are highlighted in a box
framed with a single black line.
Operating steps
Instructions on how to operate the dishwasher are described step by
step in a logical sequence.
Each step is introduced using a black square bullet point.
Example:
Open the dishwasher door.
Display
Information given via the display appears in a special display font.
Example:
Select Delay start and confirm your choice with theOK button.

Guide to the appliance
6
Overview
aDoor lock
bUpper spray arm (not visible)
cRunner for upper basket
dConnection for upper basket spray arm
eLower spray arm
fRunner for lower basket
gData plate
hRinsing agent reservoir
iDoor lock barrel
jSalt reservoir
kDispenser for powder cleaning agent
lFilter combination
mBack:
Connection for DOS modules
External dispensing pump for liquid cleaning agent (DOS1)
External dispensing pump for rinsing agent (DOS4)

Guide to the appliance
7
Control panel
aOn/Off button
For switching the dishwasher on and off
bButtons 1 - 3 (programme selector buttons)
Short cut buttons for storing favourite programmes
c button (further programmes)
For selecting further programmes
dDisplay
User interface
e and buttons
For navigating within the display
f button (cancel or back)
For cancelling a process
(not for cancelling programmes)
gStart/Stop button
For starting or cancelling a programme
h Door release button
For opening the door or interrupting a programme
iOK button (confirmation)
For selecting or confirming entries
jPC / Optical interface
This is used by Miele service technicians to run diagnostic checks
and can also be used to update programming data in the future.

Correct application
8
Correct application
This dishwasher complies with current safety requirements.
Inappropriate use can, however, lead to personal injury and
damage to property.
To avoid the risk of accidents and damage to the dishwasher,
please read these instructions carefully before using it for the first
time. They contain important information on its safety, installation,
use and maintenance. Keep these instructions in a safe place and
pass them on to any future owner.
This dishwasher with its short programme running times and
powerful cleaning performance is intended for commercial use in
– Guest houses
– Clubs
– Nursing homes
– and other similar commercial environments.
This appliance is designed exclusively for use as a "dishwasher"
for cleaning crockery, glassware and cutlery only, as described in
these instructions. Alterations or conversions to the dishwasher, or
using it for purposes other than those for which it is designed, are not
permitted and could be dangerous.
Miele cannot be held liable for damage caused by improper or
incorrect use or operation.
This dishwasher is intended for stationary, indoor use only.
The special inserts should only be used for their specific
application.
This dishwasher is not suitable for the reprocessing of medical
products or devices.
This dishwasher can only be used by people with reduced
physical, sensory or mental capabilities, or lack of experience or
knowledge, if they are supervised whilst using it or have been shown
how to use it in a safe way and understand and recognise the
consequences of incorrect operation.

Correct application
9
This dishwasher can only be used if
– the ship’s hull is longer than 28metres.
– the list of the vessel is not more than2°.
– any external vibration is no more than 150 Hz at an amplitude of
0.35mm.
The safe operation and correct functioning of this commercial
dishwasher can only be guaranteed if the above conditions are met.
This dishwasher may not be operated on an open deck.

Warning and Safety instructions
10
Correct installation
This dishwasher may only be installed and used in mobile
installations such as ships if a risk assessment of the installation has
been carried out by a suitably qualified engineer.
This dishwasher must be fixed in position when it is installed.
Failure to do this could result in personal injury, damage to the
machine and damage to property.
This dishwasher must be securely bolted to the floor using a BBF
80 kit.
Do not install this dishwasher in an area where there is a risk of
explosion or freezing conditions.
In order to reduce the risk of damage from condensation, the
furniture in the area around the dishwasher should be designed for
commercial use.
Technical safety
This dishwasher must only be installed, commissioned, repaired
and then maintained by the Miele Service Department or an
authorised Miele Service dealer. Installation, repair and other work by
unqualified persons could be dangerous and Miele will not be held
liable.
This dishwasher must only be operated by appropriately trained
personnel. They must be instructed and trained regularly.
Before using the dishwasher, check it for any externally visible
damage. Under no circumstances should you use it if it has been
damaged. It could be dangerous.
In the event of a damaged or leaking dishwasher, switch off at the
mains immediately and call the Miele Service Department or an
authorised Miele Service dealer.
Faulty components must only be replaced by genuine Miele
original spare parts. Only when these parts are fitted can Miele
guarantee the correct functioning and safety of the appliance.
The electrical safety of this dishwasher can only be guaranteed
when correctly earthed. It is essential that this standard safety
requirement is met. If in any doubt, please have the electrical
installation tested by a qualified electrician. Miele cannot be held
liable for the consequences of an inadequate earthing system (e.g.
electric shock).
Please follow the advice on installation in these instructions and
the separate Installation diagram.
Before connecting the appliance, ensure that the connection data
on the data plate (voltage, frequency and fuse rating) match the
mains electrical supply.

Warning and Safety instructions
11
There must be no electrical sockets behind the dishwasher. Danger
of overheating and fire risk if the dishwasher were to be pushed up
against a plug (see "Electrical connection").
Do not connect the dishwasher to the mains electricity supply by a
multi-socket unit or an extension lead. These do not guarantee the
required safety of the appliance (e.g. danger of overheating).
Do not open the dishwasher casing. Tampering with electrical
connections or components and mechanical parts is highly
dangerous to the user and can cause operational faults.
The dishwasher must not be used if the electrical connection cable
is damaged. If the cable is damaged it must be replaced with a
special cable available from Miele. For safety reasons this must only
be done by the Miele Service Department or an authorised Miele
Service dealer.
The dishwasher must be disconnected from the mains electricity
supply before any maintenance or repair work is carried out.
The plastic housing of the water connection contains electrical
components. It must not be dipped in water.
There are electrical wires in the water inlet hose. Do not shorten
the water inlet hose, even if it is too long.

Warning and Safety instructions
12
The integrated Waterproof system offers protection from water
damage, provided the following conditions are met:
– installation has been carried out correctly,
– the dishwasher is properly maintained and parts replaced where it
can be seen that this is necessary,
– the stopcock has been turned off during longer periods of
inactivity (e.g. whilst on holiday).
The Waterproof system will work even if the dishwasher is switched
off. However, the dishwasher must remain connected to the
electricity supply.
Correct use
This dishwasher is designed for operation with water and cleaning
agents suitable for use in commercial dishwashers only. Organic
solvents and flammable liquid agents must not be used in it.
This could cause an explosion, damage rubber or plastic components
in the dishwasher and cause liquids to leak out of it.
Only use cleaning agents formulated for use in commercial
dishwashers. Using unsuitable cleaning agents could adversely affect
components in the dishwasher, as well as items being cleaned.
Do not sit or lean on the opened door. This could cause the
dishwasher to tip up and be damaged or cause an injury.
After any plumbing work the water pipework to the dishwasher will
need to be vented. If this is not done, components can be damaged.
Please be aware that the dishwasher may be operating at high
temperatures. If the door is opened there is a danger of burning or
scalding. Crockery, cutlery, baskets and inserts must be allowed to
cool down before they are unloaded. Any water remaining in
containers could still be very hot. Empty them into the wash cabinet
before taking them out.
The water in the cabinet must not be used as drinking water.
Pre-treating items (for example with washing-up liquid and other
cleaning agents) as well as some types of soiling and some cleaning
agents can cause a build-up of foam in the wash cabinet. Foam can
have an adverse effect on the cleaning result.
Foam escaping from the wash cabinet can cause damage to the
dishwasher. If foam escapes the programme must be cancelled
immediately.
When using cleaning agents and specialised products, it is
essential that the manufacturer's instructions are followed. Cleaning
agents must only be used for the purpose they are designed for and
in the situation specified, to avoid such dangers as serious chemical
reactions and material damage (e.g. oxyhydrogen explosion).

Warning and Safety instructions
13
Do not inhale or ingest powder cleaning agent. Dishwasher
cleaning agents contain irritant or corrosive ingredients which can
cause burning in the nose, mouth and throat if swallowed, or inhibit
breathing. Seek medical attention immediately if cleaning agent has
been swallowed or inhaled.
Miele cannot be held liable for any effect chemical cleaning agents
may have on the material of the items being cleaned. Observe the
cleaning agent manufacturer's instructions with regard to storage
conditions, use and dosage.
To avoid material damage and corrosion, do not allow any acids or
solutions containing chlorides or metals which are not rust-proof to
get into the wash cabinet.
Do not wash items soiled with ash, sand, wax, grease or paint in
the dishwasher. These substances could damage the dishwasher.
Do not hose the dishwasher or near vicinity down to clean it, e.g.
with a hosepipe or a pressure washer.
Ensure that the stainless steel outer casing of the appliance does
not come into contact with solutions or steam containing acid to
avoid any corrosion damage.
Be careful when sorting items with sharp pointed ends and
positioning them in the dishwasher that you do not hurt yourself or
create a danger for others. Sharp knives, forks, etc. should be placed
in baskets with the pointed ends facing downwards.
Remove any coarse food deposits and empty out any containers
or utensils before loading them in the dishwasher.
Safety with children
Supervise children when they are anywhere near this dishwasher.
Do not let them play with it. There is a danger that children playing
might shut themselves in the dishwasher.
Children must not be allowed to operate this dishwasher.
Keep children away from chemical agents. These contain irritant
and corrosive ingredients which can cause burning in the mouth,
nose and throat if swallowed, or inhibit breathing. Keep children away
from the dishwasher when the door is open. There could still be
residual chemical agent in the cabinet. Seek medical advice
immediately if a child has swallowed or inhaled chemical agent.
Accessories
Only use genuine Miele original spare parts and accessories with
this dishwasher. Using spare parts or accessories from other
manufacturers will invalidate the guarantee and Miele cannot accept
liability.

Warning and Safety instructions
14
Only use Miele baskets and inserts with this dishwasher. Using
baskets and inserts made by other manufacturers, or making
modifications to Miele accessories can cause unsatisfactory cleaning
results, for which Miele cannot be held liable. Any resultant damage
would not be covered by the guarantee.
Symbols used
Warning:
Observe the operating instructions
Warning:
Danger of electric shock
Disposal of your old dishwasher
For safety and environmental reasons, dispose of all chemical
agents according to the manufacturer's instructions and to safety
regulations. Safety goggles and protective gloves should be worn.
Remove or disable the door lock prior to disposal of the
dishwasher, so that children cannot become trapped inside (see
"Caring for the environment").
Miele cannot be held liable for damage caused by non-compliance
with these Warning and Safety instructions.

Caring for the environment
15
Disposal of the packing material
The packaging is designed to protect the dishwasher from damage
during transportation. The packaging materials used are selected
from materials which are environmentally friendly for disposal and
should be recycled.
Recycling the packaging reduces the use of raw materials in the
manufacturing process and also reduces the amount of waste in
landfill sites. Ensure that any plastic wrappings, bags etc. are
disposed of safely and kept out of the reach of babies and young
children. Danger of suffocation.
Disposing of your old machine
Electrical and electronic machines often contain valuable materials.
They also contain materials which, if handled or disposed of
incorrectly, could be potentially hazardous to human health and to the
environment. They are, however, essential for the correct functioning
of your machine. Please do not therefore dispose of it with your
household waste.
Please dispose of it at your local community waste collection /
recycling centre or contact your dealer for advice.
Ensure that it presents no danger to children while being stored for
disposal.

User profiles
16
User groups
Users can be divided into two groups:
– Daily operators
– Experienced operators
Access to the machine can be blocked to general operators by using
a code (see "Further settings, Code").
Daily operators Operators must be instructed in operating and loading the
dishwasher and trained regularly to guarantee safe daily use.
Experienced
operators
Experienced operators can additionally block access to programmes,
modify temperature and holding times within programme cycles and
alter water levels.

Operation tips
17
Display
The display is not a touch screen.
The display is used to select or set the following:
– the programme
– the Delay start time
– the settings
During a programme, the display shows the following:
– the programme name
– the programme stage / target temperature / actual temperature
– the estimated time left for the programme to run
– any relevant fault messages and information
Menu operation This dishwasher is operated exclusively via buttons on the control
panel. The buttons are arranged to the side of the display on the
stainless steel control panel and are operated by pressing gently.
Menu operation is via the keypad to the right of the display.
– button
For navigating upwards by row within a menu, or increasing the
value highlighted.
– button (Cancel or back)
For ending a menu early. Any changes to settings are not saved
and the display reverts to the previous menu.
– button
For navigating downwards by row within a menu, or decreasing the
value highlighted.
–OK button
For confirming a selection or for saving input. The display moves to
the next menu or, when entering values, to the next input position.
The procedure for entering values is described in the relevant
section.

Operation tips
18
Menus
This dishwasher is controlled by menus. The menus are displayed in
a 3-line display on the control panel.
Example:
Language
,
;
(
english (GB)
deutsch
The name of the menu and a maximum of two options are shown.
The currently selected option is highlighted.
Simple selection
Delay start
Yes
No (
The arrow buttons and are used for navigating within the menu.
The highlighted option is selected by pressing the OK button. Once
selected, the option will have a tick beside it. Other options are
automatically deselected.
Press the OK button to progress to the next menu, or to the next
input position when confirming values. Press the button to revert
to the previous menu without saving the entry.
Multiple selection
Release programme
Short
Universal ,
;
9
9
The and arrow buttons are used for navigating within the menu.
Several options can be selected in succession within the menu using
the OK button. Once selected, an option will have a tick beside it.
To save your selection, select Accept and confirm with the OK button.

Operation tips
19
System messages The symbol denotes system messages. These give information
about current processes and the status of the dishwasher. System
messages are displayed individually at the end of the programme. If
there are a number of system messages, subsequent messages can
be displayed by pressing OK. A system message can be recalled by
pressing OK during a programme cycle.
Example:
OK
Refill salt
Automatic switch-off
The dishwasher has an automatic switch-off function. The
dishwasher switches itself off automatically after the time set. The
display and all other LEDs are switched off. To switch the dishwasher
on press the On/Off button.
Automatic switch-off can be deactivated (see "Further settings,
Switch off after"). The display will then remain switched on in standby
mode.

Operation tips
20
Symbols in the display
Navigation arrows
If a menu contains more than two options, two navigation arrows are
shown beside the options. The arrow buttons and can be used
to scroll through the options.
Dotted line ------- If a menu contains more than two options, the end of the option list is
marked by a dotted line. The last entry appears above the line, the
first entry below it.
Tick If there are several options available, the current setting is marked
with a tick .
Example
Delay start
Yes
No (
Drying If drying assistance has been activated, the drying symbol will be
displayed to the right of the programme name.
Example
Universal
Temperature
Duration
G
55 °C
Min
23
System messages
The symbol denotes system messages and is displayed alternately
with the symbol. If OK appears in the bottom right of the display,
the system message must be confirmed using the OK button. If OK
does not appear in the display, after a few seconds the display skips
to the next level up.
Fault messages
In the event of a fault a warning triangle is shown in place of the
symbol. See "Problem solving guide" for more information.
Other manuals for PG 8059
2
Table of contents
Other Miele Dishwasher manuals

Miele
Miele G4930SC User manual

Miele
Miele G 5970 User manual

Miele
Miele Crystal G 5105 SC Parts list manual

Miele
Miele G 5225 Owner's manual

Miele
Miele G 5110 User manual

Miele
Miele G 5585 SCVi User manual

Miele
Miele PFD 101 U User manual

Miele
Miele G 691 User manual

Miele
Miele G 8050 User manual

Miele
Miele G4780 User manual

Miele
Miele PG 8052 User manual

Miele
Miele G 7960 User manual

Miele
Miele 11 137 120 / 00 Assembly instructions

Miele
Miele G 5056 User manual

Miele
Miele Diamond G 5915 SCi Parts list manual

Miele
Miele G 6575 User manual

Miele
Miele G 5006 SCU XXL Active User manual

Miele
Miele G 7825 User manual

Miele
Miele PG 8504 User manual

Miele
Miele PG 8131i User manual