Miele H6267B User manual

fold here fold here fold here fold here fold here
fold herefold herefold herefold herefold here
fold here
fold here
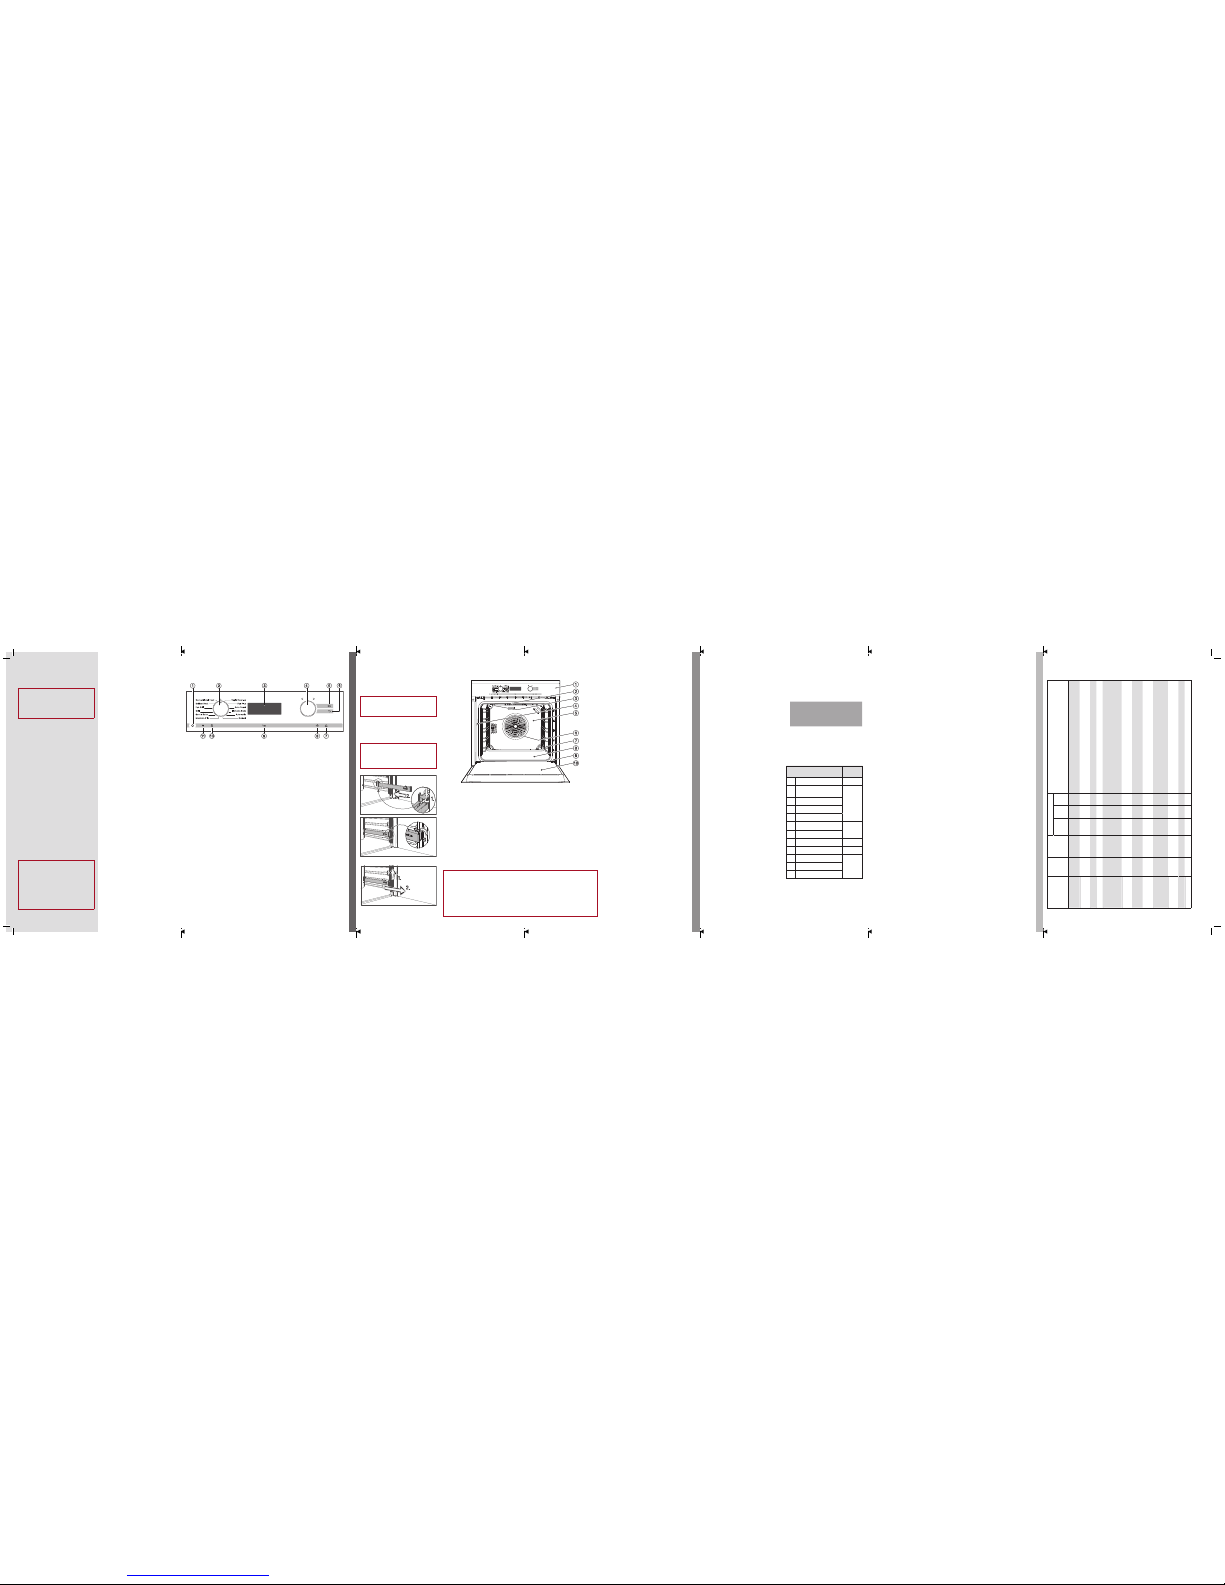
Settings Status (* factory default setting)
Time of day display *
Off
On
Signal tones volume
to
Off
On ( *)
Keypad tone *
Off
On
Clock format *
24-hour format
12-hour format
Temperature unit ° *
°
Degrees Celsius
Degrees Fahrenheit
Unit of weight *
g (weight is shown in grams)
lb/oz (weight is shown in pounds and ounces)
Display brightness to Minimum brightness to maximum brightness ( *)
Lighting *
On for 15 seconds
On
Demo mode *
deactivated
activated
Most minor problems which may occur during daily operation can be rectified without contacting Miele. The following guide is intended to help you do this.
Contact Miele if you cannot identify the cause of a problem or resolve it yourself.
Problem Cause Remedy
The display is dark. – The time of day display is deactivated.
– There is no power to the oven.
– Check the settings for the time of day and change them if necessary.
– Check if the circuit breaker has tripped. If it has, contact a qualified electrician or Miele.
A function has been selected and
the time of day and the symbol
are still showing in the display.
The system lock is switched on. Switch off the system lock (see "Operating and installation instructions").
The oven does not heat up. Demo mode is activated. appears in the display. Deactivate Demo mode (see "Operating and installation instructions").
appears withflashing
under .
The power supply was interrupted for longer than
200 hours.
Reset the time of day (see "Using for the first time").
A function has been selected but
the oven is not working.
There has been a power cut. This has caused the
current cooking process to stop.
Turn the function selector to and switch the oven off.
Restart the programme.
appears unexpectedly in
the display andis flashing at
the same time. The buzzer might
be sounding.
The oven has been operating for an unusually long
time and this has activated the safety switch-off fun-
ction.
Turn the function selector to and switch the oven off.
The oven is ready for use again immediately.
appears in the display. A fault has occurred that you cannot resolve. Call Miele.
A noise can be heard after a coo-
king process.
The cooling fan is switched on. It switches off automatically after a certain period.
No water is being taken in with
Moisture Plus function or
with Automatic programmes.
– Demo mode is activated.
– The pump for the steam injection system is faulty.
– Deactivate Demo mode (see "Operating and installation instructions").
– Call Miele.
and appear in the display. The Moisture Plusfunction and the Automaticpro-
grammes have locked out and cannot be used.
Carry out the descaling process (see "Operating and installation instructions"). All other
oven functions can still be used.
The oven has switched itself off. Energy saving mode Switch the oven back on.
Rust-like spots appear on cata-
lytic surfaces.
The catalytic cleaning process does not remove
spices, sugar and similar deposits.
Take the catalytic enamelled parts out of the oven and remove this type of soiling with a
mild solution of hot water and washing-up liquid applied with a soft brush.
Allow the parts to dry and then carefully reassemble them.
Cakes and biscuits are not suffi-
ciently baked after following the
times given in the baking chart.
– The ingredient quantities used are different from
those given in the recipe.
– A different temperature from the one given in the
recipe has been used.
– Check whether there has been a change to the recipe. The addition of more liquid or
more eggs makes a moister mix which would take longer to cook.
– Select the temperature required for the recipe.
Browning is uneven. – The material or colour of the baking tin is not suita-
ble for the oven function.
– The wrong temperature or shelf level has been
selected.
– With Conventional Heat light coloured, shiny tins are less suitable. Use matt, dark
coloured baking tins.
– If the unevenness is pronounced, check whether the correct temperature and shelf le-
vel have been selected.
There will always be a slight unevenness.
The oven lighting does not switch on. The halogen lamp is faulty and needs replacing. Replace the lamp with a new halogen bulb (see "Operating and installation instructions").
The FlexiClip telescopic runners
do not push in or pull out smoo-
thly.
The bearings in the FlexiClip telescopic runners are
not sufficiently lubricated.
Lubricate the bearings with the special Miele lubricant. Only the special Miele lubricant is desi-
gned to withstand the high temperatures in the oven. Other lubricants may harden and stick to
the FlexiClip runners when they are heated.The special lubricant is available from Miele.
Oven function: Moisture Plus
Use only fresh tap water when cooking
with the Moisture Plus function.
TIP: Use the recipes as a guide.
ĺFill a suitable container with the amount
of water required:
– Automatic burst of steam
approx. 100 ml
– Manual burst of steam
approx. 100 ml
approx. 200 ml
approx. 300 ml
ĺSelect the Moisture Plusfunction.
will appear with the triangle flas-
hing under the symbol.
ĺThe other burst of steam options , ,
can be selected using the rotary selec-
tor (the function starts the desca-
ling process).
The recommended temperature will appe-
ar in the display with the triangle flas-
hing under .
ĺUse the rotary selector to change
the temperature if necessary.
ĺConfirm with OK.
The prompt to draw in water appears. The
triangle will flash under .
ĺOpen the door and pull the intake pipe
forwards.
ĺImmerse the end of the water intake pipe
in the container with tap water.
ĺConfirm with OK.
The water intake process will begin.
ĺFold up the intake pipe and close the
door.
You will hear the pump briefly.
Danger of injury!
Steam can cause scalding. Do not open
the door during a burst of steam.
If you have selected , the burst of
steam is injected automatically after the
heating-up phase.
ĺContinue cooking until the end of the
programme.
If you have selected , or bursts of
steam, the number of bursts of steam
that can be injected appears in the dis-
play after the heating-up phase.
ĺTouch to inject the burst of steam.
The sensor light goes out and the tem-
perature and the symbol appear in the
display.
ĺProceed as described to inject further
bursts of steam.
After the last burst of steam, will go out
and the temperature will be displayed.
ĺContinue cooking until the end of the
programme.
At the end of the cooking process:
ĺTurn the function selector to.
ĺTake the food out of the oven.
ĺSwitch the oven off.
Useful tip: When appears in the dis-
play you can use Moisture Plus ten more
times before the steam injection system
must be descaled.
Using Automatic programmes
Please see the "Culinario" recipe book for
Automatic programme recipes.
A 1 Prove dough
A 2 White bread
A 3 Flatbread
A 4 White bread in tin
A 5 Rye bread
A 6 Multigrain bread
A 7 Yeast rolls
A 8 Butter cake
A 9 Plaited loaf
A 10 Bream / Snapper
A 11 Ocean trout
A 12 Salmon fillet
A 13 Blue grenadier fillet
A 14 Trout
A 15 Fillet of beef: rare
A 16 Fillet of beef: medium
A 17 Fillet of beef: well-done
A 18 Pork casserole
A 19 Saddle of venison
A 20 Saddle of lamb
A 21 Chicken breast with herbs
A 22 Chicken thighs
A 23 Turkey thighs
A 24 Potato gratin
A 25 Lasagne
ĺFill a container with the amount of fresh
tap water specified in the recipe.
ĺSelect the Automaticfunction.
ĺTurn the rotary selector until the
number of the Automatic programme
you want to use appears in the display.
ĺConfirm with OK.
With some Automatic programmes
you will now be prompted to enter the
weight of the food.
ĺUse the rotary selector to enter the
weight.
ĺConfirm with OK.
The prompt to draw in water appears. The
triangle will flash under .
ĺOpen the door and pull the intake pipe
forwards.
ĺImmerse the end of the water intake pipe
in the container with tap water.
ĺConfirm with OK.
The water intake process will begin.
ĺFold up the intake pipe and close the door.
You will hear the pump briefly.
In Automatic programmes without
pre-heating a dash will appear in the dis-
play briefly, followed immediately by the
cooking duration.
In Automatic programmes with pre-
heating wait until the pre-heating phase
has finished. At the end of the pre-heating
phase will appear in the display.
ĺOpen the door.
ĺPlace the food on shelf level 2 and clo-
se the door.
The Automatic programme will start. The
bursts of steam will be injected automati-
cally.
Danger of injury!
Steam can cause scalding. Do not open
the door during a burst of steam.
At the end of the cooking duration:
– will appear and will flash.
– A buzzer will sound if the buzzer is swit-
ched on.
ĺTurn the function selector to.
ĺTake the food out of the oven.
ĺSwitch the oven off.
Changing settings
Your appliance is supplied with a number of
factory default settings. A setting is chan-
ged by altering its status.
ĺTurn the function selector to.
ĺSelect .
ĺIf necessary, use the rotary selector
to move the triangle until it appears
under .
°C °F
h:min
ĺConfirm with OK.
A setting will appear, e.g. .
ĺIf you wish to change another setting,
use the rotary selector to select the
appropriate number.
ĺConfirm with OK.
°C °F
h:min
The setting is selected and the current
status appears, e.g. .
To change the status:
ĺUse the rotary selector to select
the status you want.
ĺConfirm with OK.
The selected status is saved and the set-
ting appears again.
ĺTo change further settings, proceed in
the same way.
ĺSelect if you do not want to change
a setting and wish to switch to another.
ĺIf you do not want to change any further
settings, select .
Cleaning the oven
Please refer to the operating and ins-
tallation instructions for more detailed
information on cleaning and care.
All surfaces of this appliance are su-
sceptible to scratching.
Remove any soiling immediately to pre-
vent a permanent discolouration or alte-
ration of the surface.
Surfaces of the oven compartment
and different accessories treated with
PerfectClean enamel are characterised by
their exceptional non-stick properties and
ease of cleaning.
To clean them by hand, you can
– remove the door
– dismantle the door
– remove the FlexiClip telescopic runners
– remove the shelf runners
– lower the top heat/grill element
– remove the catalytic enamelled back panel
Danger of burning!
Make sure the oven heating elements
are switched off. Make sure the oven
has cooled down.
ĺClean the oven front, the interior and
the door with a clean sponge and a so-
lution of warm water and washing-up li-
quid, or with a clean, damp microfib-
re cloth.
ĺWipe dry with a soft cloth.
Catalytic enamel inside the oven with
grease deposits will self-clean when high
temperatures are used.
ĺAny residual soiling can be removed
with a solution of warm water and was-
hing-up liquid applied with a soft brush.
ĺLeave all parts to dry.
The accessories are not dishwasher-sa-
fe.
Evaporating residual moisture
If a programme using the addition of
moisture is manually interrupted before all
the bursts of steam have been injected or
if there is a power cut, the water for these
unused bursts of steam will remain in the
steam injection system.
It is best to start the evaporation of re-
sidual water straight away so that only
fresh water is used during the next coo-
king programme.
Carrying out residual moisture evapo-
ration
Danger of injury!
Steam can cause scalding. Do not open
the door while the residual water is being
evaporated.
ĺSelect the Moisture Plusor the Au-
tomaticfunction.
A time, depending on the amount of resi-
dual water present, will appear and the tri-
angle will flash under the symbol.
During the evaporation process, the dura-
tion may be adjusted by the system ac-
cording to the amount of water current-
ly present.
ĺConfirm with OK.
The residual moisture evaporation pro-
cess will start.
At the end of the process:
– will appear in the display if you
have selected Moisture Plus.
– The selected Automatic programme will
appear in the display if you have selec-
ted Automatic.
ĺTurn the function selector to.
While the residual water is evapora-
ting, the moisture will condense on the
door and in the oven interior. It needs
to be wiped off after the oven has coo-
led down.
Settings overview
Quick Start Guide
H6267B
These short instructions are not a substitute for the operating and installation
instructions. It is essential to familiarise yourself with the oven before using it for the
first time. Please read the operating and installation instructions carefully and pay
particular attention to the Warning and Safety Instructions.
en – AU, NZ M.-No. 10 950 300
CLEANING AND CARE / SETTINGS
PROBLEM SOLVING GUIDE
MOISTURE PLUS / AUTOMATIC PROGRAMMES
Moisture Plus Automatic programmes Cleaning and care Settings Problem solving guide

fold here fold here fold here fold here fold here fold here
fold herefold herefold herefold herefold herefold here
Before using for the first time
Before using the oven for the first time,
ensure that it is correctly installed and
connected.
It is essential to read the separate
operating and installation instructions
supplied with the appliance.
ĺPress and release the function and ro-
tary selectors if they are retracted.
The function selector must be pointing to
.
After connecting the oven to the electrici-
ty supply will appear in the display
and the triangle will flash under the
symbol.
The time of day is shown in 24-hour for-
mat.
ĺUse the rotary selector to enter the
time of day.
ĺConfirm with OK.
The time of day is now saved.
The time of day display is switched off by
default (see "Settings – ").
The display appears dark if the oven is
switched off. The time of day continues to
run in the background.
Clean the oven interior and the accesso-
ries and rinse the steam injection system
before using the oven for the first time.
Take all accessories out of the oven,
select Moisture Pluswith automatic
burst of steam and heat up the empty
oven at 250°C for at least one hour (see
"Moisture Plus").
Ensure that the kitchen is well ventilated.
Overview of functions
These short instructions are intended to
give you a quick overview.
Please refer to the separate operating and
installation instructions supplied with your
oven for detailed information on how to
use the appliance.
Oven operating and installation
instructions
– Safety instructions
– Features and accessories
– Operation
– Moisture Plus
– Automatic programmes
– Tips on baking, roasting and grilling
– Cooking charts
– Notes on low temperature cooking and
further applications like Defrost and
Gentle Bake
– Cleaning and care
– After sales service
– Installation and connection
Recipe book "Culinario"
– Recipes for the Moisture Plus function
and Automatic programmes
aOn/Off sensor
– Is recessed
– Reacts to touch
– For switching the oven on and off
bFunction selector
– Can be retracted in the position by
pushing it in
– Can be turned clockwise and an-
ti-clockwise
– For selecting oven functions:
Conventional Heat
Bottom Heat
Fan Grill
Grill
Gentle Bake
Moisture Plus
Rapid Heat-up
Fan Plus
Auto Roast
Intensive Bake
Automatic
Defrost
cClock/Timer
Displays the time of day and settings
dRotary selector
– For setting temperatures and times
– Increase values by turning it clock-
wise
Decrease values by turning it an-
ti-clockwise
– For highlighting functions
– Can be retracted in any position by
pushing it in
eOK sensor
For confirming settings and instructions
f sensor
To go back one step at a time
g sensor
For setting the minute minder
h sensor
For switching the oven interior lighting
on and off
i sensor
For calling up functions
j sensor
For injecting bursts of steam
kOptical interface
(for Miele Service technicians only)
Fitting and removing the
FlexiClip telescopic runners
Danger of burning!
Make sure the oven heating elements
are switched off. Make sure the oven
has cooled down.
The FlexiClip telescopic runners are fitted in bet-
ween the two rails that make up a shelf level.
The FlexiClip telescopic runner with the
Miele logo is fitted on the right.
When fitting or removing the telescopic
runners do not extend them. If the teles-
copic runners are difficult to pull out af-
ter fitting, you may need to pull firmly on
them once to release them.
Fitting the FlexiClip telescopic runners:
Removing the FlexiClip telescopic runners:
Features
Oven overview
aOven controls
cTop heat/grill element
cSteam inlet openings
dWater intake pipe for the steam in-
jection system
eCatalytic enamelled back panel
fAir inlet for the cooling fan with
ring heating element behind it
gShelf runners with 5 shelf levels
hOven floor with bottom heat ele-
ment underneath it
iFront frame with data plate
jDoor
Accessories supplied
– Baking tray* with anti-tip safety
notches
– Gourmet perforated baking tray*
with anti-tip safety notches
– Universal tray* with anti-tip safety
notches
– 1 pair of FlexiClip telescopic runners*
– Rack* with non-tip safety notches
– Shelf runners*
* PerfectClean treated surfaces
Setting the minute minder
The minute minder can be used to time any
activity in the kitchen (for a maximum of 99
minutes and 55 seconds).
If you have switched the clock display off,
you will need to switch the oven on before
you can set a minute minder duration.
ĺSelect
appears withflashing under .
ĺUse the rotary selector to set the mi-
nute minder time you require.
ĺConfirm with OK.
The minute minder is saved and will count
down in seconds. The symbol indicates
that the minute minder has been set.
At the end of the minute minder time
– flashes.
– The time counts upwards.
– A buzzer will sound if the buzzer is swit-
ched on.
ĺSelect .
Changing the time set for the mi-
nute minder
ĺSelect .
The minute minder time selected appears.
ĺUse the rotary selector to change the
minute minder time.
ĺConfirm with OK.
The changed minute minder is saved and will
count down in seconds.
Cancelling the minute minder
duration
ĺSelect .
ĺUse the rotary selector to reduce the
minute minder time to .
ĺConfirm with OK.
The minute minder is now cancelled.
Minute minder
Oven function Recom-
mended
tempera-
ture 1)
Tempera-
ture range
2)
Recommendation Note
Baking/
Cook-
ing
Ro-
as-
ting
Gril-
ling
Conventi-
onal Heat
180°C 30–280 °C –For baking and roastingtraditional recipes. 3)
For low temperature cooking.
Bottom
Heat
190°C 100–250 °C – – – Use this function towards the end of cooking to brown the base of
the food.
Fan Grill 200°C 100–260 °C – – For grilling larger items (e.g. rolled meat, poultry).
Grill 240°C 200–300°C – – For grilling thin cuts (e.g. steak) and browning baked dishes.
Gentle
Bake
190°C 100–250 °C – – Suitable for small amounts, e.g. frozen pizzas, bake-off rolls, biscuits
and for meat dishes and roasts. Energy-efficient thanks to optimal
utilisation of heat. When cooking on a single level, up to 30% less
energy is used with comparatively good cooking results.
Moisture
Plus
160 °C 130–250 °C – For baking and roasting with moisture injection.
Rapid
Heat-up
160 °C 100–250 °C – – – For rapid pre-heating of the oven. Once the desired temperature has
been reached the oven function must be selected.
Fan Plus 160 °C 30 – 250 °C – For baking and roasting on different levels at the same time.
A lower temperature can be selected than with .
Auto Roast 160 °C 100–230 °C – – Automatic searing of meat at approx. 230 °C.
Then the temperature automatically drops down to 160 °C or to the
set temperature for continued roasting.
Intensive
Bake
170°C 50–250°C – – For baking dishes with a moist topping.
Automatic – – –The list of Automatic programmes available will appear in the display.
Defrost 25°C 25–50°C – – – For the gentle defrosting of frozen food.
1) As soon as you call up a function, the recommended temperature will appear in the display.
2) You can change the recommended temperature within the temperature range. Confirm with OK.
3) If using an older recipe or cookbook, set the oven temperature 10°C lower than that recommended. This will not change cooking times.
Basic operation
ĺSelect the required oven function with
the function selector.
The recommended temperature will ap-
pear.
ĺUse the rotary selector to change
the temperature if necessary.
The current temperature and temperature
indicator lightwill appear after a short
time.
ĺWhen the cooking programme is finis-
hed, turn the function selector to .
ĺTake the food out of the oven.
ĺSwitch the oven off.
The cooling fan will continue to run and
then switch off automatically.
Further functions
Cooking programmes (maximum cook-
ing time 12 hours) can be set to switch
on and off automatically once you have
selected the function and the tempera-
ture.
Duration
The oven switches off automatically when
the cooking duration has elapsed.
Cooking duration and finish time
The cooking programme switches on and
off automatically.
When the cooking duration has elap-
sed:
– appears in the display.
– flashes.
– A buzzer will sound if the buzzer is swit-
ched on.
ĺTurn the function selector to .
ĺTake the food out of the oven.
ĺSwitch the oven off.
Display
The display shows the time of day or your
settings.
g lb/oz
°C °F
h min
Symbols in the display
Depending on the position of the function
selectorand/or whether a sensor has
been pressed, the following symbols ap-
pear:
Symbols in the display/
allocated function
Minute minder Any
Temperature indica-
tor light
Oven
function
Temperature
Duration
Finish time
Water intake process /
Descaling
Bursts of steam
Weight
Setting
Time of day
System lock
You can only set or change a function if
the function selector is in the correct po-
sition.
Energy saving tips
ĺRemove any accessories that you are
not using from the oven before starting
the cooking process.
ĺPre-heat the oven only if instructed to
do so in the recipe or the cooking chart.
ĺAvoid opening the door during a cook-
ing process to prevent heat from esca-
ping.
ĺIn general, if a range of temperatures
is given in a recipe or chart,it is best to
select the lower temperature and check
the food after the shortest duration.
ĺFan Plus: For baking and roasting
on different levels at the same time. A
lower temperature can be selected than
with Conventional Heat .
ĺFan Grill: Lower temperatures can
be used than when using the Grill
function.
ĺGentle Bake: Energy-efficient ba-
king with optimal use of heat (see
"Overview of functions").
ĺReduce energy consumption by utilising
residual heat:
Cooking programmes using temperatu-
res above 140°C which take longer than
30minutes:
Turn down to the lowest possible tempe-
rature about 5minutes before the end of
cooking. The cooling fan remains switched
on. Do not switch the oven off completely.
Whenever possible bake several dishes
at the same time or immediately one after
the other.
A catalytic cleaning programme is best
started immediately after a cooking pro-
gramme.
ĺEnergy saving mode:
The oven will switch itself off automati-
cally to save energy if no programme
is being run and no controls are being
operated.
ĺUse the Automatic programmes.
ĺMonitoring the cooking time: Whenever
possible set a cooking duration or use
the food probe.
ĺUse dark coloured baking tins and con-
tainers with a matt finish made from
non-reflective materials. Do not cover
the oven floor or the rack with heat-re-
flective aluminum foil.
ĺEnergy-saving settings:
Select Status for .
Select Status for .
Tips on baking, roasting and
grilling
Baking
Bake on different levels at the same time
using the Fan Plus function:
– 1 tray: Shelf level 2
– 2 trays: Shelf levels 1+3/2+4
– 3 trays: Shelf levels 1+3+5 (not suita-
ble for moist cakes and tarts)
Roasting
Browning: Browning only occurs towards
the end of the roasting time. Remove the lid
about halfway through the roasting time if a
more intensive browning result is desired.
Standing time: At the end of the
programme, take the roast out of the
oven, wrap in aluminium foil and leave to
stand for about 10minutes. This helps
retain juices when the meat is carved.
Roasting poultry: For a crisp skin, baste
the poultry 10minutes before the end of
the cooking time with slightly salted water.
Grilling
If the surface of a thicker cut of meat is
browned but the centre is still raw, move the
food to a lower level or reduce the tempera-
ture and continue cooking. This will prevent
the surface from becoming too dark.
Safety features
– The system lock prevents the
oven from being used unintentio-
nally, for example by children.
– The cooling fan cools down the
hot air in the oven before it exits
between the door and the control
panel.
– The ventilated door helps to keep
the outer glass pane of the door
cool.
OPERATION / TIPS
FEATURES / MINUTE MINDER
IMPORTANT INFORMATION / OVEN CONTROLS
Important information Oven controls Operation Overview of functions
M.-No. 10 950 300 / 00en – AU, NZ
Useful tips
Other Miele Oven manuals

Miele
Miele DGC7440W User manual

Miele
Miele H 7464 BP User manual

Miele
Miele DG 6401 User manual

Miele
Miele H806 Series Manual

Miele
Miele TX3587 User manual

Miele
Miele H 4641 User manual

Miele
Miele H 7180 BP User manual

Miele
Miele H 4846 BP User manual

Miele
Miele MasterChef H 396 B User manual

Miele
Miele H 373-2 B User manual

Miele
Miele H387-1B User manual

Miele
Miele H 2261 B User manual

Miele
Miele DGC 7460 User manual

Miele
Miele H 5051 B User manual

Miele
Miele DG 6010 User manual

Miele
Miele H 4260 User manual

Miele
Miele DG 4086 BRWS User manual

Miele
Miele M 6160 TC User manual

Miele
Miele ContourLine DGC 6500 XL Instructions for use

Miele
Miele H 4784 BP Operating and Parts list manual