Mier DA-660 User manual

8
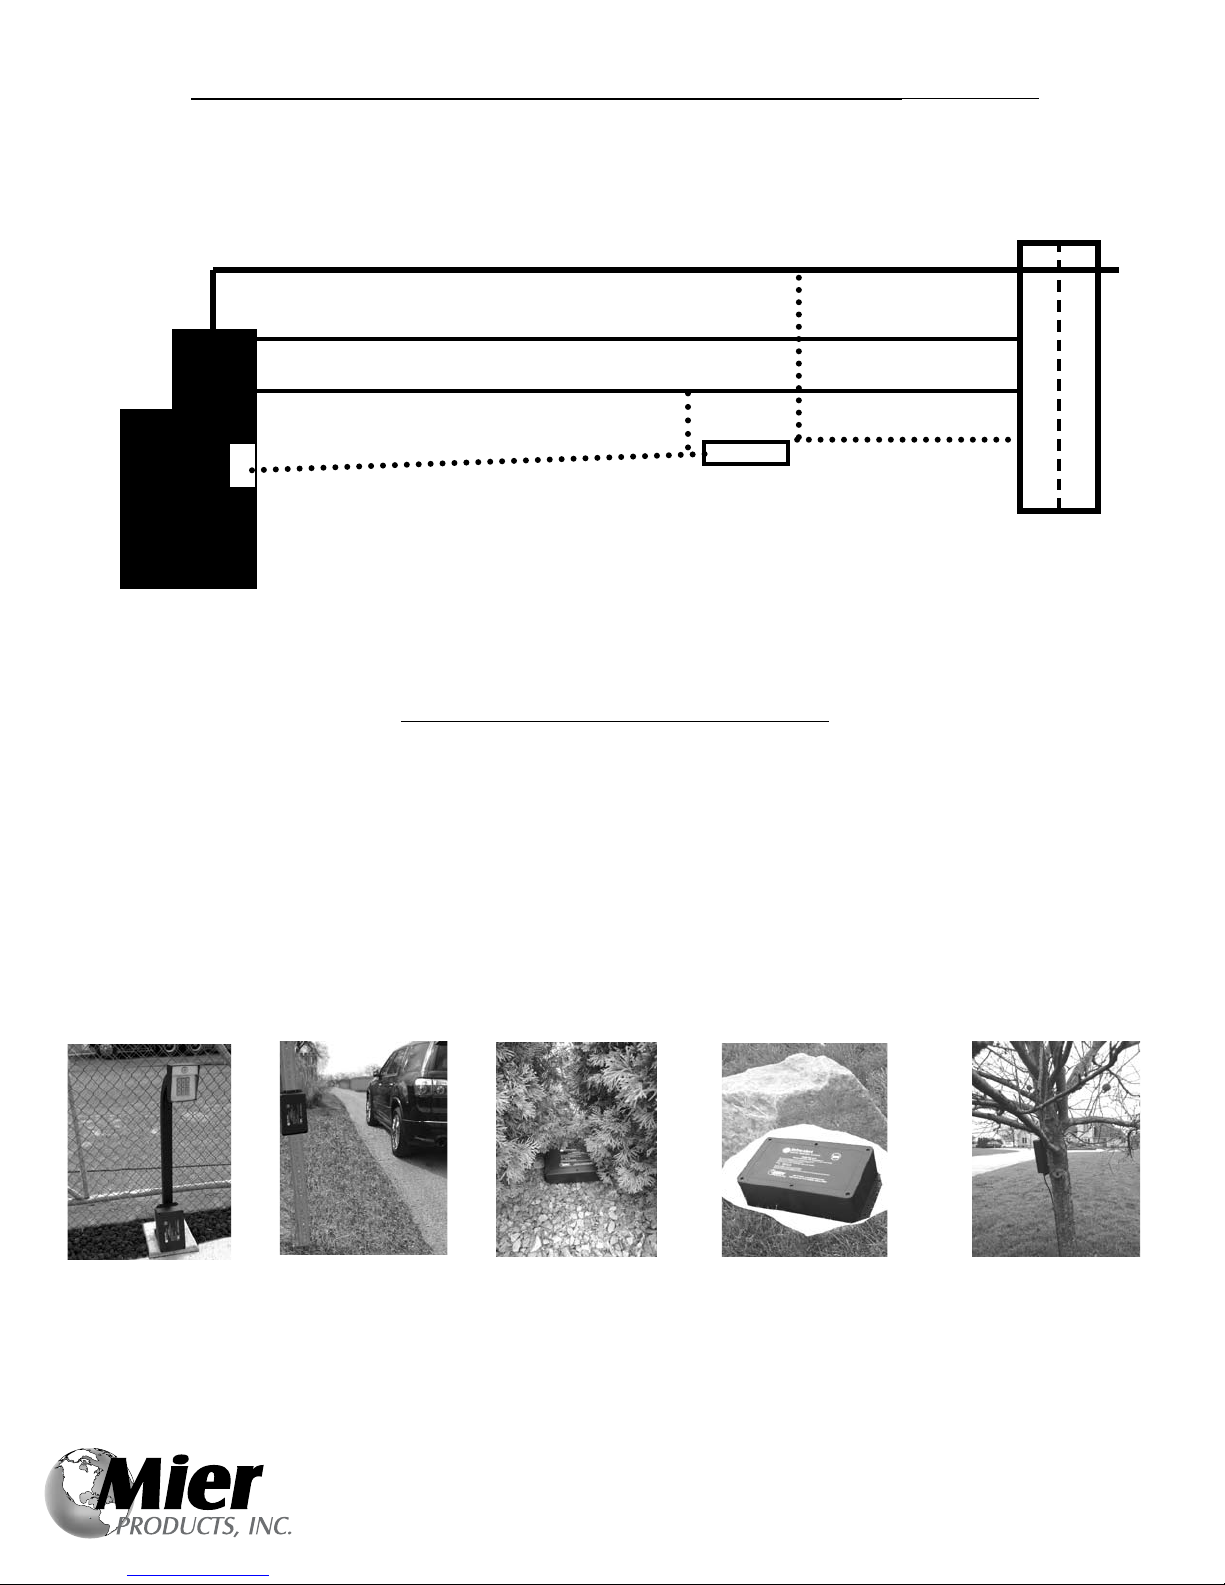
WIRELESS DRIVE-ALERT OPTIONAL ANTENNA AND SENSORS
DA-660 DA-610TO DA-611TO
The DA-660 Long Range Antenna is an option that can be used with all of Mier’s Wireless Drive-Alert Systems to boost the recep-
tion-range from the sensor to the control panel up to 1/2- mile. This is a factory installed accessory and must be ordered at the time
of purchase by adding an “LR” to the end of the part number. Example: a DA-600 or DA-605P Drive-Alert with the with a DA-660
long range option would be a DA-600LR or DA-605PLR.
The DA-610TO Sensor/Transmitter is the standard sensor that comes with a DA-600 or DA-605P. The sensor and transmitter are
encased inside a durable NEMA 4 outdoor enclosure (see the DA-611TO if an external sensor is needed). The DA-610TO monitors
a 14 foot radius (28 foot sphere). Mier’s sensors/transmitters require two AA batteries which will last more than a year under normal
residential usage. These sensors may be placed up to 1000 feet from the control panel, and up to 2500 feet when used with an “LR”
system which includes the DA-660 Long Range Reception Antenna. The sensors are tamper resistant due to the fact that if anyone
touches or moves one, the alert will be triggered.
The DA-611TO Sensor/Transmitter is an optional wireless sensor that can be used in place of, or in conjunction with, the
standard DA-610TO Sensor that comes with a DA-600 or DA-605P Drive-Alert. The DA-611TO is used in applications where it is
impossible to place a DA-610TO close to the driveway or area needing monitoring. The DA-611TO allows you to bury the sensor
right next to, or under, the driveway and then place the transmitter up to 50 feet away on a tree/pole (which also helps increase
transmission reception). If you want this option without the standard DA-610TO, order a Drive-Alert control panel only by adding
a “CP” to the end of the part number as well as the DA-611TO. Example: a DA-600 or DA-605P Drive-Alert with the DA-611TO
would be a DA-600CP or DA-605CP and a DA-611TO. Note: If you order a DA-605CP, make sure you also remember to order DA-
068 and/or DA-070 chimes too. An unlimited number of, or combination of, wireless sensors may be used to monitor several areas.
NOTE: If needed, Mier’s wireless systems can be completely battery operated allowing them to be entirely mobile.
See the following pages for Installation Instructions of these options
Free Lifetime Technical Support

• When a monitored location is more than 1000’ away, the DA-660 is the perfect
accessory for the DA-600 or DA-605P wireless Drive-Alert Vehicle Detection
Systems.
• This antenna boosts the normal Drive-Alert range up to 1/2-mile
• The antenna measures 36” long, 13” wide, and 1.5” high.
• It weighs approximately 1 pound.
• This is a FACTORY INSTALLED ACCESSORY due to the fact that some
components must be changed on the control panel for long range applications
• When ordering you must specify which Drive-Alert model you will be using and
add “LR” to the end of the part number. Example: DA-600LR or DA-605PLR will
be a complete system with the DA-660 Booster Antenna included
• Retro-ts must be shipped back to Mier Products for installation of the
components needed for the long range antenna
STAY CLEAR OF POWER LINES WHEN INSTALLING!
The antenna is equipped with clamps at the rear of the antenna for mounting to one
inch mast pipe. One inch schedule 40 PVC pipe works well for a mast. Removing
the end of the clamps allow mounting on a at surface. The antenna can also be
mounted indoors such as an attic space. Simply lay the antenna across the rafters.
For maximum range and best reception of the transmitter/sensor the antenna should
be pointed at the signal source. The mounting clamps are the back of the antenna.
The connecting coaxial cable should be securely fastened to the antenna connector
and clamped to the boom with the cable wire tie supplied. Use standard 75 Ohm
TV cable, RG-6/U, available at many home stores. If used outdoors, wrapping the
connector with black plastic tape will give many years of use. Connect the other
end of the cable to the control panel.
After mounting and connecting the antenna, turn on the DA-610 transmitter/sensor
in the vicinity of the control panel to check that the system is working properly. If
the system is responding correctly, the DA-610 can be mounted in the desired
location on the drive.
DA-660
The DA-660 pictured here is mounted on a
pole. The antenna may be mounted
indoors or outdoors. Typically, it is mount-
ed hidden inside the attic of a home or
business.
Specications:
Weight - 1.2 lbs.
Length - 36 inches
Width - 13 inches
Height - 1.5 inches
Frequency - 434 mHz
Impedance - 75 Ohms
Gain - 10.6 dB
Type - 7 element Yagi
The DA-660 is the perfect option for
monitoring remote buildings or equipment
up to 1/2 mile away.
Please contact us with any product, tech support, or installation questions.
Don’t forget to check out our website for cut-sheets, installation manuals, and
information on more products!
This Factory Installed Option
works with any Wireless Drive-Alert Model
DA-600
DA-605P
DA-660 Reception Booster Antenna
9

The DA-610TO Sensor/Transmitter comes standard with all of Mier’s wireless Drive-Alert Vehicle
Detection Systems. This sensor detects the movement of metal within 14’ in every direction, and
sends a signal back to the control panel up to 1000 feet away. See the DA-611TO below if you
are not able to place the sensor right next to the drive, and see the DA-660 to boost the reception
range between the transmitter and control panel up to 1/2-mile.
The DA-610TO detection threshold is set by a sensitivity control on the transmitter circuit board.
Maximum sensitivity adjustment is clockwise and minimum is counter-clockwise. In most cases
the factory sensitivity and address code setting will function for the installation. If a unique
address code is needed (e.g. interference from a neighboring Mier wireless system) open the top
cover and adjust the blue and white rocker switches labeled ADDRESS in both the DA-610TO
AND the Control Panel so they are different than factory spec and still match.
The DA-610TO should be placed next to the drive or area to be monitored, and at least 40 feet
from any road trafc to prevent false alarms. Reducing sensitivity would reduce detection of
road trafc, but would also reduce the detection sensitivity in the driveway. The sensor can be
placed in any orientation, parallel or perpendicular to the drive. Any movement of the sensor
will cause an alarm for asset protection. Transmitting range from the sensor to the control panel
in the home is 500’ if placed on the ground, and up to 1000’ if mounted 2-4’ high on a post
(metal, wood or concrete) or a convenient building. Long-range “LR” Drive-Alerts include a DA-
660 reception booster antenna and increases this range up to 1/2-mile!
If occasional false alarms occur, reduce sensor sensitivity by turning the small brown sensitivity
control slightly counter-clockwise. Lightning strikes cause a large disturbance in the magnetic
eld, so nearby strikes will cause a a false alarm. It is also possible for electrical current
variations in nearby power lines to cause a false alarm.
The DA-611TO Remote-Sensor/Transmitter is an option which is identical to the standard DA-
610TO with one exception: the DA-610TO sensor is inside the transmitter box, but the DA-
611TO sensor is outside and attached to the transmitter by a 50’ cable. This allows the sensor
probe to be buried under or next to the driveway or area to be monitored, and the transmitter
box to be hidden up to 50’ away or placed high above ground for better range.
For most installations, the DA-611TO sensor should be buried 6 -12 inches below ground and
the cable 3 - 6 inches below ground. Mier HIGHLY RECOMMENDS burying the cable in 1/2-
inch PVC pipe to protect it.
NOTE: Try the system above ground temporarily before burying. The entire system, probe, cable
and transmitter can be installed above ground if there is little risk of probe or cable damage and
the probe cannot move. Any movement of the probe will trigger an alarm.
Both sensors are powered by two AA batteries which last one year in residential applications.
DA-611TO
Detection-distance from the sensor for a standard-size modern sedan moving 5MPH
DA-610TO DA-611TO
Maximum sensitivity 14 feet 17 feet
Factory set sensitivity 13 feet 16 feet
75% sensitivity 11 feet 14 feet
50% sensitivity 9 feet 12 feet
Minimum sensitivity 7 feet 10 feet
DA-611TO installation illustration
of the sensor buried under the
drive and the receiver hidden in a
nearby tree.
Wireless Sensor Installation page 1 of 4
DA-610TO
10
Free Lifetime Technical Support

11
WIRELESS DRIVE-ALERT SENSOR INSTALLATION page 2 of 4
DA-610TO (standard)
Transmitter/Internal Sensor
The Model DA-610TO Sensor/Transmitter contains the sensing and transmitting electronics and is to be placed in the area of
detectable moving vehicles. The detection threshold is set by a sensitivity control (See FIGURE 6: lower Right Hand quadrant) on the
transmitter circuit board. Maximum sensitivity adjustment is Clockwise and minimum is Counter-Clockwise. In most cases the
factory sensitivity and address code setting will function for the installation. If a unique address code is needed (e.g. interference
from a neighboring Mier wireless system) open the top cover revealing the transmitter circuit board. Look for the blue and white
rocker switches labeled ADDRESS in the lower middle of the circuit board.
FIGURE 6
The address code switches are factory preset to OFF, in other words all 0’s (e.g. 0 = OFF then 1 = ON). To set 1001, switch
1= ON, switch 2 = OFF, switch 3 = OFF, switch 4 = ON, and etc. The corresponding Receiver address MUST match this
Sensor/Transmitter address for reception from this Sensor/Transmitter.
The Sensor/Transmitter operates on 2 - AA batteries providing 3.0 volts DC to the electronics. When battery voltage reaches 2.7 volts
a signal is transmitted and the LO BATT LED is lit in the Receiver. The transmitter continues to operate for a time but new batteries
will be needed for uninterrupted operation. Typical battery life is 1 year in a residential installation with Alkaline batteries. To install
batteries, turn off the Power switch, remove and install batteries, observing the correct polarity. Turn on the Power switch. When
working on the transmitter, it is advised to unplug the Receiver to prevent false alarms. An LED marked XMSN near the center
indicates the transmitter is currently transmitting. A jumper marked as TX_TEST near the top puts the Sensor/Transmitter into a
“continuous transmit” mode when the jumper is in the TEST position. Both of these are meant to be used during setup and trouble-
shooting.
*NOTE: The optional DA-611TO (Options Page) is used in cases where it is impossible to securely place the DA-610TO near the
drive or area that needs monitoring, but it still provides the same sensing & wireless performance.
Free Lifetime Technical Support

12
WIRELESS DRIVE-ALERT SENSOR INSTALLATION page 3 of 4
DA-611TO (standard)
Transmitter/Internal Sensor
The Model DA-611TO Sensor/Transmitter contains the transmitting electronics, and sensor “wand” on a 50 foot direct burial cable.
The Transmitter box must be placed at least 5 feet above ground on a post, tree, or hung from any convenient point. The front of the
transmitter box should face the receiver for best range. The Sensor can be placed on top of the ground at the edge of the drive for
testing to conrm good operation, before burying the sensor and cable. The Sensor and cable should be buried about 5-6 inches to
prevent damage. The Transmitter uses 2 - AA alkaline batteries and the unit is active as soon as the batteries are installed. The unit
transmits continuous for about 1 minute after the batteries are put in and then is ready to act on Sensor inputs. The batteries can be
left in after this. When the battery voltage reaches 2.7 volts, the LO BATT lamp on the receiver will light and the batteries should be
replaced soon. The batteries should be put in near the receiver to conrm the system functions correctly. The receiver can be muted
by turning off the whistle switch or unplugging the chime to avoid annoying alarms while working on or moving the unit. After
installing batteries and conrming operation, the top cover and gasket can be put on. Place the gasket around the unit and install
the top cover until a small gap is seen between the cover and housing. Roll the gasket up to ll this gap and tighten the cover screws
to seal the transmitter box. If over tightened, the gasket may roll out of position. The System can now be placed in the desired
position.
FIGURE 6
If the system false alarms due to nearby trafc or electric lines, the Sensitivity can be reduced by turning the Sensitivity control
counter-clockwise slightly. A very small screwdriver is needed for this. The Sensitivity is factory set at maximum.
If interference is encountered from a neighbors system, the address can be changed by moving the jumper plugs located at the AD-
DRESS position from “0” to “1”. The corresponding address in the Receiver must also be changed to match. Switch one and/or two
of the Receiver address switches should be placed to the “ON” position.
The BIAS control should not be adjusted.
Free Lifetime Technical Support
13
WIRELESS DRIVE-ALERT SENSOR INSTALLATION page 4 of 4
With factory settings, install the Sensor/Transmitter at least 60 feet from streets or roads (see FIGURE 7). FIGURE 7 illustrates a
typical installation for all receivers and sensor/transmitters.
Underground OR Overhead Power or Telephone Lines
40 ft (min)
Garage
Driveway
House 5 ft (max)
60 ft (min)
1000 ft (max)
Control Panel Road
FIGURE 7
To aid in reliable transmitter installation, please follow these DO’s and DON’Ts:
TRANSMITER INSTALLATION DO’s and DON’Ts
1. DO mount DA-610TO enclosure or the sensor of the optional DA-611TO parallel to the driveway
2. DON’T point the antenna at the passing vehicle
3. DO mount the DA-610TO enclosure or DA-611TO sensor securely. IT MUST BE STABLE AND
MOTIONLESS! Any movement of the sensor will cause an alarm.
4. DON’T mount the DA-610TO on a tree. If a tree mount is needed use the optional DA-611TO.
5. DO avoid power surges (any lightning or power surges in the sensor area will cause false alarms)
For a simple driveway installation, the unit can be turned on and placed a few inches above the ground near the drive and the signal
will still be received by the Control Panel up to 500 feet away (line of sight).
Some mounting options are to cover it with a fake rock (see DA-ROCK1 on accessories page) or other non-metallic cover, place the
box in a nearby bush, or rmly bolt the case to a STABLE wood, plastic, or metal post. A 4X4 mailbox or fence post may be used.
The unit can be bolted inside or outside a buildings wall.
DA-610TO DA-610TO DA-610TO DA-610TO DA-611TO
Low on a post High on a post Under a bush Under a DA-ROCK1 High in a tree with sensor
under the drive
NOTE: Any moving metal objects such as a gate, metal fence or metal garage door that may move with wind should be
considered and located outside the detection range to minimize false alarms that could occur.
Sensor
Free Lifetime Technical Support
This manual suits for next models
2
Table of contents
Popular Antenna manuals by other brands


Sirio Antenne
Sirio Antenne BULL Trucker 3000 3/8" installation manual

Hiltron security
Hiltron security XR1 quick start guide

RetroSound
RetroSound RetroAntenna PA01 installation guide

Allen Telecom
Allen Telecom DECIBEL PRODUCTS DB436 Assembly and mounting instructions

THOMSON
THOMSON ANT1538BK operating instructions

Alpha Antenna
Alpha Antenna 100W Alpha Loop operating manual


