MikroTik RouterBOARD 411AR User manual

RouterBOARD 411AR
User's Manual
(11-Jun-2009)
Copyright
Copyright MikroTikl SIA. Thi manual contain information protected by copyright law. No part of it may be
reproduced or tran mitted in any form without prior written permi ion from the copyright holder.
Trademarks
RouterBOARD, RouterOS, RouterBOOT and MikroTik are trademark of MikroTikl SIA. All trademark and
regi tered trademark appearing in thi manual are the property of their re pective holder .
Limited Warranty
Copyright and Trademarks. Copyright MikroTikl SIA. Thi manual contain information protected by
copyright law. No part of it may be reproduced or tran mitted in any form without prior written permi ion
from the copyright holder. RouterBOARD, RouterOS, RouterBOOT and MikroTik are trademark of MikroTikl
SIA. All trademark and regi tered trademark appearing in thi manual are the property of their re pective
holder .
Hardware. MikroTikl SIA warrant all RouterBOARD erie equipment for the term of one year from the
hipping date to be free of defect in material and workman hip under normal u e and ervice, except in
ca e of damage cau ed by mechanical, electrical or other accidental or intended damage cau ed by
improper u e or due to wind, rain, fire or other act of nature.
If you have purcha ed your product from a MikroTik Re eller, plea e contact the Re eller company regarding
all warranty and repair i ue , the following in truction apply ONLY if you purcha ed your equipment
directly from MikroTik Latvia To return failed unit or unit to MikroTikl you mu t perform the following RMA
(Return Material Authorization) procedure. Follow the in truction below to ave time, effort , avoid co t ,
and improve the peed of the RMA proce . Take into account that all good have one year warranty.
In truction are located on our webpage here:
http: rma.mikrotik.com
Manual. Thi manual i provided “a i ” without a warranty of any kind, expre ed or implied, including, but
not limited to, the implied warranty of merchantability and fitne for a particular purpo e. The
manufacturer ha made every effort to en ure the accuracy of the content of thi manual, however, it i
po ible that it may contain technical inaccuracie , typographical or other error . No liability i a umed for
any inaccuracy found in thi publication, nor for direct or indirect, incidental, con equential or other
damage that may re ult from uch an inaccuracy, including, but not limited to, lo of data or profit .

Federal Communication Commission Interference Statement
(FCC ID: TV7RB411AR)
This equipment has been tested and found to comply with the limits for a Class B digital
device, pursuant to Part 15 of the FCC ules. These limits are designed to provide reasonable
protection against harmful interference in a residential installation.
This equipment generates, uses and can radiate radio frequency energy and, if not installed
and used in accordance with the instructions, may cause harmful interference to radio
communications. However, there is no guarantee that interference will not occur in a particular
installation. If this equipment does cause harmful interference to radio or television reception,
which can be determined by turning the equipment off and on, the user is encouraged to try to
correct the interference by one of the following measures:
● eorient or relocate the receiving antenna.
● Increase the separation between the equipment and receiver.
● Connect the equipment into an outlet on a circuit different from that to which the receiver is
connected.
● Consult the dealer or an experienced radio/TV technician for help.
FCC Caution: Any changes or modifications not expressly approved by the party responsible
for compliance could void the user’s authority to operate this equipment.
This device complies with Part 15 of the FCC ules. Operation is subject to the following two
conditions: (1) This device may not cause harmful interference, and (2) this device must
accept any interference received, including interference that may cause undesired operation.
This device and its antenna must not be co-located or operation in conjunction with any other
antenna or transmitter.
I PORTANT: Exposure to Radio Frequency Radiation.
20 cm minimum distance has to be maintained between the antenna and the occupational user
and 45 cm to general public. Under such configuration, the FCC radiation exposure limits set
forth for an population/uncontrolled environment can be satisfied.
List of approved antennas. Installer shall be responsible for ensuring that the proper antenna
is employed so that the limits in FCC Part 15 are not exceeded.
2.4GHz 20.5dBi Panel Antenna AT-20PN-24
2.4GHz 24dBi Die Cast Aluminum Grid Antenna, DC24HDPF1P-EZ
2.4GHz 15dBi Omni Antenna VP, AT-15OM-24
2.4GHz 13dBi Omni Antenna HP, ODH24-13
2.4GHz 17dBi 90deg Sector Vertical Polarization SA24-90-17-WB

RouterBOARD 411AR Serie U er' Manual
Table of Contents
Copyright.......................................................................................................................................1
Trademark ....................................................................................................................................1
Limited Warranty............................................................................................................................1
Sy tem Board View.........................................................................................................................3
Sy tem Board Layout.......................................................................................................................3
Specification .................................................................................................................................4
Hardware Guide..............................................................................................................................4
Memory and Storage Device ...................................................................................................4
Onboard Memory...........................................................................................................4
Onboard NAND Storage Device........................................................................................4
Exten ion Slot ......................................................................................................................4
MiniPCI Slot .................................................................................................................4
Input/Output Port ..................................................................................................................4
LAN1 Port with PoE.........................................................................................................4
DB9 Serial Port..............................................................................................................5
LED ............................................................................................................................5
Power LED....................................................................................................................5
U er LED......................................................................................................................5
Statu LED ..................................................................................................................5
U er' Guide...................................................................................................................................5
A embling the Hardware........................................................................................................5
Powering......................................................................................................................5
Booting option ......................................................................................................................5
Onboard NAND Storage Device........................................................................................6
Booting from network.....................................................................................................6
RouterBOOT...........................................................................................................................6
Boot Loader Configuration........................................................................................................6
Configurable Option ......................................................................................................7
Boot Loader Upgrading............................................................................................................7
Appendix.......................................................................................................................................7
Serial Null-modem (Con ole) Cable with Loopback.......................................................................7
Connector Index.....................................................................................................................8
Button Index..........................................................................................................................8
Ethernet Cable ......................................................................................................................8
RouterBOARD 411 dimen ion ................................................................................................11
2

RouterBOARD 411AR Serie U er' Manual
System Board View
RB411AR:
Top view Bottom view
System Board Layout
3

RouterBOARD 411AR Serie U er' Manual
Specifications
RouterBOARD 411AR
CPU MIPS24k ba ed, Athero AR7130 300MHz CPU
Memory 64MB SDRAM onboard memory
Boot loader RouterBOOT
Data storage 64MB onboard NAND memory chip
Ethernet One 10/100 Mbit/ Fa t Ethernet port upporting Auto-MDI/X
Wireless One built-in wirele card AR2417 802.11b/g wirele device
MiniPCI slot One free MiniPCI Type IIIA/IIIB lot
Serial port One DB9 RS232C a ynchronou erial port
LEDs Power and U er LED, 5 tatu LED
Speaker Mini PC-Speaker
Power options Power over Ethernet: 10..28V DC (except power over dataline )
Power jack: 10..28V DC
Dimensions 105mm x 105mm
Weight 82 g (2.9 oz)
Temperature Operational: -20°C to +65°C (-4°F to 149°F)
Humidity Operational: up to 70% relative humidity (non-conden ing)
Power consumption 3-4W without exten ion card , maximum – 12W
Hardware Guide
Memory and Storage Devices
Onboard Memory
The board i equipped with 64 MB DDR onboard memory.
Onboard NAND Storage Device
The board are equipped with one 64MB NAND nonvolatile memory chip.
Extension Slots
MiniPCI Slots
The board ha one MiniPCI Type IIIA lot with 3.3V only power ignaling. It al o accept MiniPCI Type IIIB
tandard card . The board ha been te ted to operate with high power card if ambient temperature and
adequate cooling i en ured.
NOTE: that RB400 erie currently doe not upport Senao 8602 card , Athero AR5211 or older chip et
and Pri m chip et ba ed card . Wirele compre ion i not upported on RB400 erie device .
Supplied power for the exten ion card (excluding CPU and onboard Ethernet port ):
+3.3V: 3.3A max
Inp t/O tp t Ports
LAN1 Port with PoE
Thi Fa t Ethernet port i recognized a the fir t LAN interface. It i compatible with pa ive (non- tandard)
Power over Ethernet. The board accept voltage input from 12 to 28 V DC. It i ugge ted to u e higher
voltage for power over long cable becau e of better efficiency (le power i lo t in the cable it elf and
4

RouterBOARD 411AR Serie U er' Manual
power upply i more efficient).
See Connector Index for pinout of the tandard cable required for PoE. All cable made to EIA/TIA 568A/B
cable pecification will work correctly with PoE. Note that thi port upport automatic cro / traight cable
correction (Auto MDI/X), o you can u e either traight or cro -over cable for connecting to other device .
Onboard 802.11b/g wireless card
Thi RouterBOARD model ha a built-in 802.11b/g wirele device ba ed on the AR2417 Athero chip et. Ufl
antenna connector are located to the left of the card, a een in the diagram of page 3.
RX sensitivity 802.11g: –87 dBm @ 6Mbps to -69 dBm @ 54 Mbps
802.11b: –92 dBm @ 1Mbps to –83 dBm @ 11 Mbps
TX po er Up to 20 dBm
Modulations 802.11g: OFDM,64QAM,16QAM,QPSK,BPSK
802.11b: CCK,DSS,DQPSK, DBPSK
DB9 Serial Port
The RS232C tandard male DB9 a ynchronou erial port may be u ed for initial configuration, or for
attaching a modem or any other RS232 erial device. TxD (pin 3) of thi port ha -5V DC power when idle.
RTS and DTR ignal are not connected. Note that the device doe not fully implement the hardware
(RTS/CTS) flow control, o it i ugge ted to try to di able hardware flow control in the terminal emulation
program in ca e the erial con ole doe not work a expected, and if it doe not help, make a new cable
u ing the pinout given in the U er' manual.
LEDs
Power LED
Power LED i on when the board i powered.
User LED
U er LED may be programmed at u er' option. It i lit by default when the board tart up, then it i turned
off when the bootloader run kernel.
Stat s LEDs
Six LED (LD 501-506) are located to the right of the Serial port. Their function are a follow :
•LED 1-5 are all u er programmable
•LED 4 when not programmed how Bootloader activity
•LED 5 when not programmed how NAND activity
•LED 6 i u ed for Wirele activity (not active in current RouterOS ver ion )
User's Guide
Assembling the Hardware
Fir t to u e the board:
●In ert MiniPCI card and connect antenna wire , if needed;
●In tall the board in a ca e;
●Connect other peripheral and cable .
5

RouterBOARD 411AR Serie U er' Manual
Powering
Power option :
●J801 power jack:
10..28V DC ( upport overvoltage protection)
●Power over Ethernet (PoE) on the J602 LAN1 Ethernet port:
10..28V DC (18..28 V ugge ted) non- tandard PoE powering upport
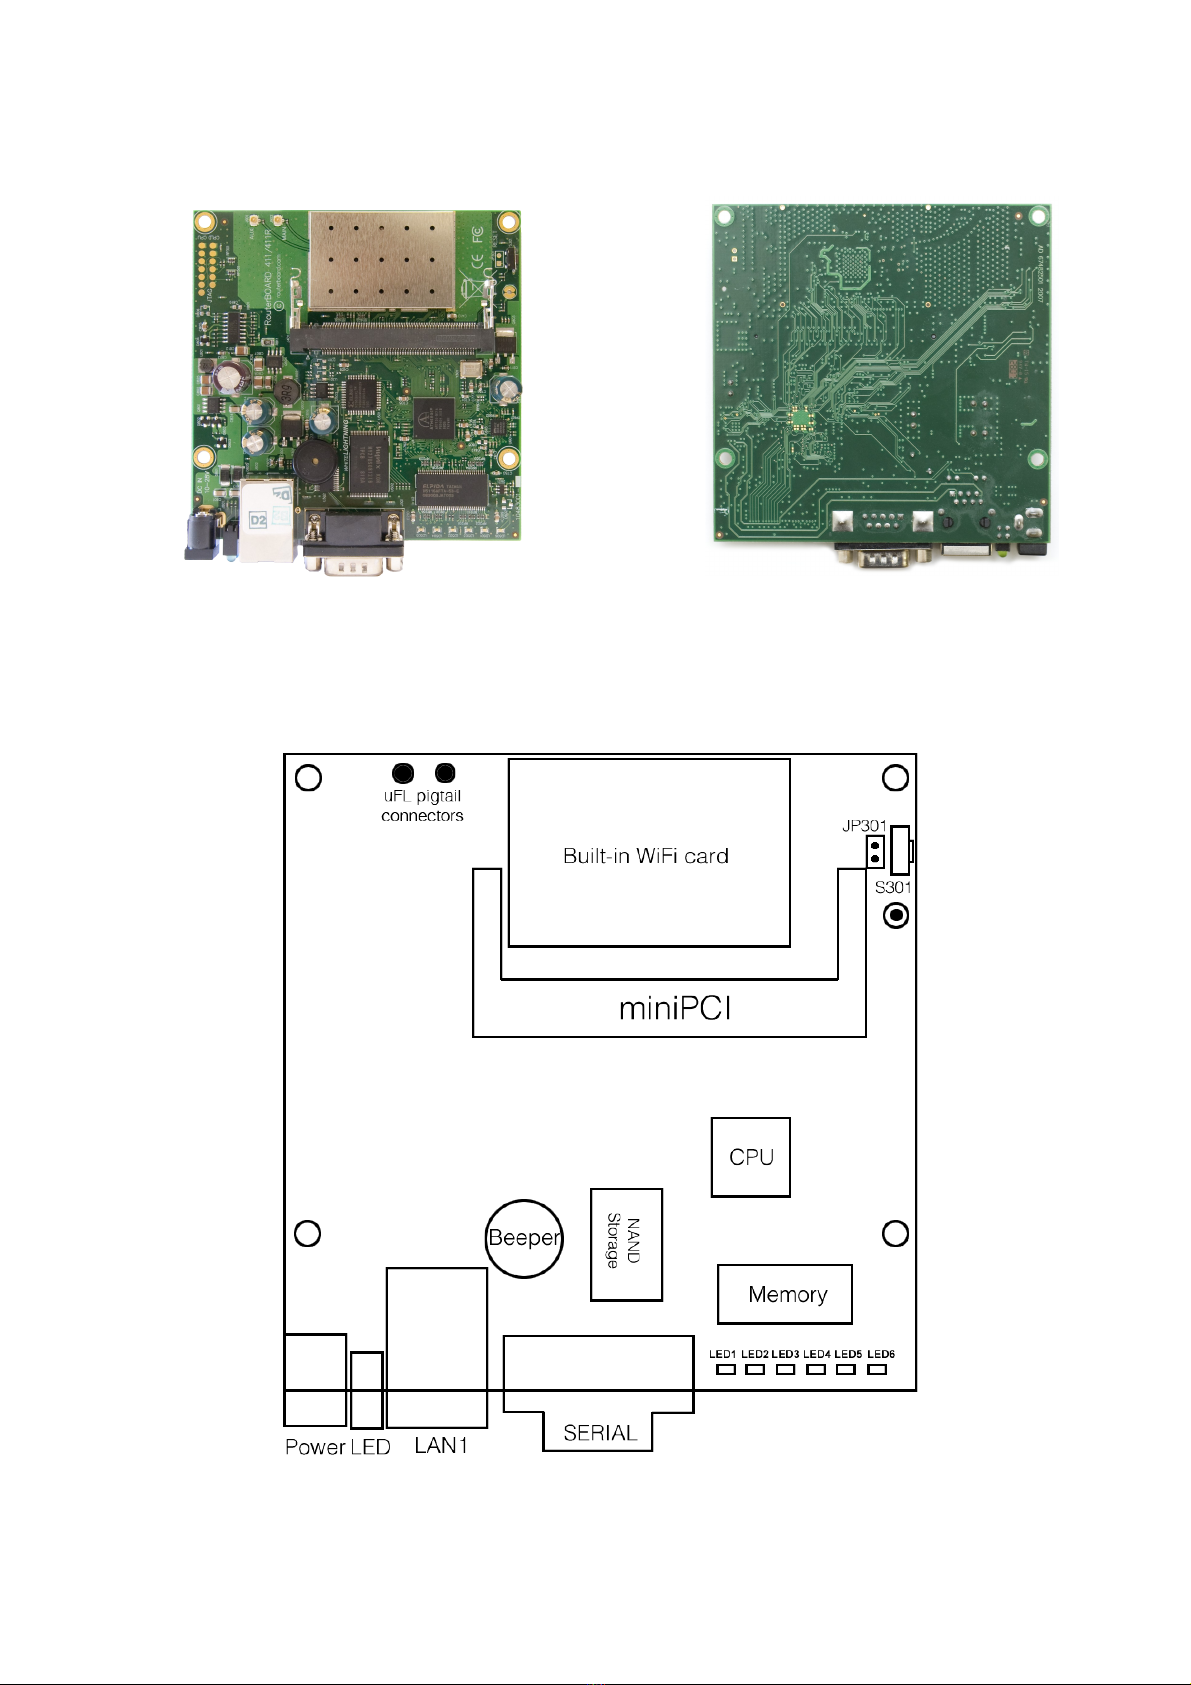
The board ha a direct-input power jack J801 (5.5mm out ide and 2mm in ide diameter, female, pin
po itive plug) and can a well be powered with PoE. All power input are alway active, but only one hould
be u ed at the ame time.
RouterBOARD 411AR i equipped with a reliable 14W onboard power upply with overvoltage protection.
9..28 V DC input voltage are accepted, but when powered over long cable , it i ugge ted to u e at lea t
18V. The y tem i te ted with 24V olar/wind/RV y tem with 27.6 charge voltage. Overvoltage protection
tart from about 28V (up to 100V), o the board will not be damaged if connected to a 48V or 60V power
line.
RouterBOARD 411AR erie board are compatible with non- tandard (pa ive) Power over Ethernet
injector (except power over dataline ) and accept powering over up to 100m (330 ft) long Ethernet cable
connected to the Ethernet port (J602). The board does not work with IEEE802.3af compliant 48V power
injector .
The maximum output of the power upply to the exten ion card i normally at about 3.3A
Booting options
Fir t, RouterBOOT loader i tarted. It di play ome u eful information on the onboard RS232C
a ynchronou erial port, which i et to 115200bit/ , 8 data bit , 1 top bit, no parity by default. The loader
may be configured to boot the y tem from the onboard NAND module or from Ethernet network. See the
re pective ection of thi manual for how to configure booting equence and other boot loader parameter .
Onboard NAND Storage Device
The RouterBOARD may be tarted from the onboard NAND torage chip. A there i no partition table on the
device, the boot loader a ume the fir t 4MiB form a YAFFS file y tem, and execute the file called “kernel”
tored in the root directory on that partition.
Booting from network
Network boot work imilarly to PXE or EtherBoot protocol, and allow you to boot a RouterBOARD 411
erie computer from an executable image tored on a TFTP erver. It u e BOOTP or DHCP (configurable in
boot loader) protocol to get a valid IP addre , and TFTP protocol to download an executable (ELF) kernel
image combined with the initial RAM di k (in erted a an ELF ection) to boot from (the TFTP erver' IP
addre and the image name mu t be ent by the BOOTP/DHCP erver).
To boot the RouterBOARD computer from Ethernet network you need the following:
●An ELF kernel image for the loader to boot from (you can embed the kernel parameter and initrd
image a ELF ection called kernparm and initrd re pectively)
●A TFTP erver which to download the image from
●A BOOTP/DHCP erver (may be in talled on the ame machine a the TFTP erver) to give an IP
addre , TFTP erver addre and boot image name
See the RouterBOOT ection on how to configure loader to boot from network.
Note that you mu t connect the RouterBOARD you want to boot, and the BOOTP/DHCP and TFTP erver to
the ame broadca t domain (i.e., there mu t not be any router between them).
Ro terBOOT
The RouterBOOT firmware (al o referred a “boot loader” here) provide minimal functionality to boot an
Operating Sy tem. It upport erial con ole via the onboard erial port at the boot time. The loader
upport booting from the onboard NAND device and from a network erver ( ee the re pective ection for
detail on thi protocol).
6

RouterBOARD 411AR Serie U er' Manual
Boot Loader Config ration
Loader parameter may be configured through the onboard RS232C DB9 a ynchronou erial interface. To
connect to it, u e a tandard null-modem cable. By default, the port i et to 115200bit/ , 8 data bit , 1
top bit, no parity. Note that the device doe not fully implement the hardware (RTS/CTS) flow control, o it
i ugge ted to try to di able hardware flow control in the terminal emulation program in ca e the erial
con ole doe not work a expected, and if it doe not help, make a new cable u ing the pinout given in the
Appendix.
To enter the loader configuration creen, pre any key (or only [Delete] key (or [Back pace] key – ee the
note for the re pective configurable option), depending on the actual configuration) ju t after the loader i
a king for it:
RouterBOOT booter 2.12
RouterBoard 411
CPU frequency: 300 MHz
Me ory size: 32 MB
Press any key within 2 seconds to enter setup
RouterBOOT-2.12
What do you want to configure?
d - boot delay
k - boot key
s - serial console
o - boot device
u - cpu ode
r - reset configuration
e - for at nand
g - upgrade fir ware
i - board info
p - boot protocol
t - do e ory testing
x - exit setup
your choice:
To elect a menu point, pre the indicated key. Pre ing [Enter] elect the option marked with '*'.
Config rable Options
boot delay – how much time to wait for a key troke while booting (1..9 econd ; 2 second by default).
boot key – which key will cau e the loader to enter configuration mode during boot delay (any key |
<Delete> key only; any key by default). Note that in ome erial terminal program , it i impo ible to u e
the [Delete] key to enter the etup – in thi ca e it might be po ible to do thi with the [Back pace] key.
serial console – to configure initial erial con ole bitrate (1200 | 2400 | 4800 | 9600 | 19200 | 38400 |
57600 | 115200; 115200 bp by default).
boot device – initial boot device (boot over Ethernet | boot from NAND | boot Ethernet once, then NAND;
boot from NAND by default). You can al o elect boot chosen device option to boot from the device
elected immediately, without aving the etting.
cpu mode – whether to enter CPU u pend mode on WAIT in truction (power ave | regular; power save
by default). Mo t OS u e WAIT in truction during CPU idle cycle. When CPU i in u pend mode, it
con ume le power, but in low-temperature condition (below 0°C) it i recommended to choo e regular
mode, o that overall y tem temperature would be higher.
reset configuration – whether to re et all the boot loader etting to their re pective default value (ye |
no; no by default).
format nand – perform a low-level NAND format. During thi operation, all previou ly marked bad ector
are rete ted to find out if they are faulty indeed.
upgrade firmware – receive a new boot loader image u ing XModem protocol over erial line or u ing
DHCP/BOOTP and TFTP protocol through the Ethernet network (upgrade firmware over ethernet | upgrade
firmware over erial port).
board info – print the erial number, boot loader ver ion, CPU frequency, memory ize and MAC addre e
of the onboard Ethernet port
boot protocol – network booting protocol (bootp protocol | dhcp protocol; bootp protocol by default).
do memory testing – perform a full memory te t.
7

RouterBOARD 411AR Serie U er' Manual
Boot Loader Upgrading
The boot loader i needed to initialize all the hardware and boot the y tem up. Newer loader ver ion might
have upport for more hardware, o it' generally a good idea to upgrade the loader once a newer ver ion i
available. You can upgrade the loader through the onboard erial port u ing XModem protocol (program
available for all major OS ). For example, you can u e HyperTerminal for Window or Minicom for Linux to
upload the boot loader. Alternatively if you have a DHCP/BOOTP and TFTP erver available, you can pecify
the loader image a a boot image and choo e the bios upgrade over ethernet option in the boot loader
configuration menu. The loader will get the image from the TFTP erver and upgrade it elf. The mo t current
loader image i available for download on www.routerboard.com.
The boot loader upgrading i upported al o from MikroTik RouterOS. The procedure i de cribed in the
MikroTik RouterOS manual.
Serial N ll-modem (Console) Cable with Loopback
DB9f Function DB9f DB25f
1 + 4 + 6 CD + DTR + DSR N/C N/C
N/C CD + DTR + DSR 1 + 4 + 6 6 + 8 + 20
2 RxD 3 2
3 TxD 2 3
5 GND 5 7
7 + 8 RTS + CTS N/C N/C
N/C RTS + CTS 7 + 8 4 + 5
8

RouterBOARD 411AR Serie U er' Manual
Connector Index
J401 MiniPCI Type type IIIA/B connector
J301 RS232C male DB9 erial port
1
4
6
Connected together
2 RxD (Receive Data)
3 TxD (Tran mit Data)
5 GND
7
8Connected together
J602 RJ45 Fa t Ethernet 100Ba e-TX port LAN1 with pa ive PoE exten ion
1 Data TX+
2 Data TX-
3 Data RX+
4
5
6
7
8
PoE power +
PoE power +
Data RX-
PoE power -
PoE power -
J801 Power jack (9..28 V DC, po itive contact i the central pin)
J901
J902
Ufl wirele connector for attaching pigtail adapter or mall indor antenna with uFl connector.
J902 i Main, a indicated on the PCB.
B tton Index
S301 Software re et button
Ethernet Cables
RJ45
Pin
Color Function RJ45 pin for Straight cable
(MDI, EIA TIA568A)
RJ45 pin for Crossover cable
(MDI-X, EIA TIA568B)
1 Green TX+ Data 1 3
2 Green/White TX- Data 2 6
3 Orange RX+ Data 3 1
4 Blue - 4 4
5 Blue/White - 5 5
6 Orange/White RX- Data 6 2
7 Brown - 7 7
8 Brown/White - 8 8
9
Other manuals for RouterBOARD 411AR
1
Table of contents
Other MikroTik Motherboard manuals

MikroTik
MikroTik RouterBOARD 411 User manual

MikroTik
MikroTik RouterBOARD 111 User manual

MikroTik
MikroTik RouterBOARD 200 Series User manual

MikroTik
MikroTik RouterBOARD M11 Series User manual

MikroTik
MikroTik RouterBOARD 911 Lite5 ac User manual

MikroTik
MikroTik RouterBOARD 532 User manual

MikroTik
MikroTik RouterBOARD 435G Series User manual

MikroTik
MikroTik RouterBOARD 600 User manual

MikroTik
MikroTik RouterBOARD 192 User manual

MikroTik
MikroTik RouterBOARD 411UAHR User manual