Mila Say hello to Mila User manual

Mila
Mila Air User Manual
Say hello to

Mila
Welcome to Mila! This manual provides speciic operating instructions for your model. Use the
unit only as instructed in this user manual. These instructions are not meant to cover every possi-
ble condition and situation that may occur. Please practice caution and common sense when
installing, operating, and maintaining any unit.
USA & CANADA: This unit has a polarized plug
(one blade is wider than the other). To reduce
the risk of electric shock, this plug is intended to
it in a polarized outlet only one way. If the plug
does not it fully in the outlet, reverse the plug. If
it still does not it, contact a qualiied electrician.
Do not attempt to defeat this safety feature.
CHILDREN AND VULNERABLE PEOPLE SAFETY
WARNING! Risk of suocation, injury or perma-
nent disability.
This unit is not intended for use by persons
(including children) with reduced physical,
sensory or mental capabilities, or lack of
experience and knowledge, unless they have
been given supervision or instruction
concerning use of the unit by a person
responsible for their safety. Children should be
supervised to ensure that they do not play with
the unit.
This unit can be used by children aged from 8
years and above and persons with reduced
physical, sensory or mental capabilities or lack
of experience and knowledge if they have been
given supervision or instruction concerning use
of the unit in a safe way and understand the
hazards involved.
Children shall not play with the unit.
Cleaning and user maintenance shall not be
made by children without supervision.
Children under 3 years of age should be kept
away from the unit unless continuously
supervised.
Keep all packaging away from children.
WARNING! Avoid ire hazard or electric shock.
Do not use an extension cord or an adaptor plug.
Do not remove any prong from the power cord.
This unit can be used in 50Hz or 60Hz power
supply without any change.
Do not store or use gasoline or other lammable
vapors and liquids in the vicinity of this or any
other unit. Read product labels for lammability
and other warnings.
Do not let water or any other liquid or lammable
detergent enter the unit to avoid electric shock
and/or a ire hazard.
Do not disassemble the product.
Do not touch the fan blade when removing the
ilter.
If the supply cord is damaged, it must be
replaced by the manufacturer, its service agent
or similarly qualiied persons in order to avoid a
hazard.
Safety Information 2

Getting Started 4
Table of Contents 3
Definitions 6
Operating Instructions 8
Air Quality 10
Modes 11
Maintenance and Care 14
Troubleshooting 16

Setting up
Read this manual carefully
Check that all parts described are
included (each Mila unit comes with a
corded plug and the unit itself).
Pay special attention to the safety precautions!
Operate your Mila in
an enclosed area.
Close all doors,
windows, and other
openings connecting
to the outside of the
room.
01
Place the air puriier
in a location that
does not restrict the
airlow through the
top of the unit, or
the intake vents on
the sides of the unit.
02
The unit must be
placed on a leveled
surface that can
support it.
03
There should be a
minimum of 11.8”
(30 cm) of clearance
around the unit.
04
Getting Started 4

Pairing Mode
Getting Started 5
Tap and hold the “Mode”
button for 5 seconds.
1
While Pairing Mode is
active, a WiFi network will
emit from the unit called
“Mila Air Puriier”.
2
Connect to the “Mila Air
Puriier” network and follow
the instructions in your Mila
app.
3
This unit is equipped with a WiFi
module, which enables remote
control and access to the full
functionality of the system via Mila’s
smart phone app, available in
Android and iOS. Download our
“Mila” app and follow the
instructions for how to connect it
with your unit.
Scan me to download
the Mila app.
Mila supports pairing with a 2.4GHz
network.
If a unit loses network connectivity, a
“Connection Lost” screen will be
shown until network connectivity is
restored.
Hi!
Air Quality Index AQI
Terms Abbreviation What It Means
An index used globally by
government agencies to
communicate how polluted the air
is. The lower your AQI score, the
fresher your air.
050 — Lookin’ good!
This is the ideal range you want
to be in.
51100 — Not bad, not great.
Air quality in this range is
considered moderate.
100+ — Yikes, not good
AQI values above this is considered
poor air quality.
Air Changes / Hr ACH Refers to how often the room’s air
will be circulated through Mila's ilter
every hour. The higher your ACH, the
higher your fan speed.
Protection Factor PF Indicates the dierence in air quality
between indoors and outdoors. An
internet connection is required.
Mode Mila operates in two primary modes:
Let Mila auto-adjust to your
ideal settings.
Automagic
A
Select your fan speed and
target AQI.
Manual
M
Definitions (1/2) 6
Automagic settings
Terms Abbreviation What it Means
Custom settings you can enable
when Mila is in Automagic Mode.
Accessible through your Mila app.
Read more about the Automagic
settings on p. 12.
Service Mode A temporary state that performs a
speciic task. An Internet connection is
required. Examples of Service Modes
include “Calibration,” which occurs
when starting up your Mila.
Target AQI Mila calculates your projected AQI
based on fan speed and room size.
Current AQI IAQ The current indoor air quality.
Calculated based on Mila’s sensors.
Outdoor AQI OAQ The current outdoor air quality.
Calculated from one of 6,000 global
air quality stations based on your
location. An Internet connection is
required.
Definitions (2/2) 7

To turn on your unit …
The unit will beep and begin operating in CALIBRATION Mode
before switching to AUTOMAGIC Mode.
NOTE: It can take up to 90 seconds for the sensor to analyze the air
quality. Each time the unit is turned on, the AUTOMAGIC Mode is
activated automatically.
Make sure your Mila
ilter door is
closed.
01
Flip the power
switch located on
the bottom of the
unit.
03
Plug in the unit to
your power outlet.
02
Operating Instructions 8

Operating Instructions 9
This mode starts automatically each
time the unit boots up or the ilter door
is removed and replaced.
In this mode, the sensors are
calibrating and functionality is disabled
until calibration is completed.
Calibration typically takes 70 seconds
to complete and displays a countdown
timer for time remaining.
Calibration Mode
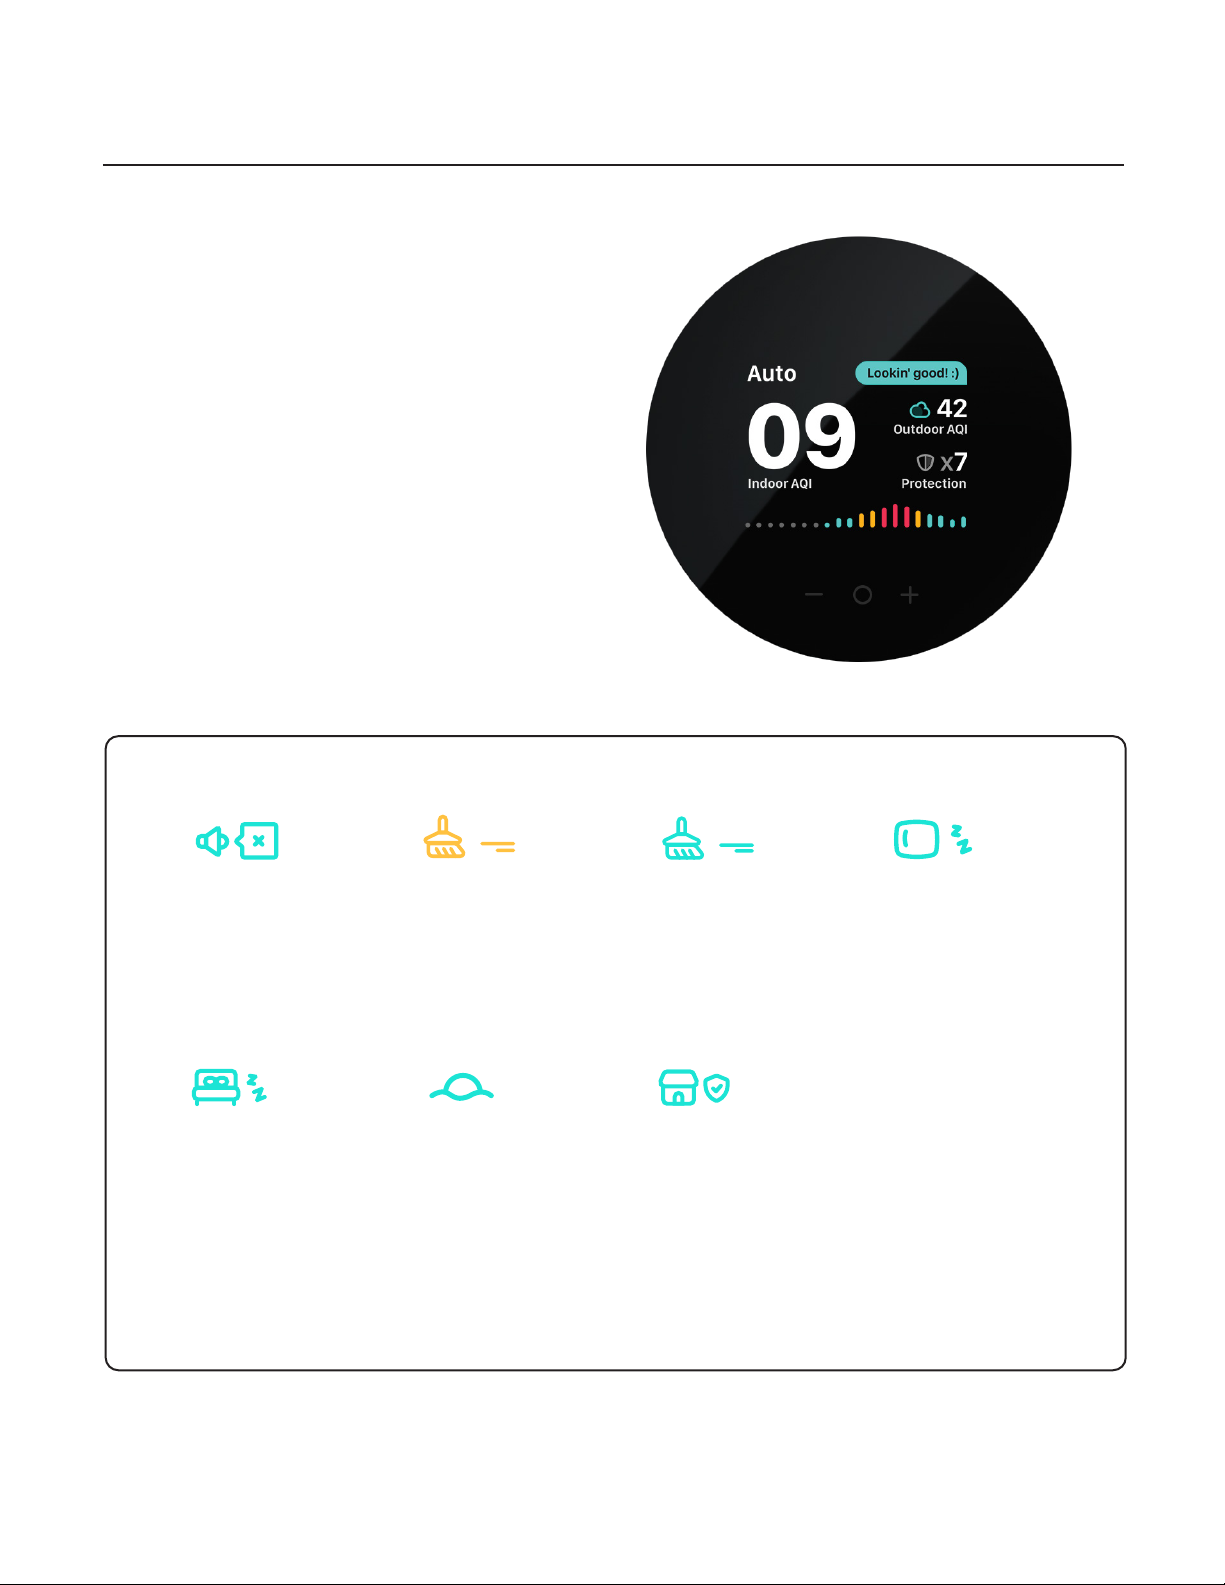
This unit has an air quality sensor that analyzes the air quality. The display will show
the air quality in real time. In Automagic Mode, a message bubble gives further
information or analysis about the air quality level detected as shown below:
NOTE: It may take up to 70 seconds for the sensor to analyze the air quality each
time the unit is turned on.
Very high humidity conditions in the room might produce condensation in the
sensors. This could aect the accuracy of the sensor readings.
Status Message AQI What it means for your air quality
Lookin' good! :) 0 - 50 Good
Not bad, not great :-\ 51 - 100 Moderate
Yikes, not good :( 101 - 150 Unhealthy for sensitive groups
151 - 200 Unhealthy for everyone
200 + Health warnings of emergency conditions
or hazardous
Air Quality 10
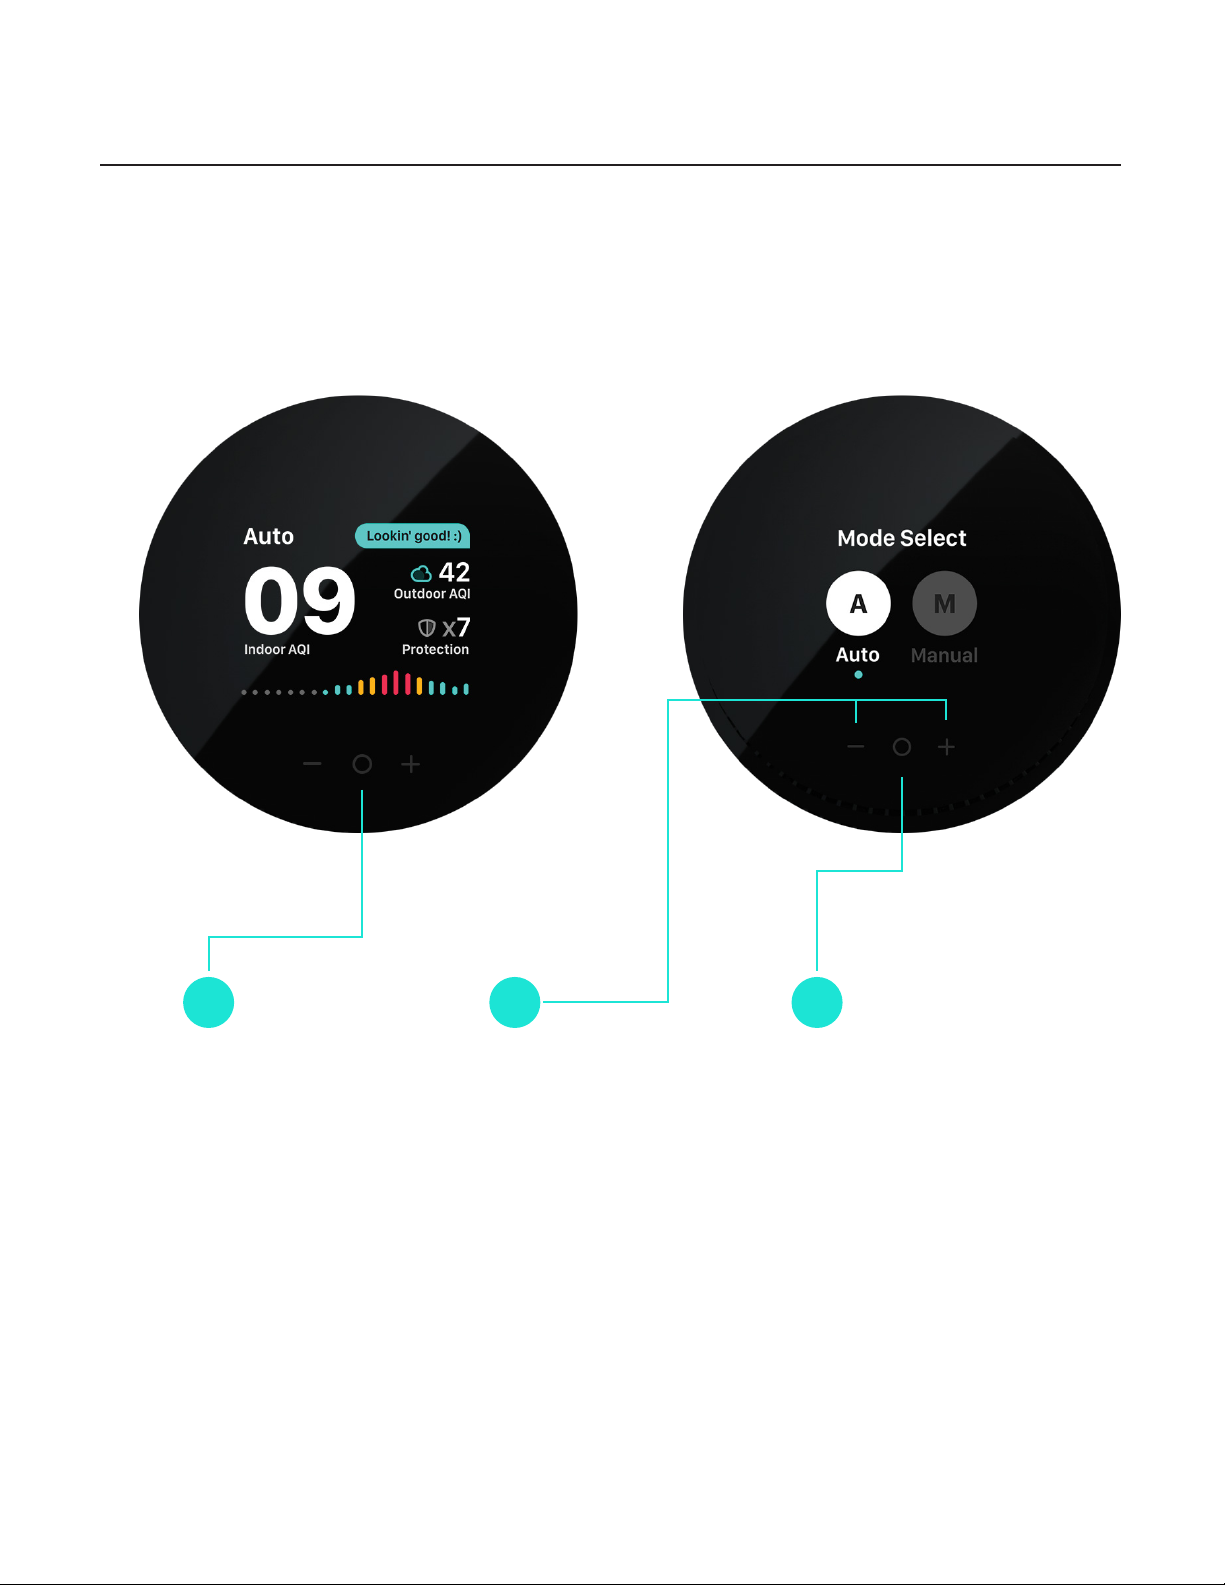
Tap the “Mode” button
(o) located at the bottom
of the display, between
the minus (-) and plus (+)
buttons. The screen will
change to show the
“Mode Selection”
screen.
Tap the “-” or “+” button to
change your selection.
1 2
Tap the “Mode” button (o)
again to conirm your
mode selection.
3
Modes 11
Quiet Mode Housekeeping
Mode Deep Clean Turndown
Service
Light Sleeper White Noise Quarantine
NOTE: In Automagic Mode the fan speed cannot be changed manually.
Modes
In this mode, the unit will choose the fan
speed automatically, based on your
preferences, the indoor air quality level,
detected pollutants in the room, and the
outdoor air quality (this requires an
Internet connection and location-sharing).
This is the default mode each time your
turn on your Mila.
Select custom Automagic settings in the
Mila app:
Automagic Mode
12
Reduce fan speeds
to whisper-quiet
levels when you’re
in the room.
Snooze in peace
and quiet with lights
o, lower fan
speeds, and
controlled fan
luctuations.
Drift o to the
calming rhythm of
oscillating fans that
clean while they
soothe.
This one’s for the
clean air freaks. Let
Mila do whatever it
takes to keep your
room 100% particle
free.
Let Mila deep-clean
your room when no
one is around.
Give your room a
thorough airing out
with a 20-minute
blast.
Activate an hour
before bedtime to
give your room a
deep clean to
reduce nighttime
allergies.
Manual Mode
Modes 13
Tap the “Mode” button.
Tap the “+” button to
change the selected mode
to Manual.
Tap the “Mode” button
again to conirm the
selection.
1
2
3
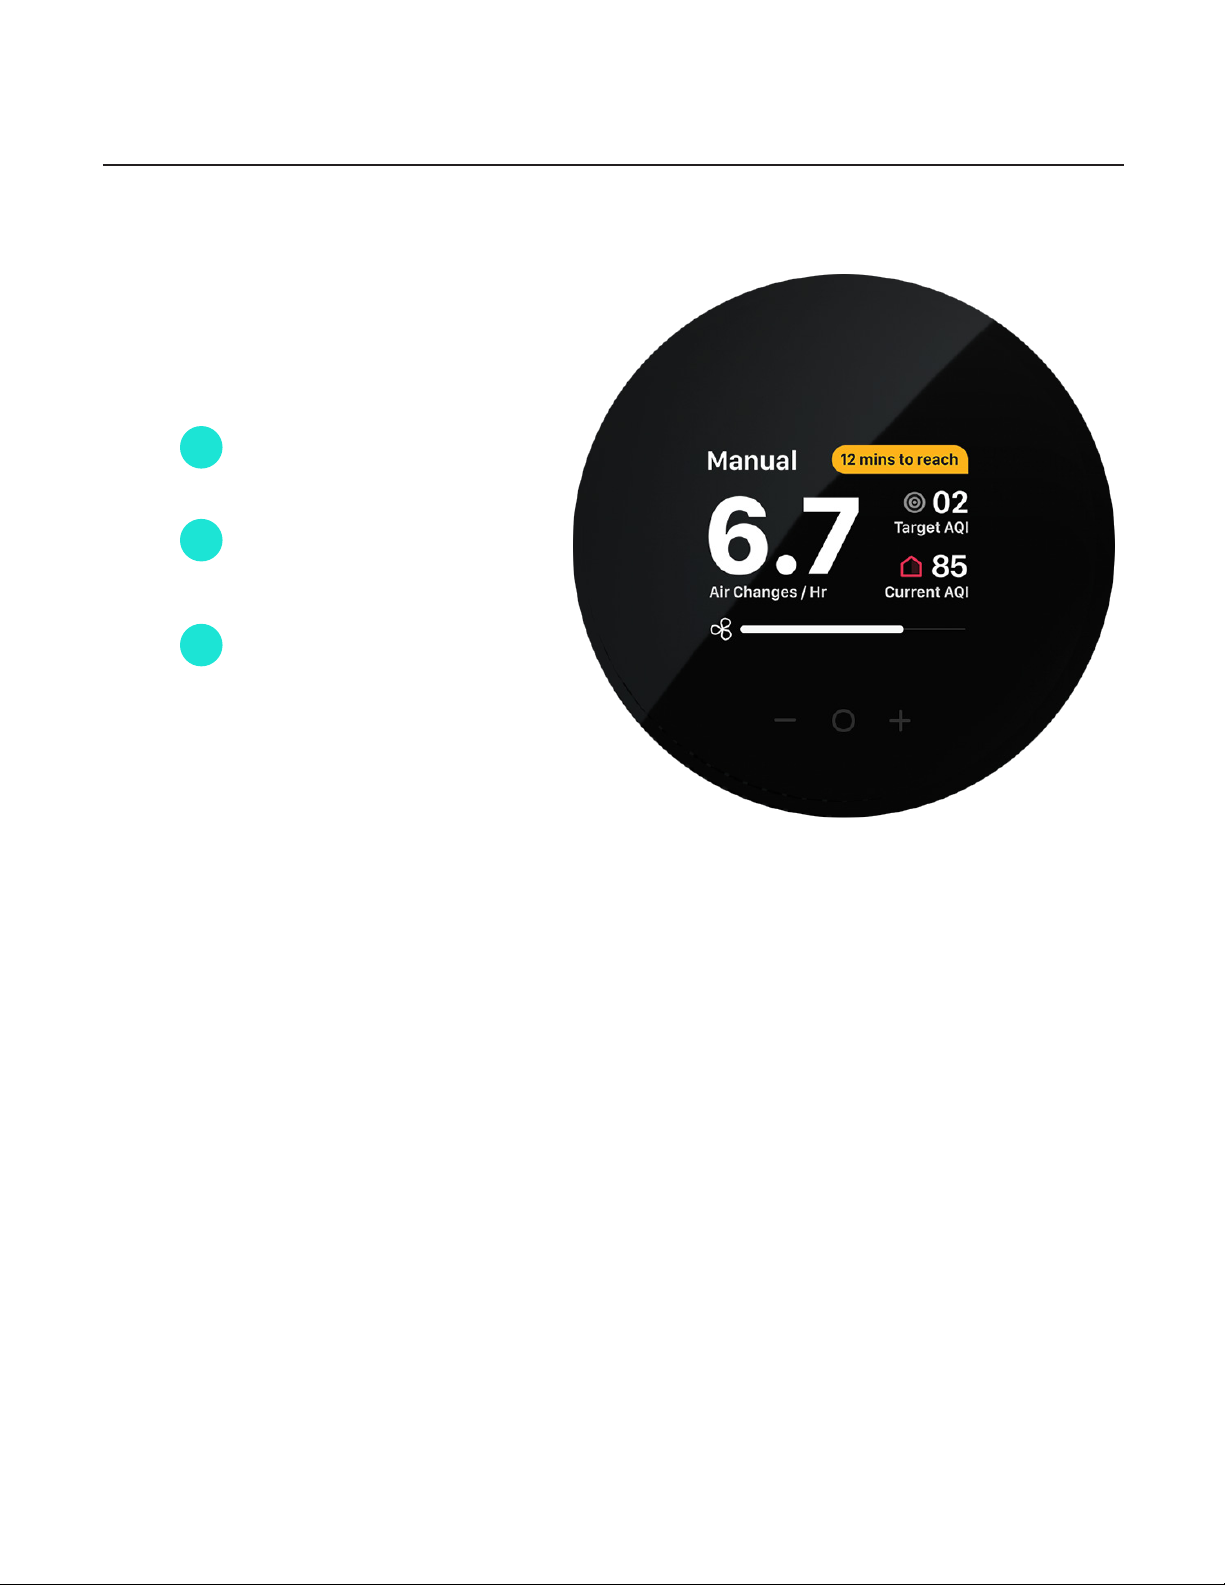
In this mode, the fan speed can be
changed manually by touching the
minus (-) and plus (+) buttons to
increase or decrease fan speed.
Manual Mode begins with the fan
stopped (0 RPM) or 0.0 Air Changes
/ Hr (ACH).
The fan speed will change gradually
after a new fan speed is selected.
Each time the fan speed changes,
the timer at the top right of the
screen will recalculate the estimated
time to clean based on the Target
AQI shown. This timer will decrease
or increase as time passes and the
air quality changes.
Each time the fan speed is changed,
the value for “Target AQI” will be
updated and a new Time to Clean will
be calculated.
Target AQI is calculated based on
your set room size and the estimated
ACH.
It’s important to note that at lower
AQI levels, it can take longer to
clean. Additionally, if your Indoor AQI
increases, so will your Time to Clean.
This screen also presents the “Air
Changes / Hr” and the indoor
“Current AQI”.
To switch to manual mode
follow the next steps.
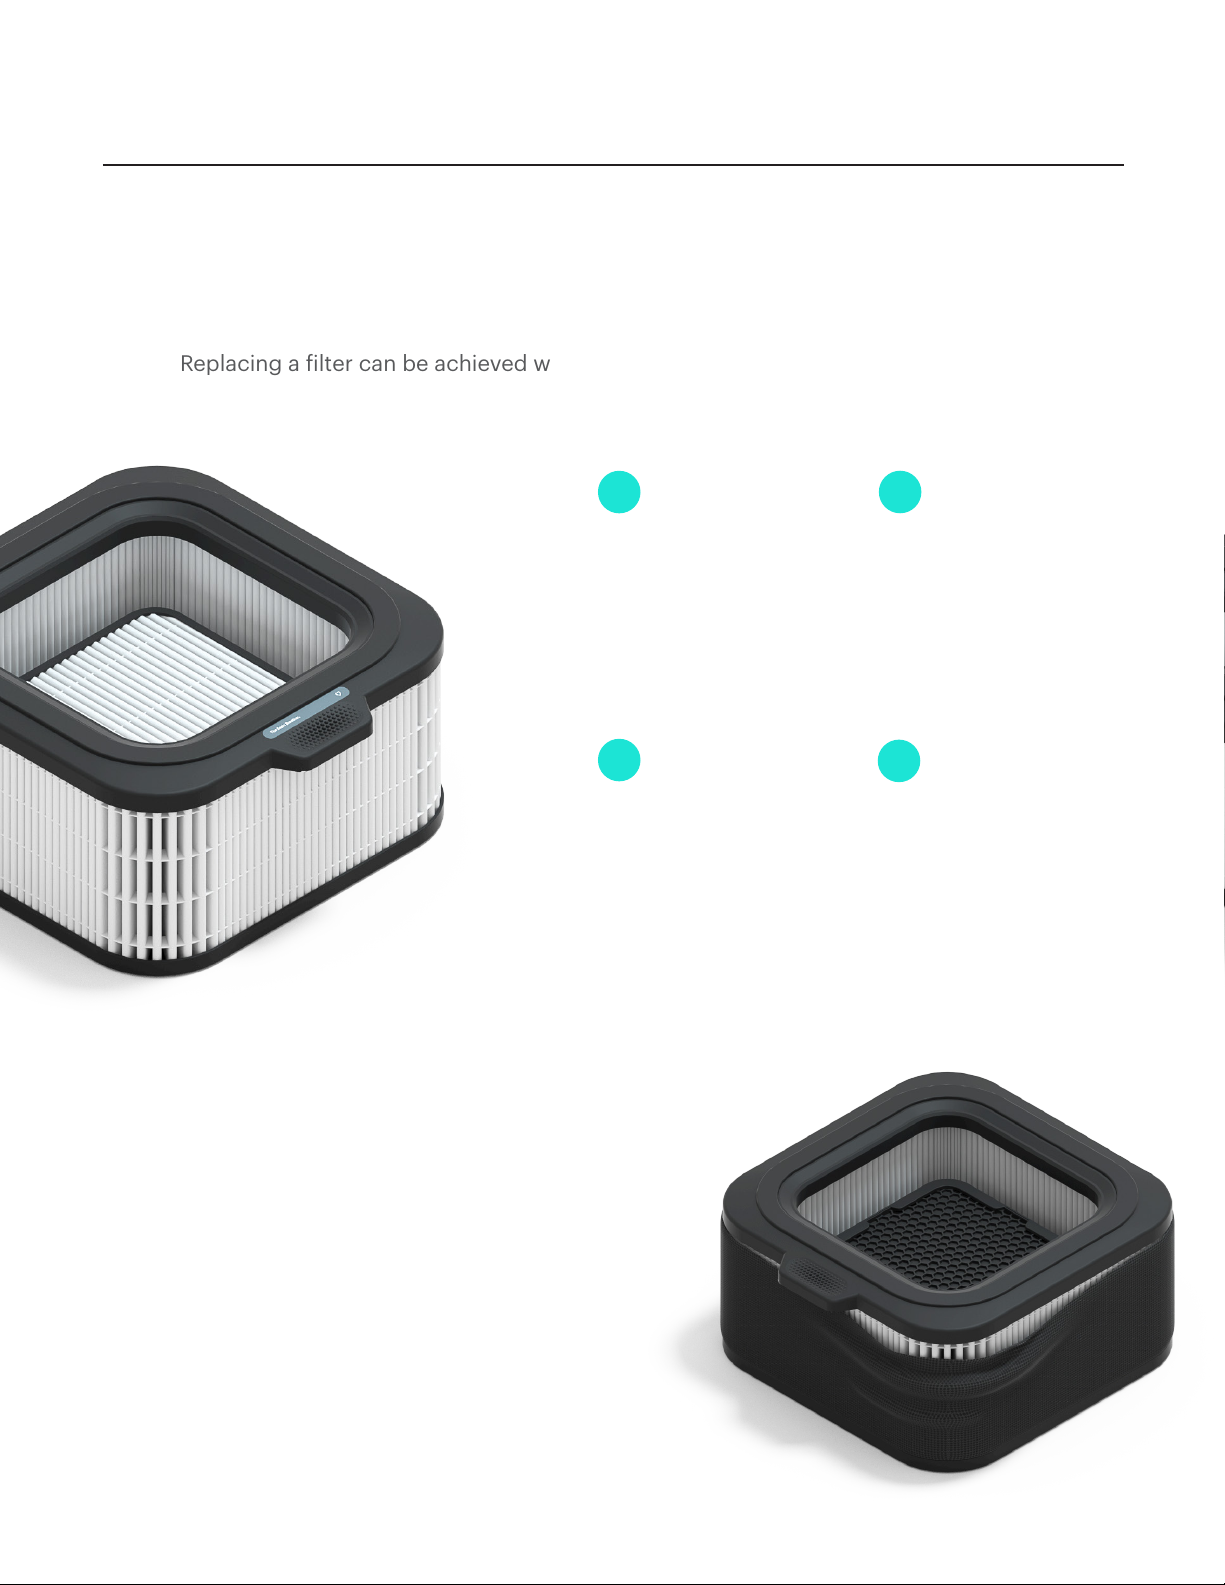
Changing Filters
Maintenance and Care 14
Remove the ilter door
located at the front of the
unit by pulling the bottom
half of the door panel. The
fan will stop and the
screen will change to
notify you that the ilter
door is open.
1
Remove the dirty ilter
and insert a fresh ilter.
2
Close the ilter door by
sliding the top irst and
pushing the magnets on
the bottom of the door
toward the unit.
3
The unit will recalibrate
its sensors after
detecting that the ilter
door has been closed.
4
Filters should be replaced every 69 months depending on use.
Replacing a ilter can be achieved while the unit is ON or OFF.
Mila Sock care
Wash the Mila Sock (preilter) by hand
in cold/warm water and let dry
completely before itting it back on
your Mila ilter.

Cleaning
Storage
Disposal
Maintenance and Care 15
Unplug the unit before cleaning to prevent shock or ire hazards.
If you are not planning to use the unit for a long time, cover it with plastic or return it
to its carton. Filters should be kept sealed in their original packaging until ready for
use.
The European directive 2012 / 19 / CE on Waste Electrical and Electronic Equipment
(WEEE), requires that old household electrical units must not be disposed in the
normal unsorted municipal waste stream. Old units must be collected separately in
order to optimize the recovery and recycling of the materials they contain and reduce
the impact on human health and the environment. The crossed out “wheeled bin”
symbol on the product reminds you of your obligation, that when you dispose of the
unit it must be separately collected. Consumers should contact their local authority
or retailer for information concerning the correct disposal of their old unit.
The plastic parts of the unit may be cleaned with an oil-free dry cloth or by
using a vacuum cleaner with a soft brush.
Never use abrasive, harsh cleaners or wax when cleaning the unit.
NOTE: The multi-layer ilter cannot be washed. Please dispose in accordance
with your local laws and replace as needed.
Troubleshooting 16
My air purifier won’t turn on.
Issue Solution
Check if the power plug is disconnected.
Push the power plug irmly into the
electrical outlet.
Check if the house fuse is blown or the
circuit breaker tripped. Replace the fuse
with a time delay type or reset the circuit
breaker.
The fan isn’t running. Make sure your ilter is installed correctly
and the ilter door is closed properly.
Restart Mila and wait for “Calibration Mode”
to complete (this usually takes around 70
seconds).
Mila will automatically run in “Automagic”
mode at startup. Switch to “Manual” mode
to set your own target AQI and fan speed.
My air quality isn’t improving. Check if any windows or doors are open.
Close all doors, windows and other
openings connecting to the outside of the
room.
The unit is very loud. Make sure there are no obstacles near the
unit and that it has a minimum of 12"
(30 cm) of clearance around it for optimal
operation.

Troubleshooting 17
Issue Solution
Please make sure you’ve selected Manual
Mode before attempting to change the fan
speed.
The fan speed will decrease or increase
gradually—this is normal. If it does not
change after a prolonged period of time
after the input, then please reach out to
Mila Customer Care for support.
My unit smells odd. The irst time you use the puriier, you
might perceive a plastic or paint smell. This
is normal, but it should disappear after a
couple days. If the smell persists or if you
sense a burning smell, please disconnect
the puriier and reach out to Mila Customer
Care for support.
Please reach out to Mila Customer Care
for support on issues related to the app.
The fan speed doesn’t change
after selecting a new fan
speed.
The app isn’t working properly
or I’m unable to pair the unit
with the app.

Troubleshooting 18
For help resolving any other issues, please contact Mila Customer Care
(support@milacares.com). We’d be happy to help.
Issue Solution
My Mila just rebooted itself. Your Mila may reboot itself from time to
time for a memory refresh (similar to how
you might reset a router). Fear not, all your
data is still there!
This screen indicates the unit lost its
network connectivity.
Make sure the unit is within range of a
stable 2.4GHz WiFi network.
Pair the unit with the Mila mobile app.
Turn OFF the unit by licking the power
switch on the bottom of your Mila. Wait 20
seconds and turn ON the unit.
Reboot your router.
My display screen says
“Connection Lost.”

Table of contents


