AENO AP2S User manual


aeno.com/documents 1
(Model AAP0002S)
26.08.2022 | v.2.5.2

2 aeno.com/documents
EN How to connect
RU Как подключиться
AR
BG Как да се свържете
CS Jak se připojit
ET Kuidas ühendada
HR Kako se povezati
HU Hogyan kell csatlakozni
HY
IT Come connettersi
KA როგორ დავუკავშირდეთ
KK Қалай қосылуға болады
LT Kaip prisijungti
LV Kā izveidot savienojumu
PL Jak podłączyć się
RO Cum să vă conectați
SK Ako sa pripojiť
SR Како се повезати
UK Як підключитися
UZ Қандай уланади
ZH 如何连接Wi-Fi

aeno.com/documents 3
EN
........................................................................................................................................................................
6
RU
.......................................................................................................................................................................
12
AR
.......................................................................................................................................................................
19
BG
.......................................................................................................................................................................
23
CS
.......................................................................................................................................................................
30
ET
........................................................................................................................................................................
36
HR
........................................................................................................................................................................
42
HU
........................................................................................................................................................................
50
HY
..........................................................................................................................................................................
54
IT
........................................................................................................................................................................
60
KA
...........................................................................................................................................................................
66
KK
........................................................................................................................................................................
73
LT
.........................................................................................................................................................................
80
LV
..........................................................................................................................................................................
86
PL
........................................................................................................................................................................
92
RO
….....................................................................................................................................................................
99
SK
...........................................................................................................................................................................
105
SR
...........................................................................................................................................................................
111
UK
...........................................................................................................................................................................
117
UZ
.........................................................................................................................................................................
123
ZH
.........................................................................................................................................................................
130

4 aeno.com/documents
a)


aeno.com/documents 5
b)
c)

6 aeno.com/documents
EN The AENO AP2S Air Purifier is a household appliance designed to clean
indoor air from allergens, pollen, fungal spores, dust particles, smoke, animal
hair, and unpleasant odors.
Specifications
Input voltage: 100–240 V (AC), 50/60 Hz. Rated power: 40 W. Air flow rate:
420 m3/h. Coverage: 50 m2. Indoor air purification time: 0,5 hours. Noise level: in
the night mode 25 dB (at a distance of 1 m). Dimensions (L ×W ×H): 590 mm ×
100 mm × 395 mm. Built-in UV LED. Wi-Fi module. RF remote control. Remote
control range: 10.5 m. Emission power: +20 dBm/100 mW.
Package Contents
AENO AP2S Air purifier , HEPA filter, remote control, mounting screw (3 pcs.),
power cord, support, wall bracket, plugs (2 pcs.), plastic inserts (4 pcs.), self-
tapping screws (4 pcs.), quick start guide, warranty card.
Limitations and Warnings
ATTENTION! The device is equipped with a built-in UV LED. It is not allowed to
disassemble the device and turn it on when disassembled, because it may be
very harmful for eyes.
Make sure the purifier is unplugged before removing the front panel. Do not
immerse the purifier in water or any other liquid. Do not use aggressive and
flammable chlorine- or alcohol-containing agents to clean the purifier. Water
is not allowed to enter the body of the purifier. Use the device as described in
this Quick Start Guide and the complete User Manual only. Failure to follow the
instructions may result in fire and other hazardous situations, as well as injuries.
Do not use the device if it is damaged or cracked. Do not install the device
outdoors or near sources of water, including humidifiers. Do not expose the
device to direct sunlight, moisture or vibration. Do not drop, throw,
disassemble the device, or try to repair it on your own. Do not lay the power
cable near radiators, stoves, or heaters. Do not use cleaning agents or

aeno.com/documents 7
detergents to clean the device. Do not dispose of the device with unsorted
urban waste, because this will be harmful for the environment. For more
information on proper disposal, please contact your local waste collection and
disposal company. Keep childrenaway from thedevice. There is a risk of serious
injury and electric shock. This device is intended for use by adults only.
Warnings, precautions, and instructions contained herein may not contain
every possible hazardous situation. Please use common sense when operating
the device.
Components of the Air Purifier (See Figure a)
(1) –Air inlet, (2) –Removable front panel, (3) –HEPA filter, (4) –Plastic plugs, (5)
–Purified air outlet, (6) –Casing, (7) –Mounting screws, (8) –Support, (9) –Wall
mounting bracket.
Initial Setup (See Figure a)
Before operation, you should remove the packaging from the HEPA filter. To
do this, first make sure that the air purifier is unplugged. Then, carefully remove
the front panel (2) and pull the HEPA filter (3) out using the fabric strips. Remove
the filter packaging and insert the HEPA filter (3) back into the device body. Close
the front panel (2).
There are two options to install the purifier as follows:
•On the support: Insert the plugs (4) in the open ends of the support (8).
Attach the support with the three mounting screws (7) to the purifier casing
(6).
•On the wall: Attach the wall bracket (9) to the wall as desired (at a height of
at least 170cm from the floor). Screw the three mounting screws (7) into the
back of the purifier casing (6). Insert the heads of the mounting screws (7) on
the back of the purifier into the grooves of the wall bracket (9) attached to
the wall.
8 aeno.com/documents
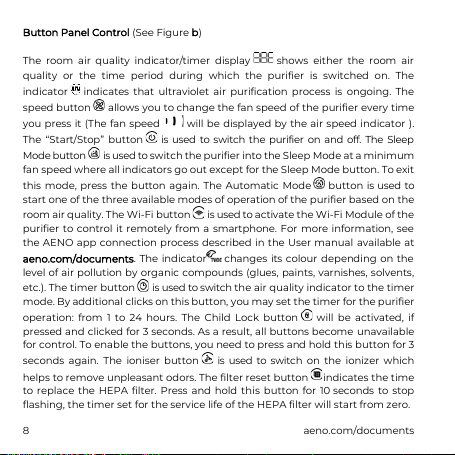
Button Panel Control (See Figure b)
The room air quality indicator/timer display shows either the room air
quality or the time period during which the purifier is switched on. The
indicator indicates that ultraviolet air purification process is ongoing. The
speed button allows you to change the fan speed of the purifier every time
you press it (The fan speed will be displayed by the air speed indicator ).
The “Start/Stop”button is used to switch the purifier on and off. The Sleep
Mode button is used to switch the purifier into the Sleep Mode at a minimum
fan speed where all indicators go out except for the Sleep Mode button. To exit
this mode, press the button again. The Automatic Mode button is used to
start one of the three available modes of operation of the purifier based on the
room air quality. The Wi-Fi button is used toactivate the Wi-Fi Module of the
purifier to control it remotely from a smartphone. For more information, see
the AENO app connection process described in the User manual available at
aeno.com/documents. The indicator changes its colour depending on the
level of air pollution by organic compounds (glues, paints, varnishes, solvents,
etc.). The timer button is used to switch the air quality indicator to the timer
mode. By additional clicks on this button, you may set the timer for the purifier
operation: from 1 to 24 hours. The Child Lock button will be activated, if
pressed and clicked for 3 seconds. As a result, all buttons become unavailable
for control. To enable the buttons, you need to press and hold this button for 3
seconds again. The ioniser button is used to switch on the ionizer which
helps to remove unpleasant odors. The filter reset button indicates the time
to replace the HEPA filter. Press and hold this button for 10 seconds to stop
flashing, the timer set for the service life of the HEPA filter will start from zero.

aeno.com/documents 9
Controlling the air purifier using the remote control (See Figure c)
The following buttons are available on the remote control: Switching on/off
, Sleeping Mode , Timer , Automatic Mode , Fan Speed .
Troubleshooting
1. The purifier does not turn on. Possible causes and solutions: Make sure that
the purifier is plugged into the mains socket, and that there is no power
supply failure, as well as that the circuit breaker is on, and that the fuses are
intact, and that the filter change LED is blinking red.
2. Dust is poorly removed. Possible causes and solutions: Make sure that the
filter surface is not clogged and that there are no obstructions preventing air
intake or discharge.
3. The device makes a loud noise. Possible causes and solutions: Make sure that
nothing is stuck in the fan, and that the purifier is not tilted. If the noise is still
too loud, try to reduce the fan speed using the fun speed button. Also, use
Sleep Mode to operate the purifier at night.
4. Unpleasant odor coming out from the purifier. If the device emits a plastic
smell during the first few hours of operation, this is deemed to be normal.
However, the device may also emit an unpleasant odor when the filter is
clogged. In this case, the filter must be cleaned or replaced. If you smell
burning, unplug the purifier immediately. Then, contact our Support Dept or
the Seller of the device for assistance.
5. The filter change LED is blinking after the filter was replaced or cleaned.
Possible causes and solutions: Press and hold the filter button for at least 3
seconds. The filter replacement timer will restart and the indicator will turn
off.

10 aeno.com/documents
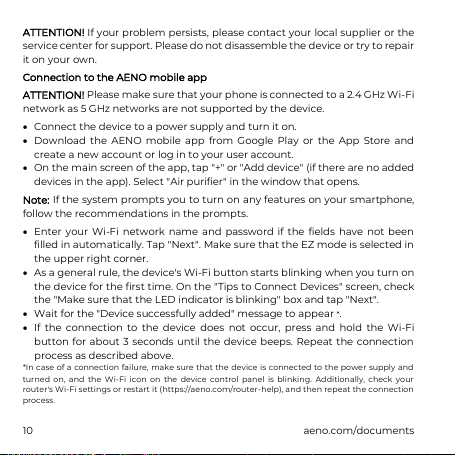
ATTENTION! If your problem persists, please contact your local supplier or the
service center for support. Please do not disassemble the device or try to repair
it on your own.
Connection to the AENO mobile app
ATTENTION! Please make sure that your phone is connected to a 2.4 GHz Wi-Fi
network as 5 GHz networks are not supported by the device.
•Connect the device to a power supply and turn it on.
•Download the AENO mobile app from Google Play or the App Store and
create a new account or log in to your user account.
•On the main screen of the app, tap "+" or "Add device" (if there are no added
devices in the app). Select "Air purifier" in the window that opens.
Note: If the system prompts you to turn on any features on your smartphone,
follow the recommendations in the prompts.
•Enter your Wi-Fi network name and password if the fields have not been
filled in automatically. Tap "Next". Make sure that the EZ mode is selected in
the upper right corner.
•As a general rule, the device's Wi-Fi button starts blinking when you turn on
the device for the first time. On the "Tips to Connect Devices" screen, check
the "Make sure that the LED indicator is blinking" box and tap "Next".
•Wait for the "Device successfully added" message to appear *.
•If the connection to the device does not occur, press and hold the Wi-Fi
button for about 3 seconds until the device beeps. Repeat the connection
process as described above.
*In case of a connection failure, make sure that the device is connected to the power supply and
turned on, and the Wi-Fi icon on the device control panel is blinking. Additionally, check your
router's Wi-Fi settings or restart it (https://aeno.com/router-help), and then repeat the connection
process.

aeno.com/documents 11
Note: It is recommended to stay as close as possible to the device and, if
possible, to the router at the moment of connection to ensure a stable Wi-Fi
signal.
After that, you will be able to control your device from the app. To learn about
remote control scenarios, see the full manual at aeno.com/documents.
Recycling information
These symbols indicate that you must follow the Waste
Electrical and Electronic Equipment (WEEE) and Waste
Battery and Battery Regulations when disposing of the device,
its batteries and accumulators, and its electricaland electronic
accessories. According to the rules, this equipment must be
disposed of separately at the end of its service life.
Do not dispose of the device, its batteries and accumulators,
or its electrical and electronic accessories together with unsorted municipal
waste, as this will harm the environment.
To dispose of this equipment, it must be returned to the point of sale or turned
in to a local recycling facility.
You should contact your local household waste disposal service for details.
The warranty period and service life shall be 2 years as from the date of
purchase of the device.
ASBISc reserves the right to modify the device and to make edits and changes to this document
without prior notice to users.
The warranty period and service life shall be 2 years as from the date of purchase of the device.
Manufacturer: ASBISc Enterprises PLC, Iapetou, 1, Agios Athanasios, 4101 Limassol, Cyprus. Made in
China. For current information and details on the device description and specification, as well as
connection process, certificates, warranty and quality issues, see relevant Installation and
Operation Manuals available for downloading at aeno.com/documents. All trademarks and names
herein are the property of their respective owners.

12 aeno.com/documents
RU Очиститель воздуха AENO AP2S предназначен для очистки воздуха в
помещении от аллергенов, цветочной пыльцы, грибковых спор, частиц
пыли, дыма, шерсти животных, а также неприятных запахов.
Технические характеристики
Входное напряжение: 110–240 В(AC), 50/60 Гц. Мощность: 40 Вт.
Продуктивность: 420 м3/ч. Площадь обслуживания: до 50 м2. Время
очистки воздуха в помещении: 0,5 ч. Уровень шума: в ночном режиме 25 дБ
(на расстоянии 1 м). Размеры (Д × Ш × В): 590 мм ×100 мм × 395 мм. УФ-
светодиод внутри корпуса. Модуль Wi-Fi. Радиочастотный пульт
дистанционного управления. Радиус действия пульта: 10,5 м. Мощность
излучения: +20 дБм/100 мВт.
Комплект поставки
Очиститель воздуха AENO AP2S, HEPA-фильтр, пульт ДУ, монтажный болт
(3 шт.), шнур питания, подставка, крепеж, пробки (2 шт.), пластиковые
вкладыши (4 шт.), шурупы-саморезы (4 шт.), краткое руководство,
гарантийный талон.
Ограничения ипредупреждения
ВНИМАНИЕ! Внутри устройства есть УФ-светодиод. Не допускается
разбирать устройство и включать его в разобранном виде, это очень
опасно для зрения.
Перед тем как снять переднюю панель, убедитесь, что очиститель
выключен из розетки. Не погружайте очиститель в воду или любую другую
жидкость. Не используйте для ухода за очистителем агрессивные и
легковоспламеняющиеся средства, содержащие хлор или алкоголь. Не
допускайте попадания воды на HEPA-фильтр. Используйте устройство
только в соответствии с описанием, указанным в кратком и полном
руководствах пользователя. Нарушение инструкций может привести к
возникновению пожара и другим опасным ситуациям, а также травмам.

aeno.com/documents 13
Не используйте устройство при наличии на нем повреждений и трещин.
Не устанавливайте устройство вне помещения, а также вблизи
источников воды, включая увлажнители воздуха. Не подвергайте
устройство воздействию прямых солнечных лучей, влаги и вибрации. Не
роняйте, не бросайте, не разбирайте устройство и не пытайтесь починить
его самостоятельно. Не размещайте кабель рядом с радиаторами,
плитами или нагревателями. Не используйте для очистки устройства
чистящие и моющие средства. Не допускается утилизировать устройство
вместе с неотсортированными городскими отходами, поскольку это
нанесет вред окружающей среде. За более подробной информацией по
правильной утилизации следует обратиться в местную организацию по
сбору и вывозу отходов. Не разрешайте детям играть с устройством.
Существует риск получения серьезных травм и поражения
электрическим током. Данное устройство предназначено для
использования исключительно взрослыми.
Предупреждения, меры предосторожности и инструкции, содержащиеся
в данном документе, не могут охватить все возможные опасные ситуации.
Следует руководствоваться здравым смыслом при использовании
устройства.
Устройство очистителя воздуха (cм. рисунок a)
(1) –воздухозаборник, (2) –съемная передняя панель, (3) –HEPA-фильтр, (4)
–пластиковые пробки, (5) –отверстия для выпуска очищенного воздуха, (6)
–корпус, (7) –установочные болты, (8) –подставка, (9) –настенный крепеж.
Подготовка устройства к работе (см. рисунок a)
Перед использованием снимите упаковку с НЕРА-фильтра. Для этого
сначала убедитесь, что очиститель воздуха отключен от сети. Затем
аккуратно снимите переднюю панель (2), возьмитесь за тканевые петли и
извлеките HEPA-фильтр (3) наружу. Удалите упаковку с фильтра. После

14 aeno.com/documents
этого вставьте HEPA-фильтр (3) на место изакройте его передней панелью
(2).
Возможны два варианта установки очистителя:
•на подставку: вставьте пробки (4) воткрытые концы подставки (8).
Присоедините подставку тремя установочными болтами (7) ккорпусу
очистителя (6).
•на стену: прикрепите крепеж (9) к выбранному месту на стене (не ниже
170 см от пола). Вкрутите в заднюю панель корпуса очистителя (6) три
установочных болта (7). Вставьте головки установочных болтов (7) на
задней панели очистителя в пазы крепежа (9), уже прикрепленного к
стене.
Управление с контрольной панели (см. рисунок b)
Индикатор качества воздуха в помещении/дисплей таймера показывает
или качество воздуха в помещении, или время работы очистителя до
отключения таймера. Индикатор показывает, что происходит
ультрафиолетовая очистка воздуха в помещении. Кнопка скорости
позволяет изменять с каждым следующим нажатием скорость вращения
вентиляторов очистителя, которую показывает индикатор скорости
воздуха . Кнопка «Старт/Стоп» позволяет включать и выключать
очиститель. Кнопка спящего режима включает очиститель в спящий
режим работы с минимальной мощностью вентиляторов, при котором все
индикаторы, кроме кнопки спящего режима, гаснут. Для выхода из этого
режима нужно нажать на кнопку повторно. Кнопка автоматического
режима запускает один из трех подходящих режимов работы
очистителя на основании оценки качества воздуха в помещении. Кнопка
Wi-Fi активирует Wi-Fi-устройство очистителя, чтобы управлять им


aeno.com/documents 15
удаленно со смартфона. Подробнее читайте в инструкции подключения
очистителя к приложению «AENO», доступной по ссылке
aeno.com/documents. Индикатор изменяет свой цвет в зависимости от
уровня загрязнения воздуха органическими соединениями (клеи, краски,
лаки, растворители и др.). Кнопка таймера переключает индикатор
качества воздуха в режим таймера. Дальнейшие нажатия устанавливают
время работы таймера: от 1 до 24 часов. Кнопка защиты от
вмешательства детей срабатывает, если удерживать ее в течение 3 секунд.
Все кнопки становятся недоступны для управления. Чтобы вернуть доступ
к кнопкам, нужно нажать и удерживать кнопку 3 секунды снова. Кнопка
ионизатора включает ионизатор, который устраняет неприятные
запахи. Кнопка перезагрузки фильтра показывает, что пришло время
заменить HEPA-фильтр. Для прекращения мигания кнопки нужно нажать
и удерживать ее 10 секунд. Отсчет времени до конца работы HEPA-
фильтра очистителя начнется с нуля.
Управление очистителем с пульта ДУ (см. рисунок c)
На пульте ДУ доступны следующие кнопки: включение/выключение
спящий режим работы, таймер, автоматический режим работы
изменение скорости вращения вентилятора .
Устранение возможных неисправностей
•Очиститель не включается. Возможные причины и решение: проверьте,
включен ли очиститель в розетку и есть ли в розетке напряжение питания,
включен ли автомат питания и целы ли предохранители, мигает ли
красный индикатор замены фильтра.

16 aeno.com/documents
•Пыль удаляется плохо. Возможные причины и решение: проверьте, не
засорена ли поверхность фильтра, нет ли препятствий, мешающих отбору
или выпуску воздуха, снята ли упаковка с фильтра.
•Сильный шум. Возможные причины и решение: проверьте, не застряло ли
что-нибудь в вентиляторе, не наклонен ли корпус очистителя. Если шум
все равно слишком сильный, попробуйте уменьшить мощность работы
очистителя кнопкой скорости. Используйте режим низкой мощности
также для работы очистителя ночью.
•Неприятный запах из очистителя. Возможные причины и решение: если в
первые несколько часов работы очиститель издает запах пластика, то это
нормально. Однако устройство может издавать неприятный запах также в
случае засорения фильтра. В этом случае его нужно очистить или
заменить. Если вы чувствуете запах горелого, то немедленно выключите
очиститель из розетки. Затем свяжитесь со службой поддержки или
продавцом, у которого вы купили устройство.
•Индикатор замены фильтра продолжает мигать даже после того, как вы
заменили или очистили фильтр. Возможные причины и решение: нажмите
на кнопку фильтра и удерживайте ее в течение не менее 3 секунд. Таймер
замены фильтра перезапустится, а индикатор погаснет.
ВНИМАНИЕ!Если ни один из возможных путей устранения не помог
решить вашу проблему, обратитесь кпоставщику либо всервисный
центр. Пожалуйста, не разбирайте устройство ине пытайтесь
отремонтировать его самостоятельно.
Подключение к мобильному приложению AENO
ВНИМАНИЕ! Убедитесь, что Ваш телефон подключен к сети Wi-Fi с
частотой 2,4 ГГц, частота 5 ГГц устройством не поддерживается.
•Подключите устройство к сети электропитания и включите его.
Other manuals for AP2S
1
This manual suits for next models
1
Table of contents
Languages:
Other AENO Air Cleaner manuals


