Milkotronic LACTOSCAN SA User manual

Ultrasonic milk analyser
Operation manual 11.04.19 1/110
Milkotronic Ltd
LACTOSCAN SA
MILK ANALYZER
LCD display – 4 lines x 16 characters
Operation manual
Ultrasonic milk analyser
Operation manual 11.04.19 2/110
Switching Adapter
•Input: 100 - 240 V ~1.6 A max.
50-60 Hz
•Output:+12 V 3 А min.
•Output power:36 - 42 W
Measurement modes
•cow milk
•sheep milk
•UHT milk
•goat milk
•buffalo milk
•cream
•whey
•recovered milk
•other /pasteurized milk/
CAUTION!
Keep the switching adapter dry!
Please, read and follow strictly all the instructions in the manual.
Due to continuous improvement in the device, information contained in this
manual is subject to change without notice. Contact the company-producer
for revisions and corrections
4, Narodni Buditeli Str.
8900 Nova Zagora
BULGARIA
Phone/Fax: + 359 457 67082
e-mail: [email protected]
www.lactoscan.com
www.milkotronic.com

Ultrasonic milk analyser
Operation manual 11.04.19 3/110
SAFETY INSTRUCTIONS
1. Read this manual carefully and make sure that you understand all the
instructions.
2. For safety purposes the device is equipped with grounded power
cable. If there is no grounded electrical outlet where the device will
be used, please, install such before using the device.
3. Place the device on leveled and stable plate. In case it falls or is
severely shocked it may be damaged.
4. Connect to the electrical network in such a way that the power cable
to stay away from the side for accessing the device and not to be
stepped on.
5. Every time before cleaning the device switch it off and unplug it from
the electrical outlet. The device has to remain unplugged till the
cleaning completion.
6. Do not disassemble the unit in order to avoid possible electrical
shock. In case of malfunction contact your local dealer.
7. Handle the liquids the device works with carefully, following all the
instructions for their preparation.
8. Place the switching adaptor in such a way as to be protected from
overflow and spillage of liquids.

Ultrasonic milk analyser
Operation manual 11.04.19 4/110
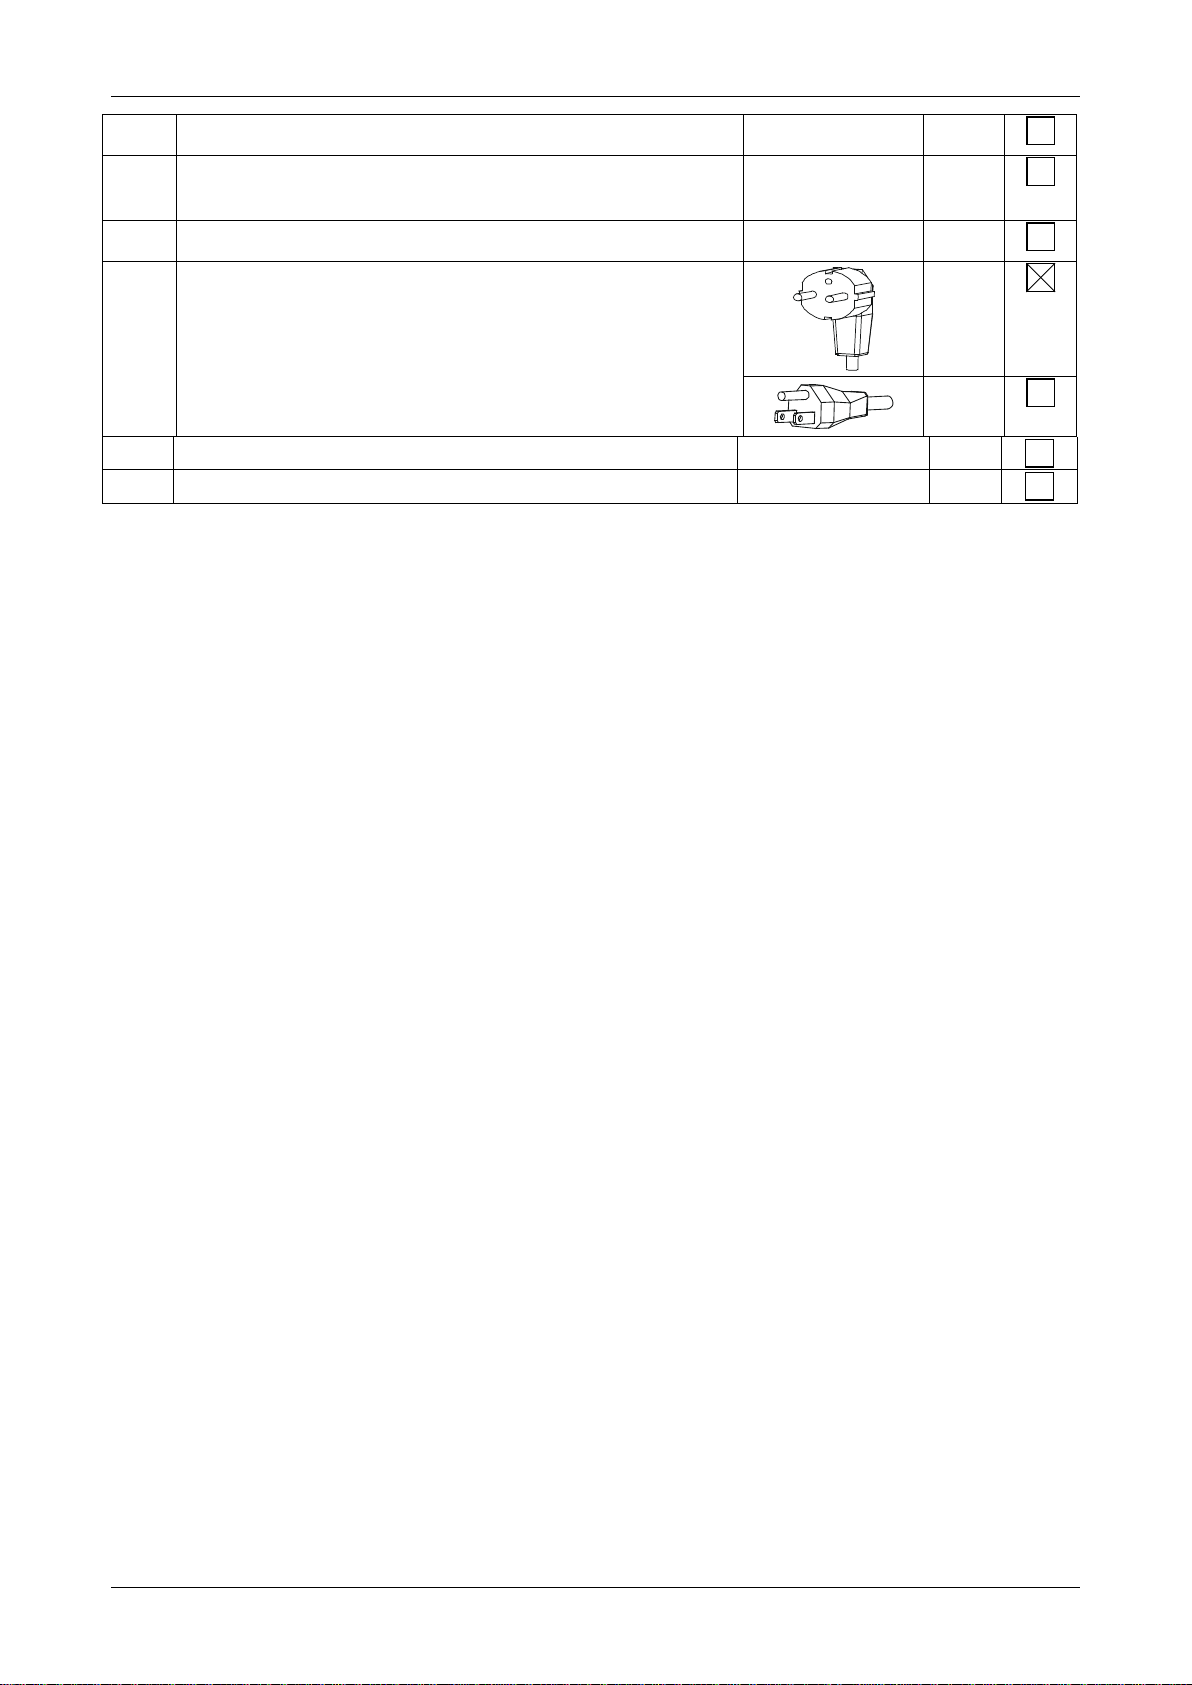
PARTS AND ACCESSORIES
In the table below the standard delivery configuration of the milk analyzer is
listed:
№
Description
Item №
pcs
1.
Ultrasonic portable milk analyzer
LSSA001
1
1 sample measurement time
50 sec
30 sec
Operation
manual
LSSA00
2
2.
Plastic sample holder
LSSA003
1
3.
Spare Pipes
LSSA004
2
4.
12 V DC Power Supply Cable
LSSA005
2
5.
Alkaline cleaning solution Lactodaily
100 g
1
6.
Acidic cleaning solution Lactoweekly
100 g
1
In the table below the milk analyzer spares and accessories, which are
delivered on customers request are listed:
№
Description
a) included in the set:
b)
not included in the set (may be
additionally bought):
Item №
pcs
/
7.
RS232 Interface Cable - Analyser-IBM PC
LSSA006
8.
Service Pack - CD
LSSA007
9.
pH measuring system
LSSA009
1
10.
pH probe with cable and holder
LSSA010
1
11.
Buffer solution Ph 60 ml
(pH7.00±0.01/20˚C)
LSSA011
1
12.
Buffer solution pH 60 ml
(pH4.00±0.01/20˚C)
LSSA012
1
13.
Milk conductivity measuring system
LSSA013
1
14.
Buffer solution conductivity 50 ml (5.02
(±5%) mS/cm (18±0.1˚C)
LSSA014
1
15.
Real time clock
LSSA015
1
16.
High-fat measuring function
LSSA016
1
17.
ECS POS Serial Printer
LSSA017
1
Ultrasonic milk analyser
Operation manual 11.04.19 5/110
18.
12 V Serial Printer Power Supply Cable
LSSA018
1
19.
RS232 Interface Cable - Milk Analyser –
Serial Printer
LSSA019
1
20.
Carrying case
LSSA020
1
21.
Plug type
1
1
22.
Spare O-ring for the pH probe
1
23.
USB flash drive (slot)
1

Ultrasonic milk analyser
Operation manual 11.04.19 6/110
1. FUNCTION
The function of the milk analyzer is to make quick analysis of milk on fat
(FAT), non-fat solids (SNF), proteins, lactose and water content
percentages, temperature (oС), pH, freezing point, salts, total solids,
conductivity as well as density of one and the same sample directly
after milking, at collecting and during processing.

Ultrasonic milk analyser
Operation manual 11.04.19 7/110
2. TECHNICAL PARAMETERS
2.1. Working modes characteristics:
The program of the milk analyzer has four working modes.
2.1.1. Measurement mode milk / dairy product – first type
2.1.2. Measurement mode milk / dairy product – second type
2.1.3. Measurement mode UHT milk / dairy product – third type
These modes have been calibrated on customers’ request for 3 milk types
from the following: cow, sheep, UHT, buffalo, goat, camel milk, cream, ice
cream mixtures, whey, recovered milk, etc. before leaving the production
facilities and the text on the display will be for the corresponding types, as is
indicated on page 2 Measurement modes.
2.1.4. Cleaning
2.1.4.1. Current
2.1.4.2. Final
Note:
For devices with a 5 button keypad on the front panel by pressing the extra
buttons, you can run the following commands:
Pressing the button labeled A - start re-printing the results
Pressing the button labeled B - start of flushing (2.1.4.)
These commands are possible when the unit is in Idle mode, i.e. expecting
command for measuring sample.

Ultrasonic milk analyser
Operation manual 11.04.19 8/110
2.2. Measuring range:
Fat ……………….....................
…………..from 0.01% to 25% (45%*)
SNF ………………………………
...…………………....from 3% to 40%
Density ** ……………………….
……...…….from 1000 to 1150 kg/m3
Proteins ………………………….
………………………..from 2% to 7%
Lactose ………………………...
…………………from 0.01 % to 20 %
Water content …………………
……………...……..from 0 % to 70 %
Temperature of milk ……………
from 1oC to 40oC (if measurement is
30 sec, then t° is from 15 to 40°)
Freezing point ***.………………
…………..from – 0,400 to – 0,700oC
Salts …………………………….
…...…………...………from 0,4 to 4%
PH*..……………………………...
…………………..………from 0 to 14
Conductivity* ** …………………
……………...…from 3 to 14 [mS/cm]
Total Solids* …………………….
………………………...from 0 to 50 %
* Option, on customers’ request
** Density data are shown in an abbreviated form. For example 27.3 have to
be understood as 1027.3 kg/m3. To determine the milk density, write down
the result from the display and add 1000.
Example: result 21,20; density = 1000 + 21,20 = 1021,2 kg/m3
The abbreviated form of the density is used also when entering data for
samples in working mode Recalibrate, for example:
If the measured sample density is 1034.5 kg/m3, then in the menu for
entering the samples parameters used for calibration, across the parameter
Den = , you have to enter 34.5.
*** pH and conductivity measurements are optional and are embedded in the
device on customers' request.
**** Please, carefully read Appendix Freezing Point.
2.3. Accuracy:
Fat …..………………………………..
…...………………….…...±0.06%
SNF …………………………………..
…………...………….…...±0.15%
Density ………………………………
………………………..±0.3 kg/m3
Proteins ……………………………...
……...……………….…...±0.15%
Lactose ………………………………
.…………………………...±0.20%
Water content ……………………….
.…………………………….±3.0%
Temperature of milk ………………..
.………………………………±1oC
Freezing point………………………..
..……...…………………±0.005oC
Salts ………………………………...
…..…………...…………...±0.05%

Ultrasonic milk analyser
Operation manual 11.04.19 9/110
PH…………………………………….
………………………………±0.05
Conductivity....……………………….
……………………………...±0.05
Total solids ………………………….
……………………………±0.17%
2.4 Correct ambient conditions:
Accuracy is guaranteed in case of normal ambient conditions:
Air temperature…………………………
….…from 10oC to 40oC (43oC)
Relative humidity ………………………
……………...from 30% to 80%
Power supply …………………………
…………………...220V (110V)
extent of contamination at normal
environmental conditions
…………………….…………..2
Accuracy values in point 2.3 are in dependence on the correctness of the
corresponding chemical method, used for component content determination.
In point 2.3. are used the following reference methods: Gerber – for fat,
gravimetric – for SNF, Kjeldahl – for protein. The boundary for maximum
variation of repeatability when the power supply voltage is from +10 to – 15%
from the nominal voltage values (220V) have to be no more than 0.8
accuracy according point 2.3. The analyser is used in conditions free of outer
electrical and magnetic fields (except the magnetic field of the Earth) and
vibrations.
2.5. Dimensions: ……………………………..240/220/100 mm, mass 3,0 kg
2.6. Continuous working time: ………………………………………non-stop
2.7 Milk sample volume per one measurement: ………..15 cm3 (= 25 ml)
Ultrasonic milk analyser
Operation manual 11.04.19 10/110
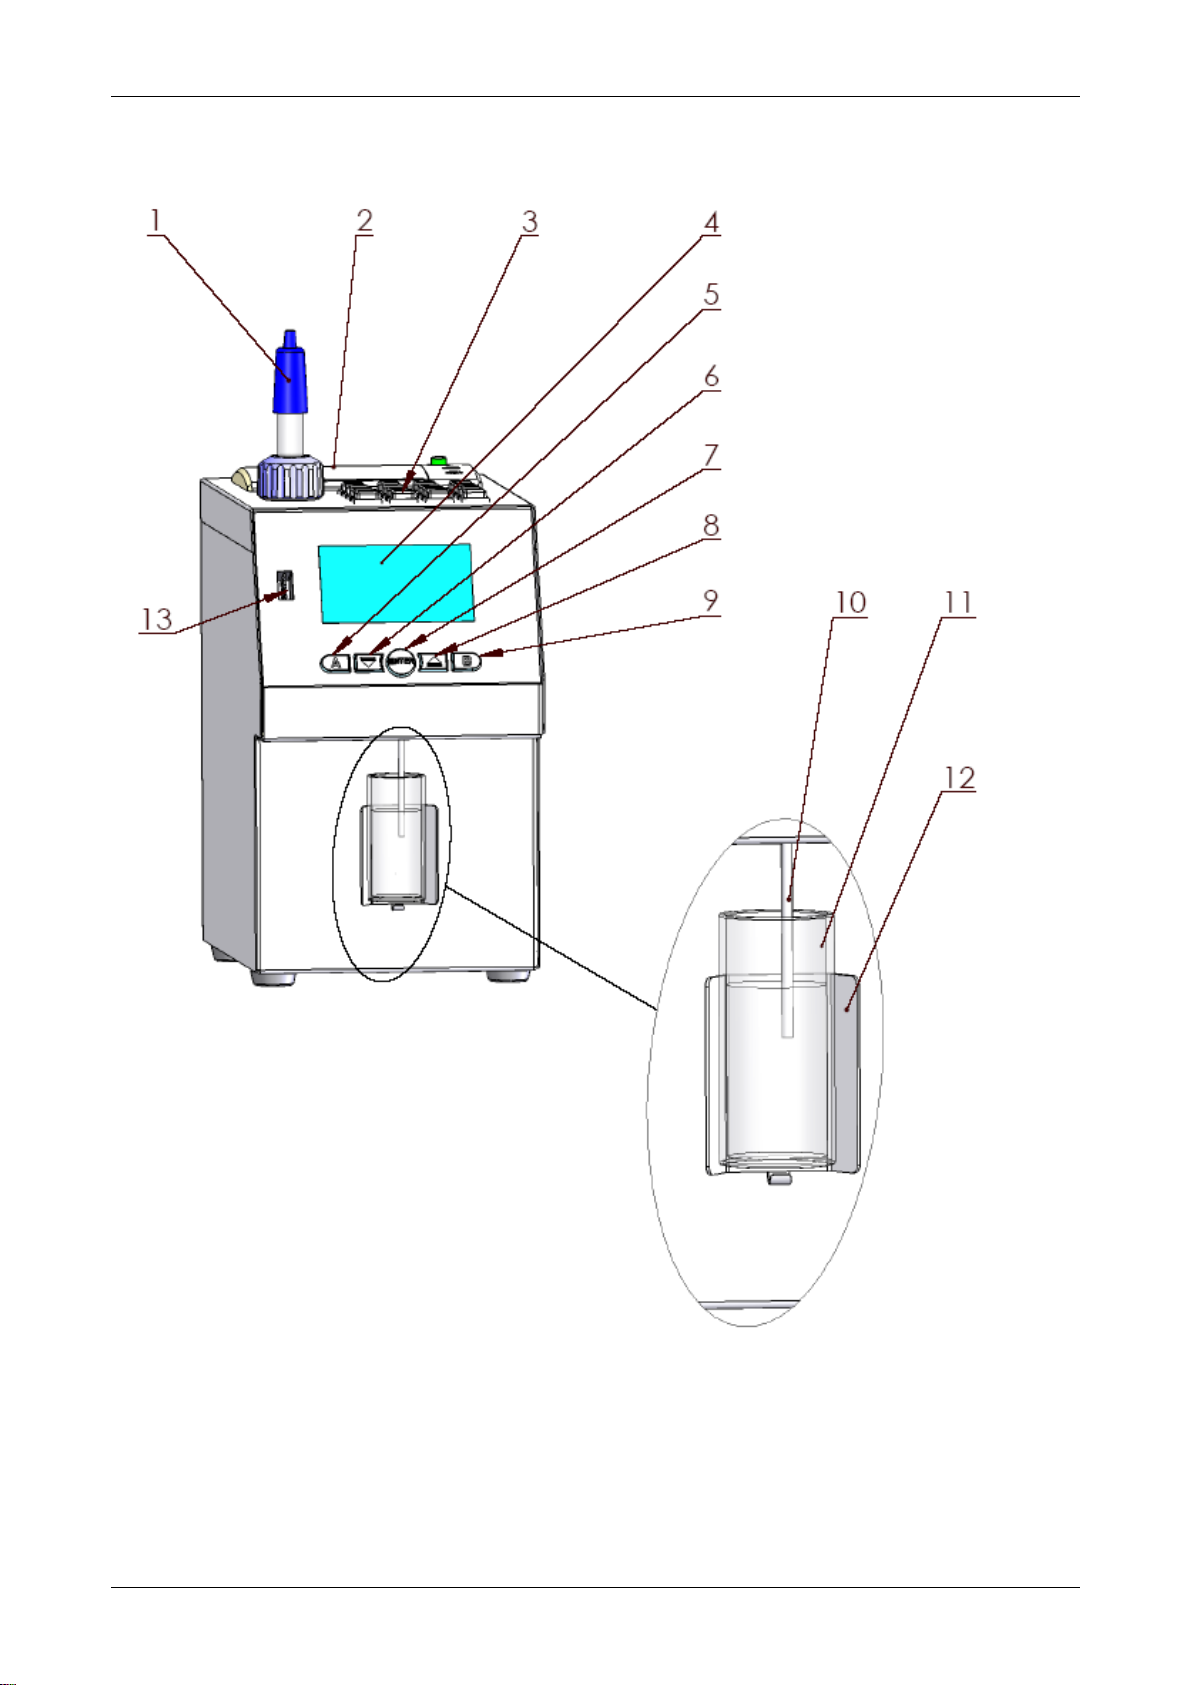
Fig.1 Front panel
1. pH probe(option)
10. Sample holder
2. printer (option)
11 Input pipe
3. keypad (option)
12. Hanger
4. Display
13. USB flash drive (slot)
5-9. Buttons
Ultrasonic milk analyser
Operation manual 11.04.19 11/110
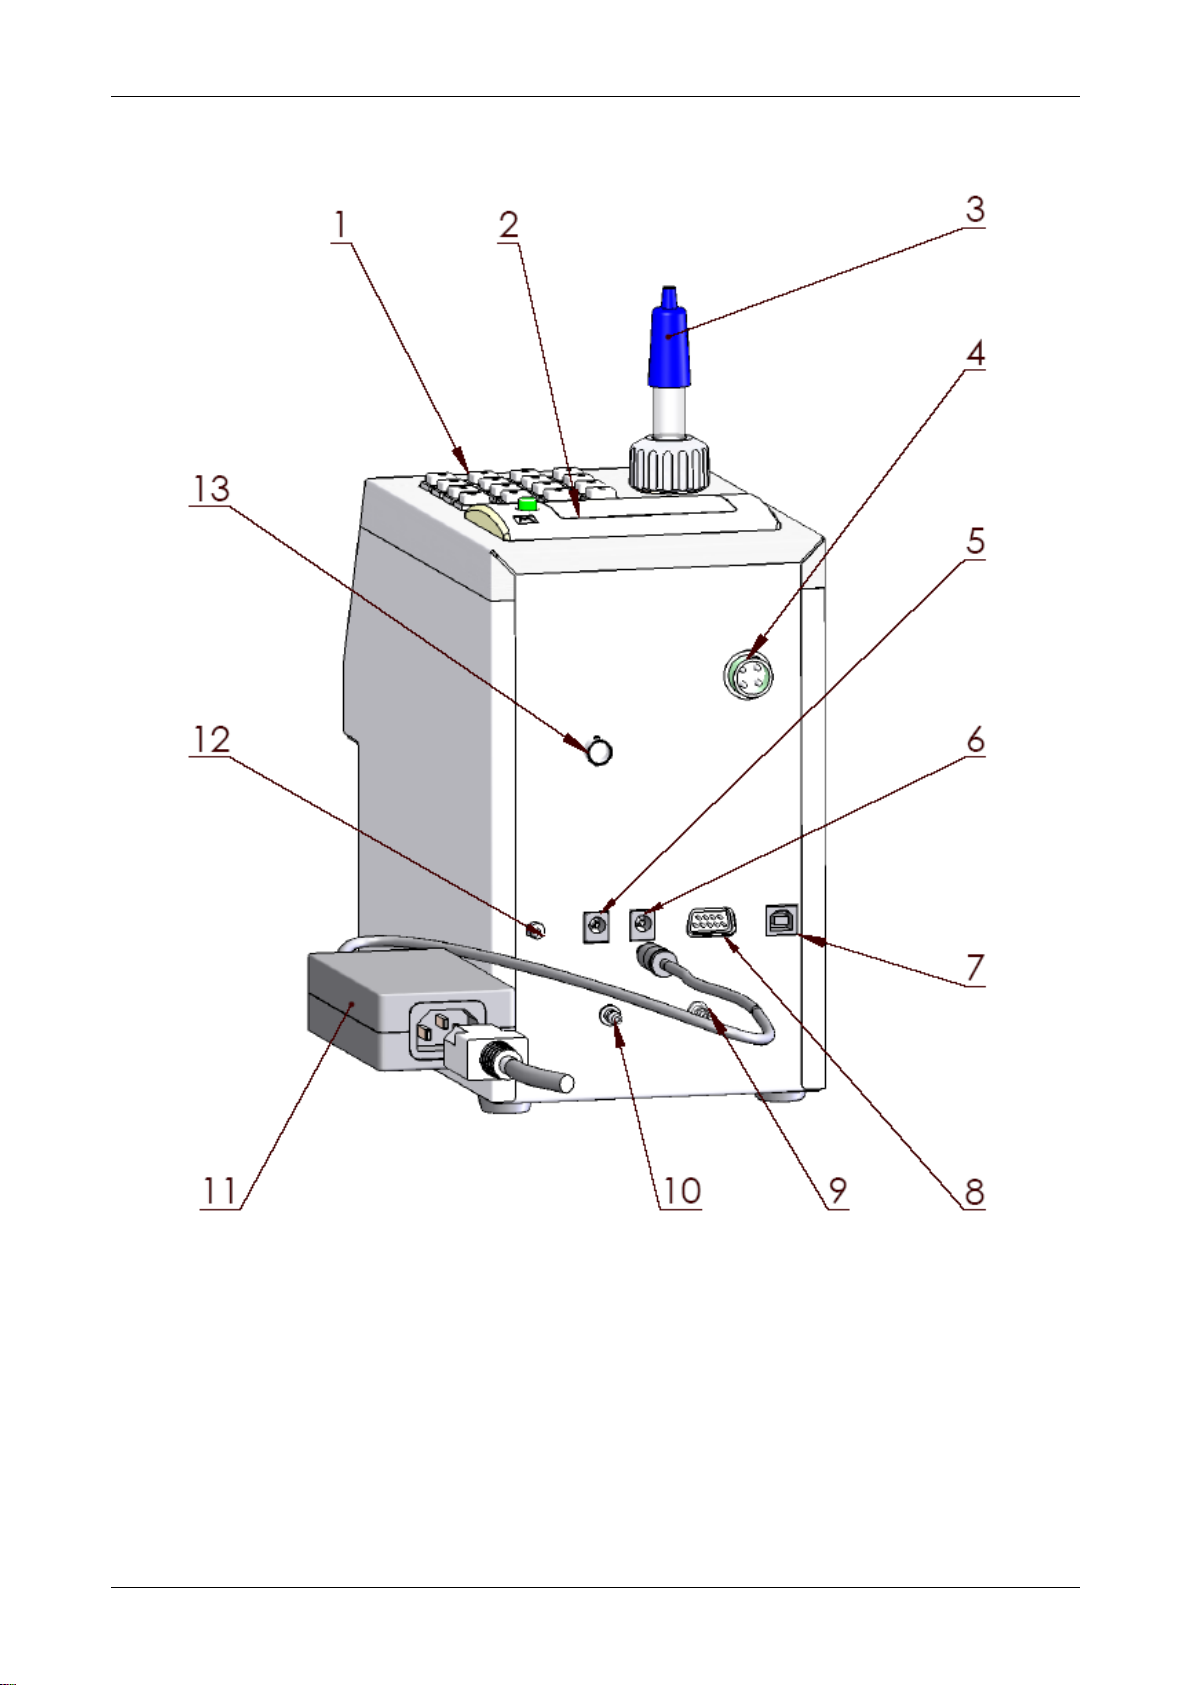
fig. 2 Back panel
1. keypad (option)
8. Serial printer interface/RS232
2. Printer (option)
9. Waste solution output pipe orifice
3. pH-probe (option)
10. Cleaning solution input pipe orifice
4. Weigh Scale input (option)
11. Switching adapter
5. AC adaptor input
12. Power switch
6. DC Power Supply output
13. pH-meter input (option)
7. USB (option)

Ultrasonic milk analyser
Operation manual 11.04.19 12/110
Fig 3 Principle working scheme

Ultrasonic milk analyser
Operation manual 11.04.19 13/110
Fig. 4 Connecting peripheral devices
Ultrasonic milk analyser
Operation manual 11.04.19 14/110
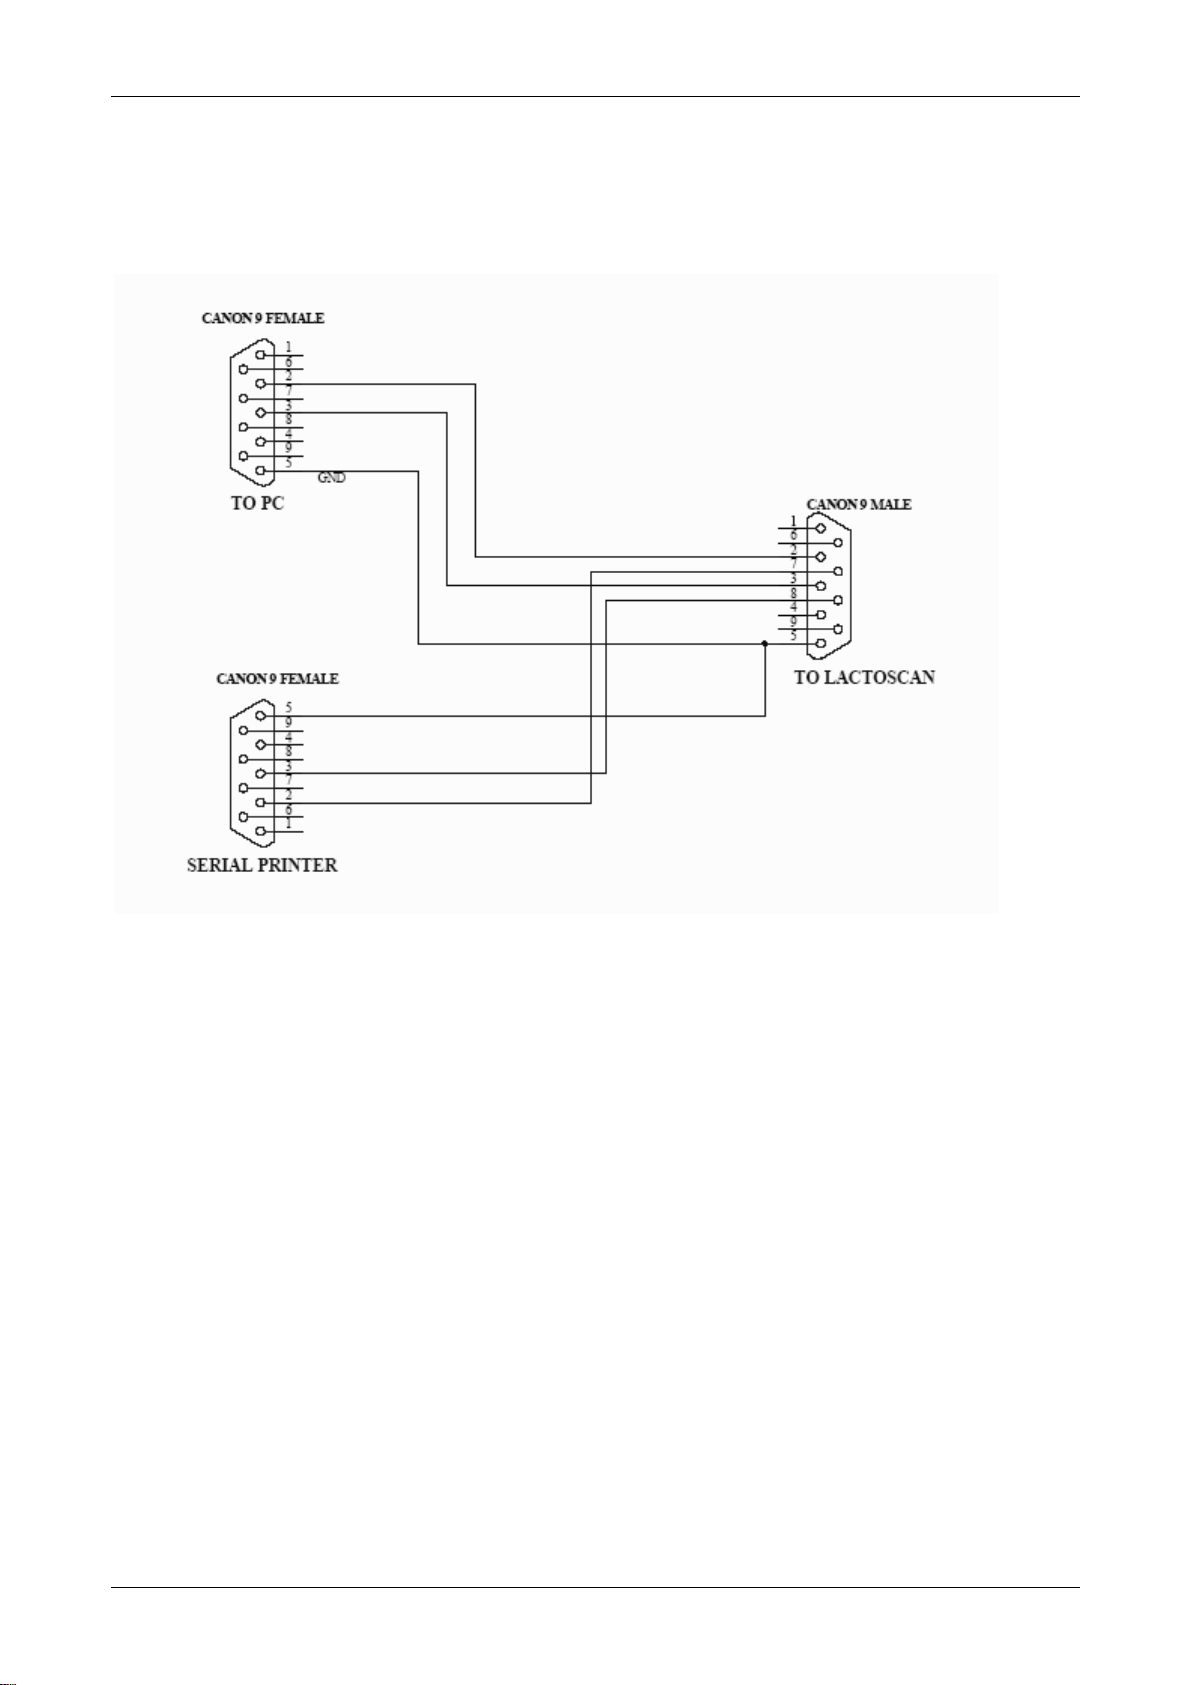
Fig. 5 Cables description
90-1801-0008
RS232 Interface Cable - Milk Analyser – Serial Printer/ IBM PC
The connection of the analyser with other devices via RS232 Interface is
made through the coupling DB9 on the back panel of the device. In it can be
plugged only the cable, supplied by the producer with the analyser (or
produced by the customer as per above scheme). The coupling from the
cable, marked on the scheme with „TO LACTOSCAN” must be plugged in the
computer. If due to some reason is used an external cable USB to RS232
Converter (usually when working with a laptop the customers buy such
cables from the market), it must be plugged in the coupling “TO PC” of the
original cable, not directly in the device.
90-1801-0009
DC 12V Power Supply Milk Analyzer Cable
1. GND
2. No connection
3. No connection
4. 12V DC
There’s an option in the analyser – embedded USB interface (USB to
RS232 Serial Converter) for connection with computer type IBM PC. It is

Ultrasonic milk analyser
Operation manual 11.04.19 15/110
intended for connecting computers from laptop type, which have no RS 232
interface (COM Ports – DB9 Connector). This option may be available
together with the standard RS232 – connector DB9, which always exists in
the analyzers. At one and the same time, connection analyzer – computer,
can be established only through one of the couplings – either only DB9, or
only USB, i.e. analyzer could not be connected at one and the same time,
using one of the interfaces with one and using the other interface to another,
second computer. The coupling for this option (Printer Type) is at the back of
the analyzer, next to the standard RS232 DB9 connector. Other USB devices
like printers, keypads etc COULD NOT be connected to this coupling.
USB interface is based on the element MCP2200 of the company
Microchip Technology Inc. – site: http://www.microchip.com. For establishing
a connection through this interface a driver has to be installed for MCP2200
in the correspondent computer, which will be connected with the analyzer.
Please, follow the procedure, from the Internet site of the producer:
http://www.microchip.com/wwwproducts/devices.aspx?ddocname=en546923,
by choosing the suitable for your operation system driver.
After installing the driver, choose the СОМ port, which will be used for
the real communication. For Win XP it is done by executing the following
commands: Start -> Settings -> Control panel -> System -> Hardware ->
Device Manager -> Ports (COM and LPT) – Right Click -> Properties -> Port
Settings -> Advanced -> COM Port Number. Choose Number 1 or if another
number is chosen, for example 3, then, when working with the software tools,
in the field COM Port (upper right corner), you have to set the new number of
the port, in this case 3.

Ultrasonic milk analyser
Operation manual 11.04.19 16/110
3. QUALIFICATION OF RAW MILK, THERMALLY TREATED
MILK, OTHER DAIRY PRODUCTS AND DERIVATIVES
3.1. Taking samples and preparation for analysis
In order to receive reliable results in qualification of milk, dairy products and
derivatives are needed: precise samples taking; correct samples storing (in
need to be preserved); correct preparation before making measurement. The
rules and requirements for this are described in details in Appendix Milk
sampling.
3.2. Making the measurement.
3.2.1. Preparing the analyzer for working mode
3.2.1.1. Put the analyzer on the working place, providing good ventilation and
not in the vicinity of heat providing devices or sources. The temperature in the
premises has to be in the boundaries 10-30oC.
3.2.1.2. Check if the power switch is in "0" position and that the outlet voltage
complies with the voltage indicated on the rating plate of the analyzer.
Connect the switching adapter.
3.2.1.3. Switch on the “POWER” button, which starts the identification
procedure. For a short time the display shows the number of the software
versions, for example:
Milkanalyzer xxx
LCD vers xx
MA vers yy
MA ser. N. xxxx
where:
Milkanalyzer xxx is the time for measurement.
LCD vers XX is display control software version.
MA vers YY is the motherboard software version.
MA ser. N. xxxx is the serial number – written on the rear panel of the
analyzer.

Ultrasonic milk analyser
Operation manual 11.04.19 17/110
If in the process of exploitation there is a need to ask a question the
company-producer, you have to send the data, written on the display during
the above described initialization procedure.
3.2.1.4.Till the analyzer is prepared for work (at about 5 minutes) the
following message is written on the display: “Getting ready”. Above pointed
time is in dependence of the environmental temperature and increases with
decreasing the temperature.
3.2.1.5. When the device is ready for work the display shows: “Ready to
start”.
The analyzer is ready to make analysis in mode 1 (normally Cow)
3.2.1.6. If you want to pass to another mode press the button Enter and hold
it pressed. The following message appears on the display:
Release button to
start menu
Release the button Enter. The display shows the possible working modes:
Milk selector
Cal1 – Cow
Cal2 – Sheep
Cal3 – UHT
------------------------------
Cleaning
Final cleaning
Using “up”▲and ”down”▼buttons, choose the working mode and press Enter
in order to start it.
3.2.2. Making analysis
To start measurement:
- pour the preliminary prepared sample in the sample holder of the
analyzer;
- put the sample holder in the recess of the analyzer;
- press the button Enter.

Ultrasonic milk analyser
Operation manual 11.04.19 18/110
The analyzer sucks the milk, makes the measurement and returns the milk in
the waste liquid reservoir. During the measurement the temperature of the
sample is shown on the display.
Ignore the results received immediately after switching on the analyzer and
after measuring distilled water. Make a second measurement with new
portion of the same sample.
3.2.3. Displaying the results
3.2.3.1. When the measurement is finished, the sample returns in the
sample-holder and the display shows the results. For example:
Results:
F=ff.ff S=ss.ss
D=dd.dd P=pp.pp
L=ll.ll W=ww.ww
Where:
F= ff.ff - measured FAT in percentage;
S= ss.ss - measured SNF in percentage;
D= dd.dd - measured density in percentage;
P= pp.pp - measured protein in percentage;
L= ll.ll - measured lactose in percentage;
W= ww.ww - measured sample’s added water in percentage;
By pressing the button” Down” ▼ the display shows the second page,
containing the results:
Page 2 Results:
T=tt.tC pH=pp.pp
FP=-0.fff
s=0.sss A=aa.aa
Where:
tt.tC - sample’s temperature;
pp.pp - sample’s pH result – if there is a pH probe connected;
-0.fff - measured sample’s freezing point;
0.sss - measured salts values;
aa.aa - measured total solids

Ultrasonic milk analyser
Operation manual 11.04.19 19/110
By pressing the button”Up” ▲ display shows the third page with results:
Page 3 Results:
L=l.ll
Where:
L= ll.ll - measured Lactose in %;
By pressing the buttons “up”▲ and ”down”▼, the operator has the possibility
to pass from one page result to another.
If the device has an embedded option “Conductivity” and "conductivity
measurement" started, the result is shown on the display, showing the basic
results replacing lactose results in the following way:
C=xx.xx
In this case the Lactose result is shown on a new page - Page 3 Results.
xx.xx is the measured milk sample’s conductivity in [mS/cm]. If the results are
outside the limits for this type of sample (see table from the Appendix
Conductivity measurement), the cursor flashes after the letter С, reminding
that the sample is not correct. On the printout it is printed as !!!.
If the conductiity value is outside measuring range (2-14 mS/cm), the
following message appears on the display:
C=OutRg (Out of Range), and on the printout there isn’t any line with
conductivity value.
3.2.3.2. Write down the results in the form. The results remain on the display
till a new measurement is started. If the analyzer is connected to a computer
or a printer, it sends the data to the computer or prints them.

Ultrasonic milk analyser
Operation manual 11.04.19 20/110
Fig. 6Printing the results
For more information for the printer see 8.2. Working with Printer.
SCHEME:
PRINTOUT OF THE RESULTS-EXAMPLE
Time: xx:xx:xx
Date: xx:xx:xxxx
Milk analyser 60 SN: xxxxx
Calibration 1 – UHT
Results:
Temp.Sample………………..˚C
Fat………………………..xx.xx%
SNF………………………xx.xx%
Density…………………….xx.xx
Protein…………………...xx.xx%
Lactose…………………..xx.xx%
Added water…………….xx.xx%
pH……………………………..xx
Salts…………………….xx.xx%
Freezing point…………-x.xxx˚C
Deliverer No……………….xxxx
Liters…………………………xx.x
Conduct.(mS/sm)…………..xx.xx
Table of contents


