Milwaukee M18 User manual

OPERATOR'S MANUAL
Cat. No.
M18 FOPH BCA
M18 FUEL™ QUIK-LOK™ BRUSHCUTTER ATTACHMENT
WARNING
To reduce the risk of injury, user must read and understand operator's manual.

2
GENERAL POWER TOOL
SAFETY WARNINGS
WARNING
Read all safety warnings, instruc-
-
•
•Keep work area clean and well lit. Cluttered or
dark areas invite accidents.
tions provided with this power tool. Failure to
follow all instructions listed below may result in
Save all
warnings and instructions for future reference.
The term "power tool" in the warnings refers to your
mains-operated (corded) power tool or battery-oper-
ated (cordless) power tool.
WORK AREA SAFETY
•
ELECTRICAL SAFETY
Do not operate power tools in explosive atmo-
liquids, gases or dust. Power tools create sparks
which may ignite the dust or fumes.
Keep children and bystanders away while operat-
ing a power tool. Distractions can cause you to lose
control.
PERSONAL SAFETY
•Power tool plugs must match the outlet. Never
modify the plug in any way. Do not use any
adapter plugs with earthed (grounded) power
tools.
reduce risk of electric shock.
•Avoid body contact with earthed or grounded
surfaces, such as pipes, radiators, ranges and
refrigerators. There is an increased risk of electric
shock if your body is earthed or grounded.
•Do not expose power tools to rain or wet condi-
tions. Water entering a power tool will increase the
risk of electric shock.
•Do not abuse the cord. Never use the cord for
carrying, pulling or unplugging the power tool.
Keep cord away from heat, oil, sharp edges or
moving parts. Damaged or entangled cords increase
the risk of electric shock.
•When operating a power tool outdoors, use an
extension cord suitable for outdoor use. Use of
a cord suitable for outdoor use reduces the risk of
electric shock.
•
•Stay alert, watch what you are doing and use
common sense when operating a power tool. Do
not use a power tool while you are tired or under
A
moment of inattention while operating power tools
may result in serious personal injury.
•Use personal protective equipment. Always
wear eye protection. Protective equipment such
as a dust mask, non-skid safety shoes, hard hat or
hearing protection used for appropriate conditions
will reduce personal injuries.
•Prevent unintentional starting. Ensure the switch
source and/or battery pack, picking up or carrying
the tool.
the switch or energising power tools that have the
switch on invites accidents.
POWER TOOL USE AND CARE
•Remove any adjusting key or wrench before
turning the power tool on. A wrench or a key left
attached to a rotating part of the power tool may
result in personal injury.
•Do not overreach. Keep proper footing and
balance at all times. This enables better control
of the power tool in unexpected situations.
•
•If devices are provided for the connection of
dust extraction and collection facilities, ensure
these are connected and properly used. Use of
dust collection can reduce dust-related hazards.
•Do not let familiarity gained from frequent use
of tools allow you to become complacent and
ignore tool safety principles. A careless action can
cause severe injury within a fraction of a second.
BATTERY TOOL USE AND CARE
manufacturer. A charger that is suitable for one type
with another battery pack.
•
battery packs. Use of any other battery packs may
•Do not force the power tool. Use the correct power
tool for your application. The correct power tool
will do the job better and safer at the rate for which
it was designed.
•Do not use the power tool if the switch does not
Any power tool that cannot be
controlled with the switch is dangerous and must be
repaired.
•Disconnect the plug from the power source and/
or remove the battery pack, if detachable, from
the power tool before making any adjustments,
changing accessories, or storing power tools.
Such preventive safety measures reduce the risk of
starting the power tool accidentally.
•Store idle power tools out of the reach of children
and do not allow persons unfamiliar with the
power tool or these instructions to operate the
power tool. Power tools are dangerous in the hands
of untrained users.
•Maintain power tools and accessories. Check
for misalignment or binding of moving parts,
breakage of parts and any other condition that
have the power tool repaired before use. Many
accidents are caused by poorly maintained power
tools.
•Keep cutting tools sharp and clean. Properly
maintained cutting tools with sharp cutting edges
are less likely to bind and are easier to control.
•Use the power tool, accessories and tool bits
etc. in accordance with these instructions,
taking into account the working conditions and
the work to be performed. Use of the power tool
result in a hazardous situation.
•Keep handles and grasping surfaces dry, clean
and free from oil and grease. Slippery handles and
grasping surfaces do not allow for safe handling and
control of the tool in unexpected situations.
Dress properly. Do not wear loose clothing or
jewellery. Keep your hair and clothing away
from moving parts. Loose clothes, jewellery or
long hair can be caught in moving parts.
If operating a power tool in a damp location is
unavoidable, use a residual current device
(RCD) protected supply. Use of a RCD reduces
the risk of electric shock.

3
SERVICE
General brushcutter safety warnings:
SPECIFIC SAFETY RULES FOR
BRUSHCUTTERS
repair person using only identical replacement
parts. This will ensure that the safety of the power
tool is maintained.
•Never service damaged battery packs. Service
of battery packs should only be performed by the
manufacturer or authorised service providers.
•When battery pack is not in use, keep it away
from other metal objects, like paper clips, coins,
keys, nails, screws or other small metal objects,
that can make a connection from one terminal
to another. Shorting the battery terminals together
•Under abusive conditions, liquid may be ejected
from the battery; avoid contact. If contact ac-
cidentally occurs, flush with water. If liquid
contacts eyes, additionally seek medical help.
Liquid ejected from the battery may cause irritation
or burns.
•Do not use a battery pack or tool that is dam-
fire, explosion or risk of injury.
•
excessive temperature. -
perature above 130°C (265°F) may cause explosion.
•Follow all charging instructions and do not charge
the battery pack or tool outside the temperature
Charging
range may damage the battery and increase the risk
•Do not use the machine in bad weather conditions,
especially when there is a risk of lightning. This
decreases the risk of being struck by lightning.
•Thoroughly inspect the area for wildlife where
the machine is to be used. Wildlife may be injured
by the machine during operation.
•Thoroughly inspect the area where the machine
is to be used and remove all stones, sticks, wires,
bones, and other foreign objects. Thrown objects
can cause personal injury.
•Before using the machine, always visually inspect
to see that the cutter or blade and the cutter or
blade assembly are not damaged. Damaged parts
increase the risk of injury.
•Follow instructions for changing accessories.
Improperly tightened blade securing nuts or bolts
may either damage the blade or result in it becoming
detached.
•The rated rotational speed of the blade must be
at least equal to the maximum rotational speed
marked on the machine. Blades running faster than
•Wear eye, ear, head and hand protection. Adequate
protective equipment will reduce personal injury by
line or blade.
•While operating the machine, always wear safety
footwear. Do not operate the machine when
barefoot or wearing open sandals. This reduces
the chance of injury to the feet from contact with a
moving cutter, line or blade.
never up or down and exercise extreme caution
when changing direction. This reduces the risk of
loss of control, slipping and falling which may result
in personal injury.
•While operating the machine, always wear long
trousers. Exposed skin increases the likelihood of
injury from thrown objects.
•Keep bystanders away while operating the ma-
chine. Thrown debris can result in serious personal
injury.
•Always use two hands when operating the
machine. Holding the machine with both hands will
avoid loss of control.
•Hold the machine by the insulated gripping
surfaces only, because the cutting line or blade
may contact hidden wiring. Cutting line or blades
contacting a "live" wire may make exposed metal
parts of the machine "live" and could give the operator
an electric shock.
•Always keep proper footing and operate the
machine only when standing on the ground.
Slippery or unstable surfaces may cause a loss of
balance or control of the machine.
•Do not operate the machine on excessively steep
slopes. This reduces the risk of loss of control,
slipping and falling which may result in personal
injury.
•When working on slopes, always be sure of your
footing, always work across the face of slopes,
•Keep all parts of the body away from the cutter,
line or blade when the machine is operating.
Before you start the machine, make sure the
cutter, line or blade is not contacting anything.
A moment of inattention while operating the machine
may result in injury to yourself or others.
•Do not operate the machine above waist height.
This helps prevent unintended cutter or blade
contact and enables better control of the machine
in unexpected situations.
•When cutting brush or saplings that are under
tension, be alert for spring back. When the tension
may strike the operator and/or throw the machine
out of control.
•Use extreme caution when cutting brush and
saplings. The slender material may catch the blade
•Maintain control of the machine and do not touch
cutters, lines or blades and other hazardous
moving parts while they are still in motion. This
reduces the risk of injury from moving parts.
•Carry the machine with the machine switched
Proper handling of
the machine will reduce the likelihood of accidental
contact with a moving cutter, line or blade.
•When transporting or storing the machine, always
Proper handling of
the machine will reduce the likelihood of accidental
contact with the blade.
•Only use replacement cutters, lines, cutting
Incorrect replacement parts may increase the risk
of breakage and injury.
•When clearing jammed material or servicing
the battery pack is removed. Unexpected starting
of the machine while clearing jammed material or
servicing may result in serious personal injury.

4
arsenic, barium, beryllium, lead, pesticides or other
health endangering materials.
Blade thrust causes and related warnings:
•lead from lead-based paint
•crystalline silica from bricks and cement and other
masonry products, and
•arsenic and chromium from chemically-treated
lumber.
Your risk from these exposures varies, depending on
how often you do this type of work. To reduce your
exposure to these chemicals: work in a well ventilated
•Use care when using around decorative plants
and other obstacles. Accessories will cut/damage
many materials.
•Do not operate the tool without the guard in
place. The guard must be attached properly
during use. Operating the tool without the guard
will cause serious injury.
•Do not use tool with a damaged cutter head.
Cracked or broken pieces can be thrown.
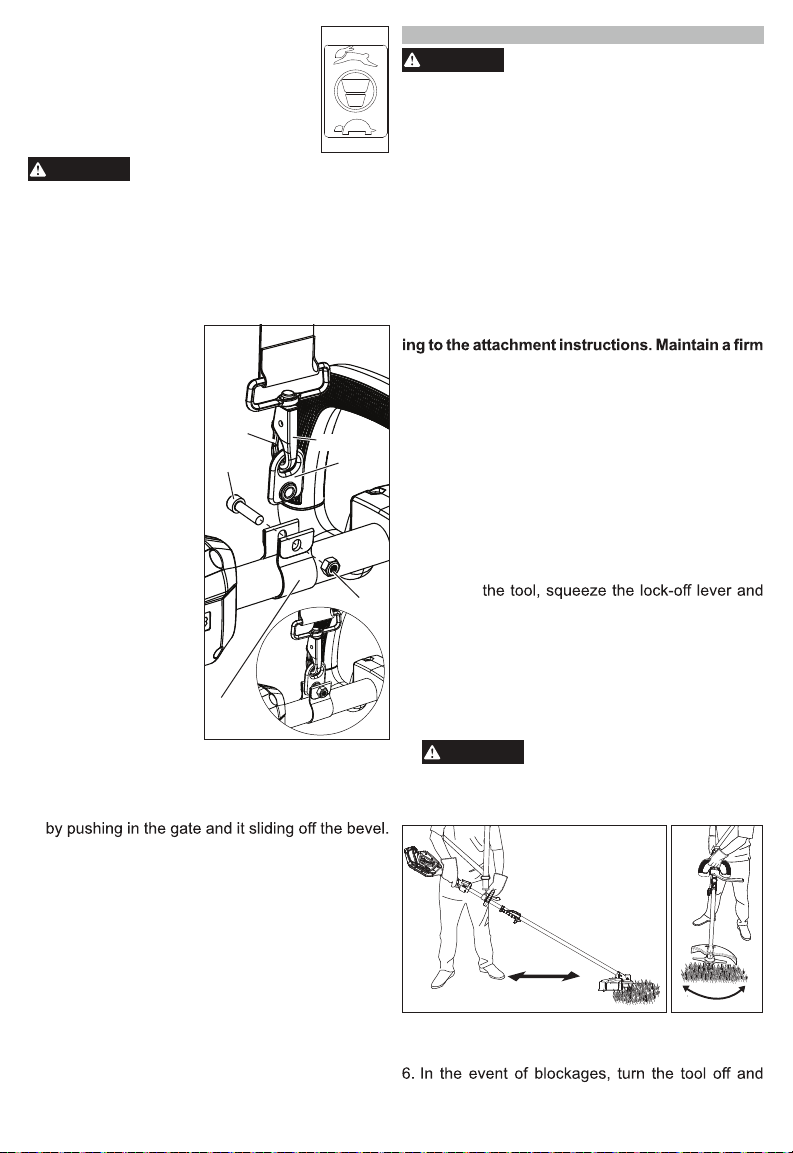
•Do not operate the tool without the front handle
and hip barrier in place. The front handle must
be attached properly during use. Use both
hands when operating the tool, according to the
Using one hand could cause loss of control and
result in serious injury.
•
•Keep face, hands and feet clear of moving parts at
all times. Moving parts can cause severe lacerations.
•Brace for unexpected movement when contact
is made with a hard object. Loss of control could
result in serious injury.
such as walls, trees, and rocks and cause injury.
When possible, do cutting by hand in closed in areas.
•Carry the tool by the front handle to avoid ac-
cidental starting. Proper handling of the tool will
prevent injury.
•
one location to another.
on the trigger. Accidental starting can cause serious
personal injury.
•Do not immerse in water or spray with a hose. Do
not clean with a pressure washer. Water entering
a power tool will increase the risk of electric shock.
Store tool indoors.
•Do not store the power tool on or near to fertilisers
or chemicals.
•
pack before changing or removing accessories.
WARNING
Do not operate near electric
•
power lines. The unit has not been
designed to provide protection from electric
shock in the event of contact with electric
power lines. Consult local regulations for safe
distances from electric power lines and ensure
that the operating position is safe and secure
before use.
•
Do not use an attachment extension with this
tool attachment. The additional length will make
cause injury.
Use the shoulder strap to reduce user fatigue
and help in maintaining control of the tool dur-
ing use.
•Do not wear multiple shoulder straps simultane-
ously. When wearing a shoulder strap, ensure
that no other wearable interferes with the release
and removal of the strap.
•Do not use the tool near anything that is burning or
smoking such as cigarettes, matches, or hot ashes.
•
To reduce the risk of health hazards from vapours
or dust, do not use tool near toxic, carcinogenic
or other hazardous materials such as asbestos,
machine and position your arms to resist blade
thrust. Position your body to the left side of the
machine. Blade thrust can increase the risk of injury
due to the machine moving unexpectedly. Blade
thrust can be controlled by the operator if proper
precautions are taken.
•If the blade binds, or when interrupting a cut
the machine motionless in the material until the
blade comes to a complete stop. While the blade
is binding, never attempt to remove the machine
from the material or pull the machine backward
while the blade is in motion, otherwise blade
thrust may occur. Investigate and take corrective
actions to eliminate the cause of blade binding.
•Do not use blunt or damaged blades. Blunt or
damaged blades increase the risk of jamming or
catching on an object, resulting in blade thrust.
•Always maintain good visibility of the material
being cut. Blade thrust is more likely to occur in
cut.
•If you are approached by another person while
There is an increased risk of injury to other persons
being struck by the moving blade in the event of
blade thrust.
Other brushcutter safety rules:
•
Before use, read this manual, and all manuals
and labels of this tool and its power head.
Failure to follow the warnings and instructions
may result in serious injury. Use tool only as
described in this manual. Use only attachments
recommended by MILWAUKEE®.
Do not use the tool as an edger. Do not tilt tool
to create a right angle to the ground. Keep
brushcutter head parallel to the ground. Guard
cannot protect against flying debris in this
orientation.
WARNING
Some dust
sawing, grinding,
creat
drilli
ed by power sanding,
ng, and other
construction activities contains chemicals known to
cause cancer, birth defects or other reproductive
harm. Some examples of these chemicals are:
•
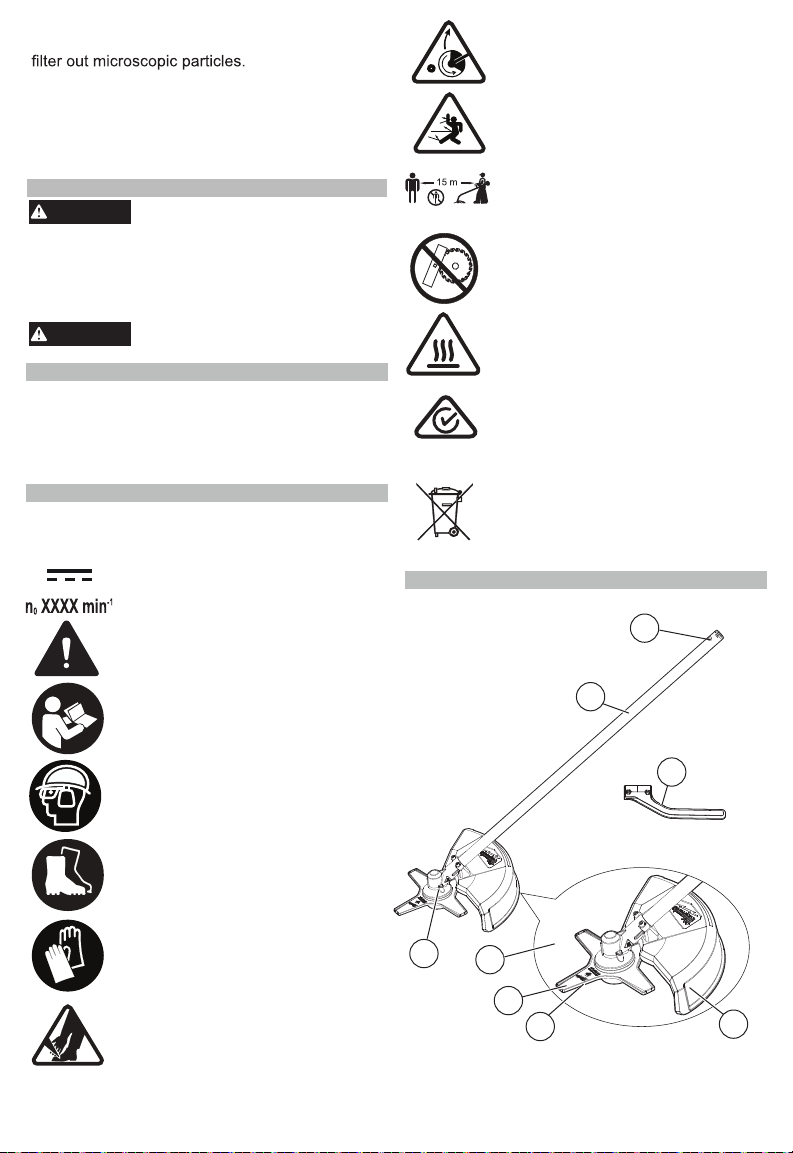
Maintain labels and nameplates. These carry
important information. If unreadable or missing,
contact a MILWAUKEE®service facility for a
replacement.
•Always use common sense and be cautious
when using tools. It is not possible to anticipate
every situation that could result in a dangerous
outcome. Do not use this tool if you do not
understand these operating instructions or you feel
the work is beyond your capability; contact
MILWAUKEE®Tool or a trained professional for
additional information or training.
Blade thrust is a sudden sideways, forward or
backward motion of the machine, which may occur
when the blade jams or catches on an object such
as a sapling or a tree stump. It can be violent
enough to cause the machine and/or operator to be
propelled in any direction, and possibly lose control
of the machine.
Blade thrust and its related hazards can be avoided
by taking proper precautions as given below.

5
Cat. No......................................... M18 FOPH BCA
SPECIFICATIONS
Cutting Blade Diameter ....................... 230 mm (9")
RPM.............................................................0-6,200
Blade Cat. No. ........................................ 49162757
Beware of blade thrust
Beware of thrown objects
The distance between the machine
and bystanders shall be at least
15 m
FUNCTIONAL DESCRIPTION
WARNING
Do
batteries.
not charge non-rechargeable
1. Detent
2. Attachment pole
3. Spindle lock
4. Brushcutter head
5. Blade
6. Blade cover
7. Guard
8. Hip barrier
WARNING
To reduce the risk of fire, personal
area, and work with approved safety equipment, such
as those dust masks that are specially designed to
READ AND SAVE ALL
INSTRUCTIONS FOR
FUTURE USE
ADDITIONAL BATTERY SAFETY RULES
injury, and product damage due to
a short circuit, never immerse your tool, battery
pack or charger in fluid or allow a fluid to flow inside
them. Corrosive or conductive fluids, such as
seawater, certain industrial chemicals, and bleach
or bleach-containing products, etc., can cause a
short circuit.
SYMBOLOGY
V
Do not use with saw or edger blade
Surface is hot. Avoid contact.
Regulatory Compliance Mark (RCM).
This product meets applicable
regulatory requirements.
Do not dispose of electric tools
together with household waste
material. Electric tools and electronic
equipment that have reached the end
of their life must be collected
separately and returned to an
environmentally compatible recycling
facility.
Volts
Direct Current
No Load Revolutions per Minute (RPM)
Safety Alert Symbol
Read operator’s manual
Wear eye, ear and head protection
Wear slip-resistant footwear
Wear protective gloves
Keep hands and feet away from the
blade
2
1
34
8
7
6
5
For use with ................. M18 FUEL™ QUIK-LOK™
Power Heads
NOTE: The shoulder strap supplied with the Power
Head and hip barrier must be installed on the
M18 FOPH M18 FUEL™ Outdoor Power Head.

6
ASSEMBLY
WARNING
Before use, read manual and labels
et with the holes in the
guard.
2. Insert four screws
through the guard and
into the bracket.
3. Tighten the screws se-
curely using the includ-
ed hex wrench.
of the power head. Important as-
sembly and use instructions are provided in the
power head manual. Connect the attachment to
the power head in accordance with the power
head manual.
Do not operate the tool without the guard and hip
barrier in place. The guard and hip barrier must
be attached properly during use. Operating the
tool without the guard and hip barrier will cause
serious injury.
Always remove battery pack before changing or
removing accessories.
Installing the Guard
The guard is shipped uninstalled and must be in-
stalled before use.
1. Line up the guard brack-
Installing the Hip Barrier
Power
head
Hip
barrier
Long screws
Front
handle
Hex nuts
WARNING
Do not use tool with a damaged
cutter head. Cracked or broken
1. Remove the two screws from underneath the front
handle of the QUIK-LOK™ Power Head.
2. Remove the hex nuts from the front handle of the
QUIK-LOK™ Power Head.
3. Line up the hip barrier on top of the front handle.
The hip barrier must be oriented on the left side
of the tool.
NOTE: The handle and hip barrier must be
installed on the power head pole, just after the
"Place Handle Here" label.
4. Line up the hex nuts on top of the hip barrier.
5. Insert the two long screws that came with the hip
barrier through the bottom of the front handle to
connect the front handle, hip barrier, and hex nuts
into place. Tighten the screws securely.
pieces can be thrown.
CAUTION
ways
When
wear
handling
gloves
a
and
cutter
put the
blade,
blade
al-
cover on the blade.
Installing/Removing the Blade Cover
To install the blade cover, snap the cover into place
over the bottom of the blade. Check to make sure the
cover is secure over each side of the blade.
To remove the blade cover, pull the cover away
from the blade.
Installing/Removing the Blade
The blade is shipped uninstalled and must be in-
stalled before use.
To install the blade:
3.
1. Remove the battery pack.
2. Insert the head removal tool into the spindle lock
and keep in place.
4.
Attach the blade onto the shaft so that the guide
Place the washer onto the shaft, on top of the
blade.
5.
6. Remove the hex wrench and head removal tool.
To remove the blade:
1. Remove the battery pack.
2. Turn the brushcutter attachment upside down.
3. Insert the head removal tool into the spindle lock
and keep in place.
4. Insert the hex wrench over the hex nut. Rotate
clockwise until the hex nut loosens. Remove the
hex nut.
5. Remove the hex nut, washer and blade.
The hip barrier is shipped uninstalled and must be
installed before use. The hip barrier must be
attached properly on the left side of the QUIK-LOK™
Power Head, so that the brushcutter is used on your
right side. This is to help prevent kickback that could
cause serious injury.
Place the hex nut over the washer and tighten the
hex nut with 13 - 23 Nm of tightening torque.
Head removal tool
Hex wrench
Spindle lock
Blade
w/ blade cover
Hex nut
Washer
Lock plate
Guard
Shaft

7
Selecting the Speed High
Low
WARNING
Do not wear multiple shoulder
straps simultaneously. When wear-
ing a shoulder strap, ensure that no other wear-
able interferes with the release and removal of
the strap.
Attaching the Shoulder Strap
(Cat. No. 204350021)
Use the speed control button to select Low
or High speeds. Use low speed for larger
jobs where extended battery life is needed.
Use high speed for dense growth applica-
tions.
1.
Use the shoulder strap to reduce user fatigue and
help in maintaining control of the tool during use.
To install the strap:
Nut
Bolt
clip
Pole
Bevel
Gate Carabiner
2.
3.
To wear the strap:
Remove the battery
pack.
Fit the pole clip around
the power head pole
between the front han-
dle and rear handle in
a location comfortable
during use.
Insert the bolt through
the pole clip and strap
bevel. Thread the nut
onto the bolt and tight-
en securely.
1.
2.
4. Clip the strap cara-
biner to the bevel.
5. Adjust the pole clip as
needed to ensure the
blade is at operating
level.
Put your right arm
and head through the
strap.
Adjust the strap clips
to change the strap
length to fit comfort-
ably.
3. Slide the neck pad to the appropriate position.
To unclip the strap:
1. Hold the tool by the front handle with your left hand.
2. Grip the carabiner with your right hand and unclip
OPERATION
1. Remove the blade cover before use. Inspect the
2.
blade for damage. If damaged, do not use and
replace the blade.
Grasp the trigger handle with your right hand and
the front handle with your left hand to properly
align yourself behind the guard and away from
the direction of cut.
To start
pull the trigger.
3.
always wear proper eye
protection marked to comply with
AS/NZS 1337.1.
Always remove battery pack before changing or
removing accessories or attachments.
Do not operate the tool without the front handle
in place. The front handle must be attached prop-
erly for use. Using one hand could cause loss of
control and result in serious injury.
Do not operate the tool without the guard and hip
barrier in place. The guard and hip barrier must
be attached properly during use. Operating the
tool without the guard and hip barrier will cause
serious injury.
During operation, use the shoulder strap. Keep
the brushcutter on your right side firmly.
Use both hands when operating the tool, accord-
grip. Using one hand could cause loss of control
and result in serious injury.
Inspect the area before use. Remove all debris
and hard objects such as rocks, glass, wire, etc.
that can ricochet, be thrown, or otherwise cause
injury or damage during operation.
Trimming
4.
5.
30 CM MINIMUM
NOTE: The brushcutter will cut best when moved
across the ground in the opposite direction of the
arrow on the guard.
remove the battery before clearing any debris.
WARNING
To reduce the risk of injury,
To vary the speed, increase or decrease the pres-
sure on the trigger. The further the trigger is pulled,
the greater the speed up to the maximum set by
the speed control button.
Allow the tool to angle down, keeping at least
30 cm between the brushcutter head and any
body part. Hold the tool just above the ground
and move the head side to side.
WARNING
Do not use tool as an edger. Do
not tilt tool to create a right angle
to the ground. Keep brushcutter head parallel to
the ground. Guard cannot protect against flying
debris in this orientation.

tool comes to a complete stop before laying the
tool down.
•
7. To stop the tool release the trigger. Make sure the
•
•
Materials to Cut
Thick grass, brush, weeds, small diameter trees and
saplings Cutting Tips
Make multiple passes in long growth to avoid block-
ages.
Avoid ornamental trees, shrubs, and plantings. Avoid
contact with siding, fence posts, etc. They can all
be damaged by the tool.
Inspect the tool for damage upon striking a hard
object or if there appears to be excessive vibration.
MAINTENANCE
WARNING
To reduce the risk of injury,
WARNING
Use only recommended accesso-
ries. Others may be hazardous.
For a complete listing of accessories, go online to
milwaukeetool.com.au / milwaukeetool.co.nz or
contact a distributor.
WARNING
Do not use blunt or damaged
immerse your tool, battery pack or charger in
liquid or allow a liquid to flow inside them.
Cleaning
Clean dust and debris from vents. Keep handles
clean, dry and free of oil or grease. Use only mild
soap and a damp cloth to clean, since certain
cleaning agents and solvents are harmful to plastics
and other insulated parts. Some of these include
petrol, turpentine, lacquer thinner, paint thinner,
chlorinated cleaning solvents, ammonia and
household detergents containing ammonia. Never
use flammable or combustible solvents around
tools.
Repairs
For repairs, return the tool, battery pack and charger
to the nearest service centre.
ACCESSORIES
blades. Blunt or damaged blades
increase the risk of jamming or catching on an
object, resulting in blade thrust.
Replacing the Blade
The blade should be inspected before each use. If the
blade chips or becomes dull, it should be replaced.
For instructions on removing and installing the blade,
please see the "Installing/Removing the Blade" sec-
tion of this manual.
always unplug the charger and
remove the battery pack from the charger or
tool before performing any maintenance. Never
disassemble the tool, battery pack or charger.
Contact a MILWAUKEE®service facility for ALL
repairs. Maintaining Tool
Keep your tool, battery pack and charger in good
repair by adopting a regular maintenance program.
Inspect your tool for issues such as undue noise,
misalignment or binding of moving parts, breakage
of parts, or any other condition that may affect the
tool operation. Return the tool, battery pack, and
charger to a MILWAUKEE®service facility for repair.
After six months to one year, depending on use,
return the tool, battery pack and charger to a
MILWAUKEE®service facility for inspection.
If the tool does not start or operate at full power with
a fully charged battery pack, clean the contacts on
the battery pack. If the tool still does not work
properly, return the tool, charger and battery pack,
to a MILWAUKEE®service facility for repairs.
WARNING
To reduce the risk of personal
injury and damage, never
WARRANTY - AUSTRALIA and NEW ZEALAND
SERVICE - AUSTRALIA and NEW ZEALAND
Please refer to Australian and New Zealand warranty supplied with tool. This warranty applies only to
product sold by authorised dealers in Australia and New Zealand.
26 - 40 Nina Link, Dandenong South,
Victoria, 3175, Australia
961014761-03(A)
Milwaukee Tool (New Zealand)
274 Church Street, Penrose,
Auckland, 1061, New Zealand
DESIGNED BY MILWAUKEE ELECTRIC TOOL CORP.
PROFESSIONALLY MADE IN CHINA
PRINTED IN CHINA
MILWAUKEE®prides itself in producing a premium quality product that is Nothing But Heavy DutyTM.
Your satisfaction with our products is very important to us! If you encounter any problems with the
operation of this tool, please contact your authorised MILWAUKEE®dealer.
For a list of MILWAUKEE®dealers, guarantee or service agents please contact MILWAUKEE®
Customer Service or visit our website.
(Australia Toll Free Telephone Number 1300 645 928)
(New Zealand Toll Free Telephone Number 0800 645 928)
or visit milwaukeetool.com.au/milwaukeetool.co.nz.
Milwaukee Electric Tool Corporation
13135 West Lisbon Road, Brookfield, Wisconsin U.S.A. 53005
Milwaukee Tool (Australia)
Other manuals for M18
103
Table of contents
Other Milwaukee Brush Cutter manuals