Mimio MimioBoard ME-77 User manual
MimioBoard ME-77 | ME-87
User Guide
mimio.com

© 2013 Mimio. All rights reserved. Revised 7/18/2013.
No part of this document or the software may be reproduced or transmitted in any form
or by any means or translated into another language without the prior written consent
of Mimio.
Mimio, MimioClassroom, MimioTeach, MimioCapture, MimioVote, MimioView,
MimioHub, MimioBoard, MimioPad, MimioMobile, MimioProjector, and MimioStudio
are registered marks in the United States and other countries. All other trademarks are
the property of their respective holders.

Contents
MimioBoard 1
What's Included 1
About MimioBoard 3
Status Lights 4
About MimioStudio 4
Getting Started 5
Setting Up MimioBoard 5
Installing MimioBoard 5
Connecting MimioBoard 11
Setting Up the Stylus 13
Setting Up Interactive Mode 13
Projecting Your Desktop 14
Calibrating Interactive Mode 14
Using MimioBoard 17
Using the Stylus 17
Using MimioStudio Tools 17
Caring for MimioBoard 19
Cleaning MimioBoard 19
Cleaning the MimioBoard Dry-Erase Surface 19
Cleaning the MimioBoard Frame and Stylus 19
Replacing the MimioTeach Bar 20
Technical and Environmental Information 21
Environmental Information 21
Safety Precautions for Lithium-Ion Rechargeable Batteries 21
Contacting Mimio 22
Documentation Feedback 22
iii
iv
This page intentionally left blank for double-sided printing.
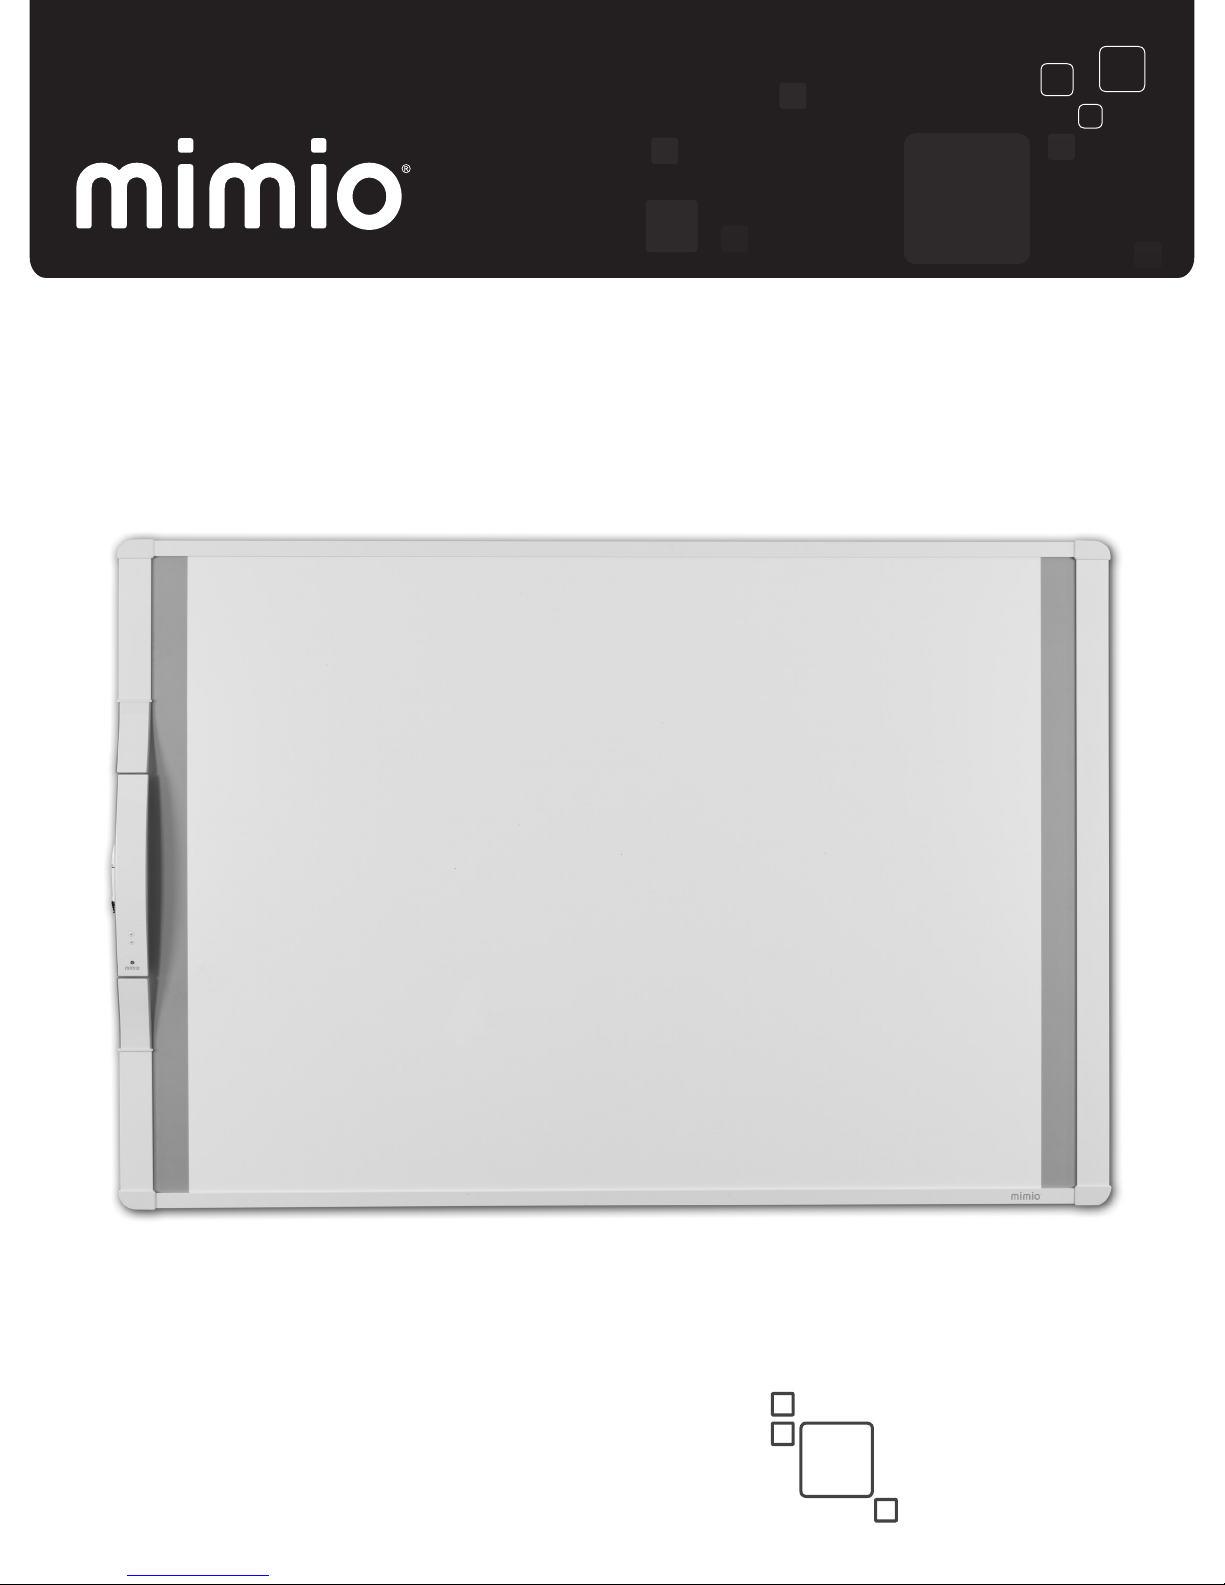
MimioBoard
MimioBoard is a dry-erasable, interactive whiteboard system. The board includes an
integrated MimioTeach bar, using MimioTeach technology to turn the MimioBoard surface
into an interactive whiteboard. Using MimioBoard with a projector and MimioStudio
classroom software, you can create and deliver lessons and presentations directly from your
MimioBoard. Using the included stylus, you can control the movement of your computer
cursor, much like you would with a mouse at your computer.
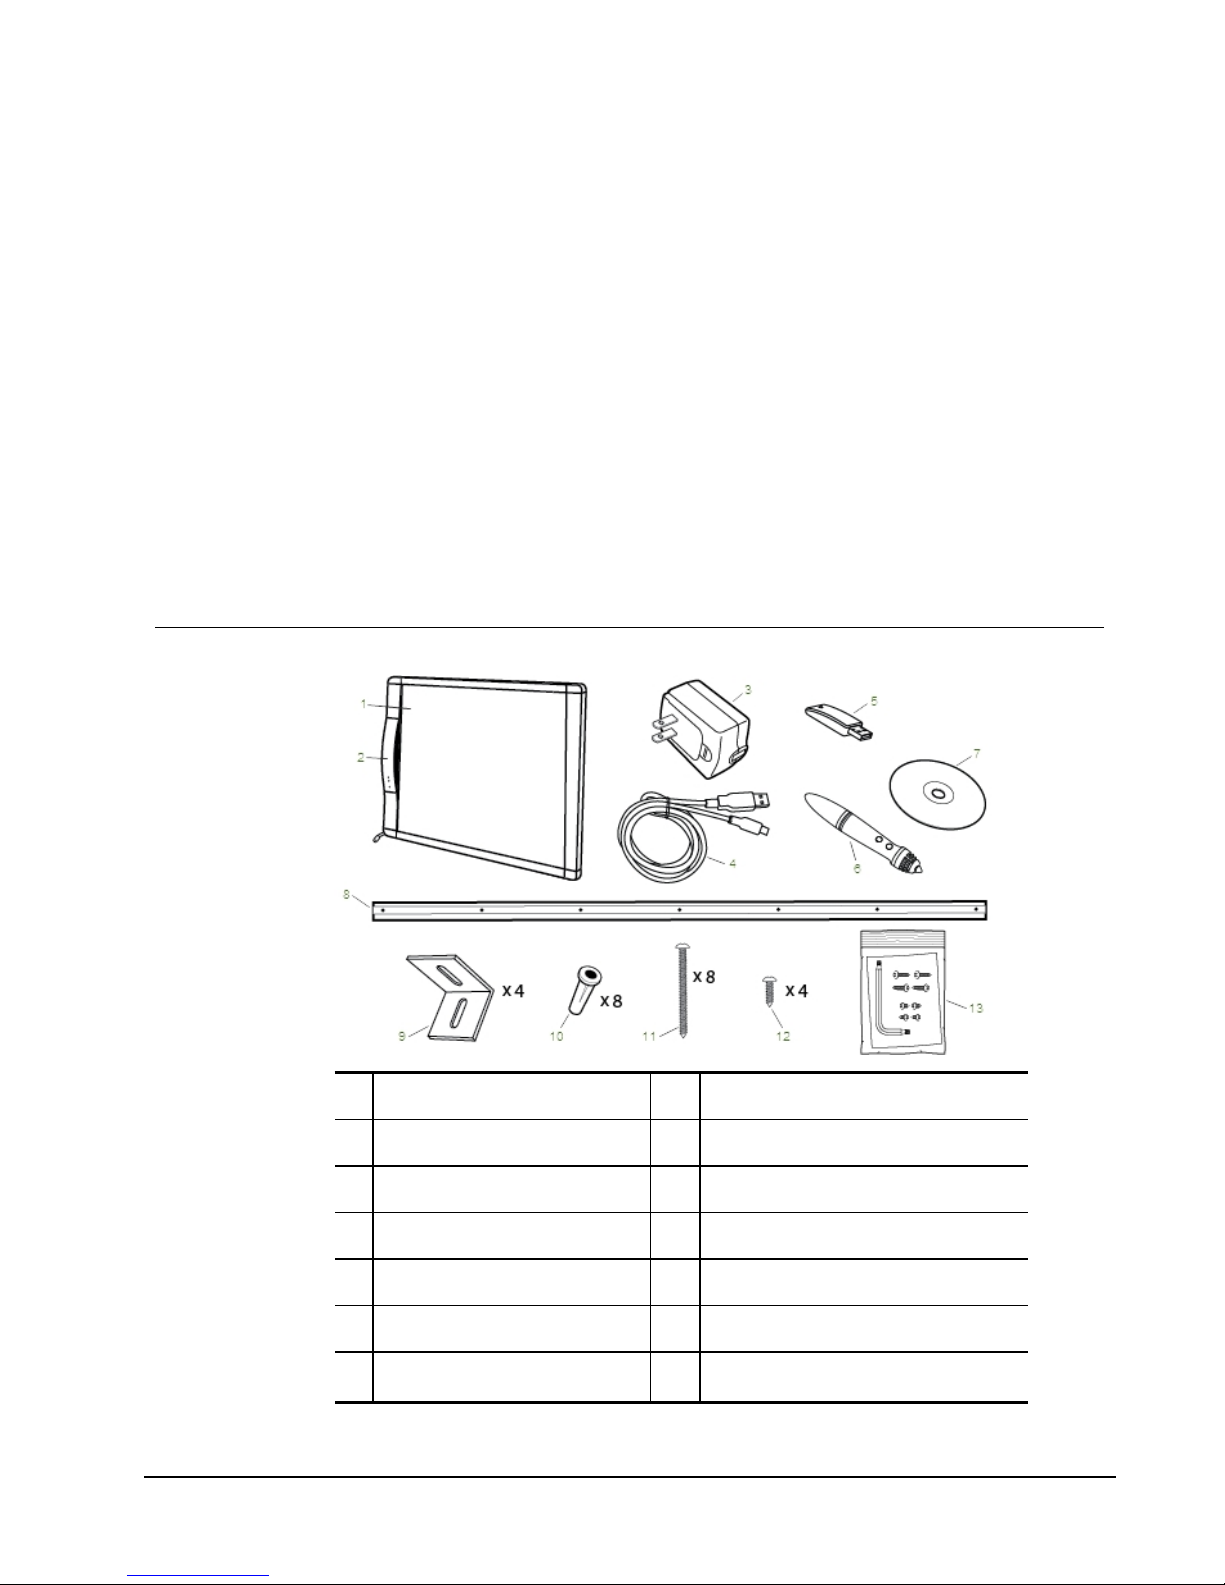
What's Included
The MimioBoard package contains the following items:
1 MimioBoard 8 Mounting bar
2 MimioTeach 9 L-brackets
3 USB power adapter 10 Drywall anchors
4 USB cable 11 #10x2½ in (M5x60mm) screws
5 MimioHub 12 #6x⅜ in (M3x8.5mm) screws
6 Stylus 13 MimioTeach removal tools
7MimioStudio DVD
1
Chapter 1

MimioBoard
If you are missing any of the items above, contact Customer Support.
2

About MimioBoard
About MimioBoard
MimioBoard has a highly durable, magnetic, and erasable surface with heavy-duty gray
strips to focus attention and make it easy to center your projection. MimioBoard interactive
whiteboard is powered by the MimioTeach bar.
Two models of MimioBoard are available.
nME-77
Aspect ratio: 4:3
Board size: 48.2 in x 71.2 in (1225 mm x 1809 mm)
Active view size: 45.9 in x 61.2 in (1167 mm x 1555 mm)
nME-87
Aspect ratio: 16:10
Board size: 48.2 in x 83.5 in (1225 mm x 2120 mm)
Active view size: 45.9 in x 73.5 in (1167 mm x 1867 mm)
The following figure shows the major components of the MimioBoard.
1 Dry-erase, magnetic, projection surface 5 Calibrate Interactive mode
2 Tools (button B) 6 Power/Status light
3 Hover/Right-click (button A) 7 MimioBoard cable
4 Launch
3
MimioBoard
Status Lights
The status light visually shows the status of the MimioBoard.
Off Not receiving power; USB/powercable is not connected or MimioBoard is turned
off.
Solid Green MimioBoard is connected and receiving power; MimioStudio software is running.
Flashing Green MimioBoard is connected or connecting, and receiving power; MimioStudio
software is not running.
Solid Amber MimioBoard cannot find an available MimioHub.
Flashing Amber MimioBoard is searching for an available MimioHub.
About MimioStudio
MimioStudio provides multiple authoring and editing tools for creating almost any type of
content. You can use MimioStudio Notebook with MimioStudio Tools to create a variety of
objects including text boxes, freehand writing and drawing, lines, arrows, and many basic
shapes. Images can be imported into a Notebook, both as objects and as background images.
See Using MimioStudio Tools for information about using MimioStudio software.
4

Getting Started
Review the following topics to install and start using your MimioBoard.
nSetting Up MimioBoard
nSetting Up the Stylus
nSetting Up Interactive Mode
Setting Up MimioBoard
MimioBoard mounts securely to the wall using the included hardware.
Two people are required to safely lift and install your MimioBoard.
Review the following topics for information about installing and connecting your
MimioBoard.
nInstalling MimioBoard
nConnecting MimioBoard
Installing MimioBoard
Only a qualified technician should install MimioBoard. The technician must be familiar
with the structure of the room and the procedures for mounting objects to the wall.
Two people are required to safely lift and install MimioBoard.
To mount your MimioBoard to the wall, you will need the included hardware along with
the following tools.
1 Drill 4 Level
2 ¼ in (6.35 mm) drill bit 5 Screwdriver
3 Tape measure 6 Pencil
5
Chapter 2

Getting Started
To install MimioBoard
1. Make a mark on the wall at the height you want the top of the MimioBoard to be
located.
2. Using a level, draw a horizontal line starting at the mark.
3. Align the mounting bar with the horizontal line and make a mark on the wall in the
center of four of the holes in the mounting bar.
The mounting bar must be securely attached to studs or other solid support. The
mounting bar supports the full weight of the MimioBoard. Extra care must be taken
to ensure that the full weight of the board can be supported.
4. Drill a hole at each mark using a ¼ in (6.35 mm) drill bit.
6

Setting Up MimioBoard
5. Insert a drywall anchor into each of the four holes so that each anchor is flush with the
surface of the wall.
The included anchors are for use with drywall only. For concrete walls, use concrete
anchors (not included).
6. Place the mounting bar against the wall so that the holes in the bar align with the four
drywall anchors.
7. Using a screw driver and four #10x2½ in (M5x60mm) screws, securely fasten the
mounting bar to the wall.
8. Hang the MimioBoard from the mounting bar.
Two people are required to safely lift and position the MimioBoard.
9. Ensure that the MimioBoard is securely attached to the wall and that all screws and
anchors are stable.
7
Getting Started
10. Make sure the MimioBoard cable goes through the cable channel and that the
MimioBoard is flush against the wall.
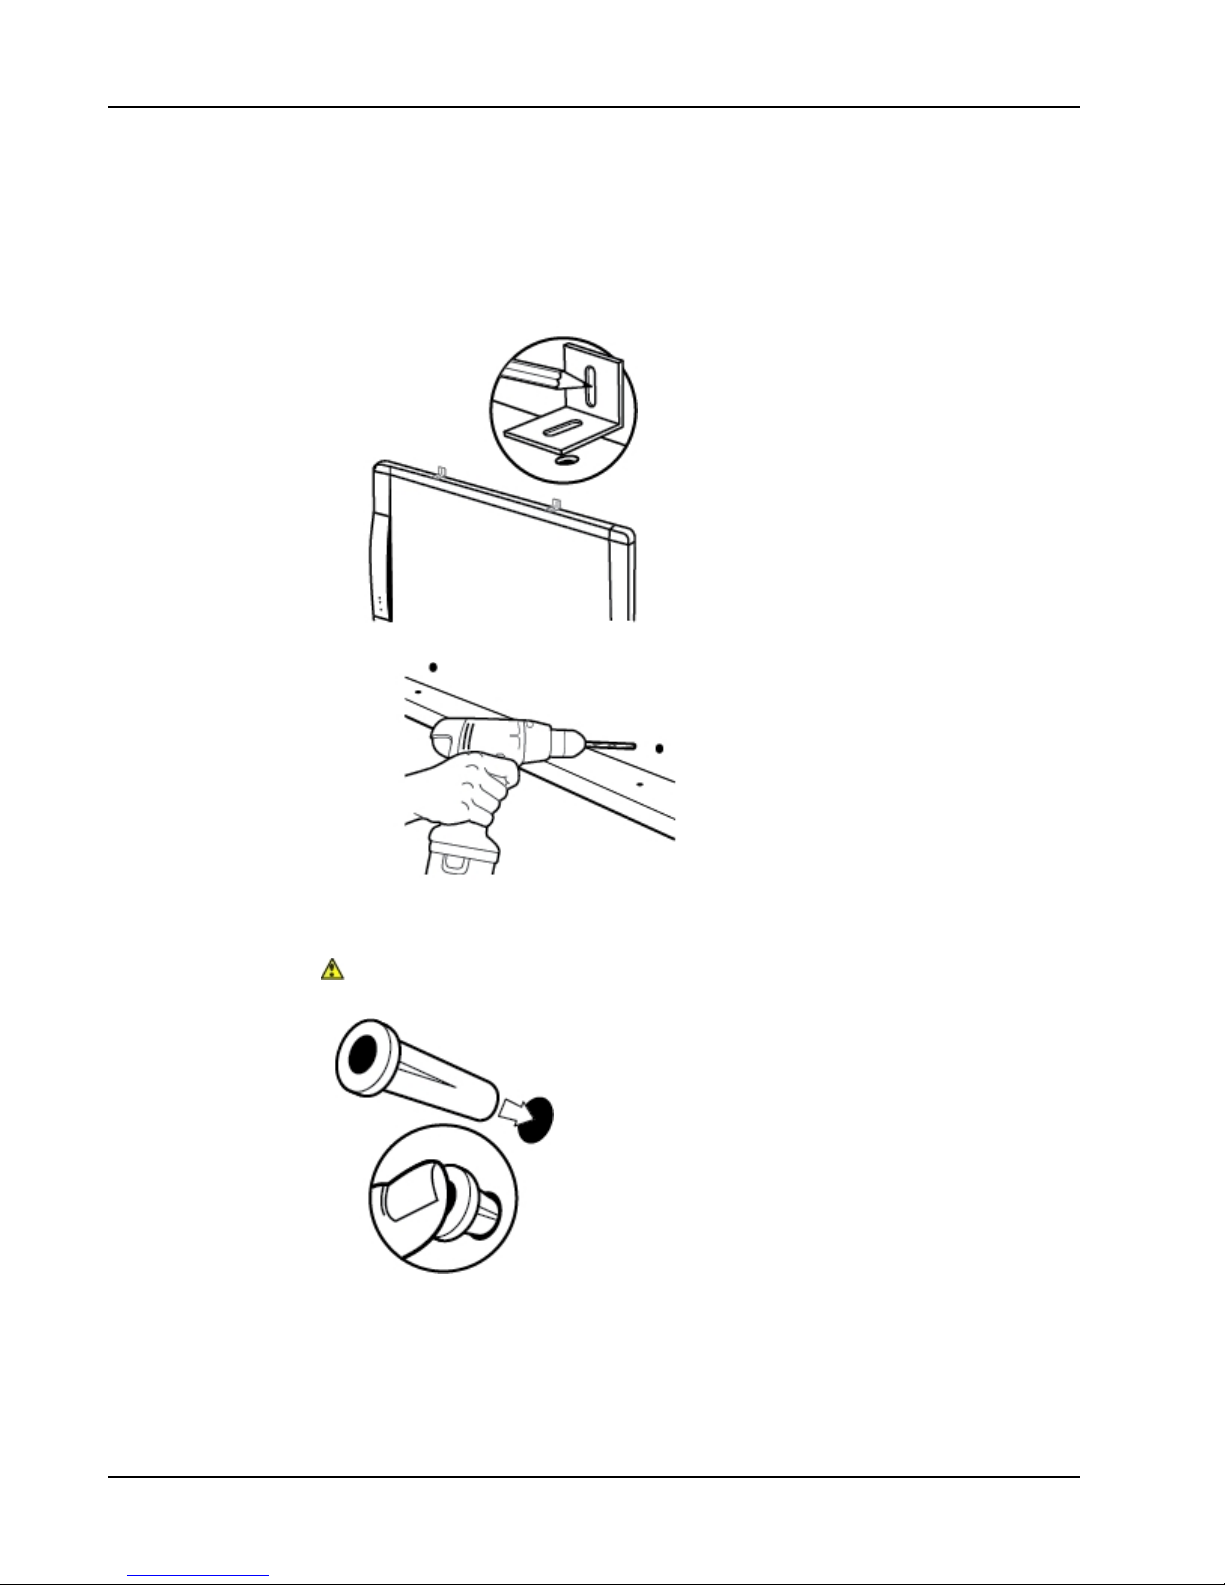
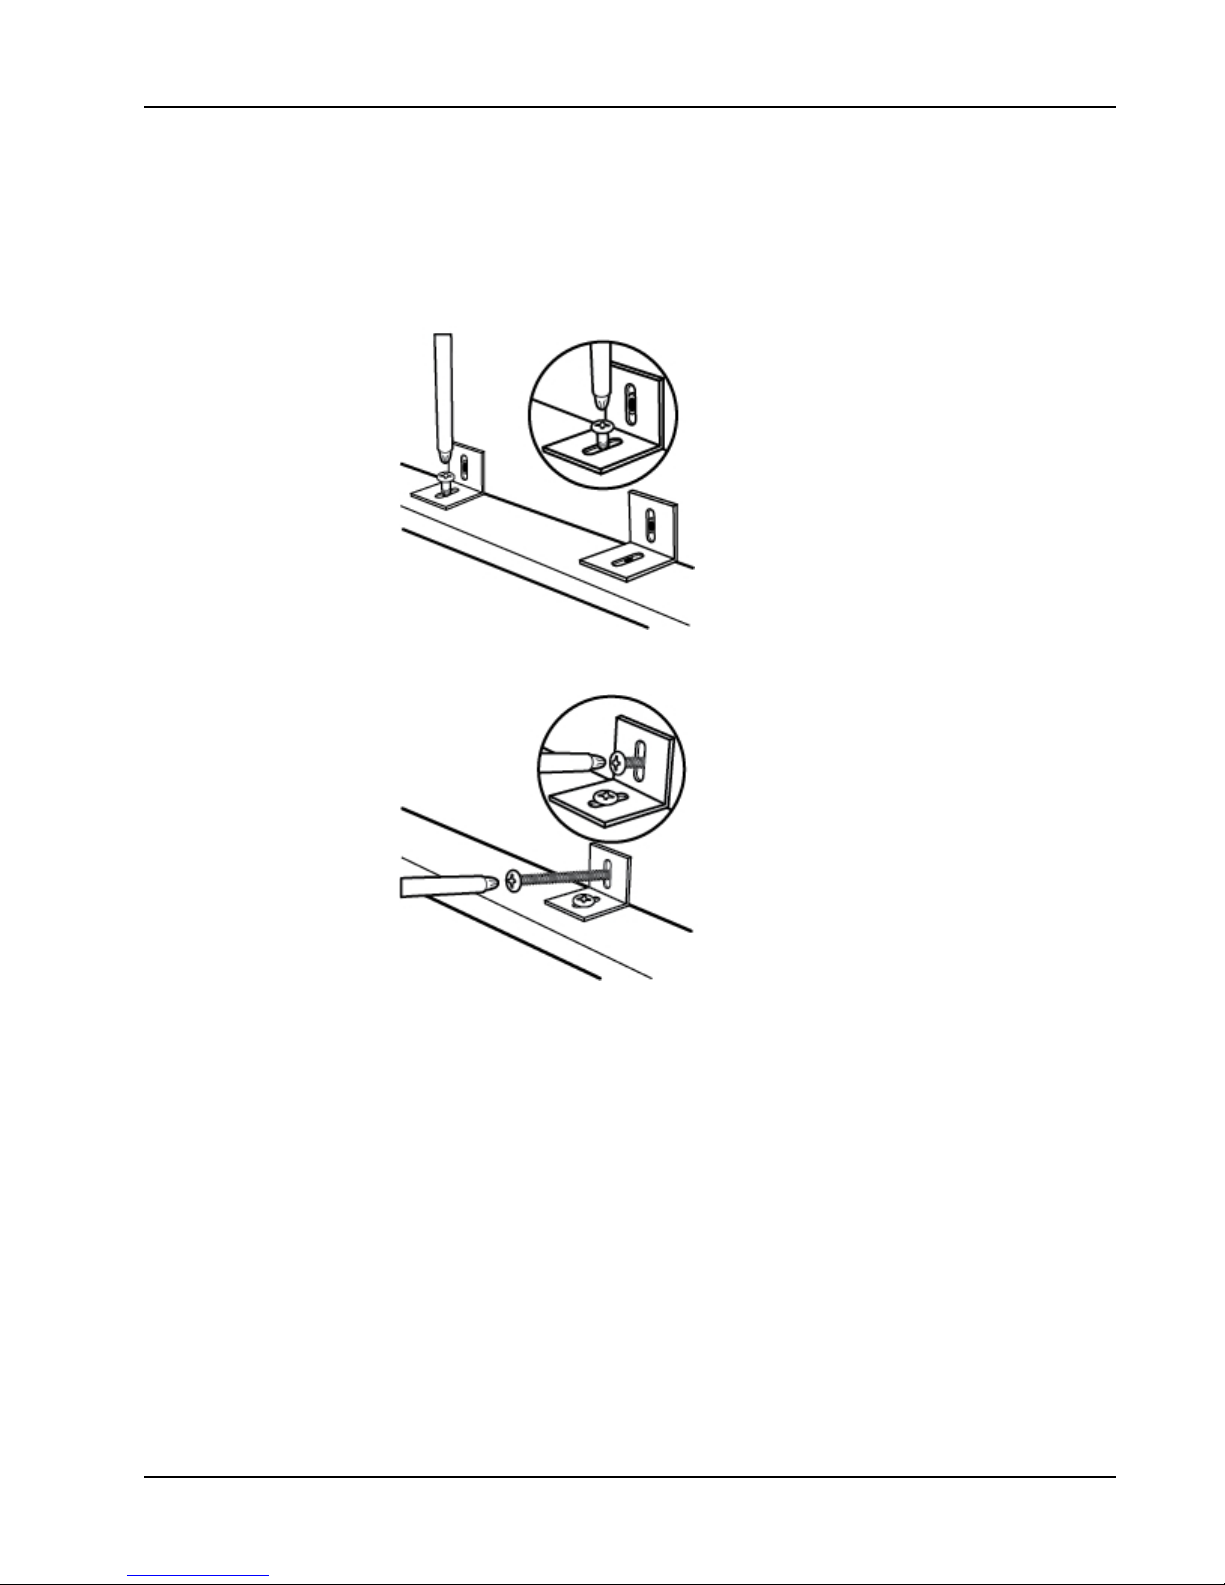
11. Locate the two holes on the bottom of the MimioBoard and do the following for each
of the two holes:
a. Align the slot in the L-bracket with the hole on the bottom of the MimioBoard.
b. Make a mark on the wall in the center of the slot in the L-bracket that is touching
the wall.
12. Remove the L-brackets and drill a hole at each mark using a ¼ in (6.35 mm) drill bit.
8

Setting Up MimioBoard
13. Insert a drywall anchor into each of the two holes so that each anchor is flush with the
surface of the wall.
The included anchors are for use with drywall only. For concrete walls, use concrete
anchors (not included).
14. For each of the brackets, do the following:
a. Align the slot in the bracket with the hole on the bottom of the MimioBoard and
the drywall anchor.
b. Using a screw driver and an #6x⅜ in (M3x8.5mm) screw, securely fasten the bracket
to the bottom of the MimioBoard.
c. Using a screw driver and a #10x2½ in (M5x60mm) screw, securely fasten each
bracket to the wall.
9
Getting Started
15. Locate the two holes on the top of the MimioBoard and do the following for each of
the two holes:
a. Align the slot in the L-bracket with the hole on the top of the MimioBoard.
b. Make a mark on the wall in the center of the slot in the L-bracket that is touching
the wall.
16. Remove the L-brackets and drill a hole at each mark using a ¼ in (6.35 mm) drill bit.
17. Insert a drywall anchor into each of the two holes so that each anchor is flush with the
surface of the wall.
The included anchors are for use with drywall only. For concrete walls, use concrete
anchors (not included).
10
Setting Up MimioBoard
18. For each of the brackets, do the following:
a. Align the slot in the bracket with the hole on the top of the MimioBoard and the
drywall anchor.
b. Using a screw driver and an #6x⅜ in (M3x8.5mm) screw, securely fasten the bracket
to the top of the MimioBoard.
c. Using a screw driver and a #10x2½ in (M5x60mm) screw, securely fasten each
bracket to the wall.
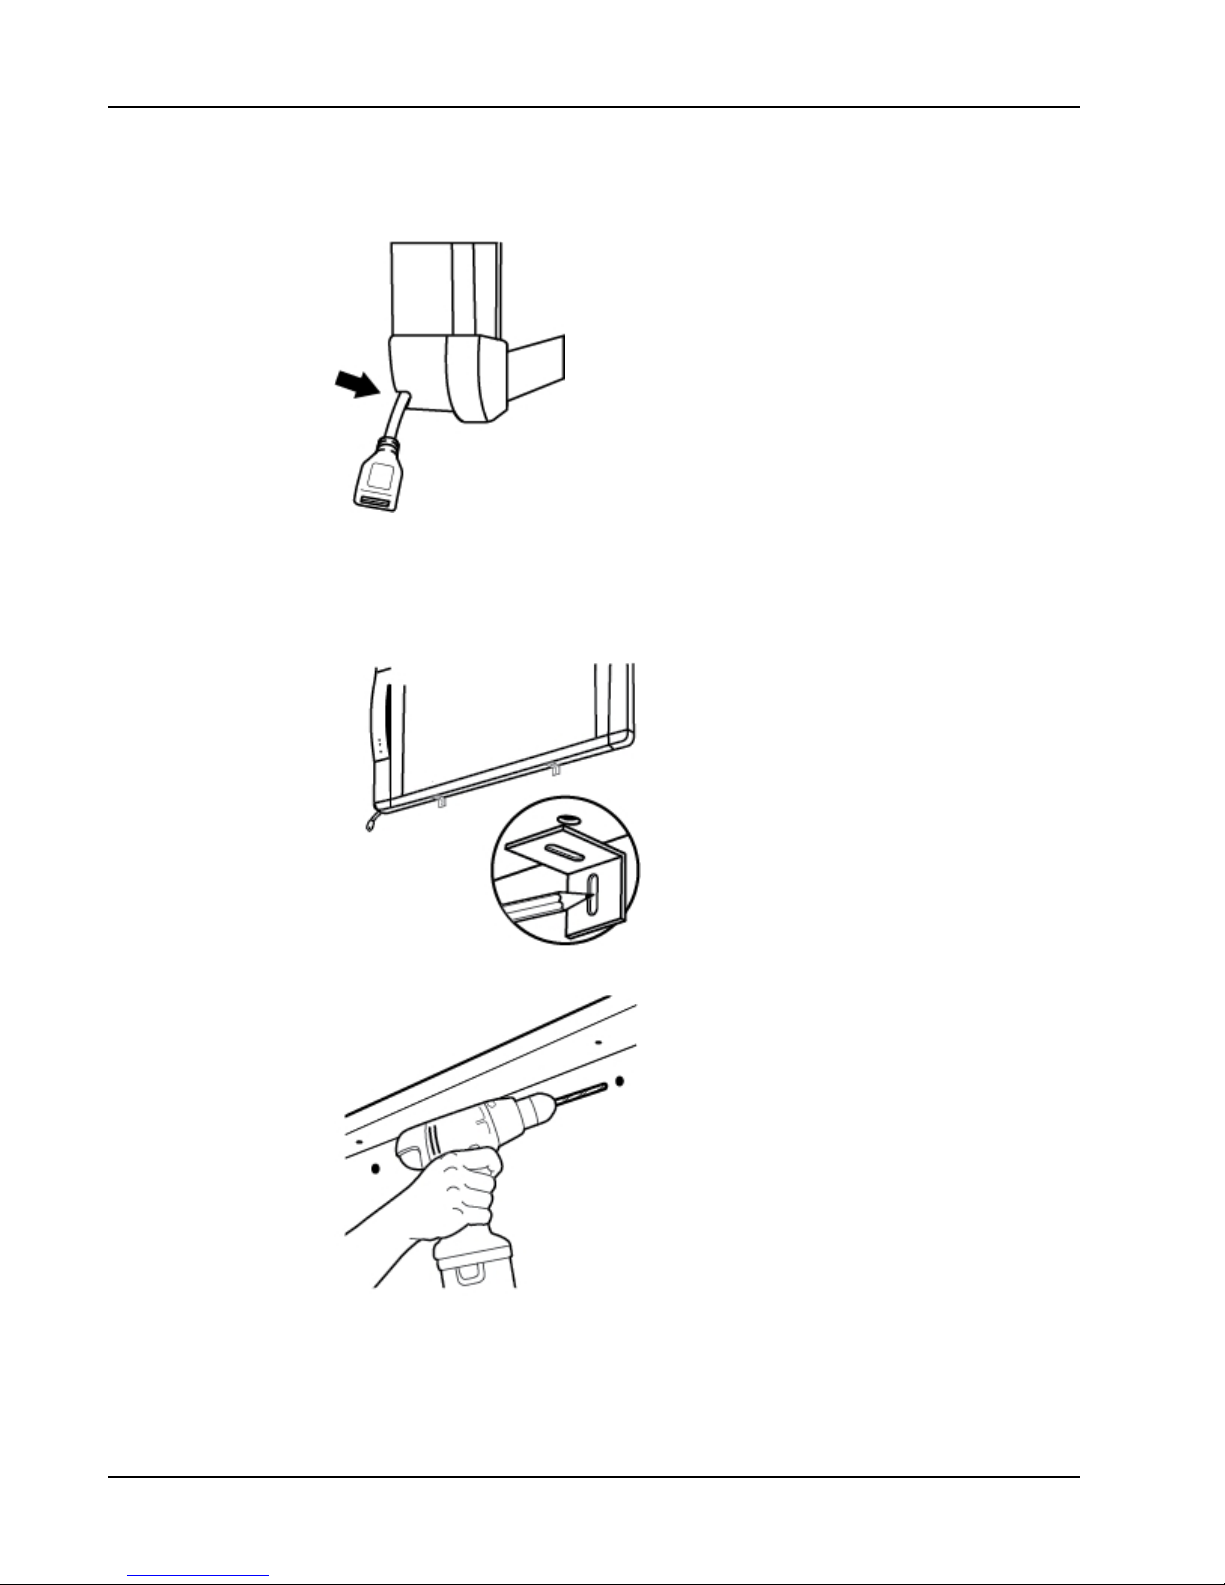
Connecting MimioBoard
MimioBoard is powered using the included USB cable and power adapter.
Your MimioBoard comes pre-linked to the included MimioHub. You can also use this
MimioHub to connect other MimioClassroom devices to your computer, such as
MimioVote.
11

Getting Started
To set up the MimioBoard
1. Plug the USB cable into the USB port on the power adapter.
2. Plug the other end of the USB cable into the MimioBoard cable.
3. Plug the power adapter into a power outlet.
4. Plug the MimioHub into an available USBport on your computer.
If you do not want to connect your MimioBoard to your computer wirelessly, you can
link the board to your computer using the included USB cable without the power
adapter. MimioBoard will be powered by USB through your computer.
12
Setting Up the Stylus
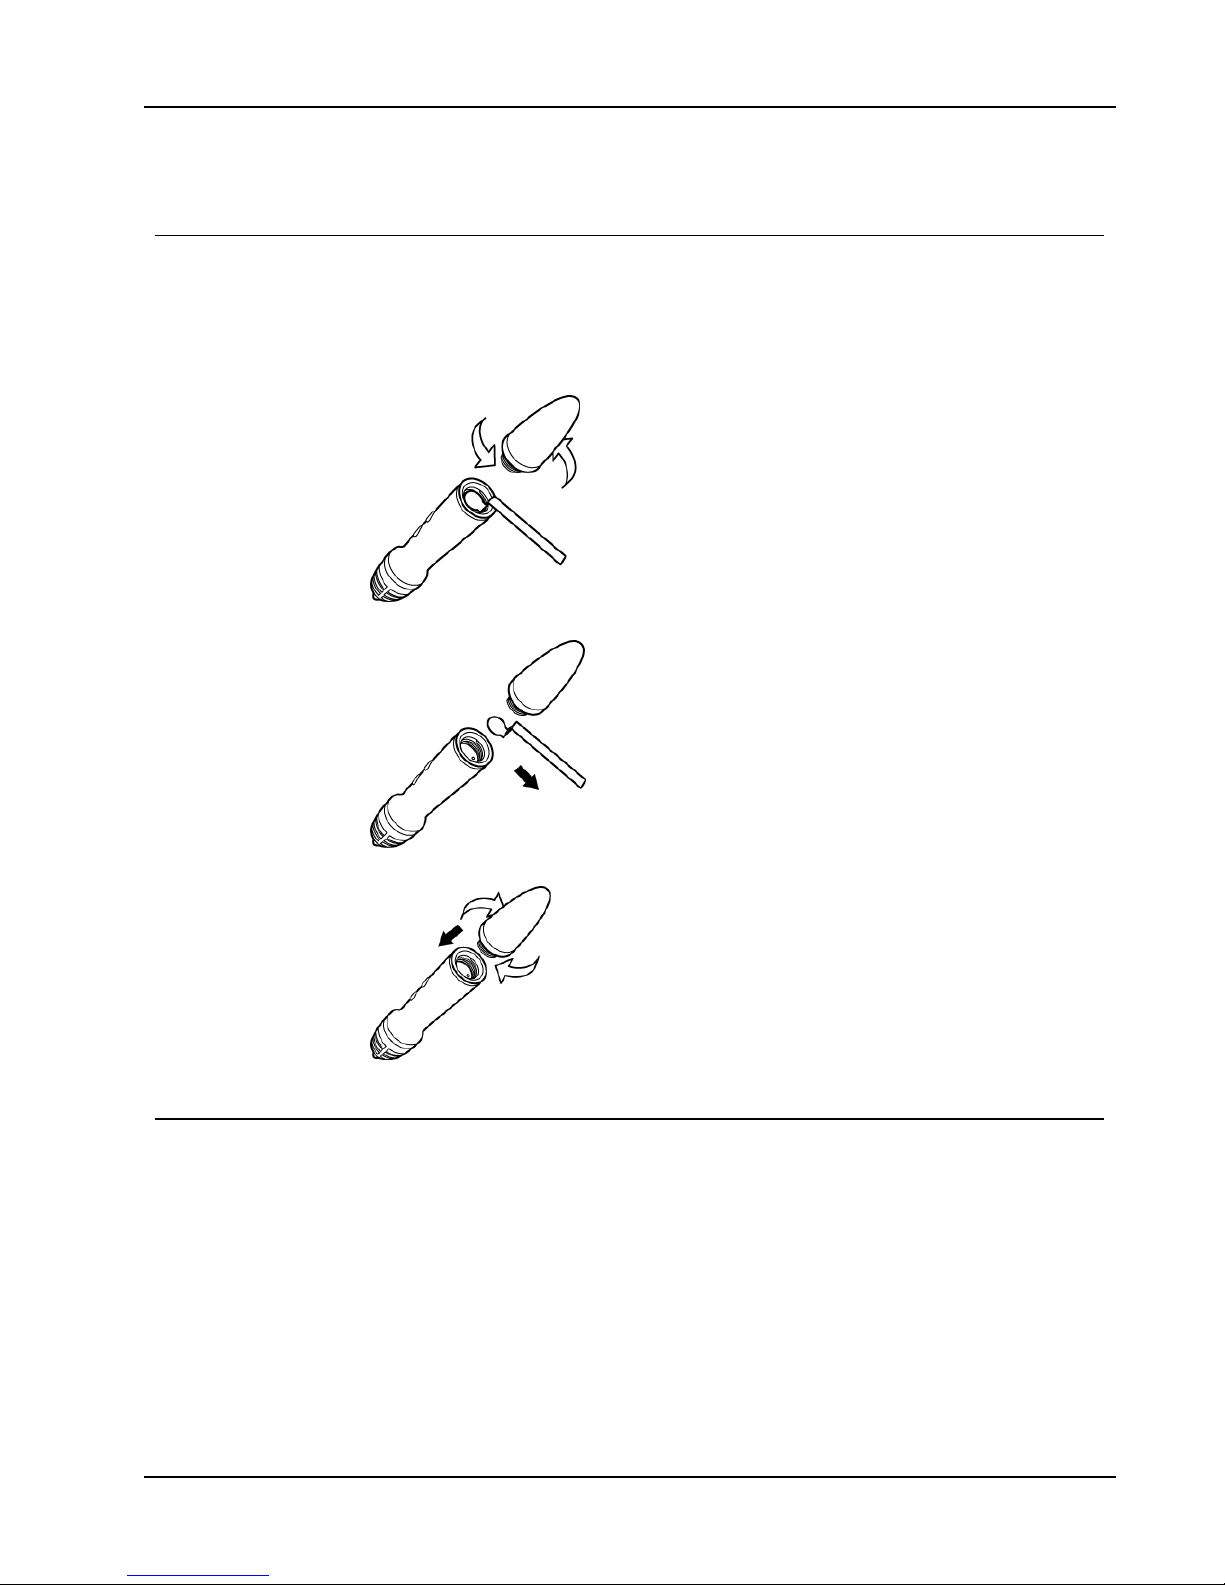
Setting Up the Stylus
The stylus is powered by a rechargeable lithium-ion battery. The battery recharges whenever
the stylus is docked on the MimioBoard.
To set up the stylus
1. Turn the top of the stylus counter-clockwise to separate the top from the body of the
stylus.
2. Remove the plastic strip from the stylus.
3. Replace the top onto the body of the stylus and turn clockwise to attach.
Setting Up Interactive Mode
Using MimioStudio Interactive mode, you can create and deliver lessons and presentations
directly from your MimioBoard.
To use Interactive mode you need a projector, a MimioBoard, and a stylus. Combined, these
devices make for a powerful tool for creating and delivering lessons and presentations.
13

Getting Started
Projecting Your Desktop
If you are presenting from a MimioStudio Notebook or another application, such as a
PowerPoint presentation, you can open the application before or after Interactive mode is
enabled and calibrated.
To start Interactive mode
1. Project your desktop image onto your MimioBoard surface.
Refer to your projector’s documentation for instructions on how to project your desktop
image.
2. Click the stylus anywhere on the MimioBoard surface.
Interactive mode starts and the calibration screen appears.
To exit Interactive mode
Do one of the following:
lPress the Interactive button, , twice on the MimioBoard.
lStart MimioStudio Tools, click Interactive , and then click Exit.
lStart MimioStudio Settings, select Interactive, and then click Disable.
Calibrating Interactive Mode
Each time Interactive mode is enabled, you are prompted to calibrate using the stylus.
When using MimioBoard with a permanently installed projector, you do not need to
recalibrate Interactive mode after the first session.
To calibrate Interactive mode
1. If the calibration screen does not appear when you start Interactive mode, do one of the
following:
lPress the Interactive button, , on your MimioBoard.
lStart MimioStudio Tools, click the Interactive button, , and then click
Recalibrate.
lStart MimioStudio Settings, select Interactive, and then click Calibrate.
2. Press the stylus down on the MimioBoard surface at the center of each of the nine
calibration targets.
Make sure to hold the stylus perpendicular to the writing surface as you click.
14

Setting Up Interactive Mode
The calibration target disappears and the next calibration target appears.
When the calibration screen disappears, Interactive mode is enabled.
15

16
This page intentionally left blank for double-sided printing.
This manual suits for next models
2
Table of contents
Other Mimio Interactive Whiteboard manuals


