Minarik DIGI-LOK DLC300 User manual

USER’S MANUAL
Model DLC300/DLC400
DIGI-LOK®Programmable Digital Control
250-0112-rev3.qxd 7/18/00 10:46 AM Page a

Copyright 2000 by
Minarik Corporation
All rights reserved. No part of this manual may be reproduced or transmitted in any
form without written permission from Minarik Corporation. The information and
technical data in this manual are subject to change without notice. Minarik
Corporation and its Divisions make no warranty of any kind with respect to this
material, including, but not limited to, the implied warranties of its merchantability
and fitness for a given purpose. Minarik Corporation and its Divisions assume no
responsibility for any errors that may appear in this manual and make no
commitment to update or to keep current the information in this manual.
Printed in the United States of America.
250-0112-rev3.qxd 7/18/00 10:46 AM Page b

Safety Warnings
•This symbol denotes an important safety tip or warning.
Please read these instructions carefully before performing
any of the procedures contained in this manual.
•DO NOT INSTALL, REMOVE, OR REWIRE THIS
EQUIPMENT WITH POWER APPLIED. Have a qualified
electrical technician install, adjust and service this equipment.
Follow the National Electrical Code and all other applicable
electrical and safety codes, including the provisions of the
Occupational Safety and Health Act (OSHA), when installing
equipment.
•Reduce the chance of an electrical fire, shock, or explosion by
proper grounding, over-current protection, thermal protection,
and enclosure. Follow sound maintenance procedures.
It is possible for a drive to run at full speed as a result of
a component failure. Minarik strongly recommends the
installation of a master switch in the main power input of the
drive controllng the motor to stop the drive in an emergency.
Circuit potentials are at 115 VAC or 230 VAC above earth
ground. Avoid direct contact with the printed circuit board or
with circuit elements to prevent the risk of serious injury or
fatality. Use a non-metallic screwdriver for adjusting the
calibration trimpots. Use approved personal protective
equipment and insulated tools if working on this drive with
power applied.
250-0112-rev3.qxd 7/18/00 10:46 AM Page i

250-0112-rev3.qxd 7/18/00 10:46 AM Page ii

iii
Specifications 1
Dimensions 3
Installation 5
Mounting ....................................................5
Wiring .......................................................6
Shielding guidelines . . . . . . . . . . . . . . . . . . . . . .....................7
Panel installation ..............................................8
DIP Switch Settings . . . . . ......................................12
Connections . ................................................13
Calibrating the speed control . . ...................................17
Programming Instructions 17
Programming Mode . . . . . ......................................18
DLC programming parameters ...................................18
Speed Scaling Factor ........................................19
Load Response Number . . ...................................21
Display Scaling Factor . ......................................23
Decimal point location . ......................................26
Exit the Programming Mode ...................................27
Troubleshooting 29
Before troubleshooting . . . . . . . . . . . . . . . . . . .......................29
Unconditional Warranty 33
Contents
250-0112-rev3.qxd 7/18/00 10:46 AM Page iii

Figure 1. DLC300/400 Dimensions ...................................3
Figure 2. DIP Switch Location . . ....................................12
Figure 3. DLC300/400 connections . .................................15
iv
Illustrations
250-0112-rev3.qxd 7/18/00 10:46 AM Page iv

v
Minarik Models DLC300 and DLC400 Digi-Lok® Converters are
used with conventional analog speed controls to produce closed-
loop digital systems capable of controlling motor speed precisely
and with excellent reproducibility.
The Digi-Lok® Converter (DLC) receives the feedback signal
generated by a sensor that monitors a rotating element driven by
the motor. The sensor assembly can be a magnetic pickup with
ferromagnetic gear, or a NPN-type optical encoder or inductive
proximity switch, or a Hall effect sensor with magnetic wheel.
An important distinction exists between any Digi-Lok®
Converter system and a conventional servo drive. The Digi-Lok
Converter reads a velocity-dependent feedback signal and corrects
its output to bring the motor back to its set speed. The Digi-Lok®
Converter will not compensate for any positioning errors caused
by very minor speed fluctuation.
Industrial applications for Digi-Lok® Converter control systems
include many within the food processing, chemical, and
pharmaceutical industries, for example. Blending, mixing,
grinding, pumping, and other such processes often require strict
repeatability to ensure product uniformity. The digital speed-
setting feature of the Digi-Lok® Converter and the closed-loop
design provide that reliability and reproducibility.
Introduction
250-0112-rev3.qxd 7/18/00 10:46 AM Page v

vi
DLC Compatibility
The DLC is compatible with positive reference-voltage speed
controls only – controls that drive the motor when the speed
adjust pot wiper is at a positive potential relative to the CCW side
of the speed adjust pot.
With few exceptions, speed controls currently being manufactured
meet this requirement. A few older design speed control models,
including Minarik Models SL31UD4 and SL51UD4, operate with
a negative reference voltage. Such controls will require use of
Model DLC100 instead of the DLC300.
Feedback device selection
Acceptable feedback frequency at any set speed in an application
must lie within the 10-2000 Hz range. Feedback frequency is
directly proportional to the number of feedback pulses per
revolution (PPR) and to the speed of the shaft (RPM) that the
feedback transducer monitors.
Since the application requirements determine the shaft speed
range, they also will determine the range within which the
number of feedback pulses per revolution must lie:
PPRminimum = 600/(RPMminimum)
PPRmaximum = 120,000/(RPMmaximurn)
250-0112-rev3.qxd 7/18/00 10:46 AM Page vi

As an example, consider an application in which the feedback
source is monitoring a driven shaft, and not the motor armature
shaft. This shaft is to be run at speeds as low as 1 rpm. The
feedback device that you select must produce at least 600 pulses
per revolution.
Conversely, if the application were one that required monitoring
and controlling a driven shaft at speeds as high as 4000 rpm, the
feedback device would be limited to one that produced 30 or
fewer pulses per revolution.
The Digi-Lok® Converter system can control armature shaft
speeds within a 30:1 range. Under no circumstances can the DLC
be expected to control motor speed beyond the speed rating of the
motor.
vii
250-0112-rev3.qxd 7/18/00 10:46 AM Page vii

viii
250-0112-rev3.qxd 7/18/00 10:46 AM Page viii

1
Line input voltage, 50-60 Hz, single phase
DLC300 115 VAC (+/-10%)
DLC400 230 VAC (+/-10%)
Line power 5.5 watts nominally
Acceptable feedback sources
5V NPN-type encoder
5V NPN-type proximity switch Hall effect sensor
Electromagnetic pickup device
Feedback frequency range 10-2,000 Hz
Maximum speed range 30:1 typical
Speed control reference voltage, maximum +20VDC
Ambient operating temperature 10ºC to 40ºC
Approximate weight 1 lb.
Specifications
250-0112-rev3.qxd 7/18/00 10:46 AM Page 1

2
250-0112-rev3.qxd 7/18/00 10:46 AM Page 2

3
Dimensions
Figure 1. DLC300/400 Dimensions
ALL DIMENSIONS IN INCHES [MILLIMETERS]
250-0112-rev3.qxd 7/18/00 10:46 AM Page 3

4
250-0112-rev3.qxd 7/18/00 10:46 AM Page 4

5
Installation
Warning
Do not install, rewire, or remove this control with input
power applied. Doing so may cause fire or serious injury.
Make sure you have read and understood the Safety
Warnings before attempting installation.
Mounting
Motor speed controls manufactured by other companies may
require hookup procedures that differ from those given in this
manual. Please contact your Minarik representative for
assistance.
A schematic diagram and the manufacturer’s instructions for
interfacing the control with an external speed-setting signal will
probably be required before the correct wiring scheme can be
determined.
Install the Digi-Lok Converter in an area that is protected from
exposure to dirt or moisture and from accidental contact. Provide
clearance that permits access for connecting wires. Do not mount
the device near other heat-producing objects, nor in an area
subject to cold and moisture. Ambient temperature within the
range of 10º to 40ºC must be maintained.
250-0112-rev3.qxd 7/18/00 10:46 AM Page 5

6Installation
• Use 16–20 AWG wire for speed adjust potentiometer wiring.
Use 14–16 AWG wire for AC line (L1, L2) and motor (A1 and
A2) wiring.
Wiring
Warning
Do not install, remove, or rewire this equipment with power
applied. Failure to heed this warning may result in fire,
explosion, or serious injury.
Circuit potentials are at 115 or 230 VAC above ground. To
prevent the risk of injury or fatality, avoid direct contact with
the printed circuit board or with circuit elements.
Do not disconnect any of the motor leads from the motor
control unless power is removed. Opening any one motor
lead may destroy the control.
Variable speed DC drives manufactured by other companies
may require hookup procedures that differ from those given
in this manual. Contact your local Minarik branch or
distributor for assistance. A schematic diagram and the
manufacturer’s instruction for interfacing the drive with an
external speed-setting signal may be required before the
correct wiring scheme can be determined.
250-0112-rev3.qxd 7/18/00 10:46 AM Page 6

Installation 7
Shielding guidelines
Warning
Under no circumstances should power and logic leads be
bundled together. Induced voltage can cause unpredictable
behavior in any electronic device, including motor controls.
As a general rule, Minarik recommends the shielding of all
conductors.
If it is not practical to shield power conductors, Minarik
recommends shielding all logic-level leads. If shielding is not
practical, the user should twist all logic leads with themselves to
minimize induced noise.
It may be necessary to earth ground the shielded cable. If noise is
produced by devices other than the drive, ground the shield at the
drive end. If noise is generated by a device on the drive, ground
the shield at the end away from the drive. Do not ground both
ends of the shield.
If the drive continues to pick up noise after grounding the shield,
it may be necessary to add AC line filtering devices, or to mount
the drive in a less noisy environment.
Logic wires from other input devices, such as motion controllers
and PLL velocity controllers, must be separated from power lines
in the same manner as the logic I/O on this drive.
250-0112-rev3.qxd 7/18/00 10:46 AM Page 7

Installation
8
Panel installation
Step 1. Cut a rectangular hole in the panel 1.73 inches
(44 mm) high, and 3.38 inches (86 mm) wide.
1.74
[44]
250-0112-rev3.qxd 7/18/00 10:46 AM Page 8
Installation 9
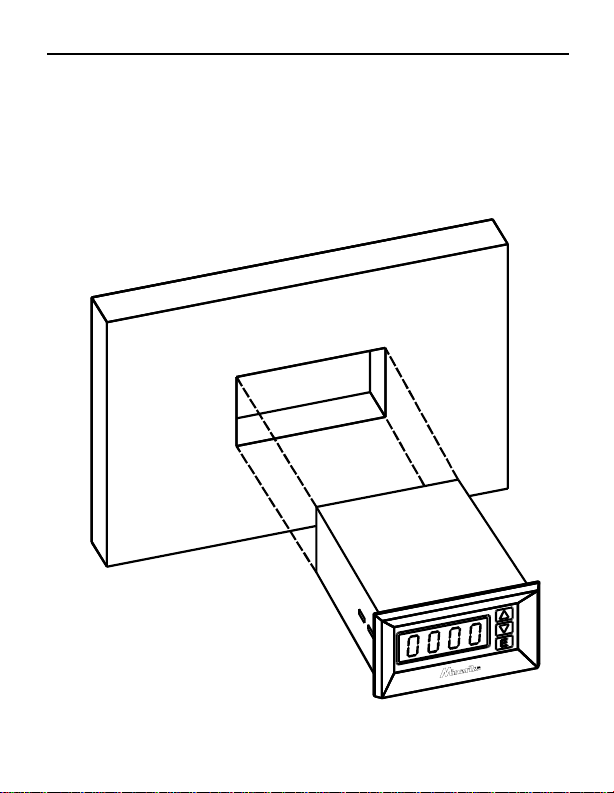
Step 2. Slide the DLC3/400 into the panel opening.
PANEL
DLC300/400
250-0112-rev3.qxd 7/18/00 10:46 AM Page 9

Installation10
Step 3. Insert the two mounting brackets into each side of the
DLC300/400 case.
250-0112-rev3.qxd 7/18/00 10:46 AM Page 10
This manual suits for next models
1
Table of contents


