Mincey Marble Manufacturing Brunswick Bypass User manual

Mincey Marble Mfg., Inc.
1940 New Harvest Road
Gainesville, GA 30507
Ph: 800.533.1806
Fx: 770.531.0935
www.minceymarble.com
MATERIALS / TOOLS NEEDED CHECKLIST
PRE-INSTALLATION PIECES / PARTS LIST
ENCLOSURE SYSTEM INSTALLATION
Installation Instructions for Mincey Marble
Manufacturing’s Brunswick Bypass Shower Enclosures
ATTENTION: Prior to starting the installation, please read through these instructions. This will
help avoid any unneccesary breakage. Any breakage due to handling or installing this enclosure
system is the responsibility of the installer and is not covered under the Mincey Warranty. Mincey
recommends that two people are used to install this shower enclosure system due to the weight
and fragility of the glass panels. Mincey also recommends that you protect the glass, especially the
bottoms, and shower pan during installation. If your doors have frosted glass, the frosted side of
the glass goes to the outside of the shower.
These installation instructions apply to the Mincey Brunswick Bypass Shower Enclosure System. In these
instructions we are going to use an example with a 60” wide shower.
All Drawings Are Not To Scale.
6WDUWE\XQFUDWLQJWKHPDWHULDOVDQGFRQ¿UPWKDWDOORIWKHSDUWVDQGSLHFHVDUHSUHVHQW The
Required Tools are listed below. The contents of the Hardware Kit are listed below. The Parts Diagram is on the
following page. Before you begin the installation, make sure that all of the pertinent surfaces are clean and free
of dust, debris and any shavings. After you perform any drilling, you will want to make sure the surfaces are
clean again - this includes the Shower Pan and the Shower Panel Walls.
MATERIALS / TOOLS NEEDED
INCLUDED IN THE HARDWARE KIT
RUBBER WALL
CHANNEL BUMPERS,
QTY: 6
DOOR ROLLERS
QTY: 4
CHROME
HEADER END CAPS, QTY: 2
1 3/4” PAN
HEAD
SCREWS,
QTY: 6
WALL
ANCHORS
QTY: 6
3/8” PAN
HEAD
SCREWS,
QTY: 6
1/2” FLAT
HEAD
SCREWS,
QTY: 6
GRAY
SCREW
COVERS
QTY: 6
CLEAR
SCREW
COVERS
QTY: 6
DRILL (CORDED OR CORDLESS),
5/16” MASONRY DRILL BIT,
1/8” METAL DRILL BIT
TAPE MEASURE
PENCIL
LEVEL
CAULK GUN,
100% SILICONE
RUBBER MALLET
PORTABLE BAND SAW
(PREFERRED METHOD)
HACK SAW- OR -
PHILLIPS HEAD SCREWDRIVER LOCTITE
BLUE 243
THREADLOCKER

If you have any questions, please call MINCEY MARBLE CUSTOMER SERVICE at 1-800-533-1806.
Mincey Marble Mfg., Inc. |1940 New Harvest Road, Gainesville, GA 30507 |800.533.1806 |minceymarble.com
ASSEMBLY CODE ASSEMBLY NAME QTY
1 WALL ANCHORS 6
2 WALL CHANNELS 2
3BUMPERS
6
4 GLASS DOORS 2
5 GRAY SCREW COVERS 6
6 1 3/4" PAN HEAD SCREWS 6
7 1/2" FLAT HEAD SCREWS 6
8HEADER END CAPS2
9 3/8" PAN HEAD SCREWS 4
10 CLEAR SCREW COVERS 10
11 ROLLERS 4
12 HEADER 1
13 DOOR GUIDES 1 SET OF 3
14 3/8" PAN HEAD SCREWS 6
15 BOTTOM RAIL 1
16 TOWEL BARS 2
17 3/8" PAN HEAD SCREWS 2
PRE-INSTALLATION PIECES / PARTS LIST (cont.) 2
ENCLOSURE PART LIST KEY
If you have any questions, please call MINCEY MARBLE CUSTOMER SERVICE at 1-800-533-1806.
Mincey Marble Mfg., Inc. |1940 New Harvest Road, Gainesville, GA 30507 |800.533.1806 |minceymarble.com
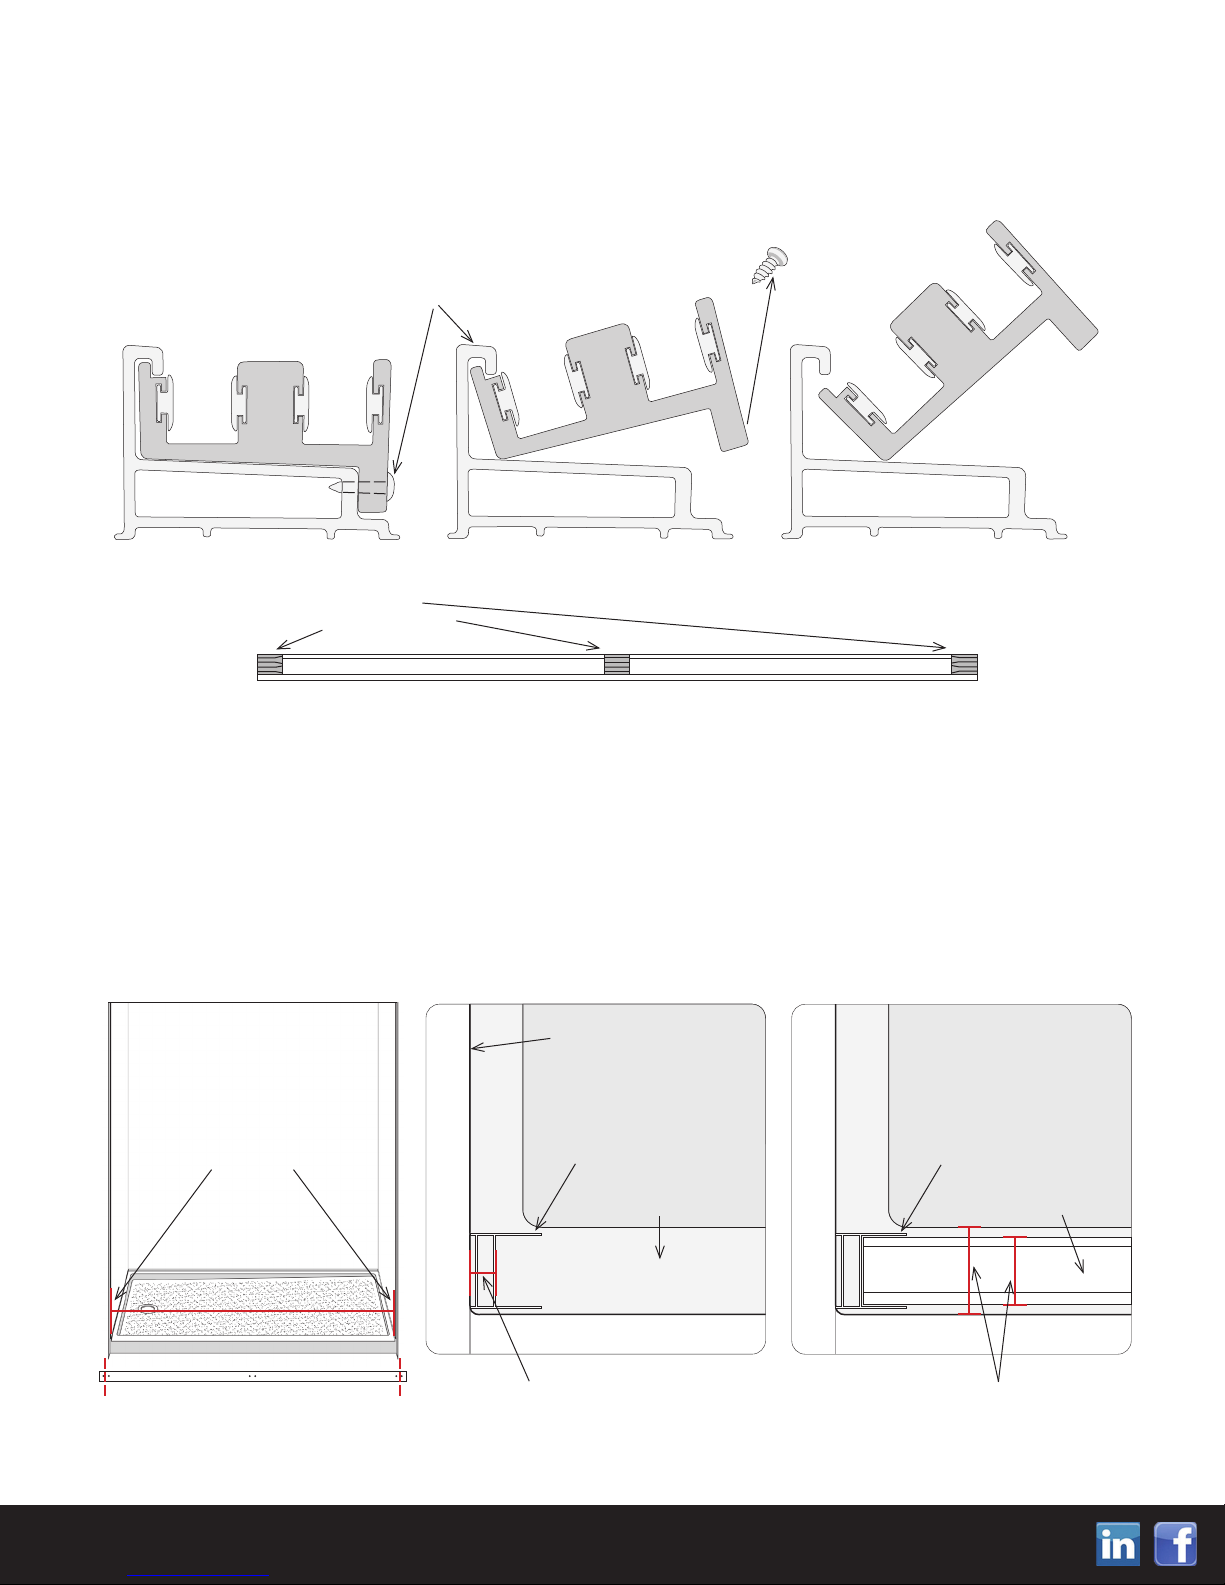
REMOVE INTERLOCKING
DOOR GUIDES FROM THE
BOTTOM RAIL BY REMOVING
5/8” PAN HEAD SCREWS
ENCLOSURE SYSTEM INSTALLATION 3
These instructions are to be followed assuming the Shower Pan is level and the Walls are plumb. After you have
FRQ¿UPHGWKDWDOORIWKHUHPDLQLQJSDUWVDQGSLHFHVDUHSUHVHQW\RXDUHUHDG\WREHJLQE\LQVWDOOLQJWKH
%277205$,/¿UVW6WDUWE\UHPRYLQJWKHWKUHH'225*8,'(6IURPWKH%277205$,/LQWKHLU/HIW&HQWHU
and Right designated locations. They will be re-installed near the end of the enclosure assembly completion. Be
sure to keep up with the screws.
LEFT, CENTER & RIGHT
SPECIFIC LOCATIONS,
BE SURE TO KEEP SCREWS
5/8” PAN HEAD SCREWS
BOTTOM RAIL
DOOR GUIDE
The example in these instructions will be using a 60” wide shower. Both the Bottom Rail and the Header will
KDYHWREHWULPPHGWR¿WEHIRUHWKH\FDQEHLQVWDOOHG
Begin by cleaning the surfaces of the Pan Curb and the Wall Panels. Measure the width between the Wall
Panels on top of the Pan Curb. You will want to Center this measurement on the Bottom Rail by trimming equal
DPRXQWVRRIHDFKHQGXVLQJWKH3RUWDEOH%DQG6DZRU+DFN6DZ'RQRWZRUU\DERXWWKHSUHGULOOHGKROHVDW
both ends, you will be re-drilling and replacing those later when re-installing the End Door Guides.
You will need to subtract 1 1/8´RRIWKHWRWDOPHDVXUHPHQWWREHWULPPHGWRDOORZIRUWKHZLGWK
of the two Side Wall Channels. You will also want to Center the Bottom Rail on the Width of the
Curb.
MEASURE WALL TO WALL
AT THE PAN CURB,
WILL TRIM BOTTOM
RAIL ON EACH END
DEDUCT 9/16” FOR EACH SIDE VERTICAL
WALL CHANNEL, TOTALLING 1 1/8”
WALL
SHOWER PAN
VERTICAL
WALL CHANNEL
PAN CURB
SHOWER PAN
VERTICAL
WALL CHANNEL
BOTTOM RAIL
YOU WILL CENTER THE BOTTOM RAIL
ON THE TOP OF THE PAN CURB
WILL RE-DRILL HOLES FOR DOOR GUIDES
If you have any questions, please call MINCEY MARBLE CUSTOMER SERVICE at 1-800-533-1806.
Mincey Marble Mfg., Inc. |1940 New Harvest Road, Gainesville, GA 30507 |800.533.1806 |minceymarble.com
BRUNSWICK BYPASS DOOR ENCLOSURE SYSTEM INSTALLATION (cont.) 4
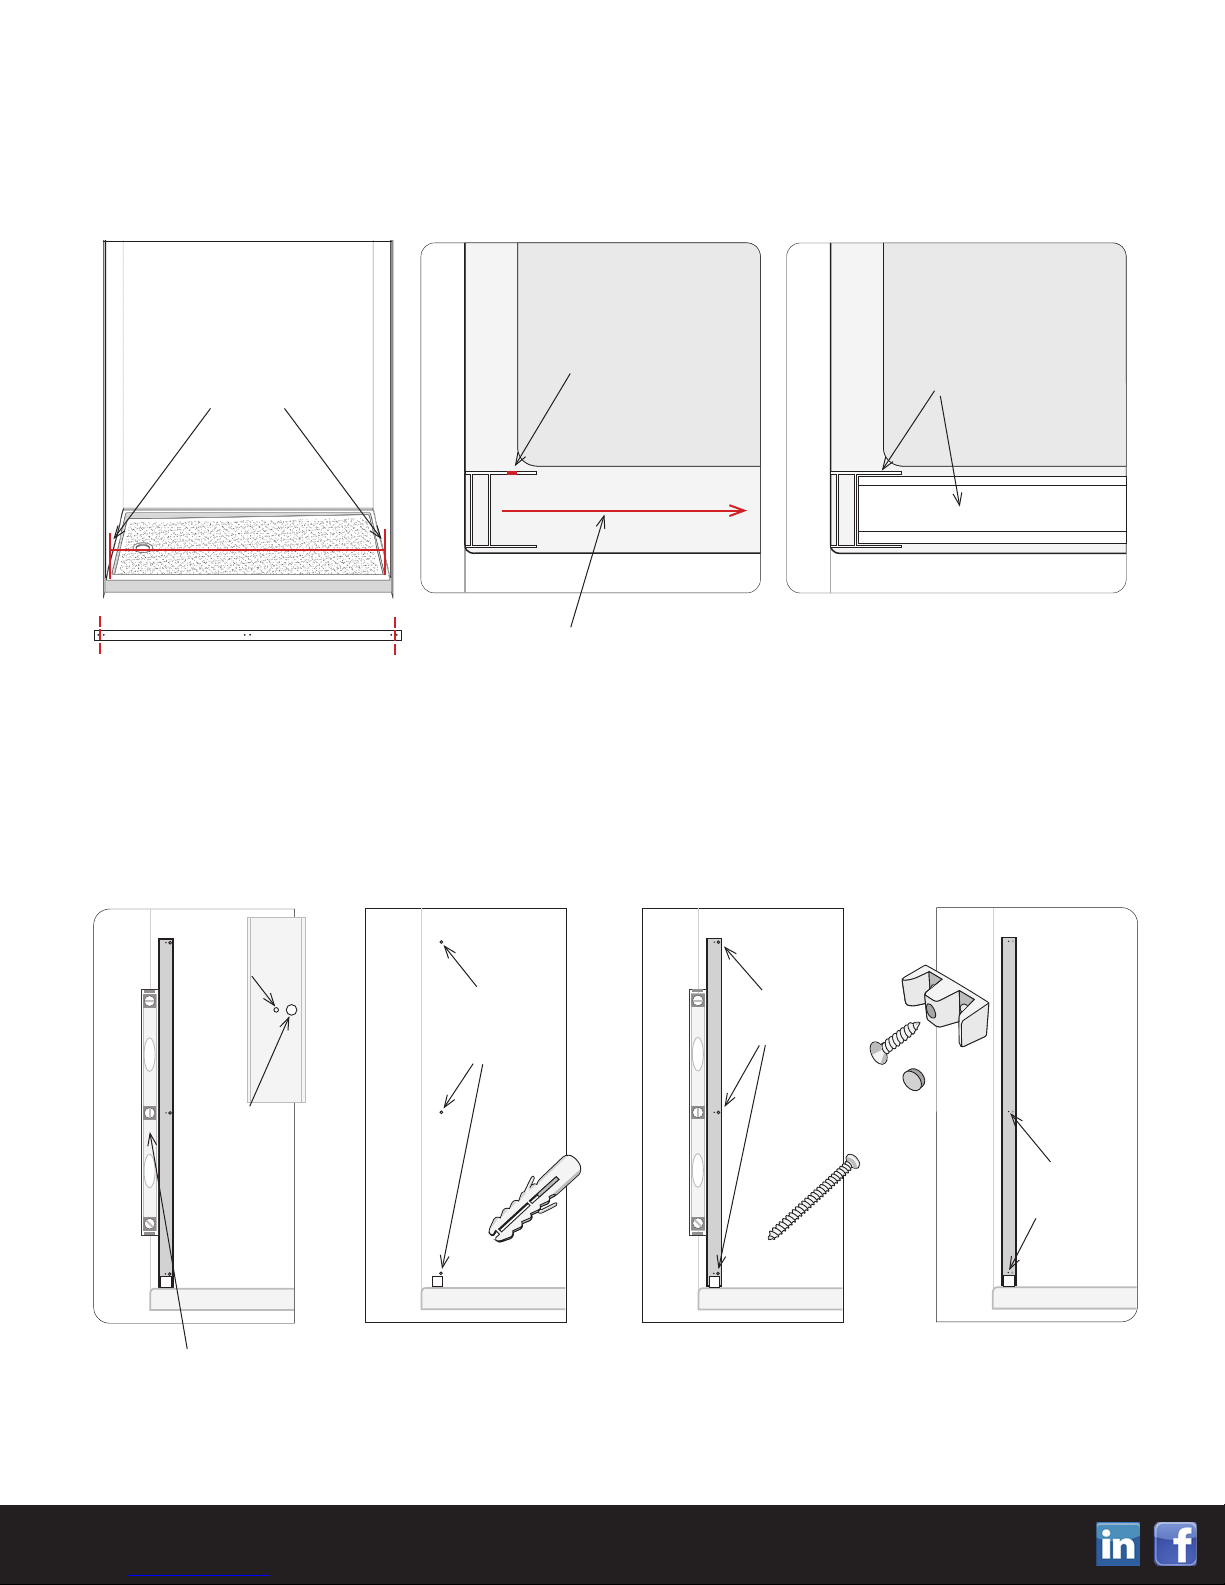
Run a thick bead of 100% Silicone on the center of the top of the Pan Curb. Place the LEFT VERTICAL WALL
CHANNEL against the wall and place the BOTTOM RAIL on the Silicone bead. THE VERTICAL WALL CHANNELS
DUHVSHFL¿FWRHDFKVLGHWKH/()7DQG5,*+7VLGHZLOOKDYHDVFUHZKROHWRDWWDFKLWWRWKH%277205$,/RQ
the Inside, towards the Shower Pan. The Silicone will help hold the BOTTOM RAIL in place while you are
installing the WALL CHANNELS.
IN THIS EXAMPLE,
THE BOTTOM RAIL WILL
MEASURE 58 7/8” AFTER
DEDUCTING THE WALL
CHANNELS
RUN 100% SILICONE BEAD IN CENTER ON
TOP OF PAN CURB, ALL THE WAY ACROSS
LEFT VERTICAL
WALL CHANNEL,
HAS HOLE ON
INSIDE
PLACE LEFT VERTICAL
WALL CHANNEL, AND
BOTTOM RAIL,
CENTERED ON
PAN CURB
BOTTOM RAIL
THE SILICONE WILL HELP HOLD THE
BOTTOM RAIL IN PLACE AS YOU
INSTALL THE VERTICAL WALL CHANNELS
TRIM BOTTOM RAIL WITH PORTABLE
BAND SAW OR HACK SAW
Use the Level to Plumb the LEFT VERTICAL WALL CHANNEL and Mark the Top, Center and Bottom Holes to
be drilled. Remove the Wall Channel. Drill the holes using the 5/16” Masonry Bit. Hammer in the three Wall
Anchors. Clean up any debris or shavings. Slide the Wall Channel over the Bottom Rail and install the Wall
Channel using three 1 3/4” Pan Head Screws, making sure the Wall Channel is still Plumb. Install the three Left
BUMPERS using the 1/2” Flat Head Screws and their gray screw covers. Repeat the process for the Right Vertical
Wall Channel.
PLUMB LEFT
VERTICAL
WALL CHANNEL
WITH LEVEL,
MARK LARGER
HOLE LOCATIONS
AND REMOVE
SCREW
TO WALL
HOLES
HAMMER
IN ALL
THREE
ANCHORS
SCREW
IN WALL
CHANNEL
REMOVE WALL
CHANNEL, DRILL
HOLES WITH
5/16”
MASONRY BIT,
HAMMER IN
WALL ANCHORS
CLEAN DEBRIS
AND SHAVINGS,
PLACE WALL
CHANNEL AND
SCREW INTO
PLACE
INSTALL BUMPERS
WITH 1/2” FLAT
HEAD SCREWS IN ALL
THREE LOCATIONS,
INSTALL GRAY
SCREW COVERS
1 3/4”
PAN HEAD
SCREWS
WALL
ANCHORS
INSTALL
BUMPERS
USING
1/2” FLAT
HEAD
SCREWS
CENTER
HOLE
LOCATIONS
PAN
BUMPER
HOLES

If you have any questions, please call MINCEY MARBLE CUSTOMER SERVICE at 1-800-533-1806.
Mincey Marble Mfg., Inc. |1940 New Harvest Road, Gainesville, GA 30507 |800.533.1806 |minceymarble.com
BRUNSWICK BYPASS DOOR ENCLOSURE SYSTEM INSTALLATION (cont.) 5
Next, you are going to measure and trim the HEADER. Measure from Wall to Wall right above the Vertical Wall
Channels. Deduct 3/16” from that measurement to allow for the END CAPS. Trim the Header from either end
using the Portable Band Saw or Hack Saw. It does not have to be centered.
,WLVUHFRPPHQGHGWKDWWZRSHRSOHDUHXVHGIRUWKHQH[WFRXSOHRIVWHSVEHFDXVHRIWKHGLFXOW\
of installing the Glass Doors without damaging them. First, carefully place the Glass Doors into the
Shower - be sure to protect the Shower Pan and the Glass Doors, especially the bottoms.
MEASURE WALL TO
WALL, DEDUCT 3/16”
FOR END CAPS, TRIM
EITHER END OF
HEADER
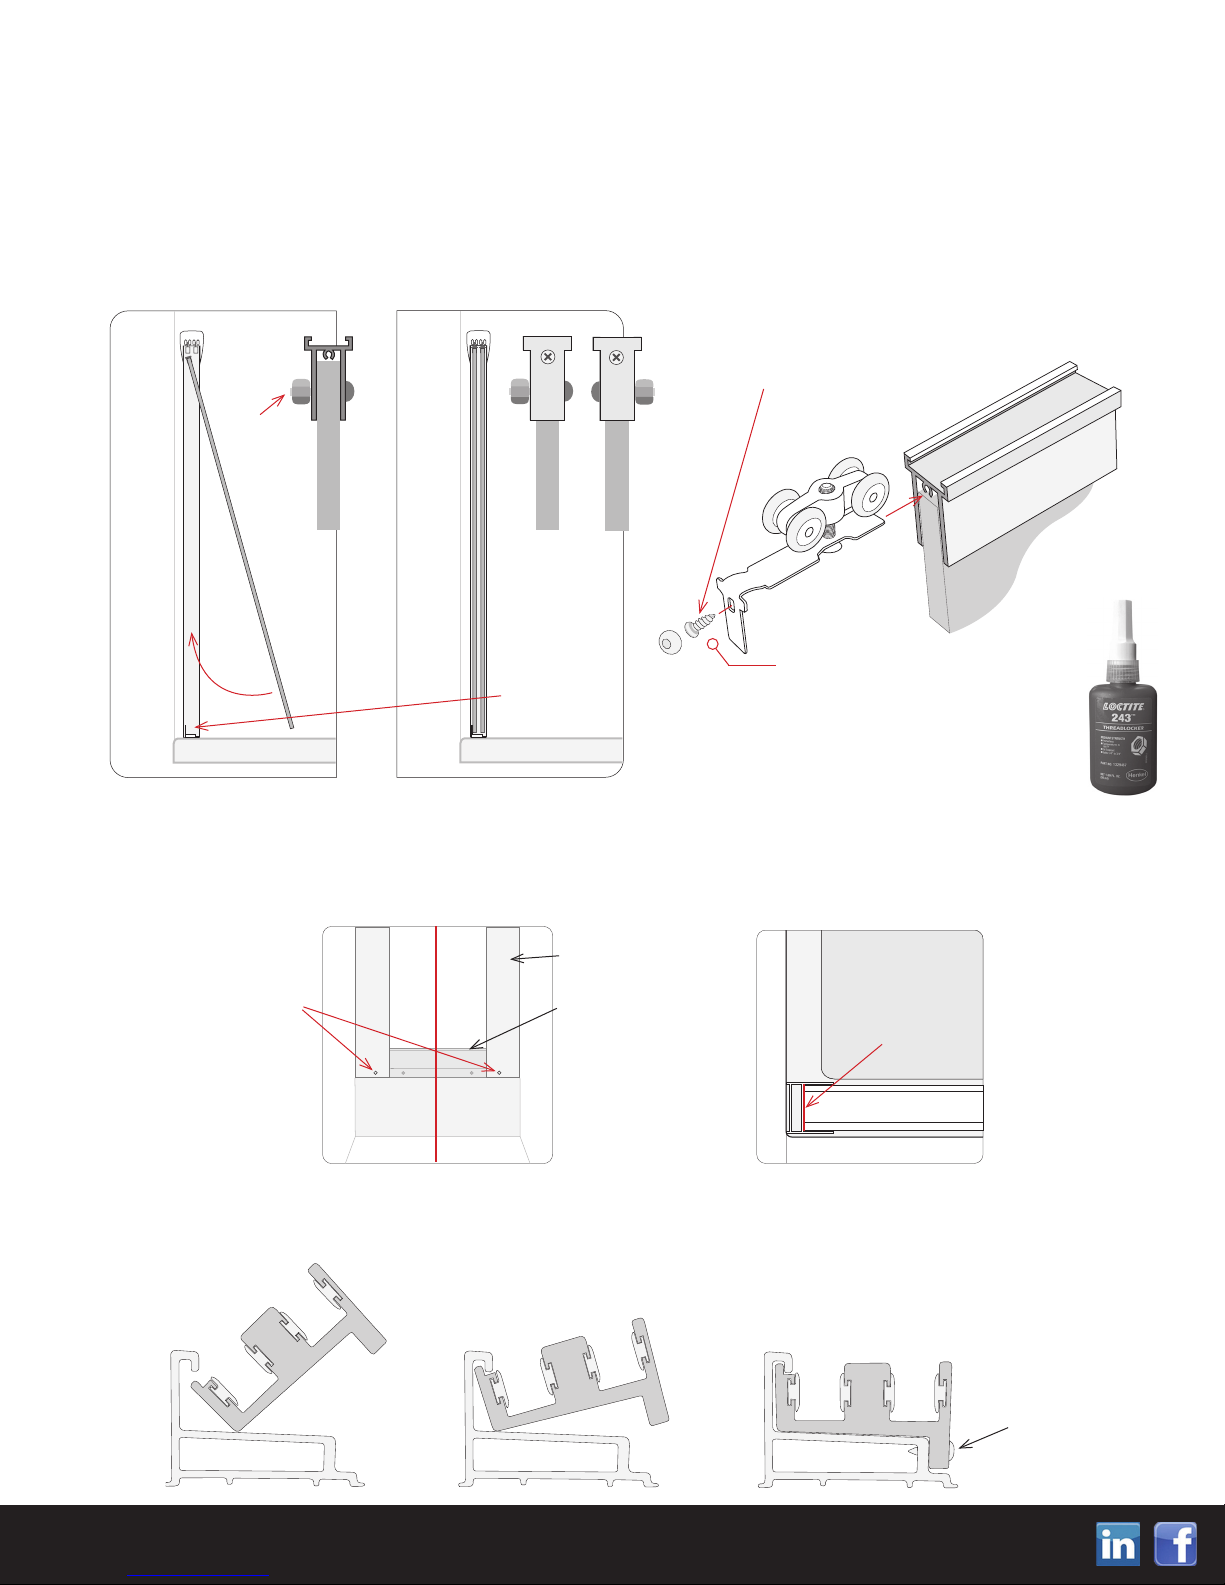
Before installing the Shower Doors, you are going to
add LOCTITE BLUE 243 to the Adjustment Screws on the
ROLLERS. Unscrew the Screws on all of the ROLLERS
to where there is approximately a 1/4” recess. Apply a
small drop of LOCTITE BLUE 243 into the recessed area.
Adjust the screws on all four ROLLERS back up to where
there is approximately 1/4” of the screw protruding.
You are now ready to proceed.
HEADER
UNSCREW UNTIL
RECESSED 1/4”, ADD
LOCTITE, TIGHTEN BACK
TO 1/4” PROTRUDING
ON ALL FOUR ROLLERS
After applying LOCTITE to the ROLLER SCREWS, slide all
four ROLLERS into the HEADER as shown below, with the
SHOWER DOOR CONNECTING TABS positioned to the outside.
Slide the ROLLERS towards the inside of the HEADER and
install the END CAPS. Then, install the HEADER
onto the VERTICAL WALL CHANNELS by
SODFLQJLW¿UPO\LQWRSRVLWLRQ7KH
weight of the installed doors
will hold it securely into
position.
Once the Header is in place, slide the Rollers
towards outside edges to make room for the
Shower Doors. You will want to install the
2XWVLGH(GJH6KRZHU'RRU¿UVW<RXZLOOXVH
four 3/8” Pan Head Screws to connect the
Rollers to the Glass Door Brackets, using
LOCTITE BLUE 243 threadlocker when
installing. The two Rollers on each end
will allow for adjustment to align the heights
of the Shower Doors properly.
NOTE: LOCTITE BLUE 243 is required
as a threadlocker to secure the
installation of the Roller Screws.
LOCTITE is NOT provided with the doors,
but is readily available at many hardware
stores, online at mscdirect.com or through
Mincey Marble at 1-800-533-1806.
If you have any questions, please call MINCEY MARBLE CUSTOMER SERVICE at 1-800-533-1806.
Mincey Marble Mfg., Inc. |1940 New Harvest Road, Gainesville, GA 30507 |800.533.1806 |minceymarble.com
6
BRUNSWICK BYPASS DOOR ENCLOSURE SYSTEM INSTALLATION (cont.)
Before you install the GLASS DOORS, take note that the Factory Installed Glass Door Bracket’s Screw Heads
will need to be to the INSIDE of the track and the Nuts will need to be to the OUTSIDE of the track for bypass
clearance.
To install the GLASS DOORS, one person needs to be inside the Shower, tilting the GLASS DOOR up to the
Header. The other person can then insert the ROLLERS into the GLASS DOOR BRACKETS. You will need to
apply LOCTITE BLUE 243 threadlocker to the 5/16” Pan Head Screw before securing them into each side of
the GLASS DOOR.
SLIDE ROLLER INTO
TRACK ON GLASS DOOR
BRACKET, ADD LOCTITE
TO SCREW, SECURE IN
PLACE
TILT DOORS
UP TO HEADER
FROM INSIDE
THE SHOWER TO
AVOID LEADING
EDGE OF
BOTTOM RAIL
Next, you will need to drill a hole from the Vertical Wall Channel into the new location on the Bottom Rail
where the two END DOOR GUIDES will be installed using a 1/8” Metal Drill Bit. After drilling the holes, clean
up any debris or shavings. Then, you will run a bead of 100% Silicone where the Bottom Rail and the Vertical
Wall Channels meet. You can then install the two END DOOR GUIDES.
NUTS TO
OUTSIDES
OF TRACK
DRILL HOLES INTO
BOTTOM RAIL WHERE
THE WALL CHANNEL
HOLES ARE FOR
END DOOR GUIDE’S
LOCATIONS
LR
PAN
BOTTOM RAIL
VERTICAL WALL
CHANNELS RUN BEAD OF 100%
SILICONE WHERE
BOTTOM RAIL AND
WALL CHANNELS
MEET
The DOOR GUIDES interlock into the Bottom Rail. Slide them back into the Bottom Rail as they were
disassembled at the beginning of these instructions. Start with the two END DOOR GUIDES (refer to
following page.)
3/8” PAN HEAD
SCREWS
NOTE: LOCTITE BLUE 243 is required
as a threadlocker to secure the
installation of the Roller Screws.
LOCTITE is NOT provided with the doors,
but is readily available at many hardware
stores, online at mscdirect.com or through
Mincey Marble at 1-800-533-1806.

If you have any questions, please call MINCEY MARBLE CUSTOMER SERVICE at 1-800-533-1806.
Mincey Marble Mfg., Inc. |1940 New Harvest Road, Gainesville, GA 30507 |800.533.1806 |minceymarble.com
7
BRUNSWICK BYPASS DOOR ENCLOSURE SYSTEM INSTALLATION (cont.)
Slide Glass to Right to install
Left End Guide
Slide Glass to Left to install
Right End Guide
Slide Glass to Left to place
Center Guide
Slide Guide to Center under
Glass and install
After you have installed the Door Guides, you will need to adjust the Glass Doors for proper alignment. You can
adjust the doors Vertically by adjusting the SCREWS in the ROLLERS on each end of the doors. You make any
adjustments by carefully sliding out the ROLLER from the Glass Door Bracket just enough to access the screw.
You can raise the door by Tightening the Screw or Lower it by Loosening the Screw.
CAREFULLY SLIDE
OUT ROLLER
FROM GLASS
DOOR BRACKET,
ADJUST ROLLER
UP OR DOWN,
APPLY LOCTITE
BLUE 243 AND
RE-INSTALL
TIGHTEN TO RIGHT
TO RAISE, LOOSEN
TO LEFT TO LOWER
Proper alignment for the Shower Doors would be Flush to
the Bumpers in the Side Vertical Wall Channels, hanging
Level, above the Door Guides in the Bottom Rail without
any interference when operating back and forth.
The Inside Door should be closed to the wall where the
Shower Head Fixture is located. The Inside Door is where
the Towel Bar / Handle will be mounted inside the shower.
ACRYLIC WASHERS
INCLUDED:
4 - 1 1/8”
2 - 7/16”
INSIDE DOOR, INSIDE TOWEL BAR LOCATED
SAME WALL WITH SHOWER HEAD FIXTURE
Install the TOWEL BARS in the pre-cut holes in the
GLASS DOORS. Be sure to tighten the TOWEL BAR
ENDS with a 3/32” ALLEN WRENCH - the hole used
for tightening is not a Set Screw, use the hole to
rotate the end until extremely tight.
Lastly, apply a bead of 100% SILICONE on the
INSIDE where the Curb meets the Pan and where
the Wall Channels meet the Panels. Repeat the
same process for the OUTSIDE of the Wall Channels
and the Bottom Rail. Must allow the Silicone to
dry for 24 hours before any exposure to water
or moisture.
USE 3/32” ALLEN
WRENCH TO
TURN
THIS IS NOT A SET
SCREW, USE ALLEN
WRENCH TO ROTATE
TOWEL BAR END
UNTIL ADEQUATELY
TIGHT
THANK YOU FOR USING OUR MINCEY MARBLE PRODUCT! WE APPRECIATE YOUR BUSINESS!
RUN A BEAD OF 100% SILICONE
ON THE INSIDE AND OUTSIDE OF
THE VERTICAL WALL CHANNELS
AND BOTTOM RAIL, ALLOW 24
HOURS BEFORE EXPOSING TO
ANY MOISTURE
ADD LOCTITE BLUE
243 TO SCREW
Other Mincey Marble Manufacturing Enclosure manuals


