Mini Aviator Living Room R/C Flyer User manual

Specifications
Wingspan ............................ 200mm ....................8ins
Length .................................. 220mm .................... 8.75ins
Flying weight ....................... 8.4g .......................... 1/3oz
Range ................................... 12m .......................... 40ft
Flying speed ........................ 2m/sec .................... 6.6ft/sec
Remote control ................... rudder and motor control
Flight time ............................ approx. 10 minutes
Features
❏ Living Room R/C action!
❏ Ready to fly indoors- just add batteries and charge
❏ Proportional throttle and steering controls
❏ Perform climbing, descending, turning and landing flight
❏ Transmitter rudder trim for precision flying
❏ Rechargeable Li-poly battery built into model
❏ Recharge aircraft from the transmitter
❏ Around 10 minutes flying time per charge
Items required
AA alkaline batteries ......... x4
Living Room R/C Flyer
Instruction Manual
& Flight Guide
#5500250

CAUTION - Please read this first!
✔ This flying infra-red remote controlled model is not a toy and must be charged and operated
according to these instructions.
✔ The model is made from VERY lightweight, delicate materials that can be damaged easily or can be
damaged if flown into objects. Damage is not covered by warranty.
✔ Fly your model in a large room well clear of children or animals.
✔ Do not fly near hot objects, heaters or naked flames as damage could result and/or control could be
lost due to interference with the infra-red transmitter signal.
✔ Keep clear of the rotating propeller which could cause injury.
✔ Fly only indoors only and away from strong sunlight.
✔ Do not fly outdoors.
CAUTION - Lithium polymer battery inside this product!
Do not short-circuit battery.
Do not dispose of model in fire.
Consult your supplier or distributor on how to dispose of this model.
Do not disassemble this model.
Do not attempt to charge except with the transmitter supplied.
Turn off all switches after use.
Contents
Warranty .......................................................... 2
Kit contents ..................................................... 3
Fitting transmitter batteries .......................... 3
Transmitter features ...................................... 4
Transmitter flight functions .......................... 4
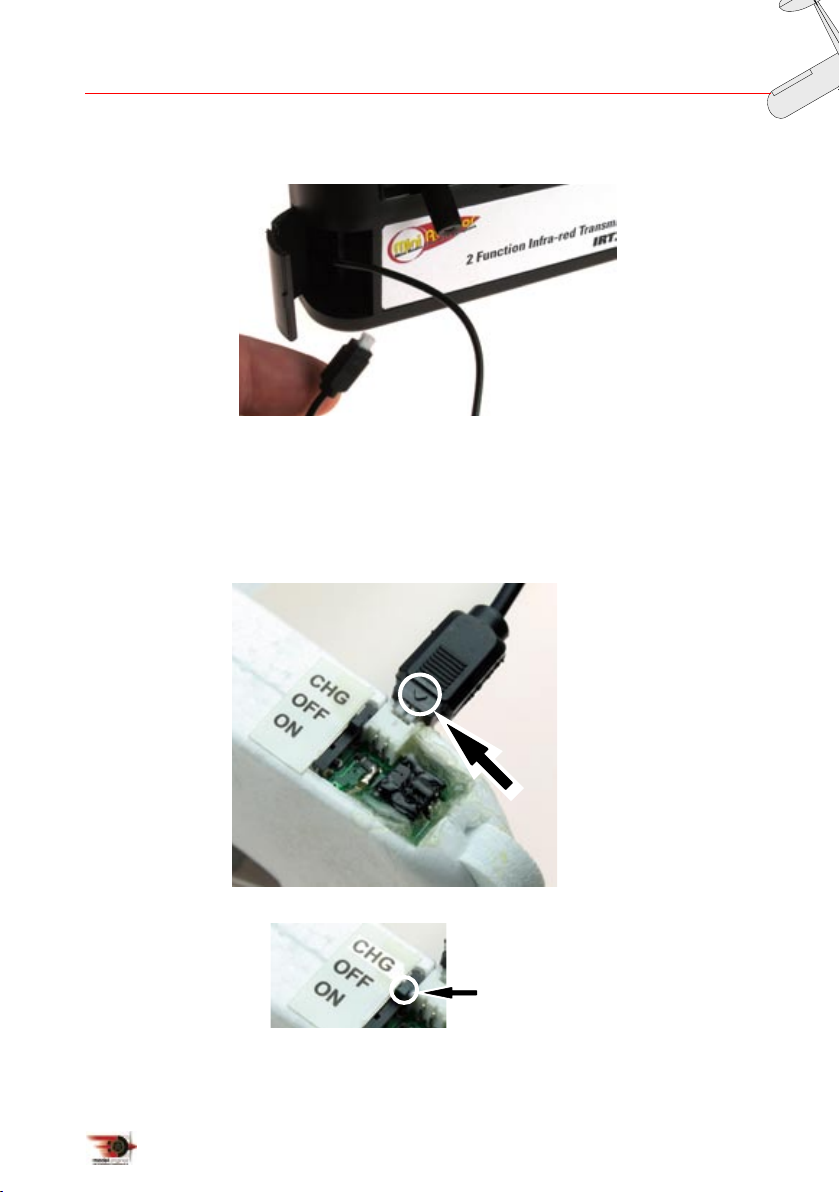
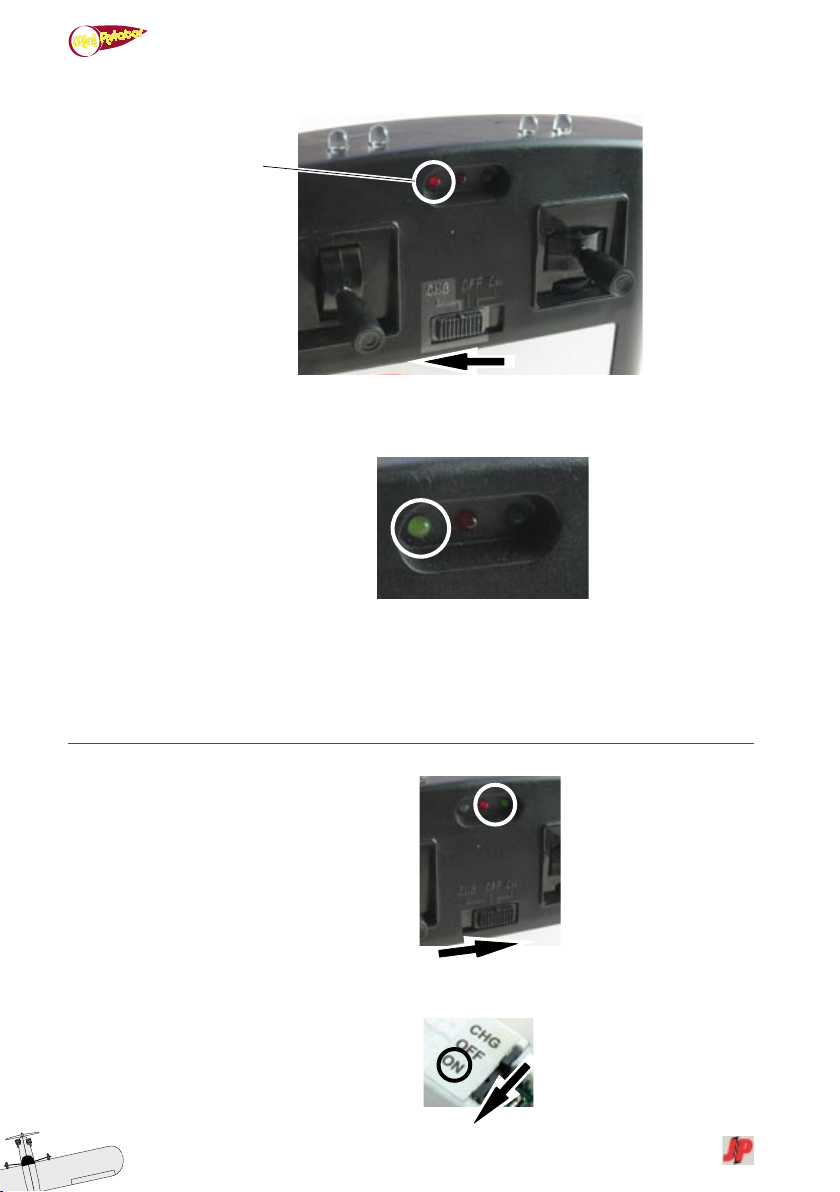
Charging Mini Aviator ................................... 5
Flying the Mini Aviator .................................. 6
How to fly: Launch technique ...................... 7
How to fly: Turning right or left .................... 7
How to fly: Descent and landing ................. 7
Aircraft adjustments: Rudder trim ............... 7
First flight tips ................................................. 7
Introduction
Before assembling and flying this model, please read this manual thoroughly.
The Mini Aviator uses the very latest materials, battery and electronics technology to provide the
ultimate professional indoor flying experience with flight durations of around 10 minutes per charge. The
manoeuvrability and flight handling of the model is exceptional and provides a great deal of fun for both
expert and novice model pilots
However, the lightweight components used in the construction of this model can be easily broken if
mishandled, therefore it is not suitable for children.
Please be aware that infra-red signals are used for control which means the model can be upset by bright
sunlight or heat.
The model uses a revolutionary non-replaceable 1 gram lithium polymer battery that gives flights of around
10 minutes per charge. The complete model weighs just 8 grams!
Warranty
J. Perkins Distribution Ltd and Model Engines (Aust.) Pty. Ltd guarantees this product is free from manufacturing or
assembly defects for a period of one year from time of purchase. This does not affect your statutory rights. The warranty
is not valid for any damage arising as a result of a crash or any damage arising as a result of failure to observe the
procedures outlined in this manual.
We reserve the right to modify the design of the model and this manual without prior notification.
Operation of this model is carried out entirely at the risk of the operator.
Copyright J Perkins Distribution Ltd, Model Engines (Aust.) Pty. Ltd 2007. All rights reserved. Distributed by J Perkins
Distribution Ltd, Lenham, Kent, UK. www.jperkinsdistribution.co.uk. , Model Engines (Aust.) Pty. Ltd., Noble Park, Victoria
3174, Australia. www.modelengines.com.au.
EC Directives - Conformity within the European Union
This product complies with Directive 2002/95/EC on the restriction of certain hazardous substances in electronic equiment
and meets the essential requirements of the Electro Magentic Compatibility directive 204/108/EC. This product must not be
disposed of through the household waste stream. This product should be recycled. For information about waste electronic
equipment disposal, recovery and collection points, please contact your local authority, household waste disposal service,
shop from where you purchased the product, or distributor of the product. E&OE.
14+
YEARS

3
2 channel RC series
Kit contents
Carefully unpack your model and check that all components are present.
Be very gentle - the model is made from very lightweight - and in some cases, delicate materials.
Note that alkaline batteries for the transmitter are not included
1. Transmitter
2. Mini Aviator
3. Display stand
4. Instruction manual
12
3
4
Fitting transmitter batteries
▼ 1. Your transmitter requires 4 AA size alkaline batteries (not supplied). Slide the battery cover down
(around 3mm). The cover pops up and can then be removed. Insert 4 batteries.
Be careful to observe correct polarity.
Replace the battery cover (the reverse of removal).

4
Transmitter features
Familiarise yourself with the transmitter features illustrated below:
Throttle stick
climb and descent
Rudder stick
left and right
On/Off/Charge
switch
Charging indicator
LED
Power indicator LEDs
Charge lead
compartment
Infra-red emitters
Rudder trimmer
Transmitter flight functions
Familiarise yourself with the transmitter functions and how they will affect your aircraft in flight:
Push throttle stick forward to climb Push left to turn left Push right to turn right
The left transmitter stick operates throttle. As the stick is moved up throttle increases. Throttle controls
climb and descent of a model.
The right stick steers the model. If the stick is moved left the rudder moves left. Rudder control rolls or
'banks' the model causing it to turn to left or right. Use the rudder trimmer to fine tune steering control.
Use rudder trimmer to achieve
straight flight

5
2 channel RC series
Charging Mini Aviator
The Lithium Polymer (Li-poly) battery built into the fuselage (the aircraft body) is charged from the
transmitter using the built-in charge lead.
The charger is fully automatic and will take approximately 25 mins to charge a flat battery.
� 1. Open the charge lead compartment door and remove the charge lead as in the photo below.
▼ 2. Plug the charge lead into the charge socket (under the nose of the plane) of the Mini Aviator.
IMPORTANT! The charge lead is polarised and fits displaying a small moulded triangle uppermost
as illustrated below.
TIP! Use a magnifying glass if you cannot make out this mark.
VERY IMPORTANT! Do not force the connector into the socket. It will NOT fit if the moulded triangle
side faces down instead of up!
WARNING! Excessive force applied to the charge socket will damage it. THIS MAY RENDER THE
PLANE UNUSABLE and the warranty void!
Small triangle
faces up
▼ �3. Move the model switch from OFF to CHG.
Move to CHG

6
▼ �3. Move the transmitter switch from OFF to CHG.
Notice the Charge Indicator LED will glow red to indicate charging is under way.
Move to CHG
Charging
red LED lit
▼ �4. When the onboard Li-poly battery is fully charged, the LED will change from red to green.
The Mini Aviator is ready for flight.
Carefully disconnect the charge lead from the model and stow the lead in the transmitter.
Green = Charge
complete
WARNING:
IF THE BODY (FUSELAGE) OF THE AIRCRAFT GETS HOT, STOP CHARGING IMMEDIATELY.
WARNING:
NEVER LEAVE YOUR AIRCRAFT CHARGING UNATTENDED IN CASE OF FIRE RISK OR DAMAGE TO YOUR
AIRCRAFT'S BUILT-IN FLIGHT BATTERY.
Flying the Mini Aviator
▼ 1. Move the transmitter switch to the ON position.
Transmitter ON
red & green LEDs lit
Move transmitter
switch to ON
The red and green power indicator LEDs will illuminate.
▼ 1. Move the model switch to the ON position.
Move model
switch to ON

7
2 channel RC series
How to fly: Launch technique
Make sure you are familiar with the controls and that you are in the largest room you can find with as few
obstacles as possible.
▼ � Move throttle stick halfway (to half power) and launch the model gently from shoulder height and
with the wings level and fuselage horizontal.
▼ � Push throttle stick forward to climb and back to descend.
Tip - if you launch too hard the model will climb steeply then descend steeply making it difficult to control.
▼ � Use the rudder to turn left or right to avoid obstacles.
WARNING! Do not fly the model towards children or animals and keep fingers and objects well clear of
the rotating prop at all times.
If the model collides with an object and crashes or falls to the ground you must kill the throttle by pulling
the stick back immediately to avoid any risk of stalling the motor or damaging the motor gears.
Crash damage is not covered by warranty.
How to fly: Turning right or left
It is best to apply rudder briefly - do not hold the rudder hard over as this may cause the aircraft to crash.
▼ � After rudder has been applied and released you will see the aircraft bank gently and then turn.
▼ � Adjust the throttle stick, if necessary, to maintain height during the turn.
IMPORTANT:
If you inadvertently hold the rudder hard over in one position, the model can enter a steeply descending
circular flight path known as a 'spiral dive'. If this occurs, release the rudder immediately and the model
will have the best chance of returning to straight and level flight.
How to fly: Descent and landing
Descending flight is achieved simply by reducing the throttle stick to about 1/3rd. Try and land on flat, open
surfaces - free of obstacles. Close the throttle after landing.
Aircraft adjustments: Rudder trim
If the aircraft tends to turn in one direction when you expect it to fly straight, you may need to adjust the
rudder position or 'rudder trim' by adjusting to left or right the rudder trim control wheel on the transmitter.
For example, if your aircraft tends to turn left all the time, it probably has 'too much left rudder trim'. In this
case, move the trimmer a little to the right and fly again.
First flight tips
▼ � Be aware that when a remote controlled model flies towards you, the controls are effectively
reversed, i.e., right becomes left and vice versa.
▼ � Try to keep the model within a defined area, such as an imaginary circle in front of you. By
consciously flying within a defined area you will give yourself a better chance of learning to fly
more quickly.
▼ � At the end of a flying session switch off your model first followed by your transmitter.
Good Flying!

Living Room R/C Flyer
Australasia agents: Model Engines,
Melbourne, Australia
www.modelengines.com.au
European agents: J Perkins Distribution,
Lenham, England
www.jperkinsdistribution.co.uk
Copyright J Perkins Distribution Ltd, Model Engines (Aust.) Pty. Ltd 2007.
Table of contents
Popular Toy manuals by other brands

TILLIG BAHN
TILLIG BAHN 85183 manual

Meccano
Meccano 18206 instructions

Super Flying Model
Super Flying Model Super Decathlon instruction manual

SKLZ
SKLZ Hurricane Category 4 instruction manual

Melissa & Doug
Melissa & Doug 9385 Assembly instructions

Horizon Hobby
Horizon Hobby PROBOAT 17 POWER BOAT RACER DEEP V owner's manual