Mini Twister Sport Mini Single Rotor Helicopter with 2.4GHz... User manual

Please read the instructions carefully before use and retain for future reference.
Mini Single Rotor Helicopter with 2.4GHz Transmitter
INSTRUCTION MANUAL
FEATURES
Gyro for incredible stability
Rechargeable, removeable Lipo
Charge easily direct from a USB port
7-8 minute flight times!
Silky smooth & stable hovering
Full 4-channel control for full indoor fun
Adjustable digital trims
Efficient, stable under-slung flybar
Bell Hiller mix for performance and stability
Flexible wide track undercarriage
Low transmitter battery power warning
Spares pack included
Spares available from your local model shop

GUARAnTEE/wARRAnTy
J. Perkins Distribution Ltd. guarantee this product to be free of manufacturing and assembly defects for a period of
one year from time of purchase. This does not affect your statutory rights. This warranty is not valid for any damage or
subsequent damage arising as a result of a crash, misuse, modification or for damage or consequential damage arising
as a result of failure to observe the procedures outlined in this manual. Operation of this model is carried out entirely at
the risk of the operator. Please note that, whilst every effort is made to ensure the accuracy of instructions and material
included with this product, mistakes can occur and J. Perkins Distribution Ltd nor it’s distributors will be held liable for any
loss or damage arising from the use of this model or for any loss or damage arising from omissions or inaccuracies in the
associated instructions or materials included with this product.
We reserve the right to modify the design of this product, contents and manuals without prior notification.
© 2011 J Perkins Distribution Ltd, Lenham, Kent, UK ME17 2DL.
www.jperkinsdistribution.co.uk
ViTAl SAFETy inFo
Please read all instructions carefully before using this
model. If any information in this manual is unclear,
please contact your supplier for help.
Please note especially the potential dangers
associated with the rotating parts in this model:
DANGER—Wear protective eyewear when using
model helicopters!
DANGER—Do not wear loose clothing or ties!
DANGER—Keep well clear of rotating blades!
DANGER—Never fly near people or animals!
DANGER—A Li-Po battery is installed in the
helicopter. Please observe the safety information
regarding the safe use of Li-Po batteries before using
this product!
DANGER—Do not touch the battery or charger with
wet hands!
fAlways let the battery cool down before
recharging.
fAlways recharge the battery after use, especially if
it is going to be stored and not used for a while.
fNot suitable for children under 14 years.
fIf you are completely new to R/C helicopters we
advise that you seek advice from an experienced
R/C helicopter pilot before attempting to fly this
model.
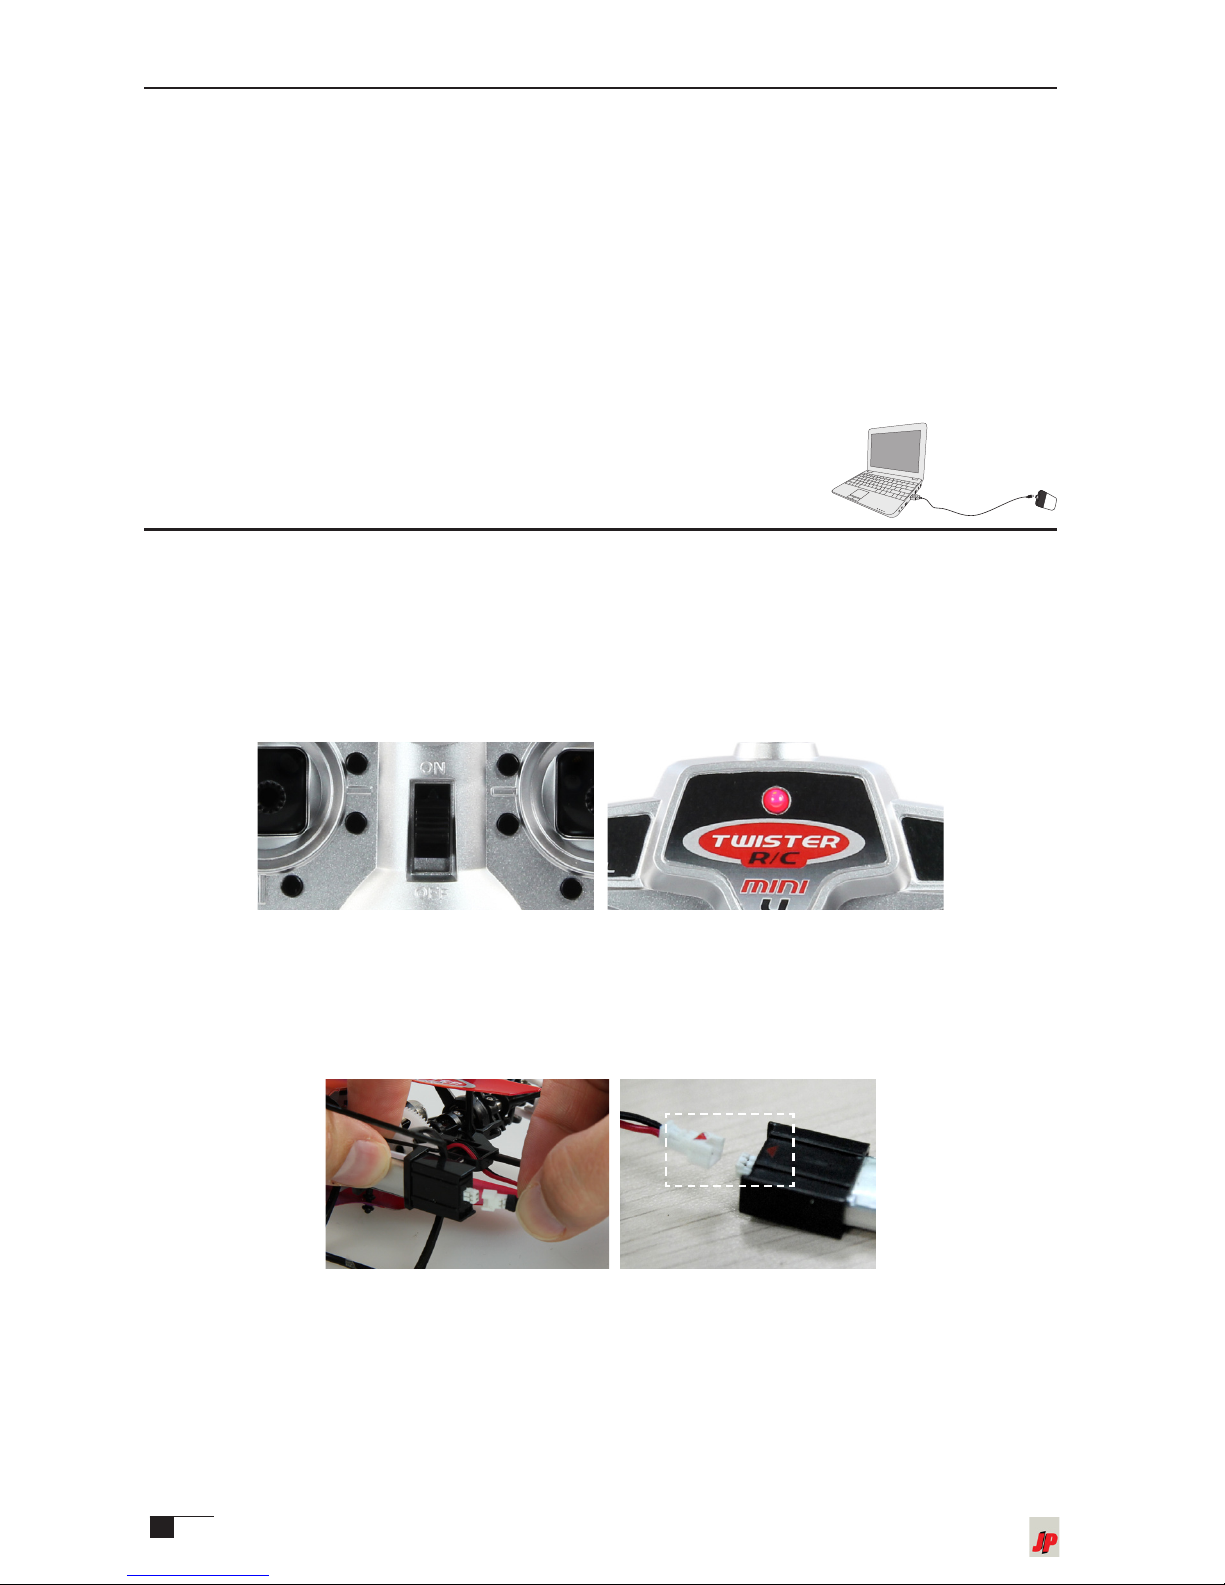
fWhen you begin to fly always turn on the
transmitter first then connect the battery on the
helicopter.
fWhen you have finished flying always disconnect
the battery on the helicopter first then turn off the
transmitter.
fOnly for use indoors
fDo not fly near electrical or wireless equipment
and magnetic objects.
fBe careful to insert the battery the correct way
round, do not force the plug.
fIf you hear the transmitter beeping this means the
transmitter batteries are low. Land immediately,
unplug the battery from the helicopter, turn off
the transmitter and replace the batteries in the
transmitter.
fOnly use the USB charge lead provided with this
model to charge the helicopter battery.
ConTEnTS
Introduction .............................................3
New to R/C helicopters? .......................3
Specifications .........................................4
Welcome ..................................................4
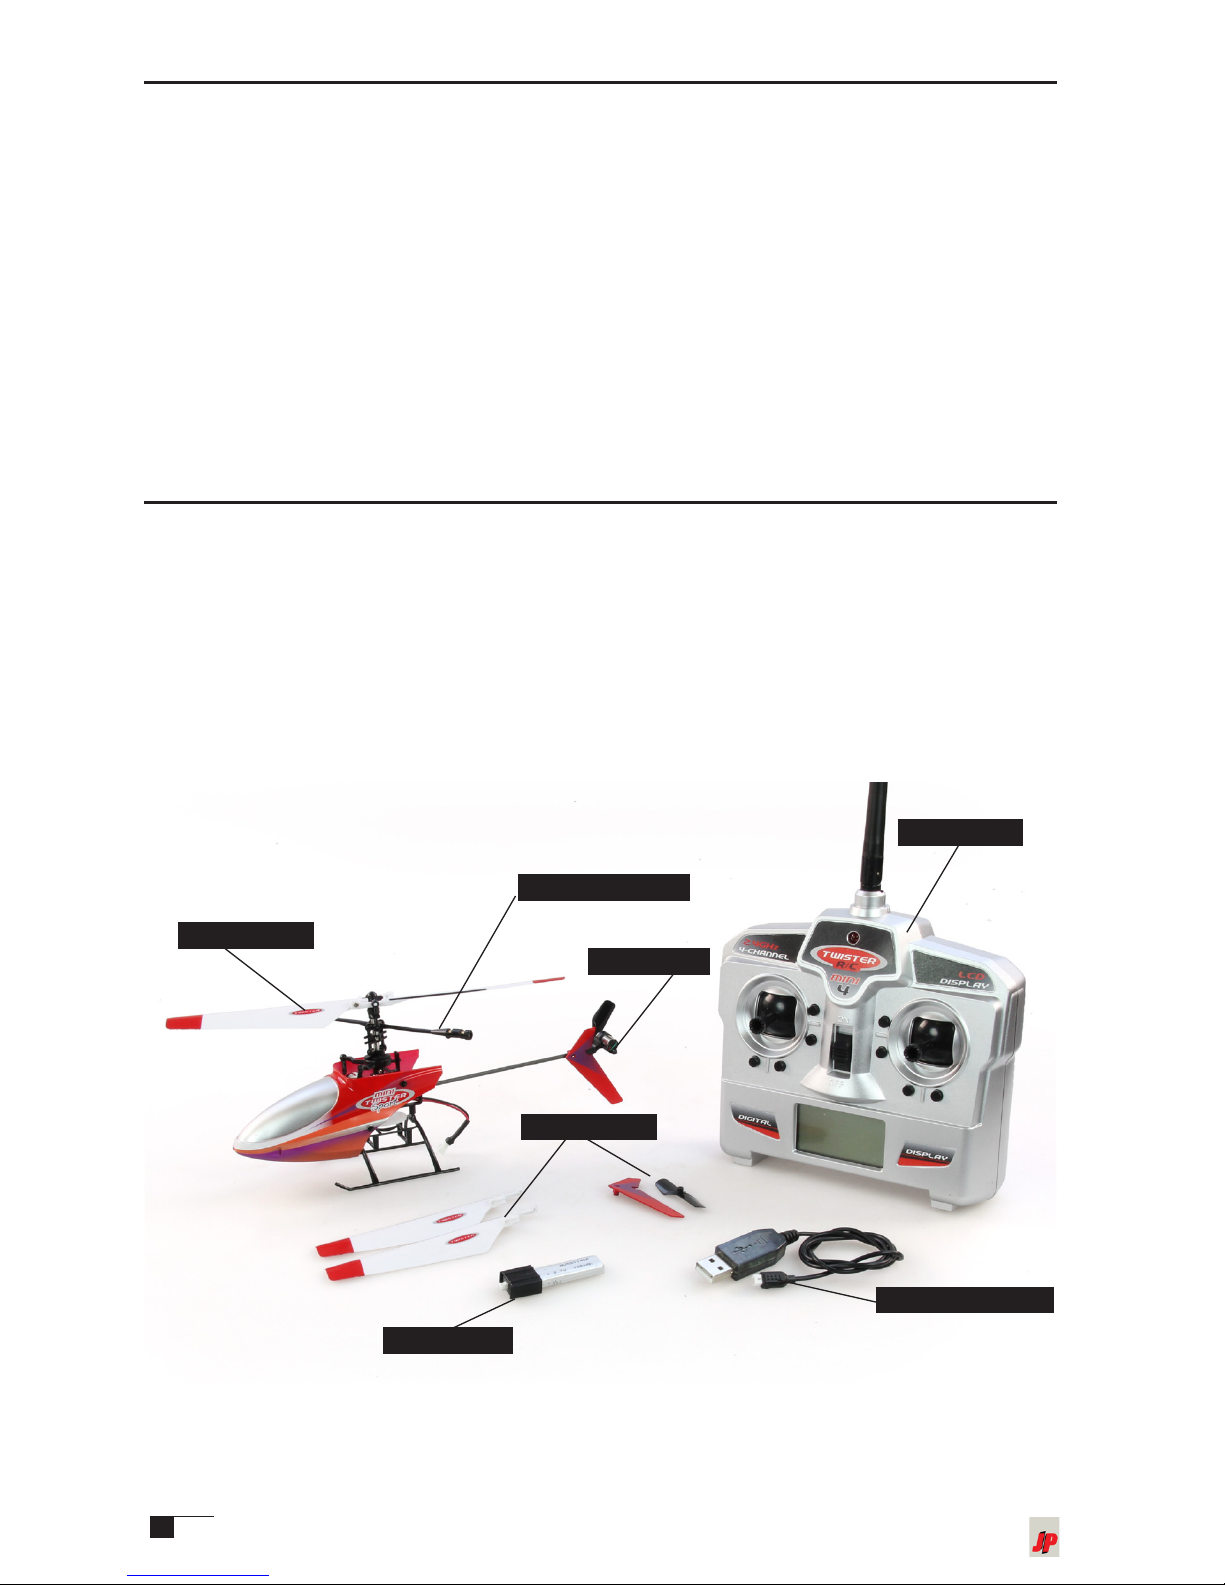
A. Kit contents .....................................4
B. Transmitter part names .................5
C. LCD display ......................................5
Flight controls (Mode 2) ........................6
Beginner and Advanced mode.............6
Binding transmitter to receiver ...........7
Transmitter usage...................................7
Helicopter charging instructions ........8
Preparing for flight .................................8
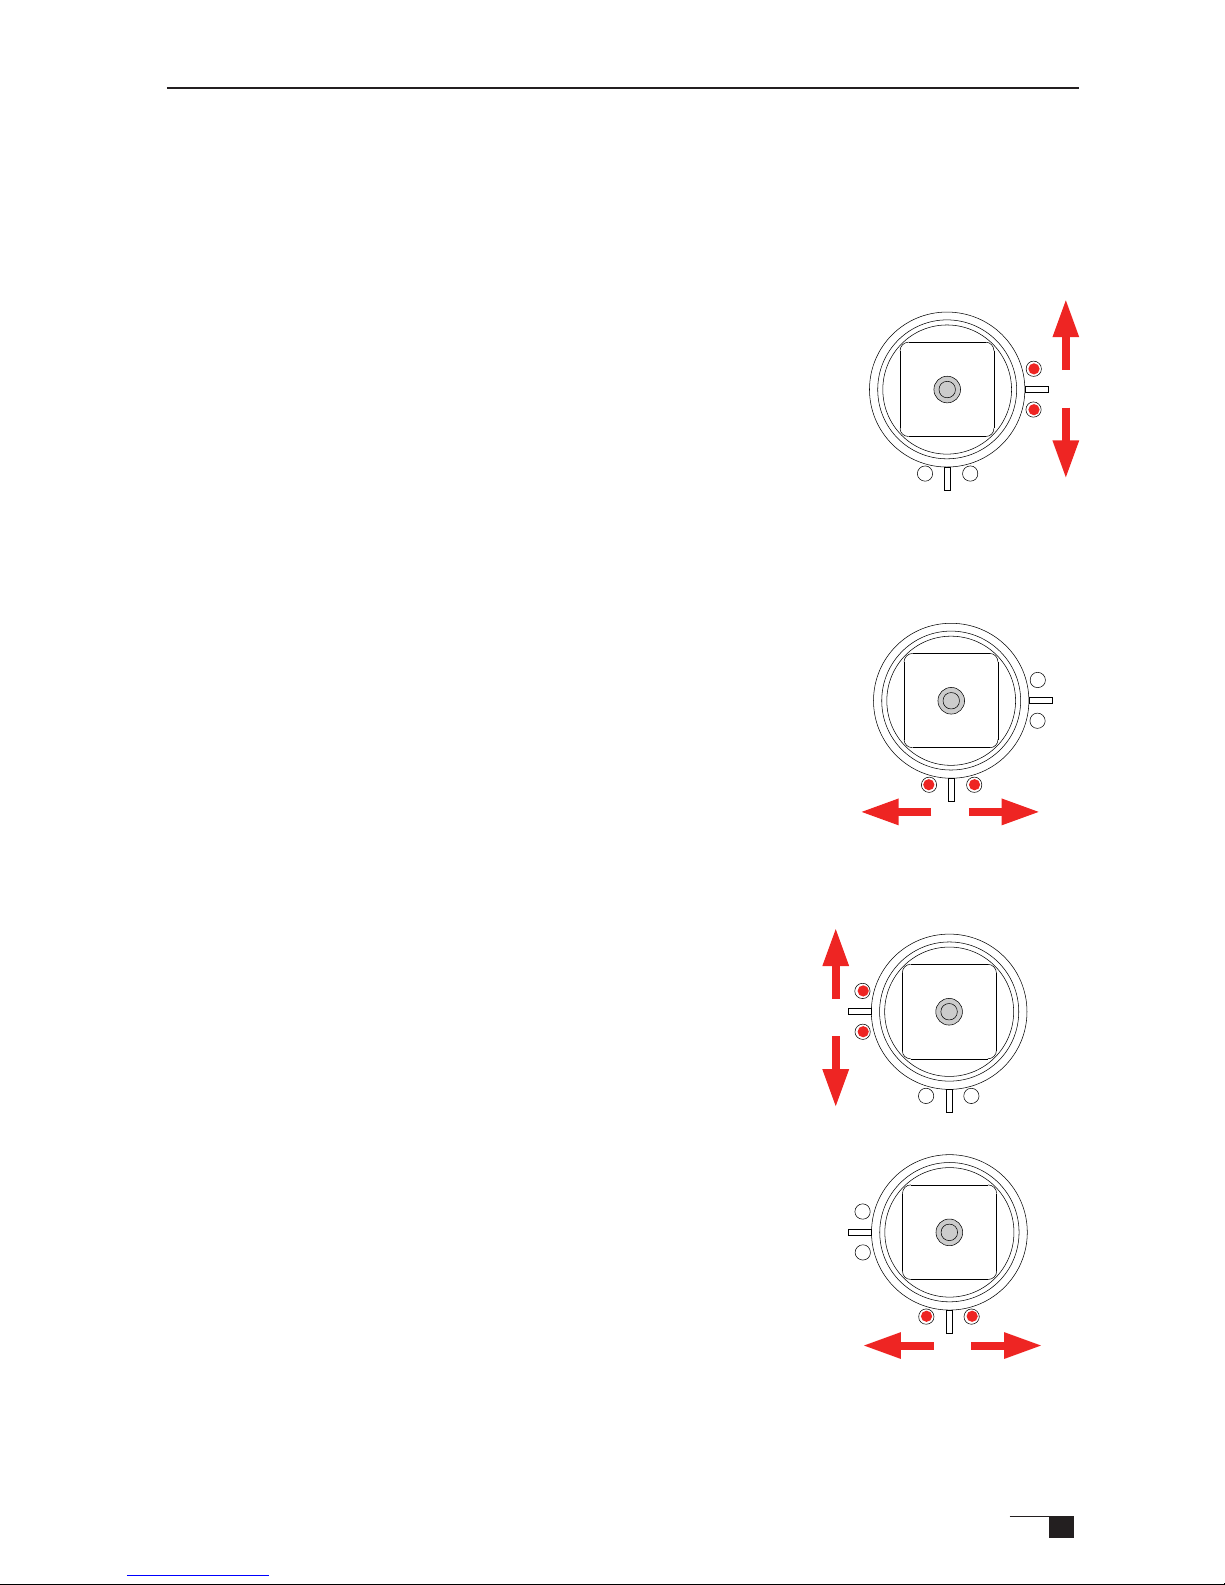
Trimming the helicopter (mode 2)........9
Throttle trim - left stick.......................9
Yaw trim - left stick .............................9
Fore/aft cyclic trim - right stick.........9
Left/right cyclic trim - right stick ......9
Flight controls .......................................10
Taking off ............................................10
Left-right rotation ..............................10
Fore/aft cyclic control ......................11
Left/right cyclic controls..................11
Exploded diagram.................................13
Parts List.................................................14
Lithium polymer battery safety ..........15

3
www.jperkinsdistribution.co.uk
inTRodUCTion
Thank you for buying the Mini Twister
Sport. It is the latest mini fixed pitch
helicopter with 4-channel R/C, 2.4GHz
radio and excellent stability. Mini Twister
Sport is an ideal choice for the beginner
helicopter pilot as it features professional
4-channel operation and stable flight.
Intermediate/Advanced pilots will
also enjoy the more advanced flight
characteristics of the Mini Twister Sport.
Small and lightweight, it can be flown
almost anywhere so almost anyone can
enjoy the fun of R/C helicopter flight.
nEw To R/C
hEliCopTERS?
The model is not a toy. If you are new to
RC helicopters, please do not expect to
be able to open the box and immediately
‘fly around’. RC helicopters are fun to
fly but require some time and training in
order to be flown successfully.
If this is not what you were expecting,
we advise you not to buy this model.
Although the Mini Twister Sport is easy to
fly, please note that we do not guarantee
that by following the information included
with this product you will be bound to
achieve successful helicopter flight.
Neither do we guarantee you will not
break anything!!
AboUT ThE FlyinG AREA
REQUiREd
The Mini Twister Sport is designed for
indoor use only. A hard, flat surface
clear of all obstacles is recommended
for take offs. Because of its size, the Mini
Twister Sport can be flown in virtually
any size room. However, you should fly
only where it is safe to do so and bear in
mind the smaller the room the more likely
you are to experience backwash from
the rotors turning which will effect the
stability of the helicopter.
AboUT TRAininG,
CRAShES & SpARE
pARTS
The Mini Twister Sport has been
designed to be strong and very easy to
repair, however, the helicopter is not
invulnerable and most people will tip their
helicopter over or break parts during their
flying career. This is quite normal. All
parts are available as spares from your
supplier. Study the exploded view of the
helicopter carefully to understand the
relationship between parts and how to
replace them if necessary. Crash damage
is not covered by warranty.

4
SpECiFiCATionS
Fuselage length.................................................................................................................202mm
Main rotor diameter..........................................................................................................190mm
Weight (inc battery)................................................................................................................33g
Charging time............................................................................................... approx. 30 minutes
Flying time ...........................................................................................................up to 7 minutes
On board power............................................................................... 3.7V 150mAh LiPo battery
Radio ...............................................................................................Twister Mini 4, 2.4GHz 4-ch
Range........................................................................................25 metres (for indoor use only)
Required
Transmitter batteries ............................................................................... 4 x 1.5V AA batteries
wElComE
1. Carefully remove the model and other items from the packaging and check all
items are included.
2. Insert 4AA alkaline batteries (not supplied) into the transmitter battery
compartment in the rear of the transmitter being careful to observe battery
polarity.
A. KIT CONTENTS
Main blades
Spares pack
Lipo battery
USB charge lead
Transmitter
Rear motor
Flybar assembly

5
www.jperkinsdistribution.co.uk
B. TRANSMITTER PART NAMES
Throttle trim
Power Indicator
Throttle/Yaw stick
Fore/Aft cyclic trim
Cyclic stick
ON/OFF switch
Aerial
LCD display
Yaw trim Left & Right
cyclic trim
Note: The throttle/yaw stick also has a built in button function
The throttle/yaw stick can be pressed like a button and is used to perform the
following functions:
Binding the transmitter and helicopter if it comes unbound (see page 7)
Switching between advanced and beginner mode (see page 6)
C. LCD DISPLAY
Throttle trim
position
Fore/Aft cyclic
trim position
Left/Right
cyclic display Battery strength
Yaw trim
position
Left/Right cyclic
trim position
Throttle gauge
Cyclic (Fore & aft) and
Yaw (left and right)
display

6
FliGhT ConTRolS (modE 2)
Fore cyclic
Aft cyclic
Right cyclic
-Roll right
Left cyclic
-Roll left
RIGHT STICK
Climb
Descend
Yaw left
-Rotate
nose right
Yaw Right
-Rotate
nose left
LEFT STICK
Each dual axis stick unit of your transmitter controls 2 helicopter functions (complete
with trimmers on each function) giving you control about all 4 axes of flight). See
above
bEGinnER And AdVAnCEd modE
The Mini Twister Sport features beginner and advanced mode.
With the transmitter and helicopter both ON press the throttle/yaw stick down, you
will hear a combination of beeps depending on the mode you are now in:
ONE BEEP: Advanced mode
TWO BEEPS: Beginner mode

7
www.jperkinsdistribution.co.uk
bindinG TRAnSmiTTER To RECEiVER
A working 2.4Ghz transmitter and receiver (in the helicopter) have a coded, ‘bound’
relationship with each other. The setting up of this relationship is known as ‘binding’.
In a ‘bound’ transmitter/receiver relationship the receiver (and therefore the
helicopter it is in) is exclusively bound to your transmitter and can only respond
to signals received from that transmitter. It will not respond to any other device or
transmitter.
Once a transmitter is bound to it’s receiver, re-binding of transmitter and receiver is
not normally required.
However, by binding your transmitter, for example, to a friend’s Mini Twister Sport,
the unique relationship between your original transmitter and receiver in your Mini
Twister Sport will be broken. Should you wish to - or need to, re-establish or ‘bind’
your transmitter with your receiver once more; proceed as follows:
HOW DO I RECOGNISE WHEN MY RECEIVER IS NOT BOUND?
Upon connecting the battery in the model the internal LED will flash on and off
slowly regardless of whether the transmitter is switched on or not. Even when the
transmitter is switched on; no control or change in the slow flash of the LED will be
seen.
HOW DO I BIND RECEIVER AND TRANSMITTER?
1. Switch off the transmitter.
2. Connect helicopter battery.
3. Within 5 seconds of connecting the battery to the helicopter press the throttle
stick down as if it were a button and turn on the transmitter
4. The internal LED will flash and then go solid and the transmitter will emit a
succession of beeps and stop.
TRAnSmiTTER USAGE
TRANSMITTER AERIAL POSITIONING
The transmitter aerial can be angled to optimise the transmitted signal. During
operation keep the aerial pointing upwards at all times. Do not fly with the aerial
pointing downwards. Avoid pointing the aerial directly at your model.
Keep the aerial pointing up–but
not directly at the model

8
hEliCopTER ChARGinG inSTRUCTionS
Note: Charge the helicopter battery before using your Mini Twister Sport for the
first time.
1. Turn on the computer power switch
2. Plug the USB charge lead into a spare USB slot in the computer
3. Carefully connect the battery to the charge lead ensuring it is the correct way
around. You should not need to force it. The light on the USB charge lead will
glow solid RED.
FORCING THE CHARGE PLUG IN THE WRONG WAY AROUND
MAY DAMAGE THE FLIGHT BATTERY OR ELECTRONICS.
4. When the battery has finished charging the light will go off.
5. Disconnect the battery from the charge lead.
pREpARinG FoR FliGhT
TURNING ON
1. Before setting the ON/OFF switch of the transmitter to ON, make sure the throttle
stick is down, in its lowest position.
2. Set the ON/OFF switch of the transmitter to ON. The LED above the ON/OFF
switch will glow RED.
Note: Always turn your transmitter ON first, then your helicopter.
3. Align the red identifying arrows and carefully push the battery into the battery
bay in the bottom of the helicopter taking care to connect it the correct way
round. You should not need to force it.
4. The internal LED will flash quickly and then go solid, this means the helicopter is
bound to the transmitter and ready to fly.
Note: If the light does not go solid and continues to flash see “BINDING THE
TRANSMITTER AND RECEIVER” on page 7.
5. Place the helicopter on the ground with its tail facing towards you.
6. Make sure you have a clear indoor space of at least 3 metres wide and two
metres high when you are learning to fly.

9
www.jperkinsdistribution.co.uk
TRimminG ThE hEliCopTER (modE 2)
Gently apply throttle until the rotor blades start to turn, keep advancing the throttle
until the helicopter leaves the ground and begins to hover.
The model should be stable and centred in the hover to produce the best flight
performance. If you find that your model has a tendency to drift out of the hover then
you can use the trim buttons detailed on page 5 to correct it.
THROTTLE TRIM - LEFT STICK
Decreasing throttle power
If the rotor blades on the model are rotating when you plug
in the battery and no throttle is applied decrease the throttle
trim by pressing the lower trim button on the throttle stick
Increasing throttle power
If the rotor blades do not start to rotate when you raise the
throttle stick increase the throttle trim by pressing the upper
trim button on the throttle stick.
YAW TRIM - LEFT STICK
The model rotates when no yaw control is applied
If the model rotates to the left or the right press the opposite
yaw trim button to correct it, e.g., If the model rotates left
press the right trim button until the model is centred.
FORE/AFT CYCLIC TRIM - RIGHT STICK
The model drifts forwards (fore) or backwards (aft) when
the fore/aft cyclic stick is centred
If the model drifts forwards or backwards press the opposite
trim button to correct it, e.g., if the model drifts forwards
apply backwards (aft) trim until the model is centred.
LEFT/RIGHT CYCLIC TRIM - RIGHT STICK
The model rolls/drifts to the side when left/right cyclic
stick is centred
If the model rolls to the left or right press the opposite trim
button to correct it, e.g., if the model drifts to the left apply
right Yaw trim until the model is centred.
Once you have trimmed your model reduce throttle to land,
disconnect the battery and read through the next section on
how to use the other controls on the helicopter.

10
FliGhT ConTRolS
TAKING OFF
If you have never flown an R/C helicopter before, we recommend learning to
fly in the beginner mode before progressing to advanced mode. See page 7 for
information on how to switch between the modes.
1. Gently move the throttle stick up. The main rotor blades will start to spin.
2. Keep advancing the throttle stick until the helicopter leaves the ground.
3. To begin with, move the throttle stick up and down in very small movements to
find the correct amount of throttle to keep the helicopter at a constant height.
4. If you get into trouble or loose orientation, slowly move the throttle stick to its
lowest position and the helicopter rotors will slow down and stop spinning and
the helicopter will land. This is a much better option than allowing the helicopter
to crash into something with the rotor blades spinning.
LEFT-RIGHT ROTATION
1. Now that you have the helicopter hovering you can learn to turn it around by
using the yaw control.
2. To make the nose turn to the left, move the stick to the left. Centre the stick to
stop the helicopter rotating to the left.
3. To make the nose turn to the right, move the stick to the right. Centre the stick to
stop the helicopter turning to the right.
Yaw left
- Rotate nose to the Left
Yaw right
- Rotate nose to the Right

11
www.jperkinsdistribution.co.uk
FORE/AFT CYCLIC CONTROL
1. Once you have got used to hovering the model and turning it you can try moving
it around the room using the for/aft cyclic control, move the stick forward to
make the helicopter move forwards. Centre the stick to stop the helicopter
moving forwards.
2. Move the stick backwards, or towards you to make the helicopter move
backwards. Centre the stick to stop the helicopter moving backwards.
Forwards -
Fore cyclic
Backwards -
Aft cyclic
3. As you get more confident, you can combine movements at the same time to
fly circles, figure eights, climbing and descending circles, nose in flying and
precision landings on objects. The possibilities are endless. ENJOY!
LEFT/RIGHT CYCLIC CONTROLS
1. Now using the left/right cyclic stick, move the stick left make the helicopter roll
to the left. Centre the stick to stop the helicopter rolling to the left.
2. Move the stick right to make the helicopter roll to the right. Centre the stick to
stop the helicopter rolling to the right.
Roll to the Left - Left cyclic Roll to the Right - Right cyclic
WHEN YOU HAVE FINISHED FLYING, UNPLUG THE BATTERY
FROM THE HELICOPTER TO TURN IT OFF, THEN TURN OFF
THE TRANSMITTER.

12
ExplodEd diAGRAm

13
www.jperkinsdistribution.co.uk
Diagram
Number
Part Description Quantity JP Numbers
001 Balance weight 2 6605655
003 Flybar 1 6605655
004 Flybar link 2 6605645
006 Centre hub 1 6605710
008 Main rotor blade 2 6605660
009 Main shaft 1 6605625
010 Swashplate link 2 6605645
011 Lower hub 1 6605715
012 Swashplate 1 6605640
013 Pushrod 2 6605650
014 Main shaft retaining collar 1 6605630
016 Main motor 1 6605620
017 Pinion gear 1 6605620
018 Main chassis 1 6605670
019 Receiver board 1 6605610
021 Main gear 1 6605625
023 Canopy 1 6605695
024 Undercarriage 1 6605665
025 LiPo battery 1 6605680
026 Vertical tail fin 1 6605685
027 Tail rotor 1 6605705
028 Tail motor mount 1 6605715
029 Carbon fibre tail boom 1 6605690
030 Tail motor 1 6605615
031 Bearing 6x2 2 6605635

14
pARTS liST
JP No Description Diagram Number
6605610 MAIN PCB WITH SERVOS WITH SCREWS (1) 19
6605615 TAIL MOTOR (1) 30
6605620 MAIN MOTOR (1) 16, 17
6605625 MAIN GEAR AND SHAFT SET 9, 21
6605630 SHAFT RETAINING COLLAR WITH SCREW 14
6605635 BALL BEARING 3x6x2mm (2) 31
6605640 SWASH PLATE (1) 12
6605645 UPPER LINK (4) 4, 10
6605650 SERVO LINK (2) 13
6605655 FLYBAR (1) 1, 3
6605660 MAIN BLADES WITH SCREWS (SET) 8
6605665 LANDING GEAR SET 24
6605670 MAIN CHASSIS 18
6605675 O RINGS (CANOPY) (8) Not shown
6605680 BATTERY 150mAh (1) 25
6605685 TAIL FIN (1) 26
6605690 BOOM (CARBON FIBRE) (1) 29
6605695 CANOPY (1) 23
6605700 USB CHARGER (1) Not shown
6605705 TAIL ROTOR BLADE (1) 27
6605710 UPPER ROTOR HUB WITH SCREWS (1) 6
6605715 ANTI ROTATION HUB WITH SCREWS (1) 11
6605720 TAIL MOTOR HOUSING (1) 28

15
www.jperkinsdistribution.co.uk
liThiUm polymER bATTERy SAFETy
Before Charging Li-po’s
Before charging your battery check for any damage e.g. check if the battery has
expanded or swollen in size or if the battery cells have been punctured. If any of
the above is true: DO NOT CHARGE THE BATTERY!
Charging Li-po’s
Only use the USB lead supplied with this product to charge the Lithium polymer
battery in the helicopter. Never use a nicad or other charger as this is very
dangerous.
Never charge unattended. Always stay with your battery whilst charging in case
of overheating or fire.
Charge on a safe surface or container (e.g. old unused microwave oven). Charge
only on non-flammable surfaces, e.g. concrete floor preferably outdoors, or in
a pyrex cooking dish with the battery placed on a bed of sand, or in a fireplace.
Never charge inside a car!
Unplug the charge lead from the computer USB end if the battery gets too hot. If
the battery becomes hot to the touch during charging, disconnect immediately
from the end that plugs into the USB slot on the computer.
Extinguish fires with sand. If something goes wrong and your battery catches
fire, always have sand from a fire bucket at hand to douse the flames. Do NOT
use water!
Using Li-po’s
Do not modify/change any part of the battery or lead. Do not remove its
protective covering. Removal or modification may damage the battery and will
invalidate any warranty claim.
Do not place this battery near fires or anything with high temperatures.
Do not store batteries in any type of motor vehicle.
Do not let the battery get wet or become submerged in any type of liquid.
Do not carry loose batteries in your pocket or bag as they could short-circuit
against other items.
If you should get electrolyte from the cells on your skin, wash thoroughly with
soap and water. If in your eyes, rinse thoroughly with water. Seek medical
assistance.
Always store batteries fully charged in a dark, dry and cool environment.

European agents: J Perkins Distribution,
Lenham, England
www.jperkinsdistribution.co.uk
Table of contents
Popular Toy manuals by other brands

AUTEC
AUTEC Cartronic C909 instruction manual

PLANEPRINT
PLANEPRINT ZLIN SAVAGE BOBBER PRINTING & CONSTRUCTION MANUAL

STAX
STAX 30816 Building Instruction

Horizon Hobby
Horizon Hobby UMX MiG 15 DF instruction manual

Bresser Junior
Bresser Junior 8880850 operating instructions

FMS
FMS RocHobby 70MM F/A-18F operating manual