Minivator Simplicity 950 Series User manual

User manual
Minivator Limited
82 First Avenue
Pensnett Estate
Kingswinford
West Midlands DY6 7FJ
England
Tel: +44 (0)1384 408700
Fax: +44 (0)1384 408719
Email: sales@minivator.co.uk
www.minivator.co.uk

Thank you for choosing a Minivator
stairlift. Please read these operating
instructions carefully. Your Minivator
stairlift has been designed and built
with careful attention to detail. In order
to obtain many years of trouble free use
please follow the instructions, paying
particular attention to the care and
maintenance requirements. Minivator
recommend that you do not undertake
any maintenance tasks other than the
routine care and cleaning explained in this
handbook.
Please contact your Minivator dealer or our
Customer Service Department in the United
Kingdom on 01384 408700 if your stairlift
requires attention and we would be
pleased to help you.
British Standards
Minivator has been accredited as
conforming to the international standard
of manufacturing, recognised by the
award of ISO 9001.
All Minivator stairlifts are built and
tested to conform to the British Standard
for stairlifts (BS5776) :1996 as well as ISO
9386-2. They also carry the CE mark.
Minivator are audited regularly to
ensure we continue to conform to
ISO 9001 and this provides you with
the assurance of using a high quality
and well manufactured product.
Introduction 1
British Standards 1
Features of your 2
Minivator Simplicity 950
Operating your 3
Minivator Simplicity 950
Key switch 3
on/off switch 3
Diagnosic display 3
Operating lever 4
Hand control 5
Folding your stairlift 5
Operating the swivel 6
Hinged track - powered (optional) 7
Emergency hand winding instructions 8
Trapped articles 8
Safety and servicing 9
Warnings and precautions 9
Routine care and cleaning 10
Battery care and charging 10
Care and cleaning 10
Appendix 1 11
–Wiring diagram
Appendix 2 12
–
Certificate of conformity
Appendix 3 13
–Diagnostic display
Introduction Page
1
Features of your Minivator Simplicity 950
2
Folding seat
Swivel seat
Infra red remote control
Folding footrest with safety edges
Simple to operate key switch control
Folding armrests
Diagnostic display
1
2
3
4
5
6
7
1
2
3
4
56
6
7
Figure 1

Operating your Minivator Simplicity 950
Your Minivator stairlift is fitted with a key
switch (Figure 2).
The stairlift cannot be operated unless
the key is inserted and turned to the on
position.
The keyswitch is provided to enable
you to lock the stairlift to prevent it
being used by others (for example
children).
However, it can be left in the on position
if desired.
If you remove your key for safety
reasons, please ensure you put it in a
safe place.
If the keyswitch is turned off the lift will
continue to charge.
As well as a key switch your stairlift is fitted
with an on/off switch (Figure 3) on the
bottom, side panel of the lift.
Ensure that this is left in the ‘ON’
position. The fault diagnosis display
panel will be illuminated to indicate this.
If you intend to be away from home for a
long period, and decide to switch off the
mains supply, it is important that you also
switch off the lift from this on/off switch.
This will ensure that the lift batteries will
remain charged while you are away.
Key switch
Diagnostic display
On/off switch
3
Figure 2 Figure 3
The stairlift is fitted with a diagnostic display
(Figure 3) that displays a code to help
diagnose faults. Refer to Appendix 3 for an
explanation of the diagnostic codes. If you
should experience a problem with your lift
please examine the display and make a note
of any codes that are displayed. Please
inform the customer services operator of
these codes when reporting any faults.
Operating your Minivator Simplicity 950
Operating lever
Before using your stairlift, MOST
IMPORTANTLY please ensure the stairs are
clear of other people, pets or any objects
which may obstruct your stairlift. Then
next, ensure that the arms, footplate and
seat are folded down for use to ensure
your safety. (Figure 4).
BEFORE OPERATING YOUR
STAIRLIFT ALWAYS FASTEN
YOUR LAP BELT.
Your Minivator stairlift is operated by
simply pressing and holding the operating
lever in the direction you wish to travel
(Figure 5). The stairlift will automatically
stop when the switch is released or the
stairlift has reached the end of its travel.
PLEASE NOTE:
In the interest of safety, initial activation
of the stairlift is delayed by 1 second from
pressing and holding the operating lever,
to avoid accidental operation. If the switch
is released while the lift is in motion, the
lift will stop and a delay of 1 second will
occur before the switch will re-start the lift.
When changing the direction of travel the
delay will be 3 seconds before the lift
begins to move.
4
Figure 4 Figure 5

Operating your Minivator Simplicity 950
The hand control (Figure 6) is used to call
the lift to either the top/bottom of the
stairs or to operate a powered folding
hinge where fitted. The control may also
be used by an attendant control where
the user is unable to operate the stairlift
themselves.
The attendant should always remain off
the staircase until the stairlift is
stationary.
Your Minivator Simpicity 950 seat,
armrests and footrest can be folded to
allow easier passage up and down stairs
when it is not in use (Figure 7).
SAFETY PRECAUTION!
ALWAYS RETURN THE STAIRLIFT TO ITS
STOWED POSITION. I.E. WITH ARMRESTS,
SEAT AND FOOTREST FOLDED AND THE
CHAIR PARALLEL TO THE TRACK AS
SHOWN IN FIGURE 7, SO THAT EXITS ARE
NOT OBSTRUCTED.
Hand control
Folding your stairlift
5
Figure 6 Figure 7
Operating your Minivator Simplicity 950
Operating the swivel
A swivel seat is provided to enable you to
mount/dismount the seat more easily at
the top of the stairs by swivelling you on
to the landing.
To operate the seat swivel, wait until
the stairlift has stopped.
To swivel the seat hold the swivel lever
down (Figure 8). When the seat reaches
90 degrees it will lock in position.
You should not attempt to leave the seat
until it has firmly ‘clicked’ into its locked
position (Figure 9).
To swivel in the opposite direction follow
the same procedure.
SAFETY PRECAUTIONS
NEVER
Swivel the seat without the lap belt
fastened.
NEVER
Mount or dismount the swivel seat unless
it is locked in position.
NEVER
Try to operate the swivel seat whilst the
stairlift is in motion. (As a safety precaution,
should you try to use it whilst the lift is in
motion, it will cause the lift to stop).
ALWAYS
Use the swivel seat to travel up or down
the staircase in the correct position (i.e.
facing directly across the staircase).
6
Figure 8 Figure 9

Operating your Minivator Simplicity 950
In some installations a hinged track
option
may be necessary, usually to move the
track out of the way of the doorway at
the foot of the stairs. The hinged track is
fully automatic in operation and will
function as follows:
Going up the stairs
Mount the stairlift as previously directed
and push the operating toggle in the up
direction. The stairlift will, after a short
delay, move up the stairs. Once the lift
has passed the hinged track section it will
stop – KEEP THE TOGGLE PRESSED IN
THE UP DIRECTION. At this time the
hinged track will automatically fold itself
away. When the hinge is fully folded
the stairlift will continue to the top of
the stairs.
Going down the stairs
Mount the stairlift as previously directed
and push the operating toggle in the
down direction. The stairlift will, after a
short delay, move down the stairs. Before
the lift has reached the hinged track
section it will stop – KEEP THE TOGGLE
PRESSED IN THE DOWN DIRECTION. At
this time the hinged track will automatically
open itself. When the hinge is fully open
the stairlift will continue to the bottom of
the stairs.
Parking the Stairlift
WHEN THE STAIRLIFT IS NOT IN USE IT
SHOULD BE MOVED TO ITS PARK POSITION
SO THAT IT DOES NOT CAUSE AN
OBSTRUCTION.
THE STAIRLIFT DOES NOT CHARGE WHEN IT
IS PARKED AT THE BOTTOM OF THE STAIRS.
To park the stairlift, press and hold the
P button on the handset (Figure 10). The
lift will travel up the stairs to its park
position and the hinge will automatically
fold itself.
Hinged track
powered (optional)
7
WARNING
BEFORE YOU OPERATE THE HINGED
TRACK PLEASE CHECK FOR OBSTACLES.
Before raising the manual hinged track
park the stairlift on the charge points,
above the hinge, or at the top of the
stairs.
Your stairlift will not work unless the
track has been lowered.
Hinged track
manual (optional)
Figure 10
Operating your Minivator Simplicity 950
8
In the unlikely event that the lift has a
total power failure or runs on to the final
track stops there is an emergency hand
winding procedure. Please follow these
steps:
1. Switch off the stairlift with the key.
2. Insert the emergency hand winding
knob (Figure 11).
3. Turn the knob in the direction
indicated for the required movement.
4. When the desired position is reached
remove the hand winder and switch
the lift on.
If in any doubt contact your local
Minivator approved dealer or ring
Minivator direct on 01384 408700
Your stairlift is fitted with safety edges
on the bottom of the footrest and on the
lift itself that will stop the stairlift should
any article become trapped by
the footrest (Figure 12).
To remove the article reverse the stairlift
away from the object then have the
object removed from the staircase.
Proceed on your stairlift as normal.
Emergency hand
winding instructions
Trapped articles
Figure 11 Figure 12

10
Your Minivator stairlift is battery powered
and will continue to work for a period of
time even if you have a power cut. You
should normally be able to travel up and
down the stairs at least 10 times without
needing to charge the batteries, however
you should always ensure that there is
sufficient lighting to allow safe travel,
especially at each end of the track where
you get on and off the lift.
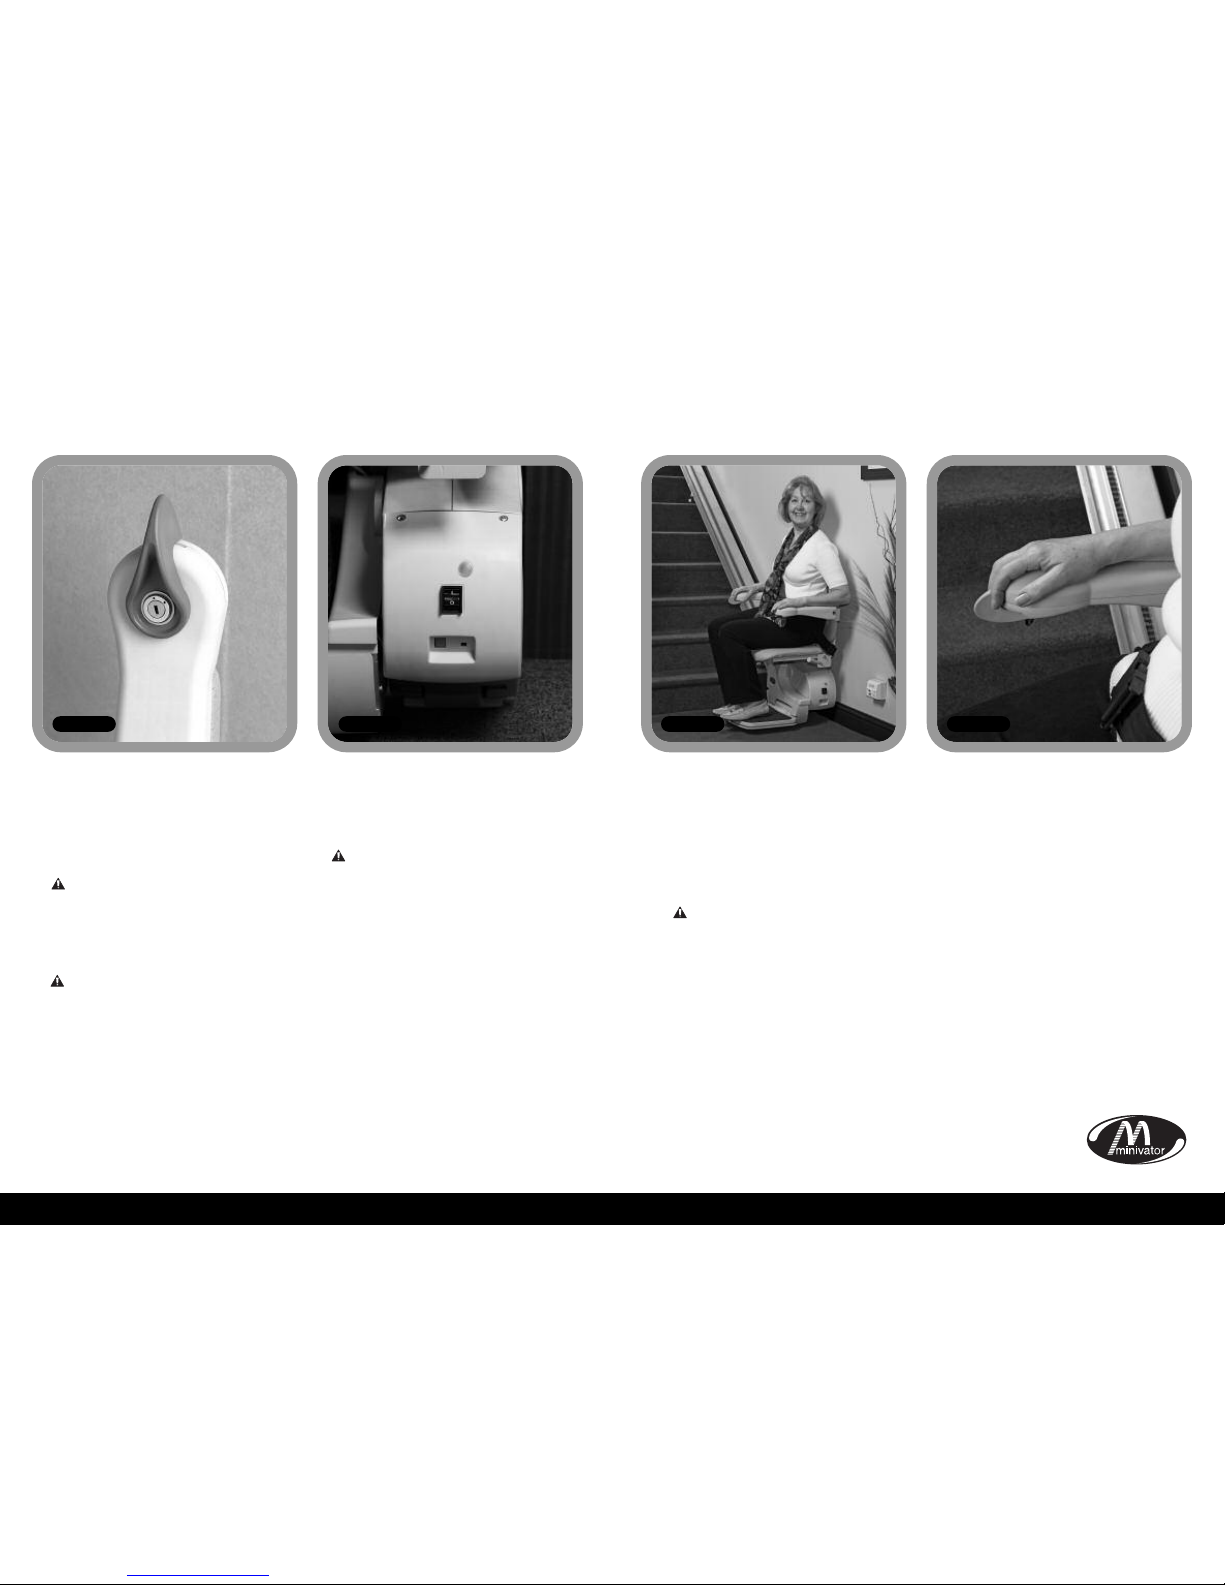
Your stairlift is fitted with a continuous
charging system such that the batteries
will charge at any point that it is parked
at. If the stairlift makes a beeping noise
when it is not in use IT IS NOT CHARGING.
Please check that the power supply for
the stairlift is switched on. If it is switched
on and the beeping continues please
contact your dealer or the Minivator
Service Department on 01384 408700.
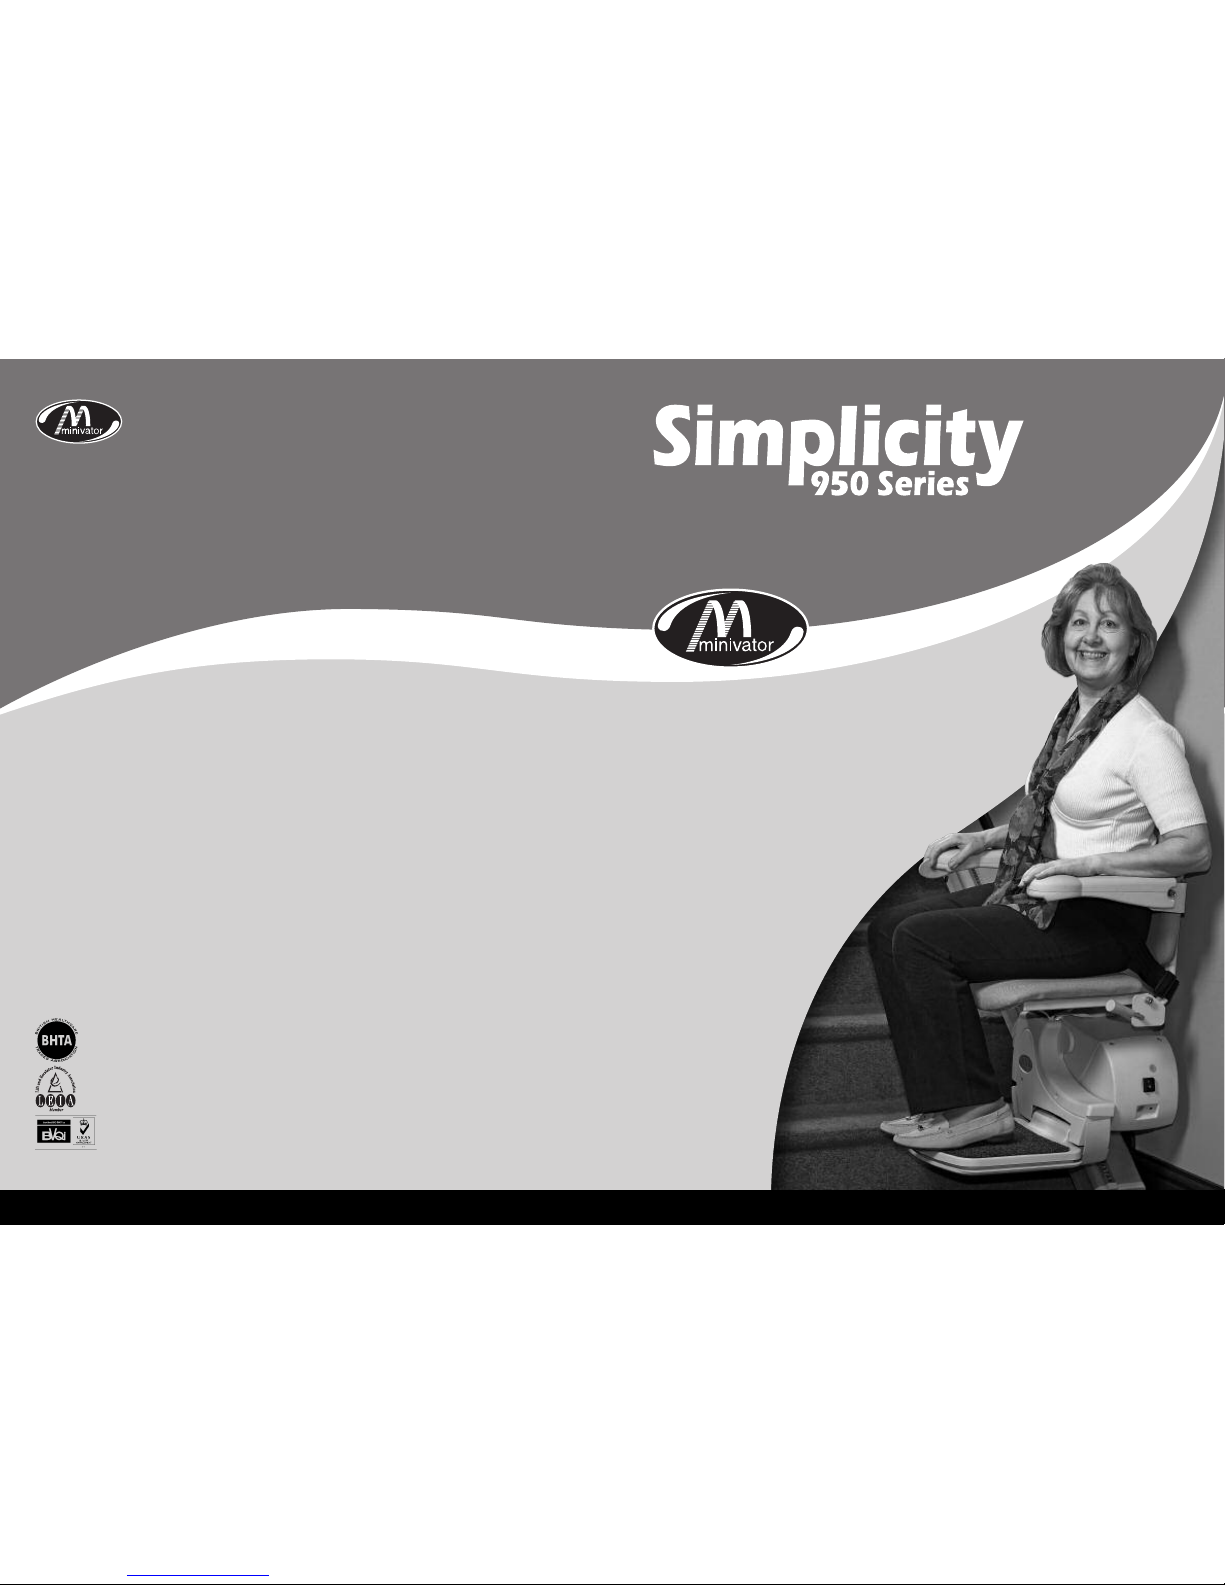
Before cleaning any part of your
Minivator stairlift, please ensure you have
removed the key.
The Minivator stairlift is manufactured
from a variety of materials, all with easy
“wipe clean” surfaces. The seat and body
covers can be wiped over with a damp,
NOT WET, cloth and a small quantity of
washing up liquid.
PLEASE DO NOT use abrasive cleaners,
bleach or solvent based cleaners, as these
will damage the seat.
To clean the track, first send the stairlift
to the top of the stairs. The track can be
cleaned with a damp cloth. When most of
the track is clean, move the stairlift to the
bottom of the stairs and finish cleaning
the track making sure that none of the
cleaning debris falls on to it.
To maintain your Minivator stairlift in
good mechanical order, it is recommended
that regular services are carried out by
qualified service engineers.
Battery care
and charging
There are no user serviceable parts fitted
to your stairlift. If any damage is visible or
your stairlift sounds or behaves unusually
contact Minivator or your approved
dealer immediately. We advise that your
stairlift is serviced after the first
12 months and thereafter AT LEAST
EVERY 12 MONTHS.
Maintenance
Care and
cleaning
Routine care and maintenance
9
Safety and servicing
We advise that your stairlift is serviced after the first 12 months and thereafter AT LEAST EVERY
12 MONTHS.
This work must be carried out by a competent person, i.e. a Minivator approved dealer.
If in doubt, please contact the Minivator Service Department on 01384 408700.
If you own your stairlift and no longer require it your dealer or Minivator may be interested in
purchasing it.
Warnings and precautions
NEVER
Allow more than one person to use the stairlift at any one time.
The maximum carrying capacity is 120kg (19 stone/265lb).
NEVER
Allow children to play on or with the stairlift.
NEVER
Allow water to come into contact with the components in the stairlift. If you have to
transport liquids DO SO WITH CARE
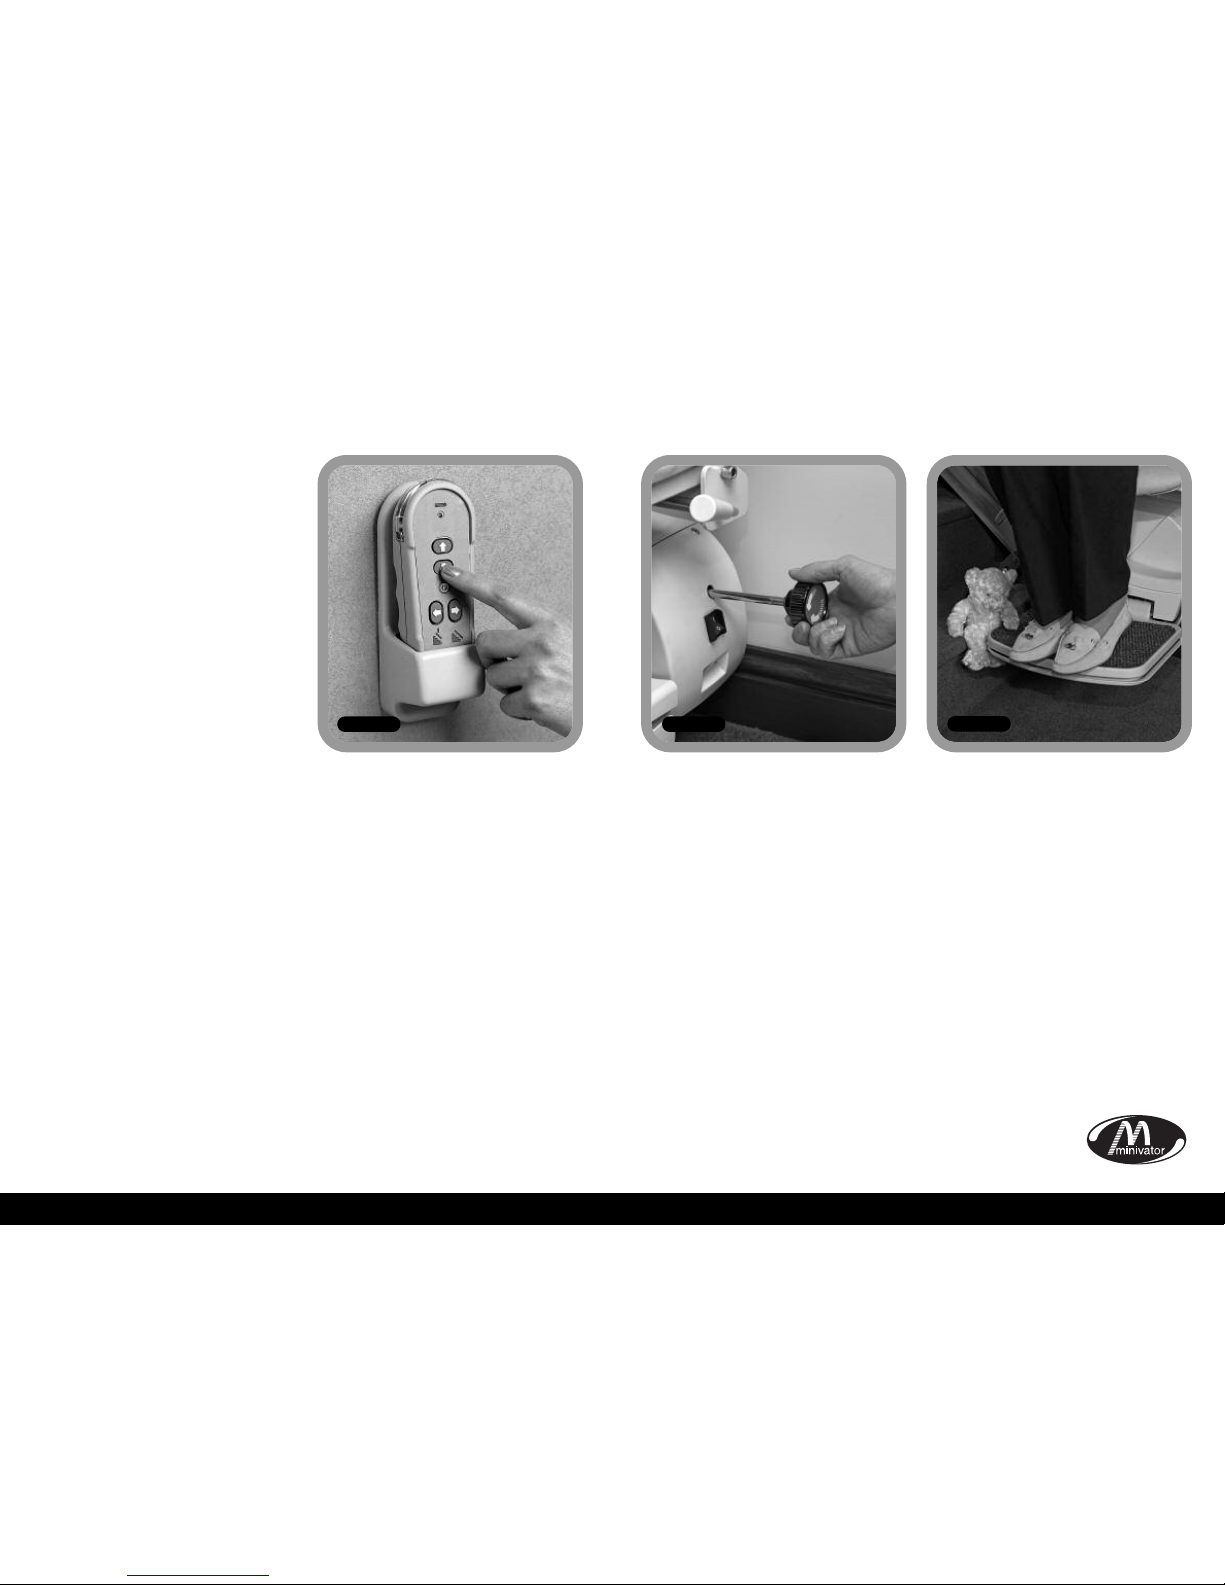
NEVER
Place objects in the track, or leave objects on the stairs, where they could come into
contact with the lift in operation. Your stairlift is fitted with sensitive side edges and
undertray on the footplate, which will automatically stop the lift if it detects any
obstructions.
NEVER
Use the stairlift without using the lap belt, or any other safety belts or harnesses fitted.
NEVER
Use the stairlift in a standing position.
ALWAYS
Keep your FEET ON THE FOOTPLATE whilst the stairlift is in motion, and try to avoid your
feet hanging over the edges of the footplate.
NEVER
Swivel the seat until the lift has come to a stop at the top or bottom of the staircase.
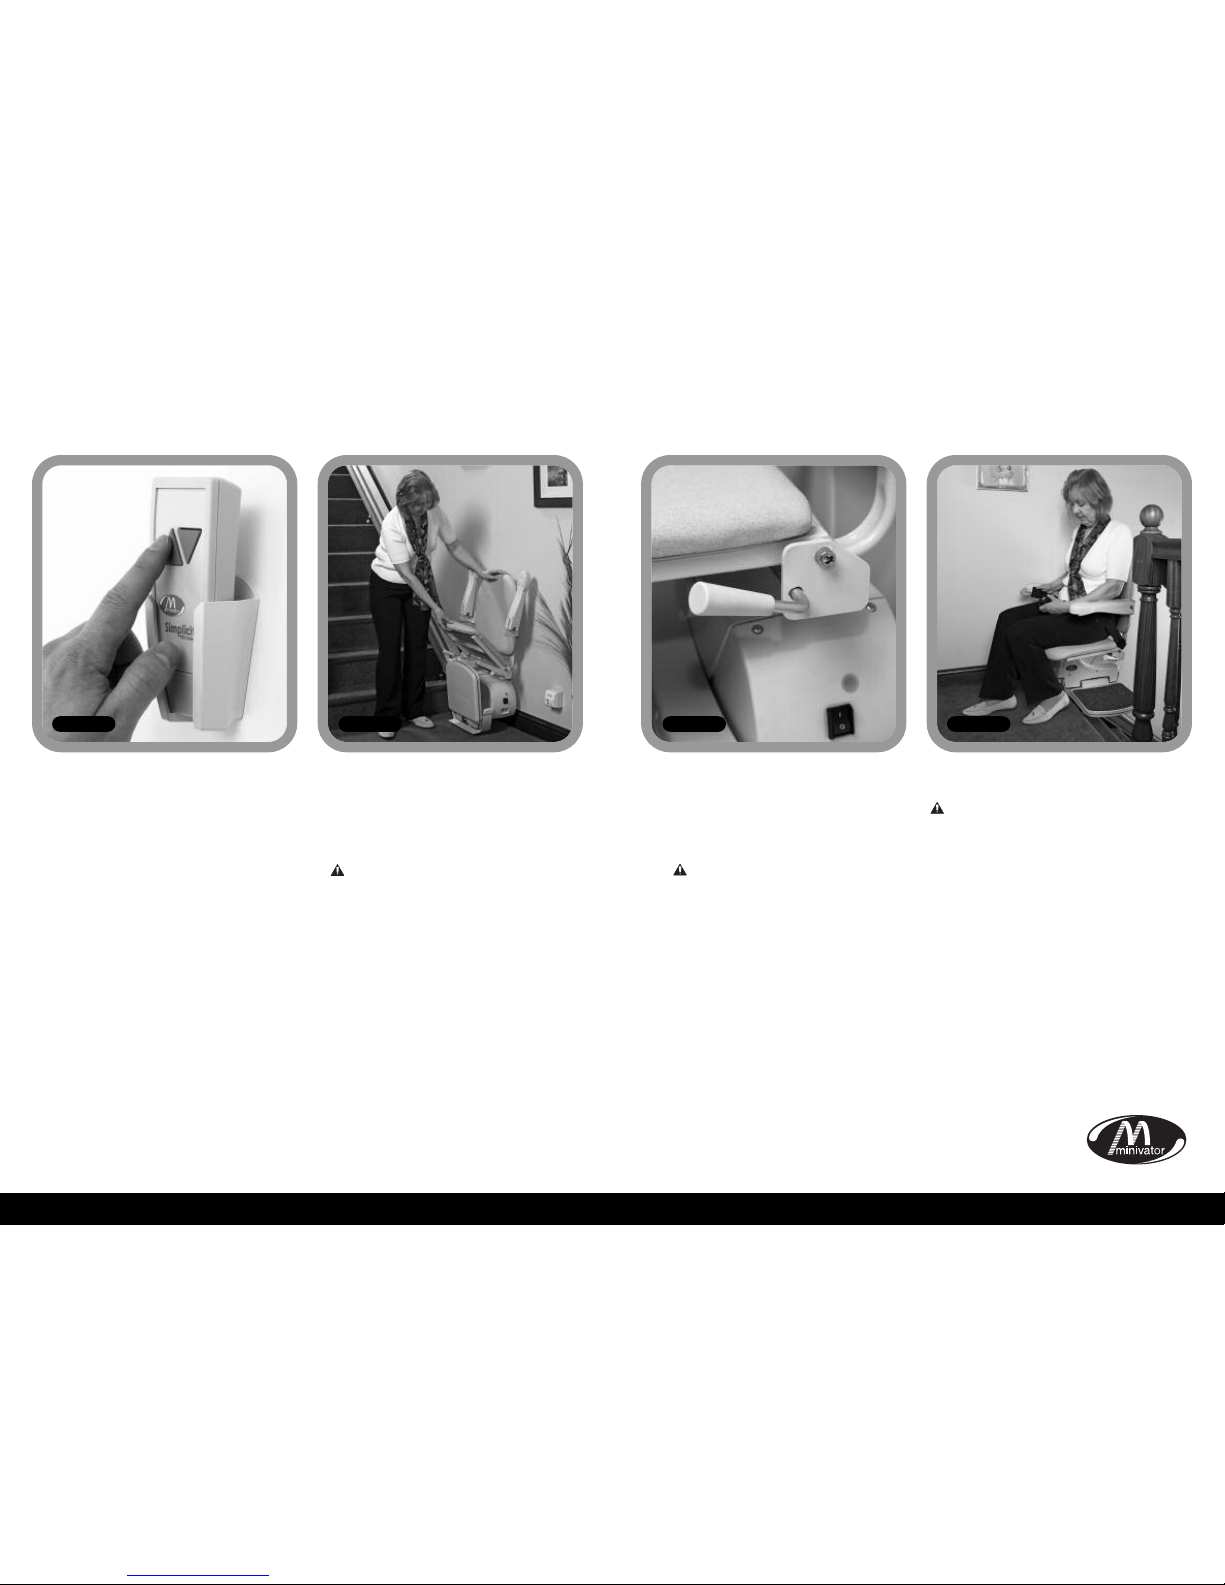
ALWAYS
Fold the chair when it is not in use, to avoid obstructing exits.
WARNING
If the overspeed governor is activated it should only be reset by a competent person, i.e. a
Minivator approved dealer. Activation of the overspeed governor is indicated by the lift
not being able to be driven down the stairs and the diagnostic display showing 0.

Appendix 2 – Certificate of conformity
12
We
Minivator Ltd
of
82 First Avenue
Pensnett Estate
Kingswinford
West Midlands
DY6 7FJ, England.
Declare under our sole responsibility that the product
Minivator Simplicity 950 Stairlift
has been manufactured in conformity with the following
standards and specification:-
BS5776:1996 Powered Stairlifts
To which this declaration relates is in conformity with the following
national standards:
Electro Magnetic Compatibility Directive 89/336/EEC
Low Voltage Directive – 73/23/EEC
Machinery Directive – 98/37/EEC
Signed:
Name: G. Welch
Date:
Position: Engineering Manager
Appendix 1 – Wiring diagram
11
Simplicity Left Hand and Right hand Standard
INFRARED/RADIO LEARN BUTTON
DIP SWITCH 2
NO CONNECTION REQUIRED
BRAKE CONNECTOR
CHARGE +
BATTERY POSITIVEBATTERY NEGATIVE
MOTOR 1 (BLACK)
MOTOR 2 (WHITE)
NO CONNECTION REQUIRED
7 SEGMENT DISPLAY
DIP SWITCH 1
9 WAY CONNECTOR
ON
ON
1 2 3 4
1 2 3 4
8 WAY CONNECTOR
INFRARED/RADIO
IF ANY DIP SWITCHES ARE CHANGED, PLEASE TURN OFF LIFT,
WAIT 10 SECONDS, THEN POWER THE LIFT BACK ON.
DIP 1
HALF SPEED UP
HALF SPEED ON
PING DISABLE
UNUSED
ON
12 3 4
DIP 2
HINGE DISABLE
DIRECTION
SLOW RAMP
UNUSED
FULL SPEED UP
FULL SPEED ON
PING ENABLE
UNUSED
HINGE ENABLE
DIRECTION B
FAST RAMP
UNUSED
ON
12 3 4
KEY:

13
Appendix 3 - Diagnostic display
Code:
None
Meaning:
No display.
Self help action:
Press the toggle switch and see if
display comes on. Check that the main
power switch on the lift is turned on.
If this does not clear the fault, contact
your dealer or Minivator.
Code:
1
Meaning:
Requires charge.
Self help action:
The stairlift batteries require charging.
Drive the lift to the charge contacts –
if the 'Okay' code does not show
contact your dealer or Minivator.
Code:
Okay
Meaning:
Okay.
Self help action:
Contact your dealer or Minivator.
Code:
0
Meaning:
Final limit activated.
Self help action:
Check that the keyswitch is on and
seat is fully swivelled to the drive
position. If this does not clear the
fault, contact your dealer or Minivator.
0
1
Code:
4
Meaning:
Safety edge (up/down
direction) activated –
footplate.
Self help action:
Contact your dealer or Minivator.
4Code:
5
Meaning:
Ends limit activated.
Self help action:
Contact your dealer or Minivator.
5
Code:
7
Meaning:
Batteries approaching
critical level.
Self help action:
The stairlift batteries require charging.
Drive the lift to the charge contacts -
if the 'Okay' code does not show
contact your dealer or Minivator.
7Code:
9
Meaning:
Shows when toggle
switch is activated in
down/up direction.
Self help action:
N/A.
Code:
6
Meaning:
A switch is active at
power on i.e. Toggle
Up, Toggle Down, IR
Up, IR Down or Learn.
Self help action:
Contact your dealer or Minivator.
6
Code:
2
Meaning:
Off charge.
Self help action:
The stairlift is not parked on a
charging position. Drive the lift to the
charge contacts – if the 'Okay' code
does not show contact your dealer or
Minivator.
Code:
3
Meaning:
Ends limit activated.
Self help action:
Contact your dealer or Minivator.
23
Code:
A
Meaning:
Hinge open.
Self help action:
Contact your dealer or Minivator.
Code:
8
Meaning:
Shows when toggle
switch is activated in
up/down direction.
Self help action:
N/A.
8
ACode:
b
Meaning:
A switch is active at
power on i.e. Toggle
Up, Toggle Down, IR
Up, IR Down or Learn.
Self help action:
Contact your dealer or Minivator.
Code:
C
Meaning:
The IR address
(dip switch) does not
match.
Self help action:
Contact your dealer or Minivator.
C
14
Code:
d
Meaning:
The main power relay
is welded closed.
Self help action:
Contact your dealer or Minivator.
Code:
E
Meaning:
The main power
relay did not close.
Self help action:
Contact your dealer or Minivator.
E
Code:
F
Meaning:
Brake semi-conductor
failed.
Self help action:
Contact your dealer or Minivator.
f
Code:
g
Meaning:
Brake not connected.
Self help action:
Contact your dealer or Minivator.
Code:
H
Meaning:
The main power relay
has closed early.
Self help action:
Contact your dealer or Minivator.
H
Code:
L
Meaning:
Current limit
exceeded.
Self help action:
Contact your dealer or Minivator.
l
Code:
n
Meaning:
Half speed.
Self help action:
If permanently showing contact your
dealer or Minivator.
Code:
o
Meaning:
The main control
board has a memory
problem.
Self help action:
Contact your dealer or Minivator.
Code:
P
Meaning:
Powered swivel did
not respond.
Self help action:
Contact your dealer or Minivator.
P
Code:
r
Meaning:
No charge current.
Self help action:
Make sure that power supply is
switched on from mains. If it is
contact your dealer or Minivator.
Code:
N/A
Meaning:
Over current.
Self help action:
Contact your dealer or Minivator.
Code:
U
Meaning:
Faulty power supply.
Self help action:
Contact your dealer or Minivator.
u
NOTE: If the display is
showing anything but the
diagnostic codes listed it
requires resetting.
Drive the lift off the charge
contacts. Turn the main switch
on the unit off for 10 seconds
and then back on.

15
Important information about your stairlift which
should be completed by the installation engineer.
Installed by: (Company Name)
Serial No
Date of installation
First service due
Dealer Stamp
Other manuals for Simplicity 950 Series
1
Table of contents
Other Minivator Stairlift manuals