Minivator 1000 series User manual
Minivator 1000 series
Owners operating instructions

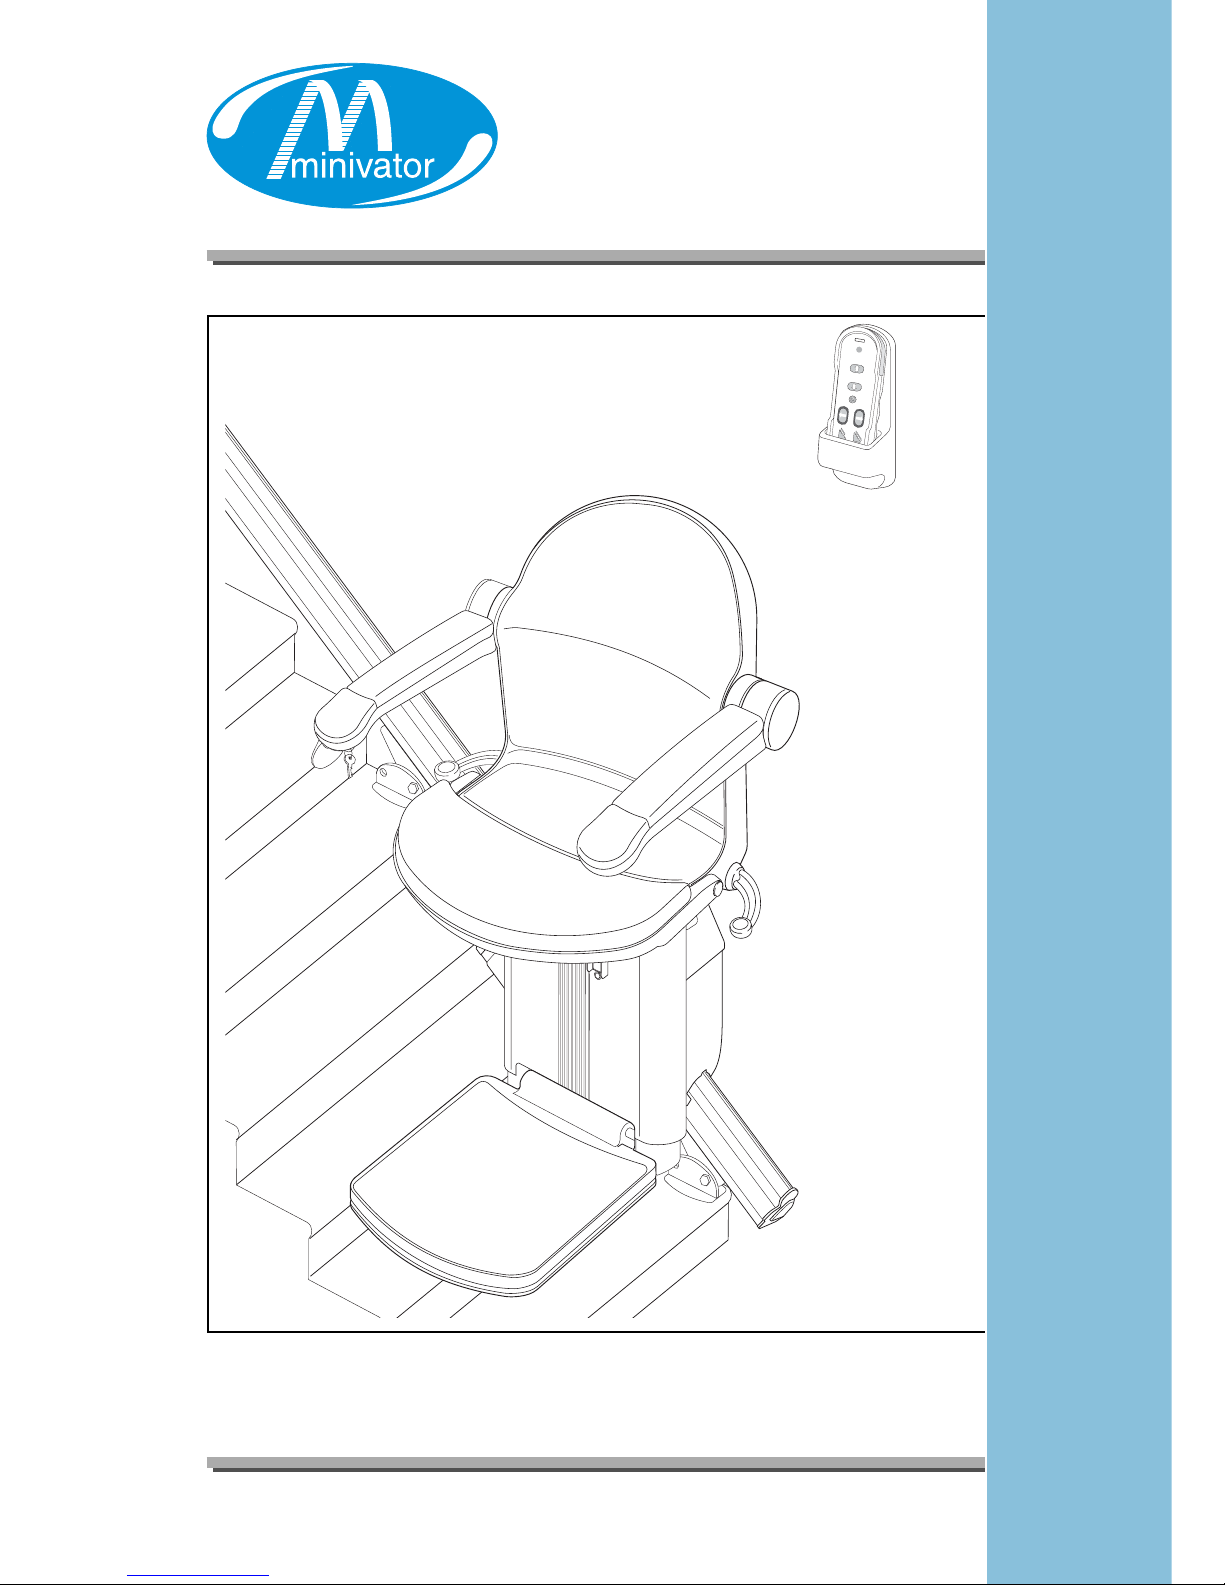
Features of your Minivator 1000
Thank you for selecting a Minivator stairlift.
Please read these operating instructions
carefully. Your Minivator stairlift has been
designed and built with careful attention to
detail. In order to obtain many years of
trouble free use please follow the
instructions, paying particular attention to the
care and maintenance requirements.
Minivator recommend that you do not
undertake maintenance tasks other than
routine care and cleaning e plained in this
handbook.
Please contact your Minivator dealer or our
Customer Service Department on
01384 408700 if your stairlift requires
attention and we would be pleased to help
you.
1. Key Switch
Lift will not operate unless key is inserted and turned page 3
2. On/Off Switch
Lift will not operate unless it is switched on page 3
3. Operating Lever
To move in the direction you wish to travel page 4
4. Fold Away
To save space when the stairlift is not in use. page 5
5. Seat Swivel Lever
Push down or pull up to swivel it around to help with your movement page 6
6. Lap belt
Must be fastened before you set lift into operation
7. Hand control
Can be wall mounted as shown or carried page 5
8. Sen itive afety edge
Safety device in place to ensure stairlift stops if obstacle in way page 8
9. Hinged track (Option) page 7
10. Minivator 1000 Perch ver ion (Option)
Minivator have been accredited as conforming
to the international standard of manufacturing,
recognised by the award of ISO 9001.
All Minivator stairlifts are built and designed to
comply to the British Standard for stairlifts
(BS5776) : 1996 as well as ISO 9386-2 and
also carry the CE mark.
Minivator are audited regularly to ensure we
continue to conform to ISO 9001 and this
provides you with the assurance of using a
high quality and well manufactured product.
Introduction British Standards
1
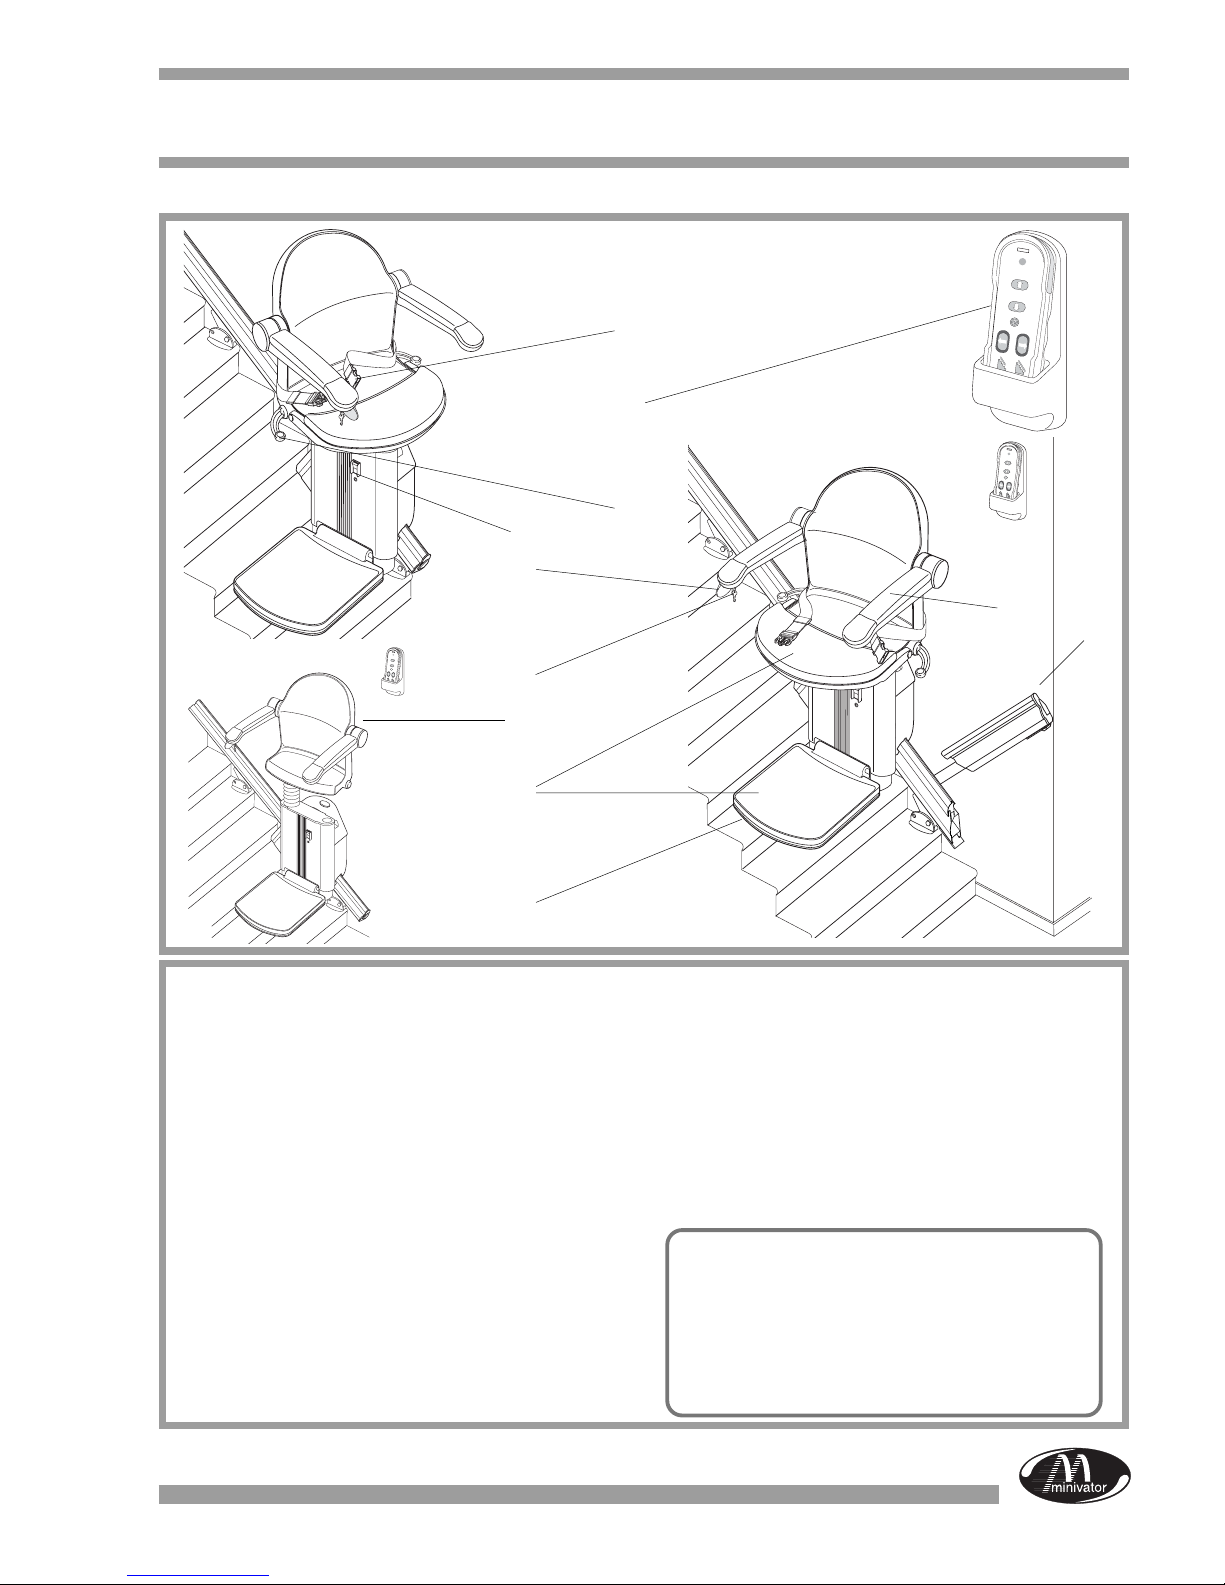
Features of your Minivator 1000
2
10
1
4
5
6
7
8
9
Important information about your stairlift which should be completed by the installation engineer.
Installed by: ................................................................................................... (Company Name)
Serial No ..................................................................................................................................
Date of Installation ....................................................................................................................
First service due .......................................................................................................................
Dealer Stamp
3
2
4

Operating your Minivator
3
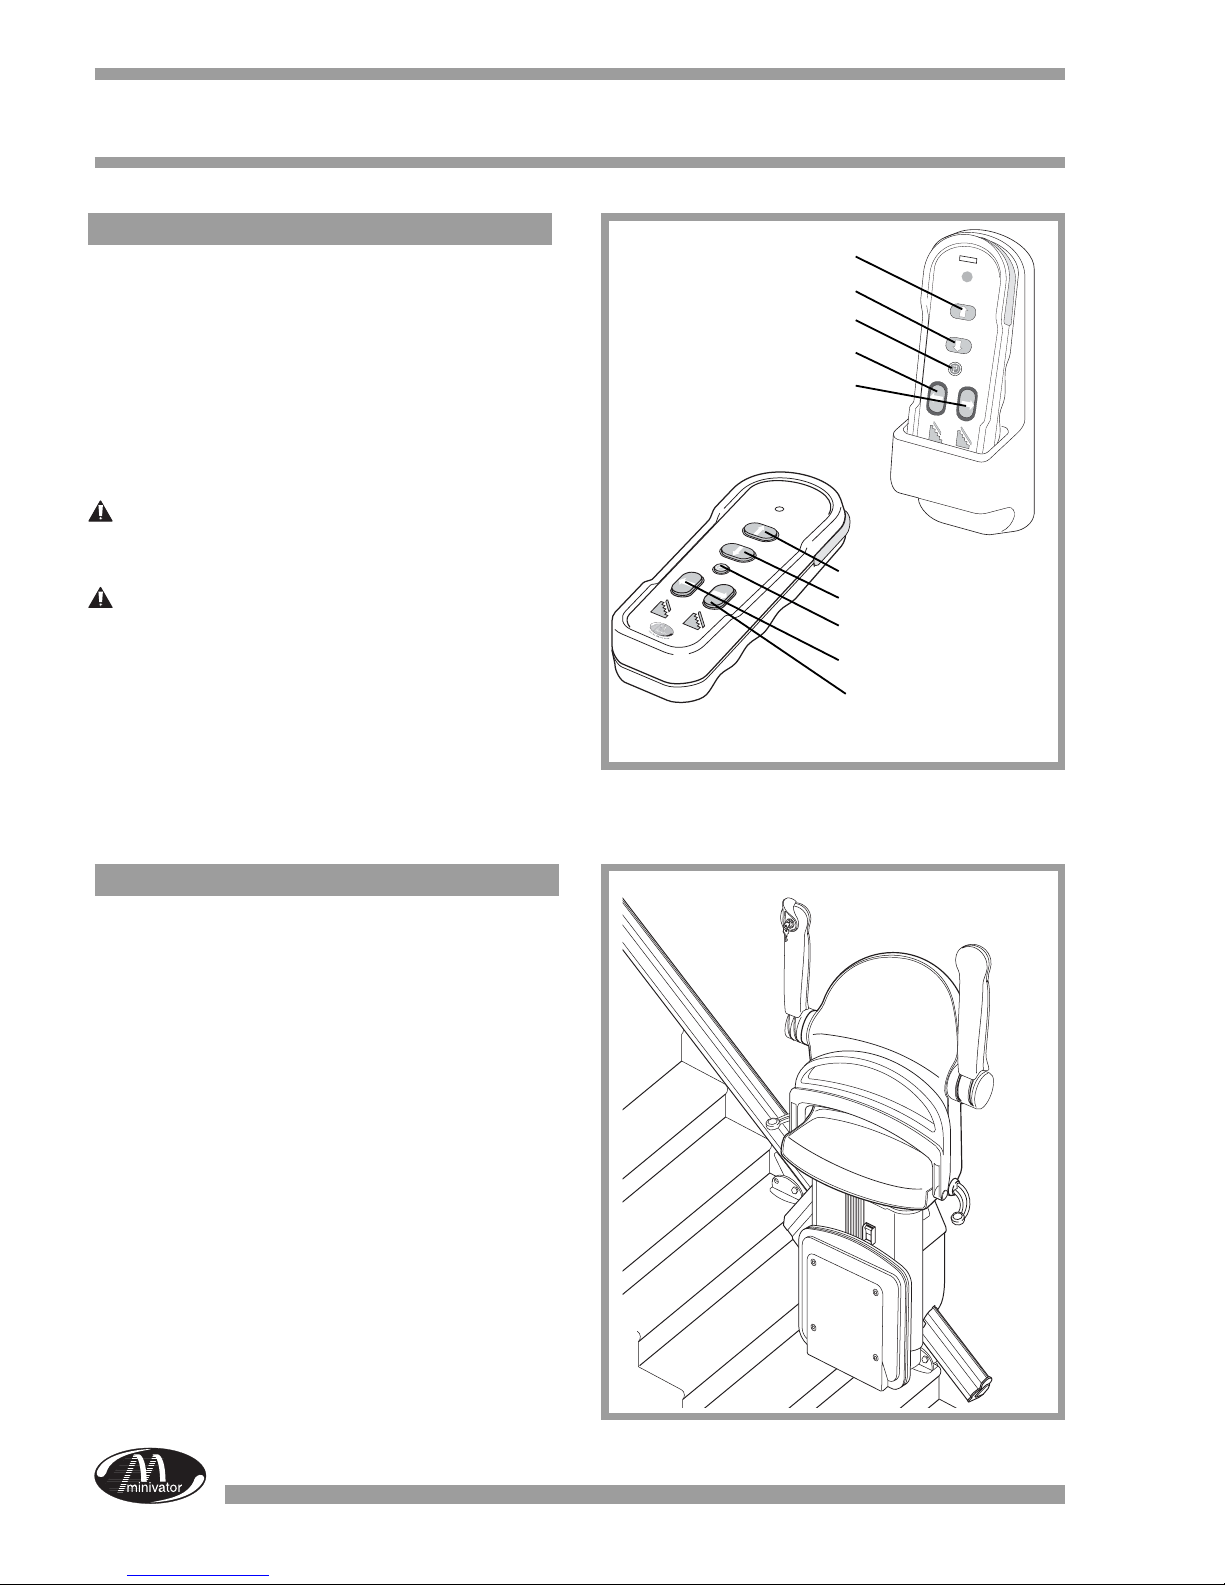
Key S itch
Your Minivator stairlift is fitted with a key
switch (Fig. 2).
The stairlift cannot be operated unless the
key is inserted and turned to the operating
position.
The keyswitch is provided to enable
you to lock the stairlift to prevent it
being used by others (for e ample
children).
However it can be left in the operating
position if desired.
If you remove your key for safety
reasons, please ensure you put it in a
safe place.
Fig. 2
On/Off s itch
As well as a key switch your stairlift is fitted
with an Off/On switch (Fig. 3) on the front
panel of the lift (below the seat).
Ensure that this is left in the ON
position which is indicated by the
green light being illuminated.
Fig. 3
On/Off switch and indicator lamp
Seat in 90º rotated position)

Operating your Minivator
4
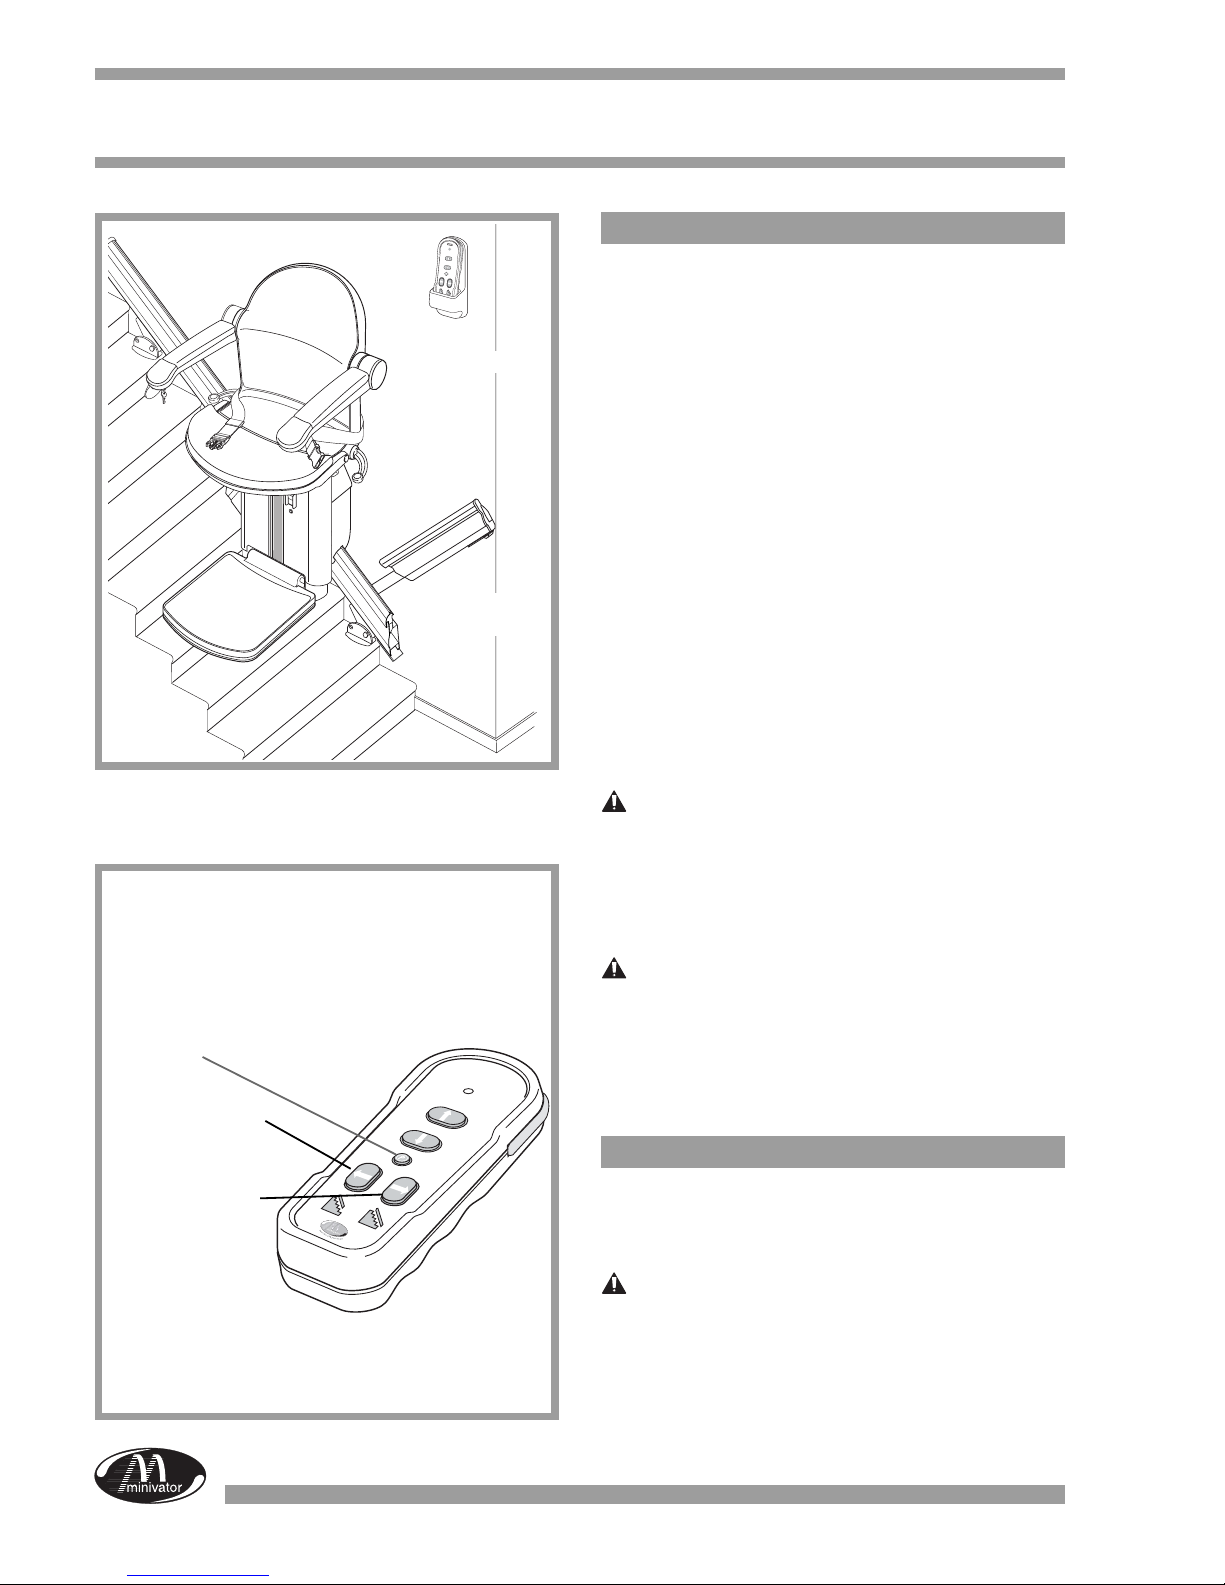
Fig. 4
Fig. 5
Operating lever
Before using your stairlift, MOST
IMPORTANTLY please ensure the stairs are
clear of other people, pets or any objects
which may obstruct your stairlift. Then ne t,
ensure arms, footplate and seat are folded
down for use, as in the interests of your
safety, the stairlift will not operate if they are
not in their operating position (Fig. 5).
BEFORE OPERATING YOUR
STAIRLIFT ALWAYS FASTEN YOUR
LAP BELT.
Your Minivator stairlift is operated by simply
pressing and holding the operating lever in
the direction you wish to travel (Fig. 4). The
stairlift will automatically stop when the switch
is released or the stairlift has reached the
end of its travel.
PLEASE NOTE:
In the interest of safety, initial activation of
the stairlift is delayed by 1 second from
pressing and holding the operating lever, to
avoid accidental operation. If the switch is
released while the lift is in motion, the lift will
stop and a delay of 1 second will occur before
the switch will re-start the lift.
When changing the direction of travel the
delay will be 3 seconds before the lift begins
to move
The stairlift will not
operate with armrests
or footrest folded up
Operating lever:
Push in the
direction you
wish to travel
Operating your Minivator
Hand Control
The hand control (Fig. 6) is used to call the
lift to either the top/bottom of the stairs or to
operate a powered folding hinge where fitted.
The control may also be used as an attendant
control where the user is unable to operate
the stairlift themselves.
Please note the hand control can be wall
mounted, if required.
Note:- the stairlift must be in its normal
operating position (i.e unfolded) before
the hand control will work.
The attendant should always remain
off the staircase until the stairlift is
stationary.
Fig. 6 * Where a powered hinged track is fitted
Move lift up
Move lift down
Park and lift folding rail *
Hinge track up *
Hinge track down *
Move lift up
Move lift down
Park and lift folding rail *
Hinge track up *
Hinge track down *
Fig. 7
Folding your stairlift
Your Minivator 1000 seat, armrests and
footrest can be folded to allow easier
passage up and down stairs when it is not in
use (Fig. 7).
5

6
Fig. 8
Fig. 9
Operating your Minivator
Operating the S ivel.
(Not on perch models)
A swivel seat is provided to enable you to
mount/dismount the seat more easily at the
top or bottom of the stairs by swivelling you
on to the landing.
To operate the seat swivel, wait until
the stairlift has stopped.
The lever (Fig. 8) needs to be held up or
down whilst you start to swivel. If you release
the swivel lever, the seat will lock first at 45º,
then at 90º.
You should not attempt to leave the seat until
it as firmly clicked into its locking position
(Fig. 9).
SAFETY PRECAUTIONS
NEVER
Swivel the seat without the lap belt fastened.
NEVER
Mount or dismount the swivel seat unless it
is locked in position
NEVER
Try and operate the swivel seat whilst the
stairlift is in motion. (As a safety precaution,
should you try to use it whilst the lift is in
motion, it will cause the lift to stop).
ALWAYS
Use the swivel seat to travel up or down the
staircase in the correct position (i.e. facing
directly across the staircase).
Push or pull either
lever to swivel the
seat
Push or pull either
lever to swivel the
seat
7
Fig. 10
Operating your Minivator
Hinged Track - Po ered (Optional)
In some installations a hinged track (Fig. 10),
option may be necessary, usually to move
the track out of the way of the doorway at
the foot of the stairs.
Before raising the hinged track use the hand
control (Fig. 11) to park the stairlift on the
charge points, above the hinge, or at the top
of the stairs.
To raise/lower the hinge track, use the
buttons on your hand control (see Fig. 11).
The hinged track will raise/lower slowly and
stop when it locks into place. Your stairlift
will not work unless the track has been
lowered.
Your hand control is fitted with a park button
(see Fig. 11) which will automatically move
the stairlift to the charge points, then raise
the track.
WARNING
BEFORE YOU OPERATE THE
HINGE TRACK PLEASE CHECK
FOR OBSTACLES
SAFETY PRECAUTIONS
NEVER
Leave the hinged track down when
the stairlift is not in use. If it
obstructs a doorway someone may
inadvertently walk into it.
Hinged Track - Manual (Optional)
Before raising the manual hinged track park
the stairlift on the charge points, above the
hinge, or at the top of the stairs.
Your stairlift will not work unless the
track has been lowered.
Wall mounted
hand control
Park button
Raise hinged track
Lower hinged track
Hinged track
in up position
Fig. 11
8
Operating your Minivator
Fig. 13
Emergency hand inding instructions
In the unlikely event that the lift has a total
power failure or runs on to the final track
stops there is an emergency hand winding
procedure. Please follow these steps:
1. Switch off the stairlift with the key.
2. Rotate the seat through 90º.
3. Remove the grommet from the top of
the power pack.
4. Insert the emergency hand winding
knob (Fig 13).
5. Turn the knob in the direction indicated
for the required movement.
6. When the desired position is reached
remove the hand winder, replace the
grommet, rotate the seat to the normal
position and switch the lift on.
If in any doubt contact your local Minivator
Approved dealer or ring Minivator direct on
01384 408700
Fig. 12
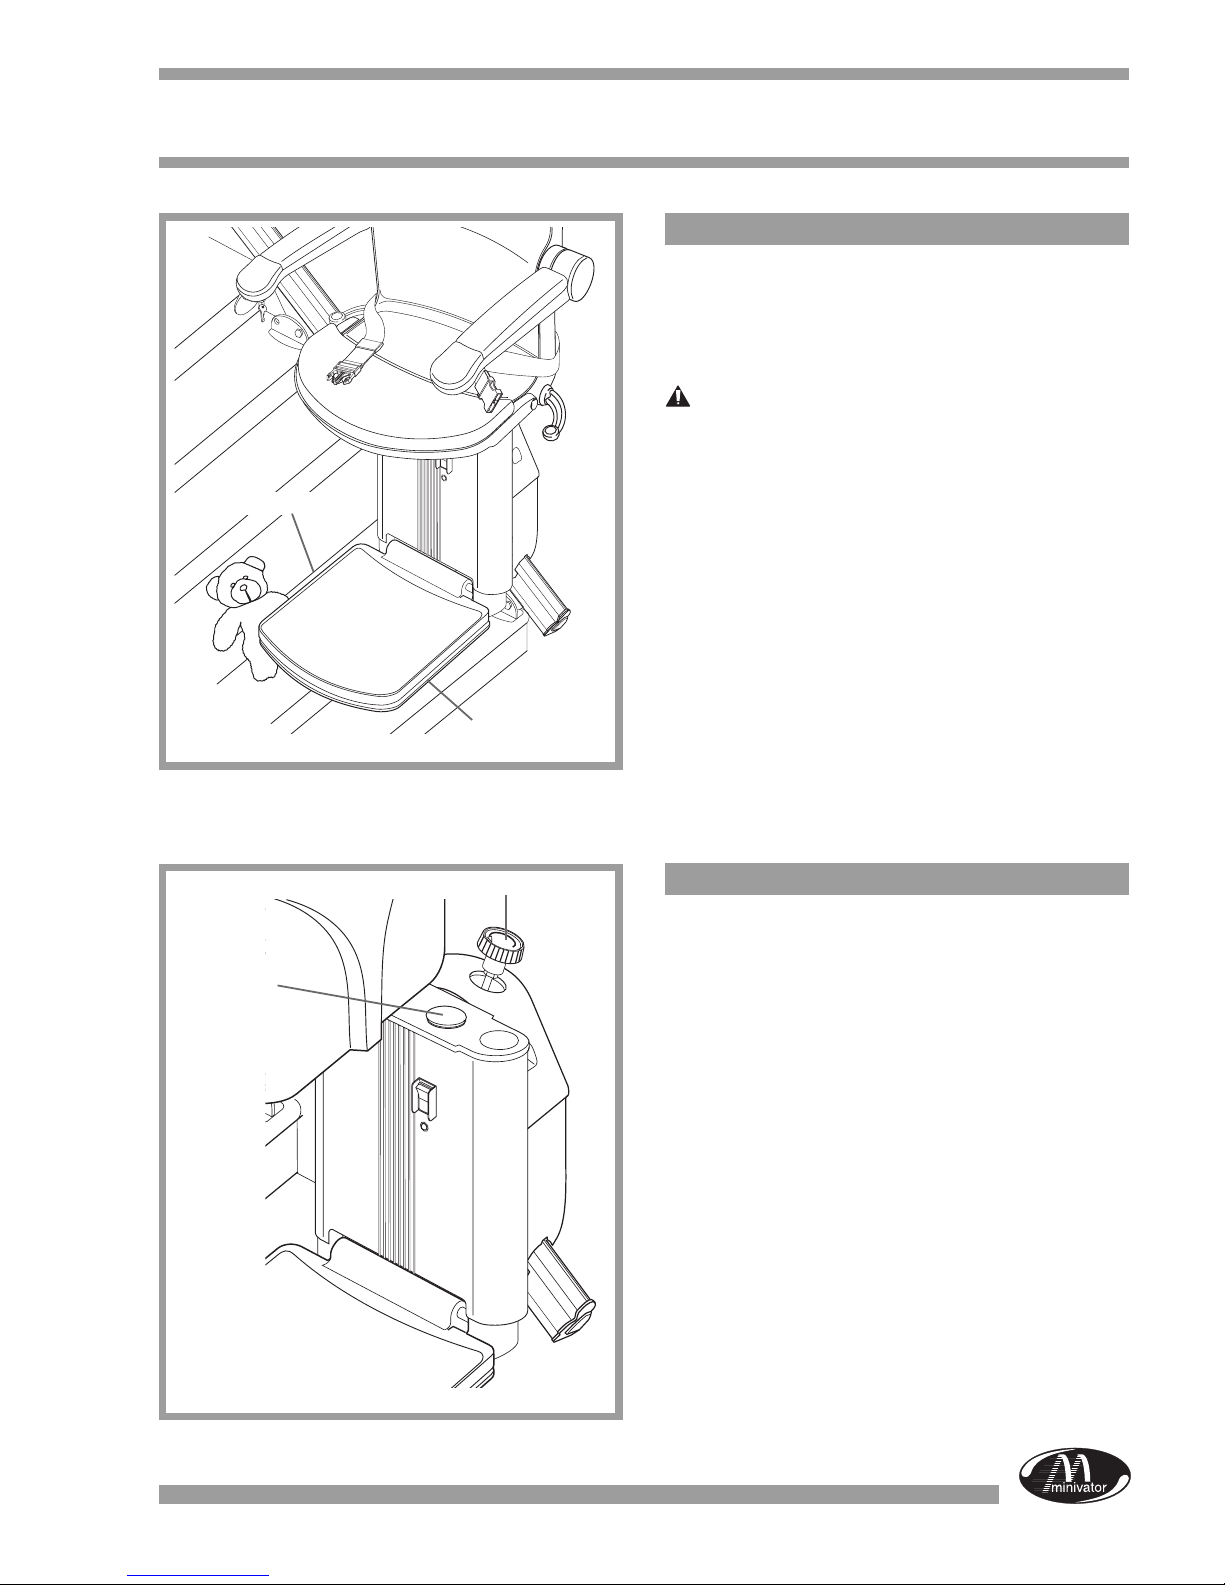
Trapped articles
Your stairlift is fitted with safety edges on the
bottom of the footrest and on the lift itself
which will stop the stairlift should any article
become trapped by the footrest.
To remove the article reverse the
stairlift away from the object then have
the object removed from the staircase.
Proceed on the stairlift as normal
Grommet
Hand winding knob
Safety edges
Safety edges

SERVICING
We advise that your stairlift is serviced after
the first 6 months and thereafter AT LEAST
EVERY 12 MONTHS.
This work must be carried out by a competent
person, i.e a Minivator approved dealer.
If in doubt, please contact the Minivator
Service Department on 01384 408700.
9
Safety and Servicing
WARNINGS AND PRECAUTIONS
NEVER
Allow more than one person to use the stairlift
at any one time.
The ma imum carrying capacity is 137kg
(21 stone).
NEVER
Allow children to play on or with the stairlift.
NEVER
Allow water to come into contact with the
components in the stairlift. If you have to
transport liquids DO SO WITH CARE.
NEVER
Place objects in the track, or leave objects
on the stairs, where they could come into
contact with the lift in operation. Your stairlift
is fitted with sensitive side edges and
undertray on the footplate, which will
automatically stop the lift if it detects any
obstructions.
NEVER
Use the stairlift without using the lap belt, or
any other safety belts or harnesses fitted.
NEVER
Use the stairlift in a standing position unless
it has been specifically designed for this i.e.
perch model.
ALWAYS
Keep your FEET ON THE FOOTPLATE
whilst the stairlift is in motion, and try to avoid
your feet hanging over the edges of the
footplate.
NEVER
Swivel the seat until the lift has come to a
stop at the top or bottom of the staircase.
Other manuals for 1000 series
3
Table of contents
Other Minivator Stairlift manuals


