Minolta MD-90 User manual

TEIOWNER'S
MANUAL
tF-
MODE
D,EMPLOI
MOTOR
DRIVE
MD-90

\
The Motor Drive MD-90 is designed
for fully integrated
operation
with your Minolta
(MAXXUM) 9000 autofocusSLR. High-speedversatility
is the key to its design:
For con-
tinuous film advanceat up to 5 frames
per
second,high
settingcanbeselected.
Mediumand
low settings can be used for respectiveratesof 3 and 2 frames per second.When using
focus-priority setting,
focus is adjustedbetweeneachexposureand shutter is released
only
whensubject
in focusframe
issharp.
Single-frameadvanceis
possible
by using"S" setting.
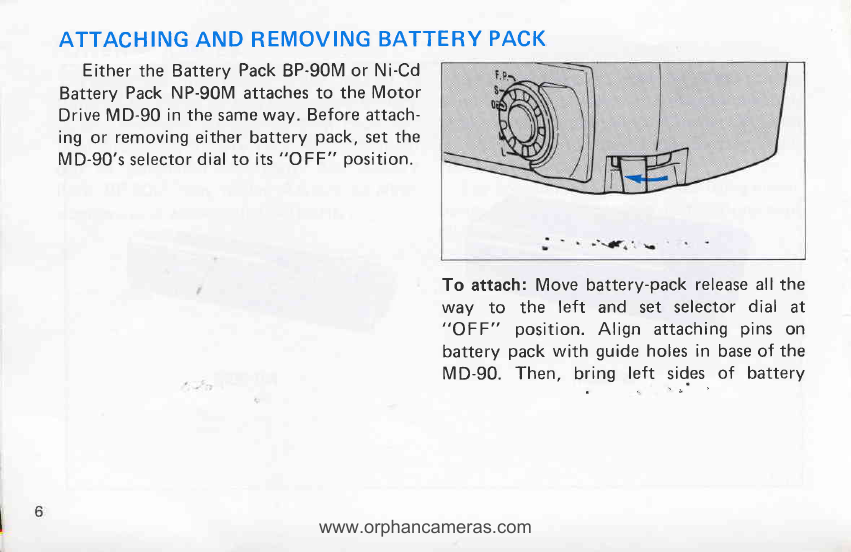
Available
separately,
eitherof two battery packs
can be quickly attachedtothe MD-90:
the Battery Pack
BP-90M
uses
AA-sizebatteries,
while the Ni-Cd Battery Pack
NP-90Mhas
rechargeable
nickel-cadmiumbatteriesand is suppliedwith its own battery charger.Both
packs
feature
shutter-release
buttons
for more
comfort when holding
thecamera
vertically.
Carefully readand follow all instructionsin this manual,
and keepit handy for future
reference.
This way you can take full advantage
of the many advanced
features
built into
your Motor DriveMD-90.
.:t t,xlb$.
**U&ro., ,..m., ;,,&
www.orphancameras.com

TABLE
OF
CONTENTS
Names
of parts 2
Power
sources 4
Attaching and removing
battery pack . . . 6
Attaching
and
removing
MD-90 . g
Loadingfilm.. ..10
Settingframe
counter. . . .10
Operation .. ...12
Shutterrelease ....13
Single-frame
operation. . . . .14
Continuousoperation.
. ....14
Focus-priorityoperation.
. . . . .15
Manual
advance. ...15
Rewindingfilm. .....16
Multipleexposures ....19
Usingdedicatedflash. .....2O
Technical
details .....22
Care
and
storage . . . . .23
^4W .-:&ei.r+;..,

NAMESOF
PARTS
Contact
pins
Rewind
coupler
Rewind
button
Monitorlamp
Attaching
screw
Selector
dial
Selector-dial
release
Counter-set
dial
N./t I t\:L-rA
Contacts
for 100-ExposureBack
EB-90 Cou
nter reset
www.orphancameras.com

Battery Pack
contacts
Battery-packrelease
Power-input
socket

POWER SOURCES
Power for the Motor Drive MD-90 is
suppliedby either
oftwo
detachablebattery
packs.
Available
are the BatteryPackBP-
90M andNi-Cd
Battery
Pack
NP-90M
which
can be purchased
separately.
The Battery
Pack
BP-90M
uses
twelve
AA-size
alkaline-
manganese
or
carbon-zinc
batteries.
The Ni-Cd BatteryPackNP-90M
features
a built-in rechargeable
nickel-cadmium
bat-
teries.The Minolta Ni-Cd Charger
NC-90M
is supplied with the Ni-Cd Battery Pack
NP-90M
for recharging.
For complete
information
for usingeither
battery pack refer to the instructions sup-
plied
with that unit.
mh*.d;***rt -*;fu;n, . ..r
www.orphancameras.com

BP.90M NP-gOM

ATTACHINGAND REMOVING
BATTERY
PACK
Eitherthe BatteryPack
BP-90M
or Ni-Cd
Battery Pack NP-90M attaches
to the Motor
Drive
MD-90 in the same
way. Beforeattach-
ing or removing
either battery pack,
setthe
MD-90's
selector
dial
to its
"OFF" position.
To attach: Move battery-pack release
all the
way to the left and set selector dial at
"OFF" position. Align attaching
pins on
battery packwith guide
holesin baseof the
MD-90. Then, bring left sides"
of battery
www.orphancameras.com

pack and motor drive together, and press
battery packfirmly onto motor drive.When
battery pack is attached correctly, battery-
pack release
will snap back to its lock
position.
To remove: With selectordial at "OFF"
position, move battery-pack release as
indicated in diagram, and separate
battery
pack from motor drive. First pull out right
side
of battery
pack,
then lefts!de.

ATTACHINGAND REMOVING
MD.gO
The Motor Drive MD-90 can be attached
or removed
from the cameraat any time. lf
film hasnot been
advanced
prior to attach-
ing motor drive, motor drive will auto-
matically advance
film to next framewhen
the selector
dial.is
setto one
of itsoperating
posrtrons.
To attach:
1. With selectordial at "OFF" position,
align
motor drive's
guide
pins
andattaching
screwwith guide
holes
and tripod socketon
bottom of camera.
2. Turn grooved'
ring'on'aita-ching
screw
clockwiseuntil motor drive
is
secured.
www.orphancameras.com

NOTE
o Alwaysset
selector
dial
to "OFF" before
attaching
or removingmotor drive.
o Before attaching
motor drive,makesure
that nothingis
lodged
in between
thecamera
and motor drive, such as the camera's
carrying strap. Also make sure that the
locating holes and couplers are f
ree of
foreign
matter.
o To assure proper connection, wipe
electrical contacts on camera and motor
drive
with acleandry cloth.
To remove:
1. With selectordial at "OFF" position,
turn grooved ring counterclockwise until
attaching screw is out of camera's
tripod
socket. " . :
2. Separatemotor drive from camera.
Make
sure guide pins in motor drive are drawn
straight
out of guide
holes
incamera.

LOADING
FILM
Set the MD-90's selectordial to "OFF" Frame
counter
and slide counter reset
to set the MD-90's After advancing
film to firstframe,
frame
framecounterto "S" (start)
position.
Open counterwill be
set
to "36". When
using
rolls
the camera's
backcover
andloadfilm. After of film with less
than 36 exposures,
frame
threadingfilm into take
take-upspool,make counter should be set to "24" for 24-
sure sprocket teeth engageholes in lower exposure rolls, "20" for 2O-exposurerolls,
edge
of film leader.Press
camera'soperating and
"12" for 12-exposure
rolls.
button and
manually
advance
film one
frame
to take up slack in film, then closecamera
back.
Setthe MD-90's
selector
dial to H, M, or
L setting and hold down the camera's
operating button. The motor drive will
advance
film to the first frame and stop
' automatically.
-
lf desired,
film can
beadvancedmanually
to the first frame. Justsetthe selectordial
. to "OFF" position,
release
the shutter,
and
operate
the film-advance
lever.
www.orphancameras.com

0
LRewtruo
NOTE
o The MD-90 frame counter is a count-
down-type which shows the remaining
number of exposureson the roll. Sincethe
camera's
frame
counter
showsactual
number
of exposures
taken,the numbers
on the two
framecounterswill not match.
o lf motor drive stops
beforelastexposure
on roll, check whether counter is set cor-
rectly. lf not, set selector
dial to "OFF",
and resetcounter
for remaining
numberof
exposures
on roll.
To set frame counter, press
in and turn
counter-set dial clockwise. Dial can be
turned
in only one
direction.lf you pass
the
number desired,
slide counter resetto set
counter to "S", then start again.
Be sureto
set counter for actual
number of exposures
on roll. Otherwise,
film perforations
may be
torn atend
of roll.
't"l

OPERATION
Focus-Priority
setting
- F.P.
Single-frams6ivsnss- $
OFF
The Motor Drive MD-90 can be set for
single-frameadvanceat "S" setting, con-
tinuousfilm advanceat "H", "M", or "L"
setting,
or for focus-priority
shutter release
at "F.P." setting. Explanations of each
settingare
given
on the followingpages.
To set film-advance: While pressing
selector-dial release,rotate dial to align
white index
with settingindication.
Release
must be pressed
whenever you want to
change
from onesetting
to apother.
www.orphancameras.com

tntnff;
tif.,t*fi,o,or
Drive
MD-eo
attached,
shutter
can
bereleased
in any of three
ways:
o Camera's
operating
button: Meter activa-
tion, continuous autofocusingwith focus
hold, and shutterrelease
are
all the same
as
for manual
film advance.
o Battery pack's shutter-release button:
Used with either motor-driven
or manual
f
iIm advance.fof moro fomTo f, wrrOt'
Fio
lU
in
g
the camera vertically. Slight pressure
switches on the camera'smeter. Pressing
partwaydown focuses
the lens
and
activates
focus hold. Pressing
all the way down
releases
shutter. This button doesnot havea
touch-sensitive switch, thus continuous auto-
focusing is not possible.
To prevent accidental exposures and
conserve battery power, shutter-release
button can be locked by sliding
the release
lock downward sothat the red
dot appears.
o Remote Cord RC-10005 or 1000L:
Attaches to remote-control terminal on
camera
body. Operation is the same
as for
battery pack's
shutter-release
button.
-,{,.. -, ". ;.*:;-i.li&rd;'-.t', ,r.f:';, *:Ll;- ,&;*l* ,,;atld***; 4q@e"i&d's-*'",. . "d
13

*l
h14
Single-frame
advance
Rotate selector dial to "S" to set the
MD-90
for single-frame
film advance.
For continous autofocusing,
touch the
camera's
operating button. To release
the
shutter, press
the operating button all the
way down. After exposure,
motor drive
will
advance
film one frame and recock
shutter
for the next exposure.
Duringfilm advance,
thegreen
monitor lamP
glows.
Continuousfilm advance
For continuous film advance, rotate
sef
ector dialto "H", "M", of " L" setting.
At
these settings,
motor drive recocks
shutter
and advances
film continuously as long as
operating button is held down. Between
exposures,
focus is not adjusted.Focus is
locked at the position used for the first
exposure
in the series.
During
film advance,
th€ green
monitor laniP
glows.
At shutter speeds below 11250 sec.,
f
ilm-advance speed is automatically
- de-
creased
to allow sufficient time for correct
exposure. Maximum film-advance speeds
arer 5 f
rames p.er second
,
(fps) at "H"
setting,
3fps at "M" (medium) setting,
and
2fps at "L" (low) setting.
For shootingat
5fps, useof the Ni-Cd Battery Pack
NP-90M
is
required.
';*,r *;&.#iir#**i.rr,.. ns*&;)-,. *d*e&#;i#dm#,yffi
**igd $esd*n
; - -.*" .:].r-.:.!;'1.+f-;,,,
www.orphancameras.com

Focus-priority settin
g
Rotate selector
dial to "F.P." setting
for
focus-priority shutter release with con-
tinuous
film advance.
To shoot autofocused sequences,
press
operating button all the way down while
keeping
subject
centered
in the focusframe.
As long as operating button is pressed,
camera
will adjust focus
for eachexposure,
then release
shutter. Film advanceis con-
tinuouswith amaximumfilm-advance
speed
of up to 4fps.
Actual speedwill vary
accord-
ing to focus adjustment required for each
shot and shutter speedin use.During film
advance,
thegreen
monitor lamp
glows.
Manual advance
With the Motor Drive MD-90 attached
and its selector dial at "OFF" position,
shutter can be released
and film advanced
manually as described in camera owner's
manual.
To reduce
the camera's
weight and
facilitatehandling,
it is bestto remove
the
motor drive
when it is
not beingused.
NOTE
o To prevent accidental
exposures,
keep
Motor Drive MD-90's
selectordialat "AFF"
position
when motor drive
is
not beingused.
o When using motor drive, camera'sfilm-
advance lever should be kept. folded up
against
the camera
body.
l
,:l
l
{l
I
I
I
I
1
151
i
i*1
..,o
.,
, .'fus., - i:-. .i ;h, ,; -u**a*- .*aL.-. .* ---'&r*qg;r. .d*,*.r, .'r.i.*---.

REWINDING
FILM
Film advance
stopsautomatically
when
the MD-90's
freme countershows
"O" or at
the end of the roll. The red monitor lamp
will glow indicatingthat film should be
rewound.
To rewind
film: With selector
dialatany
position except "OFF" , slide and hold
counter reset to left and press rewind
button. With freshbatteries
loaded,
rewind-
ing a
36-exposure
rolltakes
about
7 seconds'
When rewinding is complete, motor stops
automatically
and film leader.
remains
out.
Open
camera
back'and
remove
titm.
THiIE+
rr.z 0 f-Iillml
-r_rr-l- LnrwrNoJ
www.orphancameras.com

I
I
L *r" :
ft'". -.,;j.,,,. .
r:*:.*
. :';*r
Manual rewinding is not possible
when
the motoi'drive'is itticfied. Whenyou want
to rewind film manually,set the MD-90's
selector
dial to "OFF", then detachmotor
drive
from camera.
Rewindfilm as
explained
in
camera
owner's
manual.
NOTE
o Excess
tension
on
Tifm,
weakbatteries,
or
incorrect setting of the M
D-90's f
rame
counter may cause f
ilm advance
to stop
before the end of the roll; the red monitor
lamp will glow. lf this happens,
move
selec-
tor dial to "OFF". Then check frame-
counter setting and battery condition.
-Set
selector dial to one of its operatingposi-
tiohs.
lf lamp
remaini
on and
film does
not
advance,switch motor drive to "OFF" and
advancefilm manually.
o At the end of the roll, neverrepeatedly
turn selectordial back and forth between
"OFF" and an .operating,
position. This
coulddamage
the
film.
;;,idil*;,... .,a$litu:, .s8lle-. *r-.*."dir-64&'
17
Table of contents
Popular DC Drive manuals by other brands

GO SwissDrive
GO SwissDrive G2 Translation of original operating instructions

Nidec
Nidec Commander C200 Step-by-step guide

BECKER-Antriebe
BECKER-Antriebe E15 Assembly and operating instructions

INTECNO
INTECNO BLD15 Quick installation manual

Moons'
Moons' SR4-Plus Quick setup guide

GFA
GFA SI 25.15-30,00 installation instructions

Danfoss
Danfoss VLT CDS 303 operating instructions

Santerno
Santerno AMS90/1 Applications manual

Leroy-Somer
Leroy-Somer FMV 2307 Installation and Maintenance

Mitsubishi
Mitsubishi FREQROL-SF troubleshooting manual

TTP Ventus
TTP Ventus General Purpose Disc Pump Drive PCB user manual

Santerno
Santerno IRIS BLUE user manual