Mistral Robovac User manual

Model: MRVAC500
Robovac
Instruction Manual

2
Important Safeguards
When using this electrical appliance,
the following basic safety precautions
should always be followed:
For Your Safety
• To protect against the risk of electric shock,
DO NOT IMMERSE the main unit, adapter or
cord in water or any other liquid.
• Pleasereadtheseinstructionsbefore
operating and retain these for future
reference.
• Beforeconnectingtheappliancetothe
power supply, check that the voltage
indicated on the appliance corresponds with
the voltage in your home. If this is not the
case,contactyourlocalqualiedtechnician
and DO NOT use the appliance.
• Ifthesupplycordoranypartisdamaged,
cease use of this appliance immediately to
avoid a hazard.
• Donothangthepowercordovertheedge
oftableanddonotletcordcontacthot
surfaces, including stovetop.
• Thisapplianceisnotintendedforuseby
persons (including children) with reduced
physical,sensoryormentalcapabilities,
or lack of experience and knowledge,
unlesstheyhavebeengivensupervisionor
instruction concerning use of the appliance
byapersonresponsiblefortheirsafety.
• Childrenshouldbesupervisedtoensurethat
they do not play with appliance.
• Onlyusetheproductindoors,donotuseit
outdoors.
• Beforestartingtheproduct,makesurethe
dustbinlterisproperlyinstalled.
• Donotusethisproductinwetormoist
environment (any environment with liquid),
e.gbathroomorlaundry.
• Beforeuse,removeallunwantedobstructions
that may impede safe operation of the
appliance(removeallthefragileobjectsand
cords,clothing,papers,loosecables,aswell
as making sure to lift curtains and drapes off
theoortoavoidanypossibleaccidents.In
casethataloosecableistangledwiththe
product,thecablemightmovearoundwith
the product as it works and topple down the
table,chairs,orcabinetandmightcausehurt
or property damage.)
• Donotsitontopofthisproductorattachan
objectonthetopofit.Bewareofchildrenor
pets while the product is in operation.
• Donotallowthisproducttocomeintouch
with cigarettes, lighters, matches or any other
ammablematerials/items.
• Neverusetheproducttocleanup
combustibleorhighlyvolatileliquidssuchas
gasoline.
• Whilsttheproductisinoperation,makesure
all doors leading outside are closed.
• Incasetheproducthasmalfunctionedor
is damaged, please contact the consumer
servicehelplinebeforeattemptingtorepair.
• Beforecharging,checkwhetheradapterand
outlet are properly connected.
• Usethisproductintemperaturefrom0°Cto
40°Canddonotplacethisproductinhigh-
temperatureenvironmentorunderbaking
sunlight for a long time.
Warning
Ifthesupplycordisdamaged,thecordmustbe
replacedbythemanufacturer,itsserviceagent
orsimilarlyqualiedpersonsinordertoavoida
hazard.
Thisproducthasnotbeendesignedforanyuses
otherthanthosespeciedinthisbooklet.
Save These Instructions
THIS APPLIANCE IS DESIGNED FOR HOUSEHOLD
USE ONLY

3
FeaturesofYourRobovac
Switchon/off
Front wheel
Bumper
Anti-dropsensor
Mopping plate
Rechargeablebatteryx1 Adapterx1
Sidebrushx2 Filter x 2
Batteryhouse
Wheel
Vacuum intake
Sidebrush
Innerdustbin
Bumper
Top Cover
Mop cloth x 2Mopplatex1
4
BatteryandRecharging
Instructions
1. Thebatteryisrechargeable,pleaseusethe
voltagespeciedonthepackaging.Ifyou
are not sure of the voltage current of your
house, please check with your electricity
provider.
(Onlyusebatterypackwhichisprovidedby
the manufacturer, please check the polarity
beforeinstallingthebattery.
Batterypack:11.1V1500mA
2. Onlyusetheoriginalbatteryandpower
adapter with the product for charging.
3. Charging adaptor is for indoors use only.
4. Donotrechargetheproductifthebattery
cord or plug is damaged.
5. Nevertouchthecharger,plugorcablewith
damp hands.
6. Beforecleaningtheproduct,unplugthe
adaptor, switch Off the unit and remove the
battery.
7. Pleaseremovethebatterywhenitisnotin
use for a long time.
8. Thebatterymustberemovedfromthe
productbeforeitisscrapped.
9. Theproductmustbedisconnectedfrom
the power source when removing the
battery.Thebatteryistobedisposedof
in accordance with your local council
regulations.
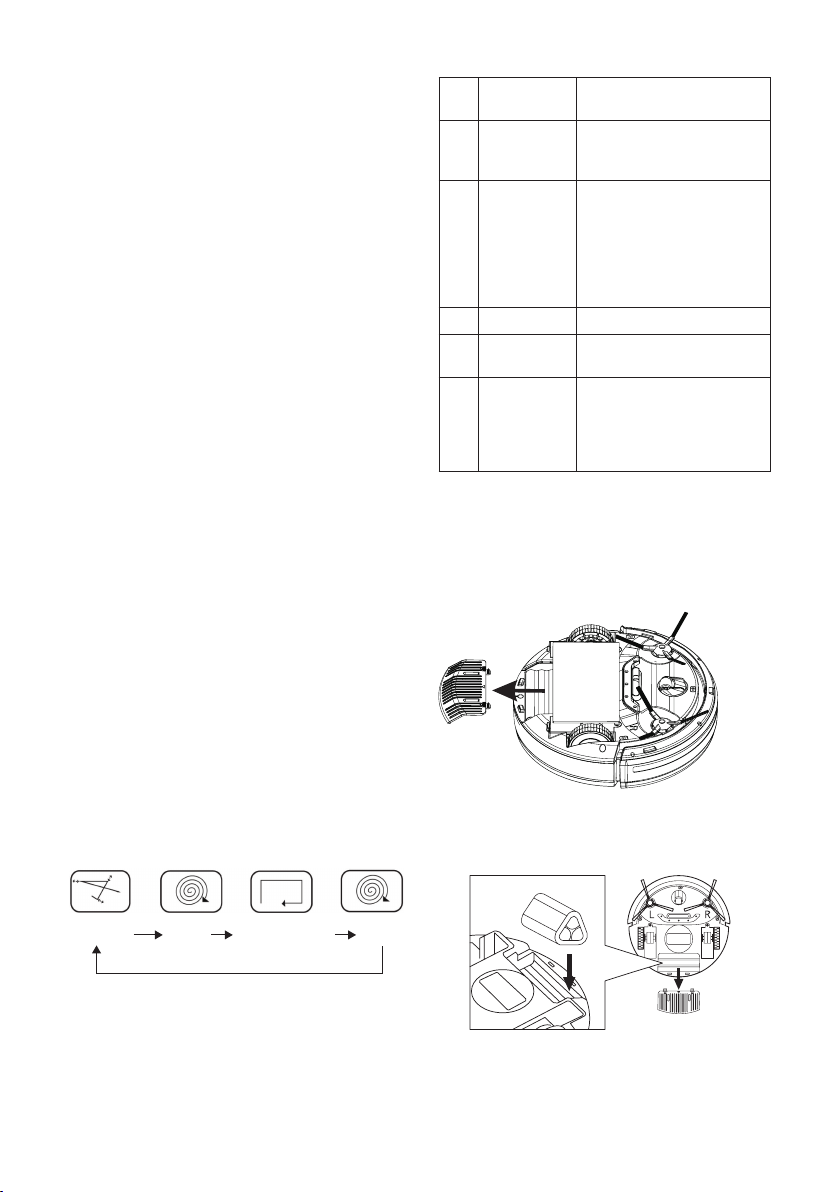
PRODUCT FEATURES
ThisrevolutionaryMiniRoboticVacuumCleaner
isequippedwithfunctionssuitableforcleaning
upoorsurfacesofhomeandofce,suchas
wood, tile, and linoleum.
Random Spiral Along the wall Spiral
Indicator light:
No. Indicator
light
Status
1OFF 1.NotPoweredOnorin
operation
2.Batterylowcondition
2 Red 1.Batterylowcondition
2.The unit is lifted with
power On.
3.Sidebrushorwheelare
overloaded due to
obstructions.
3Blue 1.Batteryisfullcharged.
4 Flashing
blue
1.Batteryischarging.
5 Flashing red
or purple
when the
batteryis
charging
1.Theunitisnotpowered
Off when charging.
BATTERY INSTALLATION AND REMOVAL
1. Beforeinstallingorremovingthebattery,
theproductmustbedisconnectedfromthe
power source.
2. Openthebatterycover.
3. Insertthebatteryintothebattery
compartment and close the cover. Make
sure the cover clips and secures into position.

5
RECHARGING BATTERY
1. Beforecharging,makesurethebatteryis
correctly installed.
2. The procedure of charging the product is as
follows: Connect the adapter output plug
intotheDCjackofthevacuum,thenplug
adapter into domestic power supply outlet.
Theblueindicatorlightwillash,indicatingitis
charging.
NOTE: If the vacuum itself is powered
On, the indicator light will ash
alternately Red and Purple when
charging the unit.
Switch the power to the vacuum Off and
the indicator light will ash Blue.
3. After fully charged, the indicator light will turn
tosolidbluelight.
4. Whentheproductrunsoutofpower,LED
indicator will turn red, which prompts the user
to charge the product.
5. Toensurethebestperformanceandlifespan
ofthebattery,pleasechargetheproduct
for at least 3 hours continuously. After fully
charged for 3 hrs, indicator light will turn to
solidbluelight.Theproductcanbeoperated
after 3 hours charging.
AdapterPlugtoDCjack
GENERAL OPERATION
Starting Operation
1. Placetheproductinaroomwithall
unwantedobstaclesremoved,turnOnthe
power of the vacuum. The vacuum does now
start vacuuming.
NOTE: The power indicator light turns OFF
during operation.
2. Whenthevacuumrunsoutofpower,theRed
indicator light will illuminate and unit will stop
operating.
Note: The red indicator light will turn
off automatically when leaving it for
approx. 5 minutes.
Note: the indicator light will turn off
automatically even if the power Off
button has not been pressed.
Note: This product is not suitable for
long-pile carpets.
SIDE BRUSH INSTALLATION
Positionboththeleftandrighthandmarked
brushesonthecorrespondingL&Rmarked
locations on the vacuum and push down to X to
secure it.
Toremovebrushessimplypullthemupwards.
CLEANING AND MAINTENANCE
Cleaning Dust Bin
1. Opentheuppercoverbyliftingthelidnear
thepowerON/OFFbutton.
2. Putyourngerintothedustbingrooveand
grip to take it out.
1 2
3. Openthedustbinlid.
4. Takeouttheinnerlter.
5. Emptythedirtinthedustbin.

6
3 4
5
CLEAN AND MAINTENANCE
Cleaning Dust Bin
1. Rinsethedustbinwithtapwater.Donot
wash it in washing machine, dishwashing
machine.
2. Periodicallycleanthelterwithasoftbristle
brush.
3. Reinstallthelteranddustbinwhentheyhave
completely dried into the vacuum unit and
secure with the cover.
NOTE: Before putting back the dust bin,
please make sure the PE pad (function
as nonreturn valve) in the dust bin is well
attached. Recheck the lter also before
operating the product. Using product
without lter might cause malfunction.
6
7
9 8
Cleaning Intake
After repeated use for some time, dirt and dust
may accumulate around the air intake of the
product,toensureitsbestcleaningeffciency
andconstantairowitshouldbecleaned
periodically.
1. Removetheexternalpowersource.
2. Clean up the dirt and dust at the air intake.
10

7
Troubleshooting
Problem Possible Cause Solution
1RedLEDstaysOn
and the unit does not
work after pressing
thepowerbutton
1.BatteryLowcondition
2. Vacuum not making
contactwiththeoor
3.thesidebrushorwheelis
obstructed
1.Rechargethebattery
2.Repositionthevacuumontheoor
3.movetheunittoanotherat
areawithnoobstructions.
2Vacuumonbut
can not collect
dirt and hair
1.Thedustbinisfull
2.Thelterisnotinstalled
correctly
1.Cleanthedustbin
2.Re-installtheltercorrectly
3The product is
movingbackwards
afterbeingstarted
1.Theproductisondark
coloredoor
2.Anti-dropsensorlight
obstructed
1.Putthevacuumonlightcoloroor.
2.Cleananti-dropsensorlight.
4LEDindicators
ashinginblueafter
3hrs charging
Powersupplymightbeen
cut off during charging
Continue charging until light no
longerashes.
5Thesidebrushes
misshaped and not
function satisfactory
Beingusedforalongtime Rinsethebrushesunderhotwater,
the plastic has a memory and will
restore to original shape.
6The product won’t
start
1.Batteryisnotinstalled
properly
2.Batterylow
3.Thevacuumhasbeen
overloaded and engaged
the overload protection.
1.Toinstallthebatterycorrectly
2.Tohavethebatteryfullycharged
(turnoffthecleanerrst)
3. Allow to cool down and reset and
then restart.
7The product circles
around only, cannot
go straight
One of the wires of the
wheels may have loosened
1.Openthewheelcoverand
connect the loose wire properly
2. Have a service technician
conduct this.
*Ifallsolutionsgivenabovedon’tworkforyou,pleasetakeactionsbelow:
1.Re-setthevacuumbyswitchingonthepowerbutton;
2.Ifre-setactiondoesn’twork,theunitmaybefaulty,returntoplaceofpurchaseforrefundifwithinthe
warranty period.
Note: Particular specication are subjected to change without prior notice.
Cat. No. MRVAC500
October2020
Specications
ConstructionMaterial:.............................ABS,POM
DustBinCapacity:..............................................0.2L
AverageChargeTime:..........................2.5-3Hours
VacuumOperationRun-Time:..............90Minutes
BatteryType:.......11.1VLi-ion,1500mAh-16.65Wh
Adapterinput:..................100-240Va.c.0.4AMax.
Adapteroutput:..............................13Vd.c.800mA
NOTE: As a result of continual improvements,
the design and specications of the product
within may differ slightly from the unit
illustrated on the packaging.
This manual suits for next models
1
Table of contents
Other Mistral Vacuum Cleaner manuals


