Mitsubishi Heavy Industries TNW4E User manual

TNW4E
TNW5E
TNW6E
TNW7E
TSJ012A149A
YEAR:2016
TSJ012A149A英トンボPDF 16.8.31 10:21 AM ページ i

TNW5E
-
25
Drive method and functions
Model name
25: Sub-engine drive exclusive for refrigeration unit,
and motor drive
Freezing and heating (no electric heater)
5 : Sub-engine drive exclusive for refrigeration unit,
and motor drive
Freezing and heating (with electric heater)
• How to read the type
Thank you for your purchase of the Mitsubishi
Transport Refrigeration Unit.
Please read this operation manual carefully in order to
ensure that the refrigeration unit is used in a safe and proper
manner. This manual explains the operation procedures and
includes a brief troubleshooting section.
This product contains fluorinated greenhouse gases.
• Refrigerant :R404A (GWP(Global Warming Potential)=3922)
Refer to a label on unit about weight of fluorinated greenhouse
gases and CO2equivalent. (Refer to page 6.)
TSJ012A149A英トンボPDF 16.8.31 10:21 AM ページ ii

Items to Observe
Parts
Operation
Troubleshooting
Each Switch Operation
Mode Display
Loading
Inspection
Specifications
1
6
19
28
17
8
32
34
40
Contents
TSJ012A149A英トンボPDF 16.8.31 10:21 AM ページ iii

1
--
1. Items to Observe (Safety Precautions)
• The meanings of the "signs" used in this manual are as follows.
WARNING
CAUTION
Precautions for installation
Please read this section "Items to Observe (Safety Precautions)" before using, to ensure that the
unit is used correctly.
The precautions given here describe important information related safety, and must always be observed.
• The signs and meanings are as follow.
Never perform.
Always ground.
Never touch.
Things you should know.
ADVICE
If mishandled, may result to serious injuries or fatalities.
If mishandled, serious results could occur depending on
the situation.
Always carry out according to the
instructions.
Always disconnect power supply
plug from socket.
Repairs and disassembly must be
done by qualified personnel.
• Store the operation manual in a place that is easy to access for future reference after reading it.
• If the ownership of the product is transferred, or if the product is lent out, always hand this oper-
ation manual to the new user so that the safe and correct usage methods can be understood.
DANGER
Indicates high and imminent potentially dangerous
situation, which if mis-handle, will result in death, injury, or
serious accident such as damage of the refrigeration unit.
WARNING
Always ground
Incomplete grounding could lead to electric shocks.
Insufficient electric circuit capacity or incorrect work could lead to electric shocks or fires.
Always use a dedicated circuit and leakage breaker for the electric
work.
DANGER
Cracking occurs in design panel, which cause a risk of falling down of panel while
the vehicle is running.
Do not paint on resinic design panel. (This will make refrigeration
unit out of warranty.)
It may cause a serious accident if customer modify the refrigeration unit or
change the specification by himself/herself.
Do not modify or perform specification change for refrigeration and
vehicle. (This will make refrigeration unit out of warranty.)
TSJ012A149A英トンボPDF 16.8.31 10:21 AM ページ 1

Gasoline
Kerosene
Items to Observe
2
--
Precautions for usage
WARNING
Always stop operation in an
abnormal state.
Continuing operation in an abnormal state
could lead to electric shocks or fires, etc.
Do not place volatile or flammable
matters in the room.
Failure to observe this could lead to
explosions or fires.
Do not wash the unit with a high-
pressure washer or steam washer.
Washing with high-pressure fluids could cause
the condenser fins to damage. Washing with
steam could cause the internal pressure to
rise abnormally and lead to ruptures.
Do not insert fingers, rod, etc., in
the air intake or outlet ports.
Since the fan is rotating at a high speed
inside, it could lead to injuries or troubles.
Do not directly splash water on
the electric parts, or wash them
with water.
It could lead to short circuits or electric
shocks.
Never touch the electric parts such as
the power supply plug with wet hands.
Never operate the switches with wet
hands.
Failure to observe this could lead to electric shocks.
TSJ012A149A英トンボPDF 16.8.31 10:21 AM ページ 2

3
--
Items to Observe
• Use 4-core cabtyre cables (con-
ductor cross section with 5mm2or
more) for power cable. Do not con-
nect it to extension code.
• Use MENNEKES Part no.6 (400V
32A) for power supply plug.
Use of a power supply cord other than a
dedicated cord and plug, a relay or
extension cord could lead to electric
shocks, overheat or fires.
Do not modify, apply undue force by,
for example, bending forcibly, pulling
hard, twisting, etc., place under a
cargo or pinch the power cord.
It could damage the power cord and
result in fires or electric shocks.
Confirm that there is no dust on
the power supply plug, and that
the plug is not loose before
connecting it securely.
Adherence of dust or incomplete connection
could lead to electric shocks or fires.
Always hold the power supply
plug when disconnecting the
power supply cord.
Pulling on the cord could cause some wires
to break and lead to overheat or fires.
Do not move the vehicle while the
commercial power supply is
connected.
Moving the vehicle while the power supply
is connected could lead to damage of the
devices, electric shocks or fires, etc.
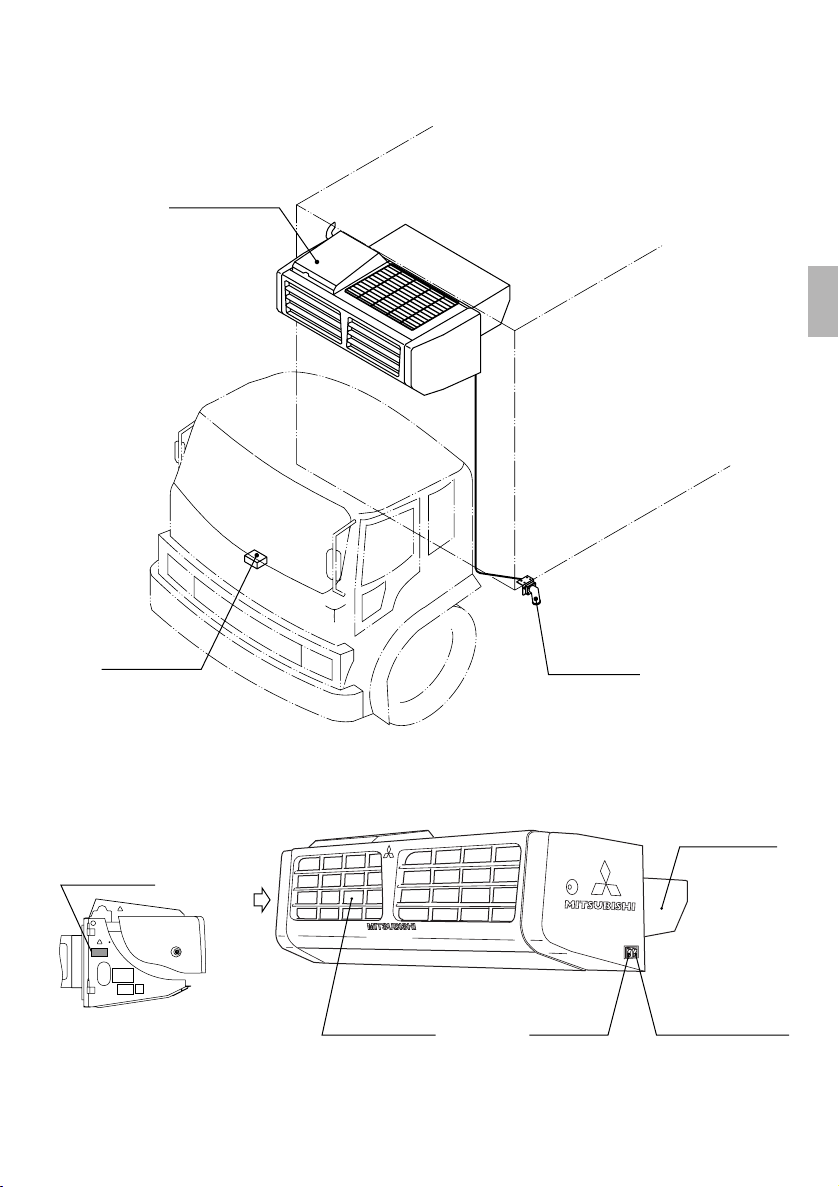
Protect the power supply socket
with the cover when it is not
used. If the cover is damaged,
repair it immediately.
Failure to use the cover or use of damaged
cover could lead to electric shocks or fires.
WARNING
TSJ012A149A英トンボPDF 16.8.31 10:21 AM ページ 3

4
--
Verify that the digital display
area is blank, or that only the
time is displayed.
Items to Observe
Use the transportation device as
intended.
Use of this device for other purposes could
deteriorate the quality of cargo or other troubles.
Do not start and stop operation by connecting
and disconnecting the power supply breaker or
power supply plug.
Failure to observe this could lead to faults
in the electrical circuit or to electric shocks.
Periodically confirm the operation of the
leakage breaker.
Use of the leakage breaker in a fault state
could impair operation in the event of a current
leakage or could lead to electric shocks.
Always press the [RUN/STOP] switch and disconnect
the power supply plug before starting cleaning,
maintenance or inspection. (Turn OFF the power
supply circuit.)
Failure to observe this could lead to
electric shocks or injuries from the fan.
CAUTION
WARNING
Do not use the cabin controller when driving the vehicle.
It could cause trouble.
Do not leave combustible objects around the exaust pipe.
These could catch fire.
It could cause injury or trouble.
Do not use the refrigeration unit in explosive atmosphere.
It could cause explosion, fire, or other accident.
It is prohibited standing on, hanging down from, holding on or
stepping on the refrigeration unit, or other similar acts.
Do not touch the high-temperature sections such as the exhaust pipe
or high pressure pipes during operation of the refrigeration unit.
Doing so could cause burns.
Do not discharge a refrigerant in the atmosphere.
It could cause environmental disruption.
TSJ012A149A英トンボPDF 16.8.31 10:21 AM ページ 4

5
--
Items to Observe
Precautions for inspections
Persons other than repair technicians or
qualified personnel must never disassemble
or repair the unit.
Incorrect disassembly or repairs could lead to injuries from
abnormal operations or to electric shocks or fires, etc.
Use the rated fuse.
Use of an incorrectly rated fuse (wire or copper
wire) could lead to fires or electric shocks, etc.
WARNING
If a fault occurs, stop the refrigeration unit, contact your nearest dealer, and maintain the
load temperature.
When a fault occurs
Never make modifications.
Making modifications could lead to ruptures, electric shocks, fires or injuries, etc.
Put on protective eyeglasses and groves when handling the refrigerant.
It could lead to injuries.
Do not run the motor at an incorrect voltage.
Doing so could lead to faults in the refrigeration unit or to fires.
Do not touch the rotary section (each pulley, drive belt,
condenser fan sub-engine cooling fan) in the condensing unit.
Doing so could lead to faults in the refrigeration unit.
Do not use brands of refrigerant, refrigerating machine oil, sub-engine
oil, sub-engine fuel, coolant (antifreeze) other than those designated.
Direct contact with the refrigerant could freeze the skin. If it enters in the
eye, it could lead to loss eyesight.
TSJ012A149A英トンボPDF 16.8.31 10:21 AM ページ 5

2 Parts
Layout of main components
6
--
Refrigeration unit
Cabin controller Concent assy
Condensing unit
Evaporator unit
CONT. RUN/AUTO
changeover switch
Main switch
(1) Refrigeration unit
Inside of view “A”
A
Label (F-Gas)
TSJ012A149A英トンボPDF 16.8.31 10:21 AM ページ 6

ON OFF
HIGH LOW
Parts
(2) Inner details of refrigeration unit
(3) Cabin controller
RUN/STOP
switch
Digital display
area
UP switch
SET switch
MODE switch
DOWN
switch
DEFROST
switch
WHISPER switch
Monitor display
7
--
Evaporator coil Evaporator fan (Two fans are used on TNW4E.)
Heat exchanger
(Excluding TNW4E)
Accumulator
Sight glass
Suction pressure
regulator valve (SPR)
Dryer
Control box
Receiver
Alternator
Motor
Condenser fan
Condenser coil
Sub-engine
Compressor
Muffler
Condensing unit
Evaporator unit
Side cover,
sub-engine side
TSJ012A149A英トンボPDF 16.8.31 10:21 AM ページ 7

8
--
This is the alarm indication. When trouble occurs, this symbol lights up (the
backlight blinks) and blinks.
This is the external communications status indicator. It lights up and blinks
at the time of external communication.
This is the printer indicator. It lights up and blinks when data are being
output to the printer, etc.
Slow speed operation display. The lamp turns on when the WHISPER switch is turned on.
This is the defrost indicator. It lights up during a defrost operation.
This is the timer indicator. It lights up and blinks when there is a display or
setting related to timer operation.
This is the fix setting indicator. It lights up and blinks when prompting you to
finalize a setting.
This is the heating operation indicator. It lights up during a heating
operation.
This is the cooling operation indicator. It lights up during a cooling operation.
This is the room temperature indicator. It lights up when the room
temperature is being displayed in the bottom row of the digital display. It also
blinks when the room temperature deviates from the setting temperature.
3 Mode Display
(1) Switch names and functions
1RUN/STOP switch Turns the refrigeration unit RUN and STOP.
2MODE switch Changes the screen display mode, etc.
3UP switch Changes the setting value of the temperature and time, etc.
4DOWN switch Changes the setting value of the temperature and time, etc.
5SET switch Registers a setting.
6DEFROST switch Performs a manual defrost operation.
7WHISPER switch
Operates the sub-engine forcibly at a slow speed to suppress noises.
(This function is not equipped on TNW4E.)
8Digital display area
Displays the setting temperature at the top, and the room temperature at the bottom.
(2) Explanation of monitor display items
1RUN/STOP switch
6DEFROST switch
7WHISPER
switch
4DOWN switch2MODE switch8Digital display area
3UP switchMonitor display area 5SET switch
TSJ012A149A英トンボPDF 16.8.31 10:21 AM ページ 8

9
--
9Cumulative engine operating time 1
•
Displays cumulative engine
operating time 1 for the engine
registered by the cabin controller.
•
A reset function is included.
•
Display units are hours.
C
Temperature deviation
•
This mode is used to set and
display the permissible range of
temperature deviation between the
setting temperature and the actual
room temperature.
DLog setting
• This mode is used to set
and display the log
interval, etc., used for
recording log data.
•
Displays cumulative engine
operating time 2 for the engine
registered in the cabin controller.
•
Display units are hours.
•
Displays the cumulative
operating time for the motor
registered in the cabin controller.
•
Display units are hours.
0Cumulative engine operating time 2
ACumulative motor operation time
•
Displays number of engine
run/stop registered in the
cabin controller.
• Display units are times.
BNumber of engine run/stop
• This mode is used to set
and display the cabin
controller functions.
• Setting items display at
2-second intervals.
8
User settings
•
This mode is used to set the
refrigeration unit's automatic
STOP timer (for one stop only).
•
If a timer setting already exists,
it displays at the top of the
digital display area.
7
OFF timer
6ON timer •
This mode is used to set the
refrigeration unit's automatic
ON timer (for one startup only).
•
If a timer setting already exists,
it displays at the top of the
digital display area.
5Printer output
•
This mode is used to print out the
room temperature and the setting
temperature.
•
Use of this function requires an
optional printer.
4Defrost timer
•
This mode is used to set and
display the defrost timer.
•
The timer setting is indicated
in hour units.
3Alarm occurrence
•
This mode indicates the currently
active alarm.
•
Up to 10 alarms display
sequentially at 2-second intervals.
2•
This mode is used to display and
specify the setting temperature &
room temperature.
•
This display displays when the
refrigeration unit is running.
1Clock •
This mode is used to set and
display the current time.
•
This display displays when the
refrigeration unit is stopped.
•
This display does not display when the
clock display setting is OFF.
(3) Mode displays and functions
• Each time the [MODE] switch is pressed, the mode changes in the sequence shown below.
• Refer to the reference page number for details of each mode's settings.
• Following a mode change, the item 2"Setting temperature / room temperature" display appears when the
[SET] switch is pressed, or after a 10-second period without a switch input.
Mode Display
Setting temperature /
room temperature
See
page 11
See
page 19
See
page 28
See
page 15
See
page 24
See
page 25
See
page 26
See
page 10
13
See
page 12
13
See
page 12
13
See
page 13
13
See
page 13
13
See
page 14
13
See
page 16
When
Stopped
During
operation
TSJ012A149A英トンボPDF 16.8.31 10:21 AM ページ 9

10
--
Mode Display
5 •8 •11
2 •3 •4 •6 •7 •9 •10
1 •12
1
2
3
4
5Buzzer setting display
Backlight setting display
Clock ON/OFF setting display
10
11
•
12
6
7
8
9
Centigrade / Fahrenheit setting display
(4) Set the user setting
Set the user setting display
Press the [MODE] switch (8 times, when the refrigeration unit is stopped, or 7 times when running) to change the display to the user settings display at the digital display area.
Setting the buzzer
Press the [UP] or [DOWN] switch to change the display to the buzzer setting display.
Setting the backlight
Press the [UP] or [DOWN] switch to display the backlight setting display. The digital display begins blinking, and the setting step display displays.
Press the [UP] or [DOWN] switch again to enable a
setting change operation (digital display begins blinking).
Press the [UP] switch for a "buzzer ON" setting, or the
[DOWN] switch for a "buzzer OFF" setting.
Press the [SET] switch to register the setting. The
display will change to then displays.
Light switch interlock
Always dim
ON only when panel is pressed (bright)
OFF
Always bright
The [UP] and [DOWN] switches can be used to select
the following setting items.
Setting the clock ON/OFF
Press the [SET] switch to register the setting. The display will change to clock ON/OFF setting display.
Press the [UP] or [DOWN] switch to start the digital display
blinking, and to change the display to the setting steps.
Press the [UP] switch to specify an ON setting, or the
[DOWN] switch to specify an OFF setting.
Press the [SET] switch to register the setting. The next
step (centigrade) then displays. After moving through the
steps, press the [MODE] switch to change the display to
the user settings display.
TSJ012A149A英トンボPDF 16.8.31 10:21 AM ページ 10

11
--
Mode Display
1
2
3
4
5
(5) Setting the time 3 •5
1 •2 •4
Time setting display (Hour)
Time setting display (Minute)
CAUTION
Before setting the time, be sure to specify an "ON" setting at the clock ON/OFF setting item
in the user setting mode.
Stop the refrigeration unit and verify that the current time setting displays. In this condition, press the [UP]
or [DOWN] switch continuously for 3 seconds to change the display to the time setting display (Hour).
Press the [SET] switch to register the setting. The
display will change to "Minute" setting display.
Verify that the "Hour" portion of the time display is
blinking at the top of the digital display area, then
press the [UP] or [DOWN] switch to specify the
current time's "Hour" setting.
ADVICE Each time the [UP] or [DOWN] switch is
pressed, the time value increases or
decreases by 1, respectively. If the switch
is pressed continuously, the time value
changes in a continuous manner.
ADVICE Each time the [UP] or [DOWN] switch is
pressed, the time value increases or
decreases by 1, respectively. If the switch
is pressed continuously, the time value
changes in a continuous manner.
Verify that the "Minute" portion of the time display is
blinking at the top of the digital display area, then
press the [UP] or [DOWN] switch to specify the
current time's "Minute" setting.
Press the [SET] switch to register the setting. The
current time then displays.
TSJ012A149A英トンボPDF 16.8.31 10:21 AM ページ 11

12
--
Mode Display
(6) Displaying cumulative engine operating time 1 (with reset function)
3
2
1
1
2
3
(7) Displaying cumulative engine operating time 2
21
1
2
Displaying cumulative engine operating time 2
Displaying cumulative engine operating time 1
Press the [MODE] switch (9 times if the refrigeration unit is stopped and 8 times if it is running) to
change the digital display to Cumulative Engine Operating Time 1 display.
Press both the [UP] and [DOWN] switches simultaneously 3 seconds or longer to reset the cumulative
engine operating time display.
Press the [SET] switch. If the refrigeration unit is running, the digital display will display the setting
temperature/room temperature. If the refrigeration unit is stopped, the display will change to the time
display.
Press the [MODE] switch (10 times if the refrigeration unit is stopped and 9 times if it is running) to
change the digital display to Cumulative Engine Operating Time 2 display.
Press the [SET] switch. If the refrigeration unit is running, the digital display will display the setting
temperature/room temperature. If the refrigeration unit is stopped, the display will change to the time
display.
TSJ012A149A英トンボPDF 16.8.31 10:21 AM ページ 12

• Each time the [UP] switch is pressed, the setting changes from to .
• Each time the [DOWN] switch is pressed, the setting changes from to .
( : OFF, : ±1ºC, : ±2ºC, : ±3ºC, : ±3ºC, : ±4ºC,
: ±5ºC)
Mode Display
(8)
Displaying the cumulative motor operating time
2
2
1
Displaying the cumulative motor operating time
(9)
Displaying deviations from the normal temperature
3
1
Displaying deviations from the normal temperature
ADVICE
If you continue to press the [UP] switch or [DOWN] switch, the setting will change continuously.
ADVICE
Press the [MODE] switch (11 times if the refrigeration unit is stopped and 10 times if it is running) to
change the digital display to the Cumulative Engine Operating Time 1 display.
Press the [SET] switch. If the refrigeration unit is running, the digital display will display the setting
temperature/room temperature. If the refrigeration unit is stopped, the display will change to the time
display.
Setting the deviation from normal temperature range setting
Press the [MODE] switch (12 times if the refrigeration unit is stopped and 11 times if it is running) to
change the digital display to the deviation from normal temperature range display.
1
Press either the [UP] switch or the [DOWN] switch. The deviation temperature range shown in the digital
display will blink and the mode will change to the deviation from normal temperature range setting
mode. Press the switch again to change the setting temperature range and turn this function OFF.
2When the display in the bottom of the digital display shows the desired temperature deviation
range, press the [SET] switch to finalize the deviation from normal temperature range setting. After
the setting is finalized, the digital display will display the setting temperature/room temperature. If
the refrigeration unit is stopped, the display will change to the time display.
This cabin controller is equipped with a function to store the setting temperature from
the time the refrigeration unit was used previously (memory function), but for reference
purposes, be sure to confirm the setting in the bottom row of the digital display.
1
1
2
3
•
2
13
--
TSJ012A149A英トンボPDF 16.8.31 10:21 AM ページ 13

Mode Display
(10) Displaying the log setting
Press the [UP] switch or [DOWN] switch. The display will change to the running log interval display.
Displaying the log setting
Running log interval
setting display
Stopped log interval
setting display
1 •3 •6
1
2
3
4
5
6
7
8
2 •4 •7
5 •8
Press the [MODE] switch (13 times if the refrigeration unit is stopped and 12 times if it is running) to
change the digital display to the log setting display.
The log setting display mode displays the fixed time interval (in minutes) when the log of the
refrigeration unit’s data are recorded while it is running and while it is stopped. In the setting mode, the
interval can be changed. If the optional printer is connected, the recorded log can be printed out.
If the [MODE] switch is pressed, the digital display will
blink and it will be possible to change the setting.
Finalize the setting by pressing the [SET] switch. After
the setting is finalized, the digital display will display
the setting temperature/room temperature. If the
refrigeration unit is stopped, the display will change to
the time display.
Finalize the setting by pressing the [SET] switch. The
display will change to the Stopped log interval display.
If the [MODE] switch is pressed, the digital display will
blink and it will be possible to change the setting.
Set the desired interval (in minutes) displayed in the bottom row of
the digital display by pressing the [UP] switch or [DOWN] switch.
Set the desired interval (in minutes) displayed in the bottom row of
the digital display by pressing the [UP] switch or [DOWN] switch.
The log is stored in the cabin controller’s flash memory, but if the memory’s capacity is
exceeded, the log will be overwritten, so exercise caution. It is possible to record the log for a
period of 2 months when in the default setting.
ADVICE
The log setting time interval can be set at 1 ~ 60 min.
ADVICE
The log setting time interval can be set at 1 ~ 60 min.
CAUTION
14
--
TSJ012A149A英トンボPDF 16.8.31 10:21 AM ページ 14

15
--
Mode Display
Displaying the printer output ON/OFF display
• Connect the printer (optional) to the PRINT port.
• Turn ON the vehicle’s ignition key to supply power to the printer.
1
Printer output operation
2
Setting the printer output time
5
4
3
Printer output ON/OFF setting display
Printer output time setting display
(11) Printer output operation
ADVICE
4 •6
2 •3 •5
1
Press the [MODE] switch (5 times when the refrigeration unit is stopped, or 4 times when running) to
change the printer output ON/OFF display.
Press the [UP] or [DOWN] switch to change the
display to the printer output ON/OFF setting display.
Press the [UP] switch to specify ON settings.
7
Press the [SET] switch to register the setting. If set
to "ON", the display will change to the printer output
time setting display.
Use the [UP] and [DOWN] switch, select which data do
you like to output depending on how many hours earlier
from now it was recorded, and press the [SET] switch.
Press the [SET] switch to register the setting. The log information for the specified time period is then
printed out. At this time, the display will change to the printer output ON/OFF display at the digital
display area.
There 9 available printer output time
settings in a range from 12H (past 12
hours) to 7d (past 7 days).
Setting the printer’s printing range
6
Printer’s printing range setting display
ADVICE
Use the [UP] and [DOWN] switch, select the range
of thermal printing for the graph.
If you press the PRINT button the printer
main unit, you can print with the
previous setting.
Range within ±30˚C
Range within ±15˚C
a.
b.
TSJ012A149A英トンボPDF 16.8.31 10:21 AM ページ 15

16
--
Mode Display
Displaying number of engine run/stop
1
2
(12) Displaying number of engine run/stop
21
Press the [MODE] switch (12 times if the refrigeration unit is stopped, or 11 times if it is running) to
change the digital display to the number of engine run/stop display.
If you press the [SET] switch when the refrigeration unit is running, the digital display will change to
the setting temperature/room temperature display. If the refrigeration unit is stopped, the display will
change to the time display.
TSJ012A149A英トンボPDF 16.8.31 10:21 AM ページ 16

OFF
ON
CONT. RUN
AUTO
START/STOP
2CONT. RUN/AUTO
changeover switch
3ELEC/DIESEL
change over switch
Cover assy, side (R)
Concent assy
1Main switch
OFF
ON
CONT. RUN
AUTO
START/STOP
17
--
4 Each Switch Operation
(1) Usage of each switch
1Main switch
2CONT. RUN/AUTO changeover switch
This switch supplies power to the circuits in the unit.
ON position This switch energizes the electrical
system for the unit.
OFF position This switch deenergizes the
electrical system and the unit will
not operate.
This switch is used to select automatic start/stop or
continuous operation.
Switch upward CONT. RUN (Continuous
operation)
Switch downward AUTO START/STOP
(Automatic start/stop)
ADVICE The refrigeration unit will not run unless
the main switch and RUN/STOP switch on
the cabin controller are set to "ON".
Normally, turn the main switch to "ON",
and operate the refrigeration unit with the
RUN/STOP switch on the cabin controller.
If the main switch has been turned off, turn
the RUN switch on the cabin controller to
"ON" to resume operation.
ADVICE When cargo is frozen products
Selecting AUTO to save fuel costs is
recommended.
When cargo is refrigerated products
Selecting AUTO is recom-mended when
fuel costs need to be saved, and selecting
CONT. RUN is recommend-ed when
distribution of the room temperature is
important.
TSJ012A149A英トンボPDF 16.8.31 10:21 AM ページ 17
This manual suits for next models
3
Table of contents
Other Mitsubishi Heavy Industries Refrigerator manuals