MIXVIBES VFX CONTROL User manual

User Manual

C
M
Y
CM
MY
CY
CMY
K
vibe-watermark-bright.pdf 25/10/2010 17:41:48
Contents
1 Welcome 4
2 Connections 5
2.1 Stand alone setup 5
2.2 External mixer setup 6
2.3 External audio interface setup 7
2.4 External mixer and external audio interface setup 8
3 Software installation 9
4 Getting started 10
4.1 Configuring display settings 10
4.2 Launching MIXVIBES VFX 10
4.3 Software activation 10
4.4 Install Wizard 10
4.5 Choosing the skin 11
4.6 Configuring the audio 11
4.7 Importing media 14
4.8 Analyzing media 14
4.9 Loading media 14
5 Controller overview 15
5.1 Top panel overview 15
5.2 Rear panel overview 19
6 Software user interface 20
6.1 Header menus 20
6.2 Players 22
6.3 Integrated Mixer 26
6.4 The Crossfader rack 28
6.5 The Main Volume / Record rack 28
6.6 The Mix rack 29
6.7 The Video Mixer rack 29
6.8 The Video Titler rack 30
6.9 Audio Sampler 31
6.10 The Preview rack 32
7 Media management 33
7.1 MediaView 33
7.2 Explorer window 36
7.3 Selection window 36
7.4 Edit media information 37
8 Preferences 38
8.1 General 38
8.2 Mix 39
8.3 Skin 39
8.4 Soundcard 39
8.5 EQ/Gain 40
8.6 Video 40
8.7 Projection 41
8.8 Effect 41
8.9 Keyboard 41
8.10 MIDI 42
8.11 Vinyl/CD input 43
9 Troubleshooting 45
10 Frequently Asked Questions 46
11 Technical specifications 48
2 / 50

C
M
Y
CM
MY
CY
CMY
K
vibe-watermark-bright.pdf 25/10/2010 17:41:48
Important safety instructions
1Read these Instructions.
2Keep these Instructions.
3Heed all Warnings.
4Follow all Instructions.
5Do not use this apparatus near water.
6Clean only with a damp cloth.
7Do not block any of the ventilation openings. Install in accordance with the manufacturer’s instructions.
8
Do not install near any heat sources such as radiators, heat registers, stoves, or other apparatus (including amplifiers)
that produce heat.
9
Do not defeat the safety purpose of the polarized plug. The wide blade is provided for your safety. If the provided plug
does not fit into your outlet, consult an electrician for replacement of the obsolete outlet.
10
Protect the power cord from being walked on or pinched particularly at plug, convenience receptacles, and point where
they exit from the apparatus.
11 Only use attachments/accessories specified by the manufacturer.
12
Use only with a cart, stand, tripod, bracket, or table specified by the manufacturer, or sold with the apparatus. When a
cart is used, use caution when moving the cart/apparatus combination to avoid injury from tip-over.
13 Unplug this apparatus during lighting storms or when unused for long periods of time.
14
Refer all servicing to qualified service personnel. Serving is required when the apparatus has been damaged in any
way, such as power-supply cord or plug is damaged, liquid has been spilled or objects have fallen into the apparatus,
the apparatus has been exposed to rain or moisture, does not operate normally, or has been dropped.
WARNING
To reduce the risk of the fire or electric shock, do not expose this apparatus to rain or moisture. The apparatus
shall not be exposed to dripping or splashing and that no objects filled with liquids, such as vases, shall be
placed on the apparatus.
CAUTION: To reduce the risk of electric shock, do not remove
any cover. No user-serviceable parts inside. Refer servicing to
qualified service personnel only.
The lightning flash with arrowhead symbol within the equilateral triangle is intended to alert the use to
the presence of un-insulated “dangerous voltage” within the product’s enclosure that may be of
sufficient magnitude to constitute a risk of electric shock.
The exclamation point within the equilateral triangle is intended to alert the user to the presence of
important operation and maintenance (servicing) instructions in the literature accompanying this
appliance.
CAUTION
To prevent electric shock, do not use this polarized plug with an extension cord, receptacle or other outlet
unless the blades can be fully inserted to prevent blade exposure
CAUTION
C
M
Y
CM
MY
CY
CMY
K
instructions.pdf 10/11/2009 15:36:39
3 / 50

C
M
Y
CM
MY
CY
CMY
K
vibe-watermark-bright.pdf 25/10/2010 17:41:48
1 Welcome
Thank you for choosing MIXVIBES VFX CONTROL. MIXVIBES VFX CONTROL is an all-in-one mobile Video DJ system featuring
standard DJ controls including 2 players and a central mixer. The controller has been designed to be light and mobile, with a
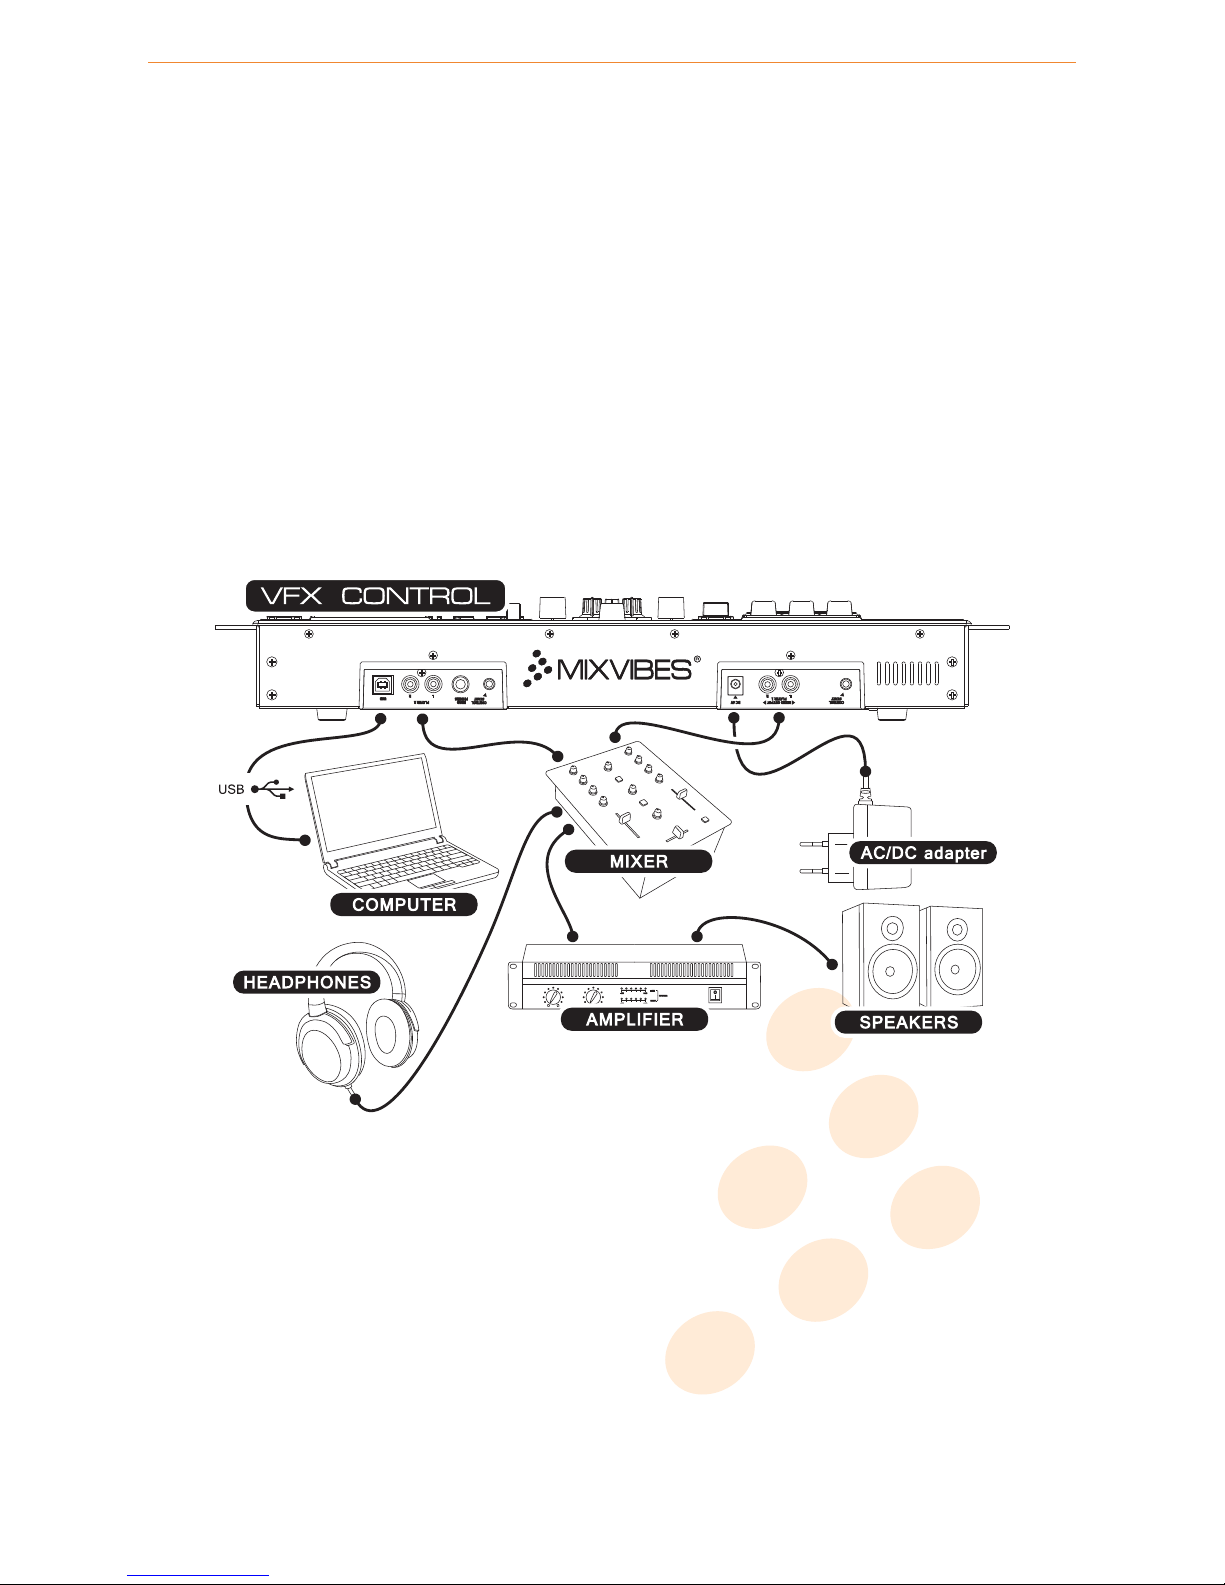
compact format. The controller comes with a built-in soundcard with two separate stereo outputs and a headphone output for
monitoring. For high precision mixing, the two ultra touch sensitive wheels will perfectly scratch your video files without any
latency.
This is a comprehensive manual that goes over the MIXVIBES VFX CONTROL functions and features. Take the time to read
this manual to take full advantage of the potential of MIXVIBES VFX CONTROL. It will guide you through the essential steps,
following the usual DJ & VJ workflow:
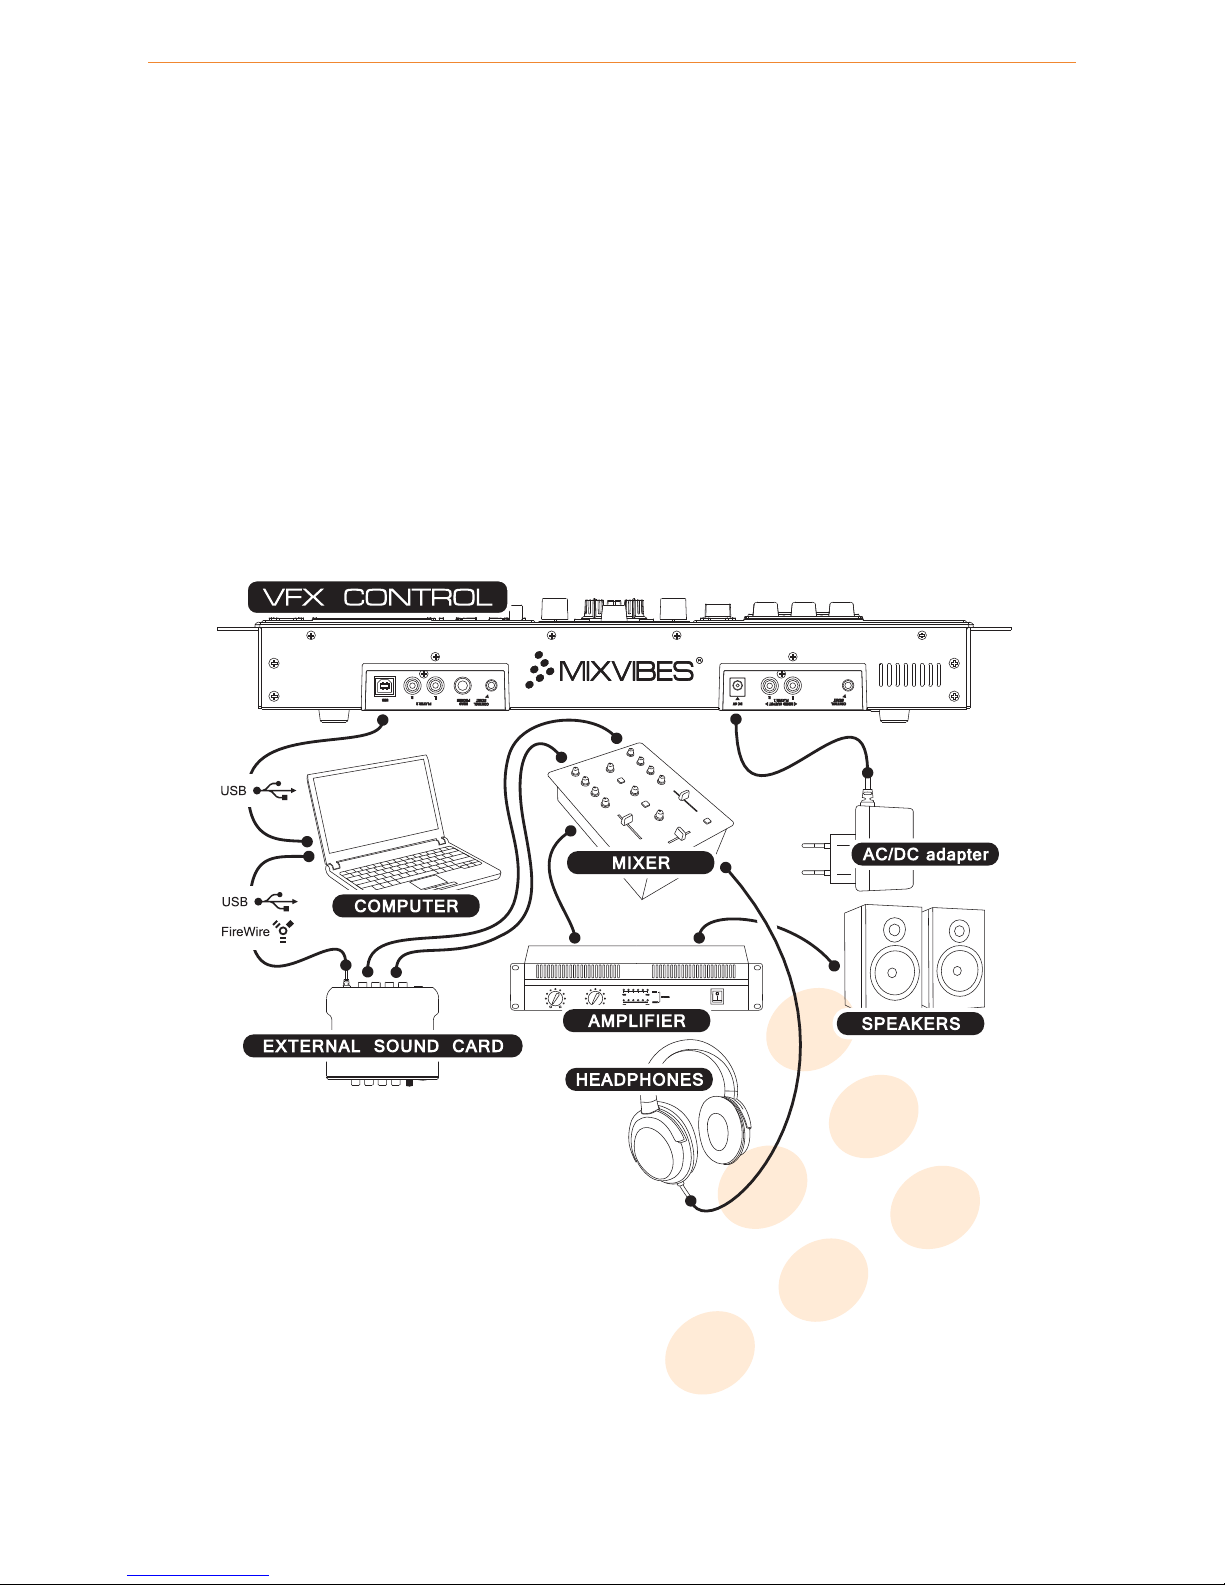
•Device connections
•Software installation
•‘Get started’: First settings and configuration, software activation, installation wizard, media import and analyze. . .
•VFX CONTROL – MIDI controller features
•VFX software user interface and main features
•In-depth look at the preferences
•Troubleshooting and FAQs
We invite you to be part of the MIXVIBES community and share your experiences with other video DJs, find help and advice,
and check for available updates. See you online on the forum1or on the website2!
MIXVIBES VFX is constantly being improved. Please make sure that you are always using the latest version of MIXVIBES VFX.
Find on our website a french version of this user manual.
Minimum System Requirements
•Windows® XP SP2 or Windows® Vista SP2 or Windows® 7. We recommend Windows® 7 over Vista or XP.
•Processor Intel® Core 2 Duo 2.2GHz or equivalent
•2 GB RAM
•
3D video card with 256 MB dedicated video memory, DirectX9 compatible + secondary monitor output (VGA, DVI,
HDMI)
•One available USB port
•Hard drive space for music and video files
Performance advice
Global performance depends mainly on CPU, hard disk drive speed and Graphics Processing Unit performance.
Box Contents
•MIXVIBES VFX installation disc
•MIXVIBES VFX CONTROL controller
•This user manual
•Switching power supply 6V DC
•1 USB cable
•Set of RCA and auto-start cables
1http://forum.mixvibes.com
2http://www.mixvibes.com
4 / 50

C
M
Y
CM
MY
CY
CMY
K
vibe-watermark-bright.pdf 25/10/2010 17:41:48
2 Connections
2.1 Stand alone setup
Follow the instructions below to use MIXVIBES VFX CONTROL with the integrated mixer.
1Connect your VFX CONTROL ‘mixed output’ to your sound system
(amplifier, powered speakers, or home
stereo).
2Connect your headphones to the ’headphones’ output of your VFX CONTROL.
3Connect the supplied USB cable between the USB output of your VFX CONTROL and a free USB slot of your computer.
4Connect the supplied power adapter.
5Turn on your VFX CONTROL.
C
M
Y
CM
MY
CY
CMY
K
stand_alone.pdf 10/11/2009 11:11:59
Stand alone setup
5 / 50

C
M
Y
CM
MY
CY
CMY
K
vibe-watermark-bright.pdf 25/10/2010 17:41:48
2 Connections
2.2 External mixer setup
Follow the instructions below to use MIXVIBES VFX CONTROL with an external mixer.
1Connect your VFX CONTROL outputs to your mixer line inputs
. Connect the ‘player 1’ outputs into a mixer line
input using the included RCA cables, then repeat for the ‘player 2’ outputs into another available mixer line input.
2Connect your headphones to the external mixer’s headphone output
and
connect your sound system
(amplifier, powered speakers, or home stereo) to the external mixer’s main output.
3
If fader start is needed use the supplied fader start cables to connect the ’control start’ outputs with the corresponding
fader start inputs of your mixer.
4Connect the supplied USB cable between the USB output of your VFX CONTROL and a free USB slot of your computer.
5Connect the supplied power adapter.
6Turn on your VFX CONTROL.
Note: the external analog mixer can not control the video mixing alone.
C
M
Y
CM
MY
CY
CMY
K
external_mixer.pdf 10/11/2009 11:15:02
External mixer setup
6 / 50

C
M
Y
CM
MY
CY
CMY
K
vibe-watermark-bright.pdf 25/10/2010 17:41:48
2 Connections
2.3 External audio interface setup
Follow the instructions below to use MIXVIBES VFX CONTROL with the
integrated mixer and an external audio interface
.
1Connect outputs 1/2 of your audio interface to your sound system
(amplifier, powered speakers, or home
stereo).
2Connect your headphones to your audio interface’s headphone output
. Audio interfaces may vary, please
refer to the owner’s manual included with your audio interface for details on its headphone output.
3Connect the audio interface to your computer (USB or Firewire).
4Turn on your audio interface.
5Connect the supplied USB cable between the USB output of your VFX CONTROL and a free USB slot of your computer.
6Connect the supplied power adapter.
7Turn on your VFX CONTROL.
C
M
Y
CM
MY
CY
CMY
K
external_audio_interface.pdf 10/11/2009 11:15:51
External audio interface setup
7 / 50

C
M
Y
CM
MY
CY
CMY
K
vibe-watermark-bright.pdf 25/10/2010 17:41:48
2 Connections
2.4 External mixer and external audio interface setup
Follow the instructions below to use MIXVIBES VFX CONTROL with an external mixer and an external audio interface.
1Connect your audio interface outputs to your mixer line inputs
. Connect the ‘player 1’ outputs into a mixer
line input using the included RCA cables, then repeat for the ‘player 2’ outputs into another available mixer line input.
2Connect your headphones to the external mixer’s headphone output
and
connect your sound system
(amplifier, powered speakers, or home stereo) to the external mixer’s main output.
3Connect the audio interface to your computer (USB or Firewire).
4Turn on your audio interface.
5Connect the supplied USB cable between the USB output of your VFX CONTROL and a free USB slot of your computer.
6Connect the supplied power adapter.
7Turn on your VFX CONTROL.
Note: the external analog mixer can not control the video mixing alone.
C
M
Y
CM
MY
CY
CMY
K
external_audio_interface_mixer.pPage 1 10/11/2009 11:16:33
External mixer and external audio interface setup
8 / 50

C
M
Y
CM
MY
CY
CMY
K
vibe-watermark-bright.pdf 25/10/2010 17:41:48
3 Software installation
1Check that your VFX CONTROL is plugged into an active USB port.
2
Insert MIXVIBES VFX installation disc into your computer’s CD-ROM drive. The installation program will launch
automatically. In case it does not, open Windows Explorer, navigate to the MIXVIBES VFX installation disc and double-
click on the «install_vfx.exe» file.
3Choose the installation language and click OK.
C
M
J
CM
MJ
CJ
CMJ
N
install1.pdf 06/04/2009 14:27:32install1.pdf 06/04/2009 14:27:32
Language Selection
4Please read and validate the user agreement by clicking Accept.
C
M
J
CM
MJ
CJ
CMJ
N
install2.pdf 06/04/2009 14:28:10install2.pdf 06/04/2009 14:28:10
End-User License Agreement
5
Enter your first name, last name, e-mail address, country, birth-date and the serial number supplied on the CD-ROM
sleeve and click Next.
C
M
J
CM
MJ
CJ
CMJ
N
install3.pdf 22/10/2009 16:26:41install3.pdf 22/10/2009 16:26:41
License key
6
Select the folder you want to install MIXVIBES VFX into. You can keep the default folder, or choose a new one by
typing directly into the box or clicking on ‘Browse..’. Press
Install
to begin installation.
Be patient, the installation
process can take a few minutes.
C
M
J
CM
MJ
CJ
CMJ
N
install4.pdf 22/10/2009 16:27:08install4.pdf 22/10/2009 16:27:08
Choose Install location
7Click Finish to end the installation process.
C
M
J
CM
MJ
CJ
CMJ
N
install5.pdf 22/10/2009 16:27:22install5.pdf 22/10/2009 16:27:22
Finish Installation
Congratulations, your MIXVIBES VFX is now installed and ready for use.
Please log in on our forum in order to register your product and to check for the latest download version of
MIXVIBES VFX software.
9 / 50

C
M
Y
CM
MY
CY
CMY
K
vibe-watermark-bright.pdf 25/10/2010 17:41:48
4 Getting started
4.1 Configuring display settings
To configure display settings:
1
Right-click on your Desktop and select
Screen resolution
in Windows
®
Vista/7 (
Properties
then
Display settings
in Windows® XP).
2
If you wish to connect a second monitor, plug the second monitor to your computer’s secondary output (please refer to
the owner’s manual for details). Right-click on the second monitor then select Attached.
3Choose the screen resolution then click OK to confirm.
C
M
J
CM
MJ
CJ
CMJ
N
display_setting.pdf 21/09/2009 17:07:05display_setting.pdf 21/09/2009 17:07:05
Display settings
4.2 Launching MIXVIBES VFX
To launch MIXVIBES VFX, go to [Start > All Programs > MixVibesVFX] and click on MixVibes VFX or double-click on the MIXVIBES
VFX shortcut on your desktop.
4.3 Software activation
Before you use MIXVIBES VFX, you need to register and activate the software.
4.4 Install Wizard
The install wizard launches automatically when running MIXVIBES VFX for the first time. The install wizard can be launched
manually in [Options/Install Wizard].
4.4.1 Auto-configuration
Auto-configuration allows MIXVIBES to:
•automatically configure MIXVIBES audio interfaces outputs.
•enable MIXVIBES MIDI controllers.
•choose the best skin according to your resolution and your MIDI setup.
C
M
Y
CM
MY
CY
CMY
K
install_wizard1.pdf 09/02/2010 12:31:36
Auto-configuration
If you use MIXVIBES VFX CONTROL in stand alone setup, it is advisable to choose the auto-configuration.
10 / 50

C
M
Y
CM
MY
CY
CMY
K
vibe-watermark-bright.pdf 25/10/2010 17:41:48
4 Getting started
4.4.2 Manual configuration
The manual configuration allows you to choose the skin and configure the audio preferences quickly.
4.5 Choosing the skin
1Open [Options/Preferences/Skin].
2Select a skin. Comments will help you select the skin:
•
1280 or 1440 pixels
screen resolution
. The VFX 1280 skin is optimized for monitors wider than 1280 pixels. The
VFX 1440 skin is optimized for monitors wider than 1440 pixels.
•VFX or VFX+mixer
skin. The VFX+mixer skin is designed for a perfect use with VFX CONTROL controller. To
show more controls, click on the Control button of the integrated mixer. VFX skin was designed to display all
functions within MIXVIBES VFX. To show 4 players, go to the menu [Options > Number of players].
4.6 Configuring the audio
To change the audio settings, you must uncheck the ’Enable the auto-configuration’ box.
4.6.1 Stand alone setup
Standalone mode is the default audio configuration when using your VFX CONTROL controller in auto-configuration. All the
following should already be set up.
1Check that all player outputs are set to 1.
2Open [Options/Preferences/Soundcard].
3Choose the ASIO mode.
4Select Mixvibes ASIO VFX Control as your output device.
5Select ’2’ as the number of outputs.
6
Click on the
’Setup’ button
to select the audio outputs (click ‘Control options’ to open the soundcard driver control
panel if necessary).
7
Choose
’VFX CONTROL 1’ and ’VFX CONTROL 2’ on the first line for stereo out 1
(this output is your system’s
MASTER out) and choose
’VFX CONTROL 5’ and ’VFX CONTROL 6’ on the second line for stereo out 2
then
click on the monitor button to set this output as your system’s MONITORING out.
8Click OK twice.
9Press the CUE button on your VFX CONTROL to pre-listen a media in the player of your choice.
C
M
Y
CM
MY
CY
CMY
K
audio_1.pdf 09/02/2010 14:20:41
Stand alone setup
11 / 50

C
M
Y
CM
MY
CY
CMY
K
vibe-watermark-bright.pdf 25/10/2010 17:41:48
4 Getting started
4.6.2 External mixer setup
1Check that all player outputs are correctly set on all players: player 1 to output 1 and player 2 to output 2.
2Open [Options/Preferences/Soundcard].
3Choose the ASIO mode.
4Select MixVibes ASIO VFX Control as your output device.
5Select ’2’ as the number of outputs.
6
Click on the
’Setup’ button
to select the audio outputs (click ‘Control options’ to open the soundcard driver control
panel if necessary).
7
Choose
’VFX CONTROL 1’ and ’VFX CONTROL 2’ on the first line for stereo out 1
(this output is then linked to
player 1) and choose
’VFX CONTROL 3’ and ’VFX CONTROL 4’ on the second line for stereo out 2
(this output
is then linked to player 2).
8Click OK twice.
9Press the CUE button on your external mixer to pre-listen a media in the player of your choice.
C
M
Y
CM
MY
CY
CMY
K
audio_2.pdf 09/02/2010 14:20:11
External mixer setup
4.6.3 External audio interface setup
1Check that all player outputs are set to 1.
2Open [Options/Preferences/Soundcard].
3Choose the ASIO mode.
4Select your external audio interface as your output device.
5Select ’2’ as the number of outputs.
6
Click on the
’Setup’ button
to select the audio outputs (click ‘Control options’ to open the soundcard driver control
panel if necessary).
7
Choose your
external audio interface output 1 and 2 on the first line for stereo out 1
(this output is your
system’s MASTER out) and choose your
headphone output on the second line for stereo out 2
then
click on
the monitor button to set this output as your system’s MONITORING out.
8Click OK twice.
9Press the CUE button on your VFX CONTROL to pre-listen a media in the player of your choice.
12 / 50

C
M
Y
CM
MY
CY
CMY
K
vibe-watermark-bright.pdf 25/10/2010 17:41:48
4 Getting started
C
M
Y
CM
MY
CY
CMY
K
audio_3.pdf 09/02/2010 14:17:50
External audio interface setup
4.6.4 External mixer and external audio interface setup
1Check that all player outputs are correctly set on all players: player 1 to output 1 and player 2 to output 2.
2Open [Options/Preferences/Soundcard].
3Choose the ASIO mode.
4Select your external audio interface as your output device.
5Select ’2’ as the number of outputs.
6
Click on the
’Setup’ button
to select the audio outputs (click ‘Control options’ to open the soundcard driver control
panel if necessary).
7
Choose
external audio interface output 1 and 2 on the first line for stereo out 1
(this output is then linked to
player 1) and choose
external audio interface output 3 and 4 on the second line for stereo out 2
(this output
is then linked to player 2).
8Click OK twice.
9Press the CUE button on your external mixer to pre-listen a media in the player of your choice.
C
M
Y
CM
MY
CY
CMY
K
audio_4.pdf 09/02/2010 14:17:16
External mixer and external audio interface setup
13 / 50

C
M
Y
CM
MY
CY
CMY
K
vibe-watermark-bright.pdf 25/10/2010 17:41:48
4 Getting started
4.7 Importing media
4.7.1 Media types
MIXVIBES VFX is a real multimedia player. It can handle many sorts of familiar of media types :
•Audio files: reads all major audio formats out of the box (WAV, MP3, WMA, OGG, CDA, AAC, M4A, FLAC).
•Video files
: reads all major video formats out of the box (MP4, MPG, MPEG, MJPEG, AVI, DIVX, MOV, VOB, FLV, M4V,
M2T, DAT).
•Flash files: you can use regular SWF flash (as media or in titler rack).
•Flash text files : you can use special SWF files with customizable text (as media or in titler rack).
•Live video feed: you can use webcams or camcorders as soon as they are Windows® compatible.
Advice about video codecs
MIXVIBES VFX supports lots of video codec, but they have not the same performance. So,
what kind of DJ/VJ are you ?
•Simple (fade from one to other): any codec will do the job.
•Live remixer (use advanced functions like loops or locations): use a codec with light compression like MPEG2.
•Scratcher: use a codec with light compression and a lot of keyframes like MJPEG.
In all cases, global performance depends on your computer power (mainly hard drive and CPU speed).
4.7.2 Importing media
Next we suggest that you scan your computer to find your media. You can do this in three ways:
•Right-click while the cursor is over the MediaBase window, from the menu select Scan .
•In the Explorer window, right-click on an item and select Scan or drag and drop it in the MediaBase window.
•Select [Media/Scan] from the top level menu.
C
M
Y
CM
MY
CY
CMY
K
scan1.pdf 08/11/2010 17:42:18
Adding your music and video
On this screen you can scan your computer for a specific media folder. If you want to just add music or video with specific tag
information (Artist, Title etc.), simply enter these into the relevant boxes and then click OK .
You can also add media to the MediaBase by dragging and dropping files from the
Explorer
window or by selecting
Add an
audio file or Add a video file from Media menu.
4.8 Analyzing media
Before you play your medias in VFX, it is important to first analyze your files. The analyze files function processes the medias
in your MediaBase to calculate gain, BPM, duration, peak, video preview and miniatures. To analyze medias, select them in
the MediaBase and click the ’BPM >’ button of the MediaBase control bar or right-click and select from the contextual menu
Analyse. It is strongly recommended to analyze files before a mix.
Note: If you analyze a large number of media at the same time, the analysis can be time consuming.
4.9 Loading media
After importing your media you can load them into the players. There are three ways of loading tracks:
•With the controller
: Use the ’Media Select’ button to scroll through your media windows (MediaView and Explorer).
Load the highlighted track into one of the players by using the ’Load A’ or ’Load B’ buttons. Use the ’Browse’ button
(’Shift’ + ’Load A’) to switch between the media windows (MediaView and Explorer). Use the ’Open’ button to open/close
directories in the Explorer window.
•With the mouse: Drag and drop a track from the media windows (MediaView and Explorer) to one of the players.
•With the keyboard
: Choose a keyboard file in
[Options/Preferences/Keyboard]
. Use the up and down arrow keys
to scroll through your MediaView. Load the highlighted track into one of the players by using the Load shortcut.
14 / 50

C
M
Y
CM
MY
CY
CMY
K
vibe-watermark-bright.pdf 25/10/2010 17:41:48
5 Controller overview
5.1 Top panel overview
C
M
Y
CM
MY
CY
CMY
K
top_panel1.pdf 10/11/2009 16:53:00
Top panel: mixer and playback controls
1. Power switch
: turns VFX CONTROL on and off. Turn on VFX CONTROL before you turn on amplifiers. Turn off amplifiers
before you turn off VFX CONTROL.
To activate the MIDI and audio standby, press the button for 3 seconds: the power switch LED is then lighted on.
To activate the MIDI standby, perform a short click: the LEDs of the effect section are then lighted on. All elements of the top
panel (buttons, jog wheels, knobs, sliders) are disabled while the audio interface is still turned on.
2. Shift
: holding shift gives many of the buttons a secondary function. Secondary functions are printed inside a grey box.
Each button has a primary and a secondary function. Primary functions are direct, just press the desired button. To access the
secondary functions, hold SHIFT and press the desired button.
Shift Open function
39. Control of players 1/2 or 3/4
: switches between the control of players 1/2 or 3/4 with the controller.
MIXER CONTROLS
3. Crossfader : use it to balance the mix of the 2 media files.
4. 5. 6. Equalization
: a 3-band equalizer is available to modify the equalization of your media file. Treble, medium and
bass can be adjusted with these knobs.
7. Volume : adjusts the players’ volume level (video, audio or video+audio).
8. Cue/Monitor knob: adjusts the volume of the headphones.
Shift function
Cue/Monitor Mix knob
: controls the balance in the headphones via software between the master output and
the headphone cue.
9. Gain: adjusts the pre-fader, pre-EQ audio level of the corresponding channel.
10. Cue/Monitor button: sends the corresponding deck to the headphone mix.
Shift Media Select function 39. Transition mode : selects the crossfader video transition mode.
Shift Load B function
40. Fader AV Sync
: synchronizes volume faders and crossfader mode (video, audio or video+audio).
PLAYBACK CONTROLS
11. Jog Wheel
: the jog wheel can be used for a number of functions. When the media is first loaded you can use the jog
wheel to cue up the media. When a media is playing and Vinyl mode is active you can use the top panel of the jog wheel to
scratch and the jog wheel margin to temporarily change the pitch of the media. When a media is playing and Vinyl mode is
not active you can use the jog wheel to temporarily change the pitch of the media. Note: this will automatically revert back to
the default pitch when you let go of the jog wheel.
Shift function Jog Seek: skips through the media at high speed.
12. Cue/Stop
: If no Cue Point is assigned, or if the deck is paused, press Cue to set a Current Cue Point. While the media is
playing, press it again to skip back to the Current Cue Point and pause playback. You can hold down Cue to start playback
from the Current Cue Point. Release it to skip back to the Current Cue Point and pause playback. You can hold down Cue and
Play/Pause simultaneously to start playback from the Current Cue Point. Release both buttons to allow playback to continue.
Shift function Cue/Set: defines a cue point on the fly.
13. Play/Pause: starts or pauses playback of a media file.
Shift function Brake: starts or pauses gradually playback of a media file.
14. Reverse: reverses the media playback.
Shift Loop in/out functions 21. 22. Rewind/Fast Forward: skips through the media at high speed.
15 / 50

C
M
Y
CM
MY
CY
CMY
K
vibe-watermark-bright.pdf 25/10/2010 17:41:48
5 Controller overview
C
M
Y
CM
MY
CY
CMY
K
top_panel2.pdf 09/11/2009 14:58:47
Top panel: pitch and loop controls
PITCH CONTROLS
15. Pitch slider: changes the speed of the currently playing media.
16. Pitch bend
: hold these buttons down to temporarily alter the speed the playing media. When released, the media
playback will return to the speed designated by the pitch slider.
Shift function Fine: hold these buttons down to temporarily and finely alter the speed the playing media.
17. Pitch range: sets the range of the Pitch slider. Push this button to change it between 6%, 10%, 16% and 100%.
18. Speed/Master Tempo select
: selects Speed or Master Tempo. Note: If Speed has been selected you can adjust the
pitch like with a normal turntable; If the Master Tempo has been activated it is possible to change the pitch via the pitch fader
without influencing the tone pitch. This means that the song’s tonal key remains the same while changing its speed.
19. Match : synchronizes the BPM with the adjacent player.
Shift function Sync : synchronizes the BPM and beat with the adjacent player.
20. Vinyl mode on/off
: while a track is playing with this option turned on you can use the jog wheel to scratch your media,
if this button is off the jog wheel will allow you to change the speed.
LOOP CONTROLS
•If Smart is disabled (when using manual loops)
•If no loop was defined
21. Loop in: sets the entry point of a manual loop. The Loop in button blinks.
22. Loop out
: sets the exit point of a manual loop. The Loop out button blinks and the Loop button lights on. Activate
‘Loop assist’ in the Options menu if you want the out point to be relative to the entry point and the BPM.
23. Loop: nothing will happen. The Loop button is lighted off.
•If a loop was defined
21. Loop in: goes back to the loop entry point. The Loop in button is lighted on.
22. Loop out: sets again the exit point of a manual loop. The Loop out button is lighted on.
23. Loop
: disables the loop (the Loop button lights off) or goes back and activates the last loop (the Loop button lights
on and the Loop in and Loop out buttons blink).
•If Smart is enabled (when using automatic loops)
•If no loop was defined
21. Loop in: nothing will happen.
22. Loop out: nothing will happen.
23. Loop
: activates automatically a BPM synchronized loop whose size depends on the previously set number of beats.
When the automatic loop function is switched on, the button flashes. The Loop button stops to blink and the button
Loop in and Loop out blink.
•If a loop was defined
21. Loop in: goes back to the loop entry point. The Loop in button is lighted on.
22. Loop out: cuts the loop interval by half. The Loop out button is lighted on.
23. Loop: disables the loop. The Loop button blinks.
Shift Loop function 23. Smart: activate/deactivate the loop smart mode.
24. Beat -/+: selects the number of beats used to create an automatic loop.
16 / 50

C
M
Y
CM
MY
CY
CMY
K
vibe-watermark-bright.pdf 25/10/2010 17:41:48
5 Controller overview
C
M
Y
CM
MY
CY
CMY
K
top_panel3.pdf 09/11/2009 15:01:48
Top panel: memory and sampler controls
MEMORY CONTROLS
25. Loop memory
: memorizes several loops by media and returns to them. To memorize a loop, simply create a loop
manually or automatically then press the appropriate memorized loop button. To return to the start of a memorized loop,
press the appropriate memorized loop button again.
Shift function Clear loop memory: clears a memorized loop.
26. Locations
: defines and reaches several location points (hot cues) in the media being played. To save a location point,
push a location button. To go to a location point, push a previously saved location button again.
Shift function Clear locations: clears a defined location point.
SAMPLER CONTROLS
27. 28. 29. 30. 31. 32. 33. 34. Pad: launches pad media playback.
Shift function 27. Active pad -: selects the active pad (previous).
Shift function 28. Active pad +: selects the active pad (next).
Shift function 29. Pad volume -: decreases active pad volume. Each pad can have its own volume level.
Shift function 30. Pad volume +: increases active pad volume. Each pad can have its own volume level.
Shift function 31. Ctrl: chooses the sample playback mode:
•Norm: allows simultaneous playback of multiple samples.
•All: allows simultaneous playback of all samples.
•Solo: allows one sample playback at a time.
•Row: allows multiple samples playback on the same column but one per line only.
•Col: allows multiple samples playback on the same line but one per column only.
Shift function 32. Repeat: enables/disables repetitive sample playback.
Shift function 33. Mute: enables/disables sample playback mute.
Shift function 34. Hold: enables/disables start-to-end sample playback when launching pad playback.
Shift Beat+ function 24. Send: sends an audio sample from current player media to sampler’s active pad.
17 / 50

C
M
Y
CM
MY
CY
CMY
K
vibe-watermark-bright.pdf 25/10/2010 17:41:48
5 Controller overview
C
M
Y
CM
MY
CY
CMY
K
top_panel4.pdf 09/11/2009 15:04:09
Top panel: effect and navigation controls
EFFECT CONTROLS
35. Effect on/off: enables/disables current effect.
Shift function Effect mode: selects the effect mode: video, audio or both.
•If you turn the button
36. Selected effect: selects an effect.
Shift function Effect X parameter: controls X parameter for the current effect. Parameters depend on the selected effect.
37. Preset: selects a preset for current effect.
Shift function Effect Y parameter: controls Y parameter for the current effect. Parameters depend on the selected effect.
38. Effect Volume: sets current effect volume (dry/wet).
Shift function FX Sync: sets effect synchronization with media:
none: no synchronization.
on Beat: synchronizes parameters with music energy (like speakers movement).
T: 1/4, T: T/2 etc: synchronizes parameters with BPM.
Note: at this time, some effects are audio only (brake ,reverse, ...).
•if you press the button
36. Active effect: selects the next effect.
Shift function Active effect: selects the previous effect.
VISUALIZATION CONTROLS
•if you press the button
37. Visualization on/off: enables/disables current visualization.
38. Selected visualization: selects the next visualization.
Shift function Selected visualization: selects the previous visualization.
BROWSE CONTROLS
•if you turn the button
39. Media Select
: allows to navigate in the media windows (MediaBase, Playlist and Explorer) to find the appropriate media.
•if you press the button
39. Open: opens/closes folders in the Explorer window.
40. Load: loads selected media into the chosen player.
Shift Load A function Browse: commutes between media windows (MediaBase, Playlist and Explorer).
18 / 50

C
M
Y
CM
MY
CY
CMY
K
vibe-watermark-bright.pdf 25/10/2010 17:41:48
5 Controller overview
5.2 Rear panel overview
1
2
3
4
5
6 6
C
M
Y
CM
MY
CY
CMY
K
rear_panel.pdf 12/11/2009 14:17:23
Rear panel
1. USB connection: used to connect VFX CONTROL to your PC or LAPTOP to control MIXVIBES VFX.
2. Player2 output: used to connect VFX CONTROL with your mixer.
•Standalone setup: not used.
•External mixer setup: connect this output to a mixer line input.
3. Headphones output: used to connect your headphones to your VFX CONTROL.
•Standalone setup: connect your headphones for monitoring here.
•External mixer setup: not used.
4. Power adapter input: connect the included power adapter here.
5. Player1/mixed output: used to connect VFX CONTROL with your sound system or mixer.
•Standalone setup: connect your sound system here.
•External mixer setup: connect this output to a mixer line input.
6. Fader start
: when used with an external mixer you can connect this output with the mixer fader start input to control the
start/stop function of the player from your mixer. (attention: works only with compatible mixer).
19 / 50

C
M
Y
CM
MY
CY
CMY
K
vibe-watermark-bright.pdf 25/10/2010 17:41:48
6 Software user interface
6.1 Header menus
12 3 4 5 6 7 8910 11 12
C
M
Y
CM
MY
CY
CMY
K
header_menus.pdf 08/11/2010 17:57:27
Header menus
1File
•
MediaBase > New : creates a new MediaBase (VIBX format). A MediaBase is the database where all your music,
video and flash information are located. One VIBX file contains one MediaBase.
•MediaBase > Open : loads a new MediaBase (VIBX, VIB or MPX format).
•MediaBase > Save : saves your MediaBase.
•MediaBase > Save as : saves the MediaBase (VIBX format) in the directory of your choice.
•MediaBase > Import iTunes®library : imports your iTunes® library.
•MediaBase > Import WMP library : imports your Windows® Media Player library.
•MediaBase > Import Serato®library : imports your Serato® library.
•Playlist > Import : imports a M3U, TXT format playlist.
•Playlist > Export : exports a playlist in M3U, TXT format.
•Sampler session > New : creates a new Sampler session (VIBS format).
•Sampler session > Open : loads a new Sampler session (VIBS format).
•Sampler session > Save as : saves a Sampler session (VIBS format) with any name.
•Recent files : last MediaBases you loaded.
•Quit : quits MIXVIBES VFX.
2Media
•Add an audio file : adds the current audio file to the MediaBase.
•Add a video file : adds the current video file to the MediaBase.
•Scan : scans one or several files selected in the Windows Explorer.
•
Selected item(s) > Edit info... : edits the information of the selected file. There are 9 available tabs to edit or view
information.
•Selected item(s) > Locate on disk : shows the media directory.
•Selected item(s) > Save ID3-Tag : saves all the tag information of the selected MP3 media file (in the file itself).
•Selected item(s) > Analyse : automatically analyzes the selected media.
•
Selected item(s) > Analyse BPM manually : manually sets the BPM for the current track. First select the required
track you want to manually beat count into the MediaBase and then drag it onto the player. Start the track playing,
go back to the MediaBase, right-click and select ‘Analyse BPM Manually’. Press the F1 key when you get to the
Start Position of the track and F2 when you get to the End Position. You can also manually select these points by
entering the start and end numbers. Now you can either press the Calculate button or enter the Beat number. You
can also use the Space key to set the BPM.
•Selected item(s) > Add to playlist : adds the file to the current Playlist.
•Selected item(s) > Delete : deletes the current media from the MediaBase.
•Selected item(s) > Select all : selects all the media of the MediaBase.
•Selected item(s) > Change path : changes the location of the selected media on the hard drive.
•Selected item(s) > Remove file(s) from disk : deletes the media file from the MediaBase and Hard Drive.
3Options
•
Preferences : opens the MixVibes VFX preferences window. Find more details in the Preferences chapter of this
manual.
•
Security : activates a security lock that prevents you from loading tracks on an active player, right clicking and
saving ID3 tags.
•
Loop assist : activate/deactivate this option to enable an adjustment of entry and exit points of your loops. This
allows you to make near to perfect loops easily.
•Bar : shows/hides bars in players and rack mix.
20 / 50
Table of contents
Other MIXVIBES Dj Equipment manuals