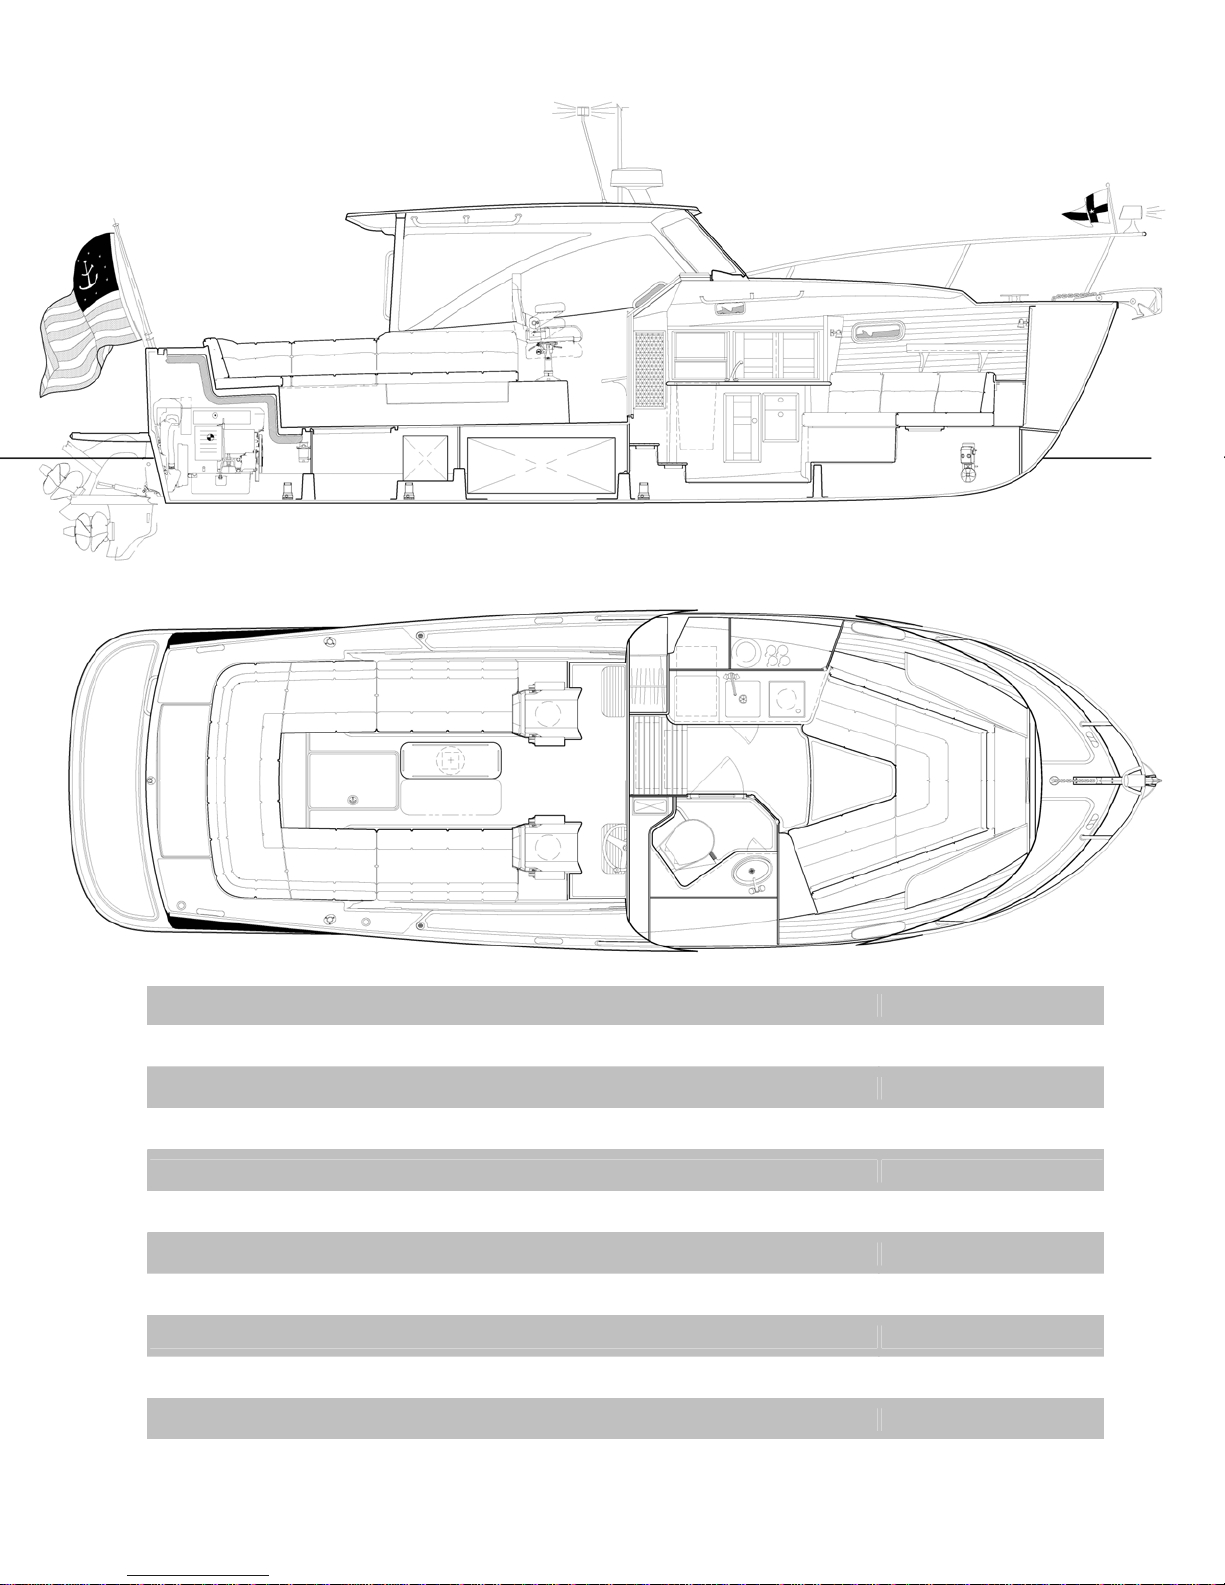
CHAPTER 3 PROPULSION SYSTEM
- 10 - 29z
INTRODUCTION - THE TOP 10 CAUSES OF ENGINE FAILURE
It doesn’t happen often and if you’re familiar with the most common causes of engine failure you can cut
down on the chances of a breakdown. As an introductory to this chapter, we want to familiarize you with
this list of causes, compiled by Motorboating Magazine (February 2006) You will notice that none of the
top 3 causes for engine failure are prevented by the installation of twin engines. And, in the case of other
causes, normal maintenance procedures or the clearing of the raw water intake, etc, obviate any
perceived advantage of a twin installation in these instances. Here are the Top Ten to be aware of:
1. NO FUEL: This is probably less of a problem on a fuel-efficient MJM than on other boats, but lack of
owner attention to fuel consumption is the primary culprit for engine failure. A boat’s fuel tank can be
nearly dry as a bone – even when the guage claims there’s a 8th of a tank left. This makes sense when
you realize that at cruising speed, the gauge shows the tanks reading more than when the boat is at rest.
2. DIRTY FUEL: Engine problems are caused by dirt and water in the fuel. Debris, stirred up from the
bottom of the tank by wave action, is drawn into the fuel line and clogs the fuel filter element. Starved for
fuel, the engine begins to run poorly, and then not at all. Water in the fuel can drive you mad. Moisture
condenses out of the highly humid air on the inside walls of a fuel tank, then runs down into the fuel.
Water can also be introduced at the fuel dock from a contaminated fuel supply. Fuel floats on top of
water and the fuel pick ups are near the bottom of the tank. A fuel/water separator protects against this
by handily extracting the water. Check the bowl daily and drain off the accumulated water. For severe
contamination, use a fuel drying additive.
3. FUEL BUGS: Diesel engines suffer from microbial bugs growing in the fuel. If left unchecked, these
critters clog filters. If you leave the same diesel fuel in the tank for any length of time, a fuel conditioner
similar to that supplied with your boat by the builder will kill the bugs and break up any hydrocarbon
residue into particles that will burn completely in the combustion process.
4. TIRED PUMP: As boats age, a worn-out circulating water pump is another engine killer. Impeller
blades are commonly made of nitrile that stiffens over time and can break off entirely, reducing coolant
flow. Periodic engine maintenance procedures can prevent this problem. A spare is provided in the
Volvo Spares Kit.
5. HARD HOSE: Another issue to be concerned about with older boats. As water intake hoses age,
they lose their resiliency and collapse under suction, causing a restriction in the flow of engine coolant.
This results in over-heating.
Prevention is easy: Visually inspect cooling hoses and squeeze them to be sure they retain shape and
set.
6. CLOGGED INTAKE: Floating debris in the water is another culprit. Things like discarded plastic
baggies, weeds, etc. can plug up the raw-water intake. You can avoid this problem by visually inspecting
the strainer basket. When removing debris, be sure to properly replace the seal, otherwise the pump will
lose suction. Smearing the seal with Vaseline or other marine-grade grease helps.
7. HARD KNOCKS: Collision with an underwater obstacle that damages the prop. Often you can still
operate the boat at low RPM to return to port, being careful to avoid excessive vibration that might
otherwise compound the damage by breaking/bending the strut and/or shaft. In 4 known incidents on
34z’s over 3 years, boats made it home at low RPM or there was no damage. (1) Hitting a rock ledge in
the Narrows above Mt. Desert Island at mid-tide. The strut was also bent. (2) Hitting submerged
Hurricane debris in Miami – Diver fixed blade in a day (3) Grounding at 15 knots in Sarasota – backed off,
no damage. (4) Grounding in mud/sand in Stuart FL – no damage. The problem may be corrected in a
day or so without hauling by an experienced diver who has access to a prop shop where the blades can
be repaired and the prop re-balanced, then re-installed.
8. BAD BATTERY: Marine starting batteries die from old age and neglect. Keep the terminals and
posts clean from that green corrosion that builds up, restricting the flow of current – preventing them from