Mono Machines intimus 26SC2 User manual

26SC2
26CC3
32SC2
32CC3
38SC2
38CC3
38CC4
50SC2
50CC3
50CC4
Postfach / p.o.box 1420
D-88672 Markdorf / Germany
Tel.: +49(0)7544/60-0
Fax: +49(0)7544/60-248 Typ/Type/Τύπος/Tipo/Tyyppi/Típus/Тип:
Internet: www.martinyale.de 273-4S/4C // 274-4S/4C // 269-4S/4C/2C // 270-4S/4C/2C
Vor der Inbetriebnahme die Bedienungsanleitung durchlesen!
Before operating, please read the Operating Instructions!
Veuillez lire le mode d’emploi avant la mise en service!
Voor de inbedrijfstelling de gebruiksaanwijzing doorlezen!
Leer las instrucciones de uso antes de la puesta en servicio!
Antes de pôr a máquina em funcionamento leia as instruções de operação!
Prima della messa in funzione leggere attentamente le istruzioni!
∆ιαβάστε τις οδηγίες χρήσης προτού χρησιµοποιήσετε το µηχάνηµα!
Läs igenom bruksanvisningen innan maskinen tas i bruk!
Læs betjeningsvejledningen før idriftsættelse!
Les gjennom bruksveiledningen før bruken!
Lue käyttöohjeet tarkoin läpi ennen käyttöönottoa!
Przed uruchomieniem urządzenia należy przeczytać instrukcję obsługi!
Před uvedením do provozu si přečtěte návod k obsluze!
Üzembe helyezés előtt olvassuk el a kezelési utasítást!
Пеpед вводом в эксплyатацию непpеменно пpочтите инстpyкцию по обслyживанию!
Bedienungsanleitung
Operating instructions
Instructions d’opération
Gebruiksaanwijzing
Instrucciones de uso
Instruções de Operação
Istruzioni per l’uso
Οδηγίες χρήσης
Betjeningsvejledning
Bruksveiledning
Bruksanvisningen
Käyttöohjeet
Instrukcja obsługi
Návod k obsluze
Kezelési utasítás
Инстpyкция по обслyживанию
(Seite 2-4)
(page 5-7)
(page 8-10)
(pagina 11-13)
(página 14-16)
(página 17-19)
(pagina 20-22)
(Σελίδα 23-25)
(side 26-28)
(side 29-31)
(sidan 32-34)
(sivulla 35-37)
(Strona 38-40)
(Strana 41-43)
(Oldal 44-46)
(стpаницы 47-49)
D
GB
F
NL
E
P
GR
DK
N
S
FIN
PL
CZ
H
RUS
I
http://www.monomachines.com/
@
~~eRr~~t:f\nL,,~
hics
Products
.
Office
and
Grap
Quality
®
intimu5

D
26SC2
26CC3
32SC2
32CC3
38SC2
38CC3
38CC4
50SC2
50CC3
50CC4
WICHTIGE SICHERHEITSHINWEISE INBETRIEBNAHME
<< Das Gerät darf nicht von mehreren Perso-
nen gleichzeitig bedient werden!
Die Auslegung der Sicherheitselemente
beruhen auf einer gefahrlosen Bedienung
im “Einmannbetrieb“.
<< Während des Zerkleinerungsvorganges
dürfen keine andere Arbeiten (z. B.
Reinigung etc.) an der Maschine getätigt
werden!
<< Die Maschine ist kein Spielzeug und für
EinsatzundBenutzungdurchKindernicht
geeignet!
DiesicherheitstechnischeGesamtkonzeption
(Abmessungen, Zuführöffnungen, Sicher-
heitsabschaltungen etc.) dieser Maschine
beinhaltet keinerlei Garantien einer gefahr-
losen Handhabung durch Kinder.
BEDIENUNG
BEDIENUNGSELEMENTE:
1 = Wippschalter „Ein / Aus“ (Abb. 2)
Mit diesem Schalter wird die Maschine ein-
bzw. ausgeschaltet.
2 = Funktionstaster (Abb. 1)
„Betriebsbereit“/„Sleep“/„Stopp“
Dieser Taster beinhaltet drei Funktionen:
a) „Betriebsbereit“-Modus
Bei kurzem Tippen dieses Tasters im
„Sleep“-Modus wird die Maschine in den
„Betriebsbereit“-Modus geschaltet.
Im „Betriebsbereit“-Modus leuchtet
gleichzeitig die integrierte LED-Anzeige
auf.
a) „Sleep“-Modus
Wird dieser Taster im „Betriebsbereit“-
Modusca.3Sek.langgedrücktgehalten,
wird die Maschine in den „Sleep“-Modus
geschaltet.
Hinweis: Bei Nichtbenutzung der Ma-
schine über einen Zeitraum von ca. 30
Min. schaltet die Maschine automatisch
in den „Sleep“-Modus.
b) „Stopp“-Funktion
Bei kurzem Tippen dieses Tasters bei
laufendem Schneidwerk wird dieses
abgeschaltet und steht.
3 = Vorwärtstaster (Abb. 1)
Dieser Taster beinhaltet zwei Funktionen:
a) Bei kurzem Tippen dieses Tasters läuft
das Schneidwerk für ein paar Sekunden
vorwärts, z.B. um im Schneidwerk ver-
bliebenes Schnittgut herauszuführen.
<< Verletzungsgefahr! Lose Teile
von Bekleidung, Krawatten,
Schmuck, langes Haar, oder
andere lose Gegenstände von
der Einlaßöffnung fernhalten!
<< Verletzungsgefahr! Nicht mit den Fingern
in die Einlaßöffnung fassen!
<< Im Gefahrenfalle die Maschine am Haupt-
schalter,oderNot-Aus-Schalterausschal-
ten, oder den Netzstecker ziehen!
<< Vor dem Öffnen der Maschine ist der
Netzstecker zu ziehen!
Reparaturen dürfen nur von einem Fach-
mann durchgeführt werden!
b) Wird dieser Taster ca. zwei Sek. lang
gedrücktgehalten,läuftdasSchneidwerk
imDauerbetriebvorwärtsunddieMaschi-
ne kann beschickt werden. Gleichzeitig
leuchtet die integrierte LED-Anzeige
auf.
4 = Rückwärtstaster (Abb. 1)
Bei Betätigung dieses Tasters läuft das
Schneidwerkrückwärts.Gleichzeitigleuchtet
die integrierte LED-Anzeige auf.
Hinweis:DasSchneidwerkläuftnursolange
rückwärts,wie derTaster gedrücktgehalten
wird (Tastfunktion).
5 = Lichtschranke (Vorwärtslauf) (Abb. 3)
Startet den Zerkleinerungsvorgang sobald
MaterialineinenderbeidenZuführschächte
eingeführt wird.
6 = Kontroll-Anzeige
„Materialstau“ (Abb. 1)
Leuchtetauf,wenndemSchneidwerkzuviel
Materialzugeführtwurde.DasSchneidwerk
blockiert, läuft anschließend ein Stückweit
rückwärts und steht. Der Motor wird abge-
schaltet.
7 = Kontroll-Anzeige
„Schneidwerk ölen“ (Abb. 1)
Leuchtet auf, wenn das Schneidwerk der
Cross-Cut-Versiongeöltwerdenmuß(siehe
unter „WARTUNG SCHNEIDWERK“).
8 = Kontroll-Anzeige
„Behälter fehlt“ (Abb. 1)
Leuchtet auf, wenn der Auffangbehälter
nicht vollständig eingeschoben ist. Die Ma-
schinewirdbeiHerausnahmedesBehälters
automatisch abgeschaltet und kann ohne
eingeschobenen Behälter nicht gestartet
EINSATZBEREICH:
DerDatenshredderintimus 26SC2/CC3 / 32SC2/
CC3/38SC2/CC3/CC4/50SC2/CC3/CC4ist eine
MaschinezumZerkleinernallgemeinenSchriftgu-
tes sowie Datenträgern wie CD’s, DVD’s, Kredit-
karten und 3,5”-Disketten (nur Modelle 38/50).
Die Maschine darf nur zur Zerkleine-
rungvonPapierundKreditkartensowie
zur Zerkleinerung von CD’s, DVD’s
und 3,5”-Disketten (Modelle 38/50)
verwendet werden!
Die Zerkleinerung andersartiger Daten-
träger können Schäden am Gerät (z.B.
Zerstörung des Schneidwerkes etc.) zur
Folge haben.
AUFSTELLUNG:
- Gerät auspacken und aufstellen.
- Plastiksack in den Auffangbehälter einsetzen.
- Gerät mit Netzstecker am Stromnetz anschlie-
ßen (Angaben über die erforderliche Vorsiche-
rung der Netzsteckdose siehe „TECHNISCHE
DATEN“).
Der Netzanschluß der Maschine muß
frei zugängig sein und sollte sich in der
Nähe der Maschine befinden!
Die Maschine sollte nur in geschlos-
senen und temperierten (10-25°C)
Räumen eingesetzt werden!
BEDIENUNG
9 = Kontroll-Anzeige
„Motorüberlastung“ (Abb. 1)
Leuchtetauf,wennderMotorüberlastetwor-
den ist und abgeschaltet hat. Die Maschine
kannwährend derAbkühlphase des Motors
nicht gestartet werden.
10 = Kontroll-Anzeige
„Benutzersperre aktiviert“ (Abb. 1)
Leuchtet auf, wenn die Benutzersperre
aktiviertist.ZurDeaktivierungderBenutzer-
sperresieheBeschreibungunterder Rubrik
„EINSCHALTEN DER MASCHINE“.
11 = Kontroll-Anzeige
„Behälter voll“ (Abb. 1)
Leuchtet auf, wenn derAuffangbehälter ge-
fülltistundgeleertwerdenmuß.Gleichzeitig
wird die Maschine automatisch abgeschal-
tet.
12 = Papierzuführschacht (Abb. 3)
13 = Sicherheits-Zuführschacht (Abb. 3)
14 = Auffangbehälter Papier (Abb. 4)
15 = Auffangschale CD/DVD (Abb. 4)
16 = Stützfuß (Abb. 4)
17 = Ölbehälter (Abb. 6)
Der Shredder darf auf keinen Fall als
Sitzgelegenheit oder als Trittfläche
verwendet werden. Sturzgefahr durch
Materialbruch!
werden.
3
9
10
11
4
13
12
6
7
8
2
1
5
Abb. 1 Abb. 2 Abb. 3
2
http://www.monomachines.com/
intimu5
&
(I)~
,~
~
•
®&
.\
t•
+

D
26SC2
26CC3
32SC2
32CC3
38SC2
38CC3
38CC4
50SC2
50CC3
50CC4
BEDIENUNG
Modelle intimus 38 / intimus 50
UmauchfürdiesegrößervolumigenMaschi-
neneinensicherenStandzugewährleisten,
müssen vor dem Einsatz die vier Stützfüße
(16) (Abb. 4) am Gehäuseboden bis zum
Fußboden hin herausgedreht werden!
EINSCHALTEN DER MASCHINE:
Hinweis: BeiAnlieferung der Maschine ist die Funktion
der Benutzersperre ausgeschaltet.
Informationen zum Ein- und Ausschalten der Benut-
zersperre entnehmen Sie bitte der Beschreibung unter
„EINSATZ DER BENUTZERSPERRE“.
Zum Einschalten der Maschine auf „betriebsbereit“
gehen Sie entsprechend der aktuell programmierten
Einstellung wie folgt vor:
Einstellung „Benutzersperre ausgeschaltet“
- Maschine am Wippschalter (1) einschalten (Stellung
„1“).
- Funktionstaster (2) kurz betätigen.
- DieLED-Anzeige desFunktionstasters(2)leuchtet
auf für „Betriebsbereit“.
- Die Maschine kann beschickt werden.
Einstellung „Benutzersperre eingeschaltet“
Hinweis: Zum Einschalten der Maschine wird im nach-
folgenden Ablauf die eingeschaltete Benutzersperre
kurzzeitig deaktiviert.
- Maschine am Wippschalter (1) einschalten (Stellung
„1“).
- Funktionstaster (2) kurz betätigen.
- Die Kontroll-Anzeige „Benutzersperre aktiviert“
(10) leuchtet auf.
- Vorwärtstaster (3) und Rückwärtstaster (4) gleichzeitig
für ca. 2 Sek. gedrückt halten.
- Die LED-Anzeige des Funktionstasters (2) blinkt
für „nicht betriebsbereit“.
- Funktionstaster (2) kurz betätigen.
- DieLED-Anzeige desFunktionstasters(2)leuchtet
jetzt permanent für „Betriebsbereit“. Die Kontroll-An-
zeige (10) erlischt.
- Die Maschine kann beschickt werden.
Hinweis: Bei wiederholtem Einschalten der Maschine
ausdem„Sleep-Modus“mussdieeingeschalteteBenut-
zersperre jeweils neu deaktiviert werden.
MATERIALZUFÜHRUNG:
Papier durch den Papierzuführschacht (12) (Abb. 3)
dem Schneidwerk zuführen.
Datenträger (CD, DVD oder Kreditkarte) einzeln durch
den separat angeordneten Sicherheits-Zuführschacht
(13) (Abb. 3) dem Schneidwerk zuführen.
Maschine schaltet automatisch auf Vorwärtslauf, zieht
dasMaterial ein undschaltet nachdem Zerkleinerungs-
vorgang automatisch ab.
Während der Zuführung von Papier nie-
mals gleichzeitig CD/DVD zuführen und
umgekehrt!
3
9
10
11
4
6
7
8
2
Hinweise: Fürdie Zerkleinerungvonlichtdurchlässigen
Folien muss die Maschine von Hand auf Vorwärtslauf
geschaltet werden (Vorwärtstaster (3) ca. 2 Sek. ge-
drückt halten).
DurchkurzeBetätigungdesFunktionstasters(2)(„Stopp“-
Funktion) kann der Zerkleinerungsvorgang jederzeit
gestoppt werden. Zum Fortfahren den Vorwärtstaster
(3) ca. 2 Sek. gedrückt halten.
Bei Nichtbenutzung der Maschine über einen Zeit-
raum von ca. 30 Min. schaltet sie automatisch in den
„Sleep“-Modus. Ist die Benutzersperre eingeschaltet,
muss diese beim Wiedereinschalten der Maschine neu
deaktiviert werden (siehe unter „EINSCHALTEN DER
MASCHINE“).
Führen Sie dem Gerät niemals mehr als die
angegebene Höchstmenge Material (siehe
„TECHNISCHE DATEN“) zu!
Sollte trotzdem zuviel Material in das Schneid-
werkgelangtsein,siehebei„STÖRUNG“unter
„MATERIALSTAU IM GERÄT“.
ENTLEEREN DES
AUFFANGBEHÄLTERS (Abb. 4):
Für eine korrekte Mülltrennung sorgt der zweiteilige
Auffangbehälter.ErbestehtausdemPapierbehälter(14)
selbstundeinerseparatangeordnetenAuffangschale(15)
für die zerkleinerten CD‘s, DVD‘s und Kreditkarten.
Der Füllstand der Auffangschale (15) wird
nicht durch die Korbvollüberwachung
angezeigt!
Bei der Zerkleinerung größerer Mengen CD’s/
DVD’s (ca. 25 Stück pro Füllung) kontrollieren
Sie bitte hin und wieder den Füllstand der
Auffangschale und entleeren, falls erforderlich
die Schale zwischenzeitlich separat.
Ist der Auffangbehälter für Papier gefüllt, schaltet die
Maschine ab. Die Kontroll-Anzeige (11) leuchtet auf.
Gehen Sie wie folgt vor:
- Den Auffangbehälter (14) mit Auffangschale (15) aus
dem Gehäuse-Unterteil herausziehen. Die Kontroll-
Anzeige (8) leuchtet auf und die Kontroll-Anzeige
(11) erlischt.
- Den Inhalt beider Behältnise jeweils getrennt entsor-
gen.
- Den entleerten Behälter mit aufgesetzterAuffangschale
wieder in das Gehäuse-Unterteil einschieben. Die
Kontroll-Anzeige (8) erlischt. Ist noch Material in
einem der Zuführschächte vorhanden, leuchtet jetzt
die Kontroll-Anzeige (6) auf.
- Betätigen Sie kurz den Vorwärtstaster (3). Das restli-
che Material wird zerkleinert und die Anzeige (6)
erlischt.
Hinweis: Die Maschine läuft nur bei vollständig einge-
schobenem Auffangbehälter!
DYNAMISCHE BELASTUNGSANZEIGE:
Modelle intimus 38 / intimus 50
Um einen Materialstau zu vermeiden und somit eine
kontinuierlicheundeffektiveVernichtungderDatenträger
zuerreichen,wirdwährenddesZerkleinerungsvorgangs
der momentane Belastungsgrad des Motors durch ein
farbig abgestimmtes, diffuses Licht im Zuführschacht
wie folgt angezeigt:
Grünes Licht: Belastung < 50%
Gelbes Licht: Belastung 50 - 75%
Rotes Licht: Belastung 75 - 100%
MANUELLER „SLEEP“-MODUS:
Durch Gedrückthalten des Funktionstasters (2) von
ca. 3 Sek. im betriebsbereiten Zustand, wird die Ma-
schine manuell in den „Sleep“-Modus geschaltet. Bei
eingeschalteter Benutzersperre wird gleichzeitig die
Verriegelungsfunktion der Benutzersperre aktiviert. Die
Maschinekannnichtgestartetwerden.UmdieBenutzer-
sperre zu deaktivieren lesen Sie unter „EINSCHALTEN
DER MASCHINE“.
EINSATZ DER BENUTZERSPERRE:
Progammiermodus aktivieren:
Um in den Programmiermodus zu gelangen muß die
Maschine „betriebsbereit“ geschaltet sein (siehe unter
„EINSCHALTEN DER MASCHINE“).
Gehen Sie wie folgt vor:
- Auffangbehälter (14) so weit herausziehen bis die
Kontroll-Anzeige (8) aufleuchtet.
- Vorwärtstaster (3) ca. 4 Sek. gedrückt halten. Die
integrierte LED-Anzeige blinkt.
Sie befinden sich jetzt im Programmiermodus.
Hinweis: Ist die Programmierung nicht innerhalb des
Programmierzeitfenstersvonca.20Sek.abgeschlossen,
so kehrt die Maschine automatisch in den „Betriebsbe-
reit“-Modus zurück.
Programmierfolge Benutzersperre einschalten:
- Programmiermodus aktivieren (siehe oben).
- Vorwärtstaster (3) und Rückwärtstaster (4) gleichzeitig
betätigenundgedrückthaltenbisdieKontroll-Anzeigen
(10), (2) und (4) blinken.
- Behälter wieder einschieben.
DieProgrammierungisterfolgt.DerProgrammiermodus
wird automatisch verlassen. Zur Wahrnehmung der
QuittierungderProgrammierungblinkendieKontroll-An-
zeigen (10), (2) und (4) noch ca. 5 Sek. nach.
Programmierfolge Benutzersperre ausschalten:
- Programmiermodus aktivieren (siehe oben).
- Vorwärtstaster (3) und Rückwärtstaster (4) gleichzeitig
betätigenundgedrückthaltenbisdieKontroll-Anzeigen
(10) und (4) blinken.
- Behälter wieder einschieben.
DieProgrammierungisterfolgt.DerProgrammiermodus
wird automatisch verlassen. Zur Wahrnehmung der
Quittierung der Programmierung blinken die Kontroll-
Anzeigen (10) und (4) noch ca. 5 Sek. nach.
15
14
16
Abb. 1 Abb. 4
3
http://www.monomachines.com/
6
intimu5
+
A@6
@
6@6
6
I!J
@
CJ
I!J

D
26SC2
26CC3
32SC2
32CC3
38SC2
38CC3
38CC4
50SC2
50CC3
50CC4
STÖRUNG
MATERIALSTAU IM GERÄT:
(Auto-Reverse-Funktion)
Ergibt sich durch zuviel zugeführtes Material ein Stau,
reagiert die Maschine wie folgt:
- Das Schneidwerk blockiert, läuft anschließend ein
Stückweit rückwärts (Material wird freigegeben) und
steht. Der Motor wird abgeschaltet.
- Die Kontroll-Anzeige (6) leuchtet auf.
Gehen Sie wie folgt vor:
Papierstau im Papierzuführschacht (12)
- Zurückgeführtes Papier aus dem Zuführschacht (12)
entnehmen.
- Schneidwerk läuft jetzt automatisch vorwärts und zer-
kleinert den im Schneidwerk verbliebenen Papierrest.
- Die Kontroll-Anzeige (6) erlischt. Die LED-Anzeige
des Vorwärtstasters (3) leuchtet permanent.
- Die Zerkleinerung mit geringerer Papiermenge fortset-
zen.
Materialstau im Sicherheits-Zuführschacht (13)
- Zurückgeführtes Material entnehmen.
Material mit Bedacht entnehmen, da
Verletzungsgefahr durch scharfkantige
Schnittstellen!
- Das restliche Schnittgut wird jetzt automatisch dem
Schneidwerk erneut zugeführt und zerkleinert.
- Die Kontroll-Anzeige (6) erlischt. Die LED-Anzeige
des Vorwärtstasters (3) leuchtet permanent.
- Ist das Schnittgut durchgelaufen, die Zerkleinerung in
der richtigen Dosierung fortsetzen.
- Falls erforderlich, das Schneidwerk manuell abwech-
selnd solange auf Vorwärts- und Rückwärtslauf schal-
ten, bis das Schnittgut vollständig durchgelaufen und
zerkleinert ist.
Bei jedem Umschalten der Laufrichtung
warten bis der Motor still steht!
MOTORSCHUTZ:
SolltederMotor überfordertwerden,so schalteterab. Die
Kontroll-Anzeige (9) blinkt. Schalten Sie das Gerät am
Wippschalter (1) aus.
Nach einer Abkühlzeit von ca. 25-40 Minuten (je nach
Modell und Raumtemperatur) können Sie das Gerät
erneut starten.
CHECKLISTE BEI STÖRUNGEN:
Sollte das Gerät nicht funktionieren, prüfen Sie folgende
Punkte:
- ist der Netzstecker am Netz angeschlossen?
- ist der Wippschalter (1) eingeschaltet?
- ist das Gerät im „Sleep“-Modus?
Siehe unter „ENERGIESPAR-AUTOMATIK“.
- ist die Benutzersperre aktiviert worden?
Siehe unter „EINSATZ DER BENUTZERSPERRE“.
- ist der Auffangbehälter eingeschoben?
- ist der Auffangbehälter voll?
Folgen Sie den Instruktionen bei „ENTLEEREN DES
AUFFANGBEHÄLTERS“.
- ist ein Materialstau im Gerät?
Folgen Sie den Instruktionen bei „MATERIALSTAU IM
GERÄT“.
- ist der Motor überlastet worden?
Siehe unter „MOTORSCHUTZ“.
WennkeinederPrüfpunktezutreffen,benachrichtigen
Sie bitte Ihren Fachhändler.
WARTUNG / ENTSORGUNG
REINIGUNG DER FOTOZELLEN (Abb. 5):
Sollten Papierstücke im Einlaßschlitz zum Liegen
kommen (z. B. nach einem Papierstau) ist es möglich,
daß das Gerät durch die „belegte“ Lichtschranke nicht
mehr ausschaltet.
Sie können die Papierstücke entfernen, bzw. die
Fotozelle reinigen, indem Sie dem Schneidwerk ein
weiteres Blatt Papier zuführen, oder die Maschine auf
RückwärtslaufschaltenundmiteinemPinselkurzüber
die beiden „Augen“ der Fotozelle wischen.
Abb. 5
17
Abb. 6
WARTUNG SCHNEIDWERK (CROSS-CUT):
Cross-Cut-Schneidwerke müssen nach einer
bestimmten Betriebszeit geölt werden.
LeuchtetdieKontroll-Anzeige (7)auf,gehen
Sie wie folgt vor:
Auffangbehälter (14) herausziehen, Ölbehälter (17)
(Abb. 6) aus der Halterung im Unterschrank nehmen
und Behälter wieder einschieben.
Etwas Öl auf einem Blatt Papier verteilen und dieses
danndurchdenPapierzuführschacht(12)demSchneid-
werk zuführen.
Das Papier wird eingezogen und das Öl gelangt so in
das Schneidwerk.
Quittierung Sie die Ölzuführung wie folgt:
- Auffangbehälter (14) so weit herausziehen bis die
Kontroll-Anzeige (8) aufleuchtet.
- Die Kontroll-Anzeigen (7) und (4) blinken.
- Rückwärtstaster (4) betätigen und gedrückt halten
bis die Kontroll-Anzeige (7) erlischt.
- Behälter wieder einschieben.
Das Schneidwerk beginnt nun automatisch den Reini-
gungszyklus(Vorwärtslauf/Rückwärtslauf)undschaltet
dann ab. Die Maschine ist wieder einsatzbereit. Im
Falle der Nachbestellung des Spezialöls siehe unter
„SONDERZUBEHÖR“.
ENERGIESPAR-AUTOMATIK:
Wirddie Maschine füreineWeilenicht benutztschaltet
sie automatisch nach ca. 30 Min. in den sogenannten
„Sleep“-Modus. Die LED-Anzeige des Funktions-
tasters (2) für „Betriebsbereit“ erlischt. Zum Wieder-
einschalten den Funktionstaster kurz betätigen. Ist
die Benutzersperre eingeschaltet, muss diese beim
WiedereinschaltenderMaschineneudeaktiviertwerden
(siehe unter „EINSCHALTEN DER MASCHINE“).
ENTSORGUNG DER MASCHINE:
Entsorgen Sie die Maschine am Ende ihrer
Lebensdauerstetsumweltgerecht.GebenSie
keineTeilederMaschineoderderVerpackung
in den Hausmüll.
TECHNISCHE DATEN
Modell Schnittbreite
Papier / CD,DVD Schneidleistung
Papier / CD,DVD Arbeitsbreite Leistung Geräuschpegel Aussetzbetrieb
EIN / AUS Abmessungen
B x T x H Gewicht
intimus 26SC2 4 mm / 6 mm 13 Blatt* / 1 Stück 235 mm 0,44 kW ca. 55 dB(A) 10 / 45 min 380 x 330 x 550 mm 16 kg
intimus 26CC3 4x28 mm / 6 mm 9 Blatt* / 1 Stück 235 mm 0,44 kW ca. 55 dB(A) 10 / 45 min 380 x 330 x 550 mm 18 kg
intimus 32SC2 4 mm/ 6 mm 17 Blatt* / 1 Stück 235 mm 0,55 kW ca. 55 dB(A) 10 / 45 min 390 x 360 x 600 mm 19 kg
intimus 32CC3 4x28 mm / 6 mm 12 Blatt* / 1 Stück 235 mm 0,55 kW ca. 55 dB(A) 10 / 45 min 390 x 360 x 600 mm 21 kg
intimus 38SC2 4 mm / 6 mm 22 Blatt* / 1 Stück 245 mm 0,74 kW ca. 55 dB(A) 30 / 90 min 420 x 380 x 700 mm 29 kg
intimus 38CC3 4x28 mm / 6 mm 16 Blatt* / 1 Stück 245 mm 0,74 kW ca. 55 dB(A) 30 / 90 min 420 x 380 x 700 mm 30 kg
intimus 38CC4 1,9x15 mm / 6 mm 13 Blatt* / 1 Stück 245 mm 0,74 kW ca. 55 dB(A) 30 / 90 min 420 x 380 x 700 mm 30 kg
intimus 50SC2 4 mm / 6 mm 26 Blatt* / 1 Stück 260 mm 0,75 kW ca. 55 dB(A) 30 / 90 min 450 x 390 x 800 mm 33 kg
intimus 50CC3 4x28 mm / 6 mm 19 Blatt* / 1 Stück 260 mm 0,75 kW ca. 55 dB(A) 30 / 90 min 450 x 390 x 800 mm 33 kg
intimus 50CC4 1,9x15 mm / 6 mm 15 Blatt* / 1 Stück 260 mm 0,90 kW ca. 55 dB(A) 30 / 90 min 450 x 390 x 800 mm 35 kg
Modell Netzanschlußdaten
Anschlußspannung / Frequenz / Stromaufnahme
intimus 26SC2 220V-240V/50Hz, 2,0A 120V/60Hz, ---- A 100V/50/60Hz, ---- A
intimus 26CC3 220V-240V/50Hz, 2,0 A 120V/60Hz, ----A 100V/50/60Hz, ---- A
intimus 32SC2 220V-240V/50Hz, 2,5A 120V/60Hz, ---- A 100V/50/60Hz, ---- A
intimus 32CC3 220V-240V/50Hz, 2,5 A 120V/60Hz, ----A 100V/50/60Hz, ---- A
intimus 38SC2 220V-240V/50Hz, 3,0A 120V/60Hz, ---- A 100V/50/60Hz, ---- A
intimus 38CC3 220V-240V/50Hz, 3,0 A 120V/60Hz, ----A 100V/50/60Hz, ---- A
intimus 38CC4 220V-240V/50Hz, 3,0 A 120V/60Hz, ----A 100V/50/60Hz, ---- A
intimus 50SC2 220V-240V/50Hz, 2,9A 120V/60Hz, ---- A 100V/50/60Hz, ---- A
intimus 50CC3 220V-240V/50Hz, 2,9 A 120V/60Hz, ----A 100V/50/60Hz, ---- A
intimus 50CC4 220V-240V/50Hz, 3,5 A 120V/60Hz, ---- A 100V/50/60Hz, ---- A
* bezogen auf A4-Papier 70g/m2bei 230V/50Hz -10%
SONDERZUBEHÖR
Benennung Best.-Nr.
Plastiksack, 300x300x700x0,018 mm (26/32) 99925
Plastiksack, 440x330x950x0,05 mm (38/50) 99977
Ölbehälter, 110 ml 88035
Hinweis: Bei Nachbestellung von Sonderzubehörteilen
und bei Ersatzteilbedarf wenden Sie sich bitte an Ihren
Fachhändler.
4
http://www.monomachines.com/
+
•
intimu5

GB
26SC2
26CC3
32SC2
32CC3
38SC2
38CC3
38CC4
50SC2
50CC3
50CC4
IMPORTANT SAFETY NOTES INITIATION
<< Themachinemaynotbeoperatedbymore
than one person at any given time!
Themachinewasdesignedforsafeoperation
by “one person only”.
<< During the shredding process no other
work may be performed on the machine
(for example cleaning, etc.)!
<< Themachineisnotatoy,andisnotsuitable
for use by children!
The overall technical safety concept of
this machine (dimensions, feed openings,
emergency shutdown devices etc.) does not
provide for any guarantee regarding hazard-
free operation by children.
OPERATION
CONTROLS:
1 = Rocker switch “On/Off” (fig. 2)
The machine is switched on and off with
this switch.
2 = Function button (fig. 1)
“Ready”/”Sleep”/”Stop”
This button has three functions:
a) “Ready” mode
If this button is pressed briefly in “Sleep”
mode, the machine is switched to
“Ready” mode.
In “Ready” mode, the integrated LED
display lights simultaneously.
a) “Sleep” mode
If this button is pressed and held for
approx. 3 secs. in Ready mode, the
machine is switched to “Sleep” mode.
Note: If the machine is not used for a
period of approx. 30 mins., it switches
automatically to “Sleep” mode.
b) “Stop” function
If this button is pressed when the cutting
mechanism is running, the mechanism
is switched off and stops.
3 = Forwards button (fig. 1)
This button has two functions:
a) If this button is pressed briefly, the
cutting mechanism runs forwards for a
few seconds, e.g. to remove remaining
material from the cutting mechanism.
<< Danger of injury! Keep all
loose articles of clothing, ties,
jewelery,longhairorotherloose
objects away from opening!
<< Danger of injury! Never insert fingers into
opening!
<< In case of danger switch the machine off
with the mains switch, or with the emer-
gency switch, or unplug the machine!
<< Always unplug the machine from the
mains power supply before opening the
machine!
Repairsmayonly be performed bytrained
personnel!
b) If this button is pressed and held
for approx. two secs., the cutting
mechanism runs forwards continually
and materials to be shredded can be fed
into the machine. At the same time the
integrated LED display lights up.
4 = Backwards button (fig. 1)
When this button is pressed briefly, the
cutting mechanism runs backwards. At the
same time the integrated LED display
lights up.
Note: The cutting mechanism only runs
backwards as long as the button is held
(touch function).
5 = Light barrier (forwards running) (fig. 3)
The shredding operation starts as soon
as material is fed into one of the two feed
slots.
6 = Control display “material jam“ (fig. 1)
Lights if too much material is fed into the
cuttingmechanism. Thecuttingmechanism
halts, then runs one step in reverse and
stops. The motor switches off.
7 = Control display
“Oil cutting mechanism” (fig. 1)
Lights up when the cutting mechanism of
the Cross-Cut version has to be oiled (see
“Maintenance cutting mechanism”).
8 = Control display
“Receptacle missing” (fig. 1)
Lights up when the receptacle is not placed
properly under the machine. The machine
is switched off automatically when the
receptacle is removed and cannot be
started if the receptacle is not placed
SCOPE OF APPLICATION:
The intimus 26SC2/CC3 / 32SC2/CC3 / 38SC2/
CC3/CC4 / 50SC2/CC3/CC4 data shredder is
designed for shredding general printed material
and data media such as CDs, DVDs, credit cards
and 3.5” diskettes (only models 38/50).
This machine should only be used
for shredding paper and credit cards
and for shredding CDs, DVDs and 3.5”
diskettes (models 38/50)!
Any attempt to shred other types of data
medium may result in damage to the
machine (e.g. destruction of the cutting
mechanism etc.).
INSTALLATION:
- Unpack and set machine upright.
- Place plastic sack into the receptacle.
- Plug in the machine (for instructions for the
necessary precautions see „TECHNICAL
DATA“).
The socket outlet shall be installed
neartheequipmentandshallbe easily
accessible!
Only operate the machine in enclosed
rooms at temperatures between 10°C
and 25°C!
OPERATION
9 = Control display
“Motor overload” (fig. 1)
Lights up when the motor has been
overloaded and has switched off. The
machine cannot be started during the
cooling down phase of the motor.
10 = Control display
“User interlock activated” (fig. 1)
Lights up when the user interlock is
activated. To activate the user interlock,
see description in the section “
OPERATING
THE MACHINE
”.
11 = Control display
“Receptacle full” (fig. 1)
Lights up when the receptacle is full and
must be replaced. At the same time the
machine is automatically switched off.
12 = Paper feed slot (fig. 3)
13 = Safety feed slot (fig. 3)
14 = Paper receptacle (fig. 4)
15 = Collection tray CD/DVD (fig. 4)
16 = Support foot (fig. 4)
17 = Oil receptacle (fig. 6)
The shredder may not be used as a
step ladder or as a seat. Danger of
falling due to breakage!
properly under the machine.
3
9
10
11
4
13
12
6
7
8
2
1
5
fig. 1 fig. 2 fig. 3
5
http://www.monomachines.com/
intimu5
~
(i)~
I
<t)
,
•
•
I
•
®
,t
i•
+

GB
26SC2
26CC3
32SC2
32CC3
38SC2
38CC3
38CC4
50SC2
50CC3
50CC4
OPERATION
Models intimus 38 / intimus 50
In order to also ensure stability for
these larger machines, the four
support feet (16) (Fig. 4) on the base
of the housing must be turned out
towards the floor!
OPERATING THE MACHINE:
Note: Whenthe machineisdelivered, thefunction
of the user interlock is switched off.
For information on activating the user interlock,
please refer to the description in “OPERATION
OF THE USER INTERLOCK”.
To switch the machine into „ready-to-operate“
continue depending on the actual programmed
mode as follows:
Mode “User interlock switched off”
- Switch machine on with rocker switch (1)
(position “1”).
- Briefly press function button (2).
- The LED display of the function button (2)
lights up for “Ready”. The machine can be
loaded.
Mode “User interlock switched on”
Note: While switching on the machine subject to
the procedure described below, the user interlock
will be temporarily deactivated.
- Switch machine on with rocker switch (1)
(position “1”).
- Briefly press function button (2).
- The Control display “User interlock activated”
(10) lights up.
- Keepforwards button(3) and backwardsbutton
(4) pressed simultaneously for approx. 2 secs.
- The LED display of the function button (2)
flashes for “not ready”.
- Briefly press function button (2).
- The LED display of the function button (2)
is now permanently lit for “Ready”. The control
display (10) goes out.
The machine can be loaded.
Note: When the machine is switched on again
from the “Sleep” mode, the activated user
interlock must be deactivated again.
MATERIAL FEED:
Feed paper into the cutting mechanism through
the paper feed slot (12) (Fig. 3).
Feed data carriers (CD, DVD or credit card)
into the cutting mechanism individually into the
separate safety feed slot (13) (Fig. 3).
The machine automatically switches to forwards
running, draws the material in and automatically
switches off after shredding.
When shredding papers, do not shred
CD/DVD at the same time, and vice
versa!
3
9
10
11
4
6
7
8
2
Note: For shredding transparent films, the
machine must be manually switched to forwards
running (press and hold the forwards button (3)
for approx. 2 secs.).
By briefly pressing the function button (2) (Stop
function), the shredding process can be stopped
at any time. To continue, press and hold the
forwards button (3) for approx. 2 secs.
If the machine is not used for a period of approx.
30 mins., it automatically switches to “Sleep”
mode. If the user interlock is switched on, it
must be deactivated again when the machine
is switched on again (see “OPERATING THE
MASCHINE”).
Neverfeedtheshredderwithaquantity
of material exceeding the maximum
indicated. Refer to the TECHNICAL
DATA section!
Should the machine become
overloaded, follow the instructions under
“MATERIAL JAM IN MACHINE” under
“MALFUNCTIONS”.
EMPTYING THE RECEPTACLE (fig. 4):
Atwo compartmentreceptacle ensuresthat waste
is separated. It consists of a paper receptacle
(14) and a separate collection tray (15) for the
shredded CDs, DVDs and credit cards.
The fill level of the collection tray
(15) is not displayed by the control
display!
When shredding large quantities of
CDs/DVDs (approx. 25 per load), please
check the fill level of the collection
tray occasionally and empty the tray
separately as required.
If the receptacle for paper is full, the machine
switches off. The control display (11) lights up.
Proceed as follows:
- Pull the receptacle (14) with the collection
tray (15) out of the lower housing. The control
display (8) lights up and the control display
(11) goes out.
- Dispose of the contents of the containers
separately.
- Push the empty receptacle with the collection
tray back into the lower housing. The control
display (8) goes out. If there is still material in
one of the feed slots, the control display (6)
now lights up.
- Briefly press the forwards button (3). The
remaining material is shredded and the display
(6) goes out.
Note:The machine only runs when the receptacle
is fully pushed in!
DYNAMIC LOAD DISPLAY:
Models intimus 38 / intimus 50
To prevent a material jam and thus ensure a
continual, effective destruction of the data carriers,
the current load level of the motor is displayed
during the shredding process by a coloured,
diffuse light in the feed slot as follows:
Green light: load < 50%
Yellow light: load 50 - 75%
Red light: load 75 - 100%
MANUAL “SLEEP” MODE:
By keeping the function button (2) pressed for
approx. 3 secs. in “Ready” mode, the machine
is manually switched to “Sleep” mode. When the
user interlock is switched on, the locking function
of the user interlock is simultaneously activated.
The machine cannot be started. In order to
deactivate the user interlock, please refer to
“OPERATING THE MASCHINE”.
OPERATION OF THE USER INTERLOCK:
Set programming mode:
To enter programming mode, the machine must
be switched to “Ready” (see “OPERATING THE
MASCHINE”).
Proceed as follows:
- Pull out receptacle (14) until the control display
(8) lights up.
- Press and hold forwards button (3) for approx.
4 secs. The integrated LED display flashes.
You are now in programming mode.
Note: If programming is not completed within the
programming time window of approx. 20 secs.,
the machine automatically returns to “Ready”
mode.
Programming sequence
to switch user interlock on:
- Set programming mode (see above).
- Pressforwardsbutton (3)andbackwards button
(4) simultaneously and keep them pressed until
the control displays (10), (2) and (4)
flash.
- Push receptacle in again.
Programming is complete. Programming mode is
switched off automatically. The control displays
(10), (2) and (4) continue to flash for approx.
5 secs to indicate completion of programming.
Programming sequence
to switch user interlock off:
- Set programming mode (see above).
- Pressforwardsbutton (3)andbackwards button
(4) simultaneously and keep them pressed until
the control displays (10) and (4) flash.
- Push receptacle in again.
Programming is complete. Programming mode is
switched off automatically. The control displays
(10) and (4) continue to flash for approx. 5 secs
to indicate completion of programming.
15
14
16
fig. 1 fig. 4
6
http://www.monomachines.com/
6
6
G
intimu5
®6
G

GB
26SC2
26CC3
32SC2
32CC3
38SC2
38CC3
38CC4
50SC2
50CC3
50CC4
MALFUNCTIONS
MATERIAL JAM IN THE MACHINE:
(Auto-reverse function)
If a jam is caused by feeding in too much material, the
machine reacts as follows:
- The cutting mechanism is blocked, then runs briefly
in reverse (material is released) and stops. The
motor is switched off.
- The control display (6) lights up.
Proceed as follows:
Paper jam in paper feed slot (12)
- Remove released paper from the feed slot (12).
- Cutting mechanism now runs forwards automatically
and shreds the remaining paper in the cutting
mechanism.
- The control display (6) goes out. The LED display
of the forwards button (3) is permanently lit.
- Continue shredding with lower quantity of paper.
Material jam in safety feed slot (13)
- Remove released material.
Take care when removing material as
sharp edges may cause injury!
- The remaining material is now automatically fed into
the cutting mechanism again and shredded.
- The control display (6) goes out. The LED display
of the forwards button (3) is permanently lit.
- When the material has run through, continue
shredding with correct quantities.
- If necessary, operate the cutting mechanism manually
forwards and backwards alternately until the material
has completely run through and has been shredded.
Wait each time until the motor stops
before switching direction!
MOTOR PROTECTION:
If the motor is overloaded, it switches off. The control
display (9) flashes. Switch the machine off with the
rocker switch (1).
After a cooling down period of approx. 25-40 minutes
(depending on the model and room temperature), you
can switch the machine on again.
CHECKLIST IN THE EVENT OF FAULTS:
If the machine does not work, check the following
points:
- is the mains plug connected to the mains?
- is the rocker switch (1) switched on?
- is the machine in “Sleep” mode?
See “AUTOMATIC ENERGY SAVING”.
- has the user interlock been activated?
See “OPERATION OF THE USER INTERLOCK”.
- is the receptacle pushed in?
- is the receptacle full?
Follow the instructions in “EMPTYING THE
RECEPTACLE”.
- is there a material jam in the machine?
Follow the instructions in “MATERIAL JAM IN THE
MACHINE”.
- Has the motor been overloaded?
See “MOTOR PROTECTION”.
If none of the above applies, please contact your
dealer.
MAINTENANCE / DISPOSING
CLEANING THE PHOTOCELLS (Fig. 5):
If paper particles should come to rest in the inlet
guide (for example after a paper jam) it is possible
that the machine will not turn off, due to the broken
light barrier.
To remove these paper strips and also to clean the
photocell, pass another sheet of paper through the
feed slot, or switch the machine to reverse and wipe
both “eyes” of the photocell with a brush.
17
fig. 5 fig. 6
MAINTENANCE OF THE
CUTTING MECHANISM (CROSS-CUT):
Cross-cut cutting mechanisms must be oiled
after a certain operating time.
If the control display (7) lights up, proceed
as follows:
Pull out receptacle (14), take oil receptacle (17) (Fig.
6) out of the holder in the lower cabinet and push
receptacle in again.
Spread some oil on a sheet of paper and then feed
it into the cutting mechanism through the paper feed
slot (12).
The paper is drawn in and the oil thus gets into the
cutting mechanism.
Carry out oil supply as follows:
- Pull out receptacle (14) until the control display
(8) lights up.
- The control displays (7) and (4) flash.
- Press backwards button (4) and keep pressed until
the control display (7) goes out.
- Push receptacle in again.
The cutting mechanism now automatically begins
the cleaning cycle (forwards operation/backwards
operation) and then switches off. The machine is
ready again. To re-order the special oil, see “SPECIAL
ACCESSORIES”.
AUTOMATIC ENERGY-SAVING:
If the machine is not used for a while, it automatically
switches to the so-called “Sleep” mode after approx.
30 mins. The LED display of the function button
(2) for “Ready” goes out. To switch on again, briefly
press the function button. If the user interlock is
switched on, it must be deactivated again when the
machine is switched on again (see “OPERATING THE
MACHINE”).
DISPOSING OF THE MACHINE:
Disposeofthe machineinan environmentally
friendlyfashion at theend ofits usefulservice
life. Do not dispose of any of the parts
included in the machine or its packaging with
household waste.
TECHNICAL DATA
Model Cutting width
paper / CD,DVD Cutting capacity
paper / CD,DVD Working width Power Noise level Intermittent operation
ON / OFF Dimensions
W x D x H Weight
intimus 26SC2 4 mm / 6 mm 13 sheets* / 1 piece 235 mm 0.44 kW app. 55 dB(A) 10 / 45 min 380 x 330 x 550 mm 16 kg
intimus 26CC3 4x28 mm / 6 mm 9 sheets* / 1 piece 235 mm 0.44 kW app. 55 dB(A) 10 / 45 min 380 x 330 x 550 mm 18 kg
intimus 32SC2 4 mm/ 6 mm 17 sheets* / 1 piece 235 mm 0.55 kW app. 55 dB(A) 10 / 45 min 390 x 360 x 600 mm 19 kg
intimus 32CC3 4x28 mm / 6 mm 12 sheets* / 1 piece 235 mm 0.55 kW app. 55 dB(A) 10 / 45 min 390 x 360 x 600 mm 21 kg
intimus 38SC2 4 mm / 6 mm 22 sheets* / 1 piece 245 mm 0.74 kW app. 55 dB(A) 30 / 90 min 420 x 380 x 700 mm 29 kg
intimus 38CC3 4x28 mm / 6 mm 16 sheets* / 1 piece 245 mm 0.74 kW app. 55 dB(A) 30 / 90 min 420 x 380 x 700 mm 30 kg
intimus 38CC4 1.9x15 mm / 6 mm 13 sheets* / 1 piece 245 mm 0.74 kW app. 55 dB(A) 30 / 90 min 420 x 380 x 700 mm 30 kg
intimus 50SC2 4 mm / 6 mm 26 sheets* / 1 piece 260 mm 0.75 kW app. 55 dB(A) 30 / 90 min 450 x 390 x 800 mm 33 kg
intimus 50CC3 4x28 mm / 6 mm 19 sheets* / 1 piece 260 mm 0.75 kW app. 55 dB(A) 30 / 90 min 450 x 390 x 800 mm 33 kg
intimus 50CC4 1.9x15 mm / 6 mm 15 sheets* / 1 piece 260 mm 0.90 kW app. 55 dB(A) 30 / 90 min 450 x 390 x 800 mm 35 kg
* based on A4-paper 70g/m² at 230V/50Hz – 10%
Model Power supply data
supply voltage / frequency / current consumption
intimus 26SC2 220V-240V/50Hz, 2.0 amps 120V/60Hz, ---- amps 100V/50/60Hz, ---- amps
intimus 26CC3 220V-240V/50Hz, 2.0 amps 120V/60Hz, ---- amps 100V/50/60Hz, ---- amps
intimus 32SC2 220V-240V/50Hz, 2.5 amps 120V/60Hz, ---- amps 100V/50/60Hz, ---- amps
intimus 32CC3 220V-240V/50Hz, 2.5 amps 120V/60Hz, ---- amps 100V/50/60Hz, ---- amps
intimus 38SC2 220V-240V/50Hz, 3,0 amps 120V/60Hz, ---- amps 100V/50/60Hz, ---- amps
intimus 38CC3 220V-240V/50Hz, 3,0 amps 120V/60Hz, ---- amps 100V/50/60Hz, ---- amps
intimus 38CC4 220V-240V/50Hz, 3,0 amps 120V/60Hz, ---- amps 100V/50/60Hz, ---- amps
intimus 50SC2 220V-240V/50Hz, 2,9 amps 120V/60Hz, ---- amps 100V/50/60Hz, ---- amps
intimus 50CC3 220V-240V/50Hz, 2,9 amps 120V/60Hz, ---- amps 100V/50/60Hz, ---- amps
intimus 50CC4 220V-240V/50Hz, 3,5 amps 120V/60Hz, ---- amps 100V/50/60Hz, ---- amps
SPECIAL ACCESSORIES
Description Order-No.
Plastic bag, 300x300x700x0.018 mm (26/32) 99925
Plastic bag, 440x330x950x0.05 mm (38/50) 99977
Lubricant, 110 ml bottle 88035
Note: For orders of special accessories and spare parts,
please contact your dealer.
7
http://www.monomachines.com/
+
•
intimu5

26SC2
26CC3
32SC2
32CC3
38SC2
38CC3
38CC4
50SC2
50CC3
50CC4
F
RECOMMANDATIONS IMPORTANTES DE SÉCURITÉ MISE EN MARCHE
<< La machine ne doit pas être utilisée par
plusieurs personnes en même temps!
La conception des éléments de sécurité
repose sur une mise en service sans danger
pour“L’utilisationdelamachineparuneseule
personne”.
<< Ne pas effectuer d’autres activités sur la
machine (par ex. nettoyage...) durant le
procédé de destruction!
<< Lamachinen’estpasunjouetetneconvient
pas pour être utilisée par des enfants!
Le concept global de sécurité (dimensions,
orifices d‘alimentation, mises hors circuit de
sécurité, etc.) de cette machine ne fournit
aucune garantie pour une manipulation sans
danger par les enfants.
UTILISATION
ELEMENTS DE COMMANDE :
1 = Commutateur bistable « Marche/Arrêt »
(Fig. 2)
Cecommutateur permet de mettre enmarche
ou d’arrêter la machine.
2 = Touche de fonction (Fig. 1)
« Prêt à fonctionner » / « Sleep » /
« Arrêt »
Cette touche comporte trois fonctions :
a) Mode « Prêt à fonctionner »
Une frappe brève sur cette touche ramène
la machine du mode « Sleep » au mode
« Prêt à fonctionner ».
Enmode « Prêt à fonctionner », l’affichage
LED intégré s’allume simultanément.
a) Mode « Sleep »
Une pression d’env. 3 secondes sur cette
touche ramène la machine du mode « Prêt
à fonctionner » au mode « Sleep ».
Remarque :Encasdenonfonctionnement
de la machine pendant un laps de
temps d’env. 30 min, la machine se met
automatiquement en mode « Sleep ».
b) Fonction « Arrêt »
Une frappe brève sur cette touche en
coursdefonctionnementdublocdecoupe,
éteint le bloc de coupe qui s’immobilise.
3 = Touche marche avant (Fig. 1)
Cette touche comporte deux fonctions :
a) Une frappe brève sur cette touche fait
avancer le bloc de coupe pour quelques
secondes,par ex.pour extrairedumatériel
à découper resté dans le bloc de coupe.
<< Risquedeblessure!N’approchez
jamaisdublocdecoupelesvête-
mentsamples,colliers,cheveux
longs, cravates etc!
<< Risque de blessure! N’introduisez jamais
les doigts dans l’ouverture!
<< En cas de danger, arrêter la machine
par l’interrupteur principal, ou par
l’interrupteur d’urgence, ou débranchez
la machine!
<< Débrancher le raccordement réseau avant
d’ouvrir l’installation!
Les travaux de réparation doivent être
effectués uniquement par un spécialiste!
b) En maintenant cette touche enfoncée
pendant env. deux secondes, le bloc de
coupe tourne en marche avant de façon
permanente et il est possible de charger la
machine. Simultanément, l’affichage LED
intégré s’allume.
4 = Touche marche arrière (Fig. 1)
L’activation de cette touche fait reculer le bloc
de coupe. Simultanément, l’affichage LED
intégré s’allume.
Remarque : Le bloc de coupe fonctionne en
marche arrière aussi longtemps que cette
touche est maintenue enfoncée (touche de
fonction).
5 = Barrière lumineuse (marche avant) (Fig.
3)
Démarre l’opération de broyage dès que du
matériel est introduit dans l’une des deux
fentes d’introduction.
6 = Affichage de contrôle
« Bourrage de matériel » (Fig. 1)
S’allume lorsque le bloc de coupe a été
alimenté d’une quantité trop importante de
matériel. Le bloc de coupe se bloque, recule
ensuite un peu en arrière et s’immobilise. Le
moteur est éteint.
7 = Affichage de contrôle
« Lubrifier bloc de coupe » (Fig. 1)
S’allume lorsque le bloc de coupe du
modèle Cross-Cut doit être lubrifié (voir sous
« ENTRETIEN DU BLOC DE COUPE »).
8 = Affichage de contrôle
« Récipient manque » (Fig. 1)
S’allume lorsque le récipient collecteur n’est
pas introduit complètement. La machine
s’éteint automatiquement lors du retrait du
récipient et ne peut pas être démarrée avant
DOMAINES D’UTILISATION:
Le destructeur de données intimus 26SC2/CC3 /
32SC2/CC3 / 38SC2/CC3/CC4 / 50SC2/CC3/CC4 est
une machine conçue pour détruire les documents en
général ainsi que les supports de données tels que les
CD, les DVD, les cartes de crédit et les disquettes de
3,5” (uniquement les modèles 38/50).
Lamachinedoitexclusivementêtreutilisée
pour la destruction de papier et de cartes
de crédit ainsi que pour la destruction de
CD, de DVD et de disquette de 3,5” (les
modèles 38/50)!
La destruction d’autres types de supports
de données peut entraîner des dommages
à l’appareil (par exemple destruction du bloc
de coupe, etc.).
INSTALLATION:
- Déballer et installer la machine.
- Mettre le sac en plastique dans la corbeille.
- Brancher la machine (voir les données de sécurité
électrique sous „CARACTÉRISTQUES TECHNI-
QUES“).
Le branchement électrique doit être à
proximité de la machine et facilement
accessible!
L’installationdoitêtremiseenplaceobliga-
toirement dans un local fermé et tempéré
(10 - 25 °C)!
UTILISATION
9 = Affichage de contrôle
« Surcharge du moteur » (Fig. 1)
S’allume lorsque le moteur est surchargé
et qu’il s’est éteint. En cours de phase
de refroidissement du moteur, il n’est pas
possible de démarrer la machine.
10 = Affichage de contrôle
« Blocage utilisateur activé » (Fig. 1)
S’allume lorsque la fonction de blocage
utilisateur est activée. Pour désactiver la
fonction de blocage utilisateur, consulter la
descriptionsousla rubrique « ENCLENCHER
LA MACHINE ».
11 = Affichage de contrôle
« Récipient plein » (Fig. 1)
S’allume lorsque le récipient collecteur est
plein et qu’il faut le vider. Simultanément,
la machine se met automatiquement hors
circuit.
12 = Fente d’introduction de papier (Fig. 3)
13 = Fente d’introduction de sécurité (Fig. 3)
14 = Récipient collecteur de papier (Fig. 4)
15 = Bac collecteur CD/DVD (Fig. 4)
16 = Pied d’appui (Fig. 4)
17 = Récipient d’huile (Fig. 6)
Le destructeur ne doit pas servir
d’escabeauoudesiège.Risquededégâts
de matériels!
d’introduire un récipient.
3
9
10
11
4
13
12
6
7
8
2
1
5
fig. 1 fig. 2 fig. 3
8
http://www.monomachines.com/
intimu5
&
(})(f)
&
~
~
,
•
®
.t
i•
+

F
26SC2
26CC3
32SC2
32CC3
38SC2
38CC3
38CC4
50SC2
50CC3
50CC4
UTILISATION
Modèles intimus 38 / intimus 50
Afin de garantir également la stabilité de
ces machines volumineuses, il convient
avant d’utiliser la machine de faire sortir
les quatre pieds d’appui (16) (Fig. 4) situés
sur le plancher du boîtier en les dévissant
jusqu’au sol !
ENCLENCHEMENT DE LA MACHINE :
Remarque :Lors delalivraison delamachine, lafonction
de blocage pour l’utilisateur est désactivée.
Consulter la description sous « UTILISATION DE LA
FONCTION DE BLOCAGE UTILISATEUR » pour obtenir
lesinformations concernantl’activation etla désactivation
de la fonction de blocage utilisateur.
Pour enclencher la machine sur le mode « Prêt à
fonctionner », procédez conformément au réglage
actuellement programmé comme suit :
Réglage « Blocage utilisateur désactivé »
- Enclencher la machine à l’aide du commutateur
bistable (1) (Position « 1 »).
- Enfoncer brièvement la touche de fonction (2).
- L’affichage LED de la touche de fonction (2)
s’allume sur « Prêt à fonctionner ».
- Il est possible maintenant de charger la machine.
Réglage « Blocage utilisateur activé »
Remarque : Pour allumer la machine, dans l’étape
suivante la fonction activée de blocage utilisateur est
brièvement désactivée.
- Enclencher la machine à l’aide du commutateur
bistable (1) (Position « 1 »).
- Enfoncer brièvement la touche de fonction (2).
- L’affichage de contrôle « Blocage utilisateur activé »
(10) s’allume.
- Appuyer simultanément pendant env. 2 secondes les
touches de marche avant (3) et de marche arrière (4).
- L’affichage LED de la touchede fonction(2)clignote
pour indiquer « Pas prêt à fonctionner ».
- Enfoncer brièvement la touche de fonction (2).
- L’affichage LED de la touche de fonction (2)
s’allume maintenant en permanence pour indiquer
« Prêt à fonctionner ». L’affichage de contrôle (10)
s’éteint.
- Il est possible maintenant de charger la machine.
Remarque : Lors d’un enclenchement répété de la
machinehorsdumode« Sleep »,ilconvientdedésactiver
chaque fois la fonction activée de blocage utilisateur.
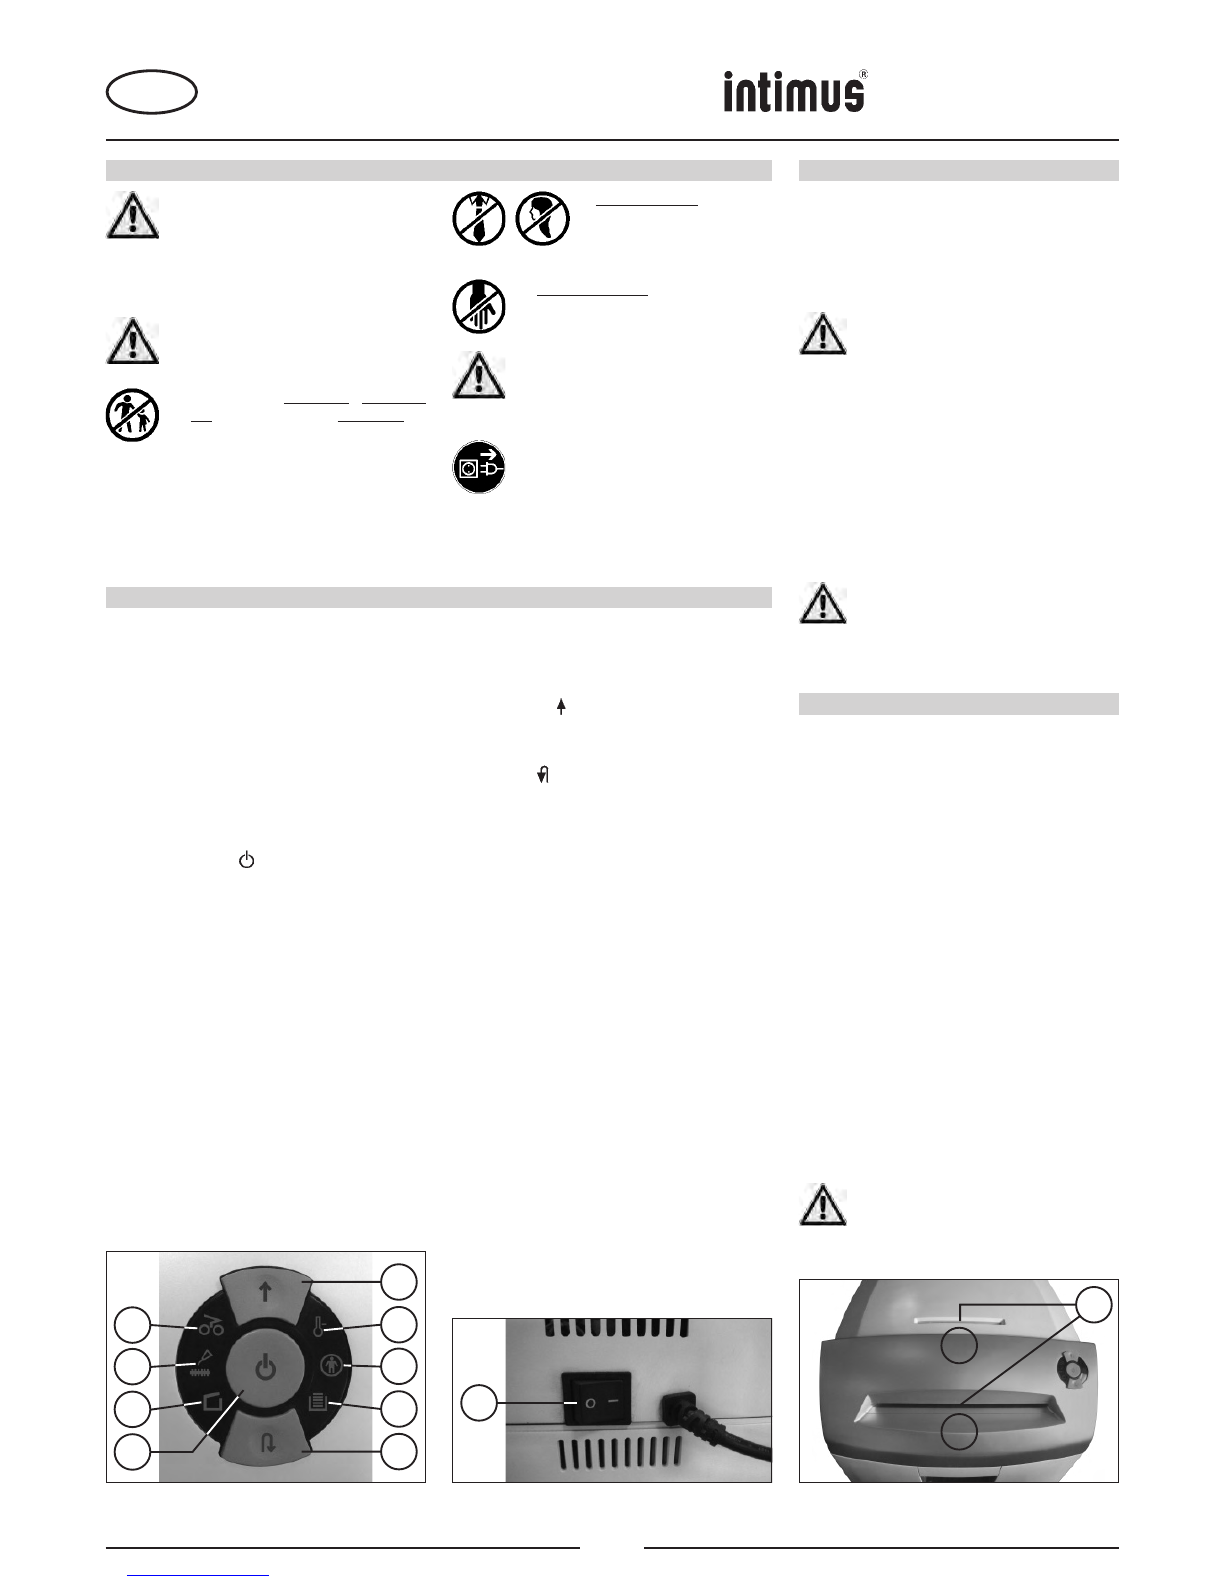
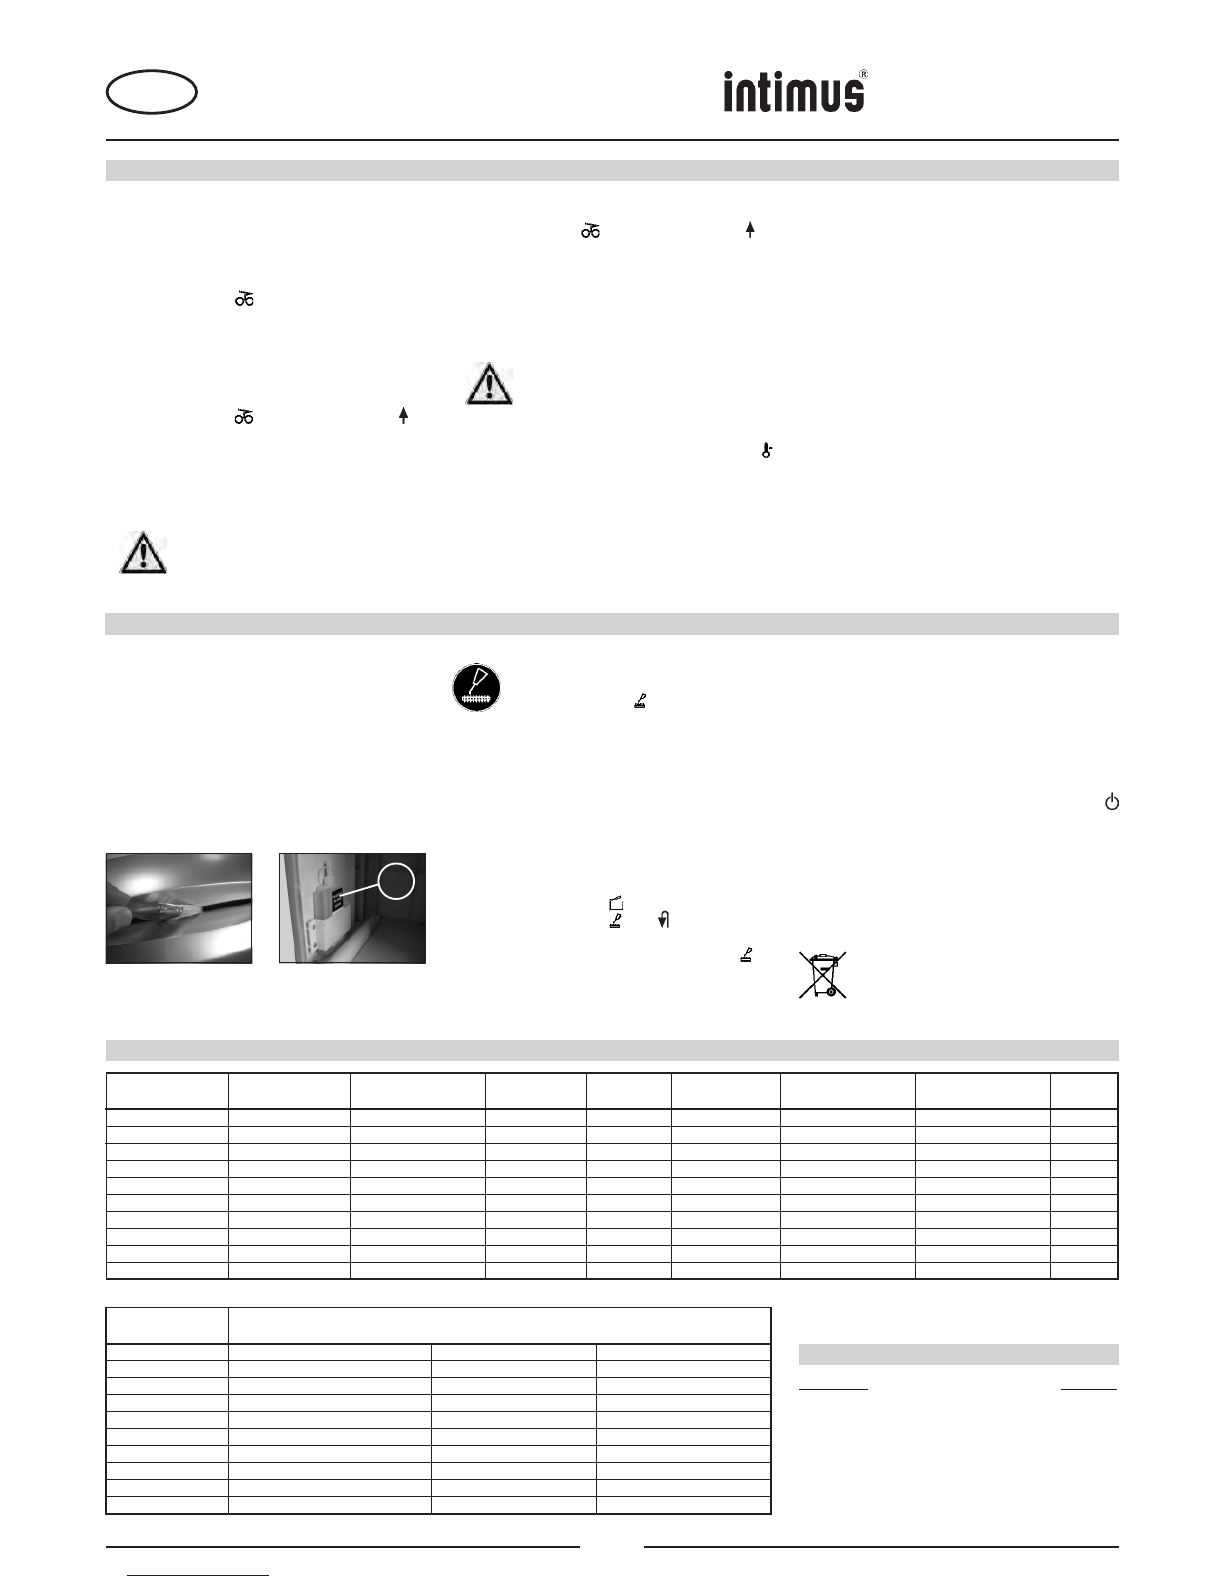
INTRODUCTION DE MATÈRIEL :
Introduire du papier dans le bloc de coupe par la fente
d’introduction pour papier (12) (Fig. 3).
Introduire un à un des supports de données (CD, DVD
ou cartes de crédit) dans le bloc de coupe par la fente
d’introduction de sécurité séparée (13) (Fig. 3).
La machine s’enclenche automatique en marche avant,
aspire le matériel et se met automatiquement hors circuit
dès l’opération de broyage terminée.
Nepas détruire lepapieret CD/DVDen même
temps et vice versa!
3
9
10
11
4
6
7
8
2
Remarque : Pour broyer des films transparents, la
machine doit être enclenchée manuellement en marche
avant (enfoncer la touche de marche avant (3) pendant
environ 2 secondes).
Une frappe brève sur la touche de fonction (2) (fonction
« arrêt ») permet d’arrêter l’opération de broyage à tout
moment. Appuyer pendant env. 2 secondes la touche de
marche avant (3) pour poursuivre.
En cas de non fonctionnement de la machine pendant
un laps de temps d’env. 30 min, la machine se met
automatiquement en mode « Sleep ». Si la fonction de
blocage utilisateur est activée, il convient de la désactiver
à nouveau lors du ré-enclenchement de la machine (voir
sous « ENCLENCHEMENT DE LAMACHINE »).
N’alimentezjamaislamachined’unequantité
de matériel supérieure à celle indiquée (voir
« CARACTERISTIQUES TECHNIQUES ») !
Si malgré tout une trop grande quantité
de matériel est introduire dans le bloc de
coupe, voir les instructions de « PANNES »
sous « BLOCAGE DE MATERIEL DANS
L’APPAREIL ».
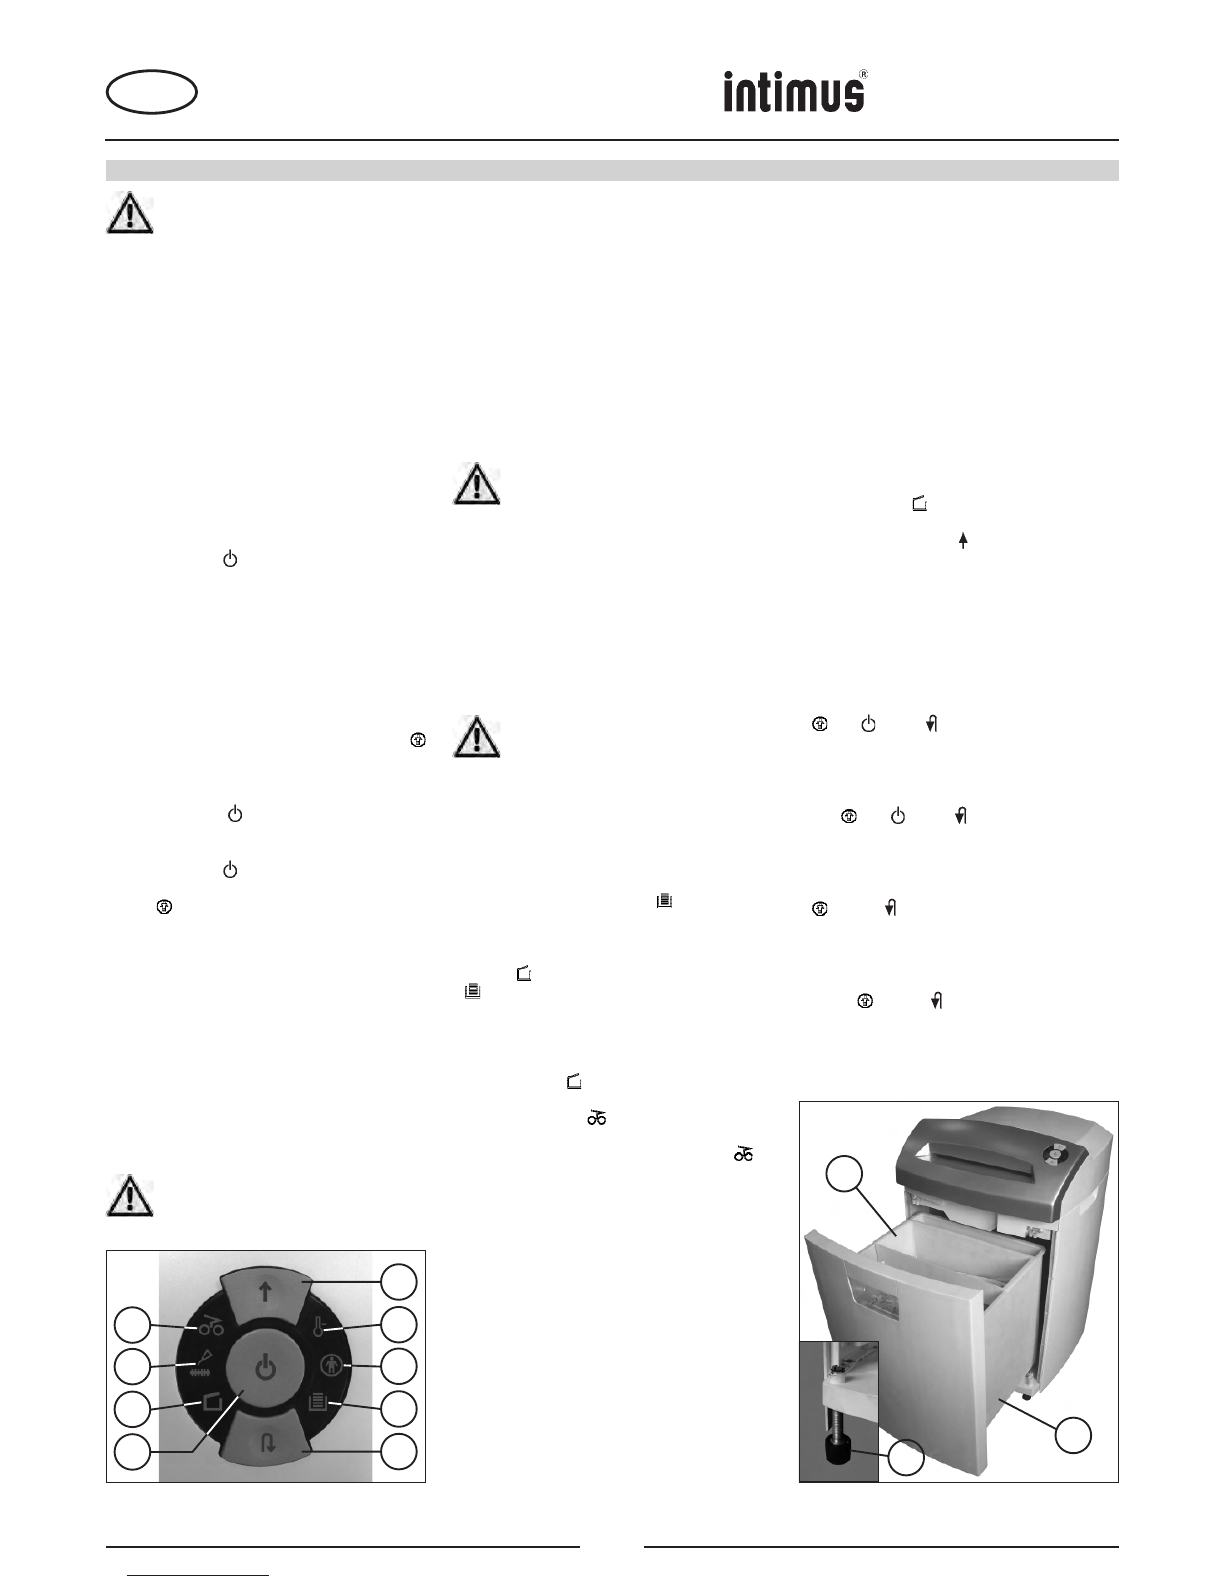
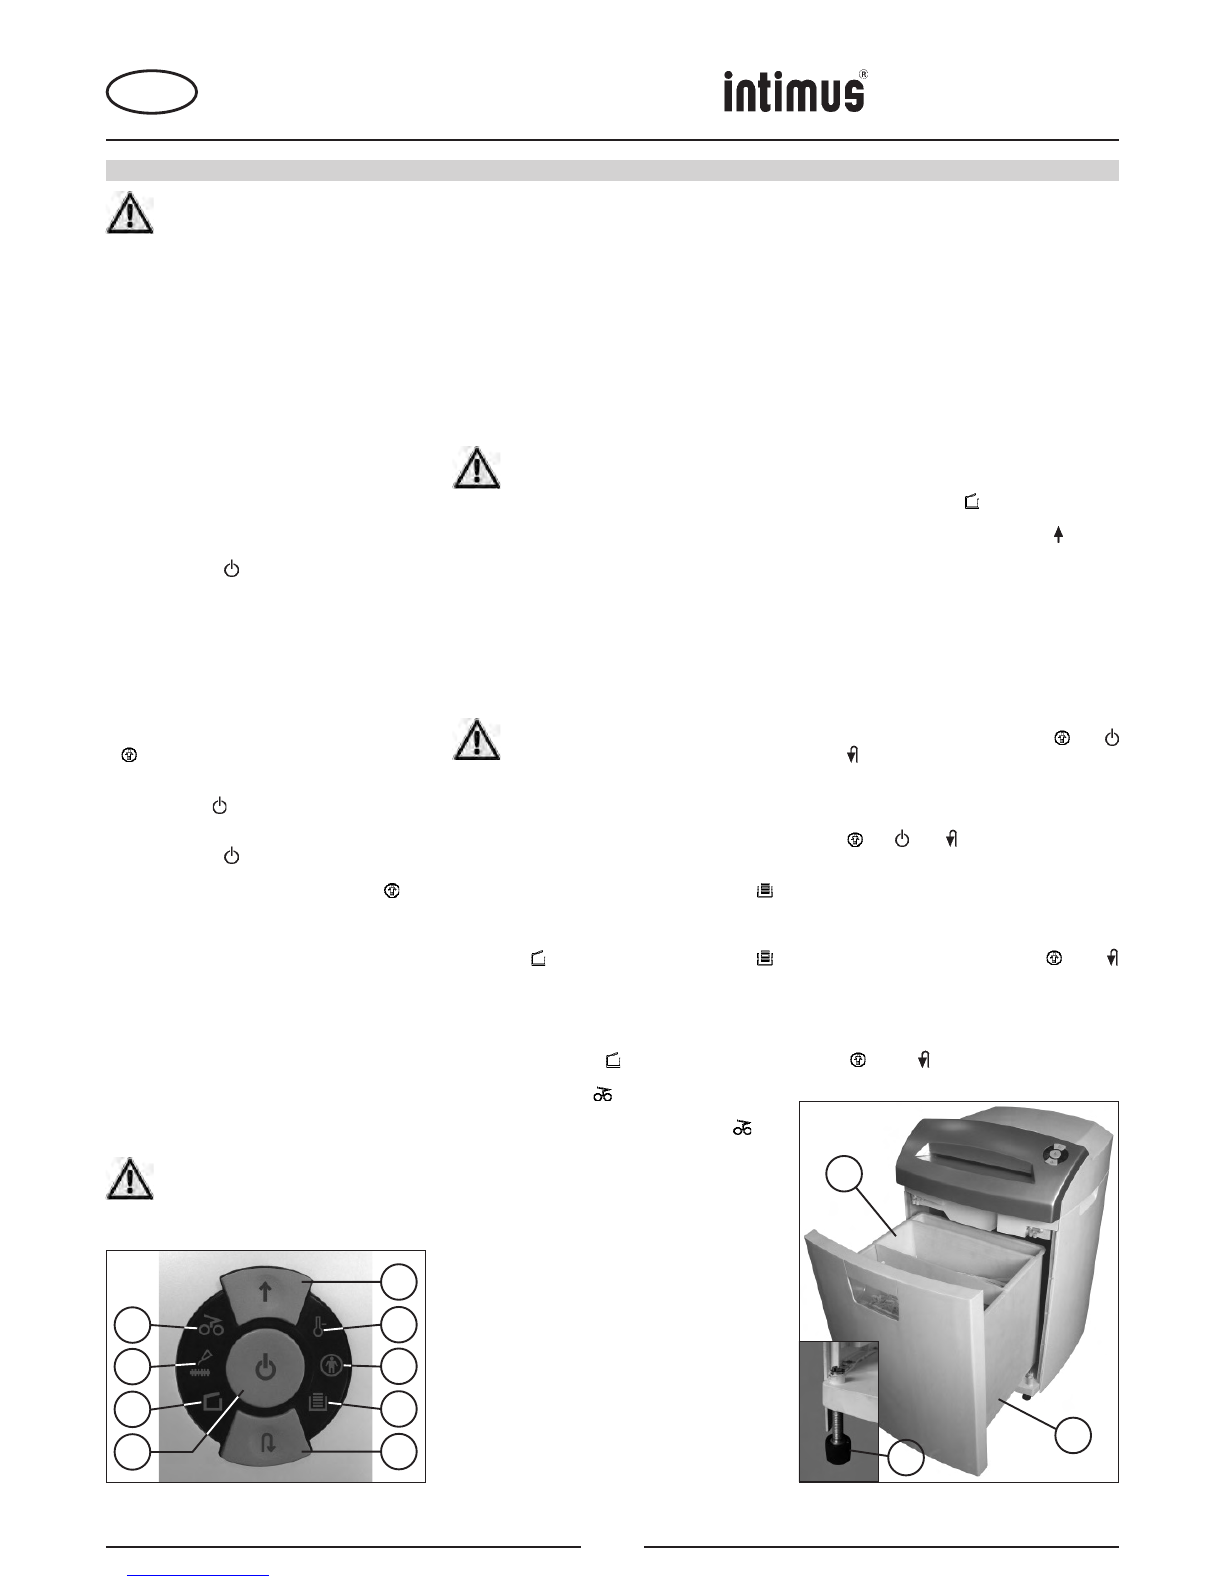
VIDER LE RECIPIENT COLLECTEUR (Fig. 4) :
Le récipient collecteur en deux pièces veille à la
séparation correcte des déchets. Il comprend le récipient
pour papier même (14) et un bac collecteur agencé
séparément (15) destiné aux CD, DVD et cartes de crédit
broyés.
Le niveau de remplissage du bac collecteur
(15) n’est pas indiqué par le dispositif de
contrôle de récipient collecteur plein !
Lors du broyage de plus grandes quantités
de CD/DVD (env. 25 pièces par séquence),
contrôler de temps en temps le niveau de
remplissage du bac collecteur et si nécessaire,
vider entre temps le bac.
Lorsque le récipient collecteur pour papier est plein, la
machine se met hors circuit. L’affichage de contrôle
(11) s’allume. Procédez comme suit :
- Extraire le récipient collecteur (14) avec le bac
collecteur (15) hors du caisson du boîtier. L’affichage
de contrôle (8) s’allume et l’affichage de contrôle
(11) s’éteint.
- Eliminer séparément le contenu respectif des deux
récipients.
- Insérer à nouveau dans le caisson du boîtier le récipient
vidé avec le bac collecteur agencé séparément.
L’affichage de contrôle (8) s’éteint. Si l’une des
fentes d’introduction contient encore du matériel,
l’affichage de contrôle (6) s’allume.
- Confirmez brièvement la touche de marche avant (3).
Le matériel résiduel sera broyé et l’affichage (6)
s’éteint.
Remarque : La machine fonctionne uniquement lorsque
le récipient collecteur est entièrement inséré !
AFFICHAGE DYNAMIQUE DE CHARGE :
Modèles intimus 38 / intimus 50
Afin d’éviter un blocage de matériel et obtenir une
destruction continue et efficace des supports de
données, le degré momentané de charge du moteur en
cours d’opération de broyage est signalisé dans la fente
d’introduction par une lumière diffuse colorée de façon
correspondante :
Lumière verte : Charge < 50 %
Lumière jaune : Charge 50 – 75 %
Lumière rouge : Charge 75 – 100 %
MODE MANUEL « SLEEP » :
En maintenant la touche de fonction (2) enfoncée
pendant env. 3 secondes dans le mode « Prêt à
fonctionner », la machine est ramenée manuellement
vers le mode « Sleep ». Lorsque le blocage utilisateur
est enclenché, la fonction de verrouillage du blocage
utilisateur est simultanément activée. Il est alors
impossible de démarrer la machine. Pour désactiver le
blocage utilisateur, lire la description sous la rubrique
« ENCLENCHER LA MACHINE ».
UTILISATION DU BLOCAGE UTILISATEUR :
Activer le mode de programmation :
Pour parvenir au mode de programmation, la machine
doit se trouver en position « Prêt à fonctionner » (voir
sous « ENCLENCHEMENT DE LAMACHINE »).
Procédez comme suit :
- Extraire le récipient collecteur (14) aussi loin jusqu’à ce
que l’affichage de contrôle (8) s’allume.
- Appuyer pendant env. 4 secondes sur la touche de
marche avant (3). L’affichage LED intégré clignote.
Vous vous trouvez maintenant en mode de
programmation.
Remarque : Si la programmation n’est pas terminée
dans le laps de temps de programmation d’environ 20
secondes, la machine retourne automatiquement vers le
mode « Prêt à fonctionner ».
Etapes de programmation pour activer le blocage
utilisateur :
- Activer le mode de programmation (voir ci-dessus).
- Actionner simultanément les touches de marche avant
(3) et de marche arrière (4) et les maintenir enfoncées
jusqu’à ce que les affichages de contrôle (10),
(2) et (4) clignotent.
- Insérer à nouveau le récipient.
La programmation est terminée. Le mode de
programmation est quitté automatiquement. Pour valider
la confirmation de la programmation, les affichages de
contrôle (10), (2) et (4) clignotent encore environ
5 secondes.
Etapes de programmation pour désactiver le blocage
utilisateur :
- Activer le mode de programmation (voir ci-dessus).
- Actionner simultanément les touches de marche avant
(3) et de marche arrière (4) et les maintenir enfoncées
jusqu’à ce que les affichages de contrôle (10) et
(4) clignotent.
- Insérer à nouveau le récipient.
La programmation est terminée. Le mode de
programmation est quitté automatiquement. Pour valider
la confirmation de la programmation, les affichages de
contrôle (10) et (4) clignotent encore environ 5
secondes.
15
14
16
fig. 1 fig. 4
9
http://www.monomachines.com/
6
6
6
,
•
intimu5
+
@6

26SC2
26CC3
32SC2
32CC3
38SC2
38CC3
38CC4
50SC2
50CC3
50CC4
F
COMMENT REMEDIER AUX PETITES PANNES
BLOCAGE DE MATERIEL DANS L’APPAREIL :
(Fonction auto-reverse)
En présence d’un blocage provoqué par une trop grande quantité
de matériel, la machine réagit comme suit :
- Le bloc de coupe se bloque, recule ensuite un peu en arrière
(la matériel est libéré) et s’immobilise. Le moteur est éteint.
- L’affichage de contrôle (6) s’allume.
Procédez comme suit :
Bourrage de papier dans la fente d’introduction de papier
(12)
- Extraire le papier bloqué hors de la fente d’introduction (12).
- Le bloc de coupe avance maintenant automatiquement et
broie le résidu de papier resté dans le bloc de coupe.
- L’affichage de contrôle (6) s’éteint. L’affichage LED de
la touche de marche avant (3) s’allume en permanence.
- Continuer le broyage avec une quantité moins importante de
papier.
Blocage de matériel dans la fente d’introduction de sécurité
(13)
- Retirer le matériel bloqué.
Retirer le matériel avec précaution car risque
de blessure sur les arêtes vives des points de
coupe !
- Le matériel à couper résiduel est maintenant introduit
automatiquement dans le bloc de coupe et est broyé.
- L’affichage de contrôle (6) s’éteint. L’affichage LED de
la touche de marche avant (3) s’allume en permanence.
- Si le matériel à couper est passé, poursuivre le broyage en
dosant la quantité correctement.
- Si nécessaire, permuter manuellement le bloc de coupe en
alternance de marche avant et marche arrière jusqu’à ce que
la matière à couper soit passée entièrement et qu’elle soit
broyée.
Lors de l’alternance du sens de marche,
attendre que le moteur soit au repos !
PROTECTION DU MOTEUR :
Lemoteur secoupe s’ilest trop sollicité.L’affichagedecontrôle
(9) clignote. Mettre l’appareil hors circuit à l’aide du commutateur
bistable (1).
Après un temps de refroidissement d’env. 25 à 40 minutes
(suivant le modèle et la température de la pièce), vous pouvez à
nouveau démarrer la machine.
LISTE DE CONTROLE EN CAS DE PANNES :
Si l’appareil ne fonctionne pas, vérifier les points suivants :
- La fiche secteur est-elle raccordée au réseau ?
- Le commutateur bistable (1) est-il enclenché ?
- L’appareil se trouve-t-il en mode « Sleep » ?
Voir sous « ECONOMIE AUTOMATIQUE D’ENERGIE ».
- Le blocage utilisateur est-il activé ?
Voir sous « UTILISATION DU BLOCAGE UTILISATEUR ».
- Le récipient collecteur est-il inséré ?
- Le récipient collecteur est-il plein ?
Suivez les instructions reprises sous « VIDER LE RECIPIENT
COLLECTEUR » .
- Y a-t-il un blocage de matériel dans l’appareil ?
Suivez les instructions reprises sous « BLOCAGE DE
MATERIEL DANS L’APPAREIL » .
- Le moteur est-il trop sollicité ?
Voir sous « PROTECTION DU MOTEUR ».
Si aucun point de contrôle n’est concerné, veuillez informer
votre distributeur spécialisé.
ENTRETIEN / ELIMINATION
NETTOYAGE DES
CELLULES PHOTO-ÉLECTRIQUES (Fig. 5):
Il est possible que des morceaux de papier restent dans
la rainure d’admission (par exemple après un bourrage) et
empêchent la barrière lumineuse de stopper l’appareil.
Vous pouvez enlever ces morceaux de papier ou nettoyer les
cellulesphoto-électriques,soitenfaisantpasserunenouvelle
feuille dans l’appareil, soit en déclenchant la marche arrière
et en passant un pinceau sur les „yeux“ des deux cellules
photo-électriques.
17
fig. 5 fig. 6
ENTRETIEN DU BLOC DE COUPE (CROSS-CUT) :
Après un certain temps de fonctionnement, les
blocs de coupe Cross-Cut doivent être lubrifiés.
L’affichage de contrôle (7) s’allume, procédez
comme suit :
Extraire le récipient collecteur (14), prendre la burette d’huile
(17) (Fig. 6) hors de son support situé dans le caisson
d’armoire et réinsérer le récipient.
Répartir un peu d’huile sur une feuille de papier et introduire
alors cette feuille au travers de la fente d’introduction de
papier (12).
Le papier est aspiré et l’huile parvient ainsi dans le bloc de
coupe.
Acquitter l’introduction d’huile comme suit :
(8) s’allume.
- Extraire le récipient collecteur (14) aussi loin jusqu’à ce
que l’affichage de contrôle
- Les affichages de contrôle (7) et (4) clignotent.
- Actionner la touche de marche arrière (4) et les maintenir
enfoncées jusqu’à ce que l’affichage de contrôle (7)
s’éteigne.
- Insérer à nouveau le récipient.
CARACTÉRISTIQUES TECHNIQUES
Le bloc de coupe débute maintenant automatiquement le
cycle de nettoyage (marche avant/marche arrière) et se met
ensuite hors circuit. La machine est à nouveau disponible
pour fonctionner. Pour commander à nouveau de l’huile
spéciale, voir « ACCESSOIRES SEPARES ».
ECONOMIE AUTOMATIQUE D’ENERGIE :
En cas de non fonctionnement de la machine pendant
un laps de temps d’env. 30 min, la machine se met
automatiquement en mode « Sleep ». L’affichage LED
de la touche de fonction (2) s’éteint pour indiquer « Prêt à
fonctionner ». Actionner brièvement la touche de fonction
pour réenclencher la machine. Si la fonction de blocage
’utilisateur est activée, il convient de la désactiver à
nouveau lors du ré-enclenchement de la machine (voir sous
« ENCLENCHEMENT DE LAMACHINE »).
ELIMINATION DE LA MACHINE:
En fin de vie, éliminez toujours la machine de
façon conforme à l‘environnement. Ne jetez aucun
composant de la machine ou de son emballage
dans les ordures ménagères.
Modèle Largeur de coupe
papier / CD,DVD Capacité de coupe
papier / CD,DVD
Largeur de travail
Puissance Niveau de bruit Sevice intermittent
MARCHE / ARRET Dimensions
L x P x H Poids
intimus 26SC2 4 mm / 6 mm 13 feuilles* / 1 pièce 235 mm 0,44 kW ca. 55 dB(A) 10 / 45 min 380 x 330 x 550 mm 16 kg
intimus 26CC3 4x28 mm / 6 mm 9 feuilles* / 1 pièce 235 mm 0,44 kW ca. 55 dB(A) 10 / 45 min 380 x 330 x 550 mm 18 kg
intimus 32SC2 4 mm/ 6 mm 17 feuilles* / 1 pièce 235 mm 0,55 kW ca. 55 dB(A) 10 / 45 min 390 x 360 x 600 mm 19 kg
intimus 32CC3 4x28 mm / 6 mm 12 feuilles* / 1 pièce 235 mm 0,55 kW ca. 55 dB(A) 10 / 45 min 390 x 360 x 600 mm 21 kg
intimus 38SC2 4 mm / 6 mm 22 feuilles* / 1 pièce 245 mm 0,74 kW ca. 55 dB(A) 30 / 90 min 420 x 380 x 700 mm 29 kg
intimus 38CC3 4x28 mm / 6 mm 16 feuilles* / 1 pièce 245 mm 0,74 kW ca. 55 dB(A) 30 / 90 min 420 x 380 x 700 mm 30 kg
intimus 38CC4 1,9x15 mm / 6 mm 13 feuilles* / 1 pièce 245 mm 0,74 kW ca. 55 dB(A) 30 / 90 min 420 x 380 x 700 mm 30 kg
intimus 50SC2 4 mm / 6 mm 26 feuilles* / 1 pièce 260 mm 0,75 kW ca. 55 dB(A) 30 / 90 min 450 x 390 x 800 mm 33 kg
intimus 50CC3 4x28 mm / 6 mm 19 feuilles* / 1 pièce 260 mm 0,75 kW ca. 55 dB(A) 30 / 90 min 450 x 390 x 800 mm 33 kg
intimus 50CC4 1,9x15 mm / 6 mm 15 feuilles* / 1 pièce 260 mm 0,90 kW ca. 55 dB(A) 30 / 90 min 450 x 390 x 800 mm 35 kg
* se réfère à du papier A4 70g/m2 pour 230 V/50 Hz -10%
Modèle Caractéristiques branchement sur le secteur
tension de raccordement / fréquence / courant absorbé
intimus 26SC2 220V-240V/50Hz, 2,0 A 120V/60Hz, ---- A 100V/50/60Hz, ---- A
intimus 26CC3 220V-240V/50Hz, 2,0 A 120V/60Hz, ---- A 100V/50/60Hz, ---- A
intimus 32SC2 220V-240V/50Hz, 2,5 A 120V/60Hz, ---- A 100V/50/60Hz, ---- A
intimus 32CC3 220V-240V/50Hz, 2,5 A 120V/60Hz, ---- A 100V/50/60Hz, ---- A
intimus 38SC2 220V-240V/50Hz, 3,0A 120V/60Hz, ---- A 100V/50/60Hz, ---- A
intimus 38CC3 220V-240V/50Hz, 3,0 A 120V/60Hz, ----A 100V/50/60Hz, ---- A
intimus 38CC4 220V-240V/50Hz, 3,0 A 120V/60Hz, ----A 100V/50/60Hz, ---- A
intimus 50SC2 220V-240V/50Hz, 2,9A 120V/60Hz, ---- A 100V/50/60Hz, ---- A
3 intimus 50CC4 220V-240V/50Hz, 3,5 A 120V/60Hz, ----A 100V/50/60Hz, ---- A
ACCESSOIRES SEPARES
Désignation Ordre-No.
Sac en plastique, 300x300x700x0,018 mm (26/32) 99925
Sac en plastique, 440x330x950x0,05 mm (38/50) 99977
Flacon d’huile special, 110 ml 88035
Notez: Pour les accessoires et pièces détachées, veuillez
contacter votre agent.
10
http://www.monomachines.com/
•
intimu5
+
<9

NL
26SC2
26CC3
32SC2
32CC3
38SC2
38CC3
38CC4
50SC2
50CC3
50CC4
BELANGRIJKE VEILIGHEIDSWENKEN INBEDRIJFSTELLING
<< Het apparaat mag niet door verscheidene
personen tegelijkertijd worden bediend!
Het ontwerp van de veiligheidselementen
berust op een veilige bediening in eenmans-
bedrijf.
<< Tijdens het versnipperen mogen geen
andere werzaamheden (b.v. reinigen) aan
het toestel worden uitgevoerd!
<< Dit toestel is geen speelgoed en mag dus
niet door kinderen worden gebruikt!
De veiligheidstechnische voorzieningen
(afmetingen, toevoeropeningen, veiligheids-
schakelaars enz.) van dit toestel garanderen
opgeenenkelemaniereengevaarloosgebruik
door kinderen.
BEDIENING
BEDIENINGSELEMENTEN:
1 = Wipschakelaar “Aan / Uit” (Fig. 2)
Met deze schakelaar schakelt u het
apparaat in resp. uit.
2 = Functietoets (Fig. 1)
“Bedrijfsklaar”/”Sleep”/”Stop”
De toets bevat drie functies:
a) “Bedrijfsklaar”
Wanneer u tijdens de slaapstand kort
op de toets drukt, zet u het apparaat op
“bedrijfsklaar”.
Tegelijk gaat het geïntegreerde LED
lampje branden.
a) “Sleep”
Wanneer u in “bedrijfsklaar”-modus
gedurende ca. 3 seconden op de toets
drukt, gaat het apparaat in slaapstand.
Tip: Als u het apparaat gedurende
ca. 30 minuten niet gebruikt, gaat het
automatisch in slaapstand.
b) “Stop”
Wanneer u de toets kort indrukt terwijl
het snijwerk draait, schakelt het snijwerk
uit en blijft het mechanisme staan.
3 = Voorwaarts toets (Fig. 1)
De toets bevat twee functies:
a) Wanneer u kort op de toets drukt,
draait het snijwerk gedurende een
paar seconden vooruit, bijv. om in het
apparaat achtergebleven papier door te
voeren.
<< Gevaar voor verwondingen!
Losse onderdelen van kleding,
dassen, sie-raden, lang haar of
andere losse voorwerpen uit
de buurt van de toevoergleuf
houden!
<< Gevaar voor verwondingen! Geen vingers
in de toevoeropening steken!
<< Bij gevaar de machine met de hoofd-scha-
kelaar of noodschakelaar uitschakelen of
de stekker uit het stopcontact trekken!
<< Voordat de machine wordt geopend de
stekker uit het stopcontact trekken!
Reparatiesmogenalleendooreenvakman
worden uitgevoerd!
b) Wanneer u de toets gedurende ca. twee
seconden ingedrukt houdt, draait het
snijwerk vooruit en kunt u beginnen met
invoeren. Tegelijk licht het LED lampje
op.
4 = Teruglooptoets (Fig. 1)
Wanneer u op deze toets drukt, draait het
snijwerk achteruit. Tegelijk licht het LED
lampje op.
Tip: Het snijwerk draait achteruit zolang u
de toets ingedrukt houdt (toetsfunctie).
5 = Lichtslot (bij vooruit draaien) (Fig. 3)
Het versnipperen start automatisch zodra u
materiaal in één van beide toevoergleuven
invoert.
6 = Controlelampje
“Doorvoerstoring” (Fig. 1)
Licht op wanneer er teveel materiaal werd
ingevoerd. Het snijwerk blokkeert, draait
even achteruit en staat dan stil. De motor
schakelt uit.
7 = Controlelampje
“Snijwerk oliën” (Fig. 1)
Brandtwanneer uhet snijwerkvan decross
cutversiemoetoliën(ziebij“ONDERHOUD
SNIJWERK”).
8 = Controlelampje
“Opvangbak ontbreekt” (Fig. 1)
Brandt wanneer de opvangbak niet
(goed) op zijn plaats zit. Het apparaat
schakelt automatisch uit wanneer u de
opvangbak eruit neemt en start niet zonder
opvangbak.
EINSATZBEREICH:
De datavernietiger intimus 26SC2/CC3 /
32SC2/CC3 / 38SC2/CC3/CC4 / 50SC2/CC3/
CC4 is een apparaat voor het versnipperen van
papier in het algemeen, en voor het vernietigen
van gegevensdragers als cd’s, dvd’s, creditcards
en 3,5”-diskettes (alleen model 38/50).
Gebruik het apparaat uitsluitend
voor het versnipperen van papier en
creditcards en voor het vernietigen
van cd’s, dvd’s en 3,5”-diskettes
(model 38/50)!
Door het versnipperen van andere
gegevensdragers kan schade aan het
apparaat ontstaan (bijv. beschadiging
van het snijwerk enz.).
OPSTELLING:
- Apparaat uitpakken en opstellen.
- Plastic zak in de opvangbak plaatsen.
- Stekker van het apparaat in een stopcontact
steken(voorgegevensm.b.t. denoodzakelijke
zekering voor het stop-contact zie „TECHNI-
SCHE GEGEVENS“).
Deaansluitingvanhetapparaatophet
stroomnet moet vrij toegankelijk zijn!
De machine mag alleen in gesloten en
niet te koude ruimten (10 °C tot 25 °C)
worden opgesteld!
BEDIENING
9 = Controlelampje
“Motor overbelast” (Fig. 1)
Brandt wanneer de motor overbelast is
en werd uitgeschakeld. Zo lang de motor
afkoelt, kunt u het apparaat niet starten.
10 = Controlelampje
“Gebruikersrestrictie geactiveerd” (Fig.
1)
Brandtwanneerdegebruikersrestrictiewerd
geactiveerd. Om de gebruikersrestrictie
uit te schakelen zie rubriek “APPARAAT
INSCHAKELEN”.
11 = Controlelampje
“Opvangbak vol” (Fig. 1)
Brandt wanneer de opvangbak vol is en
moet worden leeggemaakt. Tegelijk wordt
het apparaat automatisch uitgeschakeld.
12 = Papiertoevoergleuf (Fig. 3)
13 = Veiligheidstoevoergleuf (Fig. 3)
14 = Opvangbak papier (Fig. 4)
15 = Opvangbakje cd/dvd (Fig. 4)
16 = Steunvoetje (Fig. 4)
17 = Oliereservoir (Fig. 6)
De shredder mag in geen geval als
zitgelegenheid of als weegtableau
worden gebruikt. Kans op vallen door
materiaalbreuk!
3
9
10
11
4
13
12
6
7
8
2
1
5
Fig. 1 Fig. 2 Fig. 3
11
http://www.monomachines.com/
intimu5
~
~
~
@
~
~.
,\l•
+
6

NL
26SC2
26CC3
32SC2
32CC3
38SC2
38CC3
38CC4
50SC2
50CC3
50CC4
BEDIENING
Model intimus 38 / intimus 50
Om ook voor deze grotere apparaten de
stabiliteit te garanderen, dient u vóór het
gebruik de vier steunvoetjes (16) (Fig. 4)
aan de onderkant uit te draaien tot op de
vloer!
APPARAAT INSCHAKELEN:
Tip: Bij levering van het apparaat is de
gebruikersrestrictie functie uitgeschakeld.
Informatie over het in- en uitschakelen van de
gebruikersrestrictie vindt u onder “INSCHAKELEN
VAN DE GEBRUIKERSRESTRICTIE”
Om het apparaat op „bedrijfsklaar“ te zetten, gaat u
naargelang de geprogrammeerde instelling als volgt
tewerk:
Programma-instelling “Gebruikersrestrictie
uitgeschakeld”
- Zet het apparaat aan met de wipschakelaar (1)
(positie “1”).
- Druk kort op functietoets (2).
- Het LED lampje van functietoets (2) brandt op
“bedrijfsklaar”.
- U kunt beginnen met invoeren.
Programma-instelling “Gebruikersrestrictie
geactiveerd”
Tip: Om het apparaat aan te zetten, wordt in de
werkwijze hieronder de gebruikersrestrictie korte tijd
uitgeschakeld.
- Zet het apparaat aan met de wipschakelaar (1)
(positie “1”).
- Druk kort op functietoets (2).
- Het controlelampje „Gebruikersrestrictie aan“
(10) brandt.
- Druk gedurende ca. 2 seconden tegelijk op de
“voorwaarts” (3) en “terugloop” (4) toetsen.
- Het LED lampje van functietoets (2) knippert om
aan te duiden: “niet bedrijfsklaar”.
- Druk kort op functietoets (2).
- Het LED lampje van functietoets (2) blijft
nu branden om aan te duiden: “bedrijfsklaar”.
Controlelampje (10) gaat uit.
- U kunt beginnen met invoeren.
Tip: Wanneer u het apparaat vanuit slaapstand
opnieuw inschakelt, dient u de gebruikersrestrictie
opnieuw uit te schakelen.
MATERIAAL INVOEREN:
Papier voert u in via de papiertoevoergleuf (12) (Fig.
3).
Gegevensdragers (cd’s, dvd’s of creditcards) voert u
in via de aparte veiligheidstoevoergleuf (13) (Fig. 3).
Het apparaat begint automatisch vooruit te lopen,
trekt het materiaal naar binnen en schakelt na het
versnipperen automatisch weer uit.
Bij het invoeren van papier nooit
tezelfdertijd cd’s/dvd’s invoeren en
omgekeerd!
3
9
10
11
4
6
7
8
2
Tip: Om transparante folie te versnipperen dient u
het apparaat manueel op voorwaarts te zetten (houd
de “voorwaarts”-toets (3) gedurende ca. 2 seconden
ingedrukt).
U kunt het versnipperen op elk ogenblik stopzetten
door kort te drukken op functietoets (2) („Stop“-
functie). Om verder te gaan, de “voorwaarts”-toets (3)
gedurende ca. 2 seconden ingedrukt houden.
Wanneer u het apparaat gedurende ca. 30 minuten
niet gebruikt, gaat het automatisch in slaapstand.
Indien de gebruikersrestrictie is ingeschakeld, dient
u bij het opnieuw aanzetten van het apparaat deze
functie uit te schakelen (zie onder “APPARAAT
INSCHAKELEN”).
Voer in het apparaat nooit meer dan de
aangegeven maximum hoeveelheid in (zie
„TECHNISCHE GEGEVENS”)!
Indien toch teveel materiaal in het apparaat
is geraakt, zie bij “STORING” onder
“DOORVOERSTORING”.
LEEGMAKEN VAN DE OPVANGBAK (Fig. 4)
Detweedeligeopvangbak laatutoehetafval correctte
scheiden. De opvangbak bestaat uit de papierbak (14)
zelf en een apart opvangbakje (15) voor versnipperde
cd’s, dvd’s en creditcards.
Het controlelampje waarschuwt niet
wanneer het opvangbakje (15) vol is!
Wanneer u grotere hoeveelheden cd’s/dvd’s
versnippert (ca. 25 stuks per keer), dient u af
en toe te controleren of het opvangbakje vol
is. Indien nodig tussendoor het bakje apart
leegmaken.
Indien de opvangbak voor papier vol is, schakelt het
apparaat uit. Het controlelampje (11) brandt. Ga
als volgt tewerk:
- Neem de opvangbak (14) met opvangbakje (15) uit
de behuizing. Controlelampje (8) gaat branden
en controlelampje (11) gaat uit.
- Werp de inhoud van de twee bakken steeds apart
weg.
- Schuif de leeggemaakte opvangbak met
opvangbakje terug in de behuizing. Controlelampje
(8) gaat uit. Indien er nog materiaal in de
toevoergleuf zit, brandt controlelampje (6).
- Druk kort op de “voorwaarts”-toets (3). Het
resterende materiaal wordt versnipperd en het
lampje (6) gaat uit.
Tip: Het apparaat werkt alleen wanneer de opvangbak
goed op zijn plek zit!
DYNAMISCHE AANDUIDING VAN DE BELASTING:
Model intimus 38 / intimus 50
Om doorvoerstoringen te voorkomen en een
ononderbroken en effectieve vernietiging van
gegevensdragers te garanderen, wordt tijdens het
versnipperen de belasting van de motor aangeduid
met een lampje dat brandt in verschillende kleuren:
Groen licht: belasting < 50%
Geel licht: belasting 50 - 75%
Rood licht: belasting 75 - 100%
MANUELE “SLEEP-MODE”:
Wanneer u in bedrijfsklare toestand de functietoets
(2) gedurende ca. 3 seconden ingedrukt houdt,
gaat het apparaat automatisch in slaapstand. Bij
ingeschakelde gebruikersrestrictie wordt tegelijk de
vergrendelingsfunctie van de gebruikersrestrictie
actief. U kunt het apparaat niet starten. Om de
gebruikersrestrictie uit te schakelen: zie onder
„APPARAAT INSCHAKELEN”.
INSCHAKELEN VAN DE
GEBRUIKERSRESTRICTIE:
Programmeermodus activeren:
Om in de programmeermodus te komen, dient het
apparaat “bedrijfsklaar” ingeschakeld te zijn (zie onder
“APPARAAT INSCHAKELEN”.
Ga als volgt tewerk:
- Opvangbak (14) net zo ver uittrekken tot
controlelampje (8) gaat branden.
- Houd gedurende ca. 4 seconden de voorwaarts-
toets (3) ingedrukt. Het LED lampje knippert.
U bent nu in de programmeermodus.
Tip: Indien het programmeren niet binnen ca.
20 seconden is afgesloten, keert het apparaat
automatisch terug naar de modus “bedrijfsklaar”.
Programmeren bij ingeschakelde
gebruikersrestrictie:
- Activeer de programmeermodus (zie hierboven).
- Druk tegelijk op de voorwaarts-toets (3) en de
teruglooptoets (4) en houd deze ingedrukt tot de
controlelampjes (10), (2) en (4) knipperen.
- Schuif de opvangbak weer op zijn plek.
De programmering is geslaagd. U verlaat de
programmeermodus automatisch. De controlelampjes
(10), (2) en (4) knipperen nog gedurende
ca. 5 seconden, om aan te duiden dat u de
programmeermodus verlaat.
Programmeren bij uitgeschakelde
gebruikersrestrictie:
- Activeer de programmeermodus (zie hierboven).
- Druk tegelijk op de voorwaarts-toets (3) en de
teruglooptoets (4) en houd deze ingedrukt tot de
controlelampjes (10) en (4) knipperen.
- Schuif de opvangbak weer op zijn plek.
De programmering is geslaagd. U verlaat de
programmeermodus automatisch. De controlelampjes
(10) en (4) knipperen nog gedurende
ca. 5 seconden, om aan te duiden dat u de
programmeermodus verlaat.
15
14
16
Fig. 1 Fig. 4
12
http://www.monomachines.com/
6
6
6
• ®
intlmu5
®6
+
@6tl

NL
26SC2
26CC3
32SC2
32CC3
38SC2
38CC3
38CC4
50SC2
50CC3
50CC4
STORING
DOORVOERSTORING:
(auto reverse functie)
Wanneer er teveel materiaal wordt ingevoerd en het papier
vast komt te zitten, reageert het apparaat als volgt:
- het snijwerk blokkeert, draait even achteruit (materiaal
wordt uitgevoerd) en staat dan stil. De motor schakelt uit.
- het controlelampje (6) brandt.
Ga als volgt tewerk:
Er zit papier vast in de papiertoevoergleuf (12)
- Haal het teruggevoerde papier uit de toevoergleuf (12).
- Het snijwerk draait nu automatisch vooruit en versnippert
het in het snijwerk resterend papier.
- Het controlelampje (6) gaat uit. Het LED lampje van
de voorwaarts-toets (3) brandt permanent.
- Ga verder met versnipperen en voer minder vellen papier
tegelijk in.
Er zit materiaal vast in de
veiligheidstoevoergleuf (13)
- Haal het teruggevoerde materiaal uit het apparaat.
Wees voorzichtig, de scherpe messen kunnen
letsel veroorzaken!
- De rest van het materiaal wordt automatisch door het
snijwerk opnieuw doorgevoerd en versnipperd.
- Controlelampje (6) gaat uit. Het LED lampje van de
voorwaarts-toets (3) brandt permanent.
- Wanneer alle materiaal is versnipperd, gaat u verder
met versnipperen. Draag er zorg voor dat u de juiste
hoeveelheden invoert.
- Indien nodig, drukt u afwisselend op de voorwaarts-
en teruglooptoets om het snijwerk manueel vooruit en
achteruit te laten lopen tot alle materiaal is doorgevoerd en
versnipperd.
Telkenswanneerudelooprichtingomschakelt,
dient u te wachten tot de motor stilstaat!
MOTORBEVEILIGING:
De motor schakelt bij overbelasting automatisch uit. Het
controlelampje (9) knippert. Zet het apparaat af met de
wipschakelaar (1).
Na een afkoeltijd van ca. 25-40 minuten (afhankelijk van model
en kamertemperatuur), kunt u het apparaat opnieuw starten.
CHECKLIST BIJ STORINGEN:
Indien het apparaat niet werkt, controleert u het volgende:
- zit de stekker in het stopcontact?
- staat de wipschakelaar (1) op aan?
- is het apparaat in slaapstand?
Zie onder “AUTOMATISCH ENERGIESPAREN”.
- is de gebruikersrestrictie ingeschakeld?
Zie onder „INSCHAKELEN VAN DE
GEBRUIKERSRESTRICTIE”.
- zit de opvangbak goed op zijn plaats?
- is de opvangbak vol?
Volg de richtlijnen bij „LEEGMAKEN VAN DE
OPVANGBAK”.
- is er een doorvoerstoring?
Volg de richtlijnen bij „DOORVOERSTORING”.
- werd de motor overbelast?
Zie onder “MOTORBEVEILIGING”.
Neem contact op met uw vakhandelaar als u de storing
niet zelfstandig kunt verhelpen.
ONDERHOUD / AFDANKEN
REINIGEN VAN DE FOTOCELLEN (Fig. 5):
Mochten er papierstrookjes in de toevoergleuf blijven
liggen (bijv. na een papierdoorvoerstoring) is het mo-
gelijk dat het apparaat door het „bezette“ lichtslot niet
meer uitschakelt.
U kunt de stukjes papier verwijderen of de fotocel
schoonmaken door aan het snijmechanisme nog een
blad papier toe te voeren of de machine achteruit te
latenlopenen danmeteenkwastjeevenoverdebeide
„ogen“ van de fotocel te strijken.
Fig. 5
17
Fig. 6
ONDERHOUD SNIJWERK (CROSS CUT):
Cross cut snijwerk dient u na verloop van tijd
te oliën.
Wanneer het controlelampje (7) brandt,
doet u het volgende:
Haal de opvangbak (14) eruit, haal het oliereservoir
(17) (Fig. 6) uit de houder in de onderkast en schuif
de opvangbak weer op zijn plaats.
Druppel wat olie op een vel papier en voer dit in via de
papiertoevoergleuf (12).
Het papier wordt naar binnen getrokken en zo komt de
olie bij het snijwerk.
Beëindig het oliën als volgt:
- Trek de opvangbak (14) net zo ver uit tot het
controlelampje (8) gaat branden.
- Controlelampjes (7) en (4) knipperen.
- Druk op de achteruittoets (4) en houd deze ingedrukt
tot het controlelampje (7) gaat uit.
- Schuif de opvangbak weer op zijn plek.
Het snijwerk start automatisch met de reinigingscyclus
(voorwaarts/achteruit draaien) en schakelt dan uit. Het
apparaatisweer gebruiksklaar. Om despecialeolie na
te bestellen, zie onder “SPECIALE TOEBEHOREN”.
AUTOMATISCH ENERGIESPAREN:
Indienhetapparaatlangeretijdnietwordtgebruikt,gaat
het na ca. 30 minuten automatisch in slaapstand. Het
LED lampje van functietoets (2) voor “bedrijfsklaar”
gaat uit. Om opnieuw in te schakelen, de functietoets
kort indrukken. Indien de gebruikersrestrictie is
ingeschakeld, dient u bij het opnieuw aanzetten van
het apparaat deze functie uit te schakelen (zie onder
“APPARAAT INSCHAKELEN”).
AFDANKEN VAN HET TOESTEL:
Indien u na hopelijk lang en tevreden gebruik
het toestel wenst weg te gooien, doe dit dan
milieuvriendelijk. Delen van het toestel of de
verpakking niet wegwerpen met uw gewone
huishoudelijk afval.
TECHNISCHE GEGEVENS
Model Snijbreedte
papier / CD,DVD Capaciteit
papier / CD,DVD Werkbreedte Vermogen Geluidsniveau Pauze inschakelen
AAN / UIT Afmetingen
B x D x H Gewicht
intimus 26SC2 4 mm / 6 mm 13 blad* / 1 stuk 235 mm 0,44 kW ca. 55 dB(A) 10 / 45 min 380 x 330 x 550 mm 16 kg
intimus 26CC3 4x28 mm / 6 mm 9 blad* / 1 stuk 235 mm 0,44 kW ca. 55 dB(A) 10 / 45 min 380 x 330 x 550 mm 18 kg
intimus 32SC2 4 mm/ 6 mm 17 blad* / 1 stuk 235 mm 0,55 kW ca. 55 dB(A) 10 / 45 min 390 x 360 x 600 mm 19 kg
intimus 32CC3 4x28 mm / 6 mm 12 blad* / 1 stuk 235 mm 0,55 kW ca. 55 dB(A) 10 / 45 min 390 x 360 x 600 mm 21 kg
intimus 38SC2 4 mm / 6 mm 22 blad* / 1 stuk 245 mm 0,74 kW ca. 55 dB(A) 30 / 45 min 420 x 380 x 700 mm 29 kg
intimus 38CC3 4x28 mm / 6 mm 16 blad* / 1 stuk 245 mm 0,74 kW ca. 55 dB(A) 30 / 45 min 420 x 380 x 700 mm 30 kg
intimus 38CC4 1,9x15 mm / 6 mm 13 blad* / 1 stuk 245 mm 0,74 kW ca. 55 dB(A) 30 / 45 min 420 x 380 x 700 mm 30 kg
intimus 50SC2 4 mm / 6 mm 26 blad* / 1 stuk 260 mm 0,75 kW ca. 55 dB(A) 30 / 45 min 450 x 390 x 800 mm 33 kg
intimus 50CC3 4x28 mm / 6 mm 19 blad* / 1 stuk 260 mm 0,75 kW ca. 55 dB(A) 30 / 45 min 450 x 390 x 800 mm 33 kg
intimus 50CC4 1,9x15 mm / 6 mm 15 blad* / 1 stuk 260 mm 0,90 kW ca. 55 dB(A) 30 / 45 min 450 x 390 x 800 mm 35 kg
* van toepassing op A4-papier 70g/m2bij 230V/50Hz -10%
Model Gegevens aansluiting stroomnet
spanning / frequentie / inkomende stroom
intimus 26SC2 220V-240V/50Hz, 2,0A 120V/60Hz, ---- A 100V/50/60Hz, ---- A
intimus 26CC3 220V-240V/50Hz, 2,0 A 120V/60Hz, ----A 100V/50/60Hz, ---- A
intimus 32SC2 220V-240V/50Hz, 2,5A 120V/60Hz, ---- A 100V/50/60Hz, ---- A
intimus 32CC3 220V-240V/50Hz, 2,5 A 120V/60Hz, ----A 100V/50/60Hz, ---- A
intimus 38SC2 220V-240V/50Hz, 3,0A 120V/60Hz, ---- A 100V/50/60Hz, ---- A
intimus 38CC3 220V-240V/50Hz, 3,0 A 120V/60Hz, ----A 100V/50/60Hz, ---- A
intimus 38CC4 220V-240V/50Hz, 3,0 A 120V/60Hz, ----A 100V/50/60Hz, ---- A
intimus 50SC2 220V-240V/50Hz, 2,9A 120V/60Hz, ---- A 100V/50/60Hz, ---- A
intimus 50CC3 220V-240V/50Hz, 2,9 A 120V/60Hz, ----A 100V/50/60Hz, ---- A
intimus 50CC4 220V-240V/50Hz, 3,5 A 120V/60Hz, ---- A 100V/50/60Hz, ---- A
SPECIALE TOEBEHOREN
Benaming Best. nr.
Plastic zak, 300x300x700x0,018 mm (26/32) 99925
Plastic zak, 440x330x950x0,05 mm (38/50) 99977
Flesje olie, 110 ml 88035
Opmerking:Voorhetnabestellenvanspecialetoebehorenen
voor reserveonderdelen kunt u bij uw dealer terecht.
13
http://www.monomachines.com/
•
intimu5
+

E
26SC2
26CC3
32SC2
32CC3
38SC2
38CC3
38CC4
50SC2
50CC3
50CC4
INDICACIONES DE SEGURIDAD IMPORTANTES PUESTA EN SERVICIO
<< ¡Elaparatonodebeseroperadoporvarias << ¡Peligro de lesión! No acercar a
CAMPO DE APLICACIÓN:
personas al mismo tiempo! la apertura de alimentación pie-
Ladestructora dedatos intimus 26SC2/CC3 / 32SC2/
La concepción de los elementos de seguri- zas sueltas de ropa, corbatas,
CC3 / 38SC2/CC3/CC4 / 50SC2/CC3/CC4 ha sido
dad se basa en un manejo sin peligro en un bisutería, cabello largo u otros
concebida para el desmenuzamiento de documentos
corrientes,asícomodesoportesdedatoscomodiscos
„servicio por una sola persona“. objetos sueltos!
CD, DVD, tarjetas de crédito y disquetes de 3,5” (sólo
modelos 38/50).
<< ¡Durante el proceso de trituración no << ¡Peligrodelesión!Nointroducirlosdedos
¡La máquina solamente debe ser utilizada
se deben efectuar otros trabajos en la en la apertura de alimentación!
para el desmenuzamiento de papel y
máquina (p. ej. limpieza etc.)!
tarjetas de crédito, así como para la des-
trucción de discos CD y DVD y disquetes
<< ¡La máquina no es un juguete y no es << ¡En caso de emergencia desconectar el
de 3,5” (modelos 38/50)!
apropiada para el empleo y uso por parte aparato usando el interruptor principal o
El desmenuzamiento de otro tipo de sopor-
de niños! el interruptor de emergencia, o extraer la
tes de datos puede producir daños en la
El concepto global en razón de la seguridad clavija de red!
máquina (p.ej. destrucción del mecanismo
(dimensiones, orificios de alimentación,
de corte, etc.
desconexiones de seguridad, etc.) de esta << Antes de abrir el aparato hay que extraer
máquina no incluye ningún tipo de garantía la clavija de red!
COLOCACION:
¡Lasreparacionessolamentedebeefectu-
- Desembalaje y colocación del aparato.
de niños. arlas un técnico especialista!
- Introducir saco de plástico en el recipiente de reco-
gida.
en cuanto a un manejo inofensivo por parte
- Enchufar el aparato a la red (indicaciones sobre ...
ver „CARACTERISTICAS TECNICAS“)
¡La toma de conexión a la red se tiene que
MANEJO
encontrar en un lugar fácilmente accesible
ELEMENTOS DE MANDO: b) Si este pulsador se mantiene oprimido
y en las inmediaciones de la máquina!
1 = Interruptor basculante “Encendido/ durante unos dos segundos, el mecanismo
¡Elaparatosólosedeberáusarenrecintos
Apagado” (Fig. 2) de corte avanzará de modo continuo, por
cerradosycontemperaturascomprendidas
Con este interruptor se enciende y apaga el lo que el aparato se podrá suministrar con
entre 10 - 25°C!
aparato. material. Al mismo tiempo se encenderá el
MANEJO
2 = Pulsador funcional (Fig. 1) indicador piloto integrado .
“Listo para el uso”/”En espera”/”Parada” 4 = Pulsador de retroceso (Fig. 1) 9 = Indicador de control
Este pulsador comprende tres funciones: El mecanismo de corte retrocede al accionar “Sobrecarga motor” (Fig. 1)
a) Modo de funcionamiento “Listo para el este pulsador. Al mismo tiempo se encenderá Se enciende cuando el motor se ha
uso” el indicador piloto integrado . sobrecargado y desconectado. El aparato no se
Accionando brevemente este pulsador en Nota: El mecanismo de corte seguirá puede activar durante la fase de enfriamiento
el modo de funcionamiento “En espera” retrocediendo mientras no se suelte este del motor.
se conecta el aparato en el modo de pulsador (función pulsante). 10 = Indicador de control
funcionamiento “Listo para el uso”. 5 = Barrera fotoeléctrica (avance) (Fig. 3) “Bloqueo de usuario activado” (Fig. 1)
En el modo de funcionamiento “Listo para Inicia el proceso de desmenuzamiento en el Se enciende cuando la función de bloqueo
el uso” se enciende al mismo tiempo el momento de introducir material en uno de las de usuario se ha activado. Para desactivar el
indicador piloto integrado . ranuras de alimentación. bloqueodeusuario,consultela descripción enel
a) Modo de funcionamiento “En espera” 6 = Indicador de control apartado “CÓMO CONECTAR EL APARATO”.
Si se acciona este pulsador en el modo de “Material atascado” (Fig. 1) 11 = Indicador de control
funcionamiento “Listo para el uso” aprox. Se encenderá al introducir demasiado material “Recipiente lleno” (Fig. 1)
durante 3 segundos se conectará el aparato en el mecanismo de corte. El mecanismo de Se enciende cuando el recipiente recolector
en el modo de funcionamiento “En espera”. corte se bloquea, retrocede a continuación un está lleno y se ha de vaciar. Al mismo tiempo se
Nota: Si el aparato no se utiliza durante un poco y se para. El motor se desconecta. desconecta el aparato automáticamente.
periodo de tiempo de aprox. 30 minutos, el 7 = Indicador de control
aparato pasará automáticamente al modo “Engrasar mecanismo de corte” (Fig. 1) 12 = Ranura de alimentación de papel (Fig. 3)
de funcionamiento “En espera”. Se enciende cuando el mecanismo de 13 = Ranura de alimentación de seguridad (Fig.
b) Función de “Parada” corte de la versión Cross-Cut (cruzado) se 3)
Accione brevemente este pulsador para tiene que engrasar (consulte el apartado 14 = Recipiente recolector de papel (Fig. 4)
desconectar y parar el mecanismo de corte “MANTENIMIENTO DEL MECANISMO DE 15 = Bandeja recolectora de CD/DVD (Fig. 4)
en marcha. CORTE”). 16 = Pie de apoyo (Fig. 4)
3 = Pulsador de avance (Fig. 1) 8 = Indicador de control 17 = Botellita de aceite (Fig. 6)
Este pulsador comprende dos funciones: “Falta recipiente” (Fig. 1)
a) Accionando brevemente este pulsador, el Se enciende cuando el recipiente recolector
¡Ladestructora de datosno sedebe utilizar
mecanismo de corte avanzará unos pocos no se ha introducido por completo. El aparato
nunca como asiento ni como taburete. En
segundos,porejemplo,parasacarelmaterial se desconecta automáticamente al sacar el
caso dado, se corre el peligro de lesiones
que aún se encuentra en el mecanismo de recipiente y no se puede activar si el recipiente
por caída a causa de una posible rotura
corte. no está introducido por completo.
del material!
3
9
10
11
4
13
12
6
7
8
2
1
5
Fig. 1 Fig. 2 Fig. 3
14
http://www.monomachines.com/
intimu5
~
(I)~
I(t)
~
•
®
~
,\
i•
+

E
26SC2
26CC3
32SC2
32CC3
38SC2
38CC3
38CC4
50SC2
50CC3
50CC4
MANEJO
Modelos intimus 38 / intimus 50
¡Para poder garantizar una ubicación segura
también para aparatos de gran volumen, se
deberán desenroscar antes del uso los cuatro
pies de apoyo (16) (Fig. 4) situados en el fondo
de la carcasa de modo que lleguen hasta el
suelo!
CÓMO CONECTAR EL APARATO:
Nota: El aparato se entrega con la función “Bloqueo de
usuario” desconectada.
Para conectar y desconectar la función de bloqueo de
usuario, consulte la descripción en el apartado “EMPLEO DEL
BLOQUEO DE USUARIO”.
Para conectar el aparato al modo de funcionamiento “Listo
para el uso” proceda de acuerdo con el ajuste programado
actualmente, como sigue:
Ajuste de la función “Bloqueo de usuario desconectado”
- Conecte el aparato en el interruptor basculante (1) (posición
“1”).
- Accione brevemente el pulsador funcional (2).
- El indicador piloto del pulsador funcional (2) se
encenderá para la función “Listo para el uso”.
- A continuación se puede empezar a alimentar el aparato
con papel.
Ajuste de la función “Bloqueo de usuario conectado”
Nota: Para conectar el aparato se desactiva brevemente,
como se explica a continuación, la función conectada de
bloqueo de usuario.
- Conecte el aparato en el interruptor basculante (1) (posición
“1”).
- Accione brevemente el pulsador funcional (2).
- El indicador de control para la función “Bloqueo de usuario
activado” (10) se encenderá.
- Mantenga accionado el pulsador de avance (3) y el
pulsador de retroceso (4) al mismo tiempo durante unos 2
segundos.
- El indicador piloto del pulsador funcional (2) tendrá luz
intermitente para la función “No listo para el uso”.
- Accione brevemente el pulsador funcional (2).
- Elindicadorpiloto delpulsadorfuncional(2)seencenderá
ahora de modo permanente para la función “Listo para el
uso”. El indicador de control (10) se apaga.
- A continuación se puede empezar a alimentar el aparato
con papel.
Nota: Si se conecta el aparato repetidamente desde el modo
de funcionamiento “En espera”, la función de bloqueo de
usuario activado se deberá volver a desactivar cada vez.
ALIMENTACIÓN DE MATERIAL:
Introduzca papel por la ranura de alimentación de papel (12)
(Fig. 3) al mecanismo de corte.
Introduzca los soportes de datos (CD, DVD o tarjeta de
crédito), uno a uno, por la ranura de alimentación de seguridad,
dispuesta separadamente, (13) (Fig. 3) al mecanismo de
corte.
El aparato se conecta automáticamente a la marcha de avance,
mete el material y se desconecta automáticamente después de
haber finalizado la etapa de desmenuzamiento.
¡Mientras introduzca papel no introduzca nunca
al mismo tiempo CDs o DVDs o a la inversa!
3
9
10
11
4
6
7
8
2
Notas: Para el desmenuzamiento de láminas transparentes
se tiene que conectar el aparato a mano en el modo de
funcionamiento de avance (mantener accionado el pulsador de
avance (3) durante unos 2 segundos).
Accionando brevemente el pulsador funcional (2) (función de
“Parada”) se puede detener en todo momento la etapa de
desmenuzamiento. Para continuar, mantenga accionado el
pulsador de avance (3) durante 2 segundos.
Si el aparato no se utiliza durante un periodo de tiempo de
aprox. de 30 minutos, el aparato pasará automáticamente al
modo de funcionamiento “En espera”. Si la función de bloqueo
de usuario está conectada, se deberá desactivar de nuevo
al volver a conectar el aparato (consulte el apartado “CÓMO
CONECTAR ELAPARATO”).
¡No introduzca nunca en el aparato más de
material del indicado como máximo (consulte el
apartado “DATOS TÉCNICOS”)!
En el caso de que se haya introducido de todos
modos demasiado material en el mecanismo
de corte, consulte en “AVERÍAS” en el apartado
“MATERIAL ATASCADO EN EL APARATO”.
CÓMO VACIAR EL
RECIPIENTE RECOLECTOR (Fig. 4):
El recipiente recolector con dos compartimentos se ha
concebido para separar correctamente la basura. Está
compuesto por el recipiente de papel (14) propiamente dicho
y una bandeja recolectora dispuesta por separado (15) para
recoger los CDs, DVDs y tarjetas de crédito desmenuzados.
¡El nivel de llenado de la bandeja recolectora (15)
no se puede constatar por el sistema de control
para cesto lleno!
Si se desmenuzan grandes cantidades de CDs y/o
DVDs(unos25porllenado)recomendamoscontrolar
de vez en cuando el nivel de llenado de la bandeja
recolectora y vaciar la bandeja en caso de que fuera
necesario de tiempo en tiempo por separado.
En cuanto el recipiente recolector se haya llenado de papel,
el aparato se desconectará. El indicador de control (11) se
enciende. Proceda como sigue:
- Extraigael recipienterecolector (14) conbandeja recolectora
(15) de la parte inferior de la carcasa. El indicador de control
(8) se enciende y el indicador de control (11) se
apaga.
- Elimine por separado los residuos de ambos recipientes.
- Introduzca de nuevo el recipiente vaciado, junto con la
bandeja recolectora encajada, en la parte inferior de la
carcasa. El indicador de control (8) se apaga. Si aún
queda material en una de las ranuras de alimentación, el
indicador de control (6) se encenderá ahora.
- Accione brevemente el pulsador de avance (3). El material
restante se desmenuzará y el indicador (6) se apagará.
Nota: ¡El aparato solamente puede funcionar con el recipiente
recolector introducido por completo!
INDICADOR DINÁMICO DE CARGA:
Modelos intimus 38 / intimus 50
A fin de evitar el atasco de material y, por lo tanto, lograr una
destrucción continuada y efectiva de los soportes de datos,
se indica - durante la etapa de desmenuzamiento - el grado
momentáneo de carga del motor mediante una luz difusa,
determinada por el color, en la ranura de alimentación, como
sigue:
Luz verde: Carga < 50%
Luz amarilla: Carga 50 - 75%
Luz roja: Carga 75 - 100%
MODO DE FUNCIONAMIENTO MANUAL “EN ESPERA”:
Manteniendo accionado el pulsador funcional (2) durante unos
3 segundos en el estado de listo para el uso, el aparato se
puede conectar manualmente en el modo de funcionamiento
“En espera”. Con la función “Bloqueo de usuario” conectada
se activa, al mismo tiempo, la función de cierre del bloqueo
de usuario. Con lo que el aparato no se puede activar. Para
desactivarla función“Bloqueode usuario”,consulte elapartado
“CÓMO CONECTAR ELAPARATO”.
EMPLEO DEL BLOQUEO DE USUARIO:
Activación del modo de programación:
Para entrar en el modo de programación, el aparato tiene
que haberse conectado en el modo de funcionamiento “Listo
para el uso” (consulte el apartado “CÓMO CONECTAR EL
APARATO”).
Proceda como sigue:
- Extraiga el recipiente recolector (14) hasta que el indicador
de control (8) se encienda.
- No suelte el pulsador de avance (3) durante unos 4 segundos.
El indicador piloto integrado tendrá luz intermitente.
Ahora se encuentra en el modo de programación.
Nota: Si la programación no se concluye en el plazo
de un periodo de unos 20 segundos, el aparato volverá
automáticamente al modo de funcionamiento “Listo para el
uso”.
Secuencia de programación para conectar el bloqueo de
usuario:
- Active el modo de programación (consulte más arriba).
- Accione al mismo tiempo el pulsador de avance (3) y el
pulsador de retroceso (4) y no los suelte hasta que los
indicadores de control (10), (2) y (4) tengan luz
intermitente.
- Vuelva a introducir el recipiente.
Con lo que se ha concluido la programación. Del modo de
programación se sale automáticamente. La luz intermitente de
los indicadores de control (10), (2) y (4) durante unos
5 segundos más es la confirmación de la programación.
Secuencia de programación para desconectar el bloqueo
de usuario:
- Active el modo de programación (consulte más arriba).
- Accione al mismo tiempo el pulsador de avance (3) y
el pulsador de retroceso (4) y no los suelte hasta que
los indicadores de control (10) y (4) tengan luz
intermitente.
- Vuelva a introducir el recipiente.
Con lo que se ha concluido la programación. Del modo de
programación se sale automáticamente. La luz intermitente
de los indicadores de control (10) y (4) durante unos 5
segundos más es la confirmación de la programación.
15
14
16
Fig. 1 Fig. 4
15
http://www.monomachines.com/
(')
(')
intimu5
+
®
(')
tl
®
(')
tl
®tl

E
26SC2
26CC3
32SC2
32CC3
38SC2
38CC3
38CC4
50SC2
50CC3
50CC4
AVERIA
MATERIAL ATASCADO EN EL APARATO:
(Función de auto-retroceso)
Si se produce un atasco debido a un exceso de material
introducido, el aparato reacciona como sigue:
- El mecanismo de corte se bloquea, retrocede a continuación un
poco (material se libera) y se para. El motor se desconecta.
- El indicador de control (6) se enciende.
Proceda como sigue:
Papel atascado en la ranura de alimentación de papel (12)
- Retire el papel retrocedido de la ranura de alimentación (12).
- Una vez hecho esto, el mecanismo de corte avanzará
automáticamente y desmenuzará el resto de papel contenido
en el mecanismo de corte.
- El indicador de control (6) se apaga. El indicador piloto
del pulsador de avance (3) tiene luz permanente.
- Continúe con el desmenuzamiento introduciendo una cantidad
menor de papel.
Material atascado en la ranura de alimentación de seguridad
(13)
- Retire el material retrocedido.
¡Retire el material con sumo cuidado, porque se
puede cortar en los puntos afilados de corte!
- A continuación, material restante se vuelve a transportar
automáticamente al mecanismo de corte y se desmenuza.
- El indicador de control (6) se apaga. El indicador piloto
del pulsador de avance (3) tiene luz permanente.
- En cuanto el material haya pasado por el mecanismo de
corte, podrá seguir con el desmenuzamiento pero dosificando
correctamente.
- Si fuera necesario, conecte el mecanismo de corte a
mano, alternando entre avance y retroceso, hasta que el
material haya pasado por el mecanismo de corte y se haya
desmenuzado.
¡Espere siempre hasta que el motor esté parado
para conectar al otro sentido de marcha!
GUARDAMOTOR:
Si el motor se sobrecarga, se desconectará. El indicador de
control (9) tiene luz intermitente. Desconecte el aparato en el
interruptor basculante (1).
Deje enfriar el aparato unos 25-40 minutos (en función del
modelo y temperatura ambiental) y vuelva a activar entonces el
aparato.
MANTENIMIENTO / ELIMINACIÓN
LISTA DE VERIFICACIÓN EN LAS AVERÍAS:
Si el aparato no funciona, compruebe los siguientes puntos:
- ¿Se ha conectado la clavija de enchufe a la red de corriente
eléctrica?
- ¿Se ha conectado el interruptor basculante (1)?
- ¿Está el aparato en el modo de funcionamiento “En
espera”?
Consulte el apartado “FUNCIÓN AUTOMÁTICA AHORRO
ENERGÉTICO”.
- ¿Se ha activado la función de bloqueo de usuario?
Consulte el apartado “EMPLEO DEL BLOQUEO DE
USUARIO”.
- ¿Se ha introducido por completo el recipiente recolector?
- ¿Está lleno el recipiente recolector?
Siga las instrucciones en el apartado “CÓMO VACIAR EL
RECIPIENTE RECOLECTOR”.
- ¿Hay material atascado en el aparato?
Sigalas instruccionesen elapartado “MATERIALATASCADO
EN ELAPARATO”.
- ¿Se ha sobrecargado el motor?
Consulte el apartado “GUARDAMOTOR”.
Si su aparato presenta otro problema distinto a los alistados
anteriormente, notifíquelo a su comercio especializado.
LIMPIEZA DE LAS FOTOCELULAS (Fig. 4):
En el caso de que se hayan quedado trozos de papel adheridos
en la ranura de entrada (p. ej. tras una acumulación de papel),
es posible que el aparato no se desconecte a causa de la
fotocélula „tapada“.
Puede retirar los trozos de papel o bien limpiar la fotocélula,
alimentando el mecanismo de corte con una hoja adicional,
o activar la marcha de retroceso de la máquina, pasando a
continuación brevemente con un pincel sobre ambas „ópticas“
de las fotocélulas.
Fig. 5
17
Fig. 6
MANTENIMIENTO DEL MECANISMO DE CORTE
(CORTE CRUZADO):
Después de haber transcurrido un determinado
tiempo de servicio, se deberá aplicar aceite en los
mecanismos de corte cruzado.
Si el indicador de control está encendido (7),
proceda como sigue:
Extraiga el recipiente recolector (14), tome la botellita de aceite
(17) (Fig. 6) situada en el soporte en el armario inferior y vuelva
a introducir el recipiente.
Distribuya un poco de aceite sobre una hoja de papel y, a
continuación, introdúzcala por la ranura de alimentación de
papel (12) al mecanismo de corte.
El papel se mete y el aceite penetrará así en el mecanismo de
corte.
Confirme el suministro de aceite como sigue:
- Extraiga el recipiente recolector (14) hasta que el indicador de
control (8) se encienda.
- Los indicadores de control (7) y (4) parpadean.
- Accionar el pulsador de marcha atrás (4) y no soltarlo hasta
que el indicador de control (7) se apague.
- Vuelva a introducir el recipiente.
DATOS TÉCNICOS
Una vez hecho esto, el mecanismo de corte comenzará
automáticamente el ciclo de limpieza (avance/retroceso) y, a
continuación, se desconecta. El aparato vuelve a estar lista para
el uso. Si desea pedir el aceite especial, consulte el apartado
“ACCESORIOS ESPECIALES”.
FUNCIÓN AUTOMÁTICAAHORRO ENERGÉTICO:
Si el aparato no se utiliza durante algún tiempo, pasará
automáticamentetrasunos30minutosalmododefuncionamiento
“En espera”. El indicador piloto del pulsador funcional (2) para
la función “Listo para el uso” se apaga. Accione brevemente el
pulsador funcional para reconectar. Si la función de bloqueo de
usuario está conectada, se deberá desactivar de nuevo al volver
a conectar el aparato (consulte el apartado “CÓMO CONECTAR
ELAPARATO”).
ELIMINACIÓN DE LOS RESIDUOS DE LA MÁQUINA:
Elimine los residuos de la máquina al final de su vida
útilrespetandosiemprelasnormasmedioambientales.
No tire partes de la máquina ni el embalaje junto con
la basura doméstica.
Modelo Ancho de corte
papel / CD,DVD Rendimiento de corte
papel / CD,DVD
Ancho de trabajo
Potencia Nivel de ruídos Servicio intermitente
CONECTADO / DESCONECTADO
Dimensiones
A x F x A Peso
intimus 26SC2 4 mm / 6 mm 13 hojas* / 1 unidad 235 mm 0,44 kW aprox. 55 dB(A) 10 / 45 min 380 x 330 x 550 mm 16 kg
intimus 26CC3 4x28 mm / 6 mm 9 hojas* / 1 unidad 235 mm 0,44 kW aprox. 55 dB(A) 10 / 45 min 380 x 330 x 550 mm 18 kg
intimus 32SC2 4 mm/ 6 mm 17 hojas* / 1 unidad 235 mm 0,55 kW aprox. 55 dB(A) 10 / 45 min 390 x 360 x 600 mm 19 kg
intimus 32CC3 4x28 mm / 6 mm 12 hojas* / 1 unidad 235 mm 0,55 kW aprox. 55 dB(A) 10 / 45 min 390 x 360 x 600 mm 21 kg
intimus 38SC2 4 mm / 6 mm 22 hojas* / 1 unidad 245 mm 0,74 kW aprox. 55 dB(A) 30 / 90 min 420 x 380 x 700 mm 29 kg
intimus 38CC3 4x28 mm / 6 mm 16 hojas* / 1 unidad 245 mm 0,74 kW aprox. 55 dB(A) 30 / 90 min 420 x 380 x 700 mm 30 kg
intimus 38CC4 1,9x15 mm / 6 mm 13 hojas* / 1 unidad 245 mm 0,74 kW aprox. 55 dB(A) 30 / 90 min 420 x 380 x 700 mm 30 kg
intimus 50SC2 4 mm / 6 mm 26 hojas* / 1 unidad 260 mm 0,75 kW aprox. 55 dB(A) 30 / 90 min 450 x 390 x 800 mm 33 kg
intimus 50CC3 4x28 mm / 6 mm 19 hojas* / 1 unidad 260 mm 0,75 kW aprox. 55 dB(A) 30 / 90 min 450 x 390 x 800 mm 33 kg
intimus 50CC4 1,9x15 mm / 6 mm 15 hojas* / 1 unidad 260 mm 0,90 kW aprox. 55 dB(A) 30 / 90 min 450 x 390 x 800 mm 35 kg
* referido a papel formato A4 70g/m2a 230V/50Hz -10%
Modelo Datos de conexión a la red
tensión de conexión / frecuencia / consumo de corriente
intimus 26SC2 220V-240V/50Hz, 2,0A 120V/60Hz, ---- A 100V/50/60Hz, ---- A
intimus 26CC3 220V-240V/50Hz, 2,0 A 120V/60Hz, ----A 100V/50/60Hz, ---- A
intimus 32SC2 220V-240V/50Hz, 2,5A 120V/60Hz, ---- A 100V/50/60Hz, ---- A
intimus 32CC3 220V-240V/50Hz, 2,5 A 120V/60Hz, ----A 100V/50/60Hz, ---- A
intimus 38SC2 220V-240V/50Hz, 3,0A 120V/60Hz, ---- A 100V/50/60Hz, ---- A
intimus 38CC3 220V-240V/50Hz, 3,0 A 120V/60Hz, ----A 100V/50/60Hz, ---- A
intimus 38CC4 220V-240V/50Hz, 3,0 A 120V/60Hz, ----A 100V/50/60Hz, ---- A
intimus 50SC2 220V-240V/50Hz, 2,9A 120V/60Hz, ---- A 100V/50/60Hz, ---- A
intimus 50CC3 220V-240V/50Hz, 2,9 A 120V/60Hz, ----A 100V/50/60Hz, ---- A
intimus 50CC4 220V-240V/50Hz, 3,5 A 120V/60Hz, ----A 100V/50/60Hz, ---- A
ACCESSORIO ESPECIAL
Denominación N° de pedido
Saco de plástico, 300x300x700x0,018 mm (26/32) 99925
Saco de plástico, 440x330x950x0,05 mm (38/50) 99977
Botellita de aceite, 110 ml 88035
Inicación: En el caso de pedidos ulteriores de accesorios
especiales y de piezas de repuesto, rogamos se dirija a
nuestro representante oficial.
16
http://www.monomachines.com/
•
intimu5
+

P
26SC2
26CC3
32SC2
32CC3
38SC2
38CC3
38CC4
50SC2
50CC3
50CC4
INSTRUÇÕES DE SEGURANÇA IMPORTANTES
ENTRADA EM FUNCIONAMENTO
<< O aparelho não deve ser manejado por
várias pessoas ao mesmo tempo!
Os elementos de segurança servem para
um manejo sem perigo no „servigo por um
só operador“.
<< Durante a operação de corte de papel não
devem ser realizados outros trabalhos na
máquina (por exemplo limpezas, etc.)!
<< A máquina não é brinquedo e não
é apropriada para a utilização por
crianças!
Os aspectos de técnica de segurança
(dimensões, aberturas de alimentação,
dispositivos de desligamento de segurança,
etc.) desta máquina não implicam qualquer
garantia de manuseio seguro por crianças.
UTILIZAÇÃO
ELEMENTOS DE COMANDO:
1 = Tecla basculantes ”Liga/Desliga“ (Img. 2)
Com auxílio desta tecla a máquina é ligada e
desligada.
2 = Tecla de serviço (Img. 1)
”Pronto para funcionamento“/”Sleep“/
”Stop“
Esta tecla tem três funções:
a) Modo “Pronto para funcionamento“
Tocarbrevementeestateclanomodo”Sleep“
comuta a máquina para o modo ”Pronto para
funcionamento“.
No modo ”Pronto para funcionamento“
acende-se ao mesmo tempo a indicação
LED integrada .
a) Modo “Sleep“
Premir esta tecla no modo ”Pronto para
funcionamento“ por aprox. 3 seg., para que
a máquina comute para o modo ”Sleep“.
Indicação: Se a máquina não for utilizada
por aprox. 30 min., ela comuta de modo
automático para o modo ”Sleep“.
b) Função “Stop“
Ao tocar brevemente esta tecla, com o
cortador em funcionamento, o cortador
desliga e para.
3 = Tecla marcha para frente (Img. 1)
Esta tecla tem duas funções:
a) Tocar brevemente esta tecla para que o
cortador trabalhe em marcha para frente por
alguns segundos, p.ex. para retirar material
cortado que eventualmente tenha ficado
dentro do cortador.
<< Risco de ferimento! Manter
peças de vestuários penden-
tes, gravatas, jóias, cabelos
compridos ou outros abjectos
pendentes afastados da aber-
tura para alimentação!
<< Risco de ferimento! Não colocar as mãos
na abertura para alimentação!
<< Em caso de perigo, desligar a máquina
no interruptor principal, ou no interruptor
de emergência, ou desligar a ficha da
tomada!
<< Antes de abrir a máquina deve desligar a
ficha da tomada!
Todasasreparaçõesdevemserexecutadas
por especialistas!
b) Premir esta tecla por aprox. dois seg., para
que o cortador trabalhe em marcha para
frente de modo contínuo, e o material a ser
cortado pode ser inserido na máquina. Ao
mesmo tempo a indicação LED integrada
acende.
4 = Tecla marcha para trás (Img. 1)
Premir esta tecla para que o cortador trabalhe
em marcha para trás. Ao mesmo tempo a
indicação LED integrada acende.
Indicação: O cortador trabalha em marcha
para trás somente enquanto a tecla for mantida
premida (função da tecla).
5 = Barreira luminosa (marcha para frente) (Img.
3)
Dá início ao processo de trituração assim que o
material é inserido em uma das duas ranhuras
de alimentação.
6 = Indicação de controlo
”Congestionamento de material“ (Img. 1)
Acende quando há um excesso de material
dentro do cortador. O cortador bloqueia, em
seguida ele trabalha ainda brevemente em
marcha para trás e para. O motor é desligado.
7 = Indicação de controlo
”Lubrificar o cortador“ (Img. 1)
Acende quando o cortador da versão cross-cut
tem de ser lubrificado (vide ”MANUTENÇÃO
CORTADOR“).
8 = Indicação de controlo
“Falta recipiente“ (Img. 1)
Acendequando orecipiente derecolhanão está
correctamente inserido. Quando o recipiente é
retirado,a máquina desligade modoautomático
e não pode ser ligada sem que o recipiente
ÁREA DE APLICAÇÃO:
O triturador intimus 26SC2/CC3 / 32SC2/CC3
/ 38SC2/CC3/CC4 / 50SC2/CC3/CC4 é uma
máquina destruidora de papel em geral, e de
suportes informáticos como CDs, DVDs, cartões
de crédito e disquetes 3,5” (só modelos 38/50).
Amáquina somentedeve serutilizada
para destruir papéis e cartões de
crédito, assim como, para CDs, DVDs
e disquetes 3,5” (modelos 38/50)!
A trituração de outros suportes
informáticos pode danificar o aparelho
(p.ex. quebra do cortador, etc.).
INSTALAÇÃO:
- Desempacote a máquina e coloque-a no sitio
desejado.
- Coloque os sacos de plástico no recipiente de
saida de papel.
- Ligar o aparelho corrente. (Dados as medidas
de precaução necessárias para a instalação
da tomada em „DADOS TÉCNICOS“).
A ligação à rede da máquina tem que
ser livremente acessível!
A máquina deve apenas ser instalada
em salas fechadas e com uma tempe-
ratura de 10 a 25°!
UTILIZAÇÃO
9 = Indicação de controlo
”Sobrecarga do motor“ (Img. 1)
Acende quando o motor foi sobrecarregado
e desligou. A máquina não pode ser ligada
durante a fase de arrefecimento do motor.
10 = Indicação de controlo
”Trava do usuário activa“ (Img. 1)
Acende quando a trava do usuário está activa.
Para desactivar a trava do usuário, vide
descrição do capítulo ”LIGAR A MÁQUINA“.
11 = Indicação de controlo
“Recipiente cheio“ (Img. 1)
Acende quando o recipiente de recolha está
cheio e tem de ser esvaziado.Ao mesmo tempo
a máquina desliga de modo automático.
12 = Ranhura de alimentação (Img. 3)
13 = Ranhura de alimentação de segurança (Img.
3)
14 = Recipiente de recolha de papel (Img. 4)
15 = Recipiente de recolha CD/DVD (Img. 4)
16 = Apoio (Img. 4)
17 = Recipiente de óleo (Img. 6)
A desfibradora não pode ser utilizada
como meio de apoio de cargas. Perigo de
queda, devido à reptura do material!
tenha sido inserido.
3
9
10
11
4
13
12
6
7
8
2
1
5
Fig. 1 Fig. 2 Fig. 3
17
http://www.monomachines.com/
intimu5
~
(i)~
~
(t)
~
@I
~.
•
.\l•
+

P
26SC2
26CC3
32SC2
32CC3
38SC2
38CC3
38CC4
50SC2
50CC3
50CC4
UTILIZAÇÃO
Modelos intimus 38 / intimus 50
Afim de garantir um apoio seguro também para
máquinas de maior volume, é necessário que os
quatro pés de apoio (16) (Img. 4) junto ao fundo
da carcaça sejam desaparafusados até o fundo!
LIGAR A MÁQUINA:
Indicação: Quando do fornecimento, a função de trava do
usuário está desligada.
Informações referentes ao ligar e desligar da trava do usuário
constam do capítulo ”UTILIZAÇÃO DATRAVA DO USUÁRIO“.
Para ligar a máquina, comutar para o modo ”pronto para
funcionamento“ e, conforme o ajuste actual programado,
proceda como descrito a seguir:
Ajuste ”Trava do usuário desligada“
- Ligar a máquina por intermédio da tecla basculante (1)
(posição ”1“).
- Accionar brevemente a tecla de serviço (2).
- A indicação LED da tecla de serviço (2) acende para o
modo ”pronto para funcionamento“.
- A máquina pode ser alimentada.
Ajuste ”Trava do usuário ligada“
Indicação: Para ligar a máquina, a trava do usuário é
desactivada por um curto momento, no processo descrito a
seguir.
- Ligar a máquina por intermédio da tecla basculante (1)
(posição ”1“).
- Accionar brevemente a tecla de serviço (2).
- A indicação de controlo ”trava do usuário activa“ (10)
acende.
- Manter premidas ao mesmo tempo a tecla de marcha para
frente (3) e a tecla de marcha para trás (4) por aprox. 2
seg.
- A indicação LED da tecla de serviço (2) pisca para ”não
pronto para funcionamento“.
- Accionar brevemente a tecla de serviço (2).
- A indicação LED da tecla de serviço (2) agora acende
de modo permanente para ”pronto para funcionamento“. A
indicação de controlo (10) apaga.
- A máquina pode ser alimentada.
Indicação: Ao ligar a máquina repetidas vezes a partir do
modo ”Sleep“, a trava do usuário activa deve sempre ser
novamente desactivada.
ALIMENTAÇÃO DO MATERIAL:
Papel – inserir o papel na ranhura de alimentação (12) (Img. 3)
para que o cortador possa trabalhar.
Suportes informáticos (CD, DVD ou cartões de crédito)
– inserir suportes informáticos um por um na ranhura de
alimentação de segurança em separado (13) (Img. 3) para que
o cortador possa trabalhar.
A máquina comuta de modo automático para a marcha para
frente, puxa o material, e desliga de modo automático depois
de finalizado o processo de trituração.
Ao introduzir papel, nunca introduzir ao mesmo
tempo CD/DVD e vice-versa!
3
9
10
11
4
6
7
8
2
Indicação: Para triturar folhas translúcidas a máquina tem
de ser comutada de modo manual para marcha para frente
(manter a tecla marcha para frente (3) premida por aprox. 2
seg.).
Para interromper o processo de trituração a qualquer
momento, basta accionar brevemente a tecla de serviço (2)
(função ”Stop“). Para prosseguir, manter a tecla marcha para
frente (3) premida por aprox. 2 seg.
Se a máquina não for utilizada durante aprox. 30 min., ela
comutademodo automáticoparao modo”Sleep“.Sea travado
usuário estiver activa, ela tem de ser novamente desactivada
quando a máquina é religada (vide ”LIGAR A MÁQUINA“).
Nunca insira no aparelho uma quantidade
superior de material àquela indicada como limite
máximo (vide ”DADOS TÉCNICOS“)!
Caso ainda assim a quantidade de material
inserida seja demasiada para o cortador, vide as
indicações do capítulo ”AVARIAS“ sob o ponto
”CONGESTIONAMENTO DE MATERIAL NO
APARELHO“.
ESVAZIAR O RECIPIENTE DE RECOLHA (Img. 4):
Para que a separação dos resíduos possa ser feita de modo
correcto, o recipiente de recolha dispõe de uma subdivisão.
De um lado temos o recipiente de recolha de papel (14)
propriamente dito, e do outro um recipiente de recolha em
separado (15) para os resíduos de trituração de CDs, DVDs
e cartões de crédito.
O nível de enchimento do colector (15) não é
indicado pelo monitor de enchimento da cesta!
Quanto do trituramento de quantidades maiores
CD’s/ DVD’s (aprox. 25 unidades por enchimento)
queira vez por outra controlar o nível de enchimento
do colector e esvazie-o, caso necessário esvazie o
colector em separado.
Quando o recipiente de recolha de papel está cheio, a máquina
desliga de modo automático. A indicação de controlo (11)
acende. Proceda então conforme descrito a seguir:
- Puxar para fora na parte de baixo da carcaça o recipiente
de recolha (14) com dispositivo especial de recolha (15).
A indicação de controlo (8) acende e a indicação de
controlo (11) apaga.
- Ao jogar fora o conteúdo dos recipientes disponha-os em
lixos separados.
- Recolocar o recipiente vazio com o dispositivo de recolha
novamente na parte inferior da carcaça. A indicação de
controlo (8) apaga. Se ainda houver material nas
ranhuras de alimentação, a indicação de controlo (6)
acenderá agora.
- Accionar brevemente a tecla marcha para frente (3). O
material restante é triturado e a indicação (6) apaga.
Indicação: A máquina somente trabalha, se o recipiente de
recolha estiver totalmente inserido!
INDICAÇÃO DINÁMICA DE CARGA:
Modelos intimus 38 / intimus 50
Afim de evitar um congestionamento de material, e por
tanto garantir a destruição contínua e efectiva de suportes
informáticos, o grau de carga respectivamente actual do motor
durante o processo de trituração é indicado por intermédio
de uma luz difusa, de coloração específica, na ranhura de
alimentação, conforme indicado a seguir:
Luz verde: carga < 50%
Luz amarela: carga 50 - 75%
Luz vermelha: carga 75 - 100%
MODO “SLEEP“ MANUAL:
Ao premir e manter premida por aprox. 3 seg. a tecla de
serviço (2) no modo ‘pronto para funcionamento’, a máquina
é comutada de modo manual para o modo ”Sleep“. Se a
trava do usuário estiver activa, é activada ao mesmo tempo
a função de travamento da trava do usuário. A máquina não
pode ser ligada. Para desactivar a trava do usuário, queira ler
as instruções do capítulo ”LIGAR A MÁQUINA“.
UTILIZAÇÃO DA TRAVA DO USUÁRIO:
Activar o modo de programação:
Para chegar ao modo de programação a máquina deve estar
ajustada em ”pronto para funcionamento“ (vide o capítulo
”LIGAR A MÁQUINA“).
Proceda conforme descrito a seguir:
- Puxar para fora o recipiente de recolha (14) até que a
indicação de controlo (8) acenda.
- Manter premida por aprox. 4 seg. a tecla marcha para frente
(3). A indicação LED integrada pisca.
Agora você está no modo de programação.
Indicação:Seaprogramaçãonãoforfinalizadadentrodoprazo
de programação de aprox. 20 segundos, a máquina retorna
automaticamente para o modo ”pronto para funcionamento“.
Ligar a sequência de programação trava do usuário:
- Activar o modo de programação (vide acima).
- Accionar ao mesmo tempo a tecla marcha para frente (3) e
a tecla marcha para trás (4), e manter as teclas premidas,
até que as indicações de controlo (10), (2) e (4)
comecem a piscar.
- Voltar a inserir o recipiente.
A programação está concluída. O modo de programação é
abandonado de modo automático. Como indicação visual da
confirmação da programação efectuada, as indicações de
controlo (10), (2) e (4) ainda piscam durante aprox.
5 seg.
Desligar a sequência de programação trava do usuário:
- Activar o modo de programação (vide acima).
- Accionar ao mesmo tempo a tecla marcha para frente (3) e a
tecla marcha para trás (4), e manter as teclas premidas, até
que as indicações de controlo (10) e (4) comecem a
piscar.
- Voltar a inserir o recipiente.
A programação está concluída. O modo de programação é
abandonado de modo automático. Como indicação visual da
confirmação da programação efectuada, as indicações de
controlo (10) e (4) ainda piscam durante aprox. 5 seg.
15
14
16
Fig. 1 Fig. 4
18
http://www.monomachines.com/
®
intimu5
®6
+l
+

P
26SC2
26CC3
32SC2
32CC3
38SC2
38CC3
38CC4
50SC2
50CC3
50CC4
AVARIAS
CONGESTIONAMENTO DE MATERIAL NO APARELHO:
(Função Auto-Reverse)
O congestionamento ocorre, quando a máquina é alimentada com
um excesso de material; neste caso a máquina reage conforme
descrito a seguir:
- O cortador bloqueia, trabalha por um breve momento em marcha
para trás (afim de liberar o material) e para. O motor desliga.
- A indicação de controlo (6) acende.
Proceda conforme descrito a seguir:
Congestionamento de papel na ranhura de alimentação (12)
- Retirar o papel liberado da ranhura de alimentação (12).
- O cortador trabalha em marcha para frente de modo automático e
tritura o resto de papel que permaneceu no cortador.
- A indicação de controlo (6) apaga. A indicação LED da
tecla de marcha para frente (3) acende de modo permanente.
- Dar continuidade à trituração com uma quantidade menor de
papel.
Congestionamento de material na ranhura de alimentação de
segurança (13)
- Retirar o material inserido.
Retirar o material com cuidado, os pontos de
corte com suas bordas afiadas oferecem risco de
ferimento!
- Agora, o material restante a ser cortado é novamente levado ao
cortador de modo automático e triturado.
- A indicação de controlo (6) apaga. A indicação LED da
tecla de marcha para frente (3) acende de modo permanente.
- Depois que o material a ser cortado tiver passado pelo aparelho,
continuar o trabalho com a dosagem correcta.
- Caso necessário, comutar o cortador de modo manual
alternadamente na marcha para frente e para trás, até que
o material a ser cortado tenha passado pelo aparelho e esteja
totalmente cortado.
A cada vez que comutar outra direcção de trabalho,
aguardar até que o motor esteja parado!
PROTECÇÃO DO MOTOR:
Caso o motor seja sobrecarregado, ele desliga. A indicação de
controlo (9) pisca. Desligue o aparelho com a tecla basculante
(1).
Após um tempo para arrefecimento de aprox. 25-40 minutos
(dependendo do modelo e da temperatura ambiente) o aparelho
pode ser novamente ligado.
MANUTENÇAO / DISPOSIÇÃO
LISTA DE VERIFICAÇÃO EM CASO DE FALHA:
Caso o aparelho não trabalhe, verifique os seguintes pontos:
- a ficha de rede está ligada na tomada?
- a tecla basculante (1) está ligada?
- o aparelho está no modo ”Sleep“?
Videocapítulo”CONTROLOAUTOMÁTICOPARAECONOMIZAR
ENERGIA“.
- a trava do usuário foi activada?
Vide o capítulo ”UTILIZAÇÃO DATRAVA DO USUÁRIO“.
- o recipiente de recolha foi inserido?
- o recipiente de recolha está cheio?
Siga as instruções do capítulo ”ESVAZIAR O RECIPIENTE DE
RECOLHA“.
- há um congestionamento de material no aparelho?
Siga as instruções do capítulo ”CONGESTIONAMENTO DE
MATERIAL NO APARELHO“.
- omotor foi sobrecarregado?
Vide o capítulo ”PROTECÇÃO DO MOTOR “.
Caso nenhum deste pontos sirva para solucionar o
problema, queira entrar em contacto com o seu comerciante
especializado.
LIMPEZA DAS
CÉLULAS FOTOELECTRICAS (Fig. 5):
Casoalgumpedaçodepapelfiquepresonaranhuradealimentação
(por exemplo, após um congestionamento de papel) é possivel
queoaparelhojánãodesligueatravésdodispositivofotoeléctrico
e fique „ocupado“.
Retire o pedaço de papel e respectivamente limpe a célula foto-
eléctrica, introduzindo no mecanismo de corte mais uma folha de
papel,rebobinandoamáquinaoupassandorapidamentecomum
pincel por cima dos dois „olhos“ da cécula fotoeléctrica.
Fig. 5
17
Fig. 6
MANUTENÇÃO CORTADOR (CROSS-CUT):
Cortadores cross-cut devem ser lubrificados após um
determinado tempo de funcionamento.
Se a indicação de controlo (7) acender, proceda
conforme descrito a seguir:
Puxar para fora o recipiente de recolha (14), retirar o recipiente
de óleo (17) (Img. 6) da sua fixação no armário inferior e voltar
a inserir o recipiente.
Dispôr um pouco de óleo sobre uma folha de papel e inserir
esta folha na ranhura de alimentação (12) para que passe pelo
cortador.
O papel é puxado para dentro do aparelho e deste modo o óleo
de lubrificação chega até o cortador.
Confirmar a lubrificação conforme descrito a seguir:
- Puxar o recipiente de recolha (14) para fora até que a
indicação de controlo (8) acenda.
- As indicações de controlo (7) e (4) piscam.
- Accionar a tecla de marcha a ré (4) e matê-la premida até que
a indicação de controlo (7) apague.
- Voltar a inserir o recipiente.
O cortador agora inicia de modo automático o ciclo de limpeza
(marcha para frente/marcha para trás) e em seguida desliga.
A máquina está novamente pronta para ser utilizada. Para
encomendar nova remessa do óleo especial, vide o capítulo
”ACESSÓRIOS ESPECIAIS“.
CONTROLO AUTOMÁTICO PARA ECONOMIZAR ENERGIA:
Se a máquina não for utilizada durante algum tempo, ela comuta
de modo automático, após aprox. 30 minutos, para o dito modo
“Sleep“.A indicação LED da tecla de serviço (2) para o modo
”pronto para funcionamento“ apaga. Para religar o aparelho,
accionar brevemente a tecla de serviço. Se a trava do usuário
estiver activa, esta tem de ser novamente desactivada quando a
máquina é religada (vide o capítulo ”LIGAR A MÁQUINA“).
DISPOSIÇÃO DA MÁQUINA:
Quando jogar a máquina fora, cuide que a disposição
da mesma seja condizente com as normas de
proteção do meio ambiente. Não disponha partes da
máquina ou da sua embalagem no lixo caseiro.
DADOS TECNICOS
Modelo Largura do corte
papel / CD,DVD
Produtividade do corte
papel / CD,DVD
Lagura de trabalho
Potência Nivel de ruido Serviço intermitente
LIGAR / DESLIGAR Dimensões
L x P x A Peso
intimus 26SC2 4 mm / 6 mm 13 folhas* / 1 unidade 235 mm 0,44 kW 55 dB(A) (aprox) 10 / 45 min 380 x 330 x 550 mm 16 kg
intimus 26CC3 4x28 mm / 6 mm 9 folhas* / 1 unidade 235 mm 0,44 kW 55 dB(A) (aprox) 10 / 45 min 380 x 330 x 550 mm 18 kg
intimus 32SC2 4 mm/ 6 mm 17 folhas* / 1 unidade 235 mm 0,55 kW 55 dB(A) (aprox) 10 / 45 min 390 x 360 x 600 mm 19 kg
intimus 32CC3 4x28 mm / 6 mm 12 folhas* / 1 unidade 235 mm 0,55 kW 55 dB(A) (aprox) 10 / 45 min 390 x 360 x 600 mm 21 kg
intimus 38SC2 4 mm / 6 mm 22 folhas* / 1 unidade 245 mm 0,74 kW 55 dB(A) (aprox) 30 / 90 min 420 x 380 x 700 mm 29 kg
intimus 38CC3 4x28 mm / 6 mm 16 folhas* / 1 unidade 245 mm 0,74 kW 55 dB(A) (aprox) 30 / 90 min 420 x 380 x 700 mm 30 kg
intimus 38CC4 1,9x15 mm / 6 mm 13 folhas* / 1 unidade 245 mm 0,74 kW 55 dB(A) (aprox) 30 / 90 min 420 x 380 x 700 mm 30 kg
intimus 50SC2 4 mm / 6 mm 26 folhas* / 1 unidade 260 mm 0,75 kW 55 dB(A) (aprox) 30 / 90 min 450 x 390 x 800 mm 33 kg
intimus 50CC3 4x28 mm / 6 mm 19 folhas* / 1 unidade 260 mm 0,75 kW 55 dB(A) (aprox) 30 / 90 min 450 x 390 x 800 mm 33 kg
intimus 50CC4 1,9x15 mm / 6 mm 15 folhas* / 1 unidade 260 mm 0,90 kW 55 dB(A) (aprox) 30 / 90 min 450 x 390 x 800 mm 35 kg
* Referente a papel A4 70g/m2com 230V/50Hz -10%
Modelo Dados de conexão à rede
Tensão de conexão / Frequência / Consumo de corrente
intimus 26SC2 220V-240V/50Hz, 2,0A 120V/60Hz, ---- A 100V/50/60Hz, ---- A
intimus 26CC3 220V-240V/50Hz, 2,0 A 120V/60Hz, ----A 100V/50/60Hz, ---- A
intimus 32SC2 220V-240V/50Hz, 2,5A 120V/60Hz, ---- A 100V/50/60Hz, ---- A
intimus 32CC3 220V-240V/50Hz, 2,5 A 120V/60Hz, ----A 100V/50/60Hz, ---- A
intimus 38SC2 220V-240V/50Hz, 3,0A 120V/60Hz, ---- A 100V/50/60Hz, ---- A
intimus 38CC3 220V-240V/50Hz, 3,0 A 120V/60Hz, ----A 100V/50/60Hz, ---- A
intimus 38CC4 220V-240V/50Hz, 3,0 A 120V/60Hz, ----A 100V/50/60Hz, ---- A
intimus 50SC2 220V-240V/50Hz, 2,9A 120V/60Hz, ---- A 100V/50/60Hz, ---- A
intimus 50CC3 220V-240V/50Hz, 2,9 A 120V/60Hz, ----A 100V/50/60Hz, ---- A
intimus 50CC4 220V-240V/50Hz, 3,5 A 120V/60Hz, ----A 100V/50/60Hz, ---- A
ACESSORIOS ESPECIAIS
Designação N° de encomenda
Saco de plástico, 300x300x700x0,018 mm (26/32) 99925
Saco de plástico, 440x330x950x0,05 mm (38/50) 99977
Frasco de óleo, 110 ml 88035
Indicação: No caso de encomendar mais tarde peças dos
acessórios especiais e no caso de necessitar peças de repo-
sição, dirija-se ao seu revendedor especializado.
19
http://www.monomachines.com/
-+
•
intimu5
-+
6

I
26SC2
26CC3
32SC2
32CC3
38SC2
38CC3
38CC4
50SC2
50CC3
50CC4
IMPORTANTI ISTRUZIONI DI SICUREZZA MESSA IN FUNZIONE
<< L‘apparecchio non deve essere usato << Pericolo di lesioni! Evitare
contemporaneamente da più persone! l‘avvicinamento alla bocca
Ladisposizione degli elementidi sicurezzasi d‘immission di parti di indu-
basa su un uso esente da pericoli in „Funzio- menti, cravatte, monili, capelli
namento con un solo operatore“. lunghi o altri oggetti sciolti!
<< Pericolo di lesioni! Non avvicinarsi con le
<< Durante il procedimento di trinciatura è dita alla bocca d‘immissione!
proibito altri lavori alla macchina /ad es.
interventi di pulizia ecc.)! << IIn casi di pericolo disinnestare la mac-
china mediante l‘interruttore principale,
<< Questa macchina non è un giocattolo e oppure tramite il pulsante d‘emergenza o
non è pertanto adatta all’uso da parte di staccando la spina!
bambini!
La concezione di sicurezza della macchina << Innanzil‘aperturadellamacchinastaccare
(dimensioni, aperture di alimentazione, la spina!
interdizionidisicurezzaecc.)nonprevedeuna
Eventuali riparazioni andranno eseguite
manipolazione sicura da parte dei bambini.
USO
ELEMENTI DI COMANDO
1 = Interruttore “On/Off” (Fig. 2)
Questo pulsante consente di spegnere o
accedere la macchina.
2 = Tasto di funzione (Fig. 1)
“Pronto per il funzionamento”/”Sleep”/
”Stop” 4
Questo tasto contiene tre funzioni:
a) Modalità “Pronto per il
funzionamento”
Con una leggera pressione di questo
pulsante, la macchina passerà dalla
modalità “Sleep” alla modalità “Pronto
per il funzionamento”. 5
Inmodalità“Prontoper ilfunzionamento”
si accenderà il LED integrato .
a) Modalità “Sleep”
Premendo questo pulsante per circa 6
3 secondi, la macchina passerà dalla
modalità “Pronto per il funzionamento”
alla modalità “Sleep”.
Nota: in caso di mancato utilizzo per
un periodo di tempo di ca. 30 minuti, la
macchina passerà automaticamente in 7
modalità “Sleep”.
b) Funzione “Stop”
Per arrestare e disattivare la taglierina in
funzione, premere brevemente questo
pulsante.
3 = Tasti “Avanti” (Fig. 1) 8
Questo tasto contiene due funzioni:
a) Se si preme brevemente questo tasto,
la taglierina procede in avanti per un
paio di secondi, in modo da rimuovere,
ad esempio, del materiale rimasto
all’interno della taglierina stessa.
esclusivamente da personale specializzato!
b) Se si preme questo tasto per circa
due secondi, la taglierina scorre in
avanti in funzionamento continuo e
sarà possibile alimentare la macchina.
Contemporaneamente, si accenderà il
LED integrato .
= Tasto “Indietro” (Fig. 1)
Premere questo tasto per far scorrere
indietrolataglierina.Contemporaneamente,
si accenderà il LED integrato .
Nota: la taglierina procederà all’indietro
sino a quando il tasto verrà premuto
(funzione a tasto).
= Fotocellula (avanzamento) (Fig. 3)
Avvia il processo di distruzione con
l’inserimento del materiale in uno dei due
vani di alimentazione.
= Led di controllo
“Intasamento materiale” (Fig. 1)
Si accende se nella taglierina è stata
inseritaunaquantitàdimaterialeeccessiva.
La taglierina si blocca, scorre all’indietro e
si arresta. Il motore si disattiva.
= Led di controllo
“Oliare taglierina” (Fig. 1)
Si accende se è necessario oliare la
taglierina della versione Cross-Cut
(consultare il punto “MANUTENZIONE
TAGLIERINA”)
= Led di controllo
“Contenitore non presente” (Fig. 1)
Siaccendeseilcontenitorediraccoltanonè
stato completamente inserito. La macchina
viene automaticamente disattivata in fase
di estrazione del contenitore e non è
possibile avviarla se il contenitore non è
inserito.
CAMPO DI IMPIEGO:
Ildistruttoredidocumentiintimus 26SC2/CC3 / 32SC2/
CC3/38SC2/CC3/CC4/50SC2/CC3/CC4èunamacchi-
na concepita per la trinciatura di documenti scritti in senso
generale nonché di supporti dati come CD, DVD, carte di
credito e floppy disc 3,5” (solo modelli 38/50).
Lamacchinapuòessereimpiegatasoloper
la trinciatura di materiale cartaceo e carte
di credito nonché di CD, DVD e floppy disc
3,5” (modelli 38/50)!
La trinciatura di supporti dati di altro tipo può
provocare danni all‘apparecchio (p. es. la
distruzione della taglierina ecc.).
PLAZZAMENTO DELLA MACCHINA:
- Togliere l‘imballaggio e piazzare la macchina.
- Infilare il sacco di raccolta in plastica o carta nella
tramoggia.
- Eseguire l‘allacciamento dell‘apparecchiatura alla rete
d‘alimentazionemediante l‘innestodella spina.(Idati
relativi alle valvole di sicurezza sono esposti nel cap.
„DATI TECNICI“).
L’allacciamento alla la rete di alimentazione
della macchina deve risultare facilmente ac-
cessibilee dovrebbetrovarsinellevicinanze
della macchina!
La macchina andrà piazzata e utilizzata
solamente in luoghi chiusi temperati (10-
25°C)!
USO
9 = Led di controllo
“Sovraccarico motore” (Fig. 1)
Si accende se il motore è stato
sovraccaricato e si è disinserito. Se il
motore si trova in fase di raffreddamento,
non sarà possibile avviare la macchina.
10 = Led di controllo
“Blocco utente attivo” (Fig. 1)
Si accende se il blocco utente è attivo. Per
disattivareilbloccoconsultareladescrizione
presente al punto “ACCENSIONE DELLA
MACCHINA”.
11 = Led di controllo
“Contenitore pieno “ (Fig. 1)
Si accende se il contenitore di raccolta
è pieno e deve essere svuotato.
Contemporaneamente, la macchina si
disinserisce in automatico.
12 = Vano di alimentazione carta (Fig. 3)
13 = Vano di alimentazione carta di sicurezza
(Fig. 3)
14 = Contenitore di raccolta carta (Fig. 4)
15 = Vassoio di raccolta CD/DVD (Fig. 4)
16 = Piedini di supporto (Fig. 4)
17 = Contenitore dell’olio (Fig. 6)
Non sedersi né pestare mai il triturato-
re. Potrebbe rompersi e cadere provo-
cando danni a persone e/o cose!
3
9
10
11
4
13
12
6
7
8
2
1
5
Fig. 1 Fig. 2 Fig. 3
20
http://www.monomachines.com/
intimu5
~
(f)~
~
~
~
®
~
_\
t•
+
6
This manual suits for next models
9
Table of contents
Languages:
Other Mono Machines Paper Shredder manuals