Mooer HORNET 05i User manual

Owner'sManual

CONTENTS
PRECAUTIONS----------------------------------------------------------------------------------------01-02
-----------------------------------------------------------------------------------------03FEATURES
-------------------------------------------------------------------------------------------------04-05LAYOUT
--------------------------------------------------------------------------------------------06CONNECTION
----------------------------------------------------------------------------------------------07QUICKSTART
INSTRUCTIONS-------------------------------------------------------------------------------------------08
------------------------------------------------------------------------09-10MOOER iAMP App
--------------------------------------------------------------10-13MOOERF4WIRELESSFOOTSWITCH
--------------------------------------------------------------------19-21OTGR ECORDING/PLAYBACK
-------------------------------------------------------------------------------------------------15-20TONE
SPECIFICATIONS---------------------------------------------------------------------------------------21

01
PRECAUTIONS
PowerSupply
PleaseconnecttheDCPOWERSupplytoanACoutletofthecorrectvoltage.Pleasebesuretouse
onlyanACadapterthatsupplies 7.8V(±5%)DC,centernegative,2000mAcurrentdraw.Unplugthe
ACpoweradapterwhennotinuseorduringelectricalstorms.
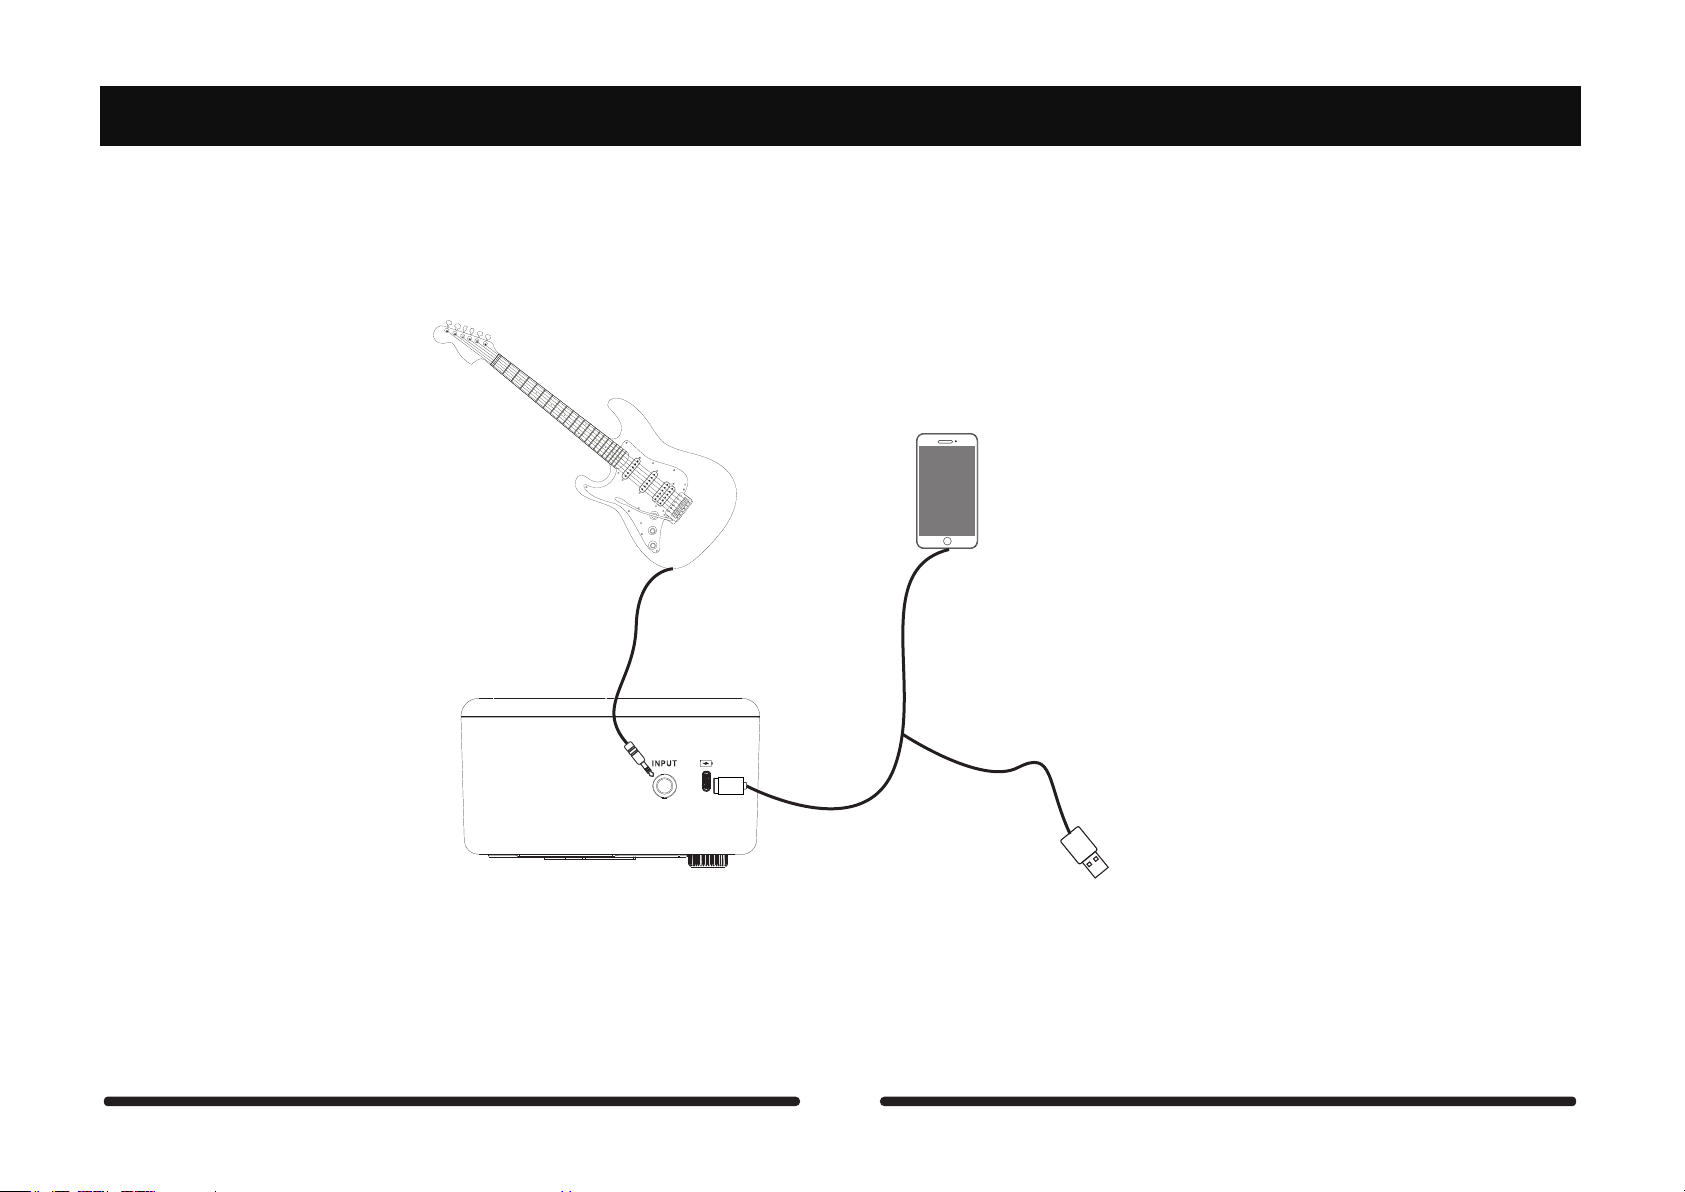
Connections
Alwaysturnoffthepoweroftheamplifierandotherdevicesbeforesettinguptheconnectionto
avoidmalfunctionandunexpecteddamage.Inaddition,beforeyoumovetheamplifier,please
ensuretheamplifierispoweredoff,anddisconnectitfromtheotherdevice.
Pleasepowerofftheamplifier,andunplugthepowersupply,iftheamplifierisidleforalongtime.
Pleasedonotusetheamplifierduringanelectricalstorm,poweroffthedeviceandunplugthe
powercordfromthesocket.
Location
●Toavoiddeformation,discoloration,orotherseriousdamage,donotexposethisunittothe
followingconditions:
●Directsunlight ●Extremetemperatureorhumidity
●Excessivedustyordirtylocation ●Magneticfields
●Highhumidityormoisture ●Strongvibrationsorshocks

Cleaning
Cleanonlywithasoft,drycloth.Ifnecessary,slightlymoistenthecloth.Donotuseabrasivecleaners,
cleaningalcohol,paintthinners,wax,solvents,cleaningfluids,orchemical-impregnatedwipingcloths.
Operation
●Pleasedonottoggletheswitch,rotatetheknobheavily.
●Pleasedonotletthepaperscrap,metaldebris,orothersundriesfallsinsidetheunit.
●Pleasedonotlettheunitfallfromahighlevel,push,orstriketheunitheavily.
●Pleasedonotmodifytheunitwithoutauthorization.
●Forrepairingservice,pleasecontacttheMOOERsupportteamformoreinformation.
02

03
Features
● DigitalmodellingamplifierbasedontheMOOERIntelligentAMPsystem.
● 52ampmodelscreatedwithMNRStechnology,and49classicandexperimentaleffects.
● 5-wattDclassamplifierwithatwo-inchloudspeakers.
●40drummachinevarietiesand10metronomes.
●80-secondlooperthatcansyncwiththedrummachine.
●Comeswithtunerfortuningyourinstrumenteasily.
●Rechargeablebatterywithupto5hoursbatterylife.
●SpecializedMOOERiAMPAPPforcompleteeffectsediting,firmwareupdates,andthe
abilitytoupload/downloadtonesfromMOOERCloud.
●Supportforwirelessfootswitchcontrol.
●Bluetooth5.0highqualityaudioinputforaudioplaybackorpractice.
●USB-Cportforhigh-qualityaudiorecordingandplayback.

04
Layout
12
3
1.INPUT
6.35mmTSinstrumentinputjackforconnectingtoguitaroranyotherelectricinstrument.
2.USB-C
Chargingport/OTGportforaudiodirectrecording,andaudioplaybackviathesmartmobile
device.
Notes:TheUSBportisdesignedfordirectrecordingviayourmobiledevice.Itcannotplay
theroleofprofessionalaudiointerfaceforlowlatencyrecording.Ifyouwouldliketouseitin
theDAWontheWindowsplatform,ASIOaudiodriversareneeded,whichcouldlead
tocompatibilityissues.
3.SuperKnob
Rotatetheknobtothefar-leftpositiontoturnOn/Offtheamplifier.Whentheamplifieris
poweredOn,rotatetheknobclockwisetoturnupthevolumelevel;rotatetheknob

05
ounterclockwisetoturndownthevolumelevel.
Presstheknobtoswitchbetween4presetpatches(ThecoloroftheknobLEDwillindicate
thecurrentlyselectedpreset.).TheknobLEDwillturnREDwhenthebatterylifeislow,please
chargetheamplifierintime.

Connection
Guitar AUXINInput
Connectionadapter
06

QuickStart
1.PowerOn
RotatetheSuperKnobclockwiseuntil"Click″toturnOnthedevice.TheLEDknobwillblink
andthenbootup.
2.Setupconnection
ConnectyourinstrumenttotheINPUTofHornet05i.RotatetheSuperKnobclockwisetoget
thepropervolumelevel.
3.Bluetooth
Openthemenuofyourmobiledevice,andsearchfor"Hornet05iAudio″intheBluetoothlist
forconnecting.Aftertheconnectionissetupsuccessfully,youcanplaytheaudiotrackfrom
yourmobiledeviceviatheHornet05idirectly.
07

Instructions
1.Switchthepreset
Hornet05iincludes10presetbanks,eachbankhas4presetpatches,and40presetpatchesin
total.WithoutconnectingtoiAMPApp,theusercanpresstheSuperKnobtoswitchbetween4
presetpatchesinthecurrentlyselectedbank.
2.Tuner
PressandholdtheSuperKnobfor2secondstoaccessthetuner.TheLEDwillturnyellow.
ThentheusercantunetheguitarviatheiAMPApp.PressandholdtheSuperKnobfor2
secondsagaintoquitthetunermode.
08

MOOERiAMPApp
1.DownloadtheMOOERiAMPApp
PleasedownloadtheMOOERiAMPAppviaGooglePlayorAppstore
2.Connection
OpentheMOOERiAMPApp,select"HornetSeries″,andclickon"Search″.Findyourdevicein
thelistbelow(Thedefaultnameis"Hornet05i″).Waitforafewsecondstosetupthe
connectionuntilitisconnectedsuccessfully.
3.Registration
PleaseregisteranewaccountforuseifyouhavenotusedtheMOOERiAMPAppbefore.You
canlogintotheMOOERCloudtodownloadandsharetonesfromusersfromallovertheworld
viatheaccount.
4.Presetselection/edition/saving
Presstheclickonthepresetareatoopenthepresetlist.Clickononeofthepresetpatchesto
selectit.
Clickontheeffectmodule,selectaneffecttypeinthelistbelow,anddragtheparameterbar
toadjusttheparametersofthecurrenteffect.
09

10
ClickontheeffectmoduleagaintoturnOn/Offthecurrentlyselectedmodule.
Pressandholdthemoduletodragittoadifferentpositionoftheeffectchain.
Clickonthesavingicontosavethechanges.
5.Upload/downloadthepresetfromCloud
PleaseensurethatyouhaveregisteredaiAMPaccountandloginforuse.
Download:Clickontheicononthetop-leftcorner,selectCloud,selectamusictype,and
clickon"PLA7″tohaveatryofit.Ifyouaresatisfiedwithit,clickonthedownloadicon,and
selectthestoringslotfordownload.
Upload:Selectapresetpatch,clickontheiconinthetop-leftcorner,selectUPLOAD,fillin
theinformationofthepreset,thenconfirmuploading.
6.Firmwareupdate
Hornet05isupportsfirmwareupdatesviatheApp.Whenthenewversionoffirmwareis
released(connectyourdevicewiththeApp),thefirmwareupdatereminderwillpopupwhen
youopentheAppforuse.Clicktoconfirmfirmwareupdating.Thedevicewillboottoupdate
mode,pleasewaitforafewminutesuntiltheupdateiscomplete.
7.Factoryreset
Clickontheicononthetop-leftcorner,andselectSETTING-VERSIONtoresetthedeviceto
factorysetting,alltheusersettingsandpresetpatcheswillbeclear.

11
MOOERF4Wirelessfootswitch
Hornet05isupportsMOOERF4wirelessfootswitchforcontrolfunctionexpansion,including
presetswitching,drummachine/loopercontrol,tuner,andtaptempo.
Paring
PleasepairthewirelessfootswitchwiththeAppforthefirsttimeofusing.
TurnontheF4,pressandholdthefootswitchAandCtoenterthepairingmode,andtheLEDof
F4willstarttoblink.
OpentheiAMPApp,andclicktheicontostartpairing.Whenthepairingiscomplete,the
screenofF4willshowthenumberofcurrentselectedpresetpatches.
Presetswitching
PressthefootswitchA/B/C/Dtoswitchbetweenfourpresetsinthecurrentselectedpreset
bank.PresstheA&Bfootswitchestoscrollupinthepresetbanks;presstheC&Dfootswitches
toscrolldowninthepresetbanks.
TAPTEMPO
WhenthedelaymoduleisOn,thefootswitchLEDwillblinkaccordingtothedelaytime.Press
thefootswitchofthecurrentselectedpresetpatchmulti-timetosetupthedelaytimedirectly.

TUNER
Pressandholdanyofthefootswitchestoentertunermode.TheAppwillswitchtotheTUNER
pageautomatically,oryoucanutilizethescreenofthefootswitchdirectlyfortuning.Theleft
partofthescreenshowsthenotenameandtherightpartofthescreenshowsthepitchstatus.
Oforstandard,rotatinganticlockwiseforbeingflat,rotatingclockwiseforbeingsharp.
Drummachine/looper
Hornet05ihastheintegrated80-secondlooperandthe40-groovedrummachine.Thelooper
cansynthwiththedrummachineforuse.Utilizingthewirelessfootswitchforabettercontrol
experience.
Looper&drummode:Inthepresetselectmode,pressthefootswitchB&Csimultaneouslyto
enterlooper&drummode,thescreenofthefootswitchwillshow“ LD”.Pressthefootswitch
B&Cagaintoquit.
Control:ThefootswitchAandBforloopercontrol.A:REC/PLAY/DUB;B:STOP/pressandhold
forclear.
ThefootswitchCandDforthedrummachinecontrol.C:Taptempofunctionofthedrum
machine,andpressitformulti-timetosetupthespeedofthedrummachine;D:Play/stopthe
drummachine.
12

PressandholdthefootswitchCtoenterthedrumgroovesselectionmode.Thescreenwill
showthenumberofcurrentlyselectedgrooves.PressCorDtogothroughtoselectagroove.
Thegrooveselectmodewillquitautomaticallyafterbeingidleforafewseconds.
13

14
OTGRecording/Playback
TheUSB-CportofHornet05isupportsOTGfunctionviaconnectingtothemobiledevice
(smartphone/tablet)fordirectrecording/audioplayback.PleasepurchasethecorrectOTG
cable(USB-AfemaletoLightning/USB-Cport),thencombineitwiththeoriginalUSB-Ato
USB-Ccablewhichcomeswiththedeviceforuse.

15
AUDIO PLAYBACK
TONE
seriarlnumbernameserialnumber
OD
1PureBoostBasedonMOOER@PureBoosteffect
2FlexBoostBasedonMOOER@FlexBoosteffect
3TubeDRBasedonBK.Butler@Tubedriveroverdriveeffect
4808BasedonIbanez@TS808overdriveeffect
5GoldClonBasedonKlonCentaur@Goldoverdriveeffect
6D-DriveBasedonBarber@DirectDriveoverdriveeffect
7JimmyODBasedonPaulCochrane@TimmyODoverdriveeffect
8FullDRBasedonFulltone@Fulldrive2overdriveeffect
9BeebeePreBasedonXoticBBPreampOverdrivedistortioneffect
10BeebeeBasedonXotic@BBPlusoverdrivedistortioneffect
11BlackRatBasedonProco@Ratdistortioneffect
12GreyFazeBasedonDunlop@FuzzFacefuzzeffect
13MuffyBasedonEH@BigMufffuzzeffect
14FullDSBasedonFulltoneGT-500distortioneffect
15ShredBasedonMarshall@ShredMasterdistortioneffect
16RietBasedonSuhr@Riotdistortioneffect
18MTLZoneBasedonBoss@MetalZoneeffect
19 MTLMasterBasedonDigitechMETALMASTERdistortioneffect
20ObsessiveDistBasedonFulltone@OCDdistortioneffect

16
seriarlnumbernameserialnumber
AMP
1
2
3
4
5
6
7
8
9
10
11
12
13
14
15
16
17
18
19
65USDLX BasedonFender@65DeluxReverbpreampmodule
65USTW BasedonFender@65TwinReverbpreampmodule
59USBass BasedonFender@59Bassmanpreampmodule
USSonic BasedonFender@SuperSonicpreampmodule
USBlueCL BasedonFender@BluesDeluxepreampmodulecleanchannel
USBlueODBasedonFender@BluesDeluxepreampmoduleoverdrivechannel
E650CL BasedonENGL@E650preampmodulecleanchannel
PowerbellCLBasedonENGL@E645preampmodulecleanchannel
BlacknightCL BasedonENGL@E650BlackmoreSignaturepreampmodulecleanchannel
MarkIIICL BasedonMesa/Boogie@MarkIIIpreampmodulecleanchannel
MarkVCL BasedonMesa/Boogie@MarkVpreampmodulecleanchannel
TriRecCL BasedonMesa/Boogie@TripleRectifierpreampmodulecleanchannel
Rockvrb CL Based on Orange® Rockerverb Clean Channel
DrZee18JRBasedonOrange@DrZee18JRpreampmodulecleanchannel
DrZeeReckBasedonDR.Z@Z-Wreckpreampmodule
Jet100HCLBasedonJetCity@JCA100Hpreampmodulecleanchannel
Jazz120 Based on Roland@ JC120 preamp module
UK30CL BasedonVoxAC30preampmodulecleansetup
UK30OD Based on Vox AC30 preamp module overdrive setup

17
AMP
20
21
22
23
24
25
26
27
28
29
30
31
32
33
34
35
36
37
HWT103BasedonHiwatt@DR-103preampmodule
PV5050CLBasedonPeavey@5150preampmodulecleanchannel
RegalToneCLBasedonToneKing@FalconpreampmoduleRhythmchannel
RegalToneOD1BasedonToneKing@FalconpreampmoduleTweedchannel
CarolCLBasedonTwoRock@Coralpreampmodulecleanchannel
CardeffBasedonTwoRock@Cardiffpreampmodule
EV5050CLBasedonEVH@5150preampmodulecleanchannel
HTClubCLBasedonBlackstar@HTStage100preampmodulecleanchannel
HugenCLBasedonDiezel@Hagenpreampmodulecleanchannel
KocheODBasedonKoch@Powertonepreampmoduleoverdrivechannel
J800BasedonMarshall@JCM800preampmodule
J900 Based on Marshall@ JCM900 preamp module
PLX100 Based on Marshall@ Plexi 100 preamp module
E650DSBased on ENGL@ E650 preamp module distortion channel
PowerbellDSBased on ENGL@ E645 preamp module distortion channel
BlacknightDSBased on ENGL@ 650 Blackmorepreamp module distortion channel
MarkIIIDSBased on Mesa/Boogie@ Mark III preamp module distortion channel
MarkVDSBased on Mesa/Boogie@ Mark V preamp module distortion channel
seriarlnumbernameserialnumber

18
AMP
38
39
40
41
42
43
44
45
46
47
48
49
50
51
52
TriRecDSBasedonMesa/Boogie@TripleRectifierpreampmoduledistortionchannel
RockvrbDSBasedonOrange@Rockverbpreampmoduledistortionchannel
Citrus30BasedonOrange@AD30preampmodule
Citrus50BasedonOrange@AD50preampmodule
Slow100CRBasedonSoldano@SLO100preampmodulecrunchchannel
Slow100DSBasedonSoldano@SLO100preampmoduledistortionchannel
Jet100HODBasedonJetCity@JCA100Hpreampmoduleoverdrivechannel
PV5050DSBasedonPeavey@5150preampmoduledistortionchannel
RegalToneOD2BasedonToneKing@FalconpreampmoduleLeadchannel
CarolODBasedonTwoRock@Coralpreampmoduleoverdrivechannel
EV5050DSBasedonEVH@5150preampmoduledistortionchannel
HTClubDSBasedonBlackstar@HTStage100preampmoduledistortionchannel
HugenODBasedonDiezel@Hagenpreampmoduleoverdrivechannel
HugenDSBasedonDiezel@Hagenpreampmoduledistortionchannel
KocheDSBasedonKoch@Powertonepreampmoduledistortionchannel
seriarlnumbernameserialnumber
Table of contents
Other Mooer Music Equipment manuals
Popular Music Equipment manuals by other brands

RCF
RCF DX4008 Installation and operation manual

Alesis
Alesis S4 Plus Reference manual

Behringer
Behringer COMPOSER PRO MDX2200 Technical specifications

Destination Audio
Destination Audio SP8-50 Installation & operation manual

Dynacord
Dynacord CLS 222 - datasheet

Blue Cat Audio
Blue Cat Audio Re-Guitar user manual