Mooer SynthDrum User manual

Electronic Hand Drum
Owner’s Manual

01
Contents
...........................................................02
.......................................................03
..................................................03
..............................................................05
............................................................05
...............................................................05
.................................................................06
............................................................06
............................................................07
................................................07
..................................................08
..................................................................08
...................................................08
.......................................09
..........................................10
.........................................................11
...................................................12
...............................................................13
.........................................................13
..........................................................18
..........................................20
Precautions
Main Features
Panel Instruction
Operation
Playing
Drum Head Replacing
Specification
Troubleshooting
Appendix
PATCH
LOOP
EFX
SENSE
CURVE
Saving Patches
Factory Reset
Basic Playing
Pressure Pad Effects
Patch List
Loop List
Velocity Curve List

02
Precautions
*PLEASEREADCAREFULLYBEFOREPROCEEDING*
Power Supply
Please connect the designated AC adapter to an AC outlet of the correct
voltage.
Be sure to use only the AC adapter supplied with the unit.
Unplug the AC power adapter when not using or during electrical storms.
Connections
Always turn off the power of this and all other equipment before
connecting or disconnecting, this will help prevent malfunction and / or
damage to other devices. Also make sure to disconnect all connection
cables and the power cord before moving this unit.
Location
To avoid deformation, discoloration, or other serious damage, do not
expose this unit to the following conditions:
Direct sunlight
Heat sources
Magnetic fields
Extreme temperature or humidity
Excessive dusty or dirty location
High humidity or moisture
Strong vibration or shock
Interference with other electrical devices
Radios and televisions placed nearby may experience reception
interference. Operate this unit at a suitable distance from radios and
televisions.
Cleaning
Clean only with a soft, dry cloth. If necessary, slightly moisten the cloth.
Do not use abrasive cleanser, cleaning alcohol, paint thinners, wax,
solvents, cleaning fluids, or chemical-impregnated wiping cloths.
Handling
Do not apply excessive force to the switches or controls.
Do not let paper, metallic, or other objects into this unit.
Take care not to drop the unit, and do not subject it to shock or excessive
pressure.

LOOP PLAY PATCH EFX
VOLUME
CURVE
DIAL / ENTER
Hold For Saving Press
OUTPUT (HP)
DC 9V
AUX IN POWER
On
- +
Off
SENSE
03
Main Features
Aluminum alloy drum frame
Hi-Tech composite materials 8″ drum head
200 preset/user sound
100 various style/tempo music loops
(50 drum loops + 50 melody loops)
5 global effect types
5 pressure pad effects
Sensitivity adjusting
9 kinds of velocity curve
1/4″ phones jack & 1/8″ AUX in jack
DC 9V adapter (500 mA, center positive) power supply
1
2
11
4
1210
6789
14 13
5
3
Panel Instruction

04
01
02
03
04
05
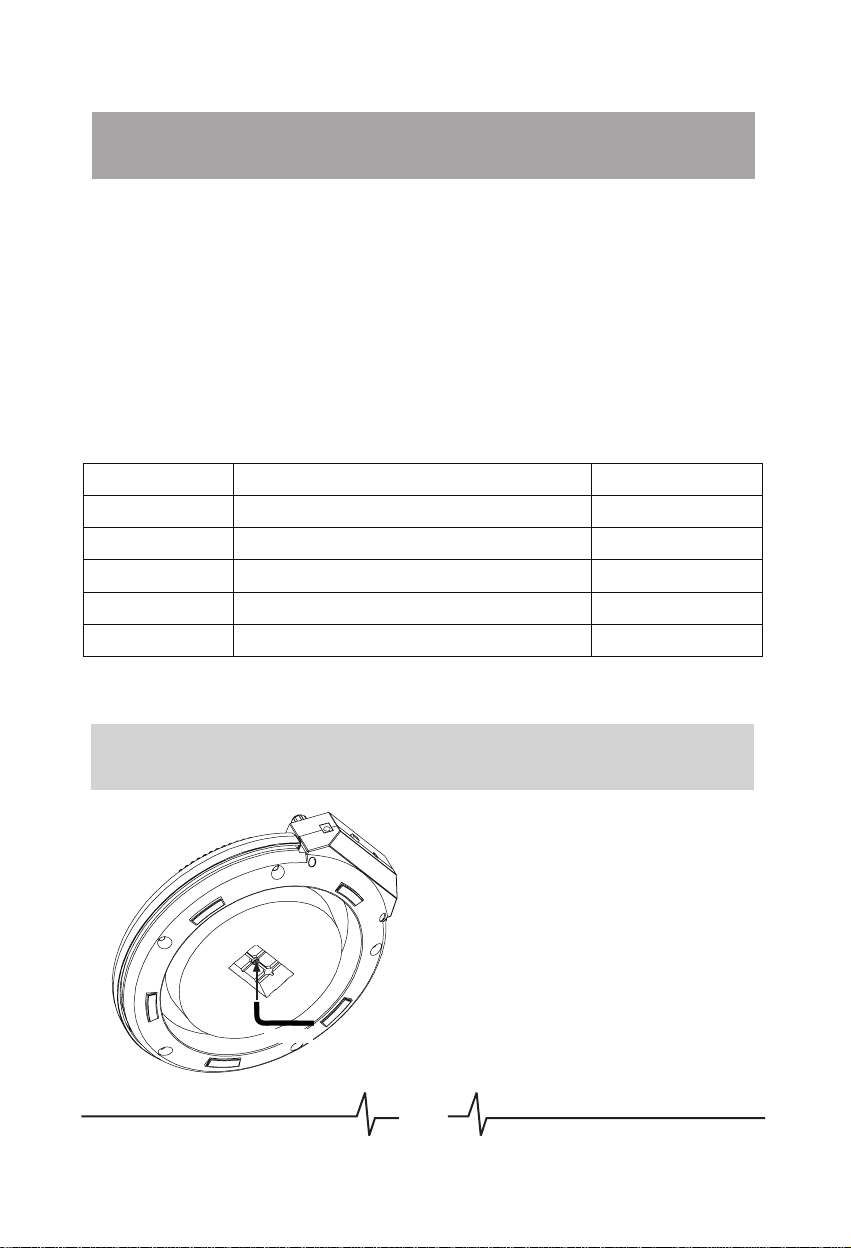
Drum Head: 8″drum head, for playing drum head sound.
Drum Rim: For playing drum rim sound.
Drum Rim Notch: For playing drum rim scratching sound.
VOLUME Knob: Rotate this knob to adjust output volume.
DIAL/ENTER Encoder with Button: Dial the knob to select
Patch/Loop, adjust loop level and Effects parameters. Press the
button to ensure selecting/storing, switch loop parameters and effect
types. Hold the button to enter store function.
06
07
08
09
10
11
12
13
14
LOOP Button: Press this button to enter Loop status, when in Loop
status, press this button to switch between Loop Selecting and Loop
Volume Adjusting function.
PLAY Button: Press this button to play or stop loop.
SENSE composite Button: Press [LOOP] and [PLAY] button
simultaneity to enter Sensitivity editing.
PATCH Button: Press this button to enter Patch status.
EFX Button: Press this button to enter Effects status, when in
Effects status, press this button to change effect types.
CURVE composite Button: Press [PATCH] and [EFX] button
simultaneity to enter Velocity Curve editing.
Display: Instruct the operation information of Synth Drum.
OUTPUT (PHONES) Jack: 1/4″stereo audio jack, output the
sound.
AUX IN Jack: 1/8″stereo audio jack, for connecting external music
players (for example: CD Player, MP3 Player, and so on).
DC 9V Power Jack: For power supply, use a 9-volt DC regulated
AC adapter, 500 mA (plug polarity is negative on the barrel and
positive in the center).
POWER Switch: To switch power on/off of Synth Drum.

05
Operation
PATCH
LOOP
01
02
03
01
02
03
04
Entering Patch Status
At any time of using Synth Drum, press [PATCH] button to enter
Patch status, the middle dot of display will be lit up to indicate the
current status (Patch).
Selecting Patches
When in Patch Status, rotate [DIAL/ENTER] knob to select patches,
the patch’s number will be flashing, but the sound will not be
changed yet.
Confirm Patch Selecting
When the number of patch is flashing, press [DIAL/ENTER] button
to confirm selecting, the number will stop flashing, and the sound will
be changed to the current patch.
Entering Loop Status
At any time of using Synth Drum, press [LOOP] button to enter Loop
status, the left dot of display will be lit up to indicate the current
status (Loop).
Selecting Loops
When in Loop Status, rotate [DIAL/ENTER] knob to select loops, the
loop’s number will be flashing, but the music will not be changed yet.
Confirm Loop Selecting
When the number of loop is flashing, press [DIAL/ENTER] button to
confirm selecting, the number will stop flashing, and the music will
be changed to fit the corresponding loop.
Playing and Stop Playing
At any time of using Synth Drum, press [PLAY] button to play the
music, when playing, press [PLAY] button will stop the music.
Note: When switching Patch or Loop, or pressing [PLAY] buon to start loop playing,
the sound will phonate aer few seconds.

06
EFX
SENSE
01
02
03
04
Entering EFX Status
At any time of using Synth Drum, press [EFX] button to enter Effects
status, the right dot of display will be lit up to indicate the current
status (Effects).
Changing Effect Types
When in Effects Status, press [DIAL/ENTER] or [EFX] button to
change effect’s type, there are 5 kinds of effect to choose: Chorus,
Flanger, Phaser, Delay, and Reverb.
Adjusting Effect Parameters
When in Effects Status, rotate [DIAL/ENTER] knob to adjust effect’s
parameters, the range of each effect is 0~9.
Note: Only one effect can be selected at a time, When parameter=0, the effect will be off.
Note: The SENSE contains both drum head and drum rim’s sensitivity value, when
choosing one value, the head and rim’s sensitivity will be changed together.
EFX list
Type Display Parameter Range Parameter Meaning
Chorus Chorus Rate
Flanger Flanger Rate
Phaser Phaser Rate
Delay Delay Time
Reverb Reverb Time
At any time of using Synth Drum, press [LOOP] and [PLAY] button
simultaneity to enter sensitivity editing.
When in SENSE editing status, rotate [DIAL/ENTER] knob to change
sensitivity value, the range is 1~9, display will show “ ~ ”, the
default value is .
~
~
~
~
~

07
CURVE
Saving Patches
Note: The CURVE contains both drum head and drum rim’s velocity curves, when
choosing one curve, the head and rim’s velocity curves will be changed together.
(refer to Appendix for detail).
Note: Aer saving, the patches will be changed to user’s seing even though next
power on.
Note: Do factory reset will initialize the patches to preset.
At any time of using Synth Drum, press [PATCH] and [EFX] button
simultaneity to enter velocity curve editing.
When in CURVE editing status, rotate [DIAL/ENTER] knob to change
velocity curve, there are 9 curves to be chosen, display will show
“ ~ ”, the default value is .
Synth Drum’s 200 Patches can be edited and saved by users, the
modifiable items include SENSE, CURVE and Effects’ parameters. User
can change the parameters of them and save them to the patches.
At any time of using Synth Drum, hold [DIAL/ENTER] button for 3
seconds to do saving operation, then the patch’s number, the middle
dot, and the right dot on the display will begin to flash together, at that
time, press [DIAL/ENTER] button again to confirm, the patch’s number
on the display will stop flashing.
When saving (the patch’s number, the middle dot, and the right dot flash
together), press other buttons (except [DIAL/ENTER]) to quit saving and
enter the corresponding status.

08
Factory Reset
Basic Playing
Playing
Note: If you want to quit Factory Reset halfway, press another buon except
[DIAL/ENTER], then the Factory Reset will be canceled.
Factory Reset function will initialize all setting of Synth Drum. All the
patches will be erased and overwritten by the presets, the SENSE and
CURVE’s setting will be set to default as well.
To do the factory reset, conform to the following instructions:
Hold down [DIAL/ENTER] button and then power on, will appear
on the display and last flashing.
At that time, press [DIAL/ENTER] button to confirm, will be
flashing in a faster speed for 2 seconds, then turn to display at a
steady status for 3 second, then back to the normal state, the factory
reset operation have been done.
Use drum sticks
Use rods
Use your hands

09
Pressure Pad Effects
Note: Pressure pad effects are real-time control, when the pressure is released, the effect
will be off.
Synth Drum has a pressure sensor under the drum head. To create
pressure pad effects on your playing, put your palm on the drum head
and exert strength, then play the head or rim (or play the drum firstly,
then put the palm on the head and press), you will get the special sound
of different type effects in different patches. More stress, more effects.
There are 5 kinds of pressure pad effects fixed up in each patch: Pitch
Up, Pitch Down, Vibrato, AEG, Volume, one of them has been fixed up
in each patch, the setting can not be modified by users.
Pressure Pad Effects List
Type Explanation More Stress
Pitch Up Pitch shift upwards Higher Pitch
Pitch Down Pitch shift downwards Lower pitch
Vibrato Inflect the pitch periodically More Depth
AEG Decrease sustain and decay time Shorter Time
Volume Decrease patch volume Lower Volume
Please read Patch List on Appendix for particular assigning information.
Wrench
Tighten or loosen
There is an adjustable screw on the
bottom centre for adjusting the
sensitivity of pressure pad.
Use the accessary wrench to
tighten the screw for lower
sensitivity or loosen it for higher
sensitivity.
*Patent pending

10
Drum Head Replacing
Bolts x5
Rim Cover
Drum Head
Sensor Cable
Step 1: Discharge 5 bolts which are fixed in the rim cover.
Step 2: Lift up the rim cover softly and take off the old drum head.
Step 3: Put the new drum head in and lay the rim cover back.
Step 4: Lock the 5 bolts up in order (clockwise or anti-clockwise).
Note: During drum head replacing, pay aention to the cables of sensor inside the
drum, do not pull or bump them as possible.
Note: When you want to tighten or loosen the drum head, screw the bolts in order
(clockwise or anti-clockwise).

11
Specification
Preset/User Patch Memory:
Music Loop Phrases:
Sampling Frequency:
Sampling Depth:
Global Effects:
Pressure Pad Effects:
Drum Head Size:
Power requirements:
Dimensions:
Weight:
Accessories:
200 Patches
100 Loops
(50 Drum Loops + 50 Melody Loops)
44.1 kHz
32 bit
5 Types
(Chorus, Flanger, Phaser, Delay, Reverb)
5 Types
(Pitch Up, Pitch Down, Vibrato, AEG, Volume)
8″
AC adapter 9V DC, 500 mA (center positive)
280 mm (D) x 270 mm (W) x 69 mm (H)
1080 g
Owner’s Manual, Drum Key, Wrench,
AC adapter(DC 9V center positive)

12
Troubleshooting
Can not power on
Check power connection.
------ Make sure the power is connected correctly.
Check the adapter.
------ Make sure the adapter is the one supplied with the unit.
No sound or low volume
Check connection of cables.
------ Make sure all the cables are connected firmly.
Check the volume of Synth Drum and amplifier (headphones).
------ Make sure each equipment’s volume is set to an appropriate level.
High noise
Check the adapter.
------ Make sure the adapter is the one supplied with the unit.
Check the cables.
------ Make sure the cables are connected firmly and have no quality
problem.

13
Appendix
Patch List
NO.
World Percussion
001 Conga 1
Conga 2
Conga 3
Conga 4
Conga 5
Bongo 1
Bongo 2
Bongo 3
Bongo 4
Bongo 5
Timbales 1
Timbales 2
Timbales 3
Timbales 4
Timbales 5
Djembel 1
Djembel 2
Djembel 3
Djembel 4
Djembel 5
Udu 1
Udu 2
Udu 3
Udu 4
Udu 5
Ewe Drum 1
Ewe Drum 2
Ewe Drum 3
Ewe Drum 4
Ewe Drum 5
Frame Drum 1
Frame Drum 2
Frame Drum 3
Frame Drum 4
Frame Drum 5
Reverb 2 Volume
Reverb 2 Volume
Reverb 2 Volume
Reverb 2 Volume
Reverb 2 Volume
Reverb 2 Volume
Reverb 2 Volume
Reverb 2 Volume
Reverb 2 Volume
Reverb 2
Reverb 3 Volume
Volume
Volume
Volume
Volume
AEG
AEG
AEG
AEG
AEG
Reverb 3
Reverb 3
Reverb 3
Reverb 3
Reverb 3
AEG
AEG
AEG
AEG
AEG
Pitch Up
Reverb 3 Pitch Up
Reverb 3 Pitch Up
Reverb 3 Pitch Up
Reverb 3
Reverb 3 Pitch Up
Pitch Up
Pitch Up
Pitch Up
Pitch Up
Pitch Down
Reverb 3
Reverb 3
Reverb 3
Reverb 3
Reverb 4
Reverb 5
Chorus 3
Chorus 3
Chorus 2
Chorus 2
Phaser 2
Reverb 5
Delay 6
Delay 8
Pitch Down
002
003
004
005
006
007
008
009
010
011
012
013
014
015
016
017
018
019
020
021
022
023
024
025
026
027
028
029
030
031
032
033
034
035
Patch Name Effects Assign Pressure Pad Assign

14
NO.
World Percussion
036
037
038
039
040
041
042
043
044
045
046
047
048
049
050
051
052
053
054
055
056
057
058
059
060
061
062
063
064
065
066
067
068
069
070
071
072
073
074
075
Dumbek 1
Dumbek 2
Dumbek 3
Dumbek 4
Dumbek 5
Tabla 1
Tabla 2
Tabla 3
Tabla 4
Tabla 5
Tabla 6
Tabla 7
Tabla 8
Tabla 9
Tabla 10
Tar 1
Tar 2
Tar 3
Berimbau 1
Berimbau 2
Berimbau Shaker 1
Berimbau Shaker 2
Agogo 1
Agogo 2
Sogo 1
Sogo 2
Cahon 1
Cahon 2
Kidi 1
Kidi 2
Log Drum 1
Log Drum 2
Batas 1
Batas 2
Batas 3
Apentemma 1
Apentemma 2
Kenkeni 1
Kenkeni 2
Kenkeni 3
Reverb 3
Reverb 3
Reverb 5
Reverb 4
Reverb 4
Reverb 4
Reverb 4
Reverb 5
Reverb 5
Flanger 2
Pitch Up
Pitch Up
Pitch Up
Pitch Up
Pitch Up
Pitch Up
Pitch Down
Pitch Down
Vibrato
Vibrato
Vibrato
Vibrato
AEG
AEG
AEG
Volume
Reverb 6
Reverb 4
Reverb 4
Reverb 5
Reverb 4 Pitch Up
Pitch Down
Pitch Down
Pitch Up
Pitch Up
Pitch Up
Pitch Up
Pitch Up
Pitch Up
Pitch Up
Pitch Up
Pitch Up
Pitch Up
Pitch Up
Pitch Up
Pitch Up
Pitch Up
Reverb 4
Reverb 4
Reverb 4
Reverb 4
Reverb 4
Reverb 4
Reverb 4
Reverb 5
Reverb 5
Reverb 4
Reverb 4
Reverb 4
Reverb 3
Reverb 5
Reverb 3
Reverb 4
Reverb 4
Reverb 4
Reverb 4
Reverb 4
Reverb 7
Reverb 4
Delay 4
Reverb 4
Delay 6
Volume
Volume
Volume
Volume
Volume
Volume
Volume
Patch Name Effects Assign Pressure Pad Assign

15
NO.
World Percussion
076
077
078
079
080
081
082
083
084
085
086
087
088
089
090
091
092
093
094
095
096
097
098
099
100
101
102
103
104
105
106
107
108
109
110
111
112
113
114
115
Atsimevu 1
Atsimevu 2
Clay Pot 1
Clay Pot 2
Clay Pot 3
Gankokwe 1
Gankokwe 2
Bombshell 1
Bombshell 2
Dual Wooden 1
Dual Wooden 2
African Metal 1
African Metal 2
Box Drum
Dull Drum
Dundun Bell
Axatse
Berkete
Petia
Taiko 1
Taiko 2
Taiko 3
Hiradaiko
Shimedaiko
Japan Suite
Turkish 1
Turkish 2
Turkish 3
Cuban 1
Cuban 2
Cuban 3
Sand Drum 1
Sand Drum 2
Sand Drum 3
War Drum 1
War Drum 2
War Drum 3
Water Drum 1
Water Drum 2
Water Drum 3
Reverb 4
Reverb 5
Reverb 4
Reverb 4
Reverb 4
Reverb 4
Reverb 4
Reverb 4
Reverb 4
Reverb 4
Reverb 4
Reverb 4
Reverb 4
Reverb 4
Reverb 4
Reverb 4
Reverb 4
Reverb 4
Reverb 4
Reverb 4
Delay 8
Delay 5
Delay 7
Delay 6
Delay 3
Chorus 3
Reverb 4
Reverb 5
Reverb 4
Reverb 4
Reverb 4
Reverb 5
Reverb 5
Reverb 5
Reverb 5
Reverb 4
Reverb 5
Reverb 3
Delay 6
Delay 5
Volume
Pitch Down
Pitch Down
Pitch Down
AEG
AEG
AEG
AEG
AEG
AEG
AEG
AEG
AEG
AEG
AEG
AEG
AEG
Pitch Up
Pitch Up
Pitch Up
Pitch Up
Pitch Up
Pitch Up
Pitch Up
Pitch Up
Pitch Up
Pitch Up
Pitch Up
Pitch Up
Pitch Up
Vibrato
Volume
Volume
Volume
Volume
Volume
Volume
Volume
Volume
Volume
Patch Name Effects Assign Pressure Pad Assign

16
NO.
World Percussion
Drum Sets & Drum Machines
116
117
118
119
120
121
122
123
124
125
126
127
128
129
130
131
132
133
134
135
136
137
138
139
140
141
142
143
144
145
146
147
148
149
150
151
152
153
154
Talking Drum 1
Talking Drum 2
Talking Drum 3
Gong 1
Gong 2
Datanggu
Xiaotanggu
Xiangluo
Xiangluo/Xiaoluo
Shougu 1
Shougu 2
Snare 1
Snare 2
Snare 3
Rock Kick/Snare
Rock Cymbal
Jazz Cymbal
Rock Tom
Jazz Tom
Jazz Kick/Snare
Brush Kick/Snare
Dance Kick/Snare
Hip Hop Kick/Snare 1
Analog Kick/Snare 1
Analog Kick/Snare 2
Industry Kick/Snare 1
Industry Kick/Snare 2
Hip Hop Kick/Snare 2
Brush Cymbal
Dance Cymbal
Analog Cymbal
Analog Tom
Analog Suite
Brush Tom
Dance Tom
Naobo
Fengluo/Naobo
Daluo 1
Daluo 2
Reverb 5
Reverb 5
Reverb 4
Reverb 4
Reverb 4
Reverb 4
Reverb 4
Reverb 4
Reverb 4
Reverb 4
Reverb 3
Reverb 4
Reverb 4
Reverb 4
Reverb 2
Reverb 5
Reverb 3
Reverb 3
Reverb 3
Reverb 3
Reverb 3
Reverb 3
Reverb 4
Reverb 3
Reverb 3
Reverb 4
Reverb 4
Reverb 4
Reverb 4
Reverb 3
Reverb 5
Reverb 3
Reverb 4
Reverb 4
Reverb 4
Reverb 4
Reverb 4
Delay 4
Delay 5
Vibrato
Volume
Volume
Volume
Volume
Volume
Volume
Volume
Volume
Volume
Volume
Volume
Volume
Volume
Volume
Volume
Pitch Up
Pitch Up
Pitch Up
Pitch Up
Pitch Up
Pitch Up
AEG
AEG
AEG
AEG
AEG
AEG
AEG
AEG
AEG
AEG
AEG
AEG
AEG
AEG
AEG
AEG
Pitch Down
Patch Name Effects Assign Pressure Pad Assign

17
Melody & Synth
Little Strike
NO.
Drum Sets & Drum Machines
155
156
157
158
159
160
161
162
163
164
165
166
167
168
169
170
171
172
173
174
175
176
177
178
179
180
181
182
183
184
185
186
187
188
189
190
Industry Cymbal
Industry Tom
Industry Suite
Beat Box 1
Beat Box 2
Beat Box 3
Clap
Cowbell
Tambourin
Maracas
Cabasa
Claves
Guiros
Vibraslap
Woodblock
Triangle
Steel Drum
Vibraphone
Berimbau Tuned
Music Box
Karimba
Marimba
Balafon
Synth Bell
Synth Explode
Synth Ray
Synth Laser Saw
Synth Flutter Kick
Synth Wow Bass
Synth LFO Bass
Timpani
Kora
Goni
Gyil
Mvet
Ngoni
Flanger 3
Flanger 4
Phaser 2
Phaser 2
Phaser 1
Reverb 4
Reverb 3
Reverb 3
Reverb 4
Reverb 4
Reverb 4
Reverb 4
Reverb 4
Reverb 4
Reverb 4
Reverb 5
Reverb 4
Reverb 4
Reverb 3
Reverb 5
Reverb 3
Reverb 4
Reverb 5
Reverb 4
Reverb 4
Reverb 4
Reverb 4
Reverb 3
Flanger 1
Chorus 3
Delay 5
Delay 8
Delay 8
Delay 7
Delay 5
Delay 9
AEG
AEG
AEG
AEG
AEG
AEG
AEG
AEG
Pitch Up
Pitch Up
Pitch Up
Pitch Up
Pitch Up
Pitch Up
Volume
Volume
Volume
Volume
Volume
Volume
Volume
Volume
Volume
Volume
Volume
Volume
Vibrato
Vibrato
Pitch Up
Pitch Up
Pitch Up
Pitch Up
Pitch Down
Pitch Down
Pitch Down
Pitch Down
Patch Name Effects Assign Pressure Pad Assign

18
NO.
Special
191
192
193
194
195
196
197
198
199
200
Metal Strike
Waterdrop
Bell Tree
Frog
Door
Kinfe
Whip
Fight
Whistle / Spring
Storm / Gunshot
Reverb 3
Reverb 4
Reverb 3
Reverb 3
Reverb 5
Reverb 4
Reverb 7
Reverb 4
Delay 4
Delay 4
Pitch Down
AEG
AEG
Pitch Up
Pitch Up
AEG
Volume
Volume
Volume
Volume
Patch Name Effects Assign Pressure Pad Assign
Loop List
No. Drum Loop Tempo No. Melody Loop Tempo
0 Rock_1 125 50 Rock 150
1 Rock_2 120 51 Alternative Rock 141
2 Rock_3 120 52 Funk Rock 112
3 Jazz_1 122 53 Blues Jazz 120
4 Jazz_2 80 54 Bebop Jazz 136
5 Jazz_3 158 55 Nu-Jazz 120
6 Funk_1 120 56 Old Funk 122
7 Funk_2 120 57 Hard Funk 120
8 Funk_3 136 58 Classic Funk 120
9 Pop_1 112 59 Indie Pop 72
10 Pop_2 102 60 60's Pop 159
11 Pop_3 116 61 Alternative Pop 132
12 Latin_1 132 62 Twisting Latin 100
13 Latin_2 120 63 Latin Street 130
14 Latin_3 112 64 Funky Latin 120
15 Bossa Nova_1 130 65 Brazilian Bossa 125
16 Bossa Nova_2 160 66 Jazz Bossa 66
17 Bossa Nova_3 144 67 Fast Bossa 178
18 Reggae_1 128 68 Caribbean 125
19 Reggae_2 70 69 Reggae 65
20 Reggae_3 84 70 Dub 140

19
21 Country_1 126 71 Country 120
22 Country_2 132 72 Country Blues 80
23 Country_3 118 73 Folk Rock 86
24 Indian_1 88 74 Indian_1 88
25 Indian_2 90 75 Indian_2 90
26 Indian_3 135 76 Indian_3 112
27 Cuban 92 77 Cuban 110
28 Chinese 160 78 China 113
29 Japanese 92 79 New Japan 94
30 Samba 128 80 Samba 110
31 Rumba 124 81 Rumba 112
32 Tango 108 82 Tango 108
33 Polka 128 83 Polka 120
34 March 132 84 March 120
35 Big Band 152 85 Big Band 135
36 Swing 150 86 Swing 150
37 Soul 88 87 Soul 88
38 Fusion 128 88 Fusion 120
39 New Age 120 89 New Age 80
40 Techno 136 90 Techno 132
41 House 128 91 House 120
42 Trance 132 92 Trance 136
43 New Wave 128 93 New Wave 120
44 Break Beat 136 94 Break Beat 134
45 Drum n' Bass 172 95 Drum n' Bass 170
46 Hip Hop 90 96 Hip Hop 88
47 Trip Hop 76 97 Trip Hop 108
48 Ambient 78 98 Ambient 78
49 Beat Box 132 99 Beat Box 113
No. Drum Loop Tempo No. Melody Loop Tempo
Table of contents
Other Mooer Music Equipment manuals
Popular Music Equipment manuals by other brands

Abstract Data
Abstract Data MORPHEX user guide

Nautel
Nautel Importer Plus Technical instruction manual

Stereoping
Stereoping synth programmer Owner's handbook

APART
APART PCR3000RMKII instruction manual

Schatten Design
Schatten Design HFN Artist installation instructions

Electrix
Electrix FilterQueen owner's manual