MOPIC 3D User manual

MOPIC 3D System User Manual
MOPIC's 3D System delivers an absolute immersive experience through MOPIC's precise eye-tracking
technology best suited for a single user.
Please refer to User Manual for instructions and optimal immersive experience
mopic3d.com 1

Prior to Use 3
Caution 3
Items and Accessories 3
Connections 4
Connecting Cables 4
Connecting Power Supplies 4
How to Use 6
Proper eye-tracking operations and the optimal distance between MOPIC 3D Monitor and the user 6
Main Ways to Enjoy MOPIC 3D System 7
Basic Troubleshooting 11
To Adjust 3D Settings 11
To confirm 3D Box settings 13
To confirm 3D Monitor settings 13
Specifications 14
3D System Specifications 14
mopic3d.com 2

Prior to Use
Caution
●The warranty becomes null and void in case of damage or injury caused by use of
non-authorized components and/or modifications
●The display may get damaged if force is applied on it by hand or via other means
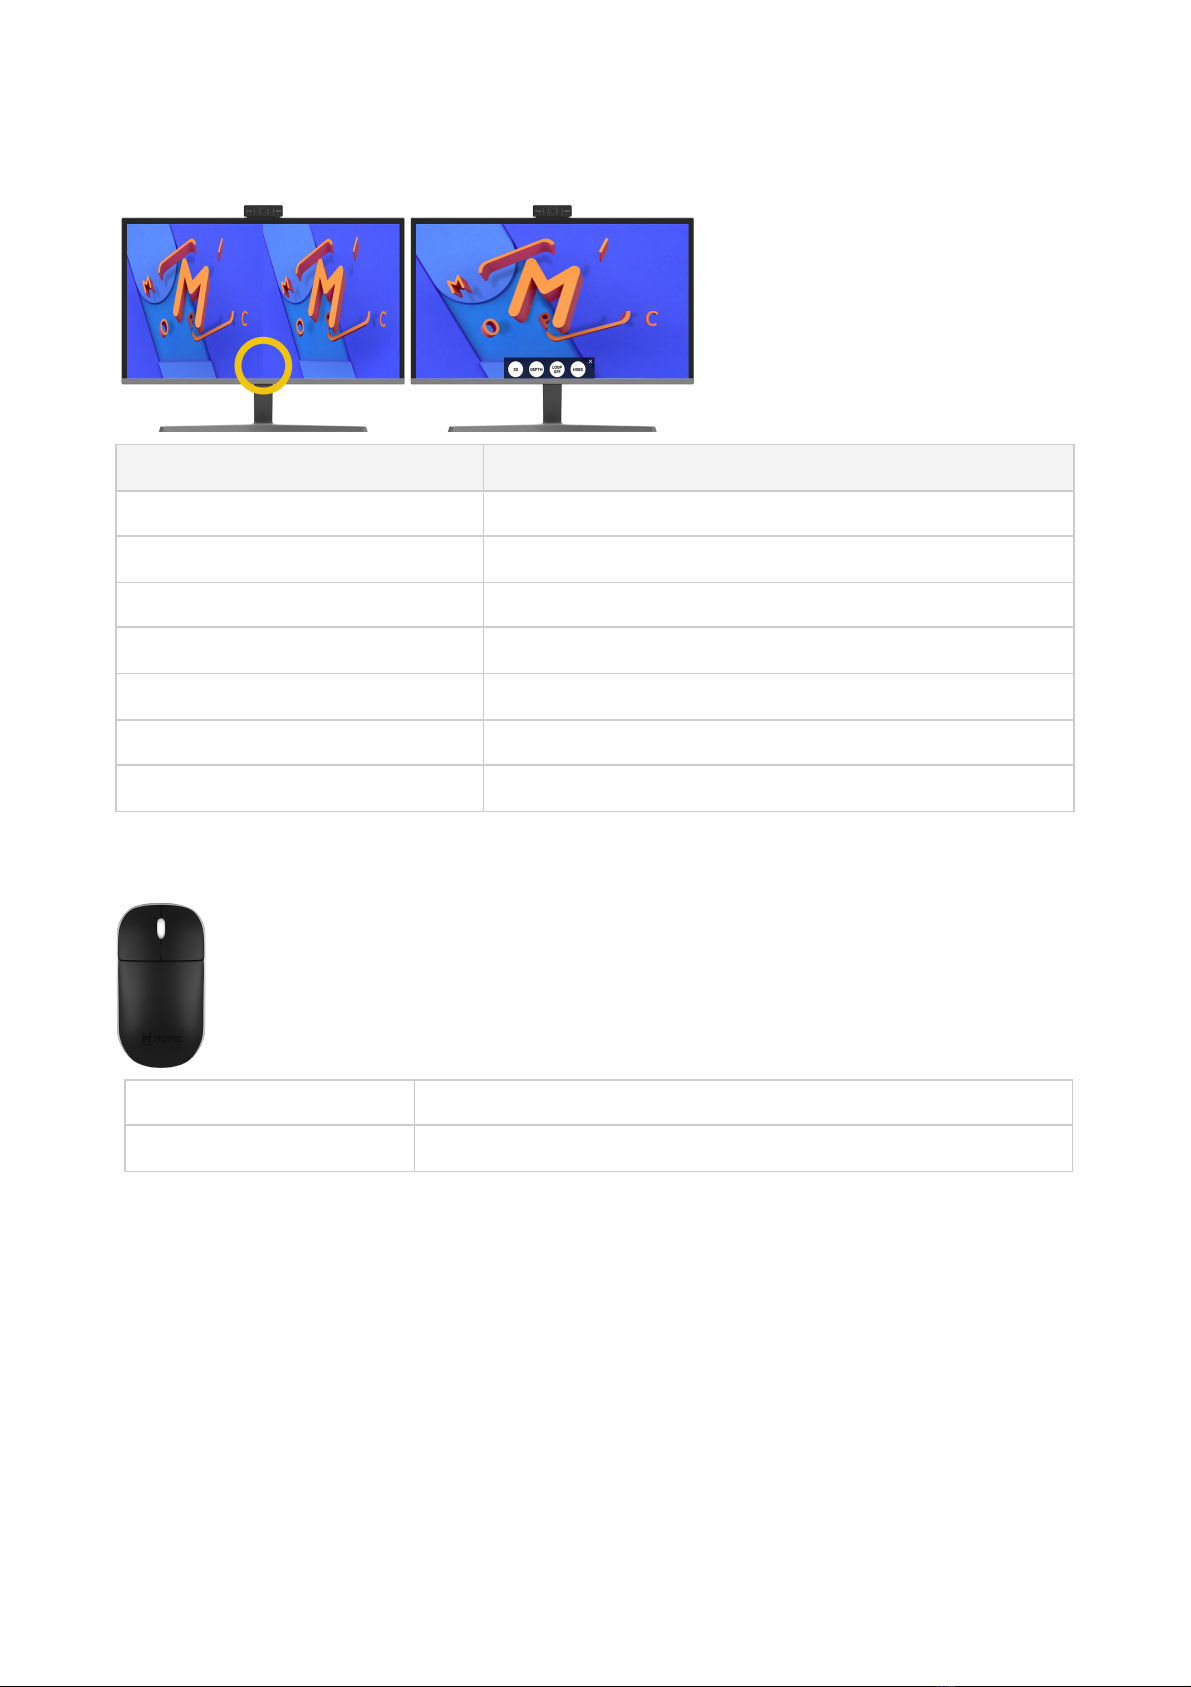
●If the front screen including the attached film gets damaged or removed, 3D immersive
experience may become hindered or impossible
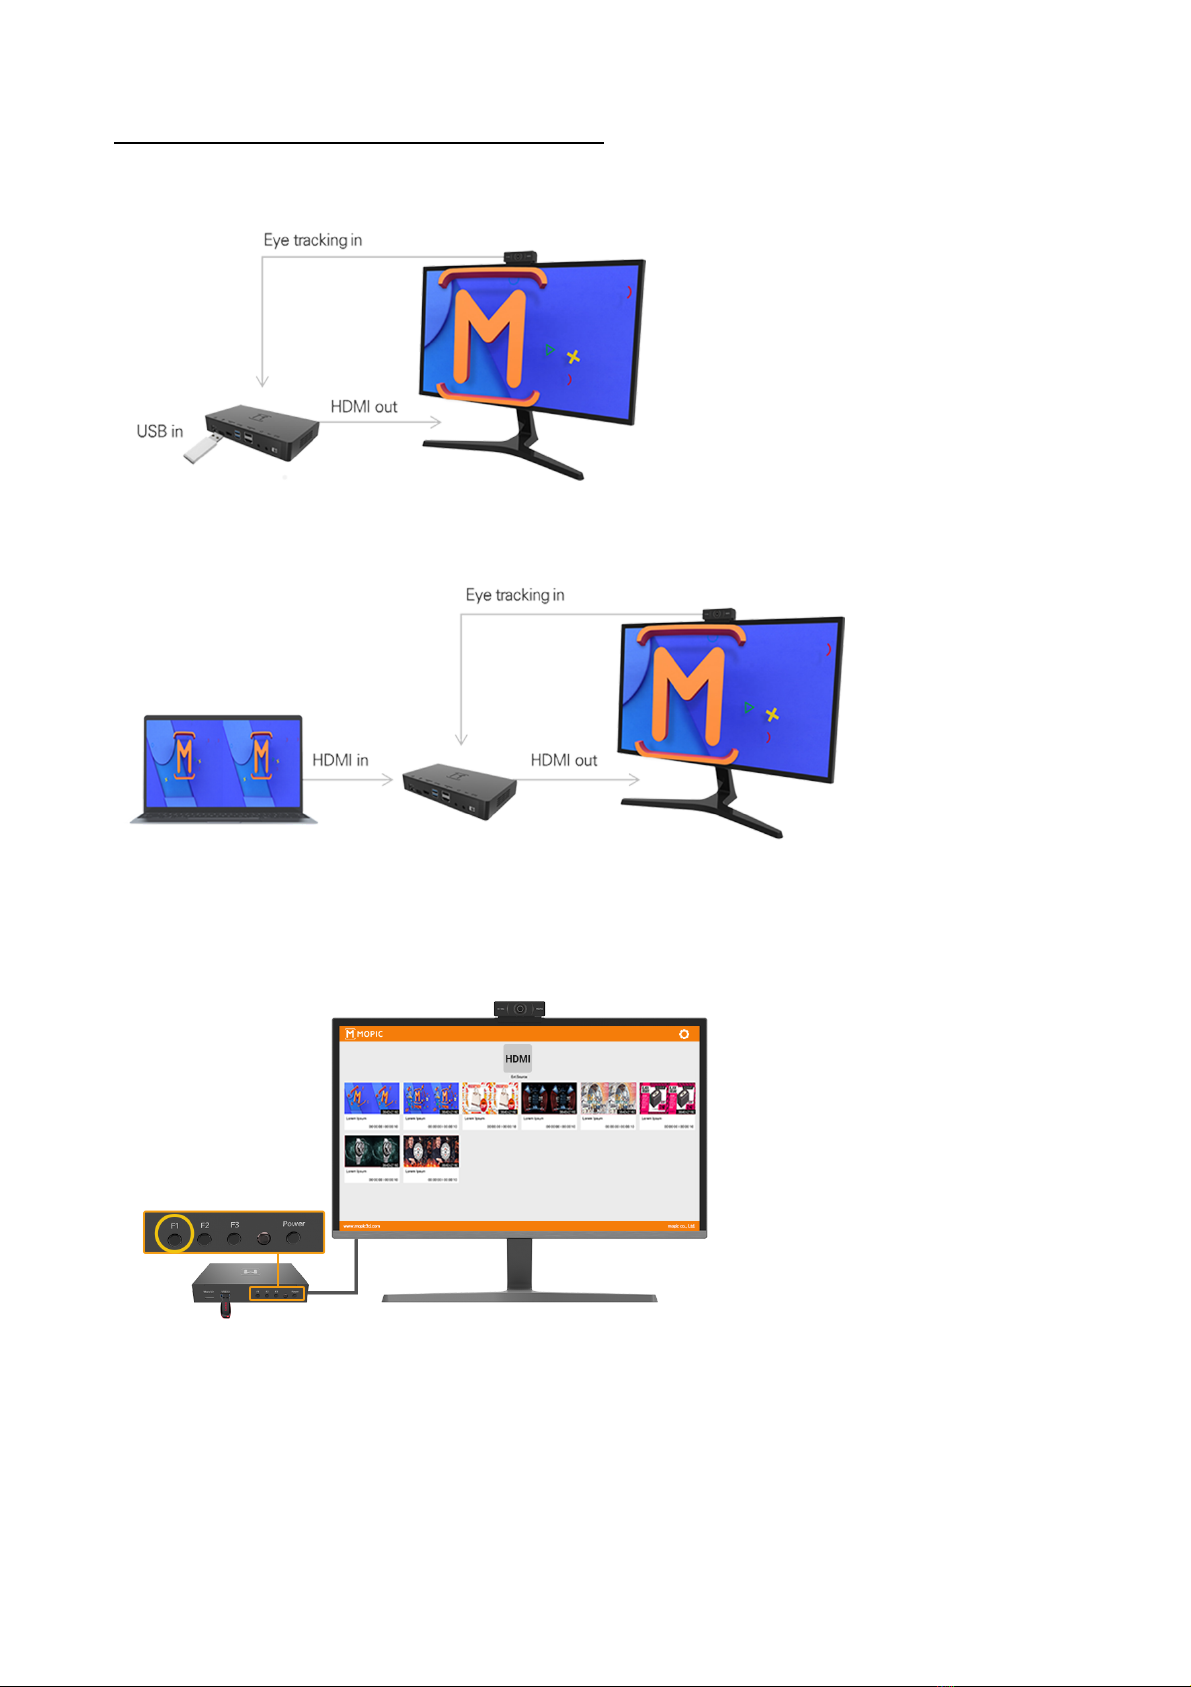
●If cables are used that are not supported or tested by MOPIC, the monitor may fail to work or
exhibit static
●Illustrations in the manual may look different from actual items and accessories
●Do not apply foreign matters such as oil and lubricants to screws and alike, during assembly
(doing so may cause damage)
●Applying excessive force while tightening screws may cause damage. The warranty becomes
null and void in case of the damage due to excessive force
●Carrying the monitor upside down by holding the monitor base may cause the monitor to
separate from the base and result in product damage and/or personal injury
●When lifting or moving the monitor, please refrain from touching the display as force applied in
the process may cause damage
●Power cords provided may be inapplicable to certain regions
Items and Accessories
Please reach out to the seller in case of missing items and accessories.
* Illustrations in the manual may look different from actual items and accessories as they become obsolete
for improvements.
mopic3d.com 3
3D Monitor
3D Box
RGB Cam
Stand
Monitor power supply
Box power supply

Connections
Connecting Cables
As the diagram below shows, please connect the PC or Mac to 3D Monitor, and RGB Cam to 3D Box.
* Illustrations in the manual may look different from actual items and accessories as they become obsolete
for improvements
mopic3d.com 4
USB mouse
HDMI cable x2
[For export only]
220v-110v voltage
plug adapter x2

Connecting Power Supplies
Please connect power supplies per instructions below.
* Illustrations in the manual may look different from actual items and accessories as they become obsolete
for improvements.
3D Monitor
1. Connect the Monitor power cable to the DC 19V terminal on the back of the Monitor
2. Connect the Monitor power cable to the power socket
● You may turn the device ON/OFF by pressing the JOG button on the back of the display
● The power supplies may change as products become obsolete for improvements
3D Box
1. Insert the USB flash drive that contains contents into the USB 3.0 terminal located on the front of the
box
2. Connect the box power cable to the DC12V terminal on the back of the box
3. Connect the box power cable to the power socket
4. Press the POWER button on the front of the box to turn on the box
● The specifications of the provided adapter may differ depending on the product standard.
● You may use FAT32 format USB flash drives only.
mopic3d.com 5

How to Use
Proper eye-tracking operations and the optimal distance
between MOPIC 3D Monitor and the user
Mplayer3D through the RGB camera tracks the user's eyes in real time and simultaneously adjusts 3D
contents to provide the most optimal immersive experience. Please ensure whether eye-tracking operations
are functioning properly at the optimal distance, per instructions below.
Proper eye-tracking operations
Please click on ( ) in the upper right-hand corner of the main screen displayed through Mplayer 3D.
The user will then be able to confirm whether the eye-tracking operations are functional by checking their
eyes are being tracked in green.
For proper eye-tracking operations, please ensure that the single user's front face is fully captured within the
dotted orange boundaries on the screen.
Optimal distance between MOPIC 3D Monitor and the user
The user can enjoy the most optimal immersive experience when the distance between MOPIC 3D Monitor
and the user is about 60 cm (24 inches) apart. The user's head and shoulder should fall within the dotted
orange boundaries on the screen, as the pictures below show.
※ Attention
mopic3d.com 6
O Good
O Good
X Too close
X Too far
X Not facing front
X More than single user
X Face hidden
X Too dark

Main Ways to Enjoy MOPIC 3D System
1.Viewing 3D contents (mp4 files only) from the 3D Box only
2.Viewing 3D contents from PC or Mac through the 3D Box
1.Viewing 3D contents (mp4 files only) from the 3D Box only
Please enjoy 3D contents per instructions below
1. Insert the USB flash drive that contains contents (mp4 files only) into the USB 3.0 terminal.
2. Click and generate 3D contents on the application main screen. Pressing the F1 button on the box
will play the first contents and the rest will follow in sequence
※ Limitations
● For ease of use, please connect a mouse to the box
● 3D contents format: Full SBS (Side By Side) or Half SBS, in mp4 file only
mopic3d.com 7

● Recommended 3D contents codec: H.264/MPEG-4 AVC, Bitrate: 26 Mbps
● Recommended USB flash drive: Sandisk USB flash drive with less than 32GB storage, no SSD, and
FAT32 format, only
※ Note
Side-by-side 3D contents refer to the normal display divided into two halves, a left view and a right view,
each occupying one-half of the original display area. Each view displays the contents from a slightly different
perspective, corresponding to the left and right eye of the viewer.
The images need to be separated in the side-by-side format for MOPIC 3D System to process and place two
halved views on top of each other, creating immersive contents for users to experience.
Buttons on 3D Box
mopic3d.com 8
Full side-by-side
Half side-by-side
Button
Description
POWER
Turn the box on or off by pressing the POWER button
F1
Play 3D contents within the box (prior to the contents being played) or return to
the main screen (while the contents are being played)
F2
Upon 1st press: convert to 'HDMI In' mode (prior to the contents being played &
while the contents are being played)
Upon 2nd press: return to the main screen (while the contents are being played)
F3
Force-refresh 3D contents within the box (in case the contents are changed) or
convert between 2D and 3D Contents (while the contents are being played)

Buttons on Mplayer3D Screen
Mplayer3D screen buttons appear after a click on the middle section of the bottom of the screen
*Noiseless: Pressing the noiseless button would show less afterimages albeit darkened, in case of less than
ideal settings
mopic3d.com 9
Button
Description
3D ↔ 2D
Convert between 2D and 3D contents
NORMAL ↔ BLACK
Convert between Normal and Noiseless* images
DEPTH
Push out 3D contents farther
LOOP ON ↔ LOOP OFF
Repeat selected 3D file of the entire 3D contents
HSBS ↔ FSBS
Convert between Half Side-By-Side / Full Side-By-Side
CAMERA PLAY↔CAMERA HOLD
Turn on and off eye-tracking
X
Hide buttons on the screen
Left Click on the Mouse
Pause
Right Click on the Mouse
Escape

2.Viewing 3D contents from PC or Mac through the 3D Box
Please enjoy 3D contents per instructions below
1. Connect the PC or Mac to the 3D Box
2. To activate the HDMI In mode, please click on the HDMI button on the application main screen or press
the F2 button on the front of the box
3. By viewing in full screen mode, you can enjoy the 3D contents from your PC or Mac
※Attention
● 3D contents in the PC or Mac must be in half or full SBS (Side By Side), though the file format can
be free
● 3D contents must be in full screen mode
Buttons on 3D Box
mopic3d.com
10
Button
Description
POWER
Turn the box on or off by pressing the POWER button
F1
Play 3D contents within the box (prior to the contents being played) or return to
the main screen (while the contents are being played)
F2
Upon 1st press: convert to 'HDMI In' mode (prior to the contents being played &
while the contents are being played)
Upon 2nd press: return to the main screen (while the contents are being played)
F3
Force-refresh 3D contents within the box (in case the contents are changed) or
convert between 2D and 3D Contents (while the contents are being played)

Buttons on Mplayer3D Screen
Mplayer3D screen buttons appear after a click on the middle section of the bottom of the screen.
*Noiseless: Pressing the noiseless button would show less afterimages albeit darkened, in case of less than
ideal settings
mopic3d.com
11
Button
Description
3D ↔ 2D
Convert between 2D and 3D contents
NORMAL ↔ BLACK*
Convert between Normal and Noiseless* images
DEPTH
Push out 3D contents farther
HSBS ↔ FSBS
Convert between Half Side-By-Side / Full Side-By-Side
CAMERA PLAY↔CAMERA HOLD
Turn on and off eye-tracking
X
Hide buttons on the screen
Left Click on the Mouse
Pause
Right Click on the Mouse
Escape

Basic Troubleshooting
To Adjust 3D Settings
The product has been pre-adjusted.
Please adjust 3D settings that cater to the most optimal 3D immersive experience
1. Click on 3D Settings
Click on ( ) to reset the 3D settings
2. Angle
Move the cursor to the left or right until the black line becomes parallel to the red line
*The red line does not need to be placed right in the middle of the black lines, as long as they are in parallel
mopic3d.com
12
O
X

3. Alignment
Move the cursor to the left or right until the floating objects on the screen show no 'afterimage', then click on (
) to complete 3D settings
* The white floating object in the middle must become the most protrusive 3D image of all, while the other
objects on the right and left show little or no afterimage
*The alignment bar is divided into three zones, blue (60), yellow (65), and red (70) that help measure and
deliver the most optimal 3D immersive experience. Please ensure to move the cursor from far left to far right
across all three zones multiple times to find the most optimal alignment point, as you will find at least three
optimal points across the three zones.
To confirm 3D Box settings
● 3D box main page > Settings > Display > HDMI > Resolution > 3840*2160 60hz
● 3D box main page > Settings > Display > Color > RGB 8bit
*Note: the product has been pre-adjusted at optimal 3D box settings. Please refrain from adjusting the display
setting as it may deliver poor quality 3D immersive experience.
mopic3d.com
13
O
X

To confirm 3D Monitor settings
● Click on the JOG button on the back of the Monitor for a few seconds > Upward Arrow Key > Display
Settings
● brightness 70 / contrast 75 / sharpness 68
*Note:The product has been pre-adjusted at optimal 3D monitor settings. Please refrain from adjusting the
monitor setting as it may deliver poor quality 3D immersive experience
For further details, please visit our FAQ page
mopic3d.com
14

Specifications
3D System Specifications
mopic3d.com
15
MODEL NO.
U28A750
MAKER
MOPIC CO., LTD.
Components
3D Monitor, 3D Box (Mplayer3D), RGB Camera
3D Monitor
Dimensions
28inch (653*376*50 mm)
Product weight
4.7kg
Resolution
3840*2160 (4K)
Screen
Orientation
Horizontal
Aspect Ratio
16:09
3D Box
OS
Android 7
USB
2x USB2.0 Host, 1x USB3.0 Host, 1x USB Type-C
Power
DC 12V/3A
Ethernet
1000M High performance Ethernet (RTL8211E), RJ45 interface
HDMI IN / OUT
Adopt Toshiba TC358749XBG bridge device / HDMI 1.4 and 2.0
Dimensions
155*105*35 (mm)
Product weight
550g
Video format
Mp4 (F/H side-by-side, top-bottom)
RGB Camera
Dimensions
140 * 80 * 70 mm
Product weight
0.250 kg
Resolution
1920*1080
Table of contents
Other MOPIC Cell Phone Accessories manuals