manuals.online logo
Brands
  1. Home
  2. •
  3. Brands
  4. •
  5. Moree
  6. •
  7. Outdoor Light
  8. •
  9. Moree lounge up outdoor 08-01-01 User manual

Moree lounge up outdoor 08-01-01 User manual

moree ltd.
Kaiserswerther Markt 11
40489 Düsseldorf
Germany
Website: www.moree.de
Designed and Produced in Germany © 2008
Sollte Ihr Gerät nicht mehr funktionieren, so prüfen Sie bitte
vorerst, ob Gründe, wie eine unterbrochene Stromversorgung,
defektes Leuchtmittel oder falsche Handhabung die Ursache
sein können. Sollte Ihr Gerät einen Defekt aufweisen, wenden
Sie sich bitte an den Verkäufer.
If your product does not function any longer, please rst examine if
there is a problem with the power supply, if the light bulb is blown
or if you have handled the product incorrectly. If your product is
defected in any way, please contact the salesman.
Dear customer,
The salesman provides warranty for perfect material and error
free manufacturing for 12 months, starting from the day of
purchase on the following conditions:
The warranty is void with interference by the customer or through
a third party. Damage caused by inappropriate treatment/use (i.e.
wrong light bulbs), natural causes or causes beyond control do
not fall under the guarantee. In response to complaints, we will
replace/repair defected parts or the whole product. Replaced
parts will be retained. No further claims exist due to the warranty.
The warranty claim needs to be proven with the purchase receipt
of the customer. In the case of warranty the table can only be
returned and accepted providing that it is in its intact original
packaging.
Vertrieb Distribution
Fehlerbehebung In case of malfunction
Sehr geehrte Kundin, sehr geehrter Kunde,
der Verkäufer leistet für einwandfreies Material und fehlerfreie
Fertigung Garantie innerhalb 12 Monaten, gerechnet vom Tage
des Kaufs, zu nachfolgenden Bedingungen.
Der Garantieanspruch erlischt bei Eingriffen durch den Käufer
oder durch Dritte. Schäden, die durch unsachgemässe Behand-
lung oder Bedienung, Umbau oder durch falsches Aufstellen,
durch unsachgemässen Anschluss oder Verwendung falscher
Leuchtmittel, sowie höhere Gewalt oder sonstige Einflüsse
entstehen, fallen nicht unter die Garantieleistungen. Wir behalten
uns vor, bei Reklamationen die defekten Teile auszubessern
oder zu ersetzen oder das Gerät auszutauschen. Ausgetauschte
Teile gehen in unser Eigentum über. Weitergehende Ansprüche
bestehen aufgrund der Garantie nicht. Der Garantieanspruch
ist vom Käufer durch Vorlage der Kaufquittung nachzuweisen.
Im Garantiefall wird der Tisch nur in unbeschädigter Original-
verpackung zurückgenommen.
Garantie Warranty
Vers. 1.0 © moree ltd.
Bedienungsanleitung/ Instruction Manual
Typ: 08-01-01
Gerät und Verpackungsmaterial sind aus recyclefähigen Materi-
alien hergestellt. Die getrennte, umweltgerechte Entsorgung von
Materialresten fördert die Wiederverwertung von Wertstoffen.
Das ausgediente Gerät sofort unbrauchbar machen und einer
ordnungsgemäßen Entsorgung zuführen. Entsorgungshinweise
erhalten Sie von der Gemeindeverwaltung.
Packaging material and appliance are made of recyclable mate-
rials. Seperation of the remaining waste materials into different
types, facilitates the recycling of valuable raw materials.
If the appliance is not used any longer, please dispose it in the
proper manner. You can obtain information on disposal from
your local authority.
Entsorgung/ Umweltschutz Disposal/ Ecology
Das Produkt besteht aus hochwertigem Kunststoff. Um Be-
schädigungen zu vermeiden, darf es nicht mit abfärbenden
oder lösungsmittelhaltigen Materialien in Berührung kommen.
Bitte nur mit einem feuchten, weichen Tuch abwischen. Auf
keinen Fall lösungsmittel- oder alkoholhaltige Reiniger ver-
wenden.
The product is made of high-quality plastic. In order to avoid
damage, it may not come into contact with solvents or materi-
als that lose colour. Wipe it with a soft, damp cloth only. Do not
use alcohol or solvent based cleaners.
Pegehinweise Maintenance
Technische Daten Technical data
Als Tischplatte ist eine Glasscheibe erhältlich. Nr.: 04-01-01
A glass table top is available as an accessory. Nr.: 04-01-01
Maße / Dimensions: ca. 84 cm , ca. 106 cm hoch/ high
Gewicht / Weight: ca. 18 kg
Material / Material: ABS / PMMA / PP
Leuchtmittel / Illuminant: 1x max. 40W E27
Standardleuchtmittel /
Standard light bulb
18W Energiesparlampe empfohlen
18W energy saving lamp recom-
mended
Schutzklasse II /
Protection class II
Verkabelung / Cabling: 3,5 m Kabel, schwarz /
3,5 m cable, black
Spritzwassergeschützt - IP23 / Splash water proofed - IP23
Für Aussenbereich geeignet / for outdoor use
Zubehör Accessories
Bedienungsanleitung/ Instruction Manual
Bodenplatte
Bottom plate
Gehäusunterteil
Lower housing
Gehäuseoberteil
Upper housing
Schrauben
Screws
Leuchtmittel
Light bulb
Leuchtmittelfassung E27
E27 Lamp holder
Leuchtmittelabdeckung
Light bulb cover
Aufbau Construction Diagram
Wichtige Sicherheitshinweise Important Saveguards
Gebrauchsanweisung vor dem ersten
Gebrauch vollständig lesen und
sorgfältig aufbewahren.
Den Tisch nur unter Strom benutzen,
nachdem er korrekt montiert wurde
und sich in technisch einwandfreiem
Zustand bendet.
Der Tisch ist nur horizontal, mit der
Tischplatte nach oben aufgestellt,
zu verwenden!
Keine heißen Gegenstände auf der
Tischplatte abstellen. Die Tischplatte
kann sich bis zu 40°C erhitzen, keine
schmelzenden Gegenstände auf den
Tisch stellen.
Nur auf festem, trockenem, nicht
leicht entzündlichem Untergrund
verwenden.
Das max. Aufstellgewicht beträgt
5 kg.
Nicht am Kabel oder an der Logo-
Schlaufe ziehen.
Die Leuchte darf nur mit einer Netzs-
pannung von 230V und den vorge-
schriebenen Leuchtmitteln (max.
40W) betrieben werden.
Vor dem Öffnen des Tisches den
Netzstecker ziehen. Veränderungen
an der Tischleuchte dürfen nicht
erfolgen.
Prüfen Sie ob die Spannungsangabe
auf dem Gerät mit der Netzspannung
übereinstimmt.
Netzkabel regelmäßig auf eventuelle
Schadstellen prüfen.
Sollte das Gerät oder das Netzkabel
beschädigt sein, diese nicht mehr
benutzen und kaputte Kompo-
nenten nur durch Ersatzteile, welche
ausschließlich über den Hersteller
oder seinen Servicevertreter erhältlich
sind, ersetzen.
Durch unsachgemäße Reparaturen
können erhebliche Gefahren für den
Benutzer entstehen.
moree Leuchten entsprechen den
einschlägigen Sicherheitsbestim-
mungen.
Before using the product, read the
instruction manual completely. Keep
the manual during the entire life of
the product.
The table may only be used as
an illuminant after correct instal-
lation.
This table may only be used
positioned horizontally, with the
table top upturned.
Do not place hot objects on top of
the table. The table top can heat
up to 40°C, do not place meltable
objects on it.
It may only be used on firm,
dry, horizontal, non-ammable
ground.
Max. load is up to 5 kg.
Do not pull on the cable or the
logo strap.
The light may only be operated
with a mains supply voltage
of 230V and a light bulb (max.
40W)
Disconnect the table from the
mains supply before opening.
You may not alter the light table
in any way.
Make sure your voltage corres-
ponds to the voltage printed on the
product. Connect it to alternating
current only.
Check the cord regularly for possible
damage.
If the appliance (including cord)
shows any defect, stop using it and
only replace damaged components
with specic ones that are only avail-
able from the manufacturer or a
representative.
Faulty or unqualied repair work
may cause accidents or injury to
the user.
moree products appliances meet
applicable safety standards.
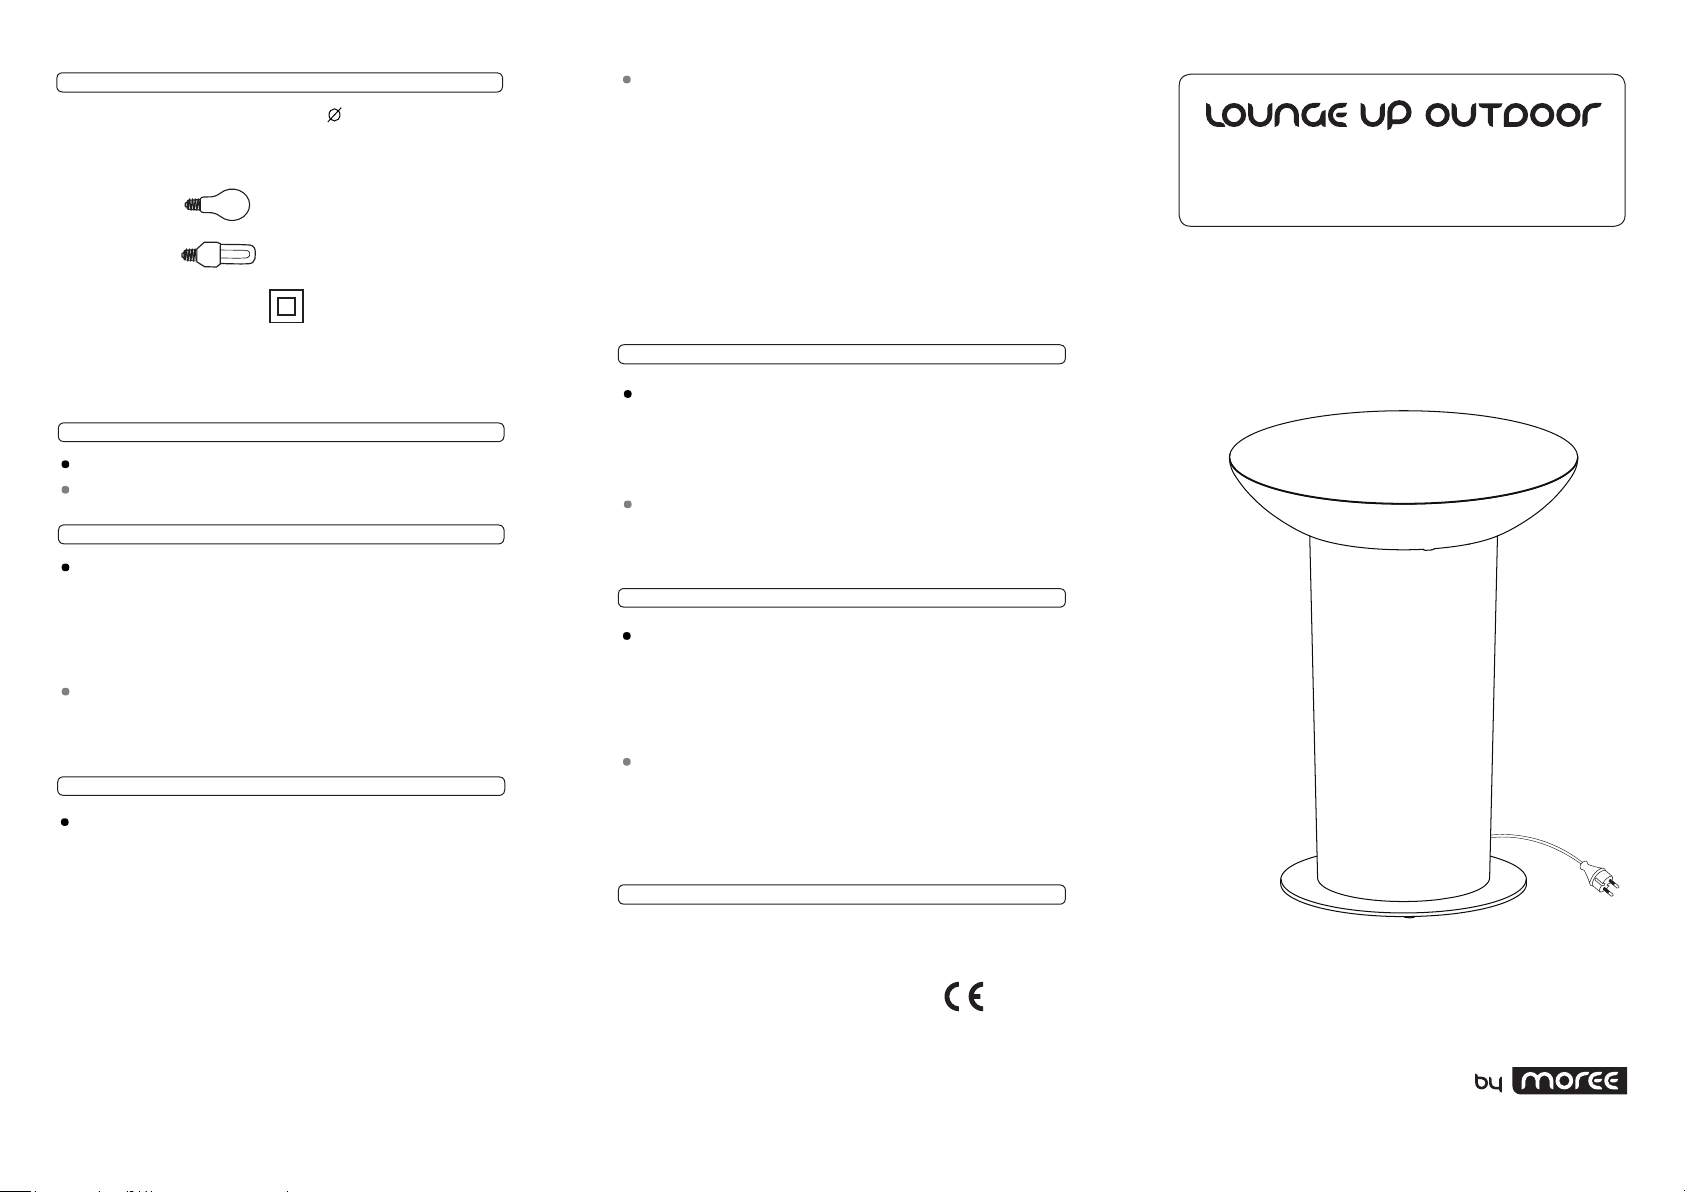
Fixieren der Bodenplatte / Fix the bottom plate
Leuchtmittelwechsel; Befestigen des Gehäuses /
Changing the light bulb; Fastening the housing
Stellen Sie sicher, dass das Gerät von der Stromquelle ge-
trennt ist (Netzstecker ziehen). Der Montageort muss trocken
und staubfrei sein. Stellen Sie das Gehäuseunterteil (2) mit
der Oberseite nach unten auf den Boden. Bitte weiche Unter-
lage verwenden, um ein Verkratzen zu vermeiden. Nehmen
Sie nun die Bodenplatte (1) und schrauben Sie diese an das
Gehäuseunterteil (2).
Drehen Sie nun das Gehäuseunterteil (2) mit der xierten Bod-
enplatte (1) um und stellen sie es auf diese. Schrauben Sie
zuerst das vorgeschriebene Leuchtmittel (5) in die Fassung
(6) und xieren Sie danach die Abdeckung (7) gewissenhaft.
Setzen Sie das Gehäuseoberteil (3) auf das Gehäuseun-
terteil (2). Fixieren Sie mit den mitgelieferten Schrauben (4)
Gehäuseunterteil (2) und Gehäuseoberteil (3). Vergewissern
Sie sich, dass alle Schrauben festsitzen. Jetzt können Sie den
Tisch an die Stromquelle anschließen.
Ensure that the equipment is away from the power source (pull
the plug from the main supply). The assembly place must be
dust free and dry. Place the lower housing (2) with the top on
the ground. Please place the table on a soft surface in order to
avoid scratching. Take the bottom plate (1) and x it together
with the lower housing (2).
Turn the lower housing (2) on the xed bottom plate. First
screw the light bulb (5) into the lamp holder (6) of the lower
housing (2) and then x the cover (7) precise. Place the upper
housing (3) on top of the lower housing (2). Assemble the low-
er housing (2) and upper housing (3) with the provided screws
(4). Make sure that all screws are xed rmly. Now you can
connect it to the mains supply.
Leuchtmittel-Wechsel Changing the light bulb
Montage Assembly
Beim Wechseln des Leuchtmittels muss die Stromverbindung
unterbrochen werden - Netzstecker ziehen! Lassen Sie das
Leuchtmittel ausreichend lange abkühlen - um evtl. Verletzun-
gen vorzubeugen.
Lösen Sie die Schrauben (4) und nehmen Sie das Gehäuse-
oberteil (3) vom Gehäuseunterteil (2) ab. Schrauben Sie die
Abdeckung (7) des Leuchtmittels vorsichtig ab. Das Leuchtmit-
tel (5) steckt in einer E27 Schraubfassung (6) im Gehäuseun-
terteil (2) und kann durch vorsichtiges Heraus-/Einschrauben
ausgetauscht werden. Zum Zusammenbau bitte alle Arbeits-
schritte in umgekehrter Folge ordnungsgemäß durchführen.
Unplug the table from the main supply before changing the
light bulb. If the light bulb is blown, leave it to cool sufciently
before changing to prevent burn injuries.
After you have loosened the screws (4), you can remove the
upper housing (3) from the lower housing (2). Remove the light
bulb cover (7). The light bulb (5) is installed in the E27 lamp
holder (6) and can be replaced by unscrewing/screwing. For
assembly do all the work steps in reverse sequence.
Sehr geehrte Kundin, sehr geehrter Kunde, wir freuen uns, dass Sie
sich für ein moree-Produkt entschieden haben.
Dear customer, we are very delighted that you have chosen a product
from our company.
4x Schrauben und
Unterlegscheiben /
4x Screws, Washers
Bedienungsanleitung Instruction Manual
8x Schrauben und
Unterlegscheiben /
8x Screws, Washers
Max. 40W

Other Moree Outdoor Light manuals

Moree HUHU User manual

Moree

Moree HUHU User manual

Moree ALICE XL User manual

Moree

Moree ALICE XL User manual

Moree LOUNGE S User manual

Moree

Moree LOUNGE S User manual

Moree CUBE LED PRO ACCU 06-01-01 Multicolour User manual

Moree

Moree CUBE LED PRO ACCU 06-01-01 Multicolour User manual

Moree 26-02-01 User manual

Moree

Moree 26-02-01 User manual

Moree 08-01-01 User manual

Moree

Moree 08-01-01 User manual

Moree LOUNGE S User manual

Moree

Moree LOUNGE S User manual

Moree Lounge 04-05-01 User manual

Moree

Moree Lounge 04-05-01 User manual

Moree ERASER 260 User manual

Moree

Moree ERASER 260 User manual

Popular Outdoor Light manuals by other brands

as-Schwabe 46978 manual

as-Schwabe

as-Schwabe 46978 manual

LIGMAN BIU-90007 installation manual

LIGMAN

LIGMAN BIU-90007 installation manual

LEDDOO QUADRA TL-1 user manual

LEDDOO

LEDDOO QUADRA TL-1 user manual

Wisdom KL5M Product description

Wisdom

Wisdom KL5M Product description

Inspire Murray instruction manual

Inspire

Inspire Murray instruction manual

Nave 5269361 manual

Nave

Nave 5269361 manual

Gama Sonic GS-106PL instruction manual

Gama Sonic

Gama Sonic GS-106PL instruction manual

IKEA PEKHULT manual

IKEA

IKEA PEKHULT manual

Cooper Lighting MSL180 instruction manual

Cooper Lighting

Cooper Lighting MSL180 instruction manual

kim lighting KLV205 installation instructions

kim lighting

kim lighting KLV205 installation instructions

Brooklyn BR-IP65-WL quick start guide

Brooklyn

Brooklyn BR-IP65-WL quick start guide

STEINEL PROFESSIONAL XLED 10 manual

STEINEL PROFESSIONAL

STEINEL PROFESSIONAL XLED 10 manual

elvita 116499 user manual

elvita

elvita 116499 user manual

Steren LAM-010 manual

Steren

Steren LAM-010 manual

Maxim Lighting CITADEL 27601CLCHB installation instructions

Maxim Lighting

Maxim Lighting CITADEL 27601CLCHB installation instructions

Nemo BORNE BETON Assembly instructions

Nemo

Nemo BORNE BETON Assembly instructions

Inspire TELIN Assembly, Use, Maintenance Manual

Inspire

Inspire TELIN Assembly, Use, Maintenance Manual

Feiss Roscoe OL12907 installation instructions

Feiss

Feiss Roscoe OL12907 installation instructions

manuals.online logo
manuals.online logoBrands
  • About & Mission
  • Contact us
  • Privacy Policy
  • Terms and Conditions

Copyright 2025 Manuals.Online. All Rights Reserved.