Motomaster 011-2064-0 User manual
INSTRUCTION
MANUAL
model no. 011-2064-0
JUMP STARTER WITH
AIR COMPRESSOR
IMPORTANT: Please read this manual carefully before using this
jump starter and save it for reference.
DO NOT RETURN THIS PRODUCT TO THE STORE!
QUESTIONS? CALL CUSTOMER SERVICE, HOTLINE:1-888-942-6686
+–
00
126
Psi
V
12V

model no. 011-2064-0 | contact us: 1-888-942-6686 1
SAVE THESE INSTRUCTIONS!
This manual contains important safety and operating instructions.
Read all instructions and follow them.
IMPORTANT SAFETY WARNINGS
KEY PARTS DIAGRAM
Screen Display
OPERATION
Jump Starting
Low Voltage Batteries & Manual Override
Recharging
Operate As 12 V Power Supply
Operate Air Compressor
LED Light
USB Power
TROUBLE SHOOTING
TECHNICAL SPECIFICATIONS
ENVIRONMENTAL PROTECTION
WARRANTY
1
6
7
8
10
12
13
14
15
17
17
18
22
23
23
READ AND UNDERSTAND ALL SAFETY INFORMATION
BEFORE USING THIS PRODUCT. Failure to follow these
safety instructions may result in ELECTRICAL SHOCK,
EXPLOSION OR FIRE, which may result in a SERIOUS
INJURY, DEATH, or PROPERTY DAMAGE.
Explosive Gases. Working in the vicinity of a lead-acid
battery is dangerous. Batteries generate explosive gases
during normal battery operation. To reduce risk of battery
explosion, follow all safety information instructions and
those published by the battery manufacturer and manu-
facturer of any equipment intended to be used in the
vicinity of battery. Review cautionary markings on these
products and on engine.
Electrical Shock. Product is an electrical device that can
shock and cause serious injury. Do not cut power cords.
Do not submerge in water or get wet.
Explosion. Unmonitored, incompatible, or damaged
batteries can explode if used with product. Do not leave
product unattended while in use. Do not attempt to jump
start a damaged or frozen battery. Use product only with
batteries of recommended voltage. Operate product in
well ventilated areas.
Fire. Product is an electrical device that emits heat and
is capable of causing burns. Do not cover product. Do not
smoke or use any source of electrical spark of re when
operating product. Keep product away from combustible
materials.
Eye injury. Wear eye protection when operating product.
Batteries can explode and cause eye and skin irritation. In
the case of contamination of eyes or skin, ush affected
area with running clean water and contact poison control
centre immediately.
WARNING
TABLE OF CONTENTS
IMPORTANT SAFETY WARNINGS

2model no. 011-2064-0 | contact us: 1-888-942-6686 3
IMPORTANT SAFETY WARNINGS
IMPORTANT SAFETY WARNINGS
Important Safety Warnings
Personal Precaution. Only use product as intended. Someone should be within
range of your voice or close enough to come to your aid in case of emergency.
Have a supply of clean water and soap nearby in the case of battery acid contam-
ination. Wear complete eye protection and protective clothing while working near
a battery. Always wash hands after handling batteries and related materials. Do
not handle or wear any metal objects when working with batteries including:
tools, watches or jewellery. If metal is dropped onto battery, it may spark or
create a short circuit resulting in electrical shock, re, explosion which may result
in injury, death or property damage.
Choking Hazard. Accessories may present a choking hazard to children. Do not
leave children unattended with product or any accessory. The product is not a toy.
Handling. Handle product with care. The product can become damaged if
impacted. Do not use a damaged product, including, but not limited to, cracks to
the casing or damaged cables. Do not use product with a damaged power cord.
Humidity and liquids may damage product. Do not handle product or any electri-
cal components near any liquid. Store and operate product in dry locations. Do not
operate product if it becomes wet. If product is already operating and becomes
wet, disconnect it from the battery and discontinue use immediately. Do not
disconnect the product by pulling on the cables.
Modications. Do not attempt to alter, modify or repair any part of product.
Disassembling product may cause injury, death or damage to property. If product
becomes damaged, malfunctions or comes in contact with any liquid, discontinue
use. Any modications to the product will void your warranty.
Accessories. This product is only approved for use with MotoMaster accesso-
ries. MotoMaster is not responsible for user safety or damage when using
accessories not approved by MotoMaster.
Location. Prevent battery acid from coming in contact with the product. Do not
operate the product in a closed-in area or an area with restricted ventilation.
Do not set a battery on top of product. Position cable leads to avoid accidental
damage by moving vehicle parts (including hoods and doors), moving engine
parts (including fan blades, belts, and pulleys), or what could become a hazard
that may cause injury or death.
Operation Temperature. This product is designed to work in ambient tempera-
tures between -30°C to 60°C (-22°F to 140°F). Do not operate outside of tempera-
ture range. Do not jump start a frozen battery. Discontinue use of product immedi-
ately if the battery becomes excessively warm.
Storage. Do not use or store your product in areas with high concentrations of
dust or airborne materials. Store your product on at, secure surfaces so it's not
prone to falling. Store your product in a dry location. The storage temperature is
-20°C to 25°C (-4°F to 77°F) (average temperature). Never exceed 80°C (176°F)
under any condition.
Compatibility. The product is only compatible with 12-volt lead-acid batteries
only. Do not attempt to use product with any other type of battery. Jump starting
other battery chemistries may result in injury, death or property damage. Contact
the battery manufacturer prior to attempting to jump start the battery. Do not jump
start a battery if you are unsure of the battery's specic chemistry or voltage.
Medical Devices. Product may emit electromagnetic elds. Product contains
magnetic components which may interfere with pacemakers, debrillators, or
other medical devices. These electromagnetic elds may interfere with pacemak-
ers or other medical devices. Consult with your physician prior to use if you have
any medical devices including pacemakers. If you suspect the product is interfering
with a medical device, stop using the product immediately and consult your
physician.
Medical Conditions. If you have any medical conditions that you believe could be
affected by product, including but not limited to: seizures, blackouts, eyestrain or
headaches, consult your physician prior to use of product.
Cleaning. Power off the product before attempting any maintenance or cleaning.
Clean and dry product immediately if it comes in contact with liquid or any type of
contaminant. Use a soft, lint-free (microbre) cloth. Avoid getting moisture in
openings.
Explosive Atmospheres. Obey all signs and instructions. Do not operate product
in any area with a potentially explosive atmosphere, including fueling areas or
areas which contain chemicals or particles such as grain, dust or metal powders.
High-consequence Activities. This product is not intended for use where the
failure of the product could lead to injury, death or severe environmental damage.
The battery. The built-in lithium-ion battery in the product must be recycled or
disposed of separately from household waste. Don't attempt to replace the
battery yourself and do not handle a damaged or leaking lithium-ion battery.
Never dispose of battery in household trash. Disposal of batteries in household
trash is unlawful under provincial environmental laws and regulations. Always
take used batteries to an your local battery recycling centre. If the product battery
is excessively hot, emitting odour, deformed, cut, or is experiencing or demon-
strating an abnormal occurrence, immediately stop all use.
Battery Charging. Charge the product with the included USB charge cable and
10 W 12 V Car Charger. A third party USB cable and 5 W or 10 W Car Charger that
may be compatible. Be cautious of using low quality power adaptors, as they may
present a serious electrical risk that can result in injury to person, device and
property.
Using damaged cables or chargers, or charging when moisture is present, can
result in electric shock. Using generic or third party power adaptor may shorten
the life of your product and cause the product to malfunction. MotoMaster is not
responsible for the user's safety when using accessories that are not approved by
MotoMaster.
When using a AC plug (not included) to charge the product, make sure that the
end of charging cable is fully inserted into the AC plug before you plug it into a
power outlet. It may become warm during normal use, and prolonged skin
contact may cause bodily injury. Always allow adequate ventilation around power
adaptors when using them.
To ensure maximum battery life, avoid charging your product for more than a
week at a time, as overcharging may shorten battery life. Over time, an unused
product will discharge and must be recharged before use. Disconnect the product
from power sources when not in use. Use the product only for its intended
purposes.
4model no. 011-2064-0 | contact us: 1-888-942-6686 5
IMPORTANT SAFETY WARNINGS
IMPORTANT SAFETY WARNINGS
Operation Temperature. This product is designed to work in ambient tempera-
tures between -30°C to 60°C (-22°F to 140°F). Do not operate outside of tempera-
ture range. Do not jump start a frozen battery. Discontinue use of product immedi-
ately if the battery becomes excessively warm.
Storage. Do not use or store your product in areas with high concentrations of
dust or airborne materials. Store your product on at, secure surfaces so it's not
prone to falling. Store your product in a dry location. The storage temperature is
-20°C to 25°C (-4°F to 77°F) (average temperature). Never exceed 80°C (176°F)
under any condition.
Compatibility. The product is only compatible with 12-volt lead-acid batteries
only. Do not attempt to use product with any other type of battery. Jump starting
other battery chemistries may result in injury, death or property damage. Contact
the battery manufacturer prior to attempting to jump start the battery. Do not jump
start a battery if you are unsure of the battery's specic chemistry or voltage.
Medical Devices. Product may emit electromagnetic elds. Product contains
magnetic components which may interfere with pacemakers, debrillators, or
other medical devices. These electromagnetic elds may interfere with pacemak-
ers or other medical devices. Consult with your physician prior to use if you have
any medical devices including pacemakers. If you suspect the product is interfering
with a medical device, stop using the product immediately and consult your
physician.
Medical Conditions. If you have any medical conditions that you believe could be
affected by product, including but not limited to: seizures, blackouts, eyestrain or
headaches, consult your physician prior to use of product.
Cleaning. Power off the product before attempting any maintenance or cleaning.
Clean and dry product immediately if it comes in contact with liquid or any type of
contaminant. Use a soft, lint-free (microbre) cloth. Avoid getting moisture in
openings.
Explosive Atmospheres. Obey all signs and instructions. Do not operate product
in any area with a potentially explosive atmosphere, including fueling areas or
areas which contain chemicals or particles such as grain, dust or metal powders.
High-consequence Activities. This product is not intended for use where the
failure of the product could lead to injury, death or severe environmental damage.
The battery. The built-in lithium-ion battery in the product must be recycled or
disposed of separately from household waste. Don't attempt to replace the
battery yourself and do not handle a damaged or leaking lithium-ion battery.
Never dispose of battery in household trash. Disposal of batteries in household
trash is unlawful under provincial environmental laws and regulations. Always
take used batteries to an your local battery recycling centre. If the product battery
is excessively hot, emitting odour, deformed, cut, or is experiencing or demon-
strating an abnormal occurrence, immediately stop all use.
Battery Charging. Charge the product with the included USB charge cable and
10 W 12 V Car Charger. A third party USB cable and 5 W or 10 W Car Charger that
may be compatible. Be cautious of using low quality power adaptors, as they may
present a serious electrical risk that can result in injury to person, device and
property.
Using damaged cables or chargers, or charging when moisture is present, can
result in electric shock. Using generic or third party power adaptor may shorten
the life of your product and cause the product to malfunction. MotoMaster is not
responsible for the user's safety when using accessories that are not approved by
MotoMaster.
When using a AC plug (not included) to charge the product, make sure that the
end of charging cable is fully inserted into the AC plug before you plug it into a
power outlet. It may become warm during normal use, and prolonged skin
contact may cause bodily injury. Always allow adequate ventilation around power
adaptors when using them.
To ensure maximum battery life, avoid charging your product for more than a
week at a time, as overcharging may shorten battery life. Over time, an unused
product will discharge and must be recharged before use. Disconnect the product
from power sources when not in use. Use the product only for its intended
purposes.
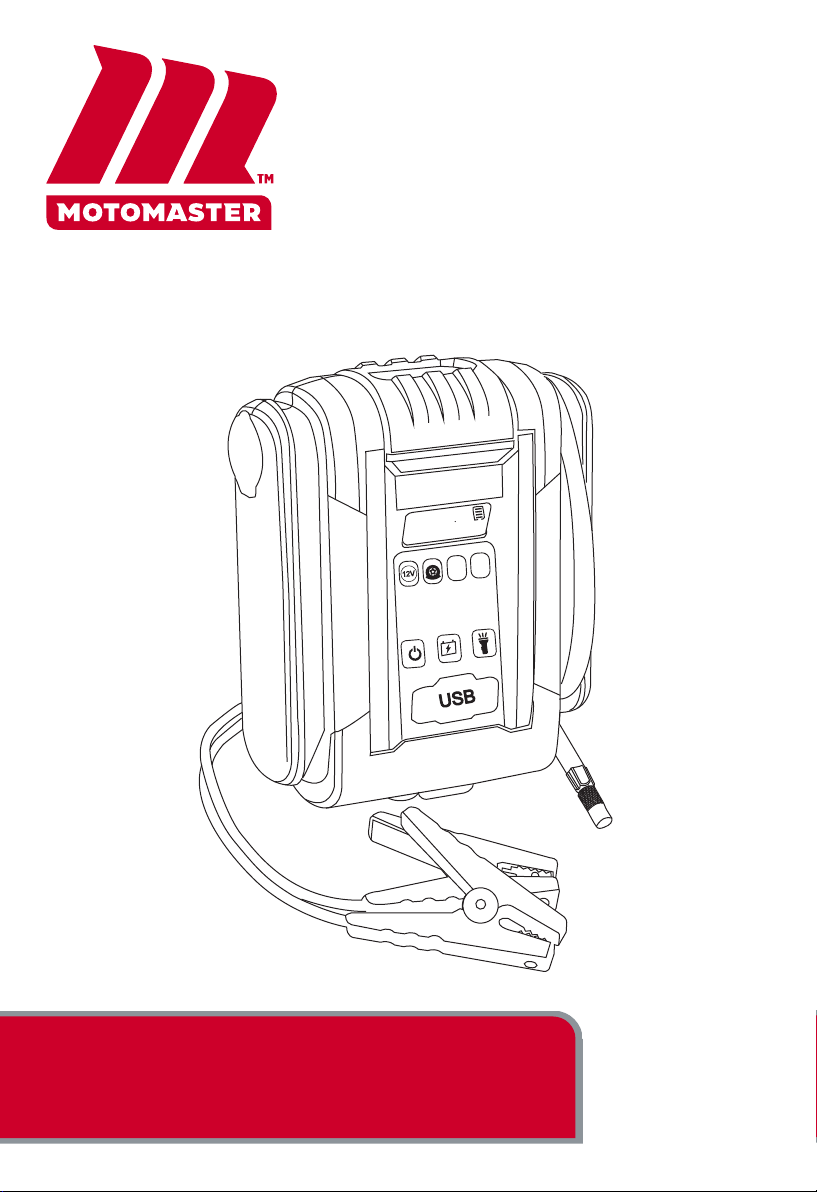
During Charging
The normal charging temperature range for the internal
battery is 0ºC to 45ºC. If the battery temperature exceeds
45ºC, the icon will appear on the display and the unit
will stop charging. The unit will resume charging once the
battery cools below 45ºC.
During Use
Over-temperature Damage
The normal operating temperature range for the internal
battery is 0ºC to 60ºC. If the battery temperature exceeds
60ºC, the icon will appear on the display and unit
functions will be inoperable. The unit will resume functions
once the battery cools below 50ºC.
If the battery temperature exceeds 80ºC, both the
and icons will appear on the display and the unit
functions will be inoperable. If, after cooling down,
the icon disappears but the icon remains, the
internal battery has been permanently damaged from
being exposed to excessive heat. Immediately stop all use
of the product.
High Temperature Protection

6model no. 011-2064-0 | contact us: 1-888-942-6686 7
KEY PARTS DIAGRAM
1
2
3
4 5
6
7
8
9
10
11
12
13 14
15 17
+–
00
126
Psi
V
12V
16
KEY PARTS DIAGRAM
KEY PARTS DIAGRAM
Screen Display
1. Main Power Button
2. 12 V DC Power Button
3. 12 V DC Power Outlet (under protective cover)
4. 90º Adjustable LED Light
5. Digital Display
6. Pressure Setting Button (+/-)
7. Air Compressor Power Button
8. LED Light Button
9. Boosting Power Button
10. USB Ports (x2) (under protective cover)
11. Air Compressor Nozzle Connector
12. Boosting Clamps
13. USB Charging Port (under protective cover)
14. Boosting Clamps Connection Port (under protective cover)
15. USB Charging Cable
16. USB 12 V Car Charger Adaptor
17. Ball/Balloon Adaptors
00
Psi
USB 5 V
126
V
OK
Internal Battery Voltage
Compressor
Pressure
Indicator
Jump
Starter
Icon
Connection Indicator
Overheat Icon
Caution Icon
USB Icon
Warm-up
Mode Icon
Battery Status Icon

8model no. 011-2064-0 | contact us: 1-888-942-6686 9
OPERATION
OPERATION
OPERATION
WARNING! EQUIPMENT DAMAGE
• Do not crank the engine for more than 3 seconds at a time. The jump start
feature is designed for short term operation only. Operating the jump start
feature for more than 3 seconds may cause damage to the unit. Do not
attempt more than 5 consecutive jump starts within a 15 minute period.
Allow the product to rest for 15 minutes before attempting to jump start the
vehicle again.
• Risk of shock, re, combustion, and burns, do not disassemble, modify,
crush, heat above 60ºC (140ºF) or incinerate.
IMPORTANT!
• Before attempting to boost vehicle.
• Verify that you have a 12 volt lead-acid battery.
• Turn off vehicle ignition and all accessories; ensure vehicle is in ''park''
and emergency brake is engaged.
• Do not attempt to jump start an engine if the battery level is at 50% or less.
• Do not place the unit where it could fall when vehicle starts up.
• Make sure that cables are routed away from motor fan or belts.
GETTING STARTED
This product comes partially charged and needs to be fully charged prior to use.
Carefully read and understand the vehicle owner's manual on specic precau-
tions and recommended methods for jump starting the vehicle. Make sure to
determine the voltage and chemistry of the battery by referring to your battery
owner's manual prior to using this product. This product is for jump starting 12
volt lead acid batteries only.
Warm-up Mode
This product is designed with an innovative self-heating feature which will warm
up the internal lithium-ion battery, improving performance in sub-zero tempera-
tures. When the unit is powered ON, if the internal battery temperature is below
0ºC, the icon will appear on the display indicating that unit is in Warm-up
mode. During warm-up, functions such as jump starting and air compressor are
inoperable – you must wait until warm-up is complete to use these functions.
Once the icon disappears, the unit is ready for use. Depending on tempera-
ture, warm-up can take anywhere from a few seconds up to 10 minutes.

10 model no. 011-2064-0 | contact us: 1-888-942-6686 11
OPERATION
OPERATION
00
Psi
126
V
00
Psi
126
V
00
Psi
126
V
OK
A
B
C
The unit has detected a good connection with a battery.
Proceed to Step 6.
Battery clamps are connected to the opposite terminals.
Reverse clamp connections before proceeding to Step 6.
The unit cannot detect a connection. Reconnect the
clamps and ensure proper contact with the battery
terminals. If connection indicator is still blank, see Low
Voltage Batteries/Manual Override section.
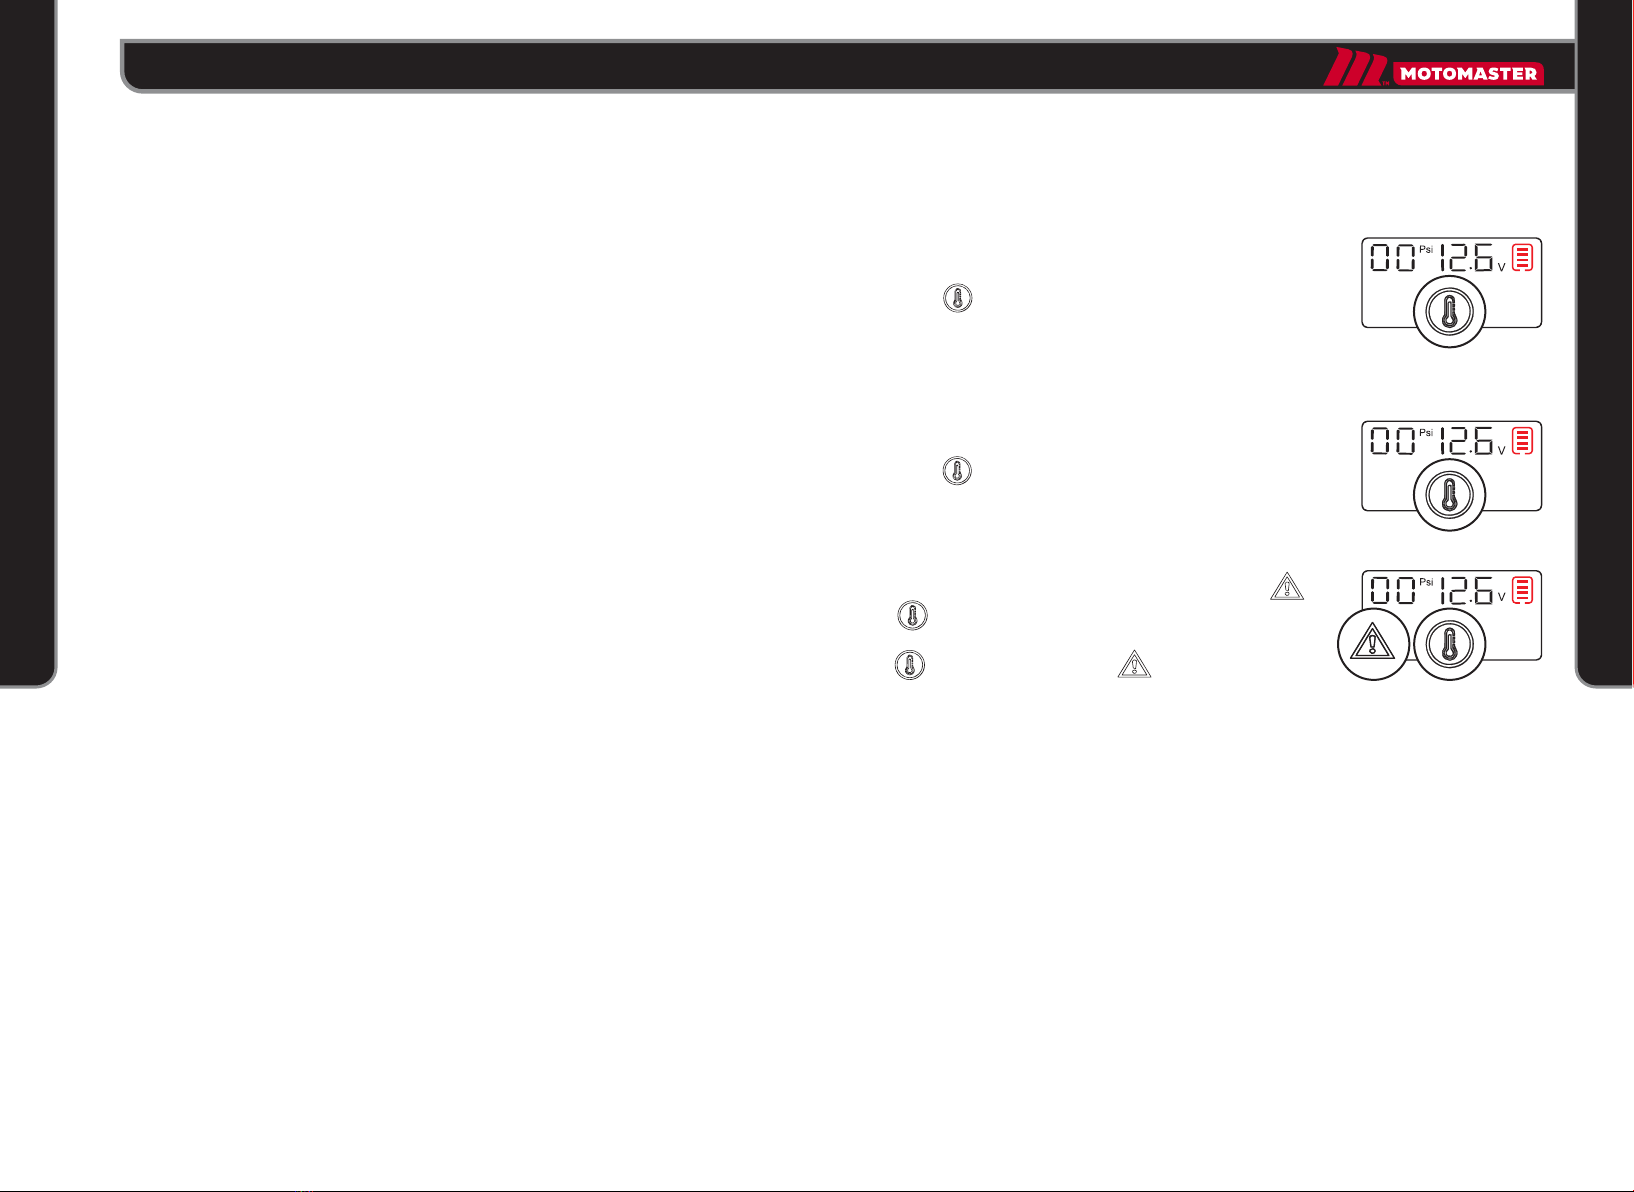
(alarm)
The icon appears and a
countdown begins. You have 50
seconds to jump start your vehicle.
00
50
Psi
OK
00
50
Psi
OK
7. Try starting the vehicle. Most vehicles will immediately start. Some vehicles
may require the unit to be connected for up to 30 seconds before starting. If
the vehicle does not start right away, wait 20-30 seconds between attempts.
CAUTION: Do not attempt more than 5 consecutive jump starts within a 15
minute period. Allow the product to rest for 15 minutes before attempting to
jump start the vehicle again.
8. Once your vehicle starts, press to turn the unit off. Disconnect the battery
clamps.
OPERATION
JUMP STARTING
Warning! Instructions are for negative ground systems only
(most common for vehicles today). If your vehicle is a positive
ground system, reverse steps 3 and 4. Please consult your
vehicle’s manual to conrm your vehicle’s ground system.
1. Firmly insert the booster clamps into boosting clamps connection port.
2. Press to turn the unit on.
3. Connect the red clamp to the POS (+) terminal of the vehicle battery.
4. Connect the black clamp to the NEG (-) terminal of the vehicle battery.
5. Check battery level indicator. If less than 3 bars, recharge the unit
before attempting a jump start.
6. Check display status and proceed as per instructions below.
00
126
Psi
V
6Proceed as per A, B or C
2
5
4
3
12 Volt
1
–
+
The number '50’ will icker
three times.
12 model no. 011-2064-0 | contact us: 1-888-942-6686 13
OPERATION
OPERATION
00
50
Psi
OK
The icon appears and a
countdown begins. You have 30
seconds to jump start your vehicle.
Low Voltage Batteries & Manual Override
The unit is designed to jump start 12 Volt lead-acid batteries down to 2 volts.
If your battery is below 2 volts, the display will be off. This is an indicator that
the unit can not detect a battery. If you need to jump start a battery below 2
volts, this unit has an OVERRIDE feature, which allows you to force 'ON' the
jump start function.
CAUTION: Use this mode with extreme care. This mode is for 12 volt
lead-acid batteries only. Both the spark-proof and reverse polarity protection
feature are disabled. Pay very close attention to the polarity of the battery
before using this mode. DO NOT allow the positive and negative battery
clamps to touch or connect to each other as the product will generate
sparks. This mode uses very high current (up to 1000 Amps) that can cause
sparks and high heat if not used properly. If you are unsure about using this
mode, do not attempt and seek professional help.
WARNING! Before using the OVERRIDE mode, ensure the clamps are
connected to the correct polarity (red clamps to POS + terminal of the
battery and black clamp to the NEG – terminal of the battery).
RECHARGING
IMPORTANT!
• Improper charging may result in damage to the unit.
• Ensure that there are no 12 V DC appliances connected to the unit while
being recharged.
• Do not operate any of this unit’s functions while charging is in progress.
• Do not recharge the unit while connected to an external battery.
• Recharge battery after each use or at least every 6 months when in storage
to prolong battery life and keep the unit ready for use.
1. Open protective ap to expose USB charging port.
2. Connect micro USB cable to the unit’s USB charging port.
3. Connect the other end of the micro USB cable to any powered USB power
port such as a laptop, 12 V DC adaptor (included) or AC charging cube (not
included).
The USB port is rated at 2.4 Amps to ensure safe and efcient charging of the
internal lithium-ion battery. We recommend that you do not charge and
discharge the unit at same time.
6. Try starting the vehicle by cranking the key.
7. Once your vehicle starts, press to turn the unit off. Disconnect the
battery clamps.
OPERATION
1. Firmly insert the booster clamps into boosting clamps connection port.
2. Press to turn the unit on.
3. Connect red clamp to the POS(+) terminal of the vehicle battery.
4. Connect black clamp to the NEG(-) terminal of the vehicle battery.
Icon will not appears.
OK
00
50
Psi
OK
5. Long Press until the
number 30 appears.
It will icker three times.
IMPORTANT
The unit must be manual turned off by press , after manual override.
Otherwise it may leads to dangerous situation.

14 model no. 011-2064-0 | contact us: 1-888-942-6686 15
OPERATION
OPERATION
00
126
Psi
V
The battery level indicator will light up and the bars will ash on/off to indicate
that the unit is charging. The bars indicate the state of charge of the internal
battery. See below:
Press the button, the Battery Level Indicator LEDs will illuminate to indicate
battery charge level.
IMPORTANT! DO NOT use this unit to operate appliances that need more than
12 A to operate from the 12 V DC power port.
This unit is equipped with one DC outlet socket and can be used to power most
12 volt accessories and appliances.
1. Pull open cover of the 12 V DC Power Port on the side of the unit.
2. Insert the 12 V DC plug from the appliance into the 12 V DC Power port on the
unit.
3. Press to turn the unit on.
4. Press to activate the DC power outlet.
The internal battery is at 25%. The internal battery is at 75%.
The internal battery is at 100%.
The internal battery is at 50%.
CHECK BATTERY STATUS
OPERATE AS 12V POWER SUPPLY
OPERATE AIR COMPRESSOR
CAUTION! EQUIPMENT DAMAGE
• DO NOT operate air compressor continuously for longer than 10 minutes.
• Allow compressor to cool down for every 10 minutes of continuous use.
• DO NOT use this product for other than its intended use.
CAUTION! BURST HAZARD AND INJURY
• Carefully follow instructions and recommended pressure of products being
inated. DO NOT OVER INFLATE.
• Always wear eye protection when operating the air compressor.
• DO NOT leave the compressor unattended during use.
IMPORTANT!
• The Air Compressor operates from the internal battery of the unit. Check
battery condition to make sure it is satisfactory before operating compressor.
DO NOT use compressor function if battery is less than 50%.
• The product records the latest pre-set pressure. For example, if your pre-set
pressure is 35 PSI, the product records the pre-set pressure at 35 PSI for the
next time. Always check pre-set pressure before activating compressor
function.
• Before reaching desired pressure, the compressor can be shut off manually
by pressing the compressor switch.
• Recharge unit after each use.
This product is equipped with 150 PSI auto shut-off digital pressure gauge that
can be used to inate tires, sports equipment and other recreational inatables.
The digital gauge can be used to monitor air pressure when inating your
products, and can automatically shut off once pre-set desired pressure is
reached.

16 model no. 011-2064-0 | contact us: 1-888-942-6686 17
OPERATION
OPERATION
1. Roll-out the Air Compressor Nozzle Connector on the side of the unit.
2. a) For inating tires or other objects with valve stems, screw in the nozzle
connector to the valve stem.
b) For inating sporting equipment, party balloons or other objects without
valve stems, screw in the appropriate adaptor into the nozzle connector
and insert it into the object being inated.
3. Press to turn the unit on.
4. Press and hold or for a few seconds until the compressor pressure
indicator starts to icker. Adjust to desired pressure ( to increase
pressure and to decrease pressure).
5. Release or once desired pressure is reached. The PSI reading will
ash a few times then go to 0 PSI. This means the pre-set pressure was
successfully recorded by the unit.
6. Press to operate the compressor. Unit will automatically shut-off once
desired pre-set pressure is reached.
7. Once unit has nished inating, press to turn the unit off.
8. Unscrew the nozzle connector from the valve stem of the object being
inated. If using an adaptor, disconnect from object being inated and
remove adaptor from nozzle connector.
9. Store air hose and ball/balloon adaptors in the appropriate storage compart-
ments.
LED LIGHT
IMPORTANT! Make sure LED light is OFF when unit is being recharged or stored.
1. Press to turn unit on.
2. Press to turn the LED light on.
3. Press again to turn the LED light off.
The light is adjustable 90°.
USB POWER
IMPORTANT! Make sure there are no devices plugged in to the USB power port
when unit is being recharged or stored.
The unit is equipped with 2 USB ports(2.4 A output in total). This port is ideal for
charging portable electronic devices such as smartphones, tablets and more.
1. Lift protective cover labelled ''USB'' to expose USB ports.
2. Connect device(s) to USB port(s).
3. Press to turn unit on and activate USB power.
4.The display will show ''USB 5 V'' indicating the USB power is on.
00
126
Psi
V
USB 5 V
18 model no. 011-2064-0 | contact us: 1-888-942-6686 19
TROUBLESHOOTING
TROUBLESHOOTING
TROUBLESHOOTING
Problem
Unit will
not charge
Possible Cause Solution
• No power from USB port
• Faulty USB cable
• Power draw during recharge
• Faulty status LED reading
• Main power is OFF
• Vehicle battery is too low
• Unit is not fully charged
• Bad clamp connection with battery
• Vehicle battery is damaged
• Mechanical issue with vehicle
• Battery in the unit is damaged
• Main power is OFF
• Unit is not fully charged
• Nozzle connector or inating adaptor not connected properly
• Compressor has overheated
• Faulty air compressor
• Main power is OFF
• Unit has insufcient charge to power appliance
• Appliance draw exceeds rating
• Main power is OFF
• Unit has insufcient charge to power appliance
• Incompatible device
• Press to turn unit ON
• Check unit battery charge level. Recharge if necessary
• Check if device is compatible with this USB type/port
• Press to turn unit ON (refer to JUMP STARTING instructions)
• Override feature needs to be used (refer to LOW VOLTAGE BATTERIES &
MANUAL OVERRIDE instructions)
• Check if unit has at least 75% charge. Recharge if necessary
• Reconnect clamps and ensure proper contact and polarity has been established
• Replace vehicle battery
• Have the vehicle serviced
• Replace unit
• Press to turn unit ON (refer to OPERATING AIR COMPRESSOR instructions)
• Check if unit has at least 75% charge. Recharge if necessary
• Make sure nozzle connector is securely screwed on to the valve stem if inating
tires; or nozzle adaptor is securely connected to nozzle connector and object
being inated
• Turn Air Compressor switch to the ''OFF'' position. Let unit cool down for 10
minutes
• Replace unit
• Press to turn unit ON (refer to OPERATE AS 12 V POWER SUPPLY instructions)
• Check unit battery charge level. Recharge if necessary
• Use appliance with a max draw of 12 A
• Plug in to a different USB outlet
• Replace USB cable
• Disconnect all accessories plugged into the unit and make sure all of the unit
functions are off
• Disconnect charger and allow unit to rest for 15 minutes. Reconnect and check
battery status
The engine
being boosted
will not start
Air compressor
will not work
12 V DC Power
function does
not work
USB Power port
does not work
Note: If the above solutions do not eliminate the problem, contact 1-888-942-6686
for assistance.

20 model no. 011-2064-0 | contact us: 1-888-942-6686 21
TROUBLESHOOTING
TROUBLESHOOTING
00
Psi
126
V
OK
00
Psi
126
V
00
Psi
126
V
The unit has detected a good connection with a battery.
Proceed to Step 6.
Follow Opeartion with correct sequence (step 1-2-3-4-…) on page 12-13.
00
Psi
126
V
(alarm)
00
50
Psi
OK
00
Psi
OK
The vehicle battery is less than 2 V, which can’t be
detected by the unit.
The unit function normally
Low battery
The surroundings is in very low temperature.
The temperature is extremely high during charging. Plug off until it cools down
Waiting 3 seconds until ickers completed.
Power on and wait for a few minutes until icon disappears, the unit is
warmed up and ready for use.
Recharging
The program only allow 50 seconds for complete
the jumping. The unit can’t jump vehicle after 50
seconds.
The program only allow 30 seconds for override vehicle.
The unit can’t override vehicle after 30 seconds.
Good connected, ready for next step.
Operation Sequence Error
Battery Clamps reverse connected, and they are
connected before unit powered on.
Operation Sequence Error
The battery clamp is connected before unit
powered on.
Follow Opeartion with correct sequence (step 1-2-3-4-…) on page 12-13.
Speed up, Follow step 3 to step 8 in 50 seconds (refer to 'operation’ on page 10 to
jump vehicle)
Follow step 5 to step 7 in 30 seconds (refer to ' Low Voltage Batteries & Manual
Override ' on page 12-13 to jump vehicle)
Problem Possible Cause Solution
The number 30/50 ickers
Follow 'Low Voltage Batteries & Manual Override’ on page 12-13 to jump vehicle.
The Icon of connection indicator
ickers, and beeping
The Icon of connection indicator
ickers and caution appears

22 model no. 011-2064-0 | contact us: 1-888-942-6686 23
TECHNICAL SPECIFICATIONS
TECHNICAL SPECIFICATIONS
Internal Battery Lithium-Ion
Internal Battery Capacity 9000 mAh
Peak Current Rating 1000 A
Operating Temperature
Storage Temperature
Micro USB Input 5 V, 2.1 A
-30°C ~ 60°C (-22°F to 140°F)
-20°C ~ 25°C (-4°F to 77°F)
22.5 × 18.5 × 8.6 cm (8 7/8 x 7 1/4 x 3 3/8")
2 kg (4 lb 7 oz)
USB Output 5 V, 2.4 A (total)
12 V DC Output 12 A max
Air Compressor 150 PSI
Dimensions
Weight
ENVIRONMENTAL PROTECTION
ENVIRONMENTAL PROTECTION
WARRANTY
Do not dispose of this product in the usual household garbage at the end of its life
cycle; hand it over at a collection point for the recycling of electrical and electronic
appliances. The symbols on the product, the instructions for use or the packing
will inform about the methods for disposal.
This MotoMaster product carries a one (1) year warranty against defects in
workmanship and materials. This product is not guaranteed against wear, break-
age or misuse. Should this product become defective within the stated warranty
period, return it to the store with proof of purchase, and it will be replaced or
repaired free of charge.
This product is recyclable. By recycling, material recycling or other forms of
re-utilization of old appliances, you are making an important contribution toward
protecting our environment.
Made in China
Imported by MotoMaster Canada Toronto, Canada M4S 2B8
Table of contents
Other Motomaster Remote Starter manuals


Popular Remote Starter manuals by other brands

Scytek electronic
Scytek electronic Galaxy 2000RS-2W product manual

Clifford
Clifford 20.7 owner's guide

Code Alarm
Code Alarm CA 4051 installation guide

Alarm Lock
Alarm Lock Trilogy DL2800 Programming instructions

Schumacher Electric
Schumacher Electric SL1464 owner's manual

Black & Decker
Black & Decker jus375ib instruction manual

Black & Decker
Black & Decker SIMPLE START BBC2CB instruction manual

matson
matson RA1900 Operator's manual

Cobra
Cobra CJS 50 operating instructions

Voxx Electronics
Voxx Electronics Pursuit PRO9056Z Installation and reference guide

Datakom
Datakom DKG-317 user manual

Vector
Vector Power on Board VEC021STC Owner's manual & warranty


