motorini XO 125 User manual

XO 125
User’s Manual

INTRODUCTION
Thank you for purchasing your Motorini XO 125.
Customer safety and satisfaction is of genuine concern to Motorini. For this reason,
we have supplied you with this User’s Manual, designed to acquaint you with the
proper and safe use of your Motorini XO 125. Please take the time to read and
understand the manual before operating your vehicle. The User’s manual has been
designed for your enjoyment and safety. Maintenance schedules and general care
instructions are included.
Our products are continuously involved in the development of the future. We therefore
ask you for your kind understanding that we reserve the right to change the scope of
delivery with respect to appearance, equipment and technology. No claims can thus be
derived from the data and descriptions contained in this manual.
We can not be held liable for any consequential damage caused by accessories not
approved by the factory.

Contents
Customer Information—4
Safety Instructions—4
Vehicle identification number and engine number—5
Location of components—6
Ignition lock—7
Instruments—8-9
Fuel tank and engine oil information—10
New vehicle running-in procedure—11
Inspection before riding—12
Main points of riding—13-15
Periodic inspection & Simple maintenance—16-17
Battery and Air filter—18-19
Spark plug & Oil consumption—20-21
Adjustment of throttle cable—21
Brake system—22
Tires & fuses—23
Use of the battery—24-25
Replacement of the light bulbs—25
Trouble shooting—26
Preservation—27

Specifications & Wiring diagram—28
Customer Information
Warnings and Notes
Throughout the book you will find the words “Warnings!” and “WARNINGS!”
These serve as reminders to be especially careful. “Warnings!” indicates an immediate
hazard, which could result in an accident. “WARNINGS!” identifies something that
could results in damage to your vehicle. You will also find information preceded by the
words “Notes”. Notes are for your information and will make procedures more easily
understood.
Safety Instructions
1. Check the motorcycle before riding to avoid an accident and damage to the the
machine.
2. The rider must pass the exam held by the traffic administration and obtain the
license to ride.
3. Wear highly visible garments.
4. Wear a helmet correctly. A high quality helmet is recommended when riding your
motorcycle.
5. Always obey the traffic laws.
6. Accidents are more likely to occur when the maximum speed limit is exceeded.
7. Always use you directional indicators when turning or changing lane.
8. Be careful when using high speed roads and approaching junctions
9. Take extra care when riding in bad weather. Ride at low speeds and always apply the
brake early.
10. Do not take wine before operation!

Vehicle identification number and engine number
Pic 02-01 Pic 02-02 Pic 02-03
The vehicle identification number (VIN) and engine number is used for
motorcycle registration。
The vehicle identification number (VIN) (1) is stamped on the main frame ,
you can access this by removing the small plastic cover (1) . The engine number (2)
is printed on the bottom left crankcase.
Please write down the VIN and engine number in case of any problems。
Exhaust maintenance
There are catalysts inside the exhaust,in order to reduce the emission
pollution. Please follow the instructions to make sure the exhausts function is
maintained.
Vehicle identification number(VIN):
Engine number:
Danger:
.Do not touch the exhaust when the engine is running or has just been switched off. It may
burn you or your garments because of the high temperature.
Warning:
Do not rev the engine whilst it is on the main stand for long periods of time.
Do not ride the bike at full throttle for long periods of time.
Do not put oil or any anti rust ointment into the exhaust .
Do not wash the exhaust with cold water when the engine is hot.
Always use a good quality grade of engine oil.

Location of components
(1) Front brake disc (2) Front shock absorber (4) Front position lamp (4)
Headlamp
(5) Rear brake lever (6) Rear view mirror (7) Instrument cluster (8) Helmet hook
(9) Rear luggage rack (10) Front brake caliper (11) Side stand (12) Pillion peg (13)
Kick start lever (14) Rear shock absorber (15) Rear brake caliper (16) Air filter
(17) Rear reflector (18) Rear indicator (19) Taillight (20) Rear luggage rack
(21) Glovebox (22) Glovebox cover (23) Throttle grip (24) Front brake lever (25)
Front brake master cylinder (26) Front indicator (27) Main stand (28) Front
position lamp (29) Pillion peg (30) Rear license lamp (31) Exhaust

Ignition lock (8)
“ ” (ON) position
All electrical circuits are on.
The engine can be started any time.
The key cannot be removed.
“ ” (OFF) position
All electrical circuits are off.
The engine cannot be started.
The key can be removed.
“ ” (LOCK) position
Turn the handlebar all the way to the left, Press the key in and turn it to the Lock
position, Remove the key, This will lock the steering handlebar. To unlock the steering
handlebar, Insert the key and turn it to the OFF position.
“OPEN” (SEAT LOCK) position
Do not press the key, when the key is on “” position turn the key in an
anti-clockwise direction, the seat can now be opened. The key will automatically return
to “ ” position.
Do not press the key, When the key is on “ ” position turn the key in a clockwise
direction, the seat can now be opened. The key will automatically return to “”
position.
Danger:
When the ignition switch turned to “ ” position please do not try to move the vehicle
and always use the main stand.

Instruments
Warning:
Do not wash the surface with high pressure water.
Do not wipe the surface solvent based products as
the surface will crack and discolor.
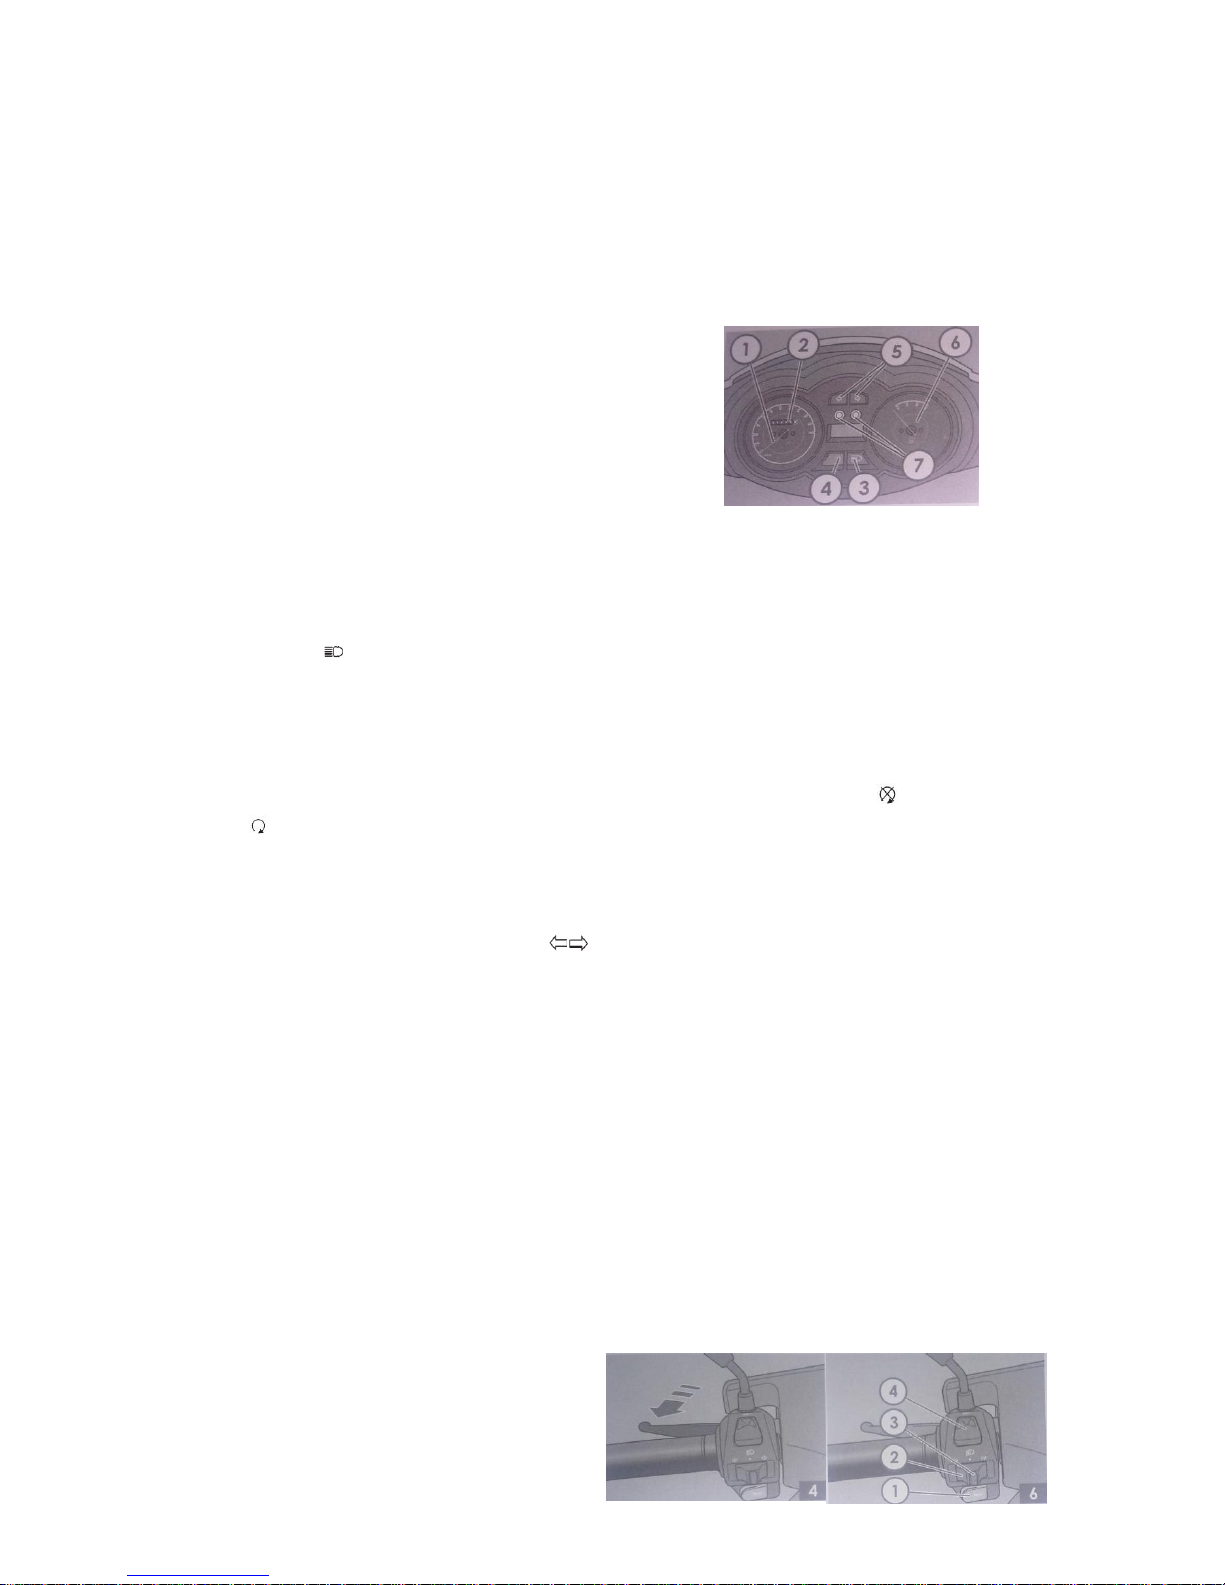
Speedometer (1)
This indicates the speed in MP/H and KM/H
Odometer (2)
This registers the total distance that the motorcycle has covered in KM
High beam (3)
This is the high beam indicator light allowing the rider to see he has high beam on or
off.
F/I Warning lamp (4)
F/I warning light should illuminate when ignition switch is turned from “ ” to
“ ” .The F/I warning light will extinguish when the vehicle is running. If the F/I
warning light is flashing it means there is a fault and you should contact your
supplying dealer.
Turn signal indicator light switch (5)
Sliding the switch to the “ ← ”position will flash the left turn signal . Moving the
switch to the “ → ”position will flash the right turn signal . Press the center of the
switch to extinguish all turn signals.
Fuel gauge (6)
The fuel gauge needle indicates the tank is empty with E or F indicates the tank is full.
If the fuel gauge needle goes to the red area you must refuel as soon as possible.
Clock (7)
This shows the time. Adjust the clock by pressing both buttons simultaneously till the
numbers flash, press the left button till the required hour is shown. Select minutes by
pressing the right button , Press the left button until the required minutes are shown.
Press both button simultaneously to set the clock.
Left handlebar control system (Pic4/6)

Rear brake lever (Pic 4)
Pull the lever to work the rear brakes.
Dim/Dip Switch (4)
When the switch is on “ ” position the front lamp main beam is ON. When the switch
is on “ ” position the front lamp dipped beam is ON and main beam indicator light
should be extinguished.
Turn signal switch (2)
Sliding the switch to the “ ” position will illuminate the left turn signal. Sliding the
switch to the “ ” position will illuminate the right turn signal. To switch off the turn
signals press the switch “(3)”.
.Warning :
Always use the signal when you intend to change lanes or make a turn. Always be sure
to turn the signal switch to the off position after completing the turn or lane change so
not to confuse other road users.
Horn button (1)
Press the switch to operate the horn.
Right handlebar control system (Pic 7)
Kill switch (1)
“ ” means you can start the engine any time.
“ ” (close) means you cannot start the engine.
Electric starter button (2)
This button is used to start the engine. Turn the ignition key to the ON position,
squeeze the rear brake lever and press the start button, the engine will now start.
Front brake lever
Pull the lever to work the front brake.
Throttle control (Pic 21)
The right hand twist grip controls the engine speed.

Fuel tank (Pic15- 17)
The fuel tank is located under the seat and luggage rack.
Open (1):
Turn the fuel cap to the left (anti-clockwise).
Close (1):
Turn the fuel cap to the right (clockwise)
Engine oil
Always use good quality 4-stroke engine oil.
Gear oil
Always use good quality SAE 80W-90 multi-grade GL-5 gear oil.
Attention:
Always dispose of waste oils at an authorised waste oil recycling plant.

New vehicle running-in procedure
Abiding by the correct vehicle running-in procedure is important.
Maximum throttle operation recommendation
It is not advised that you use max throttle for new vehicle,
Please see the following guide for your reference.
Total mileage
(km)
Available for throttle
opening
0-300
1/3 opening
300-1000
2/3 opening
1000 above
Total opening
Vary the Engine Speed
The engine speed should not be kept the same for long periods, Increase and decrease
your speed so that each component of the engine acquires a "load" pressure. This
process will contribute to longevity of the engines life.
Let the Engine Oil Circulate before Riding
After the engine has been started, When cold or warm, Let the engine run at idle speed
for an adequate period of time before riding away so that the engine oil can flow to
each of the important components.
First time maintenance overhaul
Replace the gear oil and engine oil after running 300km. Clean the oil Filter.
The maintenance after the first 1,000 km of mileage is the most important for your
motorcycle.
The maintenance after the first 1000km will contribute to a long lifetime and good
performance of the engine.

Inspection before riding
Warning:
Before starting to ride your vehicle each time, check the items listed below. Never
ignore the importance of the inspection. While checking the following items if you find
items need attention do so at once to keep the vehicle in good condition and meet with
the safe requirements.
Items to be checked
Important items of inspection
Repair
Braking
1) Correct clearances of F/R brake levers are
10-20mm.
2) Is the braking performance normal.
Fuel quantity
1) Sufficient for the planned mileage
Refer to Fuel level
gauge
Oil check & refill
Check the oil level
Tires
1) Correct air pressure
2) Tire conditions
3) No splits or cuts
Lighting
Operate all of the lights to see if they work .
Horn
Normal performance
Throttle
1) There is correct clearance at the throttle grip
cable.
2) Throttle twists and returns normally
If there are these
troubles, check and
repair to the special
dealer or service
station.
Engine
1) Is there is any abnormal sounds.
Steering
Does the steering turn without any restriction or
looseness.

Main Points of riding
WARNING
—If it is the first time you are to ride this model, we suggest that you practice riding
it on a non-public road until you are fully familiarized with the controls and skilled
in using them.
—Do not apply the brake too hard when making a turn. The correct way to do it is to
slow down the vehicle to a safe speed before making the turn.
—A wet surface is slippery, which greatly reduces the friction with the tires and
degrades the brake performance and turning capability of the vehicle.
Starting the engine
Insert the key into the key hole in the ignition switch and turn it clockwise to the ON
position and start the engine.
Starting a cold engine
(1) Squeeze the front or rear brake lever.
(2) When necessary turn the throttle to the 1/8-1/4 of fully open.
(3) Push the electric start button with your finger or kick starter lever with your foot.
(4) After the engine has started allow it to run for some time to get fully warm.
Starting a warm engine
(1) Squeeze the front or rear brake lever.
(2) Turn the throttle to the 1/8-1/4 of fully open. Push the electric start button with
your finger or kick starter lever with your foot.
WARNING
—Do not allow the engine to run at idle for too long. Excessive idling may overheat
the engine and cause damage to the engine parts.

Riding
The speed is controlled by the throttle grip.
Rotate the throttle slowly to avoid the bike pulling away faster than is necessary and
causing you to have an accident.
Apply the front and rear brakes
Only apply the front and rear brakes when the throttle has or is being returned to its
stop. Reducing the running speed gradually is the ideal way to brake.
Warning:
The braking distance is longer the faster you are traveling, So you must make sure
that you keep enough braking distance with the vehicle or subject in front of you.
Care should be taken when riding on a wet or slippery road.
Stop method
a.Approach the stop place
Send a signal with the turn light in advance so as to inform the other vehicle, then run
to the side road gradually. Return the throttle to its original position while squeezing
the brake lever, now the rear brake light is lit to make a note to the vehicle behind.
b. Parking.
Stop the motorcycle steadily. Turn off the turn signal lamp. Move the main switch
key to the “ OFF ” position.
WARNING:
Do not switch the machine off whilst you are still traveling at speed make sure the
bike has come to stop.

Load
Rear carrier load is not over 10kg.
Periodic inspection & Simple maintenance
The following table gives the schedule of check and maintenance according to the
intervals based on odometer reading. At the end of each interval, the required check,
inspection, lubrication and other servicing should be carried out.
If your motorcycle has been used under bad conditions, for example, continuously
running with large throttle in a windy or dusty environment, necessary maintenance
should be done more often.
WARNING:
It may be necessary to replace one or more parts during the scheduled maintenance.
It’s recommended that you use genuine brand parts.
WARNING
The first 1000km is the running-in period for a new motorcycle so the speed must keep
below 60km/h. Carry out the scheduled maintenance thoroughly in accordance with the
instructions of this Manual. Timely maintenance contributes to the safety and
reliability.
Maintenance Schedule
WARNING
—Maintenance during the wear-in period (1000km) must be carried out as this
enables your vehicle to work reliably and with excellent performance.
Periodic maintenance schedule
Perform periodic maintenance according to the tabulated distances and time periods,
whichever is earlier.
Km
Initial 1,000
Initial 4,000
Initial 8,000
Month
3
20
40
Exhaust pipe bolt
Tighten
Tighten
—
Air filter (element)
Clean every 3,000km of travel
Replace every 3,000km of travel
Clutch cover vent
Clean every 3,000km of travel
Replace every 3,000km of travel
Valve gap
—
Check
—
Spark plug
—
Check
Replace
Engine oil
Replace after initial 300km of travel,
then1,000km change it, every 3,000km of
travel afterwards
Oil filter (element)
Replace every 3,000km of travel
Interval
Item

Fuel hose
—
Check
—
Replace every 4 years of use
Fuel filter
—
—
Clean
Idle speed of engine
Check
Check
—
Throttle cable gap
Check
Check
—
Final gearbox oil
—
—
Replace
Brake system
Check
Check
—
Brake hose
—
Check
—
Replace every 4 years of use
Brake oil
—
Check
—
Tyre
—
Check
—
Steering system
Check
—
Check
Front fork
—
—
Check
Rear chock absorber
—
—
Check
Frame and engine bolts and nuts
Tighten
Tighten
—
Drive belt
Check every 8,000km of travel
Replace every 24,000km of travel
Clutch lining
—
—
Check
Note:
(1) Further cleaning, lubrication, adjustment or replacement of the listed parts should
be performed if required.
(2) Checks should be made more frequently if the vehicle is used in poor road
conditions or with full power.
Inspection & simple maintenance
Tools
For the convenience of maintenance, a set of tools is supplied to you at the luggage
box.

Battery (Pic9-11)
The battery is located under the footplate and should be checked periodically. It should
be recharged if the voltage is found to be lower than 12V.
To remove the battery, proceed as follows:
(1) Open the cover (Pic 9)
(2) Disconnect the negative (-) terminal and then the positive (+) terminal. (Pic 10)
(3) Take the battery out of the compartment (Pic 11)
To install a new battery, use the reverse order of the above steps.
Warning:
When installing the battery connect the positive (+) first and the negative (-) second.
—Wrong connection of the battery may cause damage to the electric system and the
battery itself. The red wire must be connected with the positive (+) terminal and the
black wire with the negative (-) terminal.
Air filter
If the air filter element is blocked by dust the resistance to air will increase and fuel
consumption will also increase but the output power will decrease. Therefore the air
filter shall be checked and cleaned in the following procedure after each 3,000km.
To remove the air filter, proceed as follows:
(1) Remove the screws.
(2) Remove the air filter cover.
(3) Remove the filter element to clean or replace
(4) Install the air filter and replace the screws.
WARNING
—If ridden in dusty surroundings you should clean or replace the element more
frequently. Never start the engine without the filter element fitted.
Oil pipe(Pic)
Do remember check the oil pipe which is under the air filter.

It will need draining at times.
Spark Plug (Pic),
The standard spark plug of this motorcycle is: A7RTC
Clear the spark plug of carbon deposit using a piece of hard iron wire or steel needle
and bring the gap to 0.6-0.8mm with a feeler gauge.
While removing carbon deposit, observe the color of the area at the ceramic point of
the spark plug. The color of a spark plug working normally should be light brown.
Following is the step:
(1) Remove the center cover bolts(1),take off center cover(2)。
(2)Remove the cap.
(3)Use spark plug wrench to remove the spark plug.
Warning:
The standard spark plug for this model of motorcycle is type A7RTC, which has been
chosen and is suitable for the engines working range. With a wrong spark plug
installed it can cause serious damage to the engine.
Warning:
—Be sure not to tighten the spark plug too much or dislocate the mating threads as
this may damage the screw threads in the cylinder head. When removing the spark
plug take care not to allow dirt to get into the engine through the spark plug
mounting hole.
—Do not use a spark plug whose thermal value is off standard as it may cause serious
damage to the engine.

Engine oil
The durability of engine depends largely on the use of quality engine oil and due
periodic replacement of oil. Checking the oil level every day and replacing the oil
periodically are two important jobs to be done in the maintenance of your vehicle.
Checking oil level (Pic7-8)
Each day before riding the vehicle, be sure to check the oil level. It should remain
between the upper limit mark and lower limit mark on the dipstick (8). Proceed as
follows:
(1)Start the engine and allow it to run idle for 3-5 minutes.
(2)Stop the engine, move the vehicle to a flat surface and place it on the center stand.
(3)Wait for 2-3 minutes, take the dipstick-mounted oil filler cap , clean the dipstick,
insert the dipstick into the oil filler but do not screw it in, remove the cap and see if the
oil level is within the upper limit mark and lower limit mark on the dipstick .
(4)When necessary fill the engine with the recommended type of oil to the upper
limit mark but do not overfill it.
Replacement of oil and oil filter
Replace or clean the oil and oil filter after the initial 1,000km is covered and at each
maintenance interval. Replace the oil while the engine is still warm.
Replace the oil as follows:
(1) Place the vehicle on the center stand on a flat surface, put an oil pan under the
crankcase, unscrew the dipstick and remove the drain plug and oil seal to drain out
oil.
(2) Check to make sure the oil seal on the drain plug is in good condition and then
screw in the drain plug. The oil seal should be replaced every two intervals of oil
replacement.
(3) Fill the crankcase with the recommended type of quality oil. Approximately 0.8L.
(4) Screw the oil filter cap back into place.
(5) Start the engine and allow it to run idle for 3~5 minutes.
(6) Stop the engine and wait for 2~3 minutes. Then place the engine on a solid flat
surface and check the oil level with the dipstick and make sure there is no leak of
oil.

Replace the oil filter as follows:
(1) Remove the oil filler cap.
(2) Place an oil pan under the crankcase and unscrew the
drain plug.
(3) Remove the drain plug to reveal the spring and filter.
(4) Replace the oil filter and put on a new o-ring.
(5) Screw the oil filer cap back into place.
Adjustment of throttle cable
(1) Loosen the locknut.
(2) Turn the adjusting lead screw to bring the gap of the cable within 0.5-1.0 mm.
WARNING
—After the throttle cable is adjusted, check the throttle grip function by turning it.
The adjustment should not result in a higher idle speed and should enable the
throttle grip to return to the closed position by itself.
Table of contents
Other motorini Scooter manuals