manuals.online logo
Brands
  1. Home
  2. •
  3. Brands
  4. •
  5. Kaabo
  6. •
  7. Scooter
  8. •
  9. Kaabo Wolf Warrior 11 User manual

Kaabo Wolf Warrior 11 User manual

Wolf warrior new
24-Hour Hotline
400-878-1500
USER MANUAL
Ningbo Kaabo Technology Co., Ltd.
Add: Wangchun Industrial Park, #885 Chunhua Road, Haishu District, Ningbo, China.
Tel: 0086-0574-88321118
Email: [email protected]
Web: www.kaabo.com
TABLE OF CONTENTS
Product Introduce............................................................................................1
Product Specification...................................................................................... 3
Safety Instruction............................................................................................. 4
Fold & Unfold................................................................................................... 5
Display & Key Settings...................................................................................7
Take The First Ride.........................................................................................11
Warranty......................................................................................................... 13
Memo..............................................................................................................14
01
02
PRODUCT INTRODUCE
PRODUCT DIAGRAM
[1] Handle Bar [2] Single Dual Switch [3] Ligt And Horn Switch
[4] Display [5] Hydraulic Brake [6] Hydraulic Fork
[7] Light [8]Horn [9]Tubeless Tire
[10]Folding Lever [11] Protection Bracket [12] Pedal
[13]Side Light [14] Rear Shock Absorbe
PRODUCT DETAILS
Forging Frame LCD Display
Dual High Torque Engine Dual Charging
Handle Bar LED Spotlight
Tail Light Spotlight Switch
Locking Shaft Folding Lever
01
03
04
03
80km/h is the maximum design speed. Please DO NOT exceed maxium
speed regulated by local laws when riding this e-scooter. Otherwise, it may
be dangerous.
PRODUCT SPECIFICATION SAFETY INSTRUCTIONS
SPECIFICATION Tips
This Chapter is very important. Please read carefully and understand all the instructions. We will not be
responsible for any property loss, casualties, accidents, and/or legal disputes caused by violation of the
safety instructions in this chapter.
Safety Instructions
1. Do not drive in rain.
2. Do not repair by yourself, electric shocks can occur.
3.Please follow the local traffic laws and regulations.
4.The scooter is designed for one person at a time only.
5. Please wear safety protective equipment such as a helmet, gloves, elbow pads and knee pads for riding.
6. Please practice on open ground first, before riding on the road.
7.Please fully charge the battery before first time use+
8.Please do not cut o the power when scooter is running.
9.Please store scooter within temperature range from -5℃to 50℃.
10. If the scooter is not in use for a long time, please charge it once every month to maintain the longevity
of the battery.
11. Keep feet on pedals at all times while riding.
02
05
06
FOLDING & UNFOLDING
Unfolding Folding
Step 1
Lift up front fork (please adjust the
position of locking shaft if needed)
Step 2
Put down the folding lever. And
make sure the locking shaft is well
positioned like the photo above:
Step 3
Adjust the position of the protection
nut
Step 4
Insert the protection pin to complete
the unfolding.
Step 1
Take out protection pin by pushing
the head of the pin and start to
fold.
Step 2
Adjust the position of the protection
nut
Step 3
Pull up the folding lever to fold the
scooter. The locking shaft will move
like the photo above:
Step 4
Lay down the front fork to complete
the folding.
04
Very important: please make sure the locking shaft is LOCKED
securely!
07
08
DISPLAY & KEY SETTINGS
Driving Mode Selection
Located underneath the main display on the right side of the handle bar you
can find two switches to control driving modes:
The ECO/TURBO switch regulates the power of your scooter. By pressing down the button,
ECO mode is activated which will reduce torque and top speed to maximize range. When the
button is not pressed, TURBO mode is activated and there is no restriction of power.
The SINGLE/DUAL switch toggles single or dual motor drive. By pressing down on the button,
DUAL motor drive is activated. When the button is not pressed, SINGLE (rear) motor drive is
activated.
For maximum range, select ECO mode and SINGLE motor drive. For maximum power and
speed, select TURBO mode and DUAL motor drive.
Display Settings –Wolf Warrior 26Ah
The Wolf warrior 26Ah scooter is equipped with the following display:
Gear change. While the scooter is powered ON, press the POWER button to enter gear setting
mode. Press MODE to switch between gears. Gear 1 is for slow speeds, gear 2 is for medium
speeds, and gear 3 is for fast speeds. To return to operating mode either press POWER or wait
for 2 seconds.
1.Speedometer: Shows the speed at which you are travelling.
2.Battery Indicator: Displays battery levels, do not let it run out
of battery. As a rough guideline, charge at or below 2 bars.
3.Power Button: To turn the scooter on or o press button for 2 seconds.
4.Accelerator: Pull to accelerate. The stronger you pull, the faster it accelerates. The scooter is
delivered in “Non-Zero Start” setting (Kick-And-Go is ON). The accelerator only works if the
scooter is already in motion.
5.Mode Button: Press to select various display options:
MODE
COMMENT
TIME
Time since powering on the scooter.
TRIP
Distance travelled since powering on the scooter.
ODO
Total distance travelled.
VOL
Current battery voltage.
CH2:00
Charging mode. Time (2 hours) scooter stays ON (overrides auto-switch
off) so you can use display’s USB port to charge e.g. your phone.
Detailed P-settings mode. To access P-settings to make various advanced changes, press
POWER [3] and MODE [5] simultaneously for 2 seconds.
Cycle through the P-settings using the MODE button. To select a P-setting in order to make
changes, press the POWER button. Change the value (up or down) using the MODE (up) and
POWER (down) buttons. To return to the P-settings menu after changing a value, wait 2
seconds. To return to operating mode, wait a further 2 seconds.
05
P-SETTINGS
P0
Tire diameter (11= 11 inch). Do not change.
P1
Controller shut-down voltage. Default set to 52V (minimum is 48V – we recommend 52V to preserve battery life).
P2
Motor magnetic pole setting. Default is 30. Do not change.
P3
Speed signal selection. Default is 0. Do not change.
P4
Distance / speed unit. 0=km, 1=miles
P5
Start setting. 1=non-zero start (Kick-and-Go), accelerator won’t work if scooter is not in motion; 0
=immediate start (CAUTION while using this)
P6
Cruise control. 0=cruise control OFF, 1=cruise control ON.
P7
Initial acceleration. 0=strong, 1=soft.
P8
Electric (regenerative) braking (E-ABS). 0=E-ABS off, 1=E-ABS on
P9
Speed limit as % of top speed, i.e. 100=no speed limit.
PA
Clear total distance travelled (ODO).
PB
Scooter auto-turn off time in minutes.
PC
Display brightness (1=low, 2=medium, 3=high)
09
10
While driving, keep the accelerator steady for a few seconds until Cruise Control kicks in and
the scooter travels at a constant speed without the rider holding down the accelerator. When
you activate the brakes, Cruise Control will be cancelled.
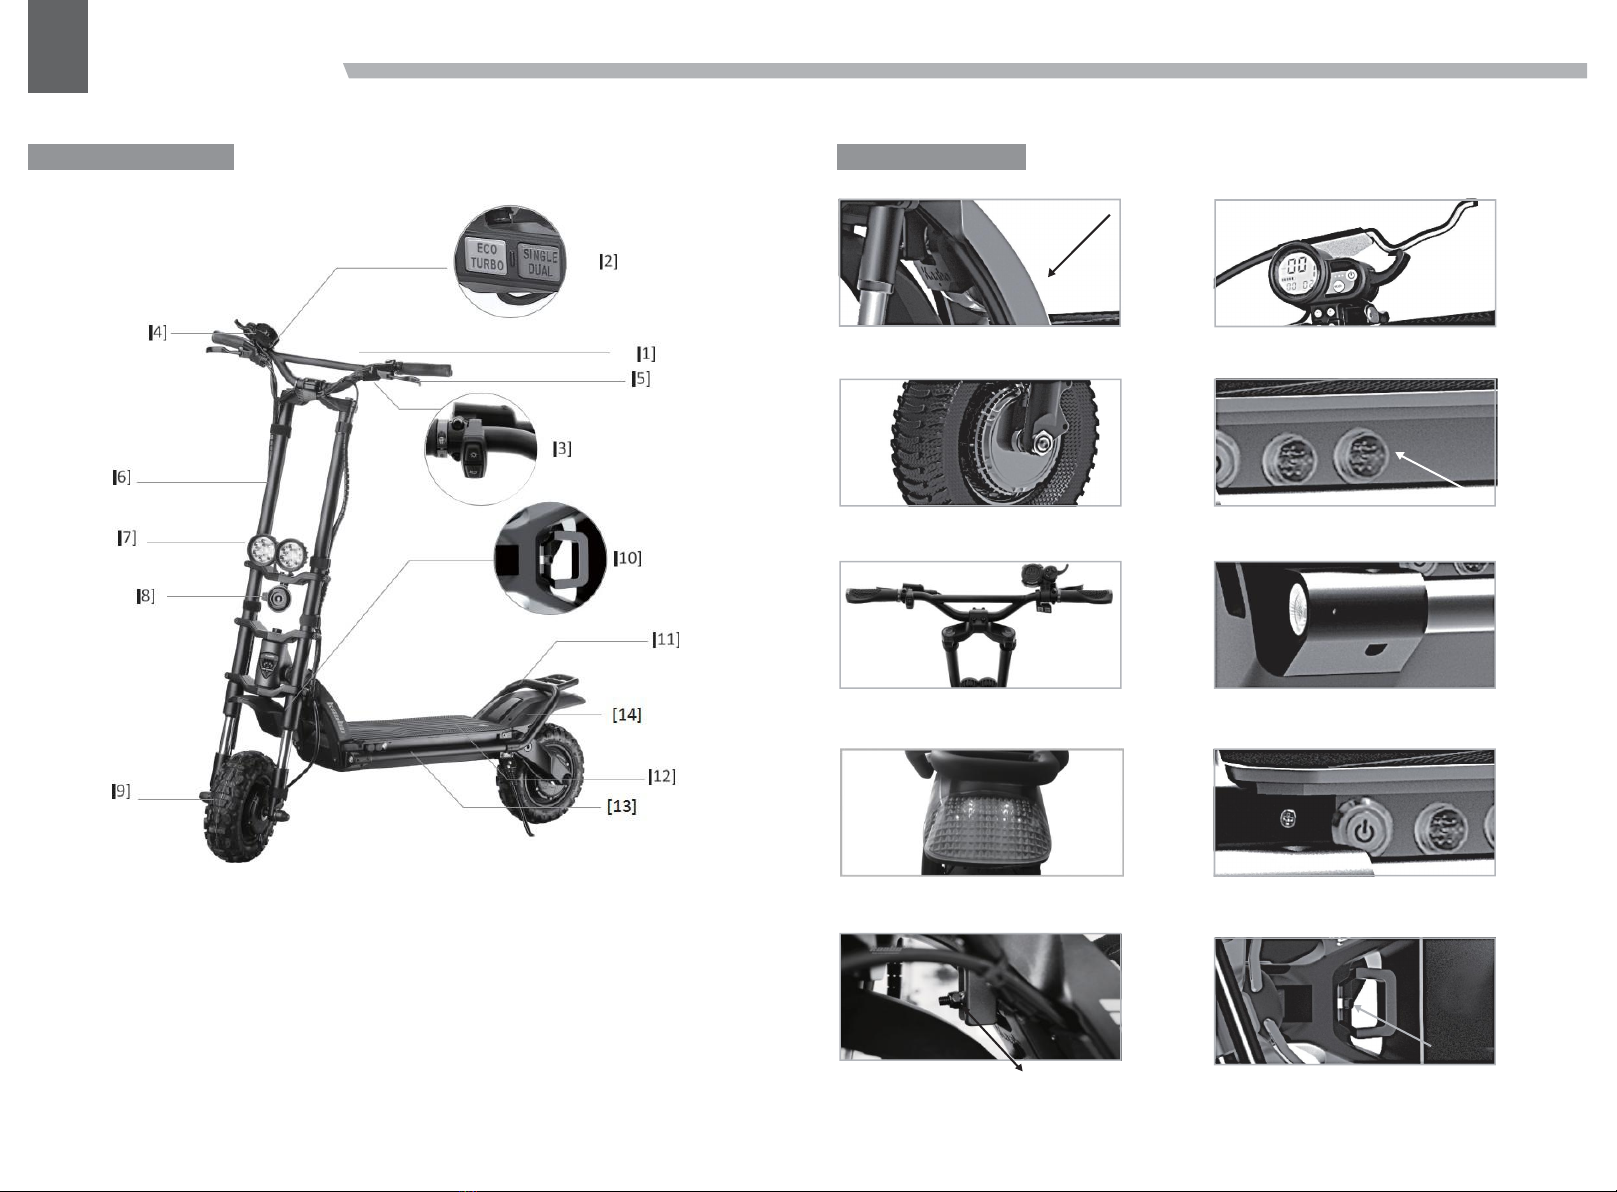
Display Settings –Wolf Warrior 35Ah
The Wolf Warrior 35Ah scooter is equipped with the following LCD display:
1.Speedometer: Shows the speed at which you are travelling.
2.Battery Indicator: Shows battery levels, do not let it run out of battery. As a rough guideline,
charge at or below 2 bars.
3.Gear: Shows the selected gear.
4.Gear selector: Press to set gear (1=slow, 2=medium, 3=fast).
5.Power Button: To turn the scooter on or o press button for 2 seconds.
6.Accelerator: Pull to accelerate. The stronger you pull, the faster it accelerates. The scooteris
delivered in “Non-Zero Start” setting (Kick-And-Go is ON). The accelerator only works if the
scooter is already in motion.
7.Mode Button: Press to select various display options:
MODE
P-SETTINGS
TIME
Time since powering on the scooter.
TRIP
Distance travelled since powering on the scooter.
ODO
Total distance travelled.
VOL
Current voltage.
CHA
Number of times battery has been charged (only full discharges are counted)
Detailed P-settings mode. To access P-settings to make various advanced changes, press
MODE [7] for 2-3 seconds.
Switch through the P-settings using the MODE button [7]. In order to change a P-setting,
press GEAR button [4]. To return to operating mode, simply wait a few seconds.
P-SETTINGS
P0
Tire diameter (11 = 11 inch). Do not change.
P1
System voltage. Default 60V. Do not change.
P2
Motor magnetic pole setting. Default 15. Do not change.
P3
Speed signal selection. Default is 0. Do not change.
P4
Distance / speed unit. 0=km, 1=miles
P5
Start setting. 1=non-zero start (Kick-and-Go), accelerator won’t work if scooter not in motion; 0=
immediate start (CAUTION while using this)
P6
Cruise control. 0=cruise control OFF, 1=cruise control ON. Advanced riders only.
P7
Initial acceleration. 0=strong power, 5=least power.
P8
Speed limit as % of top speed, i.e. 100=no speed limit.
P9
Motor torque. 1=50% of max. torque, 2=75% of max. torque, 3=max. torque
PA
Electric (regenerative) braking strength (E-ABS). 0=None, 1=Weak, 2=Medium, 3=strong.
PB
Display brightness (0=o , 5=highest illumination)
PC
Scooter auto-turn o time in minutes (1-30 minutes).
PD
ABS (anti-lock braking system) setting. 0=ABS o , 1=ABS on (as in a car, the brake engages and
disengages rapidly to prevent the wheel from blocking) WARNING: Due to increased vibration
and force and on scooter components when using ABS, users should frequently check that all
bolts are properly fastened.
Cruise Control. Cruise control allows riders to maintain driving speed automatically without
continuing to hold down the accelerator. In order to enter Cruise Control, activate it first in the
P-settings [P6].
While riding, keep the accelerator steady for 3-5 seconds until Cruise Control kicks in and the
scooter travels at a constant speed without rider holding down the accelerator. When you
activate the brakes, Cruise Control will be cancelled. CAUTION: Ride in a position where you
can immediately access the brake to cancel Cruise Control if necessary.
11
12
TAKE THE FIRST RIDE
Start
You should choose an apropriate place when first riding, which is outdoors and should be flat,
smooth, without obstacles or slipperiness.
Riding
1.Press power switch to start.
2.Put one foot on the front section of the pedal and other foot on the ground. Boost yourself
forward by the foot on the ground to start riding. Slightly pull the accelerator and tilt body
forwards.
3.When the scooter starts to go forward, get your feet both on pedal. The harder you press the
accelerator, the quicker you will be.
Parking
Slightly and gradually brake to cut power and slow down.
Do not brake hard, otherwise it may lead to tire attrition, or sudden loss of power and cause
the scooter to fall down.
Battery & Charger
Every scooter is equipped with a specialized lithium battery and a specific, intelligent charger,
so do not adopt other brand’s charger.
Lithium Battery
It is time to charge the scooter when the battery meter flickers or
there is only one bar of power left. If the scooter is not used for long time, please charge it
once a month at least, otherwise the battery may
become damaged.
Charger
After the scooter is fully charged, please unplug the charger in as soon as possible.
Instructions of Charging
1.Insert the charging plug into the charging port of the scooter first and then plug the other
end to the AC supply.
2. The scooter is being charged when the indicator light of the charger shows red. when the
red light turns to green, it means the scooter is fully charged.
06
13
14
08
WARRANTY MEMO
When the following issues occur, please consult with the vendor (after-sales department).
Accessory
Quality issue
Guarantee Period
Service
Motor
Out of Service
One Year
Free Repair
Controller
Break down
under normal use
One Year
Free Repair
Charger
Break down under
normal use
One Year
Free Repair
Battery
Unable to recharge
under normal use
One Year
Free Repair
Body Structure
Deformation under
normal use or breakage
One Year
Free Repair
The following terms are beyond the scope of warranty: 1.Malfunction due
to misuse
2. Malfunction caused by unauthorized modifications, disassembling ,or
repair.
3. Accidental damage or malfunction due to unsuitable storage.
4.Unmatched warranty/proof of purchase and product. 5.Surface damages
6.Disassembling parts unspecified in this manual. 7.Damage or
malfunction caused by riding under the rain
or soaking in water.
07

This manual suits for next models

3

Other Kaabo Scooter manuals

Kaabo MANTIS KING GT Product information sheet

Kaabo

Kaabo MANTIS KING GT Product information sheet

Kaabo Wolf Warrior 25Ah User manual

Kaabo

Kaabo Wolf Warrior 25Ah User manual

Kaabo Wolf Warrior GT Series User manual

Kaabo

Kaabo Wolf Warrior GT Series User manual

Kaabo Mantis User manual

Kaabo

Kaabo Mantis User manual

Kaabo SKYWALKER 8 36V/10.4A User manual

Kaabo

Kaabo SKYWALKER 8 36V/10.4A User manual

Kaabo Skywalker 8 User manual

Kaabo

Kaabo Skywalker 8 User manual

Kaabo Mantis 48V 13Ah User manual

Kaabo

Kaabo Mantis 48V 13Ah User manual

Kaabo WOLF WARRIOR X User manual

Kaabo

Kaabo WOLF WARRIOR X User manual

Popular Scooter manuals by other brands

DrunkLizard X7 user manual

DrunkLizard

DrunkLizard X7 user manual

Hudora 14248 INSTRUCTIONS ON ASSEMBLY AND USE

Hudora

Hudora 14248 INSTRUCTIONS ON ASSEMBLY AND USE

URBANGLIDE BIKE 140 Original manual

URBANGLIDE

URBANGLIDE BIKE 140 Original manual

Yotobike Leopard owner's manual

Yotobike

Yotobike Leopard owner's manual

Costway TY326657 user manual

Costway

Costway TY326657 user manual

Rebel FAST WHEELS user manual

Rebel

Rebel FAST WHEELS user manual

Hover-1 Gambit Operation manual

Hover-1

Hover-1 Gambit Operation manual

Mega Motion elite8 owner's manual

Mega Motion

Mega Motion elite8 owner's manual

Flykly Smart Ped user manual

Flykly

Flykly Smart Ped user manual

PIAGGIO MP3 LT 400 i.e. instruction manual

PIAGGIO

PIAGGIO MP3 LT 400 i.e. instruction manual

Kangaroo SL - A1712 manual

Kangaroo

Kangaroo SL - A1712 manual

SCOOT AND RIDE HIGHWAYKICK 1 L instruction manual

SCOOT AND RIDE

SCOOT AND RIDE HIGHWAYKICK 1 L instruction manual

Betzold 760675 instructions

Betzold

Betzold 760675 instructions

Electric Mobility Rascal 309 Owners manual & service record

Electric Mobility

Electric Mobility Rascal 309 Owners manual & service record

Whyte ES-140 SCR Supplementary service manual

Whyte

Whyte ES-140 SCR Supplementary service manual

VMW V8 user manual

VMW

VMW V8 user manual

GiGGO Toys Li'l Skootah GT00321 user manual

GiGGO Toys

GiGGO Toys Li'l Skootah GT00321 user manual

BETTY & BERTIE LUPIN quick start guide

BETTY & BERTIE

BETTY & BERTIE LUPIN quick start guide

manuals.online logo
manuals.online logoBrands
  • About & Mission
  • Contact us
  • Privacy Policy
  • Terms and Conditions

Copyright 2025 Manuals.Online. All Rights Reserved.