Mouvex MH6 User manual

Quick Start Guide
SCREW COMPRESSORS – MH6
CONTROL CHECK LIST Installation of the Compressor PTO & MH6 Compressor Set
This document does not take the place of the recommendations of the HYDROCAR (PTO) and MOUVEX
(Compressor) Instructions with which we strongly recommend that you read.
COMPLETION AND RETURN OFTHIS DOCUMENT IS ONLYTHE FIRST STEP FOR WARRANTY ACTIVATION.
PLEASE SEE ALL REQUIREMENTS NEEDED FOR WARRANTY COMPLIANCE IN IOM NT 1401Z00 MH6
CHECK LIST DE CONTROLE Installation Ensemble Pto & Compresseur MH6
Ce document ne se substitue pas aux recommandations des Notices d’instructions HYDROCAR (PTO) et
MOUVEX (compresseur) dont nous vous recommandons très vivement de prendre connaissance.
LE RETOUR COMPLÉTÉ DE CE DOCUMENT EST SEULEMENT LA PREMIÈRE ÉTAPE DE L’ACTIVATION DE LA
GARANTIE. MERCI DE BIEN VOULOIR VOUS RÉFÉRER A LA NOTICETECHNIQUE NT 1401-Z00 MH6 POUR
VOIR TOUTES LES AUTRES CONDITIONS
KONTROLL-CHECKLISTE Installation Nebenabtrieb & MH6 Kompressor-Paket
Diese Unterlage ersetzt nicht die Hinweise der Bedienungsanleitungen HYDROCAR (PTO) und MOUVEX
(Kompressor) die wir Ihnen nachdrücklich empfehlen, aufmerksam durchzulesen.
DAS AUSFÜLLEN UND ZURÜCKSENDEN DIESES DOKUMENTS IST NUR DER ERSTE SCHRITT
ZUR BEARBEITUNG VON GARANTIEFÄLLEN. BITTE BEACHTEN SIE ALLE ERFORDERLICHEN
VORAUSSETZUNGEN FÜR DIE GEWÄHRLEISTUNG IN DER ANLEITUNG IOM NT 1401Z00 MH6
Date : | Date : | Datum : | Fecha : | Data : PTO Serial number : | N° série PTO : | Serien-Nummer PTO : |
Número de serie TF : | Numero di serie PdF :
Compressor Serial number : | N° série Compresseur : | Serien-Nummer Kompressor : |
Número de serie compresor : | Numero di serie compressore :
Type : | Type : | Antrieb: | Accionamiento : |Azionamento :
oMale Screw (MS) | Vis Mâle (MS) | Hauptläufer (MS) | Tornillo
Macho (MS) |Vite Maschio (MS) oFemale Screw (FS) |Vis Femelle (FS) | Nebenläufer (FS) |
Tornillo Hembra (FS) | Vite Femmina (FS)
Ratio : | Ratio : | Übersetung : | Ratio : | Ratio :
oCoE
LISTA DE CONTROL Instalación ConjuntoTf & Compresor MH6
Este documento no sustituye las recomendaciones de los Manuales de Instrucciones HYDROCAR (TF) y
MOUVEX (compresor) las cuales le recomendamos encarecidamente que lea con atención.
LA DEVOLUCIÓN DE ESTE DOCUMENTO, ES SÓLO LA PRIMERA ETAPA DE LA ACTIVACIÓN DE LA GARANTÍA.
PARA CONOCER EL RESTO DE CONDICIONES, ROGAMOS LEAN EL MANUAL DE INSTALACIÓN Y
MANTENIMIENTO NT 1401-Z00 MH6
CHECK LIST DI CONTROLLO Installazione Gruppo Pdf & Compressore MH6
Tale documento non sostituisce le raccomandazioni contenute nelle Istruzioni HYDROCAR (PdF) e MOUVEX
(compressore) al quale si prega vivamente di fare riferimento.
IL COMPLETAMENTO E IL REINVIO DI QUESTO DOCUMENT NON È CHE IL PRIMO PASSO PER
L’ATTIVAZIONE DELLA RICHIESTA DI GARANZIA. VI PREGHIAMO DIVERIFICARE TUTTI I REQUISITI
PRESENTI ALL’INTERNO DEL MANUALE D’USO E MANUTENZIONE IOM NT 1401Z00 MH6 PER ESSERE
IN REGOLA CON LE RICHIESTE DI GARANZIA
Thoroughly review the manual, all instructions, and hazard warnings BEFORE installing, using, and performing
any maintenance on the compressor.
Manuals are available for download using the QR code and at mouvex.com.
Attempting installation, operation, and disassembling/reassembling of the compressor without reading and
following
manual instructions could lead to SAFETY risks and irreparable DAMAGES to the compressor.
Lisez attentivement le manuel, toutes les instructions et les avertissements de danger AVANT l’installation, l’utilisation et
l’entretien du compresseur.
Les notices sont disponibles par téléchargement , Utilisez le QR code et dans le site internet mouvex.com.
Tenter d’installer, d’utiliser et de démonter/remonter le compresseur sans lire et suivre les recommandations de la notice peut conduire à
des risques en termes de SECURITE et des DOMMAGES IRRÉVERSIBLES sur le compresseur.
Lesen Sie das Handbuch mit allen Anweisungen und Gefahrenhinweisen VOR der Installation, der Nutzung und der Durchführung
von Wartungsarbeiten an dem Kompressor gründlich durch.
Handbücher stehen zum Download über den QR-Code und unter mouvex.com zur Verfügung.
Die Installation, der Betrieb, die Demontage bzw. Montage des Kompressors ohne vorheriges gründliches Lesen und das Befolgen der
Anweisungen des Handbuches kann zu SICHERHEITSRISIKEN und irreparablen SCHÄDEN an dem Kompressor führen.
Revise a fondo el manual, todas las instrucciones y advertencias de peligro ANTES de instalar, de utilizar o de realizar cualquier
mantenimiento en el compresor.
Los manuales se pueden descargar usando el código QR y en mouvex.com.
Intentar instalar, hacer funcionar o desmontar / remontar el compresor sin leer y seguir las instrucciones de los manuales podría generar
riesgos de SEGURIDAD y DAÑOS irreparables para el compresor .
Revisionare attentamente il manuale, tutte le istruzioni e gli avvisi di pericolo PRIMA installazione, uso ed esecuzione di qualsiasi
intervento di manutenzione il compressore.
I manuali sono disponibili per il download utilizzando il codice QR e su mouvex.com.
Il tentativo di installazione, funzionamento e smontaggio / rimontaggio il compressore senza lettura e seguendo le istruzioni manuali
potrebbe portare a rischi di SICUREZZA e danni irreparabili il compressore.
IMPORTANT! |IMPORTANT! |WICHTIG! | ¡IMPORTANTE! | IMPORTANTE!
EN
FR
DE
ES
IT
DE
ES
IT
EN
FR

K1 K2 K3 K4 K5
32
EN
Quick Start Guide |SCREW COMPRESSORS – MH6
CONTROL CHECK LIST
Installation Of The Compressor PTO & MH6 Compressor Set
Truck
Brand : Type :
V.I.N. Number : Set Installation date :
Registration Number : Kilometers Number :
Speed GearboxType :
ZF
oECO-SPLIT
Filter : oAS-TRONIC
User : oTRAXON
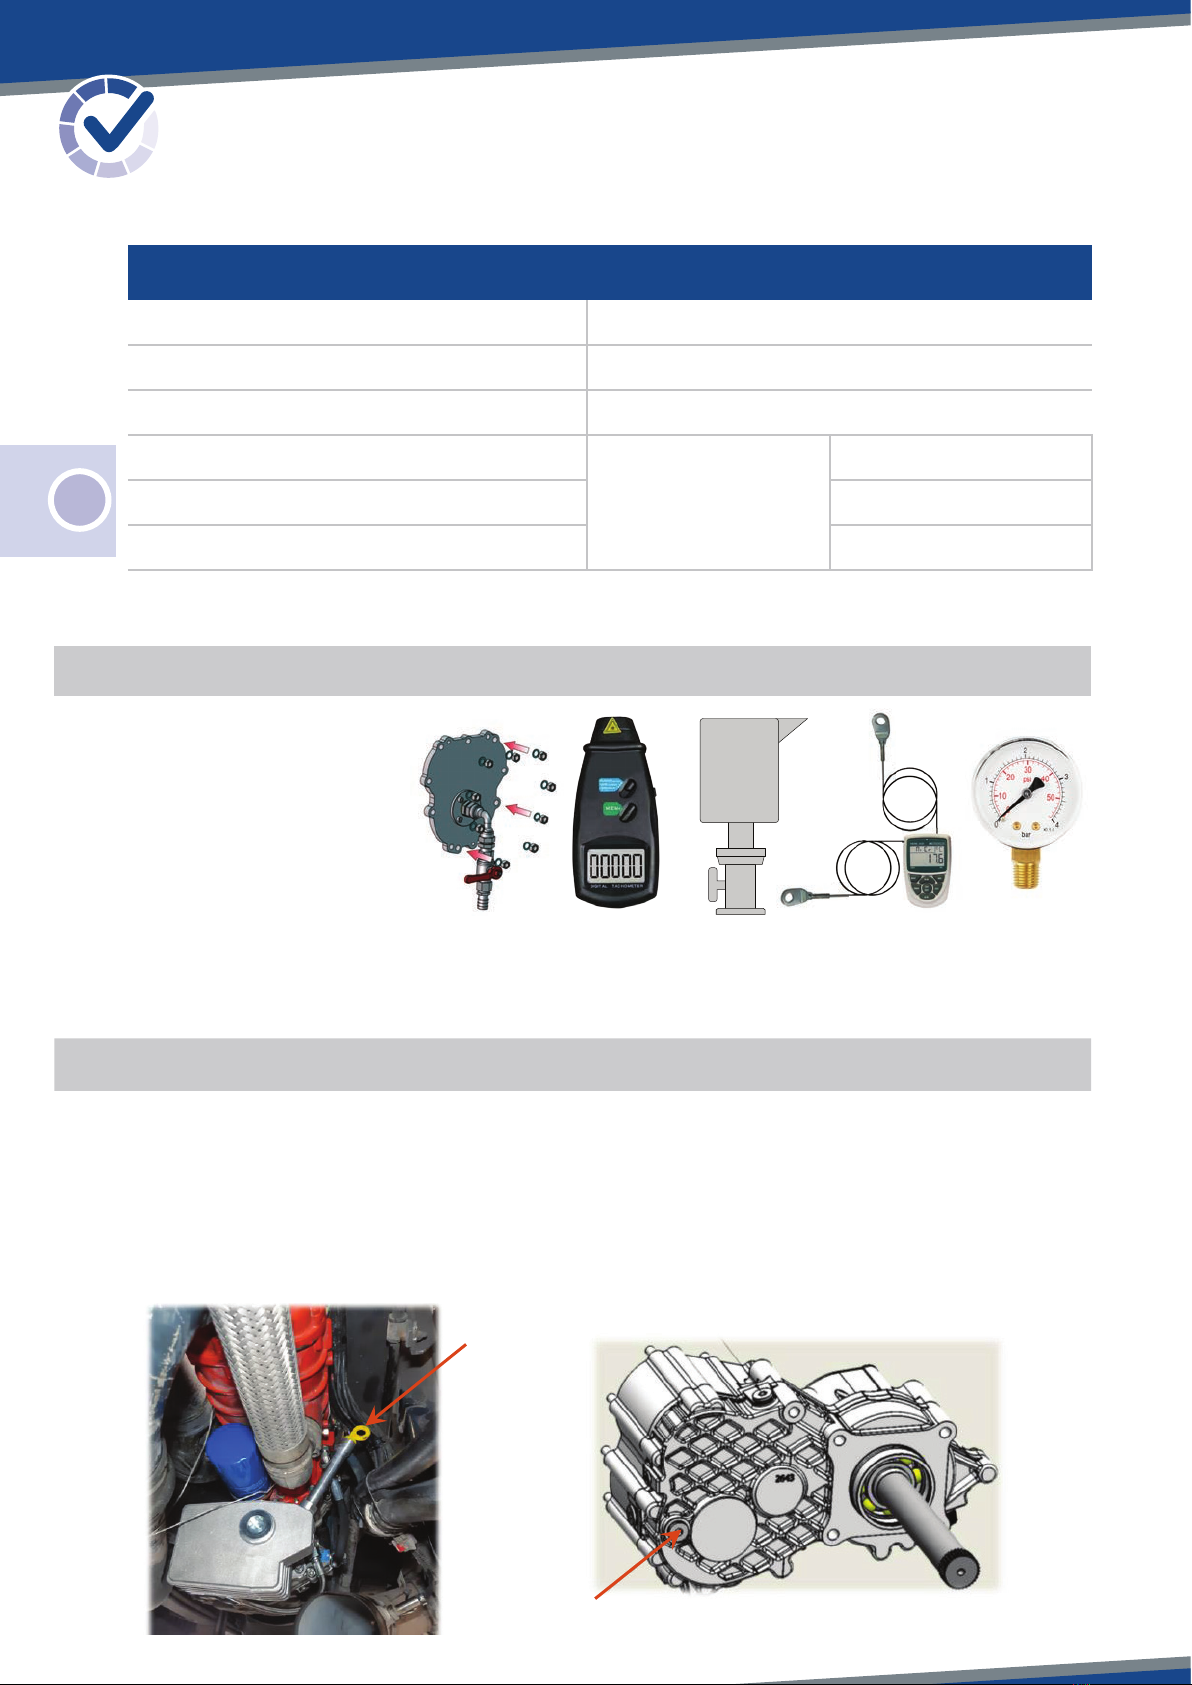
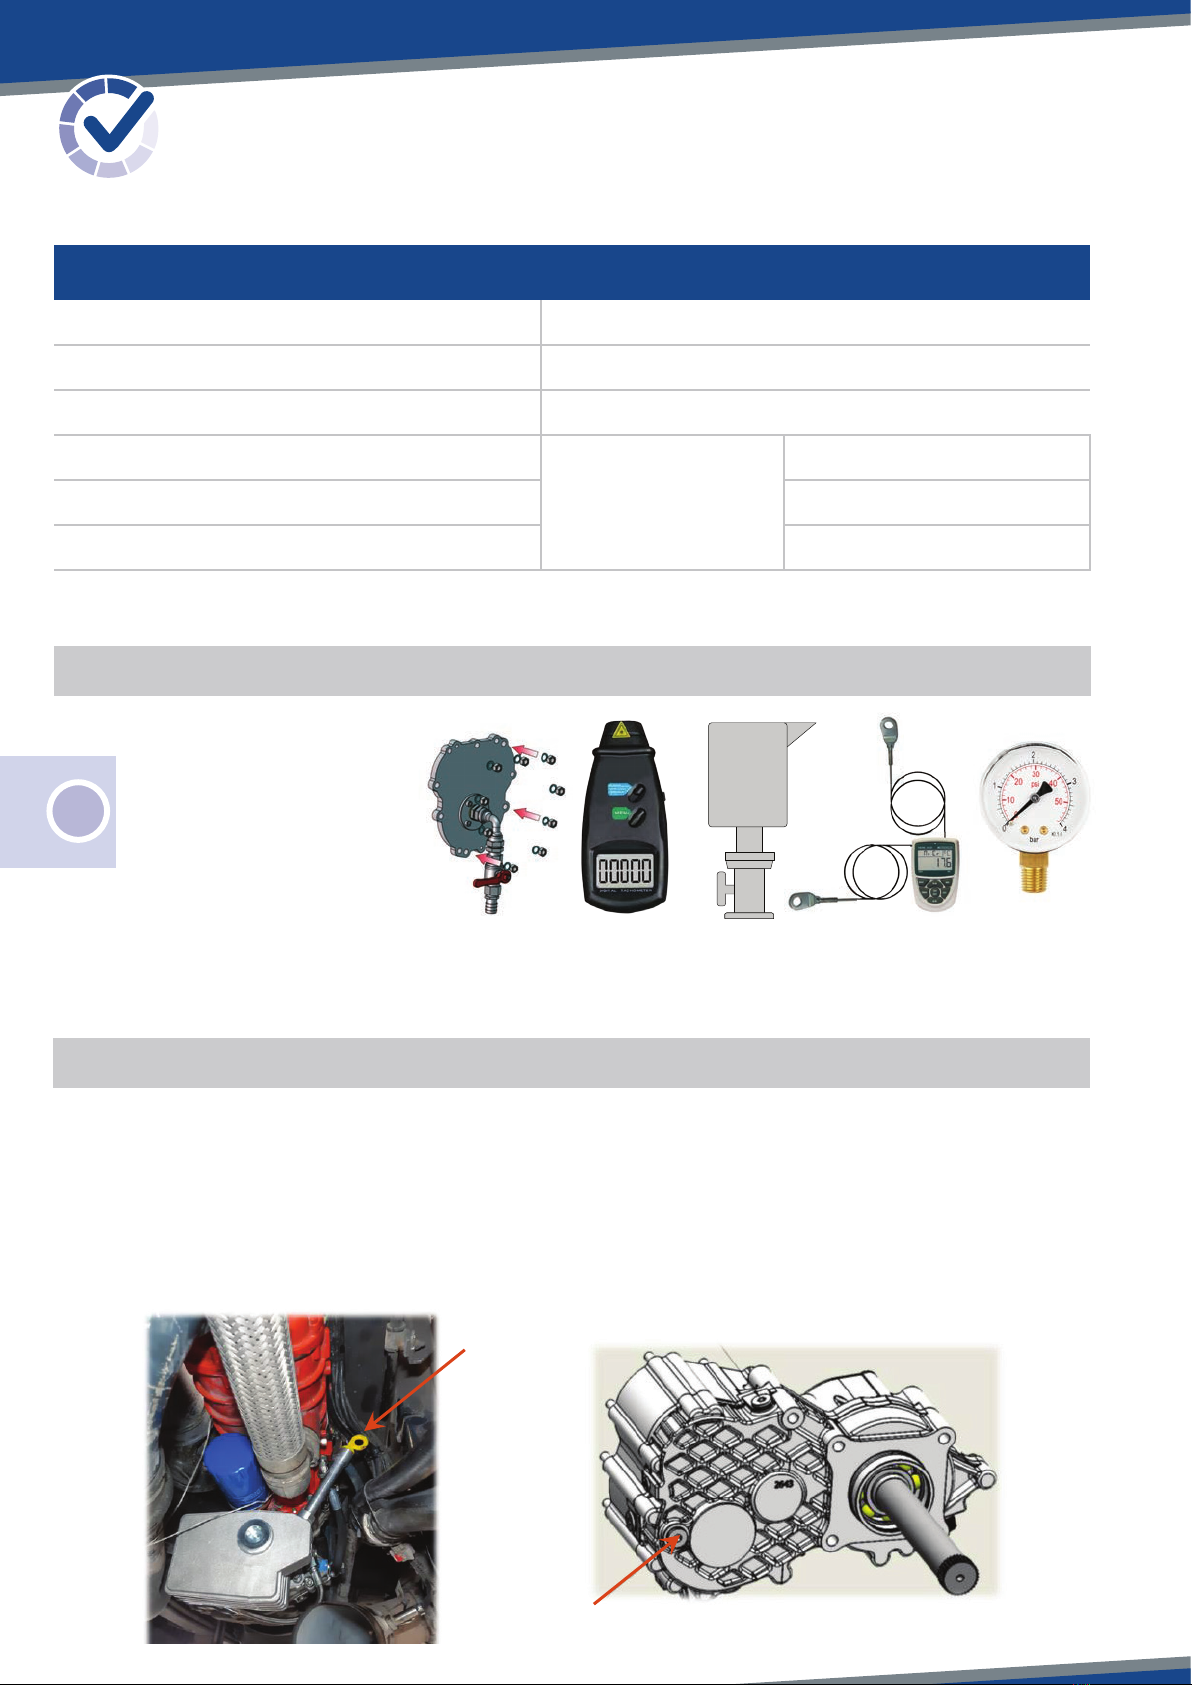
K1 : Control oil flowrate kit (HYDROCAR)
K2 : Optic tachometer
K3 : Compressor test kit (valve + silencer)
K4 : Thermometer with an eyelet end
K5 : Pressure gauge
Specific Tools Required
Lubrication Type
2 types of lubrication depending on the gearbox :
- ZF and MERCEDES: no separate lubrication, the MH6 uses standard gearbox oil.The control of the overall oil level remains that usually
carried out for the gearbox.
- SCANIA andVOLVO: separate lubrication with BSC MH specific oil, the MH6 is autonomous, and independent of the gearbox.
Oil
dipstick
Oil
level
SCANIA
VOLVO

32
Quick Start Guide |SCREW COMPRESSORS – MH6
CONTROL CHECK LIST
Installation Of The Compressor PTO & MH6 Compressor Set
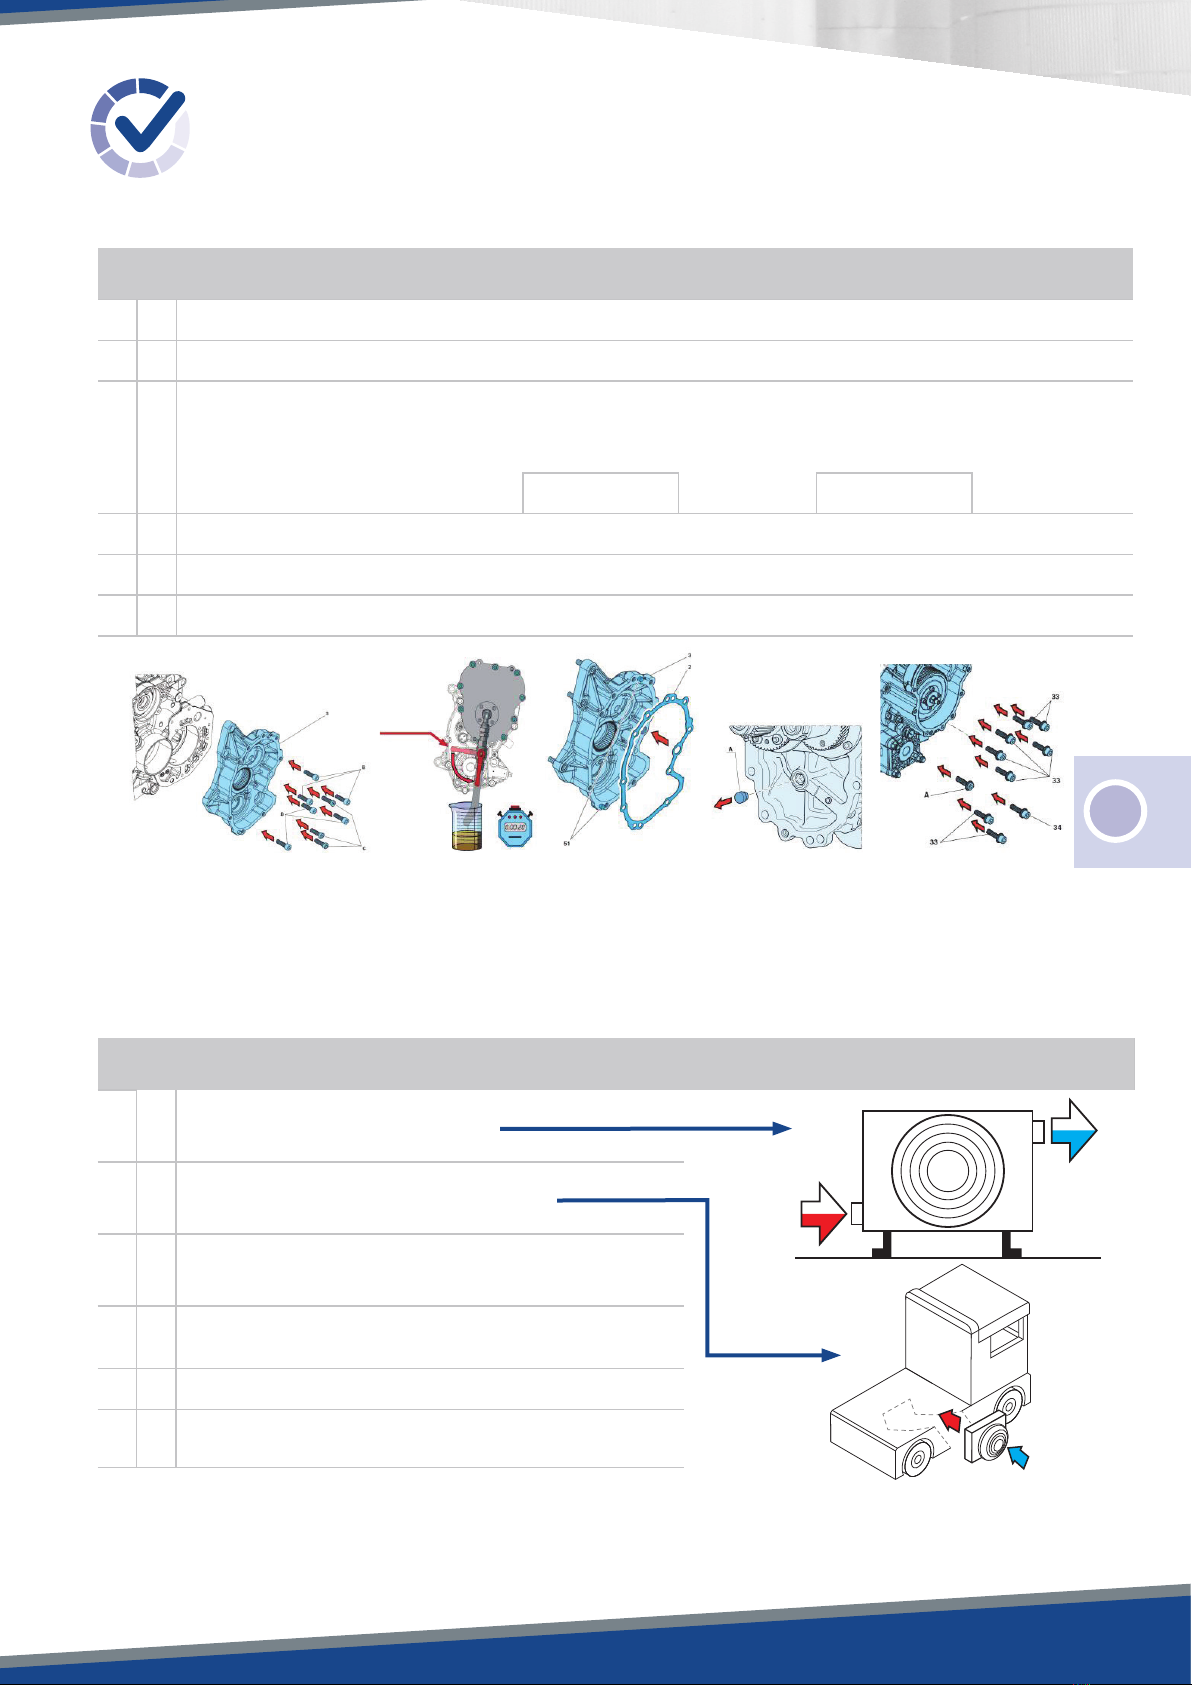
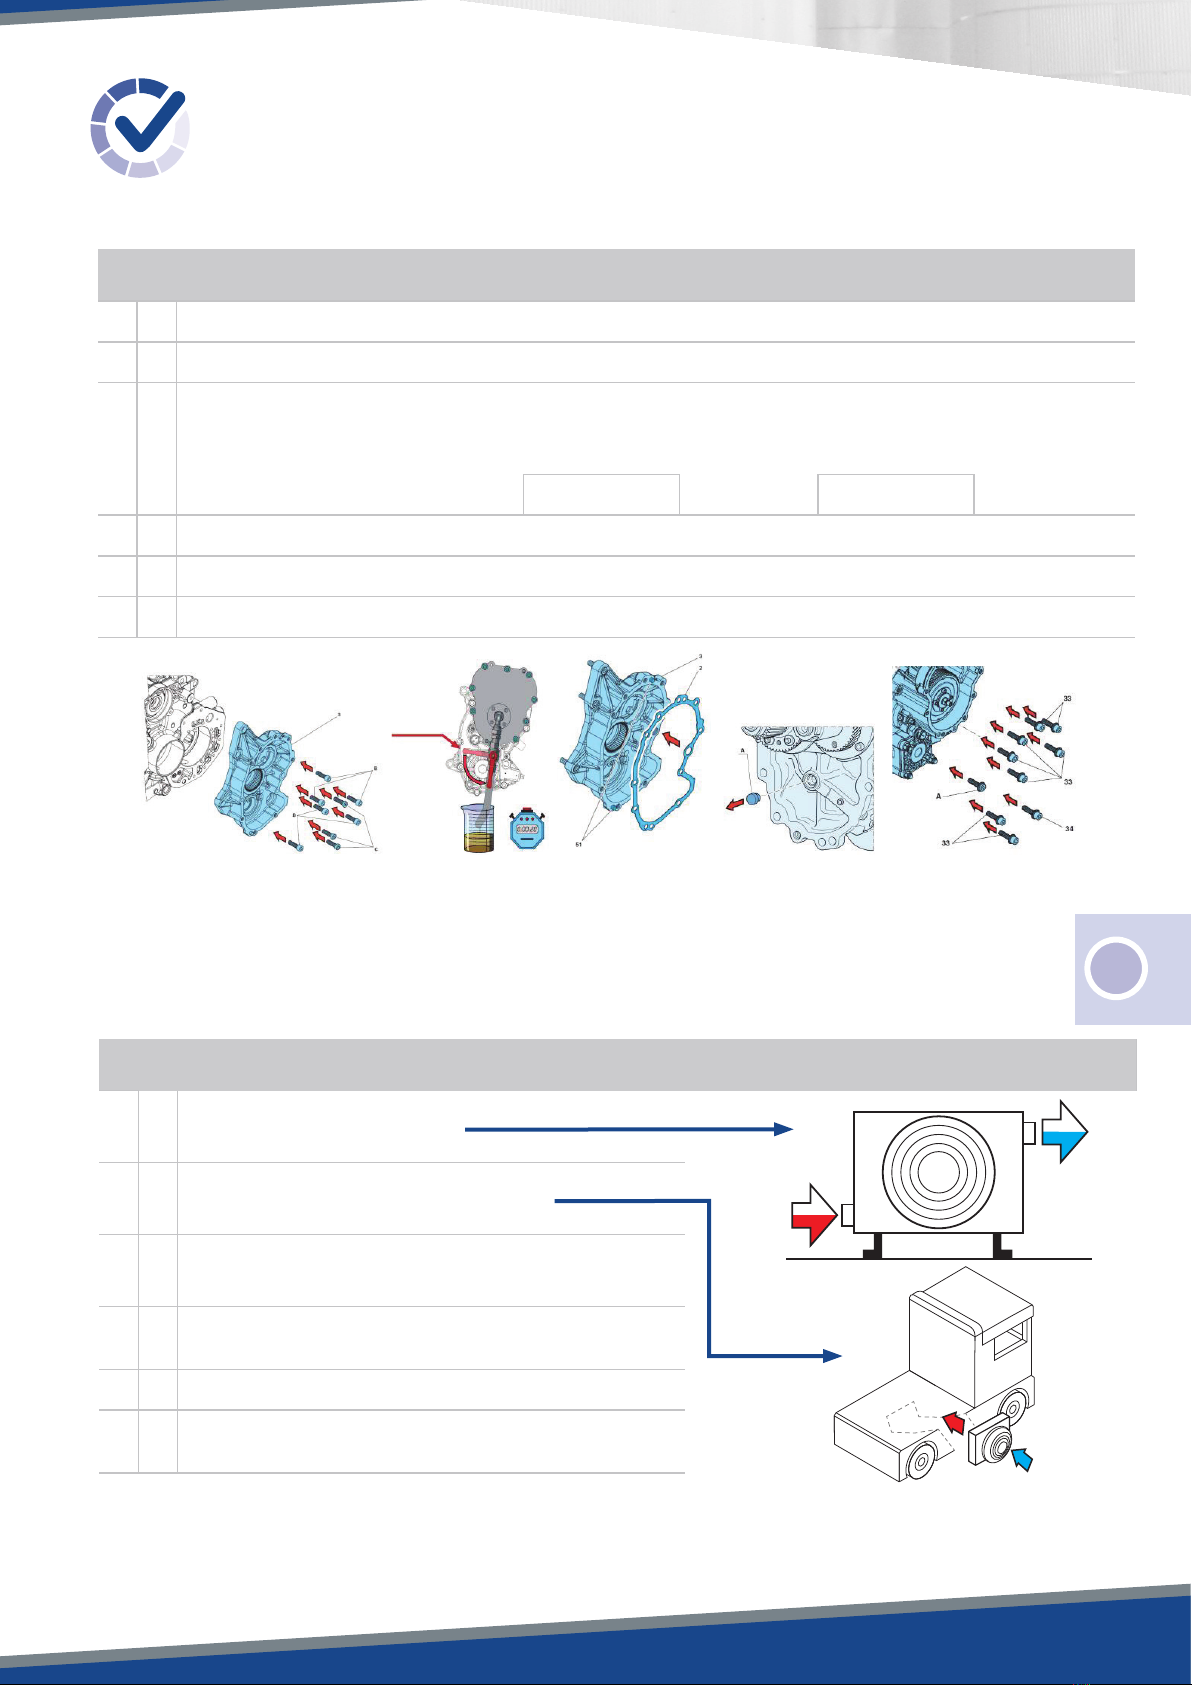
A. Assembling the PTO
o1Loctite® 5203 between PTO and gear box.
o2Fixation screws tightened at 38 Nm.
o3
For SCANIA &VOLVO, fill the PTO with 2 liters of BSC MH oil.
Control the oil flow of the PTO’s pump (K1) :
corresponding to the maximum speed of the compressor :
Measured flow rate l/min Engine speed rpm
o4Flat gasket in place.
o5Remove the plug A from MH6.
o6Install the compressor and tighten the fixing screws to 38 Nm.
Open
the tap
for 20s
2. 3. 4. 5. 6.
EN
B. Assembling the Radiator
o1The oil flow goes from the bottom to the top.
o2The air flow goes from the fan to the radiator.
o3The air flow crossing the radiator comes from an area outside
the truck.
o4The startup of the fan must be associated with the engagement of
the PTO.
o5The motor is protected by a fuse of 6.3 A.
o6Run the compressor for 2' and control the oil level of the gear box.
Oil
Air

54
Quick Start Guide |SCREW COMPRESSORS – MH6
CONTROL CHECK LIST
Installation Of The Compressor PTO & MH6 Compressor Set
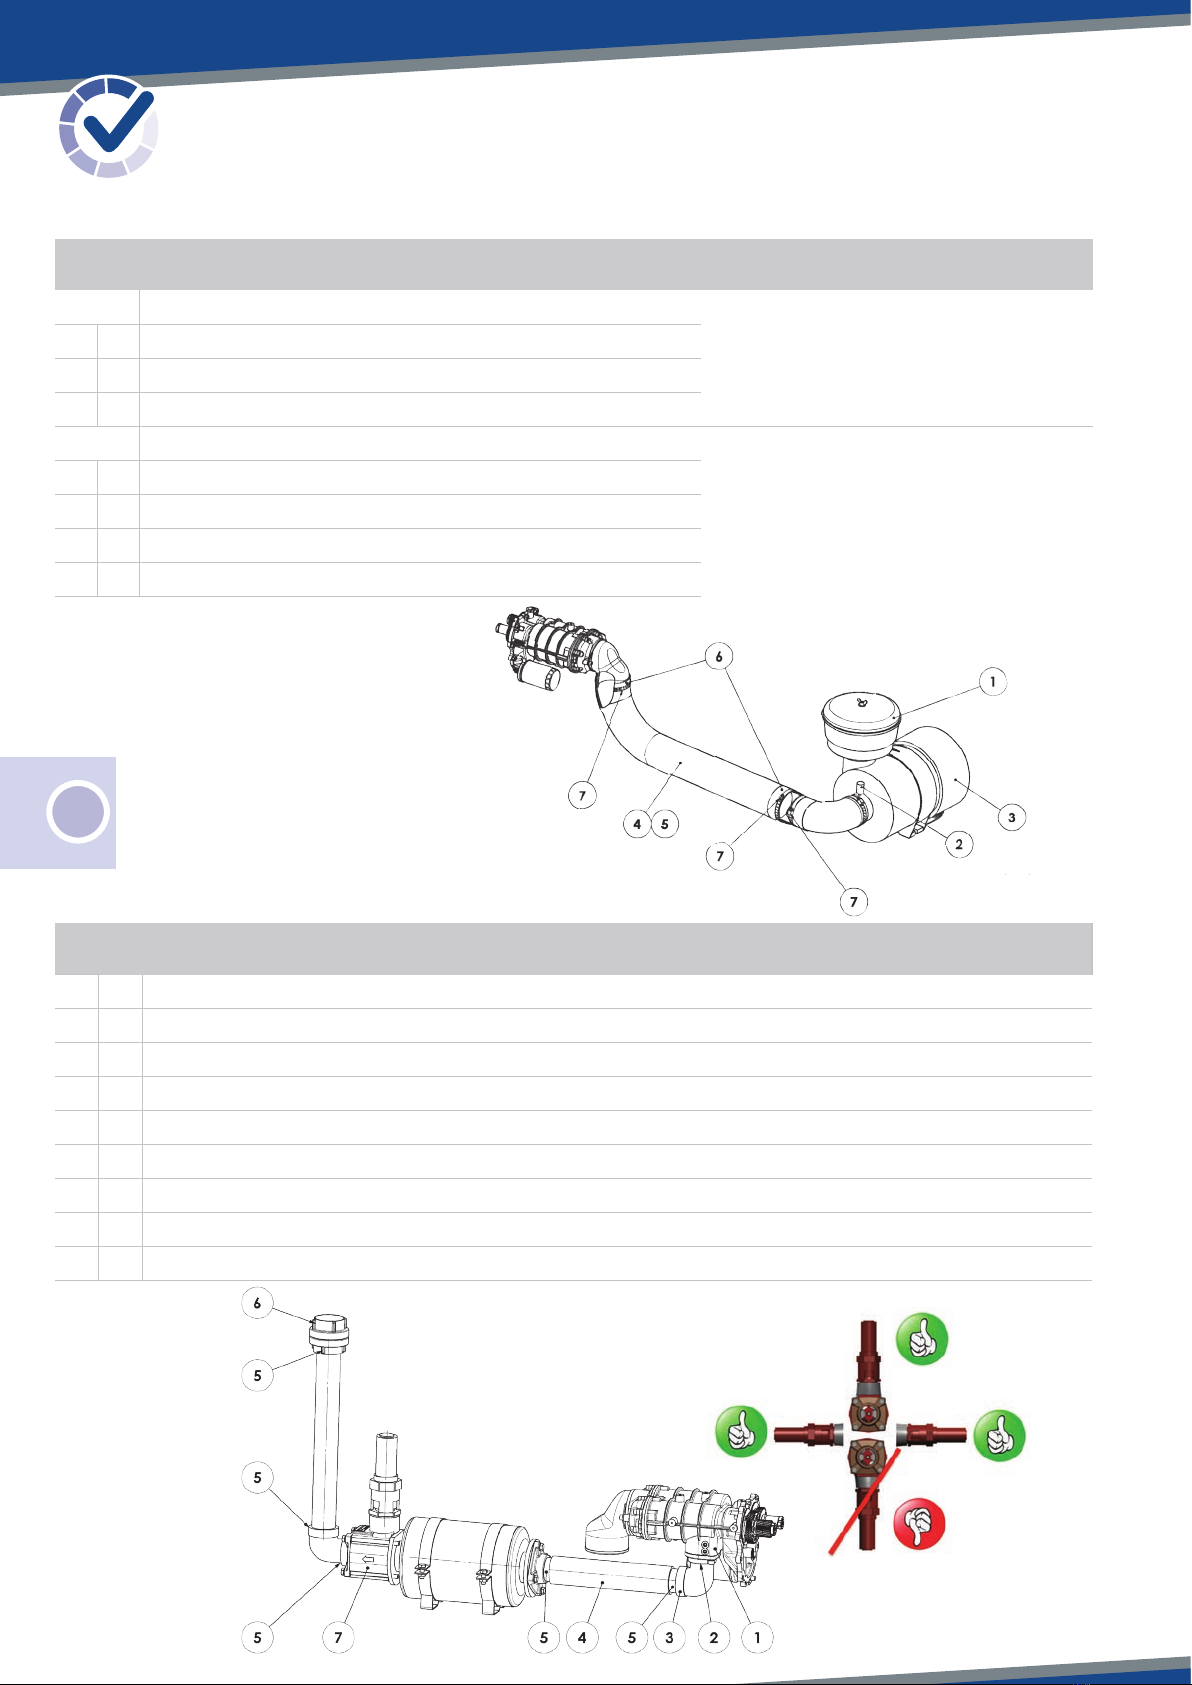
C. Compressor’s Suction
1Filter :
o1Pre-cleaner in place.
o2Clogging indicator visible.
o3Cartridge in place and clean.
2Hose :
o4Clean inside.
o5Not folded, fastened in order to avoid any banging.
o6Heat shrinkable sleeve in place at both ends.
o7Collars in place and tightened.
D. Compressor’s Discharge
o1The graphite flange gasket is in place.
o2Flange screws tightened at 44 Nm.
o3A 45° or 90° elbow is fitted on the flange (a vertical pipe between the flange and the elbow is allowed).
o4The discharge hose delivered is fitted on that elbow.
o5Threaded connexions are waterproof.
o6There is a plug at the end of the pipe.
o7Relief valve turned in the right direction.
o8The waterproofness of the whole piping has to be checked.
o9Relief valve orientation.
EN
M
B
F
54
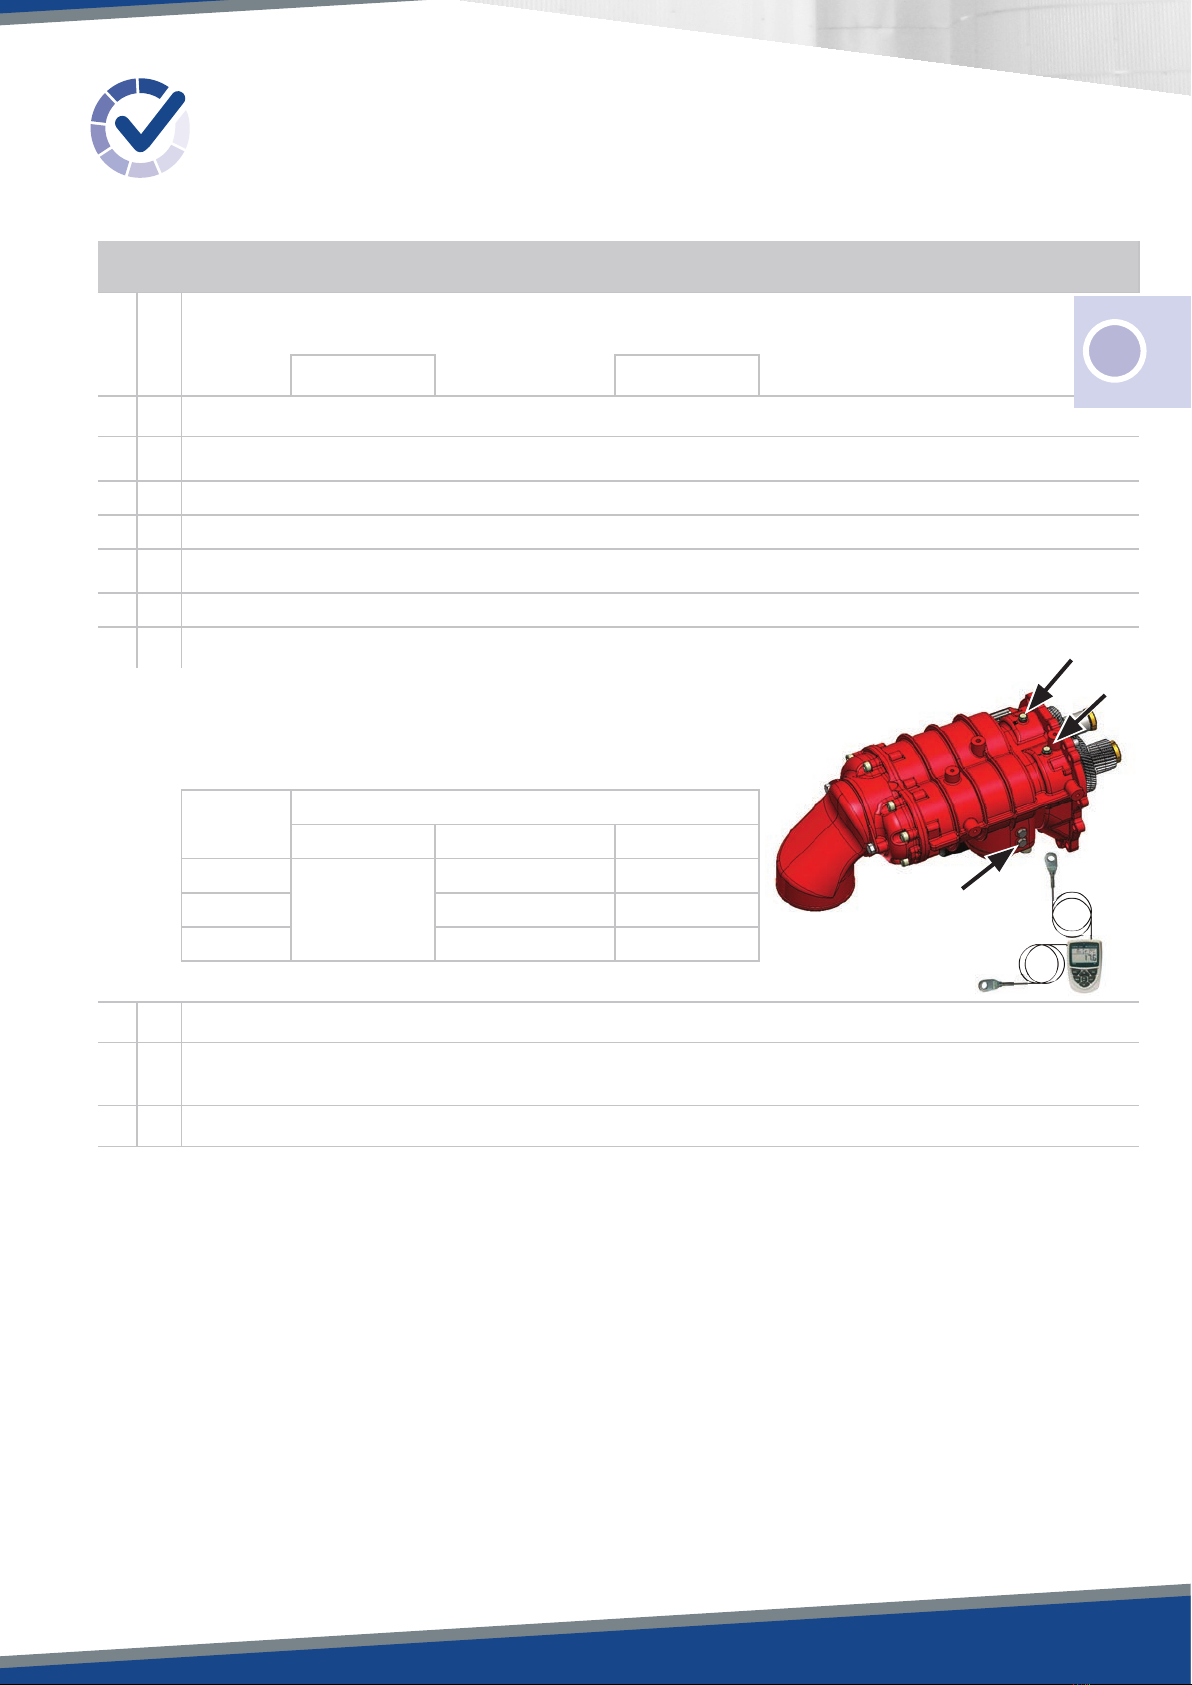
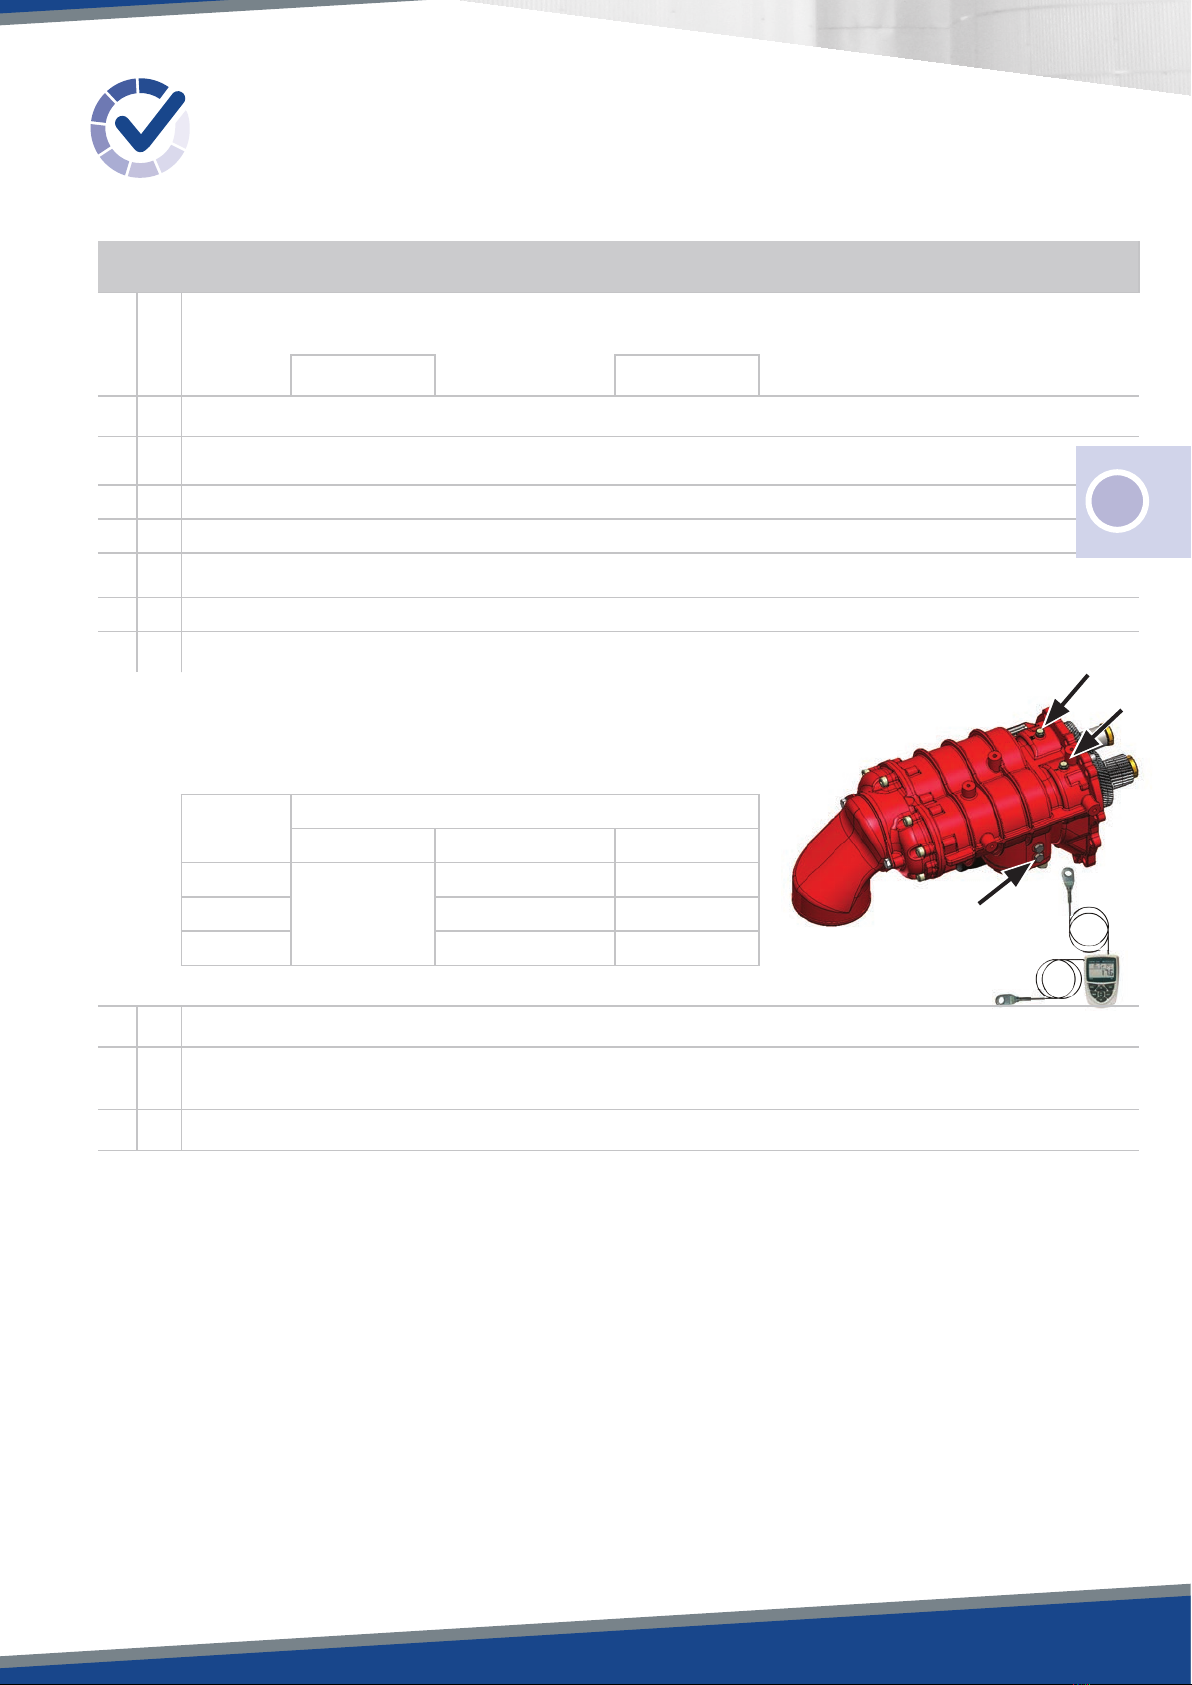
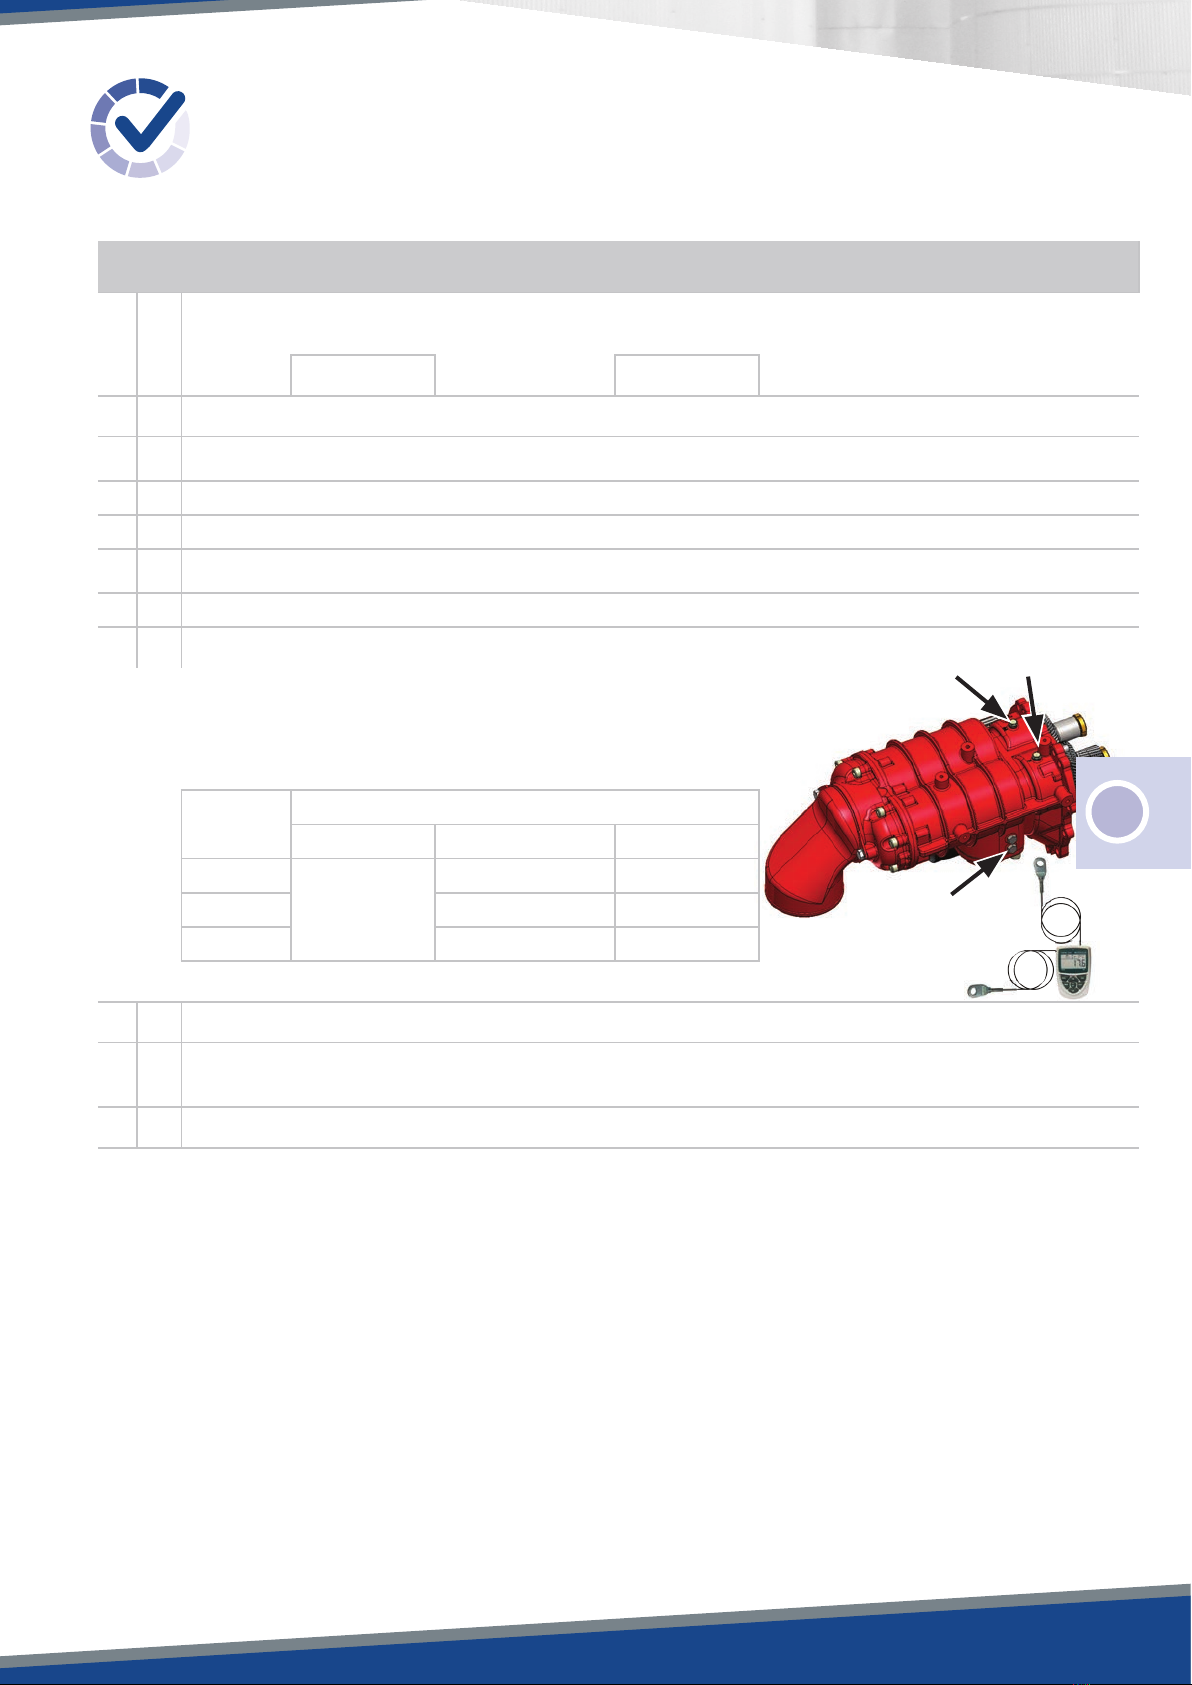
E. Test of the Compressor (K5 connected to B)
o1Speed control (male screw) :
(K2)
N mini N maxi
Caution : Consult the Instructions 1401-AA00 regarding the speed range.
o2Gear box split position : oLow oHigh
o3The split selected is locked.
o4The speed range used is locked.
o5Relief valve pressure : o2 bar o2.3 bar o2.5 bar
o6Control of the opening of the relief valve. (K3, K5)
oTemperature measurement of the compressor (K3, K4, K5)
•Run the compressor for 45 minutes at the maximum speed.
•Set the pressure to 2.5 bar, measured at point B.
•Measure the temperature at points M and F with an eyelet.Temperature < 130°C.
Duration
(min)
Temperature
Ambient Male Screw (M) Female Screw (F)
15'
30'
45'
•Stop the compressor
o8Checking for leaks on the oil circuit.
o9Check the oil level of the gearbox (according to the manufacturer recommendations).
Or check the oil level of the PTO for SCANIA and VOLVO.
o10 Check the tightness of the oil filter.
EN
Quick Start Guide |SCREW COMPRESSORS – MH6
CONTROL CHECK LIST
Installation Of The Compressor PTO & MH6 Compressor Set
76
Quick Start Guide |SCREW COMPRESSORS – MH6
CHECK LIST DE CONTROLE
Installation Ensemble Pto & Compresseur MH6
Tracteur
Marque : Type :
N° V.I.N. : Date installation ensemble :
Immatriculation : Kilométrage :
Type de boite de vitesses :
ZF
oECO-SPLIT
Installateur : oAS-TRONIC
Utilisateur : oTRAXON
K1 K2 K3 K4 K5
K1 : Kit contrôle débit huile (HYDROCAR)
K2 : Tachymètre optique
K3 : Kit essai compresseur (vanne +
silencieux)
K4 : Thermomètre de contact avec embout
à oeillet
K5 : Manomètre
Outillage spécifique requis
Type de lubrification
2 types de lubrification en fonction de la boite de vitesses :
- ZF et MERCEDES : pas de lubrification séparée, le MH6 utilise l’huile standard de la boite de vitesse. Le contrôle du niveau d’huile global
demeure celui opéré habituellement pour la boite de vitesses.
- SCANIA etVOLVO : lubrification séparée avec huile spécifique BSC MH, le MH6 est autonome, étanche de la boite de vitesses.
Jauge
à huile
Niveau
d’huile
SCANIA
VOLVO
FR

76
B. Montage du Radiateur
o1Le flux d’huile va de bas en haut.
o2Le flux d’air va du ventilateur vers le radiateur.
o3Le flux d’air traversant le radiateur provient
d’une zone extérieure au tracteur.
o4La mise en route du ventilateur doit être associée à
l’enclenchement de la PTO.
o5Le moteur est protégé par un fusible de 6,3 A.
o6Faire tourner le compresseur 2’et contrôler le niveau d’huile de la
boîte de vitesse.
A. Montage de la PTO
o1Loctite® 5203 entre PTO et boîte vitesse.
o2Vis de fixation serrées à 38 Nm.
o3
Pour SCANIA etVOLVO, introduire 2 litres d’huile BSC MH dans la PTO.
Contrôler le débit d’huile de la pompe de la PTO (K1) :
correspondant à la vitesse maxi du compresseur :
Débit mesuré l/min Régime moteur tr/min
o4Joint plat en place.
o5Retirer le bouchon A du MH6.
o6Mettre en place le compresseur et serrer les vis de fixations à 38 Nm.
Ouvrir le
robinet
pendant 20 s
2. 3. 4. 5. 6.
Quick Start Guide |SCREW COMPRESSORS – MH6
CHECK LIST DE CONTROLE
Installation Ensemble Pto & Compresseur MH6
Huile
Air
FR

98
D. Refoulement du Compresseur
o1Présence du joint de bride en graphite.
o2Vis bride serrées à 44 Nm.
o3Usage d’un coude 45° ou 90° sur la bride (une tuyauterie verticale entre la bride et le coude est autorisée).
o4Le flexible livré est monté sur ce coude.
o5Raccords filetés étanches.
o6Présence d’un bouchon sur la boîte symétrique.
o7Clapet anti-retour orienté dans le bon sens.
o8Contrôle de l’étanchéité de la ligne complète dont les soudures.
o9Orientation soupape.
Quick Start Guide |SCREW COMPRESSORS – MH6
CHECK LIST DE CONTROLE
Installation Ensemble Pto & Compresseur MH6
C. Aspiration du Compresseur
1Filtre :
o1Pre-cleaner en place.
o2Indicateur de colmatage visible.
o3Cartouche en place et propre.
2Flexible :
o4Propre à l’intérieur.
o5Non plié, maintenu afin d’éviter tout battement.
o6Gaine thermo-rétractable en place à chaque extrémité.
o7Colliers en place et serrés.
FR
M
B
F
98
E. Test du Compresseur (K5 Connecté À B)
o1Contrôle des vitesses (vis mâle) :
(K2)
N mini N maxi
Attention : Consulter la Notice d’instructions 1401-AA00 concernant la plage de vitesse.
o2Position du relais de boîte de
vitesse : oLente oRapide
o3Verrouillage de la vitesse lente / rapide (relais).
o4Verrouillage de la vitesse mini / maxi.
o5Pression de la soupape : o2 bar o2,3 bar o2,5 bar
o6Contrôle de déclenchement de la soupape. (K3, K5)
oMesure température du compresseur (K3, K4, K5)
•Faire tourner le compresseur à sa vitesse maxi durant 45'.
•Régler la pression à 2,5 bar, mesurée au point B.
•Mesurer la température aux points M et F avec sonde à œillet fixée.Température < 130°C.
Temps
(min)
Température
Ambiante Vis mâle (M) Vis femelle (F)
15'
30'
45'
•Arrêter le compresseur.
o8Contrôle absence de fuites sur le circuit d’huile.
o9Contrôle du niveau d’huile de la boîte de vitesse (selon préconisations constructeur).
Ou de la PTO pour SCANIA &VOLVO.
o10 Vérification du serrage du filtre à huile.
Quick Start Guide |SCREW COMPRESSORS – MH6
CHECK LIST DE CONTROLE
Installation Ensemble Pto & Compresseur MH6
FR

K1 K2 K3 K4 K5
1110
Quick Start Guide |SCREW COMPRESSORS – MH6
KONTROLL-CHECKLISTE
Installation Nebenabtrieb & MH6 Kompressor-Paket
Zugmaschine
Hersteller : Typ :
Serial-Nummer V.I.N : Datum der Installation :
Kennzeichen : Kilometerstand :
Typ des Getriebes :
ZF
oECO-SPLIT
Filter : oAS-TRONIC
Anwender : oTRAXON
K1 : Kit Öldurchflußkontrolle (HYDROCAR)
K2 : Optischer Drehzahlmesser
K3 : KompressorTestkit (Ventil +
Schalldämpfer)
K4 : Kontaktthermometer mit
Ösenanschlüssen
K5 : Manometer
Erforderliche Spezialwerkzeuge
Schmiermittel
2 Schmierstoffarten in Abhängigkeit vom Getriebetyp :
- ZF und MERCEDES : Keine separate Schmierung, der MH6 verwendet Standardgetriebeöl. Die Kontrolle des Ölstandes insgesamt erfolgt
wie für das Getriebe üblich.
- SCANIA undVOLVO : Getrennte Schmierung mit BSC MH-spezifischem Öl, der MH6 ist ein autonomes, vom Getriebe unabhängiges Gerät.
Ölmessstab
Ölstand
SCANIA
VOLVO
DE

1110
A. Montage des Nebenabtriebs
o1Loctite® 5203 zwischen PTO und Getriebe auftragen.
o2Befestigungsschrauben mit 38 Nm festziehen.
o3
Bei SCANIA und VOLVO 2 Liter BSC MH-Öl in die PTO einfüllen.
Den Öldurchsatz der PTO-Pumpe kontrollieren (K1) :
bei max. Drehzahl des Kompressors :
Gemessener Durchfluss l/min Motordrehzahl U/min
o4Flachdichtung aufsetzen.
o5Den Stopfen A von MH6 abnehmen.
o6Den Kompressor einbauen und die Befestigungsschrauben mit 38 Nm festziehen.
Öffnen Sie den
Hahn für 20
Sekunden
2. 3. 4. 5. 6.
Quick Start Guide |SCREW COMPRESSORS – MH6
KONTROLL-CHECKLISTE
Installation Nebenabtrieb & MH6 Kompressor-Paket
B. Montage des Wärmeaustauschers
o1Der Öldurchfluss-Richtung von unten nach oben.
o2Luftdurchfluss-Richtung vomVentilator zumWärmeaustauscher.
o3Der den Kühler durchströmende Luftstrom wird von außerhalb des
LKWs zugeführt.
o4Das Einschalten desVentilators erfolgt gleichzeitig mit dem Starten
des PTO.
o5Der Motor ist durch eine 6,3 A Sicherung geschützt.
o6Den Kompressor 2 Minuten lang laufen lassen und Ölstand des
Getriebes prüfen. Luft
ÖL
DE

1312
D. Druckseite des Kompressors
o1Flanschdichtung aus Graphit eingesetzt.
o2Flanschschraube, mit 44 Nm angezogen.
o3Am Flansch ist ein 45°- oder 90°-Bogen montiert (ein senkrechtes Rohr zwischen Flansch und Bogen ist zulässig).
o4Der mitgelieferte druckseitige Schlauch ist am Bogen montiert.
o5Die Gewindeanschlüsse sind wasserdicht.
o6am Ende des Rohres ist ein Stopfen eingesetzt.
o7Rückschlagventil in der richtigen Richtung eingebaut.
o8Wasserdichtheit der komplettenVerrohrung überprüfen.
o9Einbaulage Sicherheitsventil überprüfen.
Quick Start Guide |SCREW COMPRESSORS – MH6
KONTROLL-CHECKLISTE
Installation Nebenabtrieb & MH6 Kompressor-Paket
C. Saugseite des Kompressors
1Filter :
o1Vor-Filter eingesetzt.
o2Verstopfungsanzeige sichtbar.
o3Filtereinsatz angebracht und sauber.
2Schlauch :
o4Innen sauber.
o5Nicht gequetscht, befestigt, um ein Schlagen zu vermeiden.
o6Wärmeausgleichsmuffen an beiden Enden angebracht.
o7Sicherungschelle angebracht und angezogen.
DE

M
B
F
1312
E. Test des Kompressors (K 5 mit B verbinden)
o1Kontrolle der Drehzahlen (Antriebsspindel) :
(K2)
N min. N max.
Achtung : Siehe Betriebsanleitung 1401-AA00 hinsichtlich Drehzahlbereich.
o2Stellung des Schaltgetriebes: oLangsam oSchnell
o3Die Bereichsauswahl ist gesperrt.
o4Der verwendete Drehzahlbereich ist gesperrt.
o5Ventildruck : o2 bar o2,3 bar o2,5 bar
o6Kontrolle der Öffnungsfunktion des Überdruckventils. (K3, K5)
oKompressorTemperaturmessung (K3, K4, K5)
•Den Kompressor 45 Minuten bei max. Drehzahl laufen lassen.
•Den am Punkt B gemessenen Druck auf 2,5 bar einstellen.
•MitThermometer (Ösenanschlüsse)Temperatur an Punkten M und F messen.
Temperatur < 130°C!
Dauer
(min)
Temperatur
Umgebung Antriebsspindel (M) Nebenspindel (F)
15'
30'
45'
•Stoppen des Kompressors.
o8Kontrollieren, dass sich im Ölkreislauf keine Leckagen befinden.
o9Ölstandkontrolle des Getriebes (gemäß den Hinweisen des Herstellers). Oder Ölstandskontrolle des PTO für
SCANIA &VOLVO.
o10 Dichtheit des Ölfilters überprüfen.
Quick Start Guide |SCREW COMPRESSORS – MH6
KONTROLL-CHECKLISTE
Installation Nebenabtrieb & MH6 Kompressor-Paket
DE
K1 K2 K3 K4 K5
1514
Quick Start Guide |SCREW COMPRESSORS – MH6
LISTA DE CONTROL
Instalación Conjunto Tf & Compresor MH6
Tractor
Marca : Tipo :
Número V.I.N. : Fecha instalación conjunto :
Matriculación : Kilometraje :
Tipo de caja de cambios :
ZF
oECO-SPLIT
Instalador : oAS-TRONIC
Usuario : oTRAXON
K1 : Kit control caudale aceite
(HYDROCAR)
K2 : Tacómetro óptico
K3 : Kit prueba compresor (válvula
+ silenciador)
K4 : Termómetro de contacto con
ojal punta
K5 : Manómetro
Herramientas especiales
ES
Tipos de lubricación
2 tipos de lubricación según la caja de cambios :
- ZF y MERCEDES: lubricación dependiente a la caja de cambios el MH6 utiliza aceite estándar de caja de cambios. El control del correcto
nivel de aceite continua siendo el que normalmente se lleva a cabo para la caja de cambios.
- SCANIA yVOLVO: lubricación independiente a la caja de cambios con aceite específico BSC MH, el MH6 es autónomo e independiente del
aceite de la caja de cambios.
Varilla
del nivel
de aceite
Nivel de
aceite
SCANIA
VOLVO
1514
Quick Start Guide |SCREW COMPRESSORS – MH6
LISTA DE CONTROL
Instalación Conjunto Tf & Compresor MH6
A. Montaje de la toma de Fuerza (Tf)
o1Loctite® 5203 entre toma de fuerza (TF) y caja de cambios.
o2Tornillos de fijación apretados a 38 Nm.
o3
Para SCANIA yVOLVO, introduzca 2 litros de aceite BSC MH en la toma de fuerza (TF).
Controlar el caudal de aceite de la bomba de la toma de fuerza (K1) :
correspondiente a la velocidad máxima del compresor :
Caudale medida l/min Régimen motor rpm
o4Junta establecido.
o5Retirar el tapón A del MH6.
o6Instale el compresor y apriete los tornillos de fijación a 38 Nm.
Abrir
el grifo
durante 20 s
2. 3. 4. 5. 6.
B. Montaje del enfriador
o1El flujo de aceite es de abajo hacia arriba.
o2El flujo de aire es del ventilador hacia el enfriador.
o3El flujo de aire llega a través del enfriador procedente
de un área externa al tractor.
o4La puesta en marcha del ventilador debe estar asociado con el
acoplamiento de laTF.
o5El motor está protegido por un fusible de 6,3 A.
o6Hacer funcionar el compresor 2 minutas y controlar el nivel de
aceite de la caja de cambios.
Aceite
Aire
ES
1716
D. Descarga del Compresor
o1La junta de brida de grafito está en su sitio.
o2Tornillos brida apretados a 44 Nm.
o3Uso de un codo de 45° o 90° en la brida (una tubería vertical entre la brida y el codo está autorizada).
o4La manguera suministrada se monta en este codo.
o5Las conexiones roscadas son estancas.
o6El tapón en la caja simétrica ha sido colocado.
o7Clapeta de retención orientada en el sentido correcto.
o8Control de estanqueidad de la línea completa, incluidas las soldaduras.
o9Orientación de la válvula.
Quick Start Guide |SCREW COMPRESSORS – MH6
LISTA DE CONTROL
Instalación Conjunto Tf & Compresor MH6
ES
C. Aspiración del Compresor
1Filtro :
o1Pre-limpiador instalado.
o2Indicador de obstrucción visible.
o3Cartucho montado y limpio.
2Manguera :
o4Limpia en el interior.
o5No doblada, mantenimiento para evitar golpes de ariete.
o6Funda termorretráctil instalado en cada extremo.
o7Abrazaderas montadas y apretadas.
M
B
F
1716
E. Test del Compresor (K5 conectado a B)
o1Control de velocidad (tornillo macho) :
(K2)
N mini N maxi
Atención : Consulte el Manual de instrucciones 1401-AA00 con referencia a las rangos de velocidad.
o2Posición del relé de la caja de cambios : oLenta oRápida
o3Bloqueo de la velocidad lenta/rápida (relé).
o4Bloqueo de la velocidad mínima / máxima.
o5Presión de la válvula : o2 bar o2,3 bar o2,5 bar
o6Control de apertura de la válvula. (K3, K5)
oMedición temperatura del compresor (K3, K4, K5)
•Gire el compresor de su velocidad máxima durante 45’.
•Ajustar la presión a 2,5 bar, medida en el punto B.
•Medir la temperatura en los puntos M y F con oyal sonda fijada.Temperatura < 130°C.
Duración
(min)
Temperatura
Ambient Tornillo macho (M) Tornillo hembra (F)
15'
30'
45'
•Parar el compresor
o8Control de ausencia de fugas en el circuito de aceite.
o9Control del nivel de aceite de la caja de cambios (según recomendaciones del fabricante).
O de la toma de fuerza para SCANIA yVOLVO.
o10 Verificación de apriete del filtro de aceite.
Quick Start Guide |SCREW COMPRESSORS – MH6
LISTA DE CONTROL
Instalación Conjunto Tf & Compresor MH6
ES

K1 K2 K3 K4 K5
1918
Quick Start Guide |SCREW COMPRESSORS – MH6
CHECK LIST DI CONTROLLO
Installazione Gruppo PDF & Compressore MH6
Trattore
Marchio : Tipo :
Numero V.I.N. : Data installazione gruppo :
Registrazione : Chilometraggio :
Tipo di scatola del cambio :
ZF
oECO-SPLIT
Installatore : oAS-TRONIC
Utilizzatore : oTRAXON
K1 : Kit controllo portata olio (HYDROCAR)
K2 : Tachimetro ottico
K3 : Kit test compressore (valvola +
silenziatore)
K4 : Termometro con sonda di contatto
K5 : Manometro
Attrezzatura specifica richiesta
IT
Tipi di lubrificazione
2 tipi di lubrificazione a seconda del cambio :
- ZF e MERCEDES: nessuna lubrificazione separata, lo MH6 utilizza olio per cambio standard. Il controllo del livello generale dell’olio
rimane quello normalmente eseguito per il cambio.
- SCANIA eVOLVO: lubrificazione separata con olio specifico BSC MH, lo MH6 è autonomo, ed indipendente dalla scatola del cambio.
Astina
controllo
livello
olio
Livello
di olio
SCANIA
VOLVO
1918
Quick Start Guide |SCREW COMPRESSORS – MH6
CHECK LIST DI CONTROLLO
Installazione Gruppo PDF & Compressore MH6
IT
A. Montaggio della Presa di Forza (Pdf)
o1Loctite® 5203 tra PdF e scatola del cambio.
o2Viti di fissaggio serrata a 38 Nm.
o3
Per SCANIA eVOLVO, introdurre 2 litri di olio BSC MH nella presa di forza.
Controllare la portata dell’olio della pompa della PdF (K1) :
corrispondente alla velocità massima del compressore :
Portata misurata l/min Regime motore giri/mn
o4Guarnizione piana in luogo.
o5Estrarre il tappo A da MH6.
o6Installare il compressore e serrare le viti di fissaggio a 38 Nm.
Aprire la
valvola per
20 s
2. 3. 4. 5. 6.
B. Montaggio del Radiatore
o1Il flusso d’olio è dal basso verso l’alto.
o2Il flusso d’aria va dal ventilatore verso il radiatore.
o3Il flusso d’aria che attraversa il radiatore proviene
da una zona esterna al trattore.
o4L’avviamento del ventilatore deve essere associato all’innesto della
PdF.
o5Il motore è protetto da un fusibile da 6,3 A.
o6Azionare il compressore per 2"e controllare il livello dell’olio della
scatola del cambio.
Oil
Air

2120
D. Mandata del Compressore
o1Presenza del guarnizione a flangia in grafite.
o2Viti flangia serrata a 44 Nm.
o3Uso di un gomito a 45° o 90° sulla flangia (una tubazione verticale tra la flangia e il gomito è consentito è autorizzato).
o4Il tubo flessibile fornito è montato al gomito.
o5Raccordi filettati a tenuta.
o6Presenza di un tappo sulla boccola simmetrica.
o7Valvola di non ritorno orientata nel opportuno senso.
o8Controllo della tenuta di tutta la linea, saldature comprese.
o9Orientamento della valvola.
Quick Start Guide |SCREW COMPRESSORS – MH6
CHECK LIST DI CONTROLLO
Installazione Gruppo PDF & Compressore MH6
IT
C. Aspirazione del Compressore
1Filtro :
o1Pre-cleaner predisposto.
o2Indicatore di intasamento visibile.
o3Cartuccia predisposta pulita.
2Flessibile :
o4Internamente pulito.
o5Non piegato, fissato per evitare vibrazioni.
o6Guaina termo-retraibile predisposto su entrambe le estremità.
o7Fascette predisposte al serraggio.
Table of contents
Languages:
Other Mouvex Air Compressor manuals


Popular Air Compressor manuals by other brands


Bushranger
Bushranger Max Air III 55x23 owner's manual

ABB
ABB HT606743 Operation manual

Campbell Hausfeld
Campbell Hausfeld VT6195 Operating instructions and parts manual

GEA
GEA Searle NSQ Series Installation and maintenance instructions

Westfalia
Westfalia 6825 instruction manual

VIAIR
VIAIR 00190 user manual