Moza SLYPOD PRO User manual
SLYPOD PRO
User Manual • Uživatelský manuál •
Užívateľský manuál • Használati utasítás •
Benutzerhandbuch

2
English
3 –20
Čeština
21 –38
Slovenčina
39 –56
Magyar
57 –74
Deutsch
75 –94

3
The product user guide contains product features, how to use, and the operating
procedure. Read the user manual carefully to get the best experience and avoid
unnecessary damage. Keep this manual for future reference. If you have any questions
or comments about the device, please contact the customer line.
✉www.alza.co.uk/kontakt
✆+44 (0)203 514 4411
Importer Alza.cz a.s., Jankovcova 1522/53, Holešovice, 170 00 Praha 7, www.alza.cz

4
Disclaimer and Warning
•This document is related to the safety use and legal rights of your equipment. Please
read it carefully before the first use.
•By using this product, you are deemed to have read, understood, endorsed and
accepted all the terms and content of this statement. You are solely responsible for
the use of this product and the consequences thereof. You undertake to use this
product for legitimate purposes and agree to the terms and any relevant regulations,
policies and guidelines formulated by Shenzhen Alza Technology Co., Ltd.
(hereinafter referred to as Alza). Alza is not responsible for damage, injury or any
legal problems caused by the direct or indirect use of this product. Users should
follow all safety guidelines including but not limited to this document.
•Mini-MX is professional videography equipment. Users need to have professional
videography and safety knowledge and need to be careful. Please read the user
manual carefully before the first use.
•This product is not a toy and not suitable for use by minors. Do not allow children to
operate this product.
•Do not use with products or accessories that are not provided or recommended by
Alza, and please strictly follow the safety guidelines in the product manual.
•The final interpretation of this document belongs to Shenzhen Alza Technology Co.,
Ltd. Updates are subject to change without notice. Please visit the official website
www.gudsen.com for the latest product
Battery Charging Instructions
The MOZA SLYPOD PRO comes with a built-in lithium battery. Before using the SLYPOD
PRO, please fully charge the SLYPOD PRO to activate the battery. To charge use the
Type-C USB port and a USB power source like a phone charger or power bank. Solid red
indicates the SLYPOD PRO is charging, solid blue indicates the charging has finished. The
SLYPOD PRO will automatically stop charging when the battery is full.
Note:
1. It’s recommended to use the original charging cable provided in the package.
2. Do not overcharge or over-discharge the battery, otherwise the battery cell will get
damaged.
3. If the battery is idle for a long time, please recharge and discharge it every 3 months
to keep it active.
5
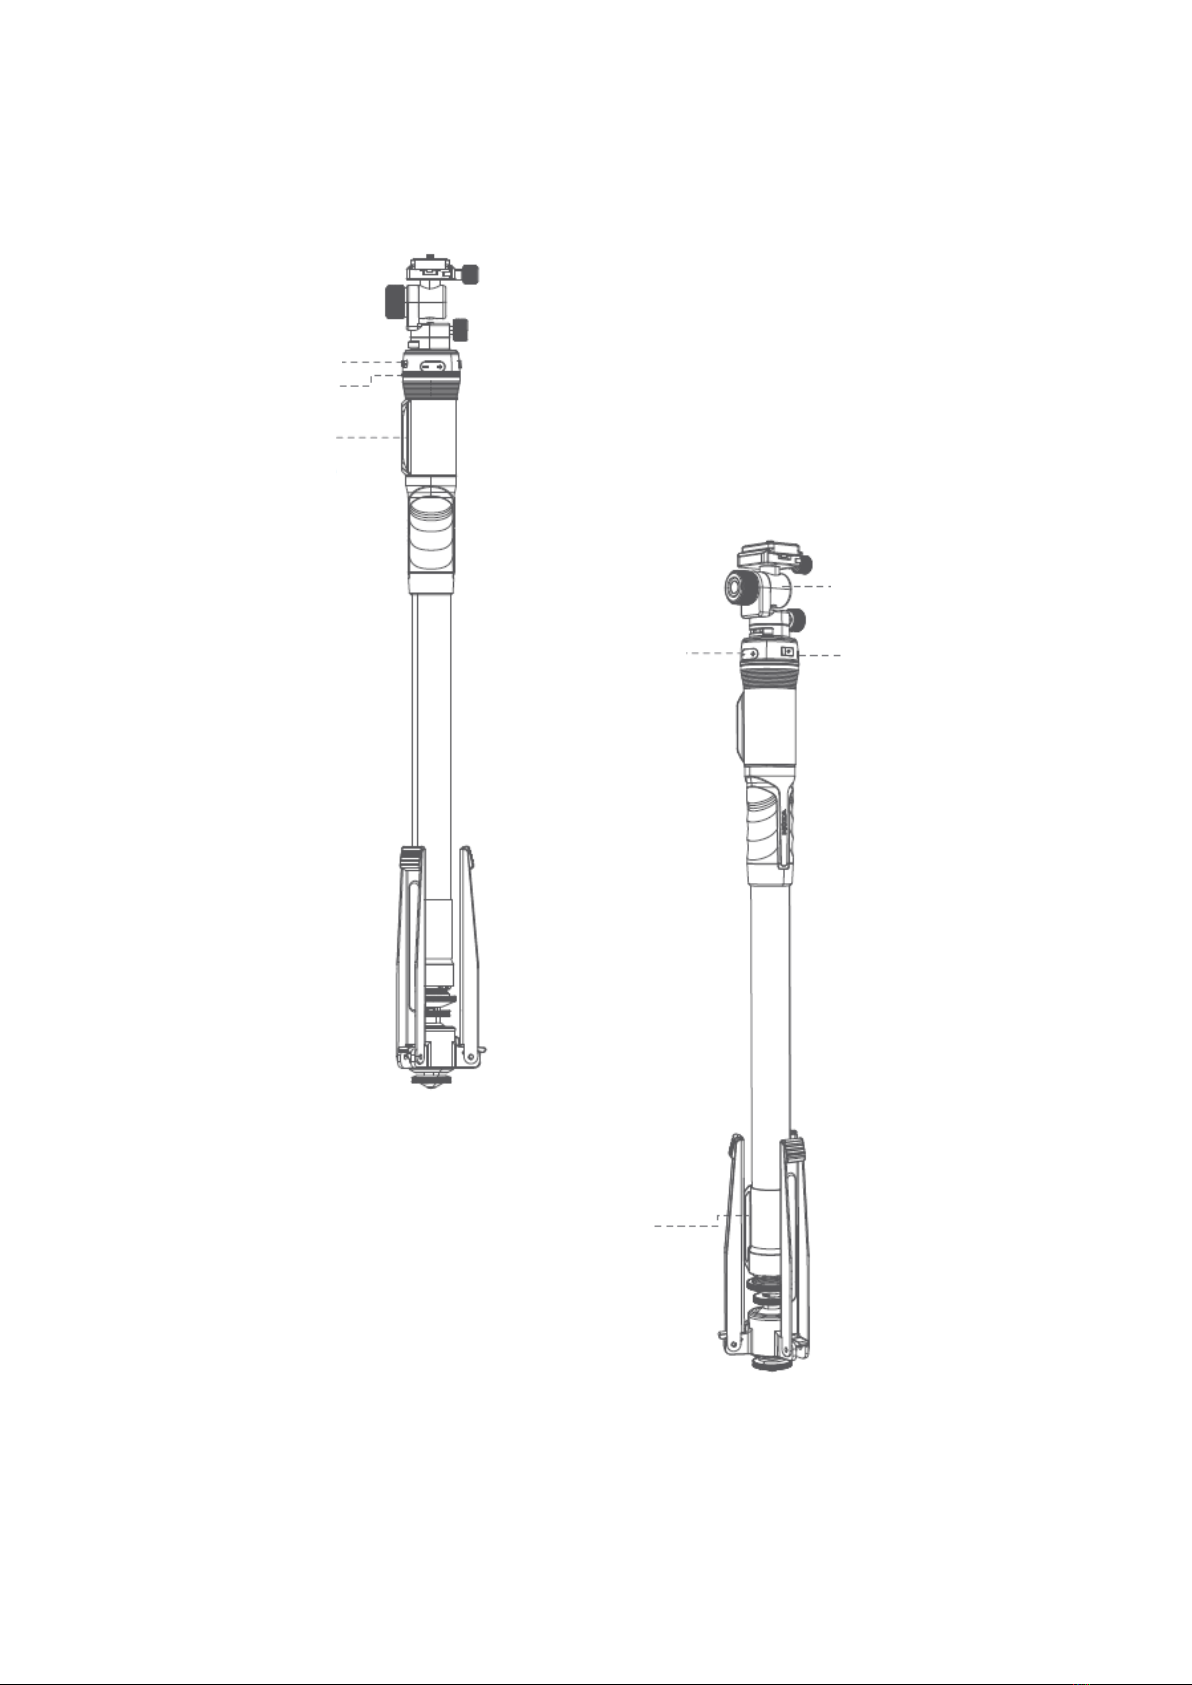
MOZA SLYPOD PRO Overview
1/4” and 3/8”
Extension Hole
Arca-Swiss
Quick Release
Charging Port
Operation Button
Indicator Light
Power Button
Pan-and-Tilt Head
6
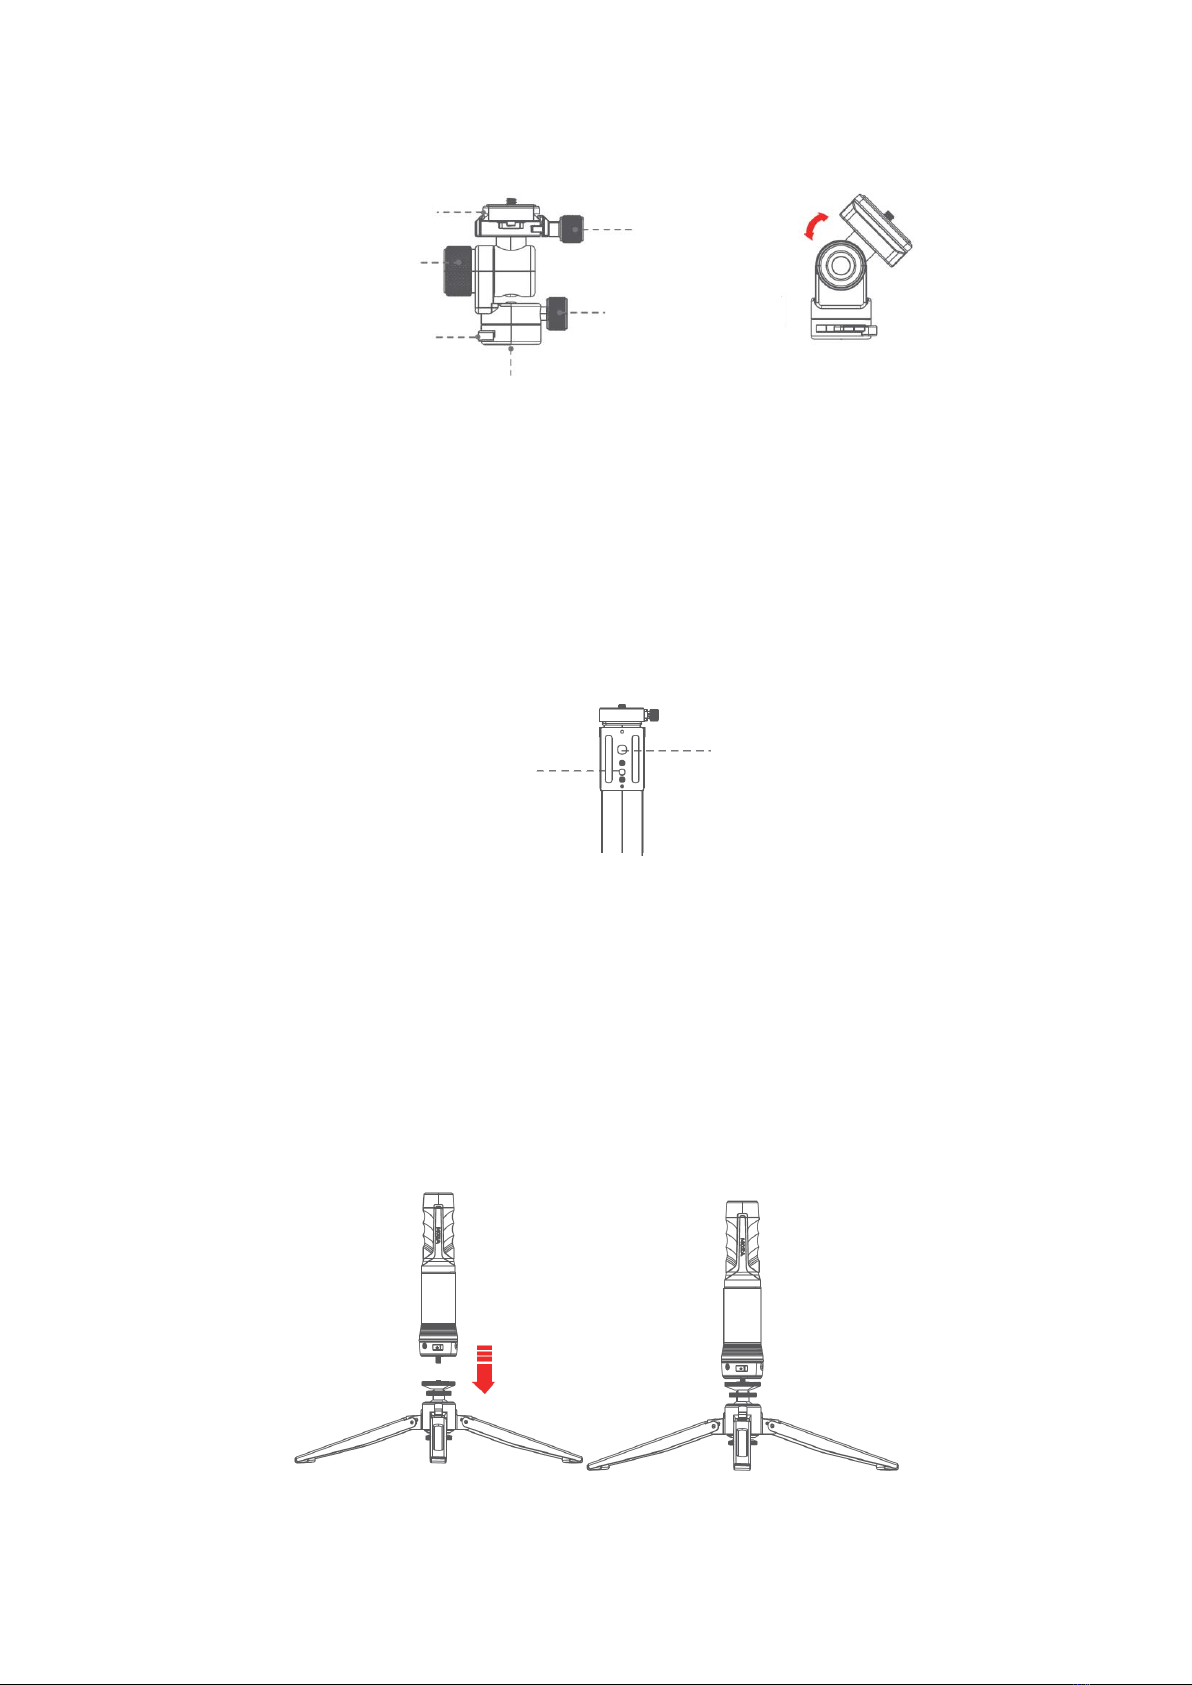
Pan-and-Tilt Head
•Release the heading adjustment knob to adjust the heading angle of gimbal and
ensure the gimbal’s position and level.
•Release the roll and pitch adjustment knob and adjus the angle of roll/pitch at the
same time, and then screw it when it is suitable.
•Release the gimbal lock and install the standard Arca quick release plate, then lock
the gimbal. the body to connect with tripod or other accessories to mount different
shooting devices.
The SLYPOD PRO’s body is supported by an Arca-Swiss quick release plate with a 1/4”
and a 3/8” mount. Use the SLYPOD PRO like a motorized slider by mounting the SLYPOD
PRO horizontal.
Install
Attaching the Tripod to The SLYPOD PRO
Align the tripod with the 1 / 4" mount of the SLYPOD PRO. Rotate the tripod until it is
hand tight.
Pan-and-Tilt Lock
Quick Release Plate
Knob Screw
Pan-and-Tilt
Lock
Pan-and-Tilt
Screw
1/4” and 3/8”
Extension Hole
1/4” Mount
3/8” Mount
7
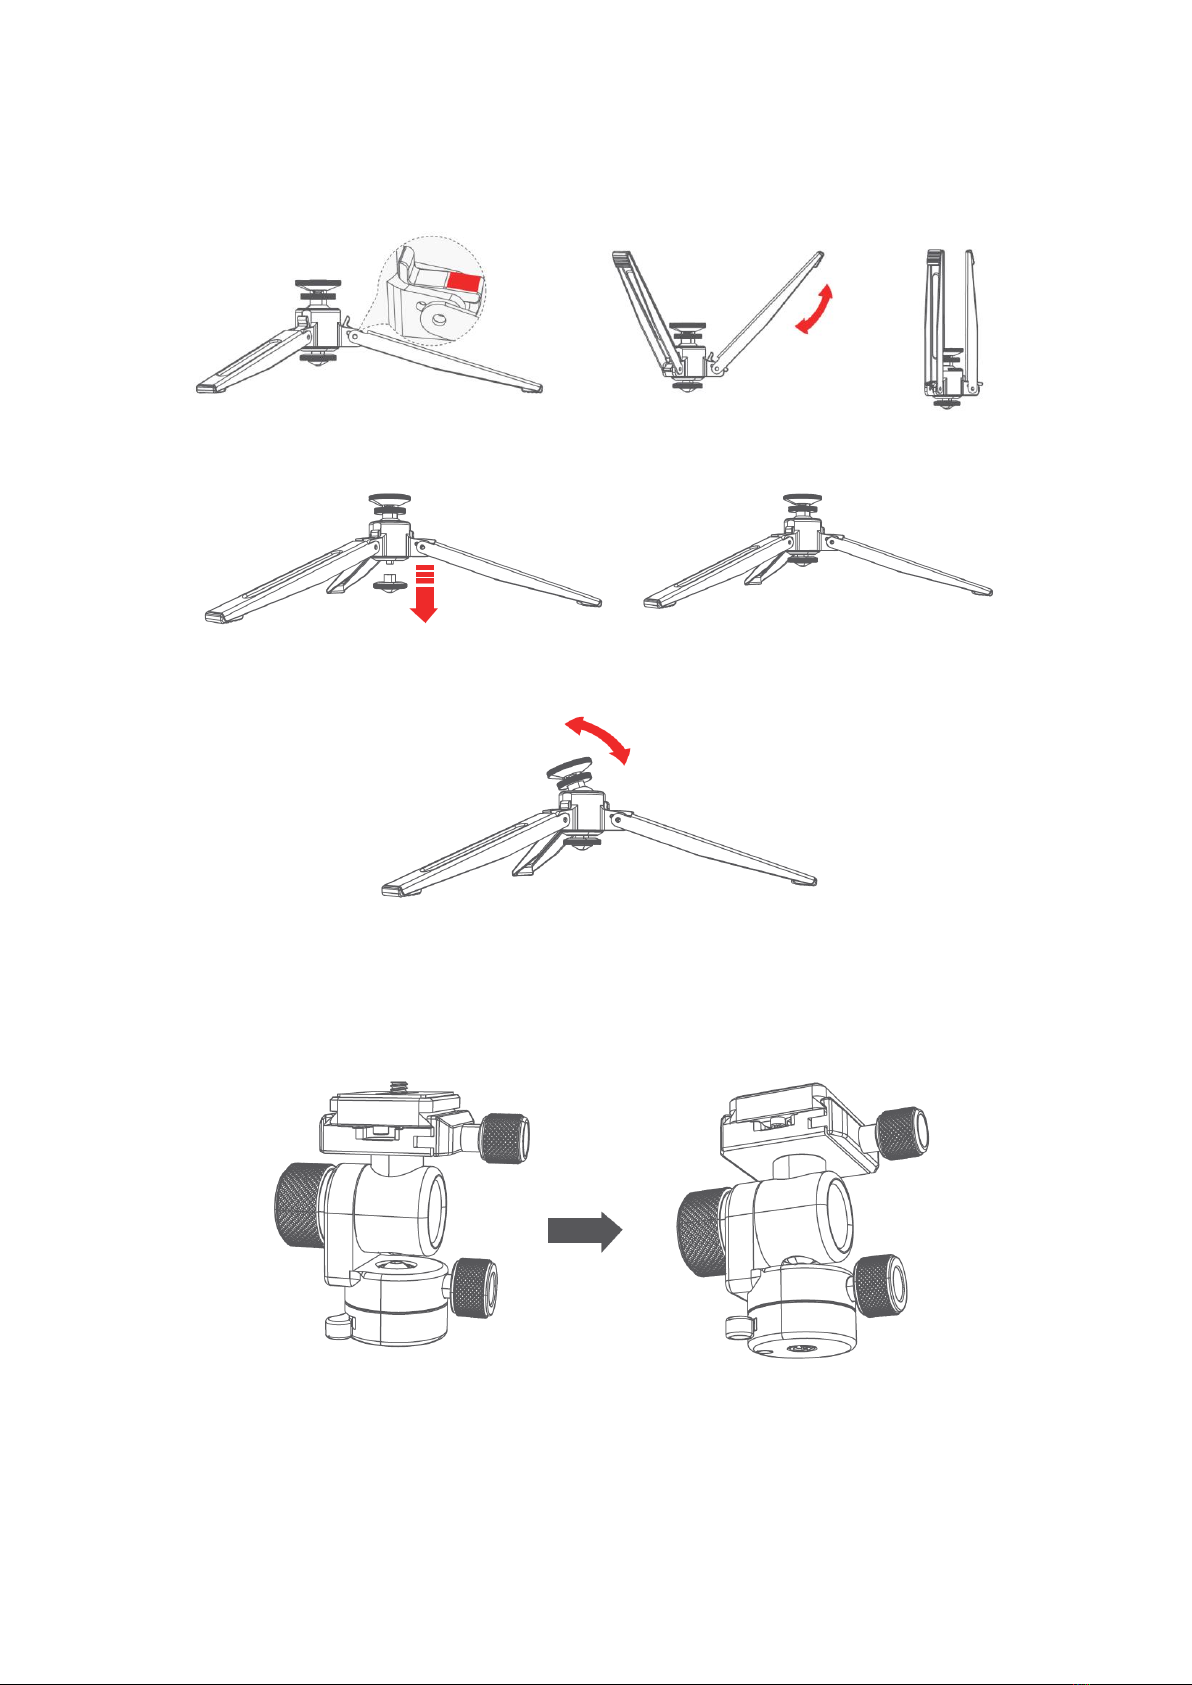
The folding method of tripod
1. Retroflex Folding
2. Shaking the lock to fold
3. Shaking the damping
Main body and gimbal
Tighten the gimbal head to the 1/4 screw of the main body, and then tighten the wrench
to fix the head.
8
Getting Started
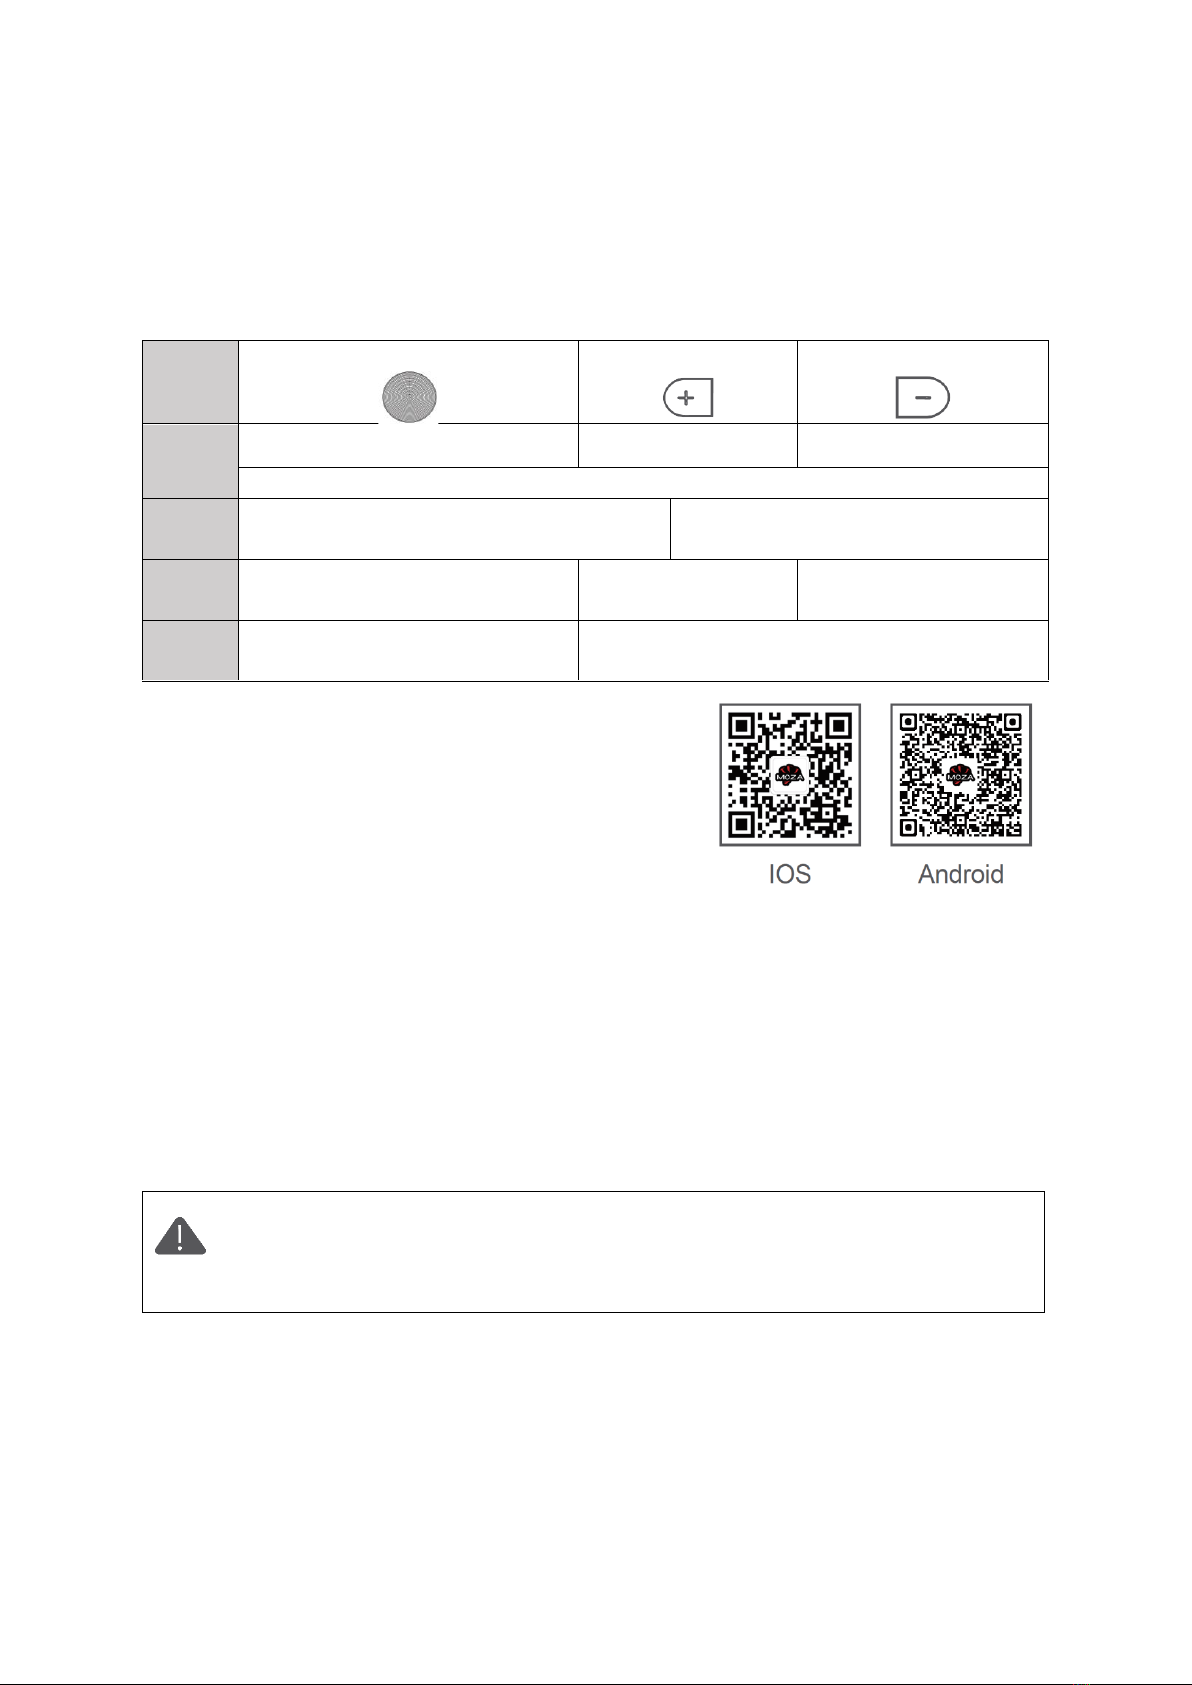
Power on/off: Long press the power button 3 seconds.
Button Operations
Power button
Extend +
Retract –
Click
once
Shot
Start to extend
Start to retract
To reset, click all three buttons at the same time. (White Light will blink )
Long
press
Up (+) /Down (-)
From green to blue, then to green
Be on reciprocating mode
Double
click
Stop
―
―
Triple
click
Reset + Turn Off (Blinking red)
App Download
Scan the QR code below or search in the App Store to
download the MOZA Master App.
Device Connection (Wireless)
Download the "MOZA Master" App.
a. Turn on the Slypod PRO and mobile phone Bluetooth.
b. Launch the "MOZA Master", select the device to connect.
c. Enter the operation interface after connection is completed.
App Operation
Before the first operation, it is required to setup the SLYPOD PRO according to
the instructions. Please use the latest App version. For App updates, please
check our official website and App store. When the SLYPOD PRO is controlled
by the App, buttons will be disabled. (Except for the power button).
9
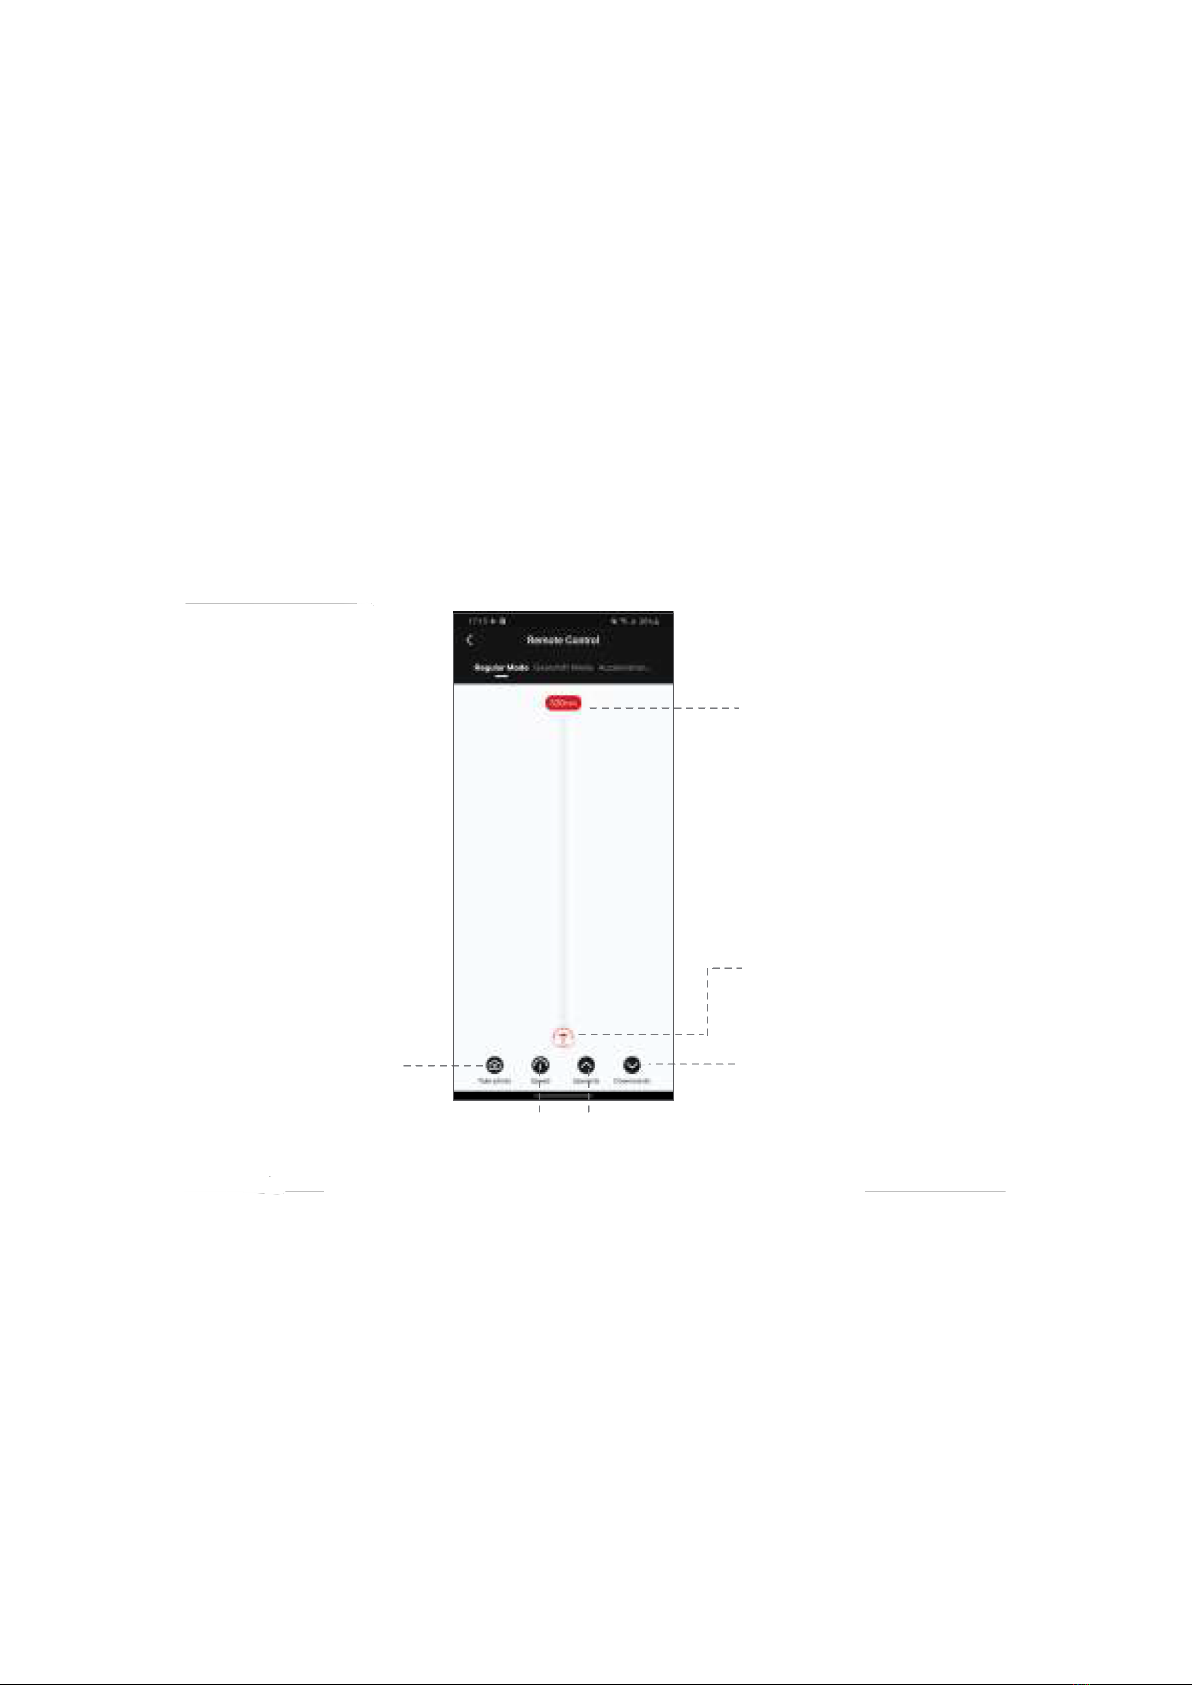
Regular Mode
Slide the red operating point from the starting point to any position, the SLYPOD PRO
will move accordingly. Release the operating point, the SLYPOD PRO will stop moving.
Long tap the “Downwards” or “Upwards” icon, the SLYPOD PRO will automatically move
up or down. Tap the “Downwards” or “Upwards” icon again to stop the movement. Tap
the ‘Take photo’ icon, and SLYPOD PRO will control the camera to take a photo. (Please
make sure your SLYPOD PRO is connected with the camera control cable, the camera
control cable needs to be purchased separately). Speed Setting: Click Speed icon to set
the speed, and the SLYPOD PRO will move according to the set speed.
Maximum moving
distance is 520mm
Operating Point, the
current movement
distance is 0mm
Long click to control the
movement, click again to
stop movement
Long click to control the
movement, click again to
stop movement
Set the up-and-down
movement speed of
the Slypod PRO
Control the camera
to take photos
10
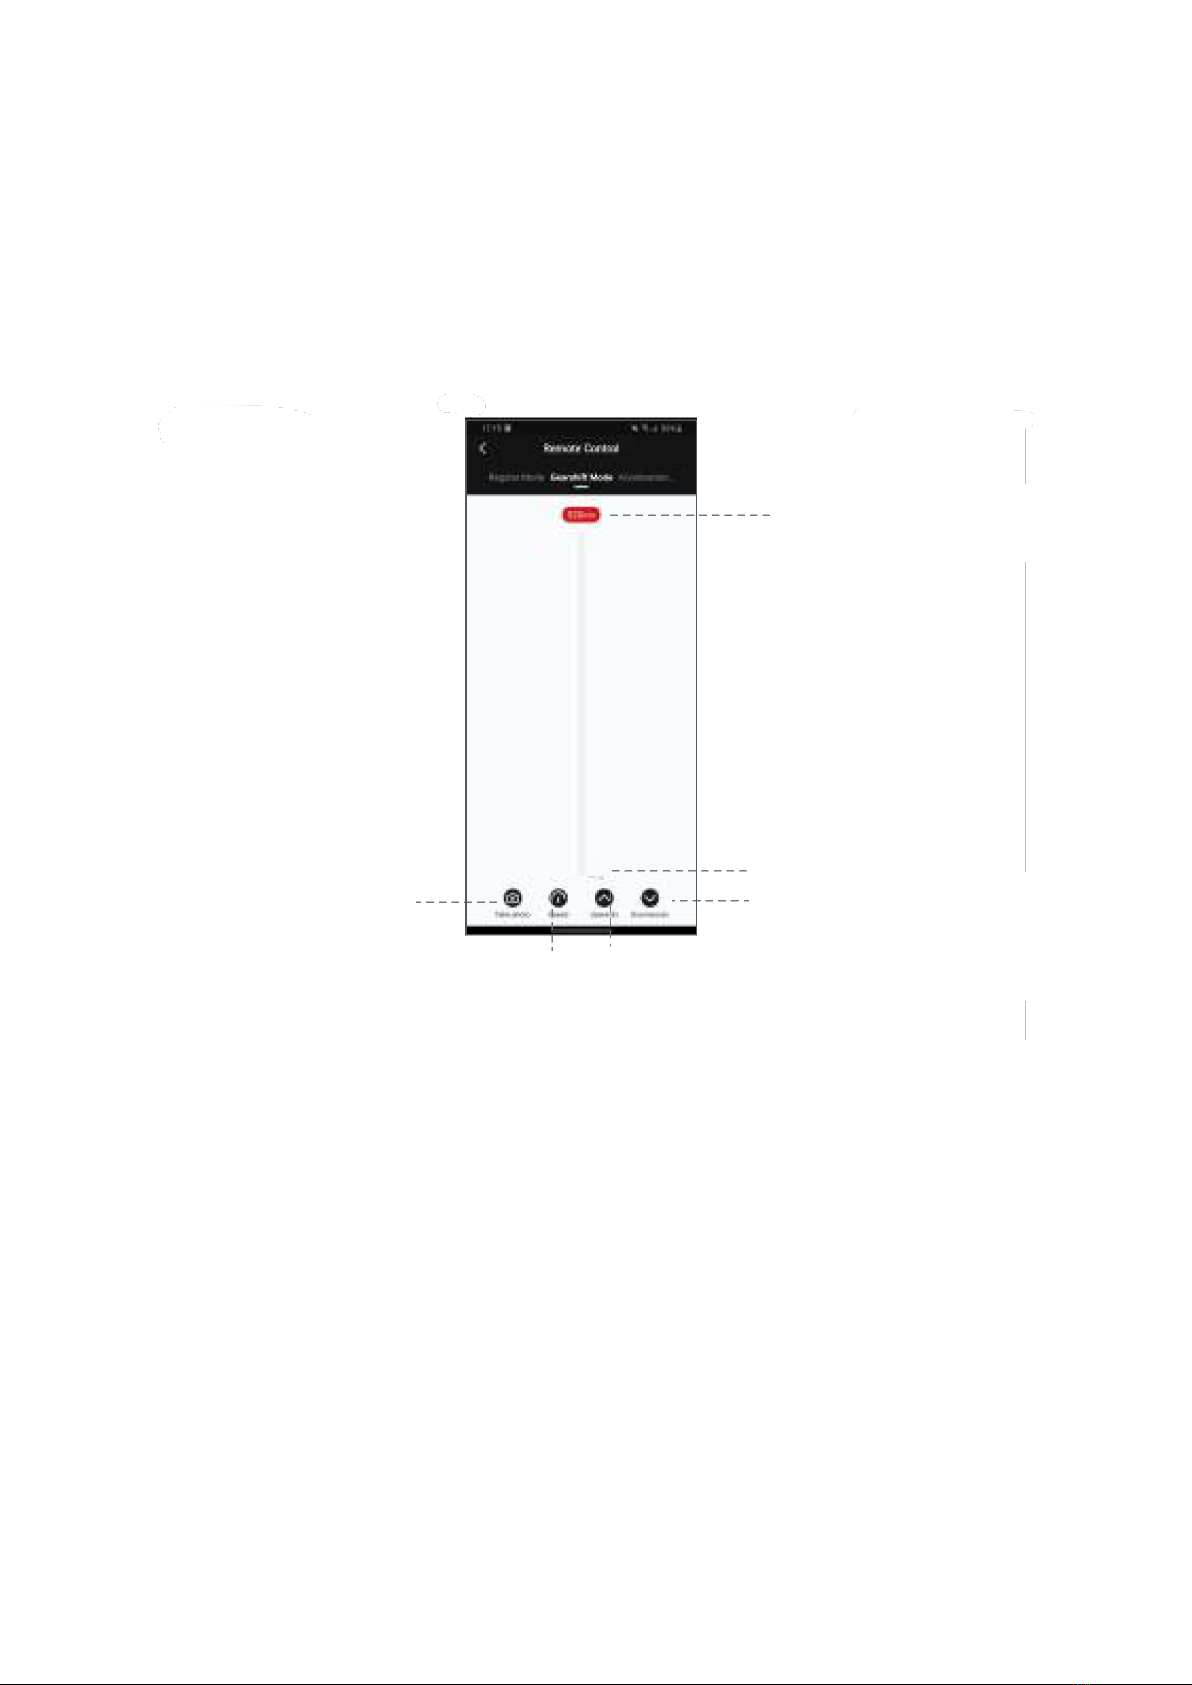
Gearshift Mode
Tap the “Upwards” or “Downwards” icon to control the movement of SLYPOD PRO. Tap
again to stop the movement. Tap Take photo icon to control the camera to take a photo.
(Please make sure your SLYPOD PRO is connected with the camera control cable, the
camera control cable needs to be purchased separately). Speed Setting: Tap speed icon
to set the speed, the SLYPOD PRO will move from the current speed to the set speed
and then decelerates to the end position. (The end position speed is 0)
Control the camera
to take photos
Maximum moving
distance is 520mm
Set the up-and-down
movement speed of
the Slypod PRO
Click to control
the movement,
click again to
stop movement
Tap to control the
movement, click again to
stop movement
The current movement
distance is 0mm
11
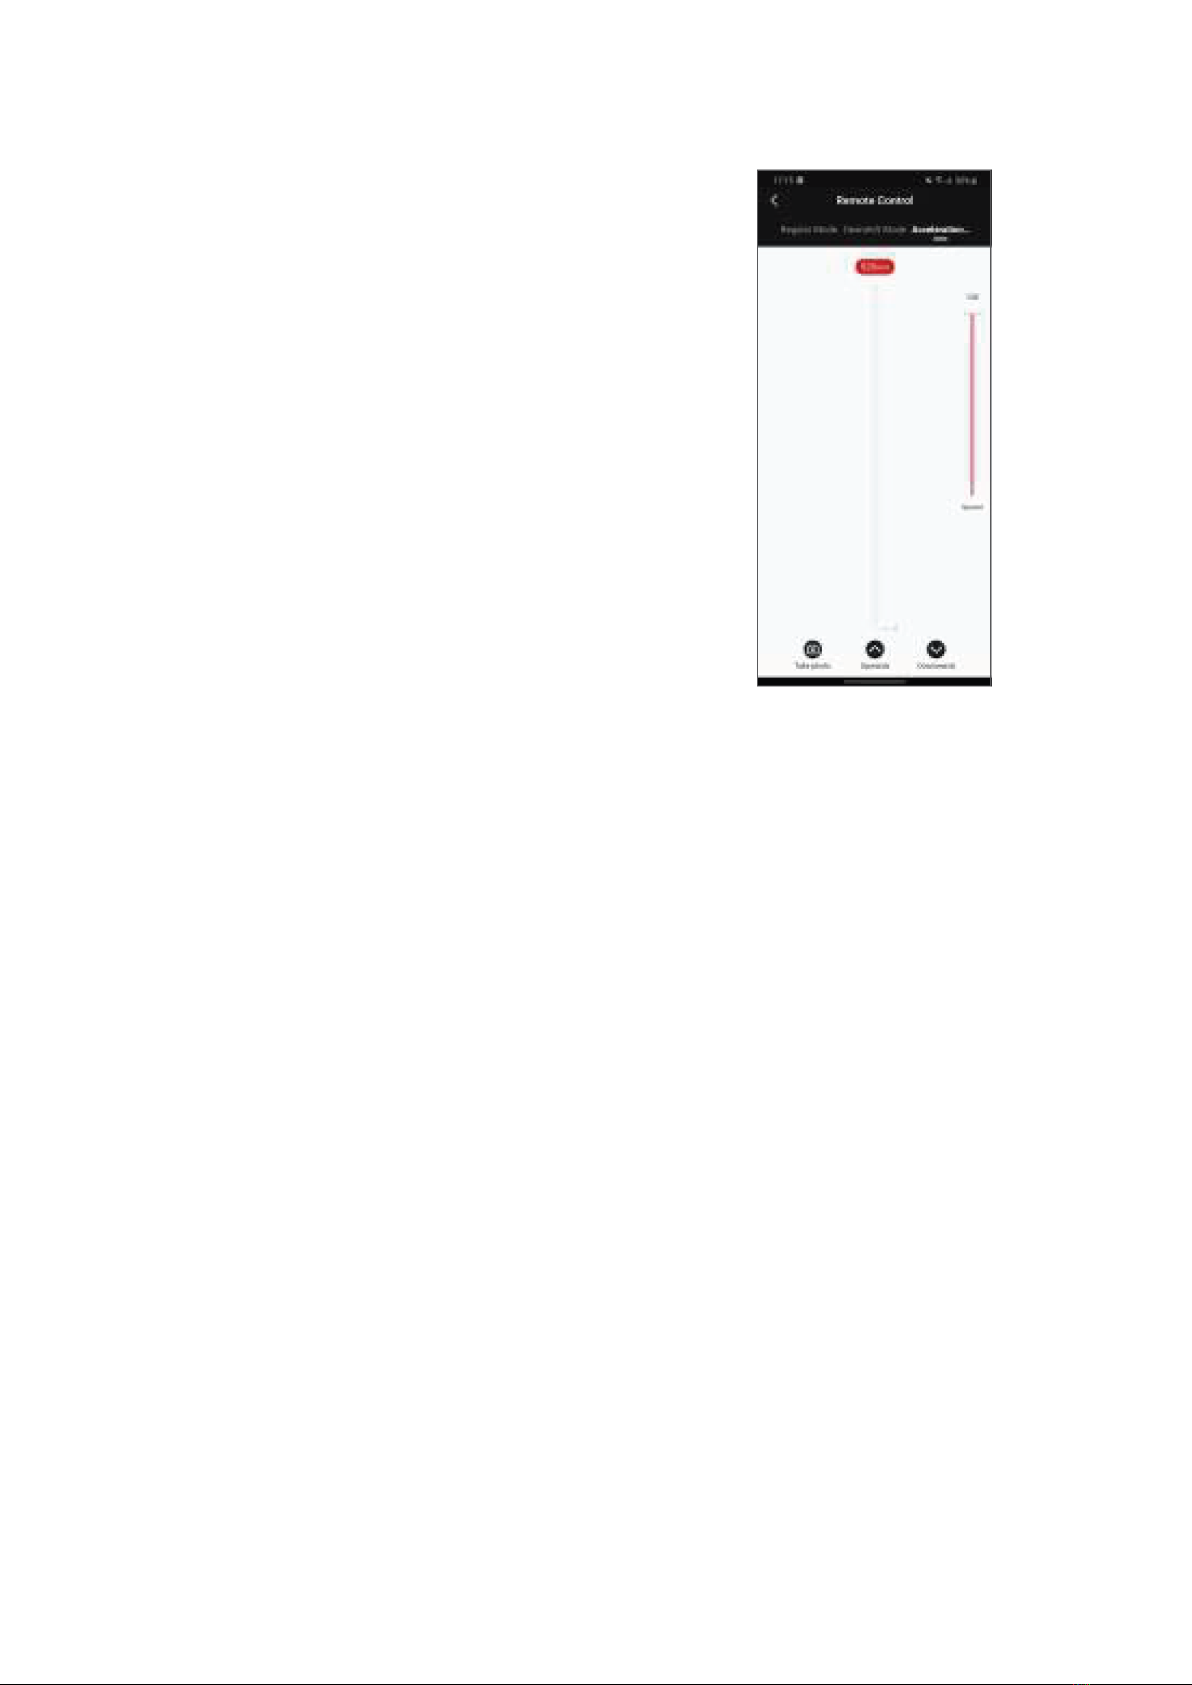
Acceleration Mode
Tap the “Upwards” and the device will move up
automatically; Tap again and the device stops moving.
Tap the “Downwards” and the device will move down
automatically; Tap again and the device stops moving.
Tap ‘Take photo’, the SLYPOD PRO controls the camera to
take a photo. (SLYPOD PRO needs to be connected to the
camera with the camera control cable, the camera control
cable needs to be purchased separately) Speed setting:
Drag the white mark to set the device acceleration speed,
and the device will continue to accelerate to the end
position according to the set speed (When the SLYPOD
PRO extends to 520mm or retracts to 0mmit will reach
the setting speed)
12
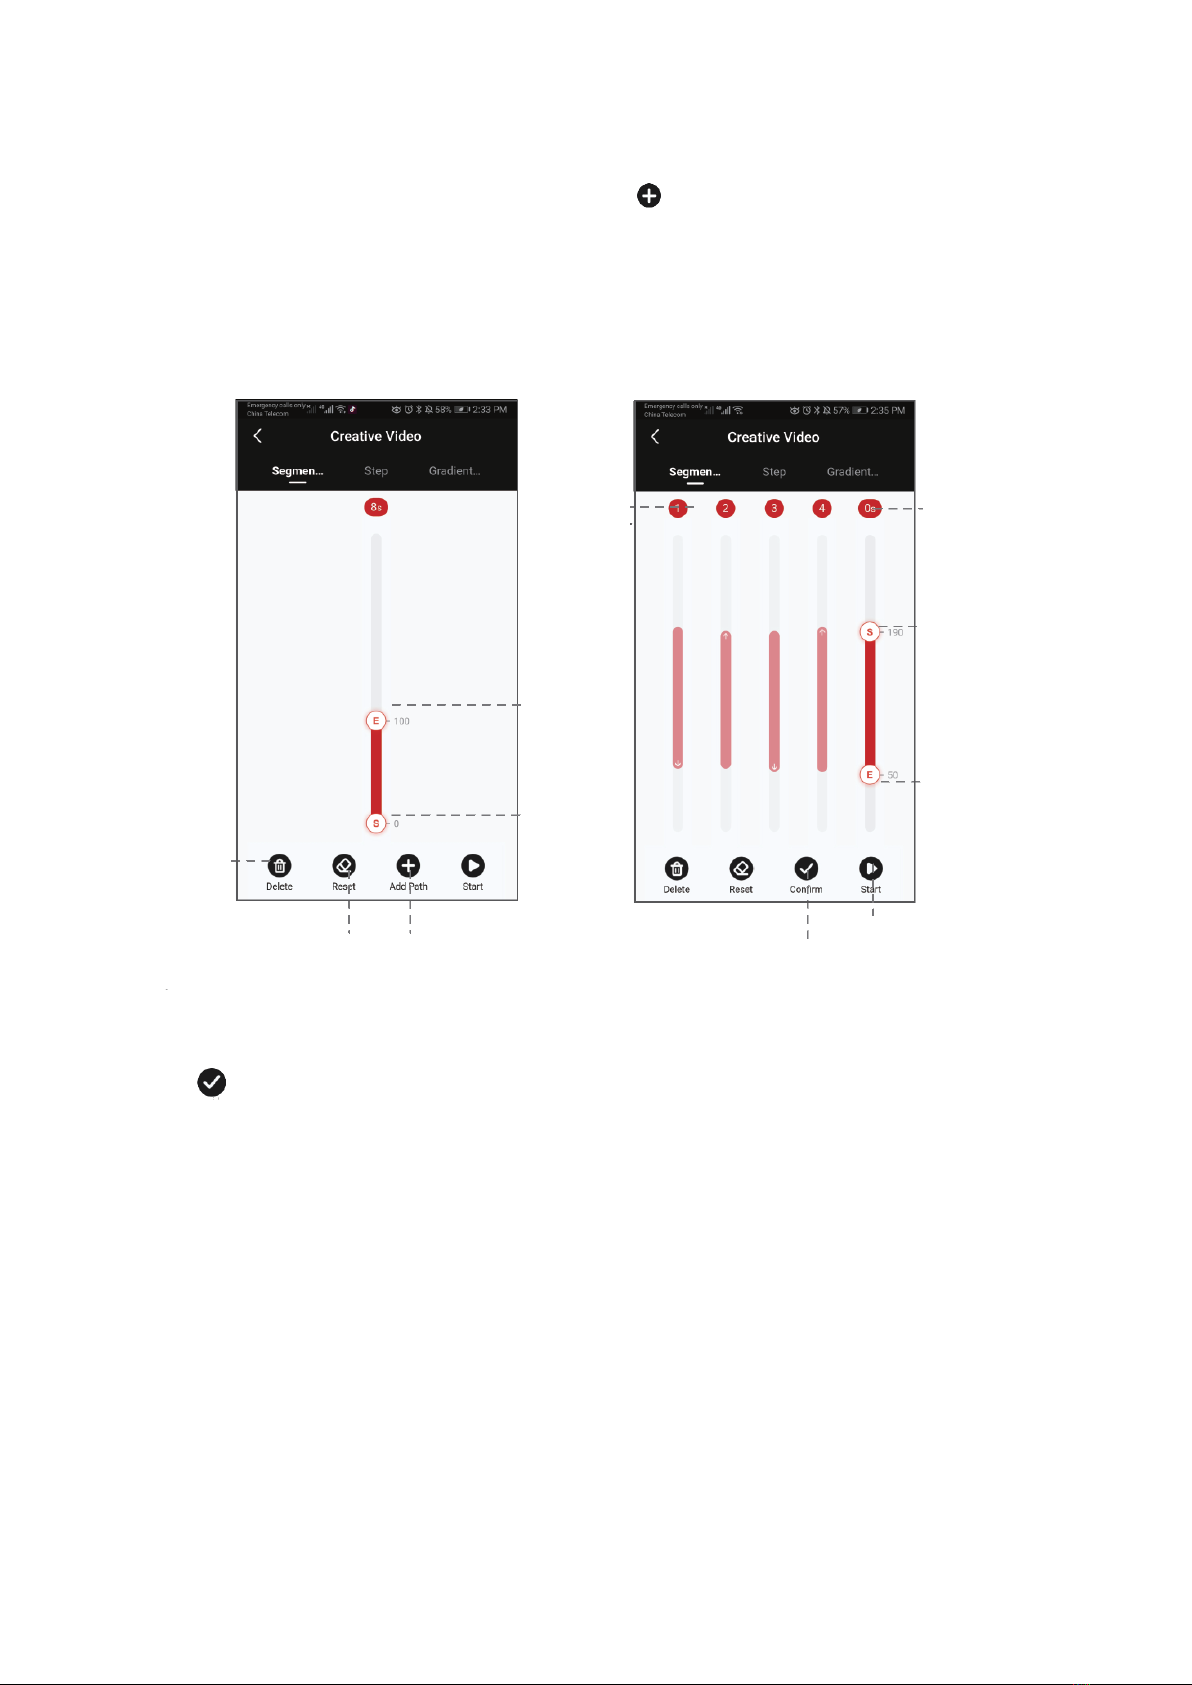
Segmentation Mode
Select the segmentation mode, add a path (Click to add the path. 5 paths is the most
that can be added, click confirm before adding the next path). Slide the S operating point
and the E operating point to any position to set the starting position and end position of
the first path. Slide the E operating point to set the end position of the second, third,
fourth or fifth path. Then, the starting point of the next path will be the end position of
the previous one.
Click to confirm the path and set the running time. After confirming the first path,
another path can be added. Tap Confirm and the SLYPOD PRO will run according to
programmed movement. Using Segmentation mode and the camera connection cable
the SLYPOD Pro will activate the camera’s shutter for a motion controlled time-lapse.
Tap to
delete
the
path
Tap to
reset the
path
Tap to add
the path
Path
number
S operation
point
E operation
point
Tap to the red
area to set the
running time
Tap to the red
area to set the
running time
End (number
shows the
distance from
the origin)
Click to confirm the
path before adding
the next path.
Click to start
13
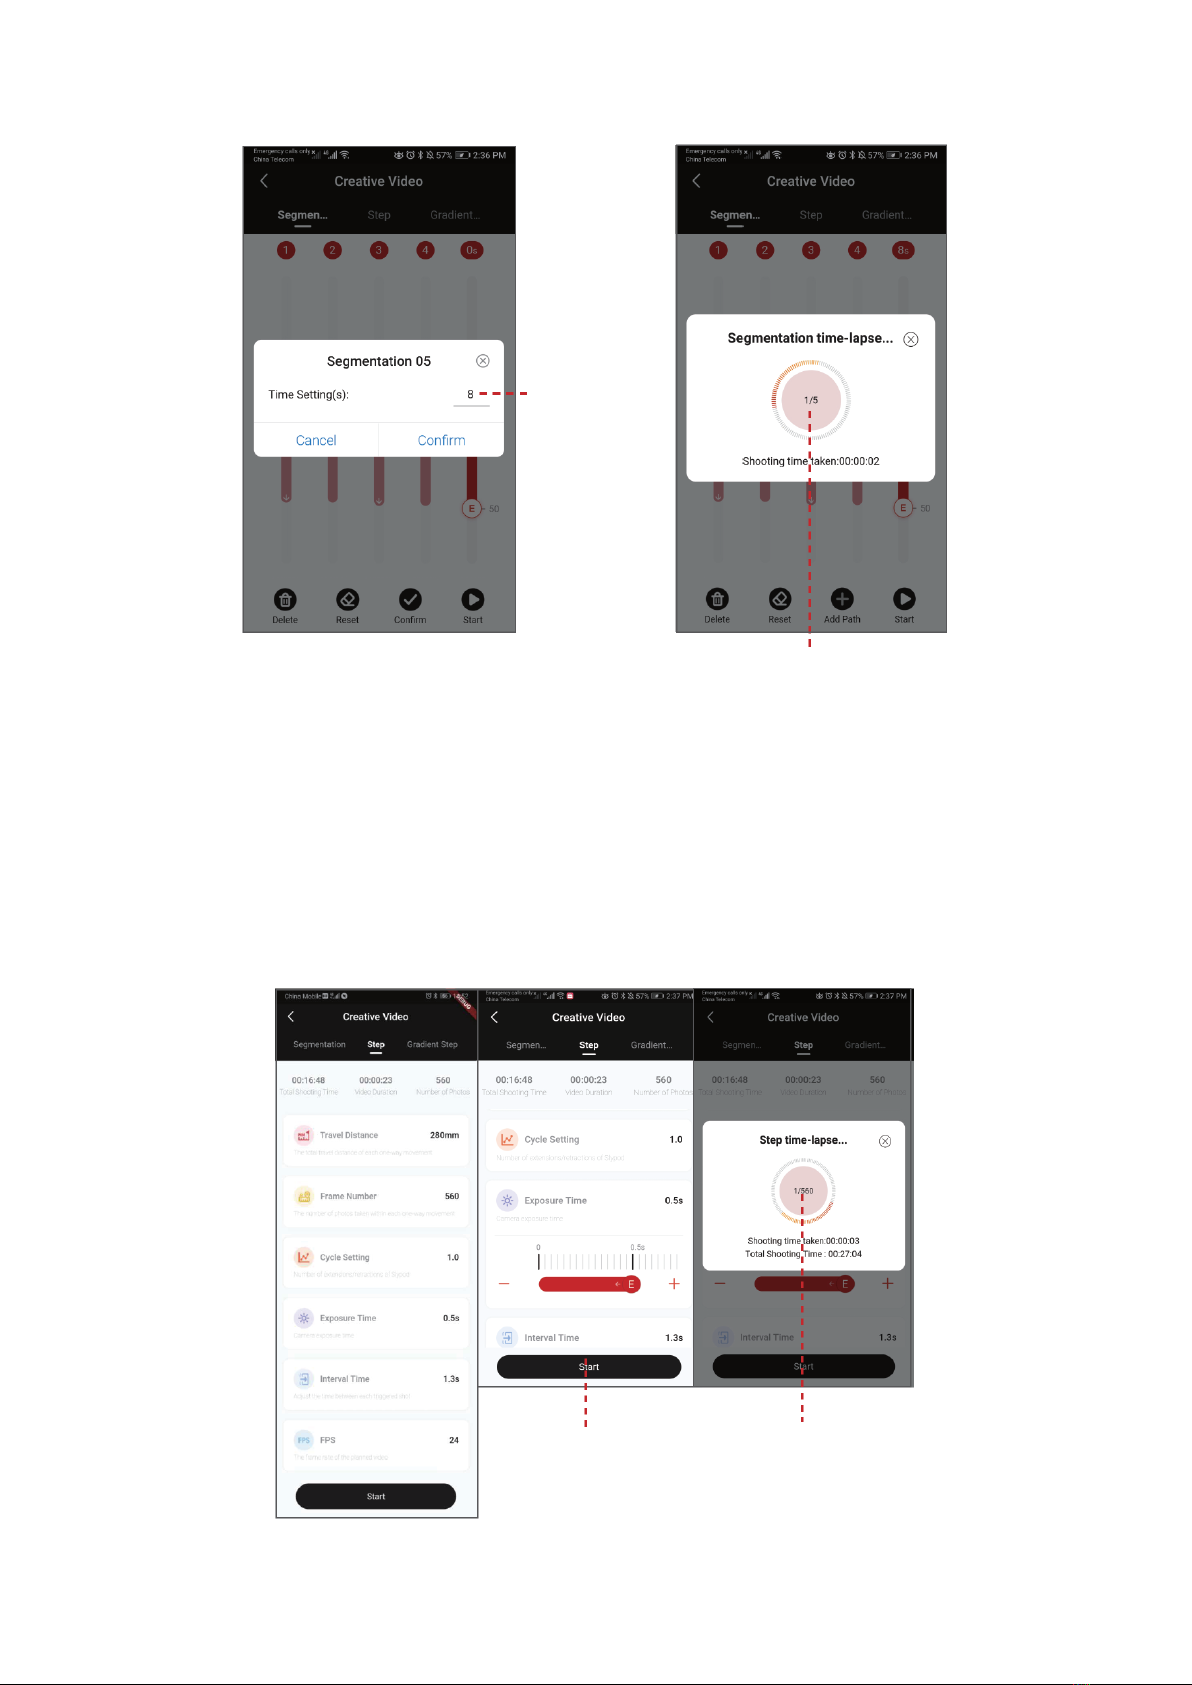
Step Time-Lapse
Select Step mode to set Travel Distance, Frame Number, Cycle Setting, Exposure Time,
Interval Time and FPS. Click “+”“-” to adjust the parameter, click to start, the SLYPOD PRO
will run according to the set parameters, the interface will display Shooting Time Taken,
Total Shooting Time, Total number of photos. Enter the Step Time-lapse interface, click
on the red circular area, the SLYPOD PRO can control the camera to take pictures.
(SLYPOD PRO needs to be connected to the camera with the camera control cable)
Set path
running time
Tap on the red circular area, the
Slypod PRO can control the
camera to take pictures
Tap Start, the Slypod
PRO will run according
to the setting
Click on the red circular
area, the Slypod PRO can
control the camera to
take pictures
14
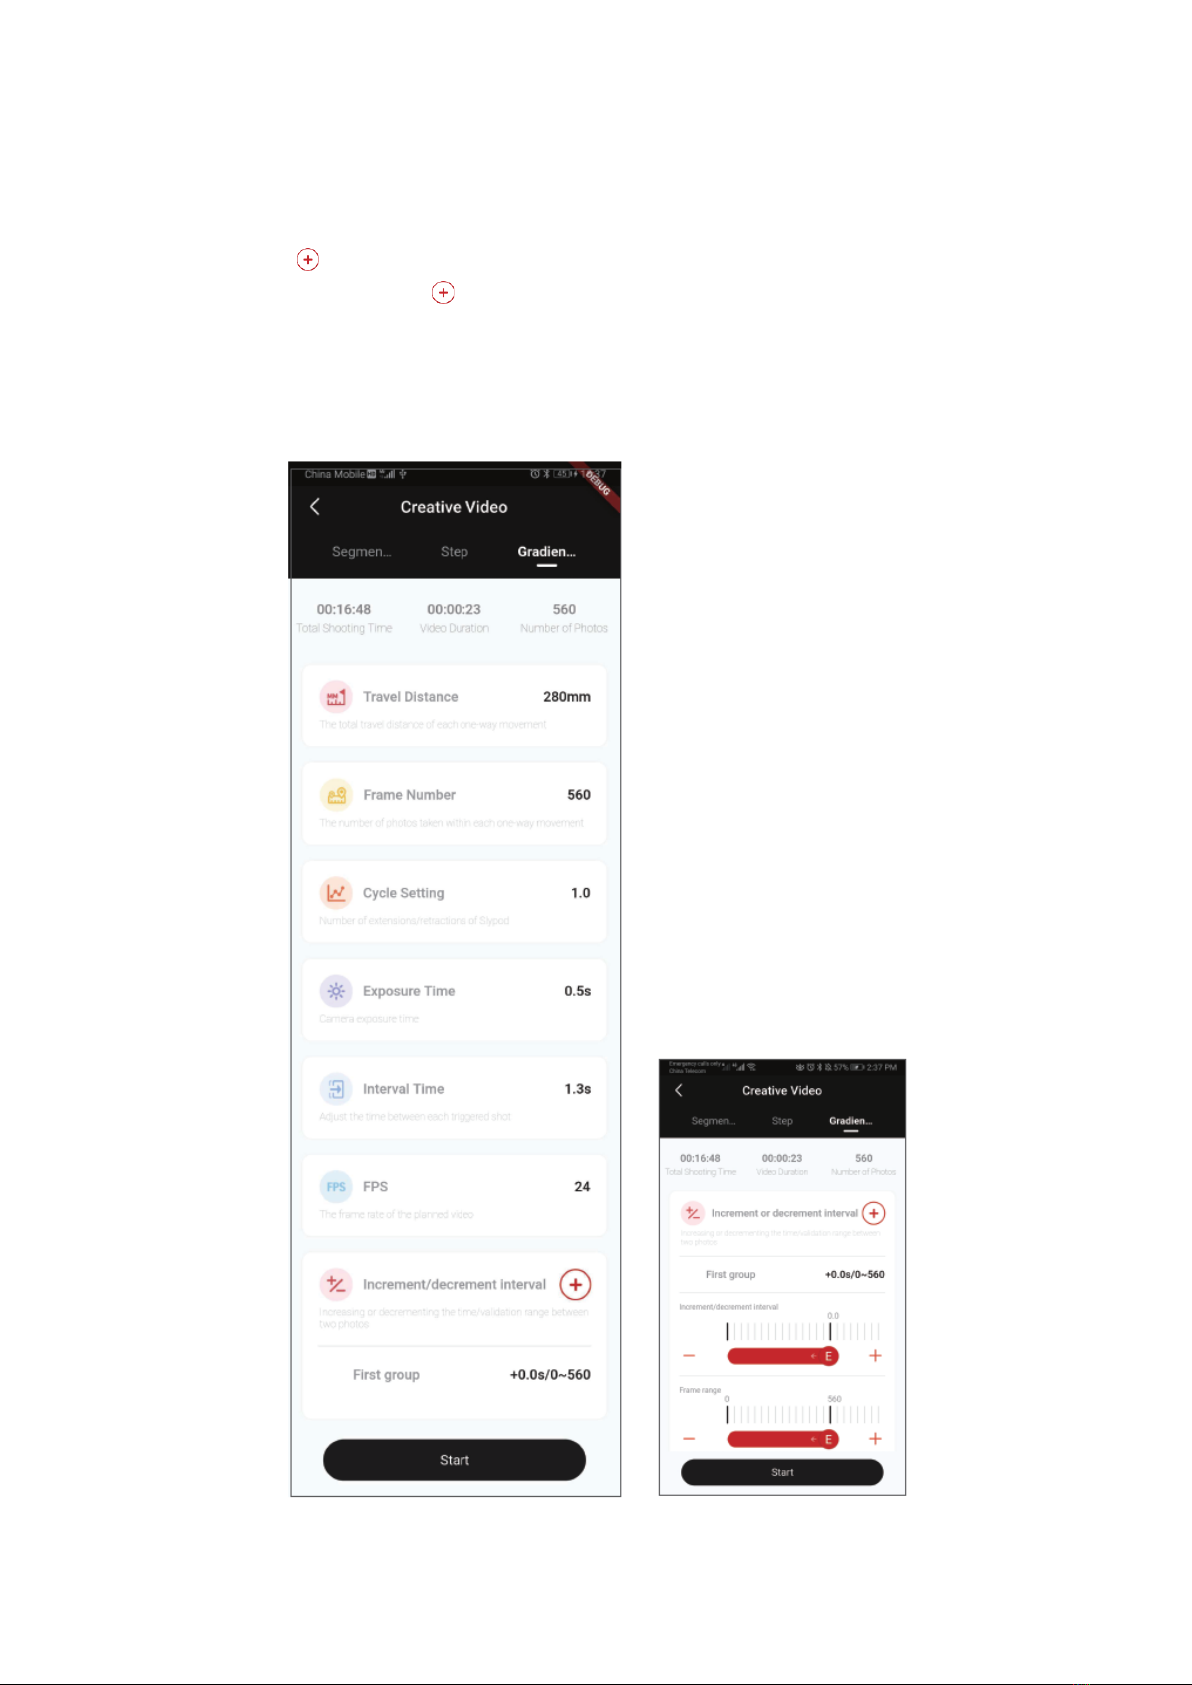
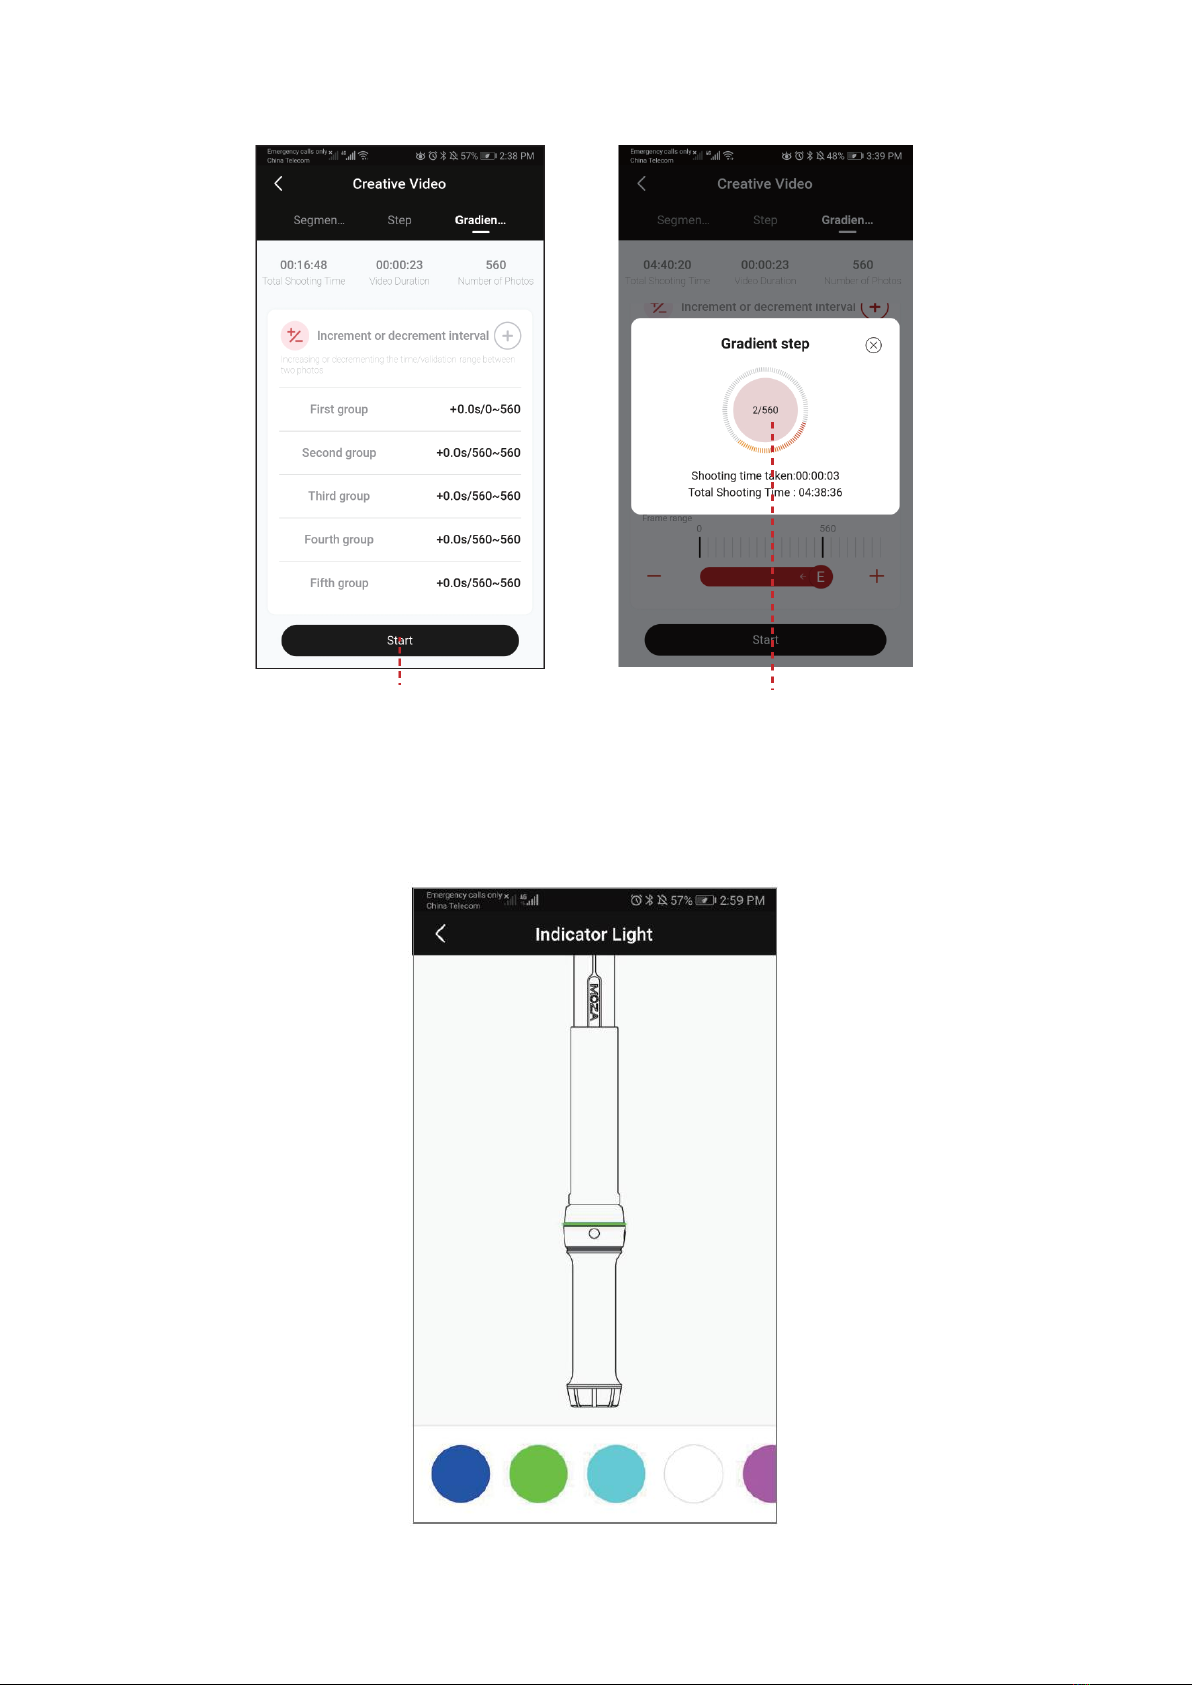
Gradient Step Time-Lapse
Select the gradient Step Time-Lapse and set the travel distance, frame number, cycle
setting, exposure time, interval time, FPS, increment and decrement of interval. For the
first time, click to add the first group of increment or decrement of time and frame
number, and click again the to add a second group (5 groups can be added at most).
Click Start, the device will move according to the settled parameters. The interface will
show the total shooting time, video duration, and the number of photos. During the
shot, click the center red area, the Slypod PRO will control the camera to take photos.
(Slypod PRO and camera need to be connected with camera shutter control cable)
15
Indicator Light Color Setting
Enter the operation interface, select Setting-Indicator Light, up to 5 kinds of indicator
light colors can be set based on personal preference.
Click to start the Gradient Step
Time-lapse
Click to control the camera

16
Firmware Upgrade
Updating the firmware of SLYPOD PRO should be done in the charging state. When in
charging state, turn on the device, connect the SLYPOD PRO to the App, enter the
operation interface and start the firmware upgrade. The SLYPOD PRO must be restarted
after the firmware upgrade succeeds. If the upgrade fails, the process needs to be
repeated until the upgrade succeeds.
Color Definition
Charging
Solid red
Charging completed
Solid blue
Power on
Solid green
Low voltage alarm
Red Light and Green Light on (Solid Orange)
Low voltage alarm
Red light flashing + automatic homing stop (press
the start button, red light flashing, no start)
Charging
Lift the rubber dust cover from the charging port to access a Type-C port. The SLYPOD
PRO can be charged by mobile phone charger, mobile power bank, etc. It will
automatically stop charging when the battery is full. Please disconnect the charger when
the SLYPOD PRO is full. It is recommended to use the original charging cable provided.
Calibration
Calibration is needed when there is abnormality with the movement. There are two
ways to calibrate the SLYPOD PRO: Click all three buttons (power, +, -) at the same time
or enter the operation interface to start calibration in the App. Subscribe Gudsen MOZA
official YouTube channel for the latest tutorials.

17
Slypod PRO
Size
Storage Length: 650mm (Main Body)
Storage Length: 865mm (Main Body and Tripod)
Expanded Length: 1180mm (Main Body and Tripod)
Weight
Main Body: 1460g
PTZ Head: 330g
Tripod: 520g
Payload
Vertical: 6kg
Horizontal: 3.5kg
Operating speed
Highest: 40mm/s
Lowest: 0.5mm/s
Operating Voltage
11.4V~16.8V
Battery Life
90min
Working Temperature
-10°C –50°C
Communication
Interface
Bluetooth
2.4G
Type-C
Battery Model
Lithium-ion Battery
Battery Capacity
2600mAh
Battery Voltage
14.4V
Charging Port
Type-C USB
Charging Voltage
5V 2A/9V 2A/12V 1.5A
Charging Time
4H

18
Warranty Conditions
A new product purchased in the Alza.cz sales network is guaranteed for 2 years. If you
need repair or other services during the warranty period, contact the product seller
directly, you must provide the original proof of purchase with the date of purchase.
The following are considered to be a conflict with the warranty conditions, for
which the claimed claim may not be recognized:
•Using the product for any purpose other than that for which the product is intended
or failing to follow the instructions for maintenance, operation and service of the
product.
•Damage to the product by a natural disaster, the intervention of an unauthorized
person or mechanically through the fault of the buyer (e.g. during transport, cleaning
by inappropriate means, etc.).
•Natural wear and aging of consumables or components during use (such as
batteries, etc.).
•Exposure to adverse external influences, such as sunlight and other radiation or
electromagnetic fields, fluid intrusion, object intrusion, mains overvoltage,
electrostatic discharge voltage (including lightning), faulty supply or input voltage and
inappropriate polarity of this voltage, chemical processes such as used power
supplies, etc.
•If anyone has made modifications, modifications, alterations to the design or
adaptation to change or extend the functions of the product compared to the
purchased design or use of non-original components.
19
EU Declaration of Conformity
Identification data of the manufacturer's / importer's authorized representative:
Importer: Alza.cz a.s.
Registered office: Jankovcova 1522/53, Holešovice, 170 00 Prague 7
IČO: 27082440
Subject of the declaration:
Title: Moza Slypod PRO
Model / Type: Slypod PRO
The above product has been tested in accordance with the standard(s) used to
demonstrate compliance with the essential requirements laid down in the
Directive(s):
Directive No. (EU) 2014/53/EU
Directive No. (EU) 2011/65/EU as amended 2015/863/EU
Prague, 20.09.2021

20
WEEE
This product must not be disposed of as normal household waste in accordance with
the EU Directive on Waste Electrical and Electronic Equipment (WEEE - 2012/19 / EU).
Instead, it shall be returned to the place of purchase or handed over to a public
collection point for the recyclable waste. By ensuring this product is disposed of
correctly, you will help prevent potential negative consequences for the environment
and human health, which could otherwise be caused by inappropriate waste handling of
this product. Contact your local authority or the nearest collection point for further
details. Improper disposal of this type of waste may result in fines in accordance with
national regulations.
Other manuals for SLYPOD PRO
1
Table of contents
Languages:
Popular Telephone Accessories manuals by other brands

Ramsey Electronics
Ramsey Electronics Phone Patch Mixer Kit PPM3 Assembly and instruction manual

Kichler Lighting
Kichler Lighting 82352 Assembly instructions

ASCOM
ASCOM d81 Messenger Configuration manual

Plantronics
Plantronics BLUETOOTH HEADSET 220 SERIES user guide

iiNet
iiNet BOB2 user manual

iCreaton
iCreaton i-400 Product information guide


