MP-Man DAB120 User manual

AC operation
1. Insert the DC power jack of the AC/DC adaptor to the DC input socket located at the back of the unit.
2. Plug the AC/DC Adaptor to the AC mains outlet.
3. Press the STANDBY/ON button on the front panel to turn the radio on.
DC (battery) operation
In DC operation, the STANDBY/ON button will work as a POWER ON/OFF button. The display will be totally off when
the radio is powered off. The display backlight will be dimmed after radio power on, and it will be turned on to full
brightness for 5 seconds on every key press.
1. Ensure the AC/DC adaptor is disconnected from the radio and AC mains.
2. Installed the batteries (4X1.5V UM3/AA battery) into the battery compartment.
3. Press the STANDBY/ON button on the front panel to toggle the radio between on and off.
Note: To obtain the best performance in DC operation, the use of alkaline batteries is highly recommended.
Clock setting
The clock will only set and be updated if you can receive DAB signals in your location. In order for the clock to
synchronise to the current local time you must leave it one DAB station for a short period. Manual clock setting is not
required.
LISTENING TO YO UR RADIO
Hints for better reception
This radio is fitted with a single DAB/FM telescopic antenna, to obtain the best performance, you should fully extend
the antenna and adjust its position as well as the direction until you find the best reception. For ideal DAB reception,
always maintain the antenna in an upright vertical position is highly recommended.
DAB mode
If the radio is powered up and switched on for the first time, it will automatically enter into the DAB mode and perform
auto scan function. During the scan the display will show “Scanning …” together with a slide bar that indicates the
progress of the scan and the amount of stations that have been found so far. (F. 1) (F. 2)
Once the scan has finished, the radio will select the first alphanumerically found station. You can now press the ▲ or
▼ button to explore the found stations and then press the SELECT button to select your station.
SWITCHING YO UR RADIO ON FOR THE FIRST TIME
When the radio is connected to the AC power (via the AC/DC adaptor) for the first time, it will be in standby mode.
The display backlight will be on for a few seconds, the display will first show the greetings and finally the clock. Press
the STANDBY/ON button once to turn the radio on, it will then automatically enter into the DAB mode and perform
auto scan function.
UK-3
UK-2
Simple DAB/FM Digital Radio
INSTRUCTION MANUAL
FEATURES AND CONTROLS
11. ANTENNA
12. VOLUME CONTROL
13. HEADPHONE JACK
14. DC INPUT SOCKET
15. BATTERY DOOR
1. SPEAKER
2. INFO BUTTON
3. MENU BUTTON
4. SELECT BUTTON
5. BUTTON ▼
6. DAB/FM BUTTON
7. LCD DISPLAY
8. PRESET BUTTON
9. STANDBY/ON BUTTON
10. BUTTON
▲
14 15
11
12
13
12
3456
7
8
9
10
UK-1
To achieve the utmost in enjoyment and performance, and in order to become familiar with its features, please read this manual carefully
before attempting to operate the unit.
Important Notes
This safety and operating instruction should be retained for future reference.
The apparatus shall not be exposed to dripping or splashing and no objects filled with liquids, such as vases, shall be placed on
apparatus. Avoid installing the unit in locations described below:
* - Places exposed to direct sunlight or close to heat radiating appliances such as electric heaters,
on top of other stereo equipment that radiate too much heat.
* - Places blocking ventilation or dusty places.
* - Places subject to constant vibration, humid or moist places.
No naked flame sources such as lighted candles should be placed on the unit.
Attention should be drawn to the environmental aspects of battery disposal.
Make sure not to obstruct the ventilation openings, a minimum of 10cm should be kept around the apparatus for ventilation.
The ventilation should not be impeded by covering the ventilation openings with items such as newspaper, table-cloths, curtains,
etc.Use apparatus in moderate climates only.
Operate tuning controls and switches as instructed in the manual.
The normal function of the product may be disturbed by Strong Electro Magnetic Interference. If so, simply reset the product to
resume normal operation by following the instruction manual. In case the function could not resume, please use the product in
other location.
Do not attempt to remove any screws, or open the casing of the unit; there are no user serviceable parts inside, refer all servicing
to qualified service personnel.
CAUTION : TO REDUCE THE RISK OF ELECTRIC SHOCK DO NOT REMOVE COVER(OR BACK), NO USER SERVICEABLE
PARTS INSIDE, REFER SERVICING TO QUALIFIED SERVICE PERSONNEL.
DANGEROUS VOLTAGE
Conductor dangerous voltage, that may be of sufficient magnitude to constitute a risk of electric shock to persons is
present within this product's enclosure.
ATTENTION
The owner's manual contains important operating and maintenance instructions, for your safety, it is necessary to refer
to the manual.
WARN IN G :TO PREVENT FIRE OR SHOCK HAZARD, DO NOT EXPOSE THIS APPLIANCE TO DRIPPING OR SPLASHING .
Note: This unit will become warm when used for a long period of time. This is normal and does not indicate a problem with the
unit.This unit includes micro-processors which may malfunction as a result of external electrical interference/ noise or electrostatic
discharge. If the unit is not working properly, disconnect the power source and then reconnect it.
The AC/DC adaptor is used as the disconnect device. It shall remain readily operable and should not be obstructed during intended use.
To be completely disconnected the apparatus from supply mains, the AC/DC adaptor of the apparatus shall be disconnected from the
mains socket outlet completely.
DAB120

UK-4
UK-5
UK-6
UK-7
F4
Note: If there is no stations found after auto scan, the radio will then enter into the Tune Select Menu, you can now
press the ▲ / ▼ buttons followed by pressing the SELECT button to select “Manual tune” or “Autoscan” for stations.
DAB auto scan
The auto scan will search for the entire DAB Band III channels. After the scan has finished, the first alphanumerically
found station will be automatically selected.
1. To activate auto scan, first press the MENU button to enter into the Tune Select Menu and then press the ▲ or
▼ button to select “Autoscan”, finally press the SELECT button to confirm, the display will show “Scanning …”
and a progressing slide bar. (F. 3)
2. All the stations that have been found will be stored automatically, to explore the stations that have been found,
press the ▲ or ▼ buttons and when you find a station that you would like to listen to, press the SELECT button.
DAB manual tune
1. To select manual tune, first press the MENU button to enter into the Tune Select Menu, then press the SELECT
button to select “Manual tune”. (F. 4)
2. Press the ▲ or ▼ button to move through the DAB channels, the display will show “5A to 13F” and their
associated frequencies. (F. 5)
3. When your desired frequency appears in the display, press the SELECT button to confirm. The name of the
station group (ensemble/multiplex) will be displayed.
4. To listen to the station selected, press the SELECT button again.
FA C TO R Y RESET
When you move the radio to another part of the country, your pre-tuned and stored DAB stations may no longer be
available. If this is the case then you will need to reset your radio back to its original factory settings; to perform a
factory reset, please do the following:
1. Connect the radio to AC mains (via the AC/DC adaptor), then press the STANDBY/ON button to turn the radio on.
2. Press and hold the MENU button until the display shows “Press SELECT to confirm reset”.
3. Release the MENU button and press the SELECT button once, the display will first show “Restarting …” and
after the reset is completed, the radio will go to standby.
4. Press the STANDBY/ON button to turn the radio on again, it will then automatically enter into the DAB mode and
perform auto scan function. After the scan has finished, the radio will select and display the first
alphanumerically found station.
Note: All of your stored DAB & FM presets will be lost once the reset has taken place.
HEADPHONE JACK
A 3.5mm type headphone jack is located at the right side of the unit. Connect a set of headphones (not included) to
this jack for private listening without disturbing others. The speaker is automatically disconnected when the
headphones are in use.
IMPORTANT: When using headphones always set the volume to a low level before you put the headphones on.
Then insert the headphones and gradually increase the volume to a comfortable listening level.
SPECIFICATION
***SPECIFICATION SUBJECT TO CHANGE WITHOUT FURTHER NOTICE.
POWER SUPPLY : AC/DC ADAPTOR INPUT: 230V~50Hz OUTPUT: 5.5V 0.9A
DC(BATTERY) 6V 1.5V(UM3) x 4
OUTPUT POWER : 1.0 W
FREQUENCY RANGE : DAB 174 - 240 MHz
FM 87.5 - 108 MHz
UNIT DIMENSION : 205 (L) x 46.2 (W) x 105 (H) mm
WEIGHT: 0.85kg
FM radio
1. To select FM, press the DAB/FM button, the display will show FM and the frequency.
2. To activate auto search, press and hold the ▲ or ▼ button until it starts to scan the frequency band, the display
will show “Searching … > .” or “Searching … < .”, and it will stop automatically once a station has been found.
(F. 6)(F. 7)
3. To activate manual search, repeatedly press the ▲ or ▼ button.
4. To select audio mode, press the SELECT button to toggle between the “Auto” or “Mono” selection.
Note: The radio will automatically switch between stereo and mono mode, but you can override this and switch this
function manually which is helpful for poor signal reception.
STORING AND RECALLING STORED S TAT I ONS
In either DAB or FM mode, you can store up to 10 stations to the favourite presets; this will enable you to get direct
access to your favourite stations.
1. To store a preset, first tune to your desired station, then press and hold the PRESET button, the display will
show “Empty preset 1”, and the preset number will flash. (F. 8)
2. Press the ▲ or ▼ button to select your desired station preset number.
3. Press the SELECT to confirm your selection, the display will show “Preset # saved” (F. 9)
4. To recall a preset station, first press the PRESET button once, then press the ▲ or ▼ button to scroll up or
down the presets that you have stored. When the display shows your desired preset number, release the
buttons. If the preset hasn't been allocated a station, the display will show “Empty preset #”.
DAB secondary services
On some occasions you will see a “>” symbol directly after the name of the station, this indicates that there are
secondary services available to that station. These secondary services contain extra services that relate to the
primary station. E.g. a sports station may want to add extra commentaries. The secondary services are inserted
directly after the primary station.
DAB display modes
Every time you press the INFO button, the display will cycle through the following display modes:
Time and date
The time and date will be automatically updated by the broadcasted information; it is no need to set the clock
manually. In the unlikely event that no clock information is received, the display will show “<TIME/DATE>”.
Frequency
The frequency of the present station will be displayed.
Audio bit rate
The display will show the digital audio bit rate being received.
Signal strength
The display will show a slide bar to indicate the signal strength, the stronger the signal, the longer the bar will be from
left to right.
DLS
DLS stands for Dynamic Label Segment which is a scrolling message that the broadcaster may include in their
transmissions. The message usually includes information such as programme details …etc.
Programme type
This describes the style of the programme that is being broadcast. If the information is not available, the display will
show “<Programme Type>”.
Ensemble/Multiplex (Group name)
The Ensemble/Multiplex is a collection of radio stations that are bundled and transmitted together in a single
frequency. There are national and local multiplexes, local ones contain stations that are specific to that area.
Note: Press and hold the INFO button for longer than 2 seconds, the software version number will be displayed.
F3
F6
F1 F2
F8
F7
Ensemble/Multiplex(Group name)
Time/Date Signal strength
DLS
Audio Bit Rate
Programme Typ e
Frequency
F5
F9

Radio numérique DAB/FM simple
MODE D'EMPLOI
CONSIGNES DE SÉCURITÉ
Lisez soigneusement ce mode d’emploi avant d’utiliser cet appareil afin de vous familiariser avec ses fonctionnalités et de profiter au
maximum de toutes ses performances. Remarques importantes
Ces instructions d’utilisation et de sécurité doivent être conservées pour pouvoir les consulter ultérieurement. L’appareil ne doit pas être
exposé au ruissellement ni aux éclaboussures, évitez de poser des objets remplis de liquide, tels que des vases, sur cet appareil. Évitez de
mettre l’appareil dans les endroits décrits ci-dessous :
* - des endroits exposés aux rayons directs du soleil ou près d’appareil de chauffage tel qu’un radiateur électrique, au dessus d’un autre
appareil stéréo qui dégage beaucoup de chaleur.
* - des endroits qui bloquent la ventilation ou poussiéreux.
* - des endroits soumis à une vibration permanente.
Ne déposez pas sur l’appareil des sources de flamme nue telles que des chandelles allumées.
Lors de l’élimination des piles usagées, il faut tenir compte de la protection de l’environnement.
Veillez à ne pas obstruer les fentes de ventilation ; laissez un minimum de 10 cm d’espace libre autour de l’appareil pour sa bonne
ventilation.
Pour ne pas gêner la ventilation, les fentes de ventilation ne doivent pas être couvertes par des objets tels que des journaux, nappes de
table, rideaux, etc.
Suivez les instructions du mode d’emploi lors de l’utilisation des commandes et des commutateurs.
Avant d’utiliser l’appareil pour la première fois, assurez-vous que le cordon d’alimentation électrique est bien raccordé.
La fiche d’alimentation est utilisée comme dispositif de débranchement de l’appareil, elle doit rester facilement accessible. Pour un
débranchement total de l’appareil, débranchez la fiche de l’appareil de la prise de courant électrique.
Le fonctionnement normal de l’appareil peut être empêché par des interférences électromagnétiques fortes. Dans ce cas, réinitialisez
simplement l’appareil pour reprendre son utilisation normale en suivant les instructions du mode d'emploi. Si le fonctionnement n’a pas lieu,
déplacez l’appareil vers un autre endroit.
Ne retirez aucune des vis et n’ouvrez pas le boîtier de l’appareil, car aucune pièce contenue à l’intérieur ne peut être réparée par l’utilisateur ;
confiez toute réparation à un personnel qualifié. ATTENTION
RISQUE
D’ÉLECTROCUTION
ATTENTION : AFIN DE RÉDUIRE LES RISQUES D'ÉLECTROCUTION, N’ENLEVEZ PAS LE COUVERCLE (OU LE PANNEAU ARRIÈRE).
NE CONTIENT AUCUNE PIECE RÉPARABLE PAR L’UTILISATEUR. CONFIEZ TOUTE RÉPARATION À UN PERSONNEL QUALIFIÉ.
TENSION DANGEREUSE
Présence d’un voltage dangereux non isolé dans l’enceinte de cet appareil d’une magnitude pouvant constituer un risque
d’électrocution.
ATTENTION
Le manuel renferme des directives de fonctionnement et d’entretien importantes ; pour votre sécurité, il est nécessaire de vous
référer à ce mode d’emploi.
AVERTISSEMENT : AFIN DE RÉDUIRE LES RISQUES D’INCENDIE OU D’ÉLECTROCUTION, NE PAS EXPOSER CET APPAREIL AU
RUISSELLEMENT OU AUX ÉCLABOUSSURES.
Remarque : l’appareil devient chaud lorsqu’il est utilisé pendant une période prolongée. Ceci est normal et ne signifie pas un problème de
fonctionnement de l’appareil. Cet appareil renferme des microprocesseurs qui pourraient mal fonctionner en cas d’interférences électriques
ou de décharges électrostatiques externes. Si l’appareil ne fonctionne pas correctement, débranchez-le de la prise d’alimentation puis
rebranchez-le.
FONCTIONS ET COMMANDES
1. HAUT-PARLEUR 6. TOUCHE DAB/FM 11. ANTENNE TIGE
2. TOUCHE INFO 7. ÉCRAN LCD 12. COMMANDE DU VOLUME
3. TOUCHE MENU 8. TOUCHE DE RÉINITIALISATION 13. PRISE POUR CASQUE D’ÉCOUTE
4. TOUCHE SELECT 9. Touche STANDBY/ON (veille/marche) 14. PRISE ALIMENTATION CC
5. TOUCHE 10. TOUCHE 15. COMPARTIMENT DES PILES
MISE EN MARCHE DE LA RADIO POUR LA PREMIÈRE FOIS
Lorsque la radio est mise sous tension (CA ou CC) pour la première fois, elle est en mode de veille. L’éclairage de fond de
l’afficheur s’active pendant quelques secondes, laissant ainsi apparaître la phrase de bienvenue et enfin l’horloge. Appuyez sur
STANDBY/ON pour allumer la radio, le mode DAB est automatiquement sélectionné et la radio effectue une recherche
automatique.
Utilisation en CA (secteur)
1. Branchez la fiche CC de l’adaptateur pile/secteur (CA/CC) à la prise CC située au dos de l’appareil.
2. Raccordez l’adaptateur pile/secteur au secteur.
3. Allumez l’appareil en appuyant sur la touche STANDBY/ON située sur le panneau frontal.
Utilisation en CC (piles)
En mode CC, la touche STANDBY/ON se comporte comme un interrupteur MARCHE/ARRET. L’afficheur s’éteint
complètement lorsque la radio est mise hors tension. À la mise en marche de la radio, l’éclairage de fond s’éteint puis
s’illumine au maximum pendant cinq secondes à chaque pression de touche.
1. Assurez-vous que l’adaptateur CA/CC n’est pas branché à la radio.
2. Installez les piles (4x1.5V UM3/AA) dans le compartiment des piles.
3. Appuyez sur STANDBY/ON située sur le panneau frontal pour allumer ou éteindre la radio.
Remarque : pour obtenir les meilleures performances en mode CC, l’utilisation de piles alcalines est fortement recommandée.
Réglage de l’heure
L’heure est réglée est actualisée automatiquement en cas de réception de signaux DAB dans votre localité. Mettez la radio
sur une station DAB pendant un court laps de temps afin que l’horloge se synchronise avec l’heure courante locale. Le
réglage manuel de l’heure n’est pas nécessaire.
ÉCOUTER LA RADIO
Conseils pour une meilleure réception
La radio est équipée d’une seule antenne télescopique DAB/FM. Pour obtenir la meilleure réception possible, déployez
totalement l’antenne et orientez-la jusqu’à obtenir la meilleure réception. Pour une réception DAB optimale, il est fortement
recommandé de garder l’antenne dressée en position verticale.
Mode DAB
Lorsque la radio est allumée pour la première fois, le mode DAB est automatiquement sélectionné et la radio effectue une
recherche automatique. Pendant la syntonisation, l’écran affiche «Scanning…» (syntonisation) ainsi qu’une barre de
progression de la recherche et le nombre de stations trouvées jusque-là. (F. 1) (F. 2)
Au terme de la recherche automatique, la première station dans l’ordre alphanumérique est restituée. Appuyez maintenant
VXUODWRXFKHŸRXźSRXUGpFRXYULUOHVVWDWLRQVQXPpULTXHVWURuvées puis sur SELECT pour en sélectionner une.
FR-2
FR-1 FR-3

Remarque : Si aucune station n’est trouvée après la recherche automatique, la radio passe alors au Tune Select menu (menu de
VpOHFWLRQGHODV\QWRQLVDWLRQDSSX\H]VXUOHVWRXFKHVŸźSuis sur SELECT pour choisir entre «Manual tune» (syntonisation
manuelle) ou «Autoscan» (recherche automatique) des stations.
Recherche automatique avec DAB
La recherche automatique s’effectue pour l’ensemble des canaux DAB en bande III. Au terme de la recherche, la première station dans
l’ordre alphanumérique est automatiquement sélectionnée.
1. Pour activer la syntonisation automatique, appuyez d’abord sur la touche MENU pour accéder au menu de sélection de la
syntonisation (TXQH6HOHFW0HQXSXLVVXUODWRXFKHŸRXźSRXUVpOHFWLRQQHU©$XWRVFDQªHQILQDSSX\H]VXUODWRXFKHSELECT
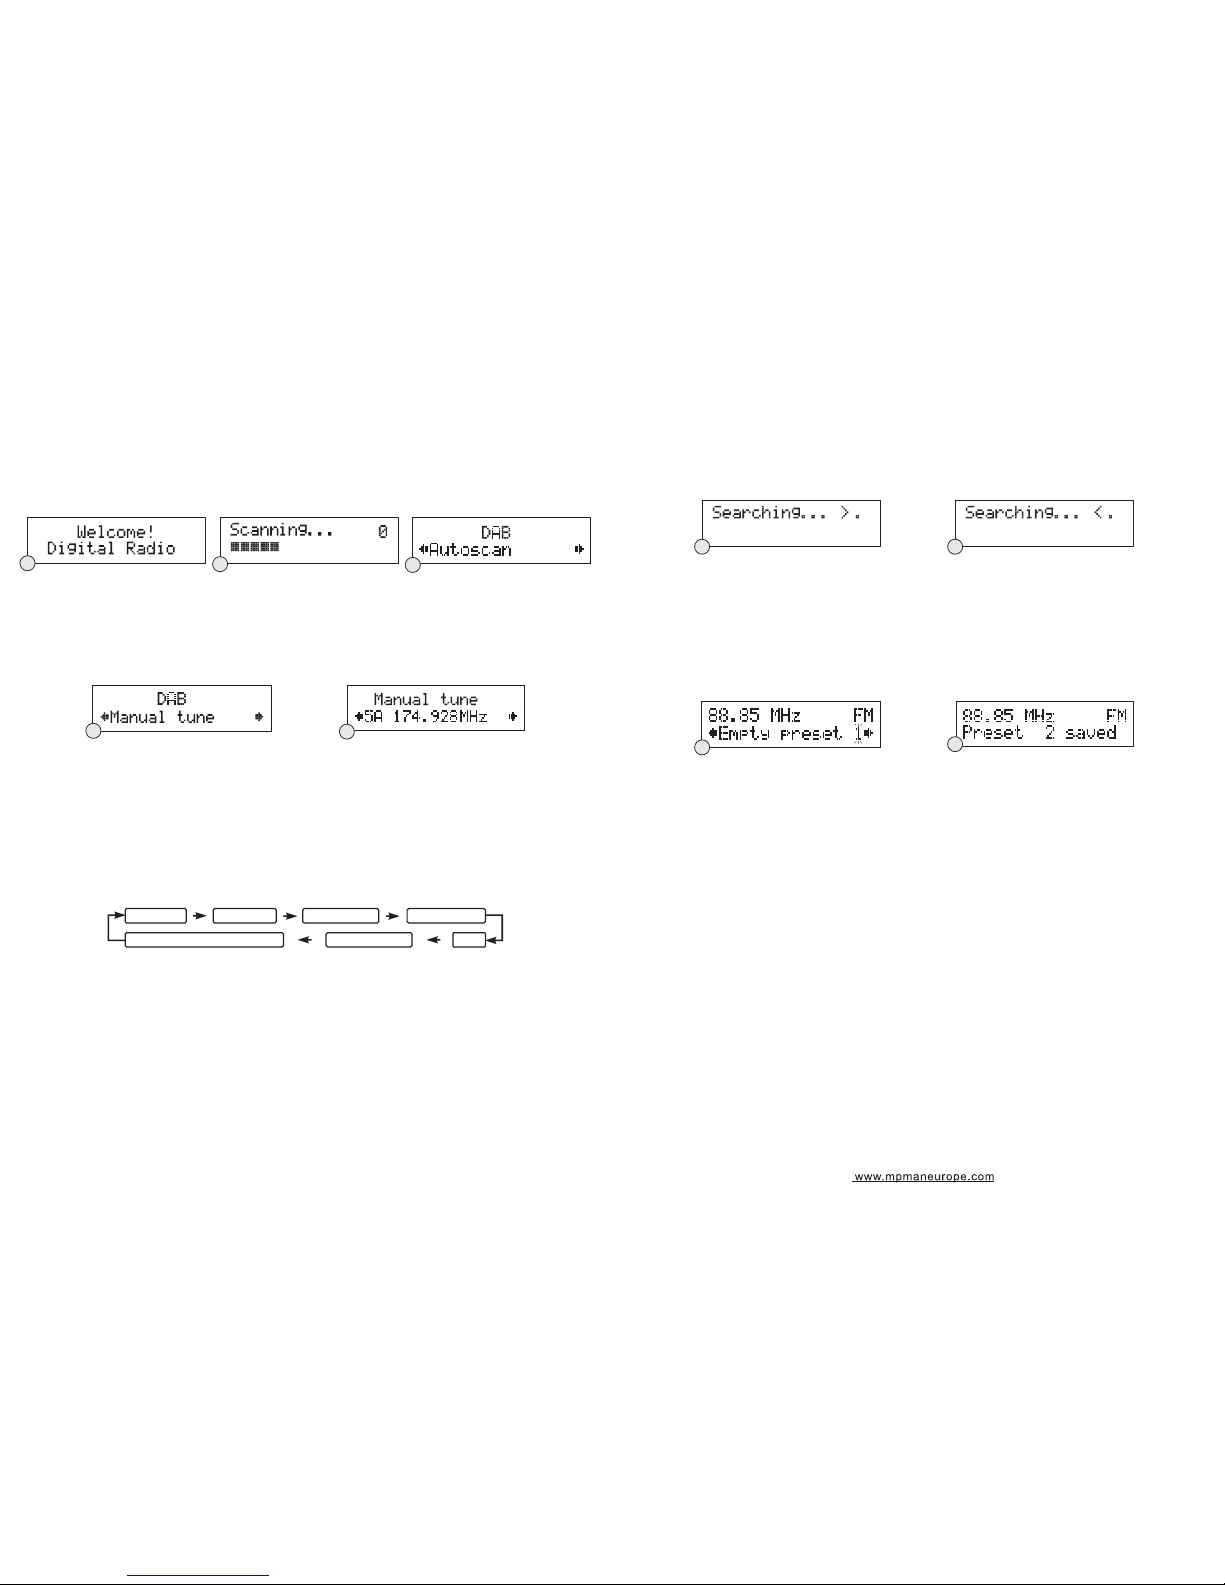
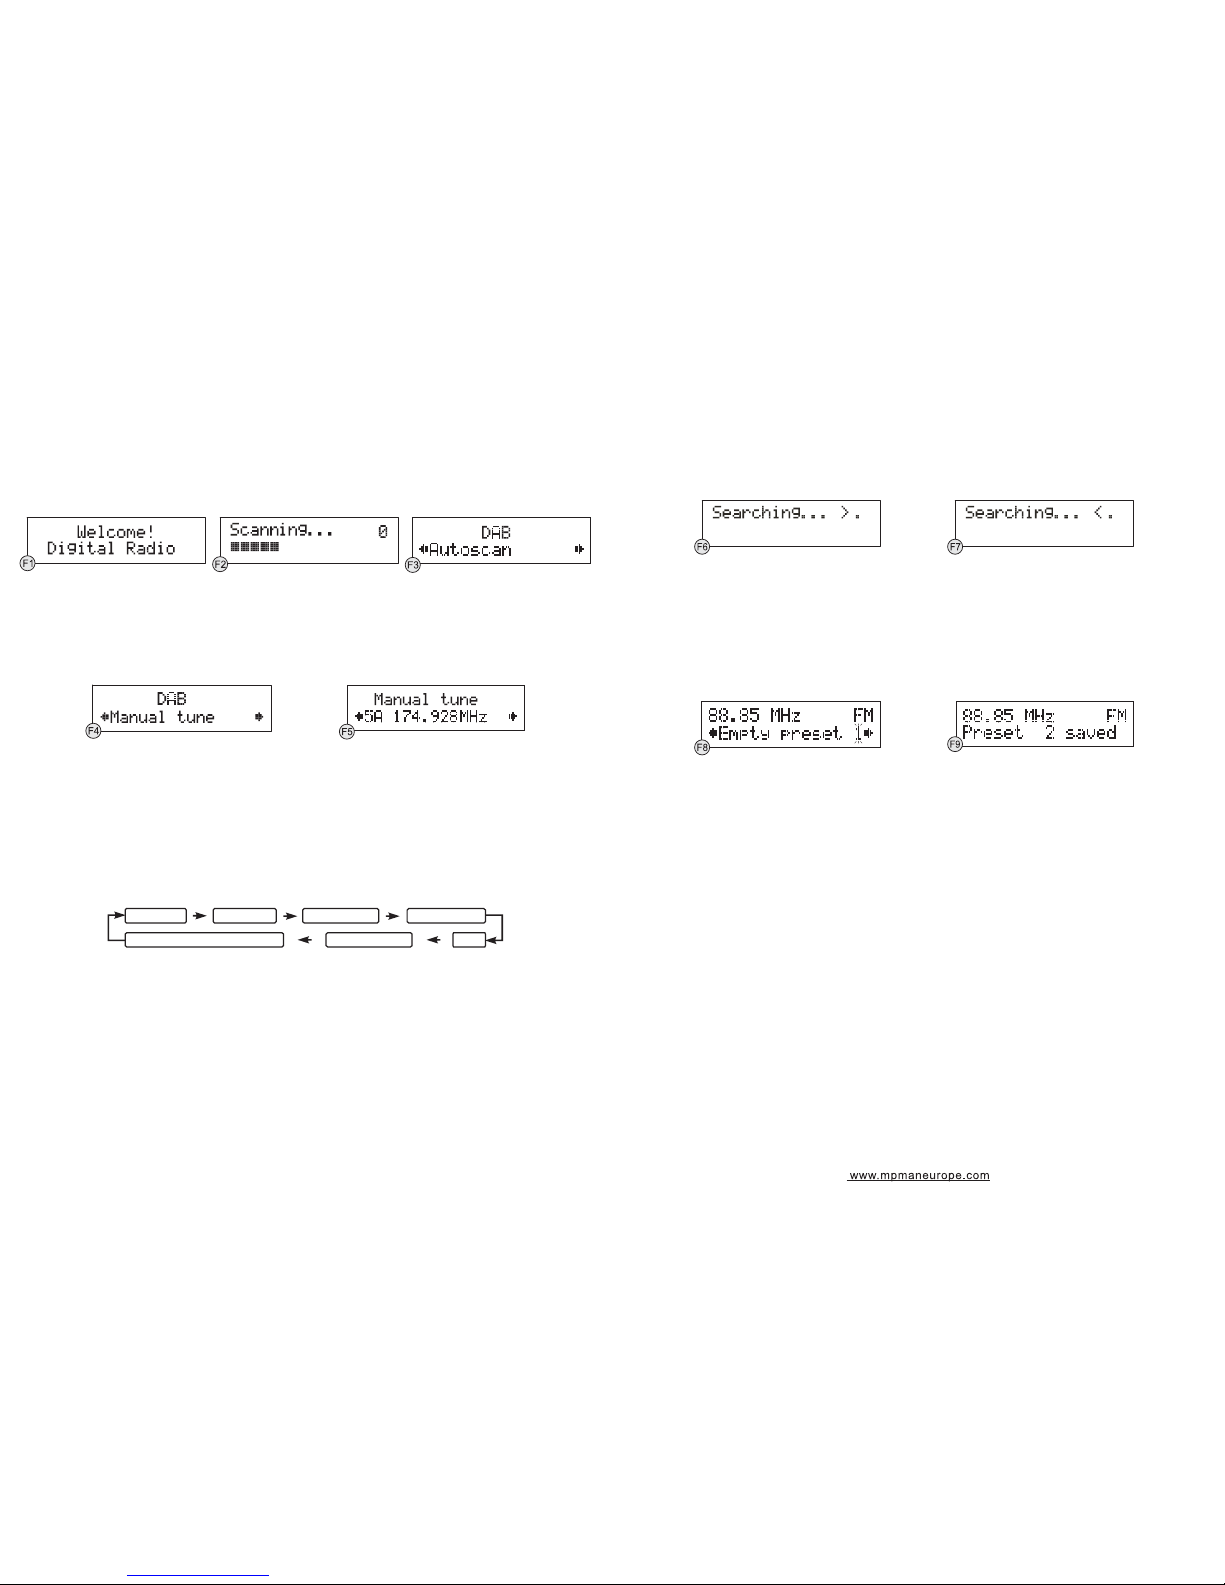
pour valider, l’écran affiche alors «Scanning…» ainsi que la barre de progression de la recherche. (F. 3)
2. Toutes les stations trouvées seront mémorisées automatiquement ; pour les explorerDSSX\H]VXUODWRXFKHŸRXźSXLVVXUOD
touche SELECT pour écouter l’une d’elles.
Syntonisation manuelle avec DAB
1. Pour sélectionner la syntonisation manuelle, appuyez d’abord sur MENU pour accéder au menu de sélection de la syntonisation puis
sur SELECT afin de choisir «Manual tune». (F. 4)
2. $SSX\H]VXUODWRXFKHŸRXźSRXUH[SORUHUOHVVWDWLRQV'$%WURXYpHVO¶pFUDQDffiche alors «5A to 13F» et leurs fréquences. (F. 5)
3. Lorsque la fréquence voulue apparaît à l’écran, appuyez sur la touche SELECT pour confirmer. Le nom du groupe de stations
HQVHPEOHPXOWLSOH[V¶Dffiche alors à l’écran.
4. Appuyez à nouveau sur la touche SELECT pour écouter la station choisie.
Services supplémentaires DAB
Parfois le symbole «>» apparaît à côté du nom d’une station, ceci indique que la station radio offre des services supplémentaires. Ces
services supplémentaires contiennent des services relatifs à la station primaire. Ex. : une radio de sports pourrait vouloir ajouter des
informations supplémentaires. Les services secondaires sont insérés directement après la station primaire.
Mode d’affichage DAB
À chaque fois que vous appuyez sur la touche INFO, l’affichage effectue le cycle des modes d’affichage suivants :
Date et heure
La date est l’heure seront automatiquement mises à jour par les informations de l’émission ; vous n’aurez pas besoin de régler l’heure
manuellement. Dans l’éventualité peu probable où aucune informaWLRQVXUODGDWHHWO¶KHXUHQ¶HVWUHoXHOHPHVVDJH©7,0('ATE>»
sera affiché.
Fréquence
La fréquence de la station courante sera affichée.
Taux binaire audio
L’écran affichera le taux binaire audio de la station reçue.
Puissance du signal
Une barre sera affichée montrant la puissance du signal ; plus le signal est fort, plus la barre s’allonge de la gauche vers la droite.
DLS
DLS est l’acronyme de Dynamic Label Segment qui sont des messages défilants reçus avec l’émission. Généralement, ces messages
comprennent des informations sur les programmes, etc.
Type de programme
Il décrit le style de programme en cours d’émission. Si aucune information n’est disponible, le message «Programme Type» sera affiché.
Ensemble/Multiplex (nom du groupe)
8Q(QVHPEOH0XOWLSOH[HVWXQHQVHPEOHGHVWDWLRQVUDGLRUHJURXSées et retransmises sous la même fréquence. Il y a des multiplexes
nationaux et locaux, ces derniers contiennent des stations qui sont spécifiques à la zone.
Remarque : Le numéro de version du logiciel s’affiche en maintenant la touche INFO enfoncée plus de deux secondes.
KHXUHGDWH
(QVHPEOH0XOWLSOH[QRPGXJURXSH
fréquence
type de programme DLS
taux binaire audio puissance du signal
Radio FM
1. Pour sélectionner le mode FM, appuyez sur la touche DAB/FM, FM et la fréquence s’affichent alors à l’écran.
2. 0DLQWHQH]HQIRQFpHODWRXFKHŸRXźMXVTX¶DXGpPDUUDJHGHODV\QWRQLVDWLRQDXWRPDWLTXH©6HDUFKLQJ«!ªRX©6HDUFKLQJ«ª
s’affiche alors à l’écran et s’arrête dès qu’une station est trouvée. (F. 6) (F. 7)
3. 8WLOLVH]ODWRXFKHŸRXźSRXUIDLUHXQHUHFKHUFKHPDQXHOOH
4. Pour sélectionner le mode audio, appuyez sur la touche SELECT pour basculer entre «Auto» et «Mono».
Remarque : la radio bascule automatiquement entre le mode stéréo et mono, mais vous pouvez passer outre et basculer manuellement
surtout lorsque le signal est trop faible.
MÉMORISATION ET RAPPELS DES STATIONS MÉMORISÉES
En mode DAB ou FM, vous pouvez mémoriser jusqu’à 10 stations favorites et pouvoir leur accéder directement.
1. Pour mémoriser une station, il faut tout d’abord se syntoniser à une station, puis maintenir enfoncée la touche PRESET jusqu’à ce
que «Empty preset 1» s’affiche et le numéro de mémoire clignote. (F. 8)
2. $SSX\H]VXUODWRXFKHŸRXźSRXUVpOHFWLRQQHUOHQXPpURGHODVWDWLRQPpPRULVpHYRXOXH
3. Appuyez sur SELECT pour confirmer votre sélection, «Preset # saved» apparaît alors à l’écran (F.9)
4. Pour rappeler une station mémorisée, appuyez tout d’abord sur la touche PRESET, puis déroulez vers le haut ou le bas la liste des
VWDWLRQVPpPRULVpHVHQPDLQWHQDQWHQIRQFpHODWRXFKHŸRXź5Hlâchez la touche dès que le numéro de mémoire désiré apparaît
à l’écran. Si un numéro de mémoire n’est pas affecté à une station, le message “Empty preset #” s’affiche alors à l’écran.
RESTAURATION DES PARAMÈTRES D’USINE
Lorsque vous déplacez la radio dans une autre zone du pays, les stations DAB syntonisées et mémorisées peuvent ne pas être captées.
Dans ce cas, vous devez restaurer les paramètres radio à leurs valeurs d’usine en suivant la procédure suivante :
1. %UDQFKH]ODUDGLRDXVHFWHXUYLDO¶DGDSWDWHXU&$&&SXLVDSSX\H]VXUODWRXFKHSTANDBY/ON pour allumer l’appareil.
2. Maintenez enfoncée la touche MENU jusqu’à l’apparition du message «Press SELECT to confirm reset» (appuyez sur SELECT pour
confirmer la réinitialisation).
3. 5HOkFKH]ODWRXFKHHWDSSX\H]VXUSELECT, l’écran afILFKHDORUV©5HVWDUWLQJ«ªUHGpPDUUDJHXQHIRLVODUpLQLWLDOLVDWLRQWHUPLQpH
la radio passe en mode de veille.
4. Appuyez sur STANDBY/ON pour rallumer la radio, le mode DAB est automatiquement sélectionné et la radio effectue une recherche
automatique. Au terme de la recherche automatique, la première station dans l’ordre alphanumérique est restituée.
Remarque : Toutes les stations DAB et FM mémorisées seront perdues une fois la réinitialisation du système effectuée.
PRISE POUR CASQUE D’ÉCOUTE
Une prise pour casque d’écoute 3,5 mm est située sur le côté droit de l’appareil. Branchez le casque d’écoute (non fourni) à cette prise
pour écouter sans déranger les autres. Le haut-parleur est déconnecté automatiquement lorsque le casque d’écoute est branché.
IMPORTANT : Baissez le volume avant d’utiliser le casque d’écoute. Puis, mettez le casque en élevant graduellement le volume jusqu’à
un niveau sonore agréable.
CARACTERISTIQUES
ALIMENTA7,21(/(&75,48( ADAPTA7(85&$&&(175e(9a+]6257,(9$
&&3,/(69980[
PUISSANCE DE SO5TIE : 1,0 W
%$1'('()5e48(1&(6 '$%0+]
)00+]
DIMENSIONS DE L’APP$5(,L : /îO[+PP
POIDS : 0,85 kg
***LES CARACTERISTIQUES TECHNIQUES SONT SUSCEPTIBLES D’ÊTRE MODIFIÉES SANS PRÉAVIS.
)5 )5
)5)5

Einfaches DAB/FM-Digitalradio
BEDIENUNGSANLEITUNG
ACHTUNG
GEFAHR DURCH
ELEKTRISCHEN SCHLAG
FUNKTIONEN UND BEDIENELEMENTE
ERSTMALIGES EINSCHALTEN IHRES RADIOS
Wenn Sie das Radio zum ersten Mal an den Strom anschließen (über den Netzadapter), befindet es sich im Standby-Modus.
Die Anzeige leuchtet für einige Sekunden auf; es wird erst die Begrüßung, dann die Uhrzeit angezeigt. Schalten Sie das Radio
mit der STANDBY/EIN-Taste an; es wechselt dann automatisch in den DAB-Modus und führt einen automatischen Suchlauf aus.
SICHERHEITSMASSNAHMEN
Um sich mit allen Funktionen vertraut zu machen und die bestmögliche Leistung zu erzielen, lesen Sie bitte dieses Handbuch sorgfältig,
bevor Sie das Gerät in Betrieb nehmen. Wichtige Hinweise
Heben Sie diese Sicherheits- und Bedienungshinweise zur Information auf. Das Gerät darf keinem Tropf- oder Spritzwasser ausgesetzt
werden, und es sollten keine mit Flüssigkeiten gefüllten Objekte wie Vasen auf das Gerät gestellt werden. Platzieren Sie das Gerät nicht an
den folgenden Orten:
* - Orte mit direktem Sonnenlicht oder in der Nähe von Wärme abstrahlenden Geräten wie elektrischen Heizungen, oder auf anderen
Stereoanlagen, die zu viel Wärme abstrahlen.
* - Orte mit schlechter Belüftung oder staubige Orte.
* - Orte, die ständigen Vibrationen unterliegen sowie feuchte oder nasse Orte.
Stellen Sie keine offenen Flammen wie brennende Kerzen auf das Gerät.
Achten Sie auf eine umweltfreundliche Entsorgung von Batterien und Akkus.
Verdecken Sie nie die Lüftungsschlitze; lassen Sie um das Gerät herum einen Mindestabstand von 10 cm zur Belüftung frei.
Die Belüftung sollte nicht durch Verdecken der Lüftungsschlitze mit Gegenständen wie Zeitungen, Tischdecken, Vorhängen usw. behindert
werden.
Bedienen Sie die Drehknöpfe und Schalter wie im Handbuch beschrieben.
Überprüfen Sie vor dem ersten Einschalten des Geräts, ob das Netzkabel richtig angesteckt ist.
Mit dem Netzstecker trennen Sie das Gerät vom Strom; er sollte immer betriebsbereit sein. Um das Gerät vollständig vom Strom zu trennen,
müssen Sie den Netzstecker des Geräts vom Stromnetz trennen.
Starke elektromagnetische Interferenzen können die normale Funktionsweise des Geräts stören. In diesem Fall folgen Sie bitte der Anleitung
und setzen das Gerät auf die Werkseinstellungen zurück. Funktioniert das Gerät dennoch nicht wieder normal, nutzen Sie es bitte an einem
anderen Standort.
Versuchen Sie nie, Schrauben zu lösen oder das Gehäuse des Geräts zu öffnen; es gibt keine vom Benutzer zu wartenden Teile im Inneren;
überlassen Sie sämtliche Wartungsarbeiten qualifiziertem Fachpersonal.
ACHTUNG: UM DIE GEFAHR EINES ELEKTRISCHEN SCHLAGS ZU MINIMIEREN, ENTFERNEN SIE NIE DAS GEHÄUSE (ODER DIE
RÜCKSEITE); ES BEFINDEN SICH KEINE VOM BENUTZER ZU WARTENDEN TEILE IM INNEREN; ÜBERLASSEN SIE WARTUNG-
SARBEITEN QUALIFIZIERTEM FACHPERSONAL.
GEFÄHRLICHE SPANNUNG
Innerhalb des Gehäuses dieses Geräts besteht eine gefährliche leitende Spannung, die stark genug sein kann, um Personen
durch einen elektrischen Schlag zu gefährden.
ACHTUNG
Die Bedienungsanleitung enthält wichtige Bedienungs- und Wartungshinweise für Ihre Sicherheit; bitte lesen Sie diese
Anleitung unbedingt durch.
WARNUNG: UM FEUER ODER STROMSCHLÄGE ZU VERMEIDEN, SETZEN SIE DIESES GERÄT KEINEM TROPF- ODER SPRITZWASSER AUS.
Hinweis: Dieses Gerät wird bei Verwendung über einen längeren Zeitraum warm. Das ist normal und kein Anzeichen für ein Problem mit
dem Gerät. Das Gerät enthält Mikroprozessoren, die infolge von äußeren elektrischen Interferenzen / Rauschen oder elektrostatischer
Entladung Fehlfunktionen aufweisen können. Wenn das Gerät nicht ordnungsgemäß funktioniert, ziehen Sie den Netzstecker und schließen
Sie ihn erneut an.
1. LAUTSPRECHER 6. DAB/FM-TASTE 11. ANTENNE
2. INFO-TASTE 7. LCD-ANZEIGE 12. LAUTSTÄRKEREGLER
3. MENÜ-TASTE 8. FAVORITEN-TASTE 13. KOPFHÖRERANSCHLUSS
4. AUSWAHL-TASTE 9. STANDBY/EIN-TASTE 14. GLEICHSTROM-EINGANGSBUCHSE
ź7$67(Ÿ7$67( 15. BATTERIEABDECKUNG
Nutzung mit Wechselstrom
1. Stecken Sie den Gleichstromstecker des Netzadapters in die Gleichstrom-Eingangsbuchse auf der Rückseite des Geräts.
2. Stecken Sie den Netzadapter in die Wechselstromsteckdose.
3. Drücken Sie die STANDBY/EIN-Taste vorne am Gerät, um das Radio einzuschalten.
Batteriebetrieb (Gleichstrom)
Im Batteriebetrieb dient die STANDBY/EIN-Taste als EIN-/AUS-Taste. Die Anzeige wird komplett ausgeschaltet, wenn das
Radio ausgeschaltet wird. Die Beleuchtung der Anzeige wird nach dem Einschalten des Radios abgedunkelt; bei jedem
Tastendruck leuchtet die Anzeige für 5 Sekunden in voller Helligkeit auf.
1. Achten Sie darauf, dass der Netzadapter vom Radio und Stromnetz getrennt ist.
2. Legen Sie die Batterien (4x1,5V-UM3/AA-Batterien) in das Batteriefach ein.
3. Schalten Sie das Radio mit der STANDBY/EIN-Taste vorne am Gerät ein oder aus.
Hinweis: Damit das Gerät im Batteriebetrieb bestmöglich funktioniert, wird die Nutzung von Alkalibatterien empfohlen.
Uhrzeit einstellen
Die Uhr wird nur dann gestellt und aktualisiert, wenn Sie an Ihrem Standort DAB-Signale empfangen. Damit die Uhr mit der
aktuellen Ortszeit synchronisiert wird, müssen Sie für eine Weile bei einem DAB-Sender bleiben. Es ist nicht nötig, die Uhrzeit
manuell einzustellen.
RADIO HÖREN
Hinweise zum besseren Empfang
Dieses Radio verfügt über eine einzelne DAB/FM-Empfangsantenne; für den bestmöglichen Empfang ziehen Sie sie bitte
vollständig heraus und richten Sie sie aus, bis der Empfang am besten ist. Den idealen DAB-Empfang erzielen Sie, wenn Sie
die Antenne immer senkrecht nach oben ausrichten.
DAB-Modus
Wenn das Radio am Strom angeschlossen und erstmals eingeschaltet wird, wechselt es automatisch in den DAB-Modus und
führt einen automatischen Suchlauf durch. Während des Suchlaufs steht in der Anzeige „Suchlauf…“ („Scanning…“),
zusammen mit einem Fortschrittsbalken, der die Zahl der bereits gefundenen Sender angibt. (Abb. 1) (Abb. 2)
Ist der Suchlauf beendet, wählt das Radio den ersten gefundenenDOSKDQXPHULVFKHQ6HQGHUDXV6LHN|QQHQQXQPLWŸRGHU
ź]ZLVFKHQGHQJHIXQGHQHQ6HQGHUQQDYLJLHUHQPLWGHUAUSWAHL-Taste wählen Sie Ihren gewünschten Sender.
DE-2
DE-3DE-1

Zeit/Datum
Ensemble/Multiplex (Gruppenname)
Frequenz
Programmtyp DLS
Audio-Bitrate Signalstärke
FM-Radio
1. Zur FM-Auswahl drücken Sie die DAB/FM-Taste; in der Anzeige erscheint FM und die Frequenz.
2. =XUDXWRPDWLVFKHQ6XFKHKDOWHQ6LHŸRGHUźJHGUFNWELVGHU6XFKODXIGXUFKGDV)UHTXHQ]EDQGJHVWDUWHWZLUGLQGHU Anzeige
VWHKWÄ6XFKHOlXIW«!³Ä6HDUFKLQJ!RGHUÄ6XFKHOlXIW«³Ä6HDUFKLQJ«´VREDOGHLQ6HQGHUJHIXQGHQZLUGHQGHW
die Suche automatisch. (Abb. 6) (Abb. 7)
3. Zum $NWLYLHUHQGHUPDQXHOOHQ6XFKHGUFNHQ6LHZLHGHUKROWŸRGHUź
4. Zur Auswahl des Audiomodus drücken Sie die AUSWAHL-TDVWHXP]ZLVFKHQÄ$XWR³RGHUÄ0RQR³]XZHFKVHOQ
Hinweis: 'DV5DGLRVFKDOWHWDXWRPDWLVFK]ZLVFKHQ6WHUHRXQG0RQRXPDEHr Sie können auch manuell zwischen diesen beiden
ZHFKVHOQZDVEHLVFKOHFKWHP6LJQDOHPSIDQJKLOIUHLFKVHLQNDQQ
SENDER SPEICHERN UND GESPEICHERTE SENDER ABRUFEN
,P'$%RGHU)00RGXVN|QQHQ6LHELV]X6HQGHUDXIGLH)DYRUitenspeicherplätze legen; dadurch haben Sie jederzeit ZugriIIDXI
Ihre Lieblingssender.
1. 8PHLQHQ)DYRULWHQ]XVSHLFKHUQZlKOHQ6LH]XHUVW,KUHQJHZQVFKWHQ6HQGHr. Halten Sie dann die FAVORITEN-Taste gedrückt;
in der $Q]HLJHHUVFKHLQWÄ)UHLHU6HQGHUSODW]³Ä(PSW\SUHVHW³XQGGLH6HQGHUSODW]QXPPHUEOLQNW$EE
2. :lKOHQ6LHPLWŸRGHUź,KUHJHZQVFKWH6HQGHUSODW]QXPPHr.
3. Bestätigen Sie Ihre Auswahl mit AUSWAHL; in der $Q]HLJHHUVFKHLQWÄ6HQGHUSODW]JHVSHLFKHUW³Ä3UHVHWVDYHG³$EE
4. Zum $EUXIHQHLQHVJHVSHLFKHUWHQ6HQGHUVGUFNHQ6LHGLHFAVORITEN-TDVWHQDYLJLHUHQ6LHGDQQPLWŸRGHUź]ZLVFKHQ,KUHQ
Favoriten. Wenn die $Q]HLJHGLHJHZQVFKWH6HQGHUSODW]QXPPHU]HLJWODVVHQ6LHGLH Tasten los. Wurde einem Senderplatz noch
NHLQ6HQGHU]XJHZLHVHQVWHKWLQGHU $Q]HLJHÄ)UHLHU6HQGHUSODW]³Ä(PSW\SUHVHW³
WERKSEINSTELLUNG ZURÜCKSETZEN
WHQQ6LHGDV5DGLRLQHLQHUDQGHUHQ5HJLRQQXW]HQVLQG,KUHHLQJHVWHOOWHQXQGJHVSHLFKHUWHQ'$%6HQGHUX8QLFKWPHKUYHUIJEDr.
,VWGLHVGHU)DOOPVVHQ6LH,KU5DGLRPLWGHQIROJHQGHQ6FKULWWHQDXIGLHWerkseinstellungen zurücksetzen:
1. Verbinden Sie das Radio mit dem Stromnetz (über den Netzadapter) und schalten Sie das Radio mit der STANDBY/EIN-Taste an.
2. Halten Sie die MENÜ-TDVWHJHGUFNWELVDXIGHU Anzeige „Werkseinstellung mit AUSWAHLEHVWlWLJHQ³Ä3UHVV6(/(&TWRFRQILUP
UHVHW³HUVFKHLQW
3. Lassen Sie die MENÜ-Taste los und drücken Sie die AUSWAHL-Taste; die $Q]HLJH]HLJW]XHUVWÄ1HXVWDUW«³Ä5HVWDUWLQJ«³
VREDOGGHU1HXVWDUWYROO]RJHQLVWVFKDOWHWGDV5DGLRLQGHQ6Wandby-Modus.
4. Drücken Sie die STANDBY/EIN-TDVWHXPGDV5DGLRZLHGHUHLQ]XVFKDOWHQHVZHFKVHOWGDQQDXWRPDWLVFKLQGHQ'$%0RGXVXQG
IKUWHLQHQDXWRPDWLVFKHQ6XFKODXIGXUFK,VWGHU6XFKODXIEHHQGHWZlKOWGDV5DGLRGHQHUVWHQJHIXQGHQHQDOSKDQXPHULVFKHQ
Sender und zeigt ihn an.
Hinweis: Durch den Neustart gehen alle Ihre gespeicherten DAB&FM-Favoriten verloren.
KOPFHÖRERANSCHLUSS
$QGHUUHFKWHQ6HLWHGHV*HUlWVILQGHWVLFKHLQPP.RSIK|UHUDQVFKOXVV6FKOLHHQ6LH.RSIK|UHUQLFKWPLWJHOLHIHUWDQGLHsem
$QVFKOXVVDQGDPLW6LH0XVLNK|UHQN|QQHQRKQH $QGHUH]XVW|UHQ'LH/DXWVSUHFKHUZHUGHQDXWRPDWLVFKDXIVWXPPJHVFKDOWHW
ZHQQ.RSIK|UHUDQJHVFKORVVHQZHUGHQ
WICHTIG: WHQQ6LH.RSIK|UHUYHUZHQGHQGUHKHQ6LHGLH/DXWVWlUNHLPPHUHUVWOHLVHrEHYRU6LHGLH.RSIK|UHUDXIVHW]HQ6HW]HQ6LH
VLHGDQQDXIXQGVWHOOHQ6LHVFKULWWZHLVHHLQHIU6LHDQJHQHKPe Lautstärke ein.
SPEZIFIKATION
STROMVERSORGUNG: NETZADAPTER (WHFKVHOVWURP*OHLFKVWURP(,1*$1*9a+]
$86*$1*9$
GLEICHSTROM (BA77(5,(9980[
AUSGANGSSTROM: :
FREQUENZBEREICH: DAB 174 - 240 MHz
)00+]
GERÄTEABMESSUNGEN: /[%[+PP
GEWICHT: NJ
***DIE SPEZIFIKATION KANN OHNE ANKÜNDIGUNG GEÄNDERT WERDEN.
Hinweis: WXUGHQLPDXWRPDWLVFKHQ6XFKODXINHLQH6HQGHUJHIXQGHQZHFKVHOWGDV5DGLR]XP6XFKODXIPHQ6LHN|QQHQQXQPLW
ŸźJHIROJWYRQGHUAUSWAHL-TDVWH]ZLVFKHQGHUÄ0DQXHOOHQ6XFKH³Ä0DQXDO TXQH³RGHUGHPÄ$XWRP6XFKODXI³Ä$XWRVFDQ³
wählen.
Automatischer DAB-Suchlauf
'HUDXWRPDWLVFKH6XFKODXIVXFKWQDFKDOOHQ.DQlOHQLP'$%%DQGIII. Nach $EVFKOXVVGHV6XFKODXIVZLUGDXWRPDWLVFKGHUHUVWH
JHIXQGHQHDOSKDQXPHULVFKH6HQGHUJHZlKOW
1. 8PGHQDXWRPDWLVFKHQ6XFKODXI]XDNWLYLHUHQGUFNHQ6LHHUVWGLH MENÜ-TDVWHXPLQV6XFKODXIPHQ]XJHODQJHQZlKOHQ6LH
GDQQPLWŸźGHQÄ$XWRP6XFKODXI³XQGEHVWlWLJHQ6LHPLWGHrAUSWAHL-Taste; in der $Q]HLJHHUVFKHLQWÄ6XFKODXI³XQGHLQ
Fortschrittsbalken. (Abb. 3)
2. $OOHJHIXQGHQHQ6HQGHUZHUGHQDXWRPDWLVFKJHVSHLFKHUWPLWŸRGHUźN|QQHQ6LH]ZLVFKHQLKQHQQDYLJLHUHQ+DEHQ6LHHLQHQ
6HQGHUJHIXQGHQGHU,KQHQJHIlOOWGUFNHQ6LHGLHAUSWAHL-Taste.
Manuelle DAB-Senderwahl
1. Zur manuellen Sendersuche drücken Sie zuerst die MENÜ-Taste zum ÖIIQHQGHV6XFKODXIPHQV:lKOHQ6LHGDQQPLWGHU
AUSWAHL-TDVWHGLHÄ0DQXHOOH6XFKH³$EE
2. Navigieren Sie miWŸoderźdurch die DAB-Kanäle; auIder Anzeige erscheint ÄA bis 13F´mit den zugehörigen Frequenzen. (Abb.
3. Wenn Ihre gewünschte Frequenz in der $Q]HLJHHUVFKHLQWEHVWlWLJHQ6LHPLWGHUAUSWAHL-Taste. Der Name der Sendergruppe
(Ensemble/Multiplex) erscheint.
4. 8PGHQJHZlKOWHQ6HQGHUDQ]XK|UHQGUFNHQ6LHGLH AUSWAHL-Taste erneut.
Sekundäre DAB-Dienste
*HOHJHQWOLFKVHKHQ6LHHLQÄ!³6\PEROGLUHNWQDFKGHP1DPHQGHV6HQGHUVGLHVEHGHXWHWGDVVIUGLHVHQ6HQGHUVHNXQGlUH'LHQste
YHUIJEDUVLQG'LHVHVHNXQGlUHQ'LHQVWHXPIDVVHQ]XVlW]OLFKH,QIRUPDWLRQHQ]XPSULPlUHQ6HQGHr. Z.B. könnte ein Sportsender
]XVlW]OLFKH.RPPHQWDUHDQELHWHQ'LHVHNXQGlUHQ'LHQVWHILQGHQsich direkt nach dem primären Sender.
DAB-Anzeigemodi
-HGHV0DOZHQQ6LHGLHINFO-TDVWHGUFNHQHUVFKHLQHQLQGHU $Q]HLJHGLHIROJHQGHQ,QIRUPDWLRQHQ
Zeit und Datum
=HLWXQG'DWXPZHUGHQDXWRPDWLVFKGXUFKGLHJHVHQGHWHQ,QIRUPDWionen aktualisiert; die Uhr muss nicht manuell gestellt werden.
,PXQZDKUVFKHLQOLFKHQ)DOOGDVVNHLQH8KU]HLWGDWHQHPSIDQJHQZHUGHQHUVFKHLQWLQGHU $Q]HLJHÄ8+5=(,7'A780!³
Ä7,0('A7(!³
Frequenz
Die Frequenz des aktuellen Senders wird angezeigt.
Audio-Bitrate
Die $Q]HLJH]HLJWGLHHPSIDQJHQHGLJLWDOH Audio-Bitrate.
Signalstärke
Die $Q]HLJH]HLJWHLQHQ%DONHQPLWGHU6LJQDOVWlUNHMHVWlUNHUGDV6LJQDOGHVWROlQJHULVWGHU%DONHQYRQOLQNVQDFKUHFKWV
DLS (Programmtext)
'/6VWHKWIU'\QDPLF/DEHO6HJPHQWDOVRHLQHQSURJUDPPEHJOHLWenden TexttickerGHUYRP6HQGHUPLWEHUWUDJHQZHUGHQNDQQ
Der TH[WHQWKlOWIUJHZ|KQOLFK3URJUDPPGHWDLOVXQGlKQOLFKH,QIRUPDWLRQHQ
Programmtyp
Hier wird der Stil des gesendeten Programms beschrieben. Ist diH,QIRUPDWLRQQLFKWYHUIJEDrHUVFKHLQWLQGHU Anzeige
Ä3URJUDPPW\S!³Ä3URJUDPPH T\SH!³
Ensemble/Multiplex (Gruppenname)
Bei Ensemble/Multiplex handelt es sich um eine Sammlung von RadLRVHQGHUQGLHJHEQGHOWXQGJHPHLQVDPDXIHLQHU)UHTXHQ]
übertragen werden. Es gibt nationale und lokale MultiplexsendeUORNDOH6HQGHUVLQGUHJLRQDOVSH]LILVFKH6HQGHr.
Hinweis: Halten Sie die INFO-TDVWHIUPHKUDOV6HNXQGHQJHGUFNWGDQQZLUGGLH6RIWZDUHYHUVLRQDQJH]HLJW
DE-4 DE-6
DE-7'(

ATTENZIONE: PER RIDURRE IL RISCHIO DI SHOCK ELETTRICO NON RIMUOVERE IL COPERCHIO (O IL RETRO), NON C’E’
ALCUNA PARTE UTILIZZABILE DALL’UTENTE ALL’INTERNO. RIVOLGERSI PER LA MANUTENZIONE A PERSONALE QUALIFICATO.
VOLTAGGIO PERICOLOSO
Voltaggio conduttore pericoloso, può essere di sufficiente magnitudo da costituire un rischio di shock elettrico per le persone
all’interno della chiusura del prodotto.
ATTENZIONE
Il manuale dell’utente contiene importanti istruzioni di funzionamento e manutenzione per la vostra sicurezza, è necessario
fare riferimento al manuale
ATTENZIONE: PER PREVENIRE INCENDI O PERICOLO DI SHOCK, NON ESPORRE QUESTO APPARECCHIO A SGOCCIOLAMENTI
O SCHIZZI.
Nota: L’unità diventerà calda se usata per un lungo periodo di tempo. Questo è normale e non indica un problema con l’unità. Essa include
microprocessori che possono avere un cattivo funzionamento a causa di interferenza elettrica/rumore esterni o di scarica elettrostatica.
Se l’unità non funziona correttamente, scollegare l’alimentazione e poi ricollegarla.
Semplice Radio Digitale DAB/FM
MANUALE DI ISTRUZIONI
ATTENZIONE
RISCHIO DI
SHOCK ELETTRICO
CARATTERISTICHE E CONTROLLI
ACCENDERE LA RADIO PER LA PRIMA VOLTA
PRECAUZIONI DI SICUREZZA
Per ottenere il Massimo della prestazione e del divertimento e per prendere familiarità con le sue caratteristiche, leggere questo manuale
attentamente prima di cercare di mettere in funzione l’unità. Note importanti
Queste istruzioni di sicurezza e funzionamento devono essere conservate per una consultazione futura. L’apparecchio non deve essere
esposto a schizzi o sgocciolamenti e a nessun oggetto colmo di liquidi, come i vasi, deve essere posto sull’apparecchio. Evitare di installare
l’unità nei luoghi elencati di seguito:
* - Posti esposti alla luce del sole diretta o vicino ad apparecchi che irradiano calore come le stufe elettriche, sopra un’altra apparecchiatura
stereo che emana troppo calore.
* - Luoghi con il blocco della ventilazione o luoghi polverosi.
* - Luoghi soggetti a una vibrazione costante, umidità o luoghi umidi.
Nessuna fonte di fiamma viva come le candele accese deve essere posizionata sull’unità.
Prestare attenzione agli aspetti ambientali dello smaltimento delle batterie.
Assicurarsi di non ostruire le aperture di ventilazione, deve essere lasciato un minimo di 10cm intorno all’apparecchio per la ventilazione.
La ventilazione non deve essere impedita dalla copertura dei fori di ventilazione con oggetti come giornali, tovaglie da tavola, tende, ecc.
Usare l’apparecchio soltanto in climi moderati.
Azionare i comandi e gli interruttori come descritto nel manuale.
Prima di accendere l’apparecchio per la prima volta assicurarsi che il cavo di alimentazione sia installato completamente.
La spina di rete è usata come dispositivo di disconnessione e deve restare sempre attivabile. Per completare la disconnessione dalla rete
elettrica, la spina dell’apparecchio deve essere scollegata dalla rete.
Il normale funzionamento del prodotto può essere disturbato da una Forte Interferenza Elettromagnetica. Se è così, resettare semplicemente
il prodotto per riprendere il normale funzionamento seguendo il manuale di istruzioni. Nel caso in cui la funzione non possa essere ripresa,
usare il prodotto in un altro luogo.
Non cercare di rimuovere alcuna vite o di aprire l’involucro dell’unità; non ci sono parti utilizzabili dall’utente all’interno, rivolgersi per tutta la
manutenzione a personale qualificato.
1. ALTOPARLANTE 6. PULSANTE DAS/FM 11. ANTENNA
2. PULSANTE INFO 7. DISPLAY LCD 12. CONTROLLO DEL VOLUME
3. PULSANTE MENU 8. PULSANTE PREDEFINITO 13. PRESA CUFFIA
4. PULSANTE SELEZIONA 9. PULSANTE STANDY/ON 14. PRESA DI INGRESSO DC
38/6$17(ź38/6$17(Ÿ15. PORTA BATTERIE
Quando la radio è collegata alla corrente AC ( attraverso l’adattatore AD/CD) per la prima volta, sarà in modalità standby. La
retroilluminazione del display si accenderà per pochi secondi, il display mostrerà per primo i salute alla fine l’orologio. Premere il
pulsante STANDBY/ON una volta per accendere la radio, entrerà automaticamente in modalità DAB ed effettuare la funzione di
ricerca automatica.
Funzionamento AC
1. Inserire lo spinotto della corrente DC dell’adattatore AC/DC nella presa elettrica situata sul retro dell’unità.
2. Collegare l’adattatore AC/DC alla presa elettrica.
3. Premere il pulsante STANDBY/ON sul pannello anteriore per accendere la radio.
Funzionamento DC (batteria)
Nel funzionamento DC, il pulsante STANDBY/ON. Il display si spegnerà completamente quando la radio è spenta. La
retroilluminazione del display sarà oscurata dopo l’accensione della radio e sarà portata a piena luminosità per 5 secondi ad
ogni pigiata di tasto.
1. Assicurarsi che l’adattatore AC/DC sia scollegato dalla radio e dalla rete AC.
2. Le batterie vanno installate ( 4 batterie AA/UM3 dal 1.5V) nel vano batterie.
3. Premere il pulsante STANDBY/ON sulla pannello anteriore per mantenere sospesa la radio tra accesa e spenta.
Nota: Per ottenere la migliore prestazione durante in funzionamento in DC, è altamente consigliato l’utilizzo di batterie alcaline.
Impostazioni Orologio
L’orologio sarà impostato e aggiornato solo se potete ricevere i segnali DAB nella vostra postazione. Per sincronizzare
l’orologio sull’ ora corrente locale dovete lasciare una stazione DAB per un breve periodo, L’impostazione manuale
dell’orologio non è necessaria.
ASCOLTARE LA RADIO
Suggerimenti per una migliore ricezione
Questa radio è fornita di una singola antenna telescopica DAB/FM per ottenere la migliore prestazione, dovete estendere
completamente l’antenna e regolare la sua posizione e la direzione finché non trovate la migliore ricezione DAB, è altamente
consigliato mantenere sempre l’antenna in posizione eretta verticale.
Modalità DAB
Se la radio è migliorata e accesa per la prima volta, entrerà automaticamente in modalità DAB ed effettuare la funzione di
ricerca automatica. “Ricerca in corso …” insieme alla balla scorrevole che indica la progressione della ricerca e il numero di
stazioni che sono state trovate finora. (F. 1) (F. 2)
Una volta che la ricerca è terminata, la radio selezionerà la prima stazione trovata alfa numericamente. Potete premere ora il
SXOVDQWHŸRUźSHUHVSORUDUHOHVWD]LRQLWURYDWHHTXLQGLSUHmere il pulsante SELEZIONA per selezionare la vostra stazione.
IT-2
IT-3IT-1

Data/Ora
Complesso/Multiplo (nome Gruppo)
Frequenza
Tipo di Programma DLS
Bit Rate Audio
Potenza del Segnale
Nota: Se non ci sono stazioni trovate dopo la ricerca automatica, la radio entrerà nel Menu Seleziona Sintonizzazione, potete premere
RUDLSXOVDQWLŸźVHJXLWRSUHPHQGRLOSXOVDQWHSELEZIONA per selezionare “Sintonizzazione Manuale” o “ Ricerca Automatica” per le
stazioni.
Ricerca automatica DAB
La ricerca automatica effettuerà la ricerca dei canali interi della Banda III DAB. Dopo che la ricerca è terminata, la prima stazione trovata
alfa numericamente sarà selezionata automaticamente.
1. Per attivare la ricerca automatica, premere per prima cosa il pulsante MENU per entrare nel Menu Seleziona Sintonizzazione e
TXLQGLSUHPHUHLOSXOVDQWHŸRźSHUVHOH]LRQDUH³5LFHUFD Automatica”, premere finalmente il pulsante SELEZIONA per confermare,
il display mostrerà “Ricerca in corso …” e una barra scorrevole progressiva. (F.3)
2. Tutte le stazioni che sono state trovate saranno memorizzate automaticamente, per navigare tra le stazioni che sono state trovate,
SUHPHUHLSXOVDQWLŸRźHTXDQGRWURYDWHXQDVWD]LRQHFKHGHsiderate ascoltare, premere il pulsante SELEZIONA.
Sintonizzazione manual DAB
1. Per selezionare la sintonizzazione manuale, premere per prima cosa il pulsante MENU per entrare nel Menu di Selezione
Sintonizzazione, quindi premere il pulsante SELEZIONA per selezionare la “Sintonizzazione Manuale”. (F.4)
2. 3UHPHUHLOSXOVDQWHŸRźSHUQDYLJDUHWUD,FDQDOL'$%LOGLVSOD\PRVWUHUj³GDA a 13F” e le loro frequenze associate. (F
3. Quando la frequenza desiderata appare nel display, premere il pulsante SELEZIONA per confermare.
Apparirà il nome del gruppo di stazione ( complesso/multiplo).
4. Per ascoltare la stazione selezionata, premere di nuovo il pulsante SELEZIONA.
Servizi Secondari DAB
In qualche occasione vedrete un simbolo “>” direttamente dopo che il nome della stazione, questo indica che ci sono servizi secondari
disponibili per quella stazione. Questi servizi disponibili contengono servizi extra che si legano alla stazione primaria. Ad es. le stazioni
sportive possono voler aggiungere commenti extra. I servizi secondari sono inseriti direttamente dopo la stazione primaria.
Modalità display DAB
Ogni volt ache premete il pulsante INFO mil display passerà ciclicamente attraverso le seguenti modalità display:
Data e Ora
La data e l’ora saranno aggiornate automaticamente dalle informazioni dell’emittente; non c’è bisogno di impostare l’orologio
manualmente. Nell’improbabile ipotesi in cui nessun informazione oraria sia ricevuta, il display mostrerà “<DATA/ORA>”.
Frequenza
La frequenza della stazione corrente verrà visualizzata.
Bit rate Audio
Il display mostrerà il bit rate dell’audio digitale che si sta ricevendo.
Potenza del segnale
Il display mostrerà una barra scorrevole per indicare la potenza del segnale, più forte è il segnale, più lunga sarà la barra da sinistra a
destra.
DLS
DLS sta per Segmento dell’Etichetta Dinamica che ‘ un messaggio scorrevole che l’emittente può includere nelle loro trasmissioni,
Il messaggio di solito include informazioni come dettagli sui programmi … ecc.
Tipo di programma
Questo descrive lo stile del programma che viene trasmesso. Se l’informazione non è disponibile, il display mostrerà “ <Tipo di
Programma>”.
Complesso/Multiplo (Nome Gruppo)
Il Complesso/Multiplo è un’insieme di stazioni radio raggruppate e trasmesse insieme in una singola frequenza, Ci sono multipli nazionali
e locali, quelle locali contengono le stazioni che sono specifiche di quella zona.
Nota: Premere e tenere premuto il pulsante INFO per più di 2 secondi, sarà visualizzato il numero della versione del software.
Radio FM
1. Per selezionare FM, premere il pulsante DAB/FM, il display mostrerà FM e la frequenza.
2. 3HUDWWLYDUHODULFHUFDDXWRPDWLFDSUHPHUHHWHQHUHSUHPXWRLOSXOVDQWHŸRźSHULQL]LDUHODULFHUFDGHOODEDQGDGLIUHTXHQ]D
il display mostrerà “Ricerca in corso …>” o “Ricerca in corso … <”. E si fermerà automaticamente una volta che è stata trovata una
stazione. (F.6)(F.7)
3. 3HUDWWLYDUHODULFHUFDPDQXDOHSUHPHUHULSHWXWDPHQWHLOSXOVDQWHŸRź
4. Per selezionare la modalità audio, premere il pulsante SELEZIONA per selezionare tra “Automatico” o “Mono”.
Nota: La radio passerà automaticamente tra modalità stereo e mono ma potete superare questo e cambiare questa funzione manual-
mente che è d’aiuto per una ricezione di segnale bassa.
MEMORIZZARE E RICHIAMARE LE STAZIONI MEMORIZZATE
Sia in modalità DAB che FM, potete memorizzare fino a 10 stazioni per le predefinite preferite; questo vi abiliterà per ottenere un accesso
diretto alle vostre stazioni preferite.
1. Per memorizzare le predefinite, per prima cosa sintonizzare alla vostra stazione desiderata, quindi premere e tenere premuto il
pulsante PREDEFINITO, il display mostrerà “ Predefinito 1 Vuoto”, e il numero predefinito lampeggerà (F.8)
2. 3UHPHUHLOSXOVDQWHŸRźSHUVHOH]LRQDUHLOQXPHURGHOODVWD]LRQHSUHGHILQLWDGHVLGHUDWD
3. Premere SELEZIONA per confermare la vostra scelta, il display mostrerà ”Predefinita # salvata” (F.9)
4. Per richiamare una stazione predefinita salvata, premere il pulsante PREDIFINITO XQDYROWDTXLQGLSUHPHUHLOSXOVDQWHŸRźSHU
scorrere verso l’alto o verso il basso le predefinite che avete memorizzato. Quando il display mostra il vostro numero di preselezione
preferito, rilasciare i pulsanti. Se non è stata collocata una stazione nella predefinita, il display mostrerà “Predefinita Vuota #”.
RESETTAGGI DI FABBRICA
Quando spostate la radio in un’altra parte del paese, le stazioni DAB predefinite e memorizzate non possono essere più disponibili.
Nel caso in caso aveste bisogno di resettare la radio alle impostazioni di fabbrica originali; per effettuare tale re settaggio, operare nel
seguente modo:
1. Collegare la radio alla rete AC ( attraverso l’adattatore AC/DC) , quindi premere il pulsante STANDBY/ON per accendere la radio.
2. Premere e tenere premuto il pulsante MENU fino a che il display mostra “ Premere SELEZIONA per confermare il resettaggio”.
3. Premere il pulsante il pulsante MENU e premere il pulsante SELEZIONA una volta, il display mostrerà ”Riavvio in corso …” per
prima cosa e dopo che il resettaggio è completato, andrà in standby.
4. Premere il pulsante STANDBY/ON per accendere di nuovo la radio, essa entrerà automaticamente in modalità DAB ed effettuerà la
funzione di ricerca automatica. Dopo che la scansione è stata terminata, la radio sarà selezionata e mostrerà la prima stazione
trovata alfa numericamente.
Nota: Tutte le DAB e FM predefinite saranno perse una volta che ha avuto luogo il resettaggio.
PRESA CUFFIE
Una presa cufILHGHOWLSRGLPPqORFDOL]]DWDVXOODWRGHVWRGHOO¶XQLWj&ROOHJDUHXQVHWGLFXffie (non incluse) a questa presa per un
ascolto privato senza disturbare gli altri. L’altoparlante è scollegato automaticamente quando le cuffie sono in uso.
IMPORTANTE: Quando si usano le cuffie impostare sempre il volume a un livello basso prima di mettersi le cuffie. Quindi inserire le
cuffie e aumentare gradualmente il volume a un livello comodo di ascolto.
SPECIFICHE
ALIMENTAZIONE ADATTATORE AC/DC ,1*5(6629a+]86&,T$9$
DC (BA77(5,$8099
POTENZA DI EMISSIONE: 1.0 W
INTERVALLO DI FREQUENZA: '$%0+]
)00+]
DIMENSIONI UNITA’: /[3[+PP
PESO NJ
*** LE SPECIFICHE SONO SOGGETTE A CAMBIAMENTO SENZA ULTERIORE PREAVVISO.
IT-4 IT-6
IT-7,7
Table of contents
Languages:
Other MP-Man Radio manuals