MrCool MTW04RO Quick start guide

Please read this manual carefully before installation and keep it for future reference.
Please read this manual carefully before installation and keep it for future reference.
V04.10.2020
Owner & Installation
Manual
Water Dispenser
Models: MTW04RO|MTW04UF

Contents
Page 1 mrcool.com
Product Summary .............................................................................2
General Information..........................................................................3
How to Install......................................................................................5
How to Use...........................................................................................7
Troubleshooting..................................................................................11
Light Indicator.....................................................................................12
1
2
3
4
5
6

Product Summary
Page 2
mrcool.com
1
To Our Customers
Packing List
Thank you for choosing the MRCOOL®Water Dispenser. In order to use and maintain this product correctly, please
read the manual carefully before using the product. Store the manual for future reference.
(1) This is a vertical water dispenser, please place it on the ground firmly to avoid falling.
(2) Operation conditions: Water source: municipal tap water, Feed water pressure: 0.1 MPa ~ 0.4MPa,
Feed water temperature: 41°F-100°F (5-38°C), Altitude: < 4921ft (1500 meter)
(3) Check the product periodically for any connection leaks or any loose wires. If the product fails, shut off the water
main and power supply immediately, and contact your dealer.
(4) lf this product won't be used for a long time, shut off the water supply and power off. If it hasn't been used for
more than 3 days, drain off all the remaining water in the tanks and flush the system for more than 5 minutes
before putting it into use again.
(5) DO NOT allow children to operate the unit to avoid injury. It is designed for indoor use only. DO NOT use it in an
explosive environment.
(6) Every machine must pass a water leakage test before packing.
(7) lnstallation and maintenance should be performed by a professional. Improper installation may
cause water leakage, electrical shock, or may void the warranty.
Main Body 1 Set
Accessory Kit
Instruction Manual
Tube
PP Spun Filter
Block Carbon Filter
RO Membrane/UF Membrane
Post Carbon Filter
Power Adapter
Self Piercing Valve
Drain Clamp
1 Bag
1 Piece
3 Rolls
1 Piece
1 Piece
1 Piece
1 Piece
1 Piece
1 Piece
1 Piece
2
Page 3
General Information
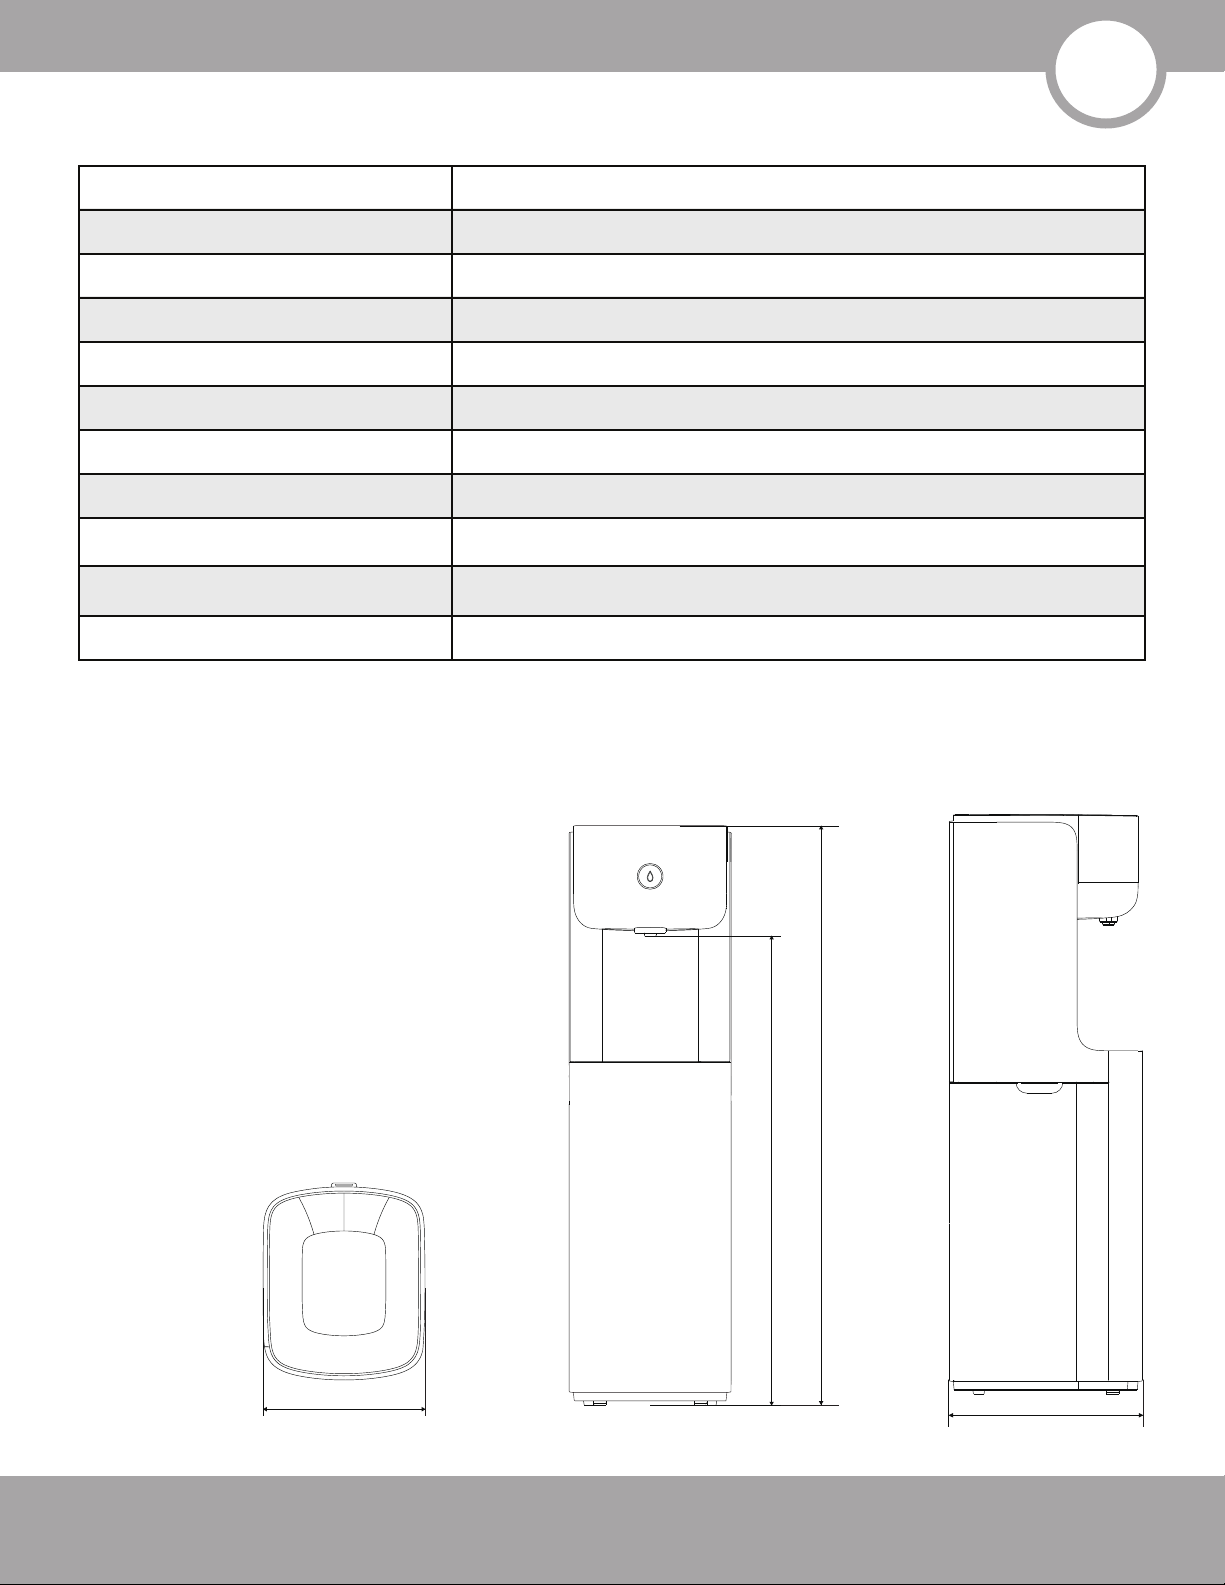
Technical Parameters
Recommended Locations
Function
mrcool.com
Model Number MTW04RO / MTW04UF
Municipal tap water
110/220V, 50/60HZ
665W
500W
150W
15W
14.5 to 58 PSI (0.1MPa ~ 0.4MPa)
41-100°F (5-38°C)
0.4L/min(RO) / 2L/min (UF)
W - 1.3Ft (387mm) * D - 1.5Ft (462mm) * H - 4.5ft (1385mm)
Feed Water
Voltage and Frequency
Rated Power
Heating Power
Cooling Power
Water Production Power
Inlet Water Pressure
Inlet Water Temperature
Purified Water Flow
Dimensions
•Offices
•Clubs
•Hotels
•Airports
•Train Stations
•Factories
•Many more
•Dispense hot water
•Dispense cold water
•Dispense ambient water
1.3ft (387mm) 1.5ft (462mm)
4.5ft (1385mm)
3.7ft (1122mm)
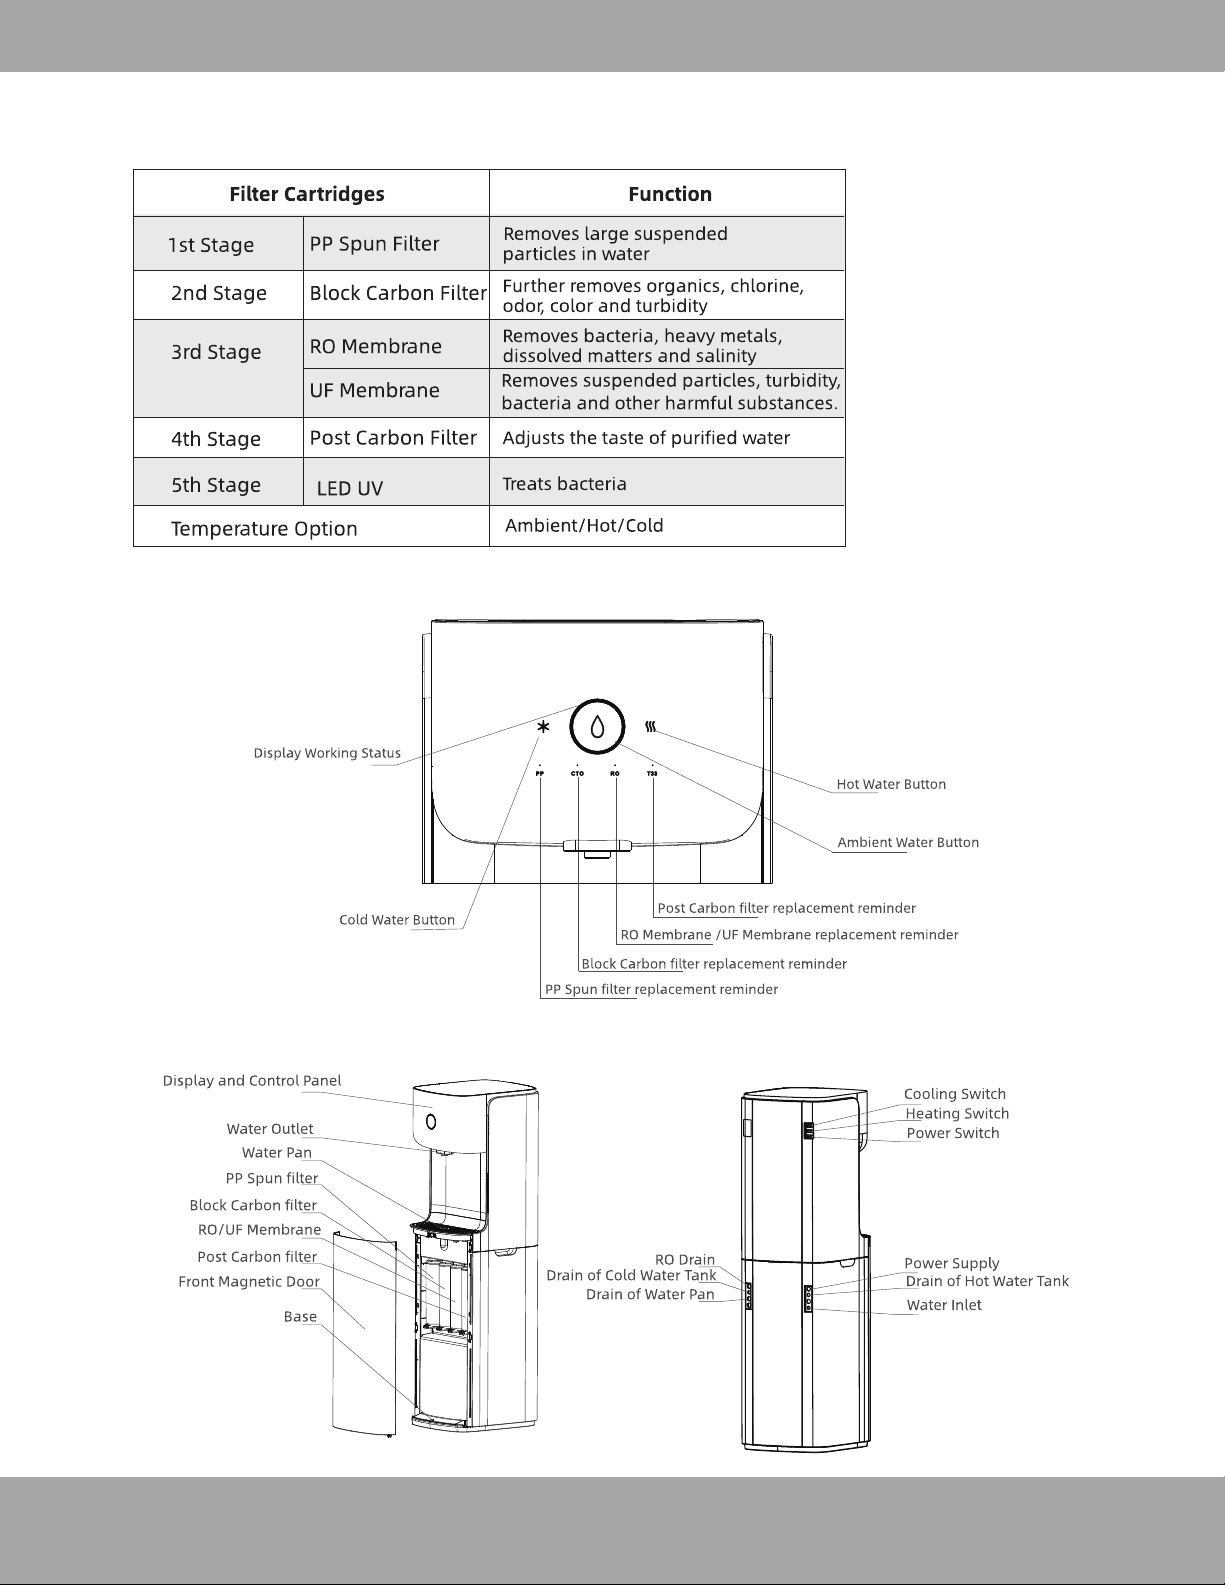
Filters and Their Functions
Page 4
General Information
mrcool.com
(Model
MTW04RO only)

RO
Installation Procedures
3
Page 5
How To Install
mrcool.com
(1) Tools Required:
•Phillips (cross-tip) screw driver
•Adjustable wrench
•Scissors
(2) Review the Packing List to ensure all items are
included in the packaging.
(3) Installation Position Required:
•Close to 220V /11OV socket
•Close to tap water source
•Close to drain outlet, please note that the position of drain
pipes should be at least 20cm lower than water pan.
(4) Install Inlet Ball Valve (4A) or Self-piercing Valve (4B) You
can choose 4A or 4B based on your preference.
A. Install the Inlet Ball Valve and Tee Fitting according
to the Fig 3.1
•Wrap threads of Feed Water Valve and Tee Fitting with Teflon
tape.
•Connect White Feed Water tube from unit to Feed Water
Valve.
•Install the Feed water valve Tee fitting, and then connect to
source water.
B. Turn off the water supply and make sure the pipe is clean
where the valve will be attached according to Fig 3.2.
•Mount the valve by placing the rubber washer or gasket in
alignment with the saddle valve opening directly with the
needle on the valve. Fit the brackets around the water supply
pipe and hold them in place. Insert the bolts through the
holes in the bracket and hand tighten. Use a screwdriver to
tighten the bolts evenly on both sides of the pipe, however, do
not overtighten.
•Install the water supply tube
•Pierce the pipe by turning the saddle valve clockwise slowly.
Keep turning the handle until it stops.
(5) Install tubing:
•Cut tubing to appropriate length and prepare 2 pieces
ensuring ends are flat and can make a flush connection.
•Connect ball valve to water inlet port with one piece.
•Connect the drain to the waste water port with
the other piece.
•Connect the silicon tube to the drain of
the water pan or a bucket.
Fig 3.1
Fig 3.2
Fig 3.3
PIpe
Piercing
Tip
Handle
Tubing

(6) Install Drain Clamp (For Model MTW04RO only)
• Position drain clamp on drain pipe above the drain trap and ti ghten securely.
• Using the drain clamp as a guide, drill a 6mm hole, enough for the 1/4" tubing to pass, through one side of the
drain pipe. DO NOT drill through both sides.
(7) Install filter cartridges to water purifier by taking off the front panel and follow the directions according to
the labels indicated above. After filters are installed, cover the front panel.
(8) For First Use -
•Open Inlet Ball Valve, connect power supply and power on. The machine will start producing water. During this
period, the switch for heating should be off.
•After the machine completes water production (White light around the big button in the middle), shut off the
power supply. Connect the silicon tube to drain off hot water tank and the other end to a bucket to drain out
all of the water in the tank.
•Power on again to prompt the machine to produce water and then drain the water out of the tank after water
production is completed. Repeat this process 2 to 3 times to flush the machine. During this process, pay close
attention to all connections to check for leaks.
•After flushing, remove the silicon tube and pack it up. Block the drain of hot water tank.
Page 6
How To Install
mrcool.com
NOTE
When cutting the tubing make clean, square, cuts, failing to do so result in poor connection
and possible leaks.
CAUTION
It is recommended to install the RO waste water drain clamp above the drain p-trap. There
should be no sag in the line as this may cause excessive noise as the reject water is flowing to
drain.
Fig 3.4 Fig 3.5

How To Get Hot Water
How To Get Ambient Water
4
Page 7
How To Use
mrcool.com
1. Flip the heating switch on (switch position will be from "O" to "-".), the machine will start heating.
2. Press the hot water button on the control panel. After a short "Ding" sound, the hot water status is
released and will last for 3 seconds.
3. Press the "water Outlet/ Ambient Water button" within 3 seconds and you will get hot water (a red
circling light will appear around the "water outlet" button ).
4. Press the "water Outlet/Ambient Water button " again to end the hot water output. The machine will
conduct a 30-second hot water output if not ended manually.
1. Press the Water Outlet / Ambient Water Button on the control panel, and you will get ambient water (a
green light will circle around the "water outlet" button ).
2. Press the "water Outlet/ Ambient Water button" again to end the ambient water output. The machine will
conduct a 30-second ambient water output if not ended manually.

Page 8
How to Use
mrcool.com
How To Get Cold Water
LED UV Sterilizer
How to Flush
Memory
Power Saving Mode
1. Press the Cooling switch on (switch position will be from "O" to "-”), the machine will start cooling.
2. Press the cold water button on the control panel. A "Ding” sound will signal the cold water status is
released and will last for 3 seconds.
3. Press the "water Outlet/ Ambient Water button" within 3 seconds and you will get cold water (a blue light
will circle around the "water outlet" button ).
4. Press the “water Outlet/Ambient Water button” again to end the cold water output. The machine will
conduct a 30-second cold water output if not ended manually.
If there is no manual operation within 30 minutes, the machine will enter the Power Saving Mode. This mode
only reduces the brightness of the light, it does not affect any other machine functions.
•The machine will conduct a 90-second flush every time it's powered on.
•After the water production time reaches one hour, the machine will conduct a 10 second flush process.
Even when the machine is powered off, it will still record all data automatically, such as service life of filter,
remaining life of LED UV sterilizer, mode of the machine, etc.
Brand new machine:
After the first complete water production cycle, the LED UV will work for 150 minutes. DO NOT interrupt this
process.
During daily use:
If there is no water production, the LED UV will conduct a 30-second sterilizer every hour.The LED UV will
conduct a 50-minute sterilizer each time the machine completes water production.

Page 9 mrcool.com
Service Life of Filter Cartridges and Filter Change Reminder
How to Use
NOTE
The service life in the follow tables is calculated when the machine is in the process of pure
water production.
This manual suits for next models
1
Table of contents
Other MrCool Water Dispenser manuals


