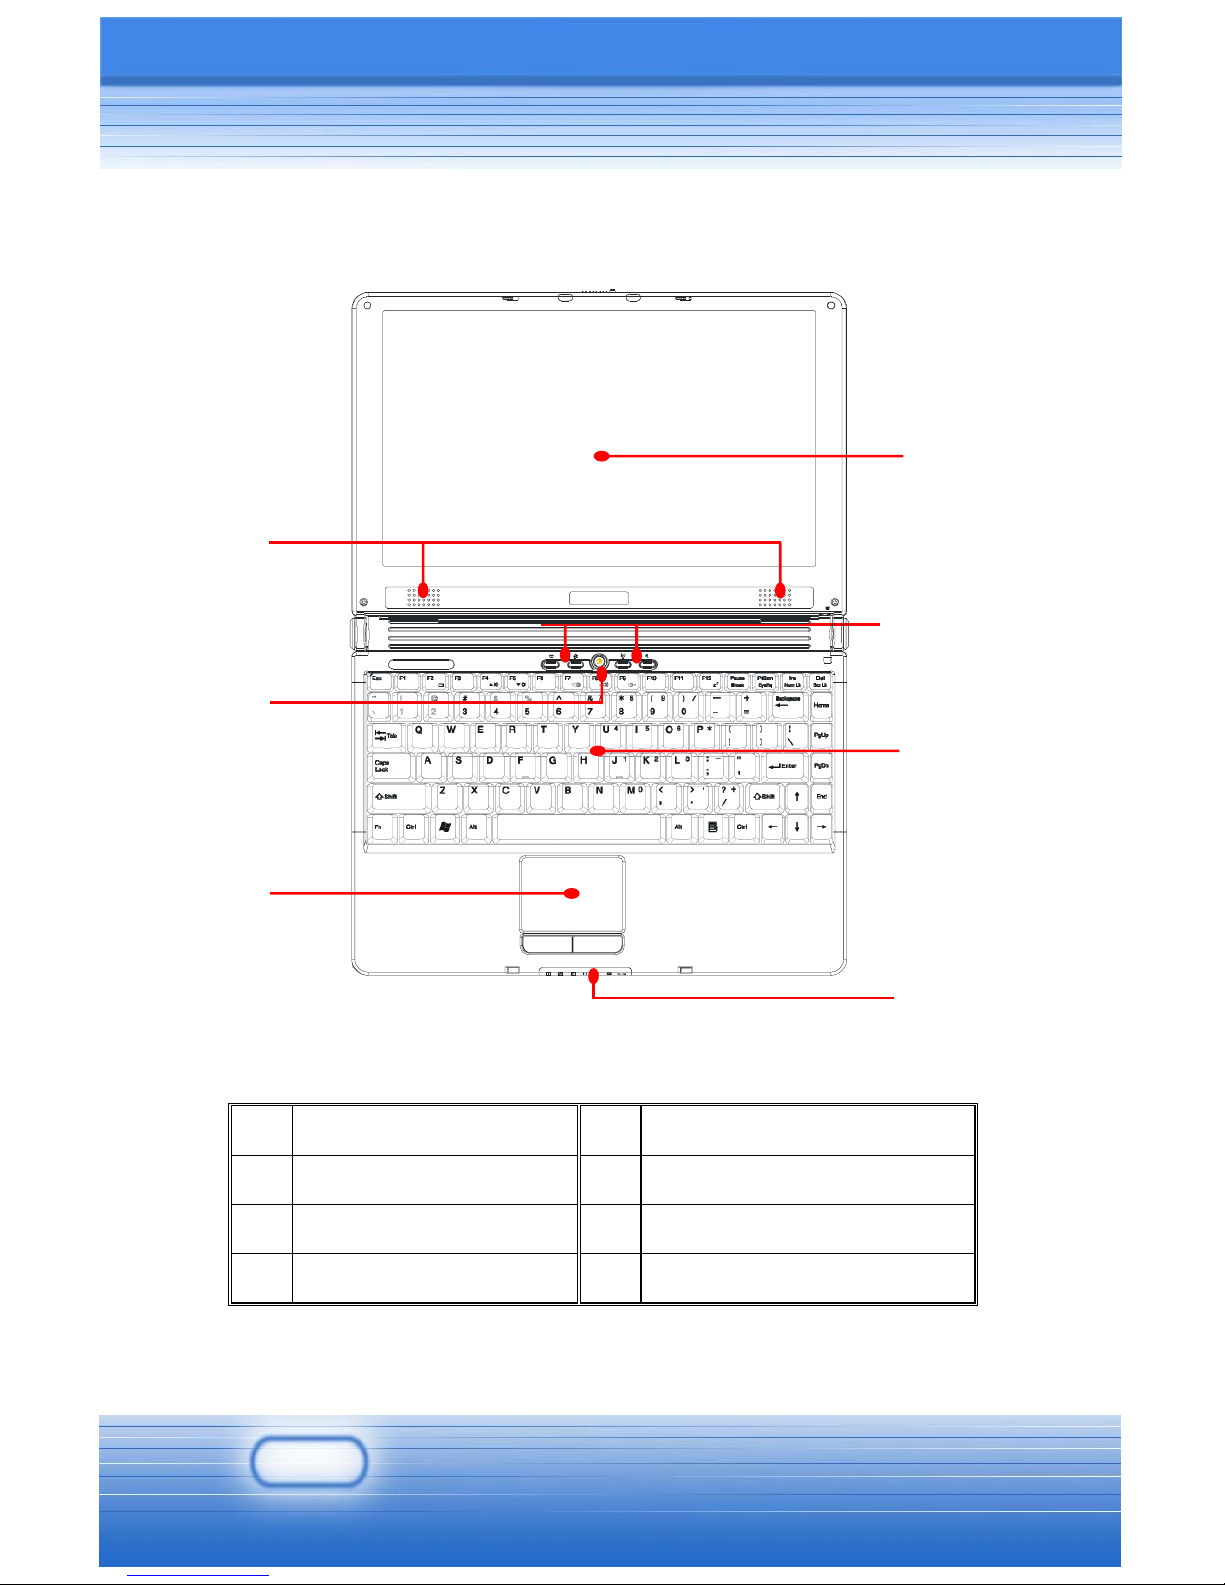
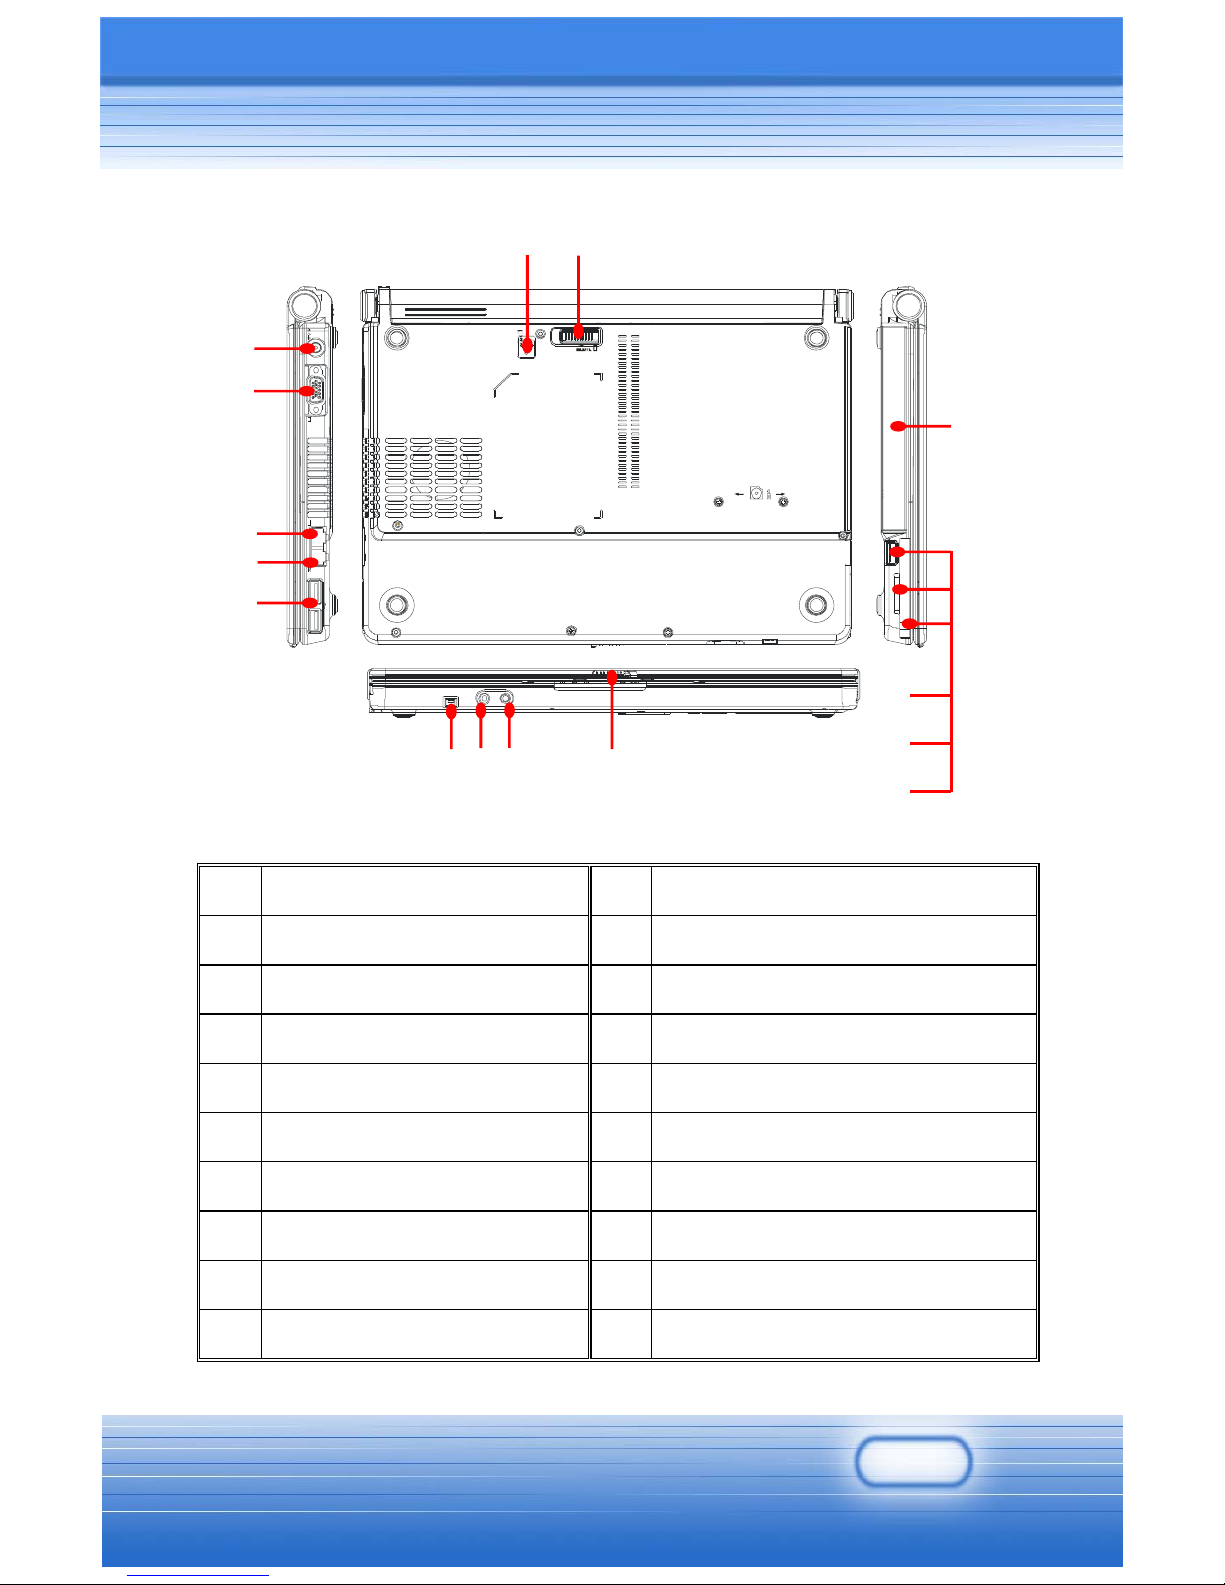
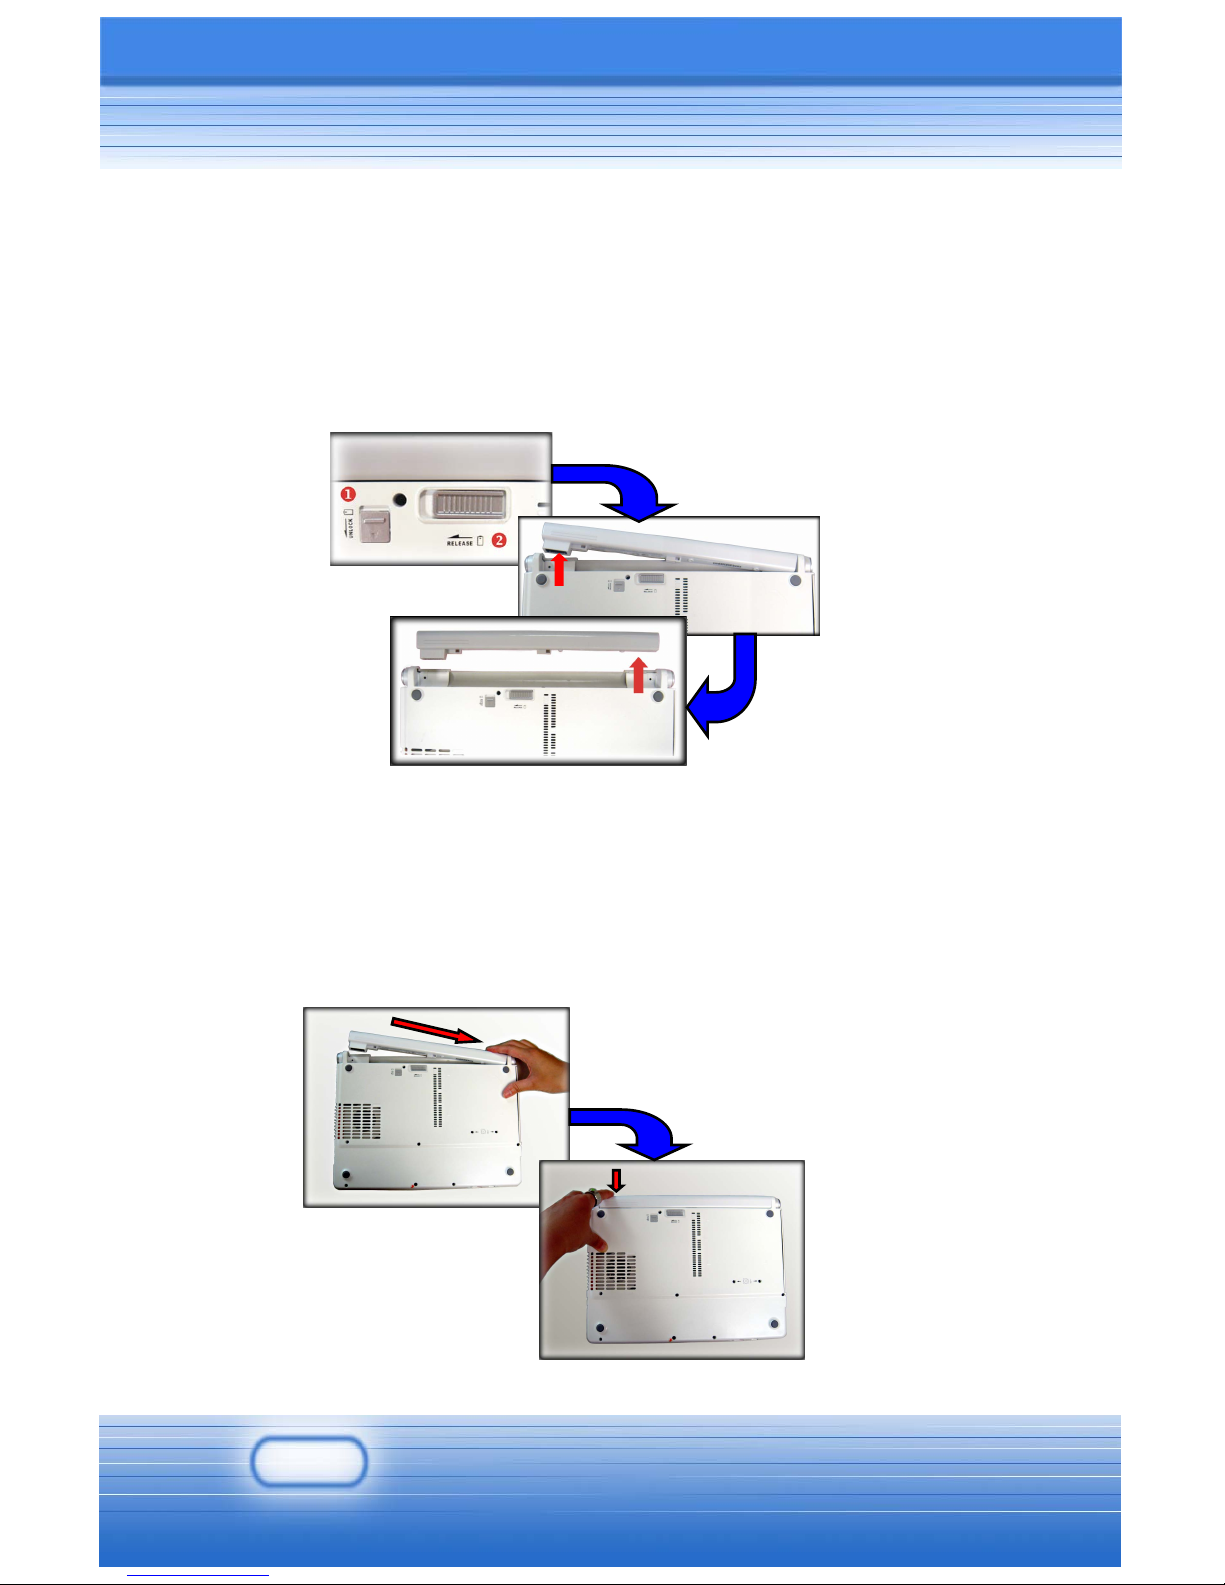
MSI MEGA BOOK S250 User manual

Notice
Please note that the setting diagrams or values in this guide are FOR
YOUR REFERENCE ONLY. The model you bought may be slightly
different from the illustrations and descriptions in this guide. If you are not
sure about these information, such as the computer specification and
equipment, please ask your local vendor for help.
Trademarks
•All trademarks are the properties of their respective owners.
•Microsoft is a registered trademark of Microsoft Corporation.
Windows®98/ME2000/XP are registered trademarks of Microsoft
Corporation.
•AMI® is a registered trademark of American Megatrends Inc.
•PCMCIAand CardBus are registered trademarks of the Personal
Computer Memory Card International Association.
Release History
Version Revision Note Date
1.0 First Release September 2004
G52-B1006X4

Table of Content
ENGLISH................................. 1
ﻰــــــــﺑﺮــــــﻋ ................................ 17
ITALIANO................................ 34
РУССКИЙ ............................... 49
ESPAÑOL................................ 66
TÜRKÇE.................................. 82

1
ENGLISH

2
Unpacking
First, unpack the shipping carton and check all items carefully. If any item
contained is damaged or missing, please contact your local dealer
immediately. Also, keep the box and packing materials in case you need
to ship the unit in the future.
The package should contain the following items:
One Notebook PC - MSI MEGABook S250.
One Recovery CD.
One Software CD containing the drivers and utilities.
One User’s Manual and one Quick Guide.
One Warranty Card.
Accessories:
High-capacity Li-ion battery pack.
AC adapter and power cord.
Phone cable/Phone jack (optional).
Notebook PC carry bag (optional).

3
Specification
Physical Characteristic
Dimension 303mm(L) x 225mm(D) x 26-28mm(H)
Weight 1.8 kg
CPU
Processor Type Socket 478 (478 pins)
Support Processor @
Launch
Intel Celeron M up to 1.6GHz, and Intel
Pentium M Dothan
L2 Cache On die/ 512K
Core Chips
North Bridge SiS® M661MX
South Bridge SiS® 963L
Memory
Technology DDR 226/333/400
Memory DDR SO-DIMM X 2 slot
128/256/512/1024MB DDR SDRAM
Maximum 2GB (1024MB DDR SO-DIMM X 2)
Power
AC Adapter 65W, 19 Volt
Battery Type I 4 cells (Li-lon)(18650)(2200mA)
Battery Type II (Optional) 8 cells (Li-lon)(18650)(4400mA)
Power Management Support ACPI 2.0a

4
Storage
HDD form factor 2.5”, 9.5mm(H), 30/40/60GB
IDE Controller Ultra DMAATA-100
Optical Device CD-ROM, CD-RW, DVD-ROM, Combo
I/O Port
Monitor(VGA) 15 pin Mini D-Sub x 1
USB x 3 (USB version 1.1/2.0)
IEEE 1394 x 1
Mic-in
Line-in x 1
Headphone Out
Line-out
SPDIF-out
x 1
RJ11 x 1
RJ45 x 1
Card Reader MMC/SD/MS (3 in 1)
Communication Port
56K Fax/MODEM Support I/F – AC97 S/W Modem, Wake
on Ring (S3 state supported) and PTT
Approval (FCC/CTR21/JATE)
LAN Realtek ICS1893 Controller(PHY)
Support Wake on LAN function
Support LAN Boot function
Wireless LAN 802.11b and 802.11g

5
PCMCIA
Controller RICOH 5C593
Slot Type II x 1
CardBus Support
Software & BIOS
Support OS Win XP Home and Professional edition
Fast Boot Support Yes (Win XP)
Display
LCD Type 12.1” WXGA, 1280x800 dpi
Setup Adjustment Adjustment controlled by K/B hot-keys
CRT Support 800x600, max, 32bit color
1024x768, max, 32bit color
1400x1050, max, 32bit color
1152x768, max, 32bit color
1280x1024, max, 32bit color
1600x1200, max, 32bit color
1920x1440, max, 32bit color
2048x1536, max, 32bit color
DualView Functitons System auto detect LCD or CRT.
Display by CRT-only if LCD is closed.
Display by LCD-only if CRT is closed.
Dual display available when both of
LCD and CRT are detected and
activated.

6
Product View
LCD Panel
Stereo Speaker
Quick Start Button
Power Button
Keyboard
Touchpad
Status LED

7
Battery Lock/Unlock Button 1
CD/DVD/CD-RW Drive
Battery Release Button 2
USB Port
Power Connector 3
SD/MMC/MS Card Reader
VGA Port 4
PC Card Slot
RJ-11 Connector 5
Cover Latch
RJ-45 Connector
USB Port
IEEE 1394 Port
Line-in
Line-out
1
2
3
4
5

8
Releasing the Battery Pack
1. Check the Lock/Unlock button () is in unlocked status.
2. Push the Release Button ().
3. Slide the left side of the battery pack ().
4. Pull the right side of the battery pack ().
Replacing the Battery Pack
1. Insert the right side of battery pack into the compartment ().
2. Slide and press the battery pack into the right place, then press the left
side of battery pack into the battery chamber ().
3. Make sure the Lock/Unlock Button is in lock position.

9
Connecting the AC Power
1. Unpack the package to find the AC adapter and power cord.
2. Attach the power cord to the connector of the AC adapter ().
3. Plug the DC end of the adapter to the computer (), and the male
end of the power cord to the electrical outlet ().
Disconnecting the AC Power
When you disconnect the AC adapter, you should:
1. Unplug the power cord from the electrical outlet first ().
2. Unplug the connector from the computer.
3. When unplugging the power cord, always hold the connector part of
the cord (). Never pull the cord directly!
Connecting the AC power
Disconnecting the AC Power

10
Turning Off the Computer
Turning On/Off the Notebook PC
Turning On the Computer
1. Make sure that the computer is connected to the AC power.
2. Press the power button ( ).
Once pressed, the power button
lights White to indicate that the
computer is turned on.
3. It performs a series of diagnostic
test called Power-On Self Test
(POST). Then, the operating system will start.
Turning Off the Computer
1. Click Start () from the taskbar, and then select the Turn Off
Computer option ().
2. Click Turn Off () to turn off the system.

11
Quick Launch Button
Power Button: To turn your Notebook PC power ON and
OFF.
Email: To launch the E-mail application (such as Outlook
Express) to receive and send your E-mail.
Internet: To launch the web browser (such as Internet
Explorer) to surf the Internet.
Wireless LAN: To enable or disable the wireless LAN
function of your computer.
AC Power On: Glowing Blue when the AC Power is
activated and blinking Blue when computer is getting into
sleep mode.
Operating Icon
Line-in Line-out
1394 Port Modem Port
LAN Port USB Port
VGA Port AC Power In
Card Reader CD-ROM Release
Battery Release Battery Unlock

12
Status LEDs
Num Lock: Glowing Blue when the Num Lock function
is activated.
Caps Lock: Glowing Blue when the Caps Lock
function is activated.
Scroll Lock: Glowing Blue when the Scroll Lock
function is activated.
Hard Disk In-use: Blinking Blue when computer is
accessing the hard disk drive.
AC Power On: Glowing Blue when the AC Power is
activated and blinking Blue when computer is getting
into sleep mode.
Battery Status: Blinking Green when the battery is
being charged and blinking red is in LLB status (Low
Low Battery status). (Note: The status would show
when AC adapter connected).
Wireless LAN: Glowing Blue when wireless LAN
function of the computer is enabled.

13
OSD (On-Screen Display)
Your Notebook PC is already installed a special OSD interface. It gives
you vivid and friendly displays on your screen when you are enabling
Function Keys and Quick Launch Buttons. Take the tables below as your
reference and know every function with its related keys and reminders.
[Fn] + [Fx] Display Status
+NA
Toggle between internal and
external displays without any
status reminder.
+Adjustable scroll bar to
increase brightness.
+Adjustable scroll bar to
decrease brightness.
+Adjustable scroll bar to
increase volume.
+Adjustable scroll bar to
decrease volume.
+/
Toggle between mute and
sound effect modes.
+
Reminder before getting into
Hibernation.

14
Using the Recovery CD
The Recovery CD is a compact disk that records the sources of operating
system and important data and can be used to restore the hard disk to its
original state. When the operating system of your computer is damaged
and can not work properly any more, you can use the Recovery CD to
resume the system in its original state.
To resume the operating system from the Recovery CD:
The package should contain the following items:
To resume the operating system from the Recovery CD.
Insert the Recovery CD into the CD/DVD-ROM drive.
Press the [Del] key on the keyboard to enter the BIOS Setup Utility when
the system boots up.
In the BIOS Setup Utility, set the CD/DVDVD-ROM drive as the first boot
device (See Boot Menu in Chapter 5 for more instruction).
Choose to restore the operating system from the Recovery CD when
prompted. Then, follow the on-screen instructions to complete the
procedures. The system will reboot automatically when completed.

15
Connecting the Peripheral Device
This PC has VGA, IEEE 1394 Port and USB port for expanding external
devices. You can link external LCD through VGA port, connect digital
camera or video through IEEE 1394 port or connect printer, scanner,
mouse and keyboard through USB port. (Please refer to specification of
any device you are going to connect with your PC and find what kind of port
the external device can be applied to).

16
Connecting the Network
Using the Modem
The built-in 56Kbps fax/data modem allows you to use a telephone line to
communicate with others or to dial-up to connect the Internet.
Using the LAN
The RJ-45 connector of the computer allows you to connect the LAN (local
area network) devices, such as a hub, switch and gateway, to build a
network connection. This built-in 10/100 Base-T LAN module supports
data transfer rate up to 100Mbps.
Using the Wireless LAN
You can connect to Internet by activating WLAN function.
NOTE: For more instructions or detailed steps on connecting to the
Network, please ask your MIS staff or network manager for help.

17
ﻰــــــــﺑﺮــــــﻋ

18
تﺎﻳﻮﺘﺤﻤﻟا ﻎﻳﺮﻔﺗ
ﺔﻳﺎﻨﻌﺑ ﻊﻄﻘﻟا ﻊﻴﻤﺟ ﻦﻣ ﻖﻘﺤﺗو ﻦﺤﺸﻟا نﻮﺗﺮآ ﻎﻳﺮﻔﺘﺑ ﻢﻗ ،ﻻوأ
.ﻦﻣ ﺔﻌﻄﻗ ىأ ناﺪﻘﻓ وأ ﻒﻠﺗ ﺔﻟﺎﺡ ﻰﻓ
لﺎﺤﻟا ﻰﻓ ﻰﻠﺤﻤﻟا ﻚﻠﻴآﻮﺑ لﺎﺼﺗﻹا ءﺎﺟر ،تﺎﻳﻮﺘﺤﻤﻟا.داﻮﻣو قوﺪﻨﺼﻟﺎﺑ ظﺎﻔﺘﺡﻹﺎﺑ ﻢﻗ ،ﺎﻀﻳأو
ﺡﻮﻟا ﻦﺤﺸﻟ ﺔﺟﺎﺤﻟا ﺔﻟﺎﺡ ﻰﻓ ﺔﺌﺒﻌﺘﻟاﻞﺒﻘﺘﺴﻤﻟا ﻰﻓ ةﺪ.
ﺔﻴﻟﺎﺘﻟا ﻊﻄﻘﻟا ﻰﻠﻋ ةﻮﺒﻌﻟا ىﻮﺘﺤﺗ نأ ﺐﺠﻳ:
لﺎﻘﻥ ﻰﺼﺨﺵ ﺮﺗﻮﻴﺒﻤآ ﺪﺡاو-MSI MEGA Book S250
دادﺮﺘﺱﻺﻟ ﺞﻣﺪﻣ صﺮﻗ ﺪﺡاو.
ﺔﻣﺪﺨﻟاو تﺎﻗاﻮﺴﻠﻟ ﺞﻣاﺮﺑ ىﻮﺘﺤﻳ ﺞﻣﺪﻣ صﺮﻗ ﺪﺡاو.
ﻊﻳﺮﺱ ﻞﻴﻟدو مﺪﺨﺘﺴﻤﻟا ﺐﻴﺘآ.
نﺎﻤﻀﻟا ﺔﻗﺎﻄﺑ.
تاراﻮﺴﺴآﻹا:
ﺔﻳرﺎﻄﺒﻟا ةﻮﺒﻋLi-ionﻟا ةرﺪﻘﻟا تاذﺔﻴﻟﺎﻌ.
ءﺎﺑﺮﻬآ ﻞﺑﺎآو ﻞﻳﺪﺒﻟا رﺎﻴﺘﻠﻟ لﻮﺤﻣ.
نﻮﻔﻴﻠﺗ ﻞﺑﺎآ/نﻮﻔﻴﻠﺗ ﺲﺒﻘﻣ)ىرﺎﻴﺘﺥإ(
لﺎﻘﻥ ﺮﺗﻮﻴﺒﻤآ ﺔﺒﻴﻘﺡ)ىرﺎﻴﺘﺥإ(
Other manuals for MEGA BOOK S250
1
Table of contents
Languages:
Other MSI Laptop manuals

MSI
MSI S425 - Megabook - Pentium M 1.73 GHz User manual

MSI
MSI CX605 User manual

MSI
MSI Vector GP68HX 12V 12VH-058IT User manual

MSI
MSI GT740 User manual

MSI
MSI Megabook L725 User manual

MSI
MSI CX705 User manual

MSI
MSI MS-1592 User manual

MSI
MSI CX600 User manual

MSI
MSI Wind U160-006US User manual

MSI
MSI L715 User manual