MSI P320 User manual

MSI Digital Player
Model: P320
User’s Manual
1

Preface
Thank you for purchasing “MSI” MP3 player. This user’s manual specifically introduces various functions of this
player, enabling you to operate the machine freely, and fully experience the extra-value feasts brought to you by this
product. Before use, please read this user’s manual carefully.
Notes:
1. This player is a high-precision electronic product, so please don’t disassemble it by yourself.
2. Avoid from intensively knocking and colliding this player.
3. Avoid from using this player in the following environment: High temperature, low temperature, humidity, dusts,
strong magnetic field and exposed to the sunlight for long time.
4. The wet cotton cloth that has been tweaked to be dry can be used to gently clean the shell of this player, and it is
strictly prohibited from cleaning with other chemical solution.
5. This player should not suffer water drop or splash, and the article filled with liquid like water cup should not be
placed near the player.
6. When listening to the player, please select the appropriate volume, to avoid damaging your hearing.
7. Please do not alter any part of this player.
8. Please only use the batteries, the charger and accessories permitted by the manufacturer. Use of any other type of
products will violate the warranty regulations, and maybe will have hazard.
9. Please follow the related local regulations on environmental protection to dispose the player and accessories out of
date.
10. If this player has any problem during its use, please contact the local distributor or directly contact Customer
Service Center in our company.
Declaration
1. In order to prevent material from being lost, it is suggested that the user should back up the important data. Our
company takes no responsibility for the loss caused by data loss.
2. This user’s manual is fabricated as the initial version of this product, and if functions are added or deleted and
operation altered after the version upgrade, please refer to the installation CD in the corresponding version or the user’s
manual in the corresponding version on MSI website, so if the specific descriptions in foresaid two materials have
differences, please refer to the installation CD with the player or the user’s manual in the corresponding version as the
standard.
3. If situations like added or deleted function and operation alteration occur after the version upgrade of this player,
please visit our company’s website http://www.msi.com.tw to download corresponding driver.
4. Pictures in the user’s manual are for reference only, and for the product, please refer to the real object as the
standard.
5. If there is any alteration in the product, we are sorry for not giving any additional notice, and for any inconvenience
caused, please forgive us!
Table of Contents
I. Product introduction
1. General description of product
2. Accessories with the player
3. Minimum configuration requirements for computer
4. Connection with computer
5. Product specification
2

II. Brief introduction of player
1. Sketch map of product
2. Notes for buttons
III. Startup/Shutdown
IV. Power Supply
V. Functions Introduction
A. Play Music
B. FM Tuner
C. Voice
D. Setting
E. Record
F. Delete Track
G. About
H. Exit
VI. Program update
VII. Portable Hard Drive
VIII. Formatting of this player
IX. Q & A
X. DRM10
I. Product introduction
1. General description of product
This digital player is a product with multi functions, high quality, low power consumption, and integrated with music
and language learning, and it adopts the extendable USB insertion design, aesthetic and fashionable, supporting MP3,
WMA and WAV formats, and DRM10, equipped with the functions of language rereading, digital audio recording, EL
backlighting and software upgrade, etc, and can also be played with electronic hard disc without drive (Excluding
Windows 98 and MAC Operation Systems).
2. Accessories with the player
Including the following accessories. When purchasing the product, if the quantities are not sufficient, please contact the
local distributor.
• Earphone (1 pair)
• USB cable (1 piece)
• Installation CD (1 disc)
• User’s manual (1 book)
3. Minimum configuration requirements for computer
• MS Windows 98/2000/XP/ME
• Pentium 200MHz central processor or above
• USB interface
• CD-ROM drive
• 40MB hard drive space
• 32MB RAM
3

4. Connection with computer
Please push out USB along the direction pointed by arrow with the “USB push-out button” on the back of the player,
and then insert into USB interface on the computer, thus to fulfill the connection between computer and the player.
5. Product specifications
• Model: P320
• Memory medium: RAM 64MB-4GB flash memory (Optional)
• Interface: USB2.0
• Transmission speed: >500KBps
• Audio recording format: WAV
• Bite rate: 8Kbps-320Kbps
• Audio recording time: Depending on the capacity of flash and the quality of audio recording selected
• Monitor: Single-color LCD
• Battery: Li batteries
• Battery recharging time: About 2 hours
• Maximum output: Earphone 16mwx2
• Specifications and dimensions: 69mm (L) x 27mm (W) x 12mm (H).
II. Brief Introduction of Player
(1)Strap line (2)Reset key (3)MIC
(4)Menu key/exit (hold)
(5)Hold: save recording/A-B repeat; Press: start and pause recording/select song and volume function switch
(6)Hold: play mode selection; Press: sound effect selection
(5)+(6)Lock/Unlock
(7)USB interface
(8)Hold: fast backward/fast volume-; Press: last song/volume-/choose icon forward
(9)Hold: fast forward/fast volume+; Press: next song/volume+/choose icon backward
(10)Hold: start-up/shut down/stop; Press: play/pause
4
(11)Earphone interface (12)USB push key
III. Start-up/Shut down
Start-up: hold 【】key for start-up, automatically turn to music playing after display screen shows start-up menu;
Shut down: hold【】key till dark screen, and then shutdown.
IV. Power Supply
1. Electricity surveillance: Check how much electricity is left with the indication on the battery icon, so as to
recharge in time.
When battery icon shows full, the power is the most sufficient, as increase of using time, the case number
displayed on the battery icon will also corresponding decrease.
When battery is almost used up, the area inside the battery icon will become blank, at this time, it should be
recharged in a timely manner. If forcefully starting up the machine at this time, the system will prompt a “Shut
down the player with low voltage” hint box, and then it will automatically shut down.
2. Battery Charging
The MP3 has two charging modes, including charger charging and computer USB charging (the charging mode is to
connect USB cable to MP3). For charging, the indication bar of battery icon rolls, the display screen shows “In
Charging”. For full battery, the system shows prompt of “Battery Full” and the battery is full and not changeable.
V. Functions Introduction
A. Play Music
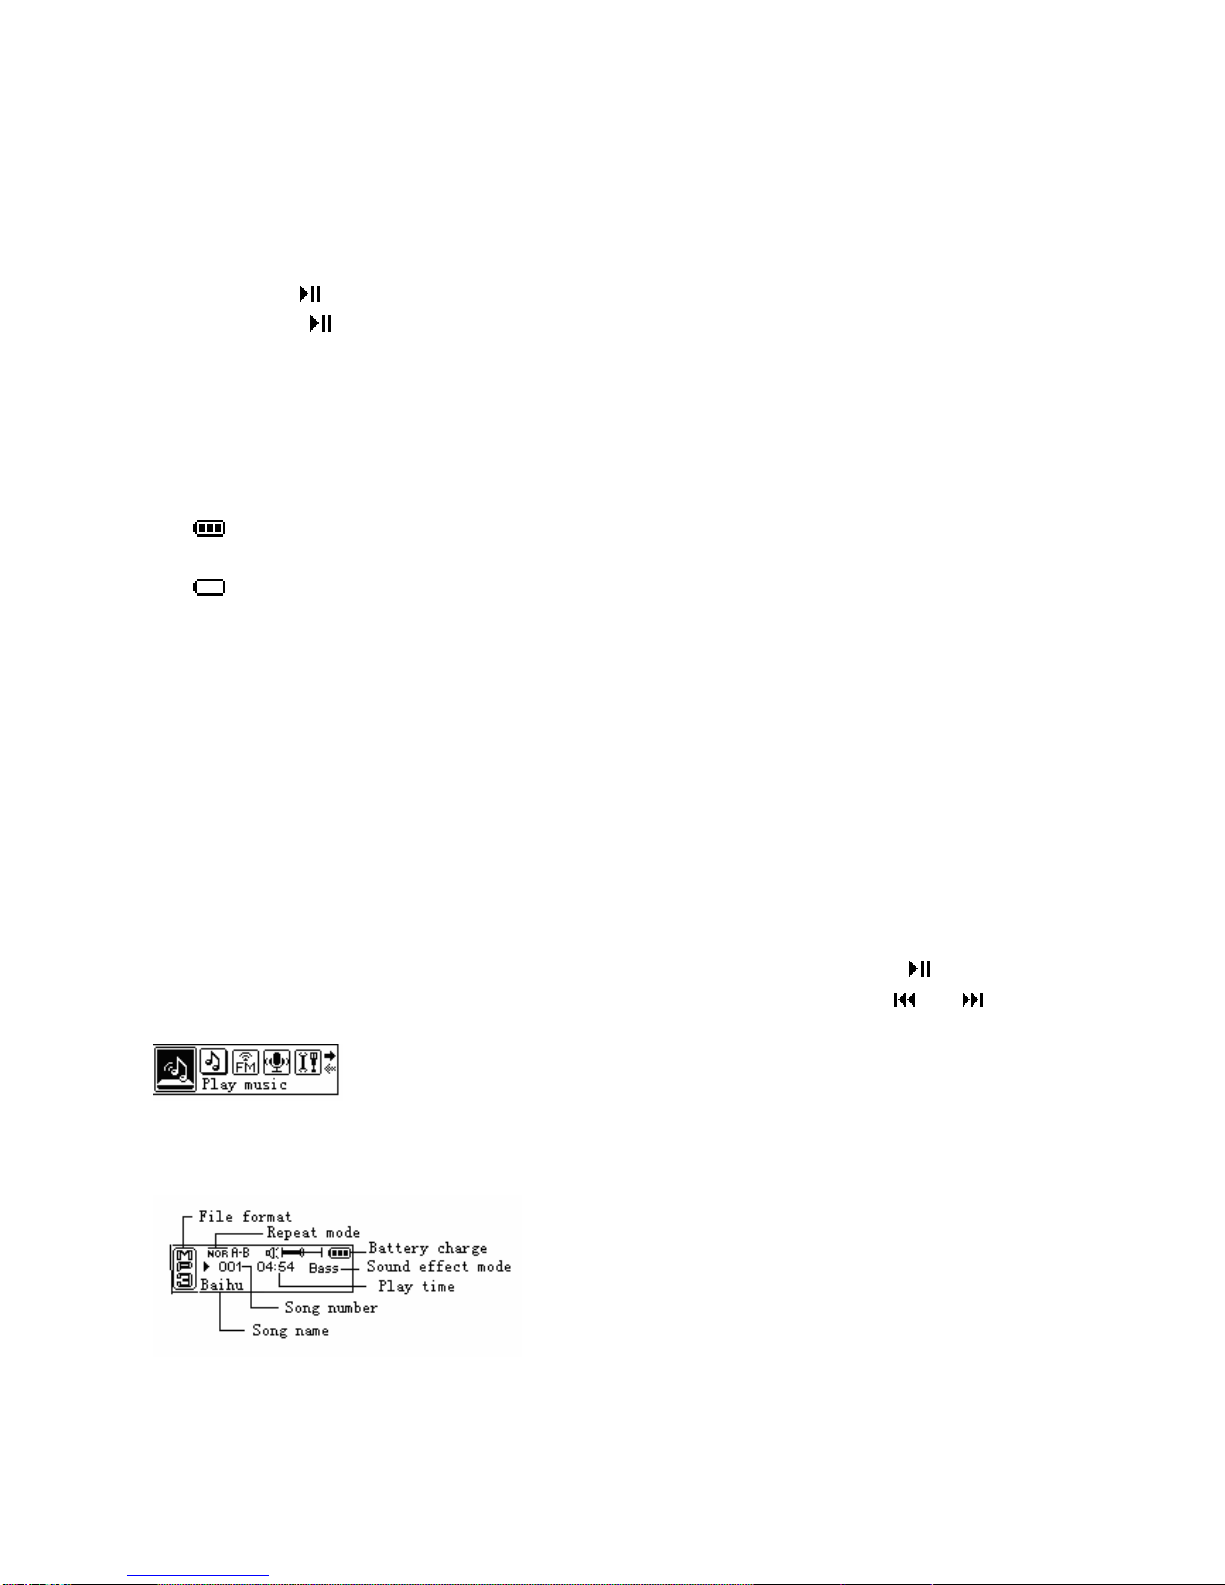
If the player has music file, automatically enter music play after start-up as Picture 2, press 【】key pause/continue
playing song. Under play mode, hold【MENU】key to be in menu mode as Picture 1, press【/-】or【/+】key, choose
“Music” icon and press【MENU】key to enter music play mode.
Picture 1
1. Interface Display Explanation under Play Mode
Picture 2
2. Select song: under play mode, press【REC】key to switch between volume adjustment and song selection, in song
5
selection mode, press【/-】or【/+】key to choose last or next music while current song fast forward/backward for
holding.
3. Adjust volume: under play mode, press【REC】key to witch between volume adjustment and select song, in volume
adjustment mode, press【/-】or【/+】key for volume-/+ while fast volume-/+ for holding.
4. Volume adjustment: press【EQ】key to switch among “NORMAL, ROCK, JAZZ, CLASSIC, POP and BASS”.
5. Play mode: hold 【EQ】key to switch among five play modes, including normal play ( play from the selected file
in the player or directory to the last file), single repetition ( repeat to play current file), overall repetition ( repeat
to play all files in the player or directory), stochastic play ( stochastically play the file in the player or directory)
and stochastic repetition ( stochastically repeat to play the file in the player or directory).
6. A-B read again: hold【REC】key to set the beginning point “A”, the display screen shows “ ”, and then hold the
key to set the ending point “B” and the display screen shows “ ”, the player reads again from the beginning point to
ending point, hold this key again to cancel the repetition.
7. File navigation: in play mode, press【MENU】key to enter file navigation function and then press【】key to enter
next directory or play the selected song. Press【MENU】key to return to last directory, quit the file navigation in the root
directory.
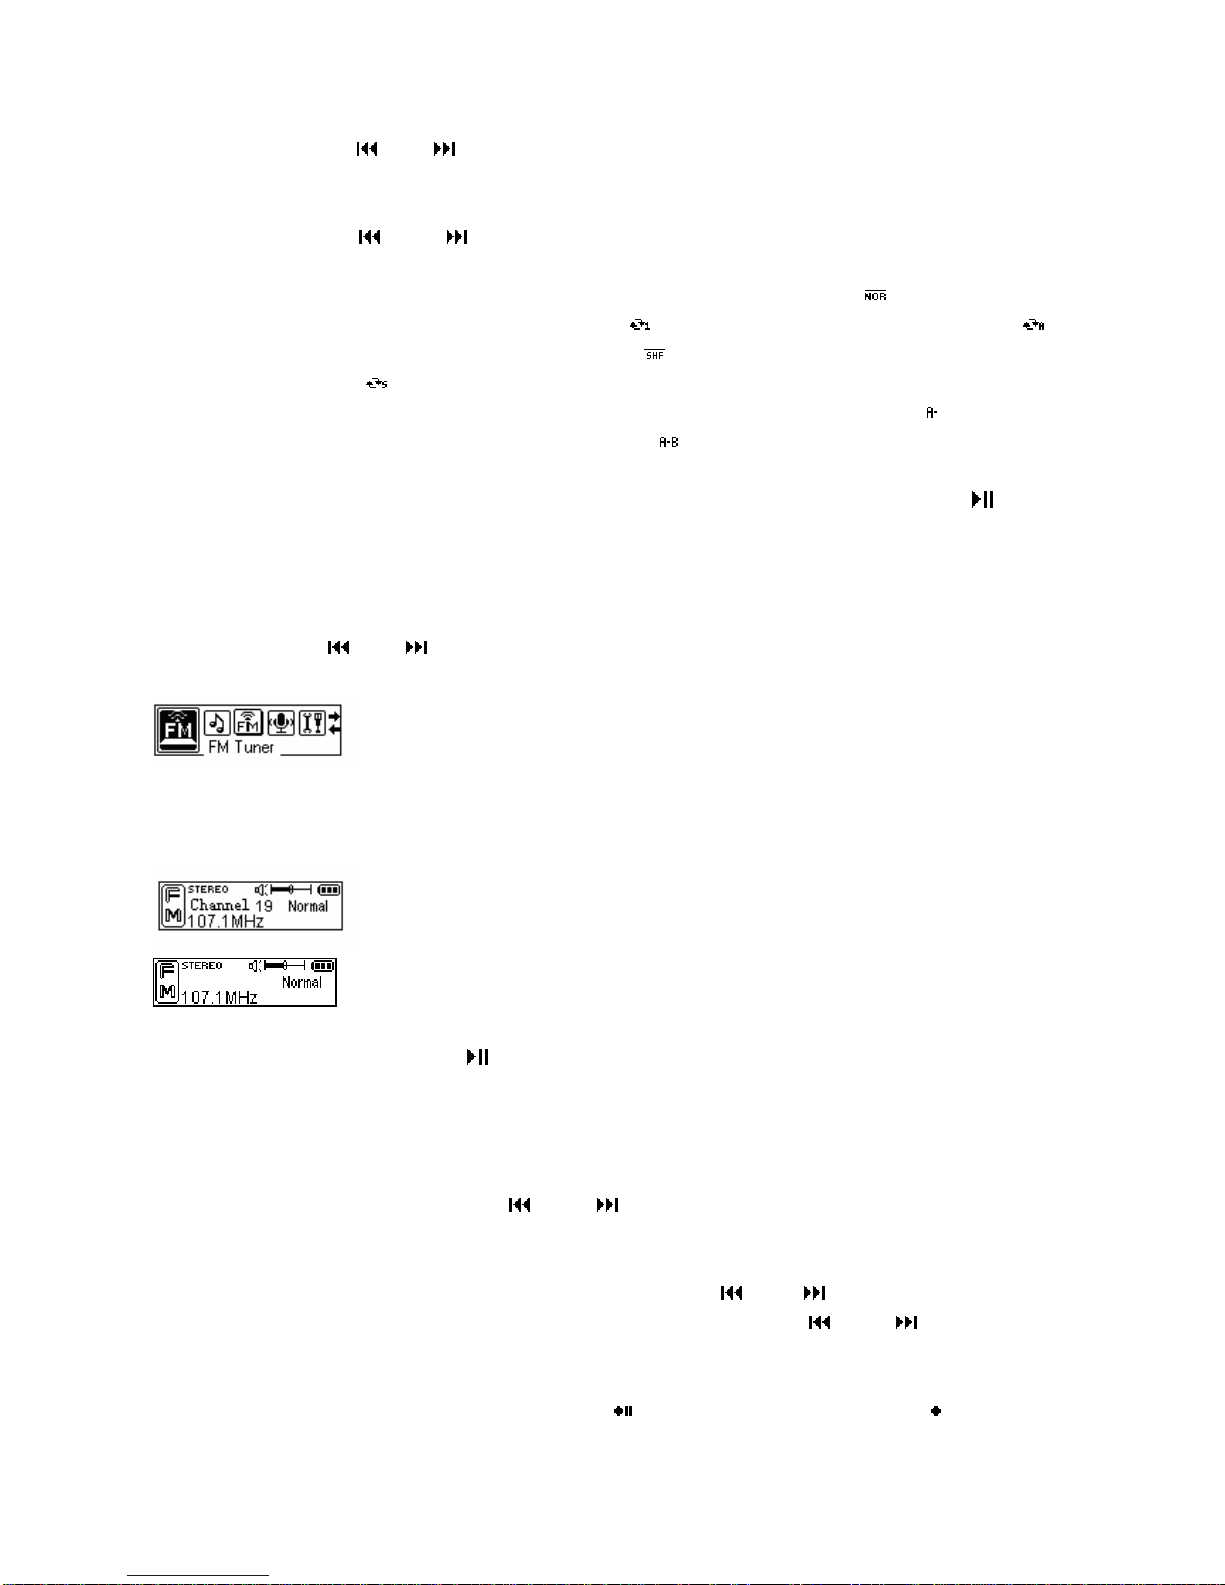
B. FM Tuner
In main menu, press【/-】or【/+】key to choose “FM Radio” icon as Picture 3 and press【MENU】key to enter FM
radio tune mode.
Picture 3
1. FM Tune/Search: In FM mode, if the player has saved broadcasting station, enter tune mode as Picture 4, otherwise
enter search mode as Picture 5.
Picture 4
Picture 5
Pause/Continue in FM mode: Press【 】key for pause/continue.
Search mode switch: press【MENU】key to search FM stations.
Search mode: two modes, automatic search and manual search.
(1) Automatic search: press【EQ】key, the system automatically searches and saves the searched
broadcasting stations.
Manual search/save: in search mode, press【/-】or【/+】key to search broadcasting station, and press【EQ】key
to save the channel for the broadcasting station
Switch broadcasting station selection and volume function: in FM listening mode, press【REC】key to switch
between select broadcasting station and volume, in select mode, press【/-】or【/+】key to switch among the saved
broadcasting stations; in volume mode, the display screen shows “V” icon, press【/-】or【/+】key for volume- or
volume+.
2. FM record: in FM listening mode, hold【REC】key to enter FM record mode as Picture 6. In FM record mode, press
【REC】key for record pause (the display screen shows )/continue (the display screen shows ). Hold 【MENU】
6
key to save record, quit inner record state and return tune state. The recording files are named ×××.WAV orderly
and saved in “FM” folder.
Picture 6
Note: the earphone used for the player is the radio antenna, insert the earphone into the socket for recording
FM radio otherwise it may not record the satisfactory signal of FM broadcasting station.
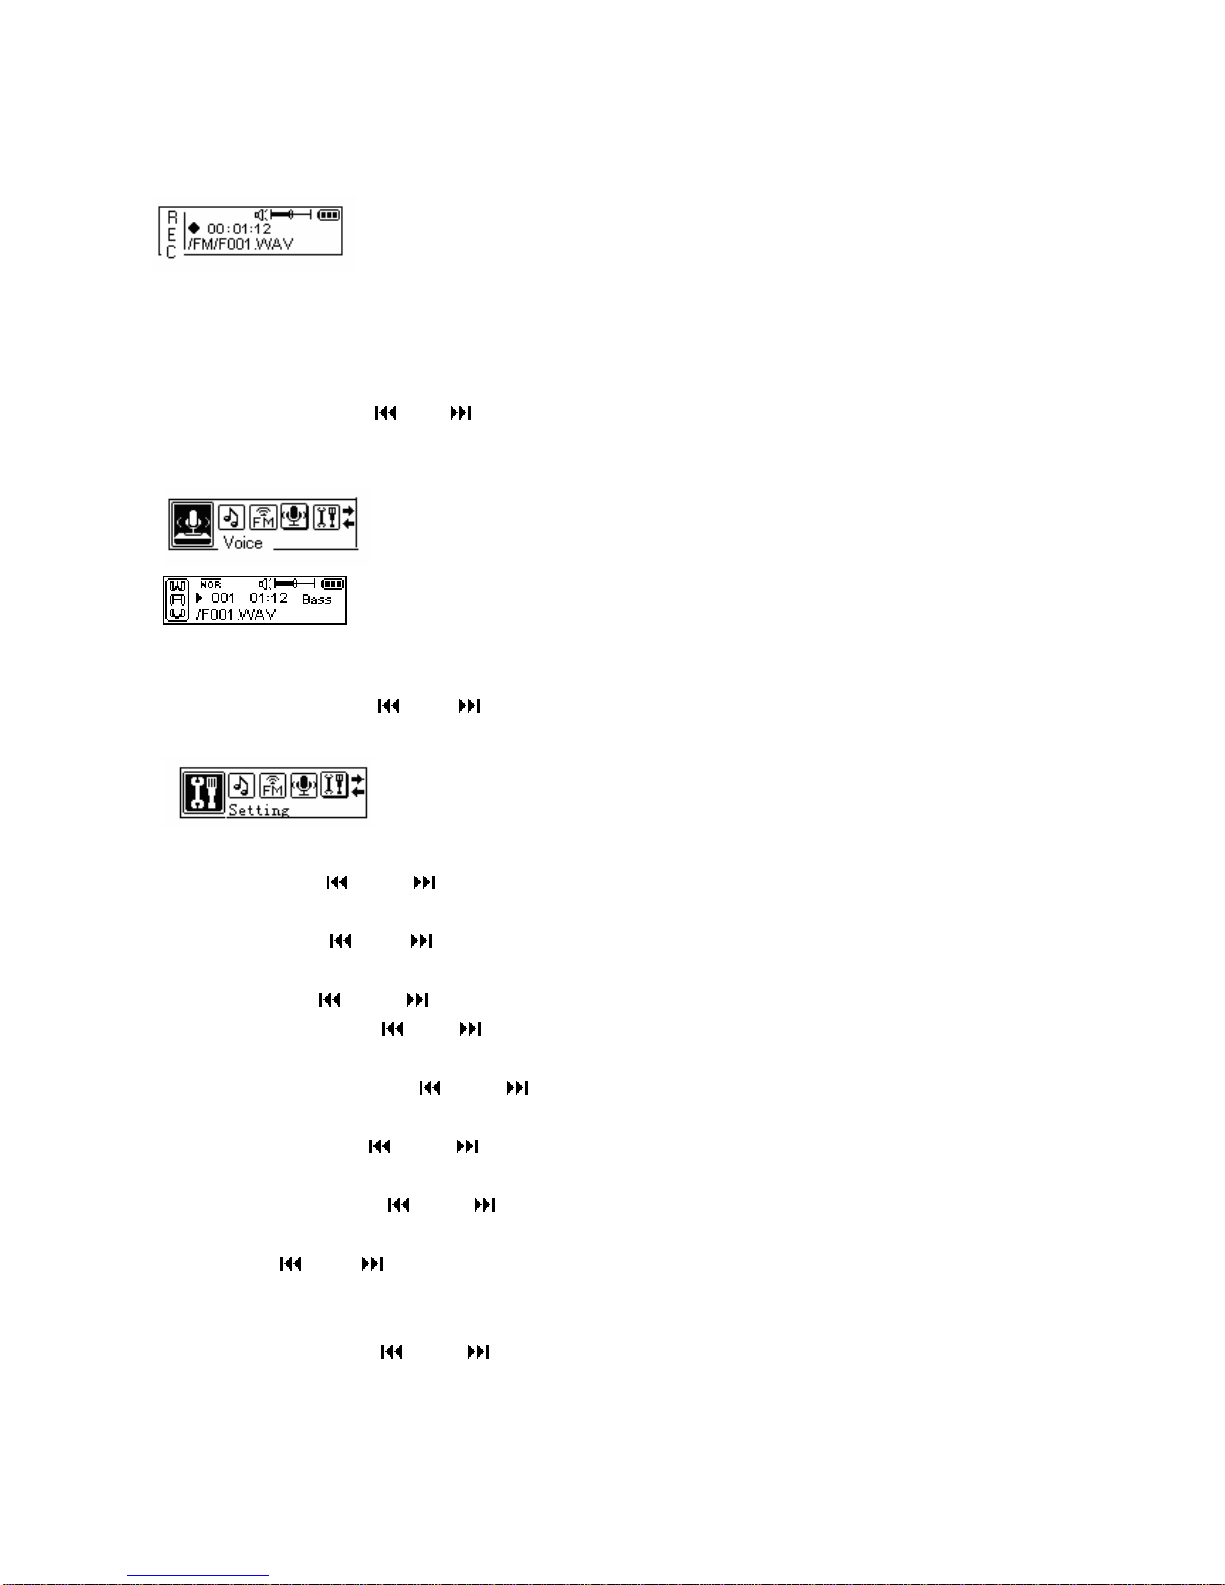
C. Voice
In main menu mode, press【/-】or【/+】key to choose “Sound” icon as Picture 7, press【MENU】key to enter sound
play mode as Picture 8. If the player doesn’t save sound file, the play interface shows “NO FILES” and the operation
for playing is the same as music play.
Picture 7
Picture 8
D. Setting
In main menu mode, press【/-】or【/+】key to choose “Setting” icon as Picture 9, press【MENU】key to enter the
setting interface.
Picture 9
1. Equalizer: press【/-】or【/+】key to choose sound effect mode, press【MENU】key to confirm and return to
last directory.
2. Play mode: press【/-】or【/+】key to choose repetition mode, press【MENU】key to confirm and return to last
directory.
3. Contrast: press【/-】or【/+】key to set contrast, press【MENU】key to confirm and return to last directory.
4. Backlight setting: press【/-】or【/+】key to set backlight time, press【MENU】key to confirm and return to last
directory. With screen protection, press any key to recover bright firstly, it will be effective for pressing again.
5. Automatic shutdown: press【/-】or【/+】key to choose the duration of automatic shutdown, press【MENU】
key to confirm and return to last directory, and “Forbid” means no automatic shutdown.
6. Record setting: press【/-】or【/+】key to choose different sampling frequencies and press【MENU】key to
confirm and return to last directory.
7. Language setting: press【/-】or【/+】key to choose menu language and press 【MENU】key to confirm and
return to last directory.
8. Quit: press【/-】or【/+】key to choose the item and press【MENU】key to confirm and return to last directory.
E. Record
In main menu mode, press【/-】or【/+】key to choose “Record” icon as Picture 10, press【MENU】key to enter
record interface as Picture 11.
7
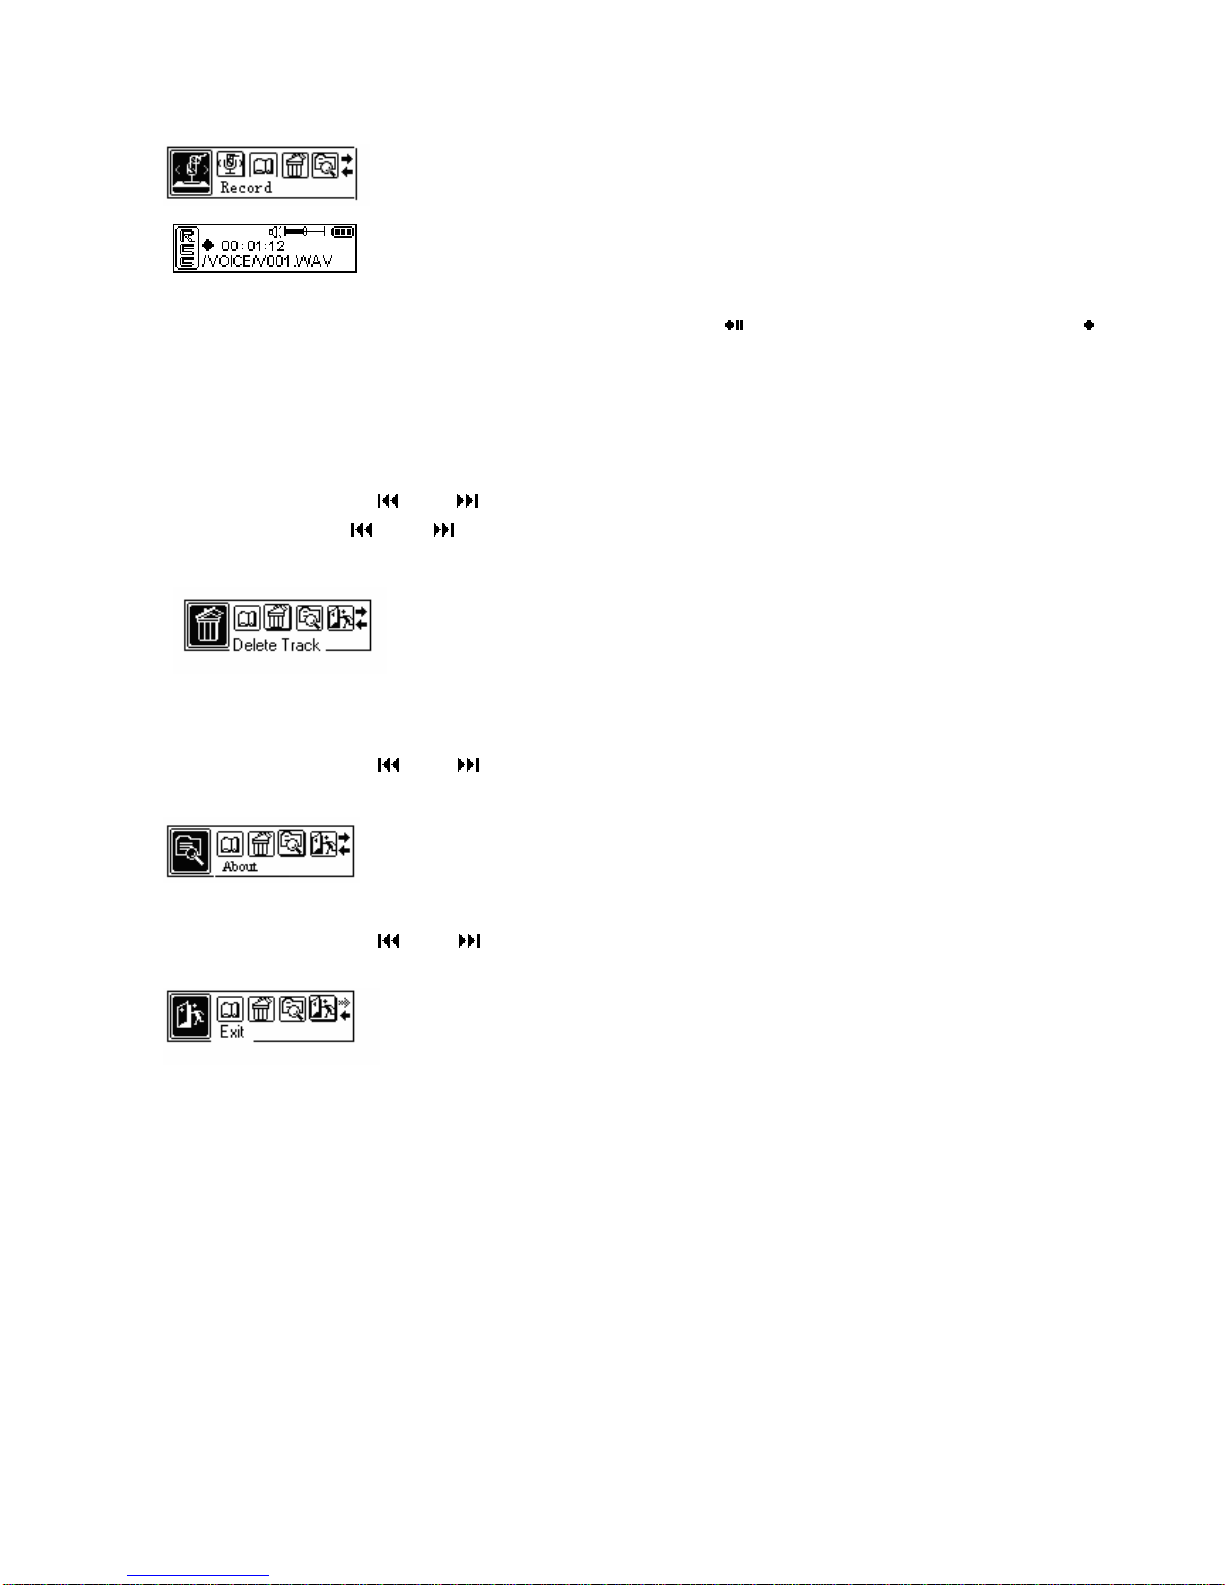
Picture 10
Picture 11
During record, press【REC】key to pause (the display screen shows ) and continue (the display screen shows )
recording, hold【REC】key to save record file and enter next record, and hold【MENU】key to save record and return
to main menu. The files recorded WAV format are V×××.wav while the files recorded MP3 format are named V××
×.MP3 orderly and saved in VOICE folder.
F. Delete Track
In main menu mode, press【/-】or【/+】key to choose “Delete” icon as Picture 12, press【MENU】key and pop up
“Delete” prompt, press【/-】or【/+】key to choose the file that will be deleted, select Yes and press【MENU】key
to delete the selected file, after that, the display screen shows “Have been deleted”, hold【MENU】key for abandoning.
Picture 12
G. About
In main menu mode, press【/-】or【/+】key to choose “About” icon as Picture 13, press【MENU】key to view the
total memory space and free space of the player.
Picture 13
H. Exit
In main menu mode, press【/-】or【/+】key to choose “Quit” icon as Picture 14, and press【MENU】key to return
play interface.
Picture 14
VI. Installation, deletion and use of computer-connected software
Computer-connected software is the interactive media between player and computer, MP3/WMA files,
audio files and material files etc all can be downloaded to the player or uploaded to the computer.
1. Installation
(1) Insert the installation CD with the player into the CD-ROM drive in the computer, and open the
installation file “P320 Program” and find “Setup” application program and double click to run, and press
the installation guide to execute the installation operation.
(2) Restart the computer, and connect the digital player with the computer, and then there will be an icon
of drive appearing on the desktop.
2. Deletion
After double clicking “Add/delete program” in the “Control panel”, a dialogue box of “Select to add or
8

delete program” will appear, and select the part of “Alter or delete program (H)”, and select “SigmaTel
MSCN Audio Player”, and click “Alter/Delete” button, and then proceed as indicated, or click
“Open/Program/SigmaTel MSCN Audio Player/Uninstall” on the desktop.
3. Use
Note: After installing the computer-connected software, it also needs to install USB drive to use.
Connect the player with the computer, and at the same time, the monitor of the player will display
connection status, and in the computer, double click “My Computer”, one removable disk will appear
under the index.
(1) Download (Transmit from computer to player)
Copy the file that needs to be downloaded from the hard drive of computer, and directly paste it on Disk
F.
(2) Upload (Transmit from player to computer)
Copy the file that needs to be uploaded from Disk F, and directly paste it in the directory in the
computer the file should be stored.
(3) Delete
Select the file to be deleted on Disk F, and then press the right button of the mouse to select to delete or
press “Delete” button on the computer keyboard.
(4) Formatting this player
If MP3 with flash memory has the data error, it will have the phenomenon of being unable to be
identified after connected to computer, and it will not respond by pressing the “Play” button, and at this
time, it needs to format this player.
Notes: When formatting, it will clean off all the MP3 music, audio records and data files. So please
make sure backup the important data.
Formatting method: Connect the USB of player with computer, and find “Removable disc” and press
the right button of mouse to pop out the pulling bar, and select “Format (A)…”, and in the formatting
dialog box popped out, select【Start】, it will appear the hint warning of “Confirm formatting”, and at this moment,
press 【Confirm】, it will start to format, and after completion of formatting, the system will appear the hint box of
“Completion of formatting”.
VII. Program upgrade
Please insert the CD with the player into CD-ROM of the computer (Or log onto our website to
download the latest program), and install program for computer connection as hint, and after installation
completed, please use the mouse to press “Start/Program/ SigmaTel MSCN Audio Player/ Firmware
Download..”, and at this time, press the start-up button on MP3 player and be connected with PC, it will
appear a “Equipment will be repositioned” hint box, and select 【Confirm】, it will appear “Software upgrade”
interface. Press “Download” to pop out “Firmware upgrade” window, and at this time, press “Display details”, you can
look up the current version, upgraded version and equipment details of this player, and press 【Start】, it will
automatically upgrade the current program, and when the window displays “Completed”, you can click 【Close】, to
complete the program upgrade of this player.
VIII. Portable Hard Drive
This player can be used as U disc without drive in Win ME/2000/XP OS, and in Win 98 and MAC OS,
the drive with the player must be installed, and it can upload/download file in any format, and due to
these files are not in MP3/WMA and audio recording formats, when playing, rereading and recording
MP3/WMA/audio record, it will not be displayed or affected. In OS over Win98, in order to avoid the
data loss caused by suddenly unplugging the player from USB port, please click the “ ” icon on the
right bottom corner of Windows desktop, and follow the instructions to complete getting USB from
computer step by step.
IX. Q & A
9

1. Why some songs in WMA format cannot be played after downloaded to digital player?
Now, there are many music files in many formats on the Internet, including many files fabricated in
WMA format. You maybe know that for music in WMA format, there is a DRM (License) copyright
protection measure, which can make people without the authorization unable to play the corresponding
music, and thus can protect the interest of the music owner very well.
Nowadays, there are some websites on the Internet that provide WMA music without the license
protection, and like music in MP3 format, you can reproduce or play them as you like. But, there are
also some websites that only provide WMA music with the license protection (Like www.9sky.com), at
this time, you maybe can only play the music on Windows Media Player with the license (Windows
Media Player is a stream-media broadcasting software playing WMA provided by Microsoft for free,
and you can download from many websites), but you cannot simply reproduce it onto another computer
without the license to play, thus effectively preventing the spreading of music, and protecting the
owner’s interest.
This digital player also provides the feature playing WMA, and when you intend to download a WMA
music that you have obtained the corresponding license to play, please do not directly simply reproduce
it on computer to download the music to digital player, because thus the music cannot be normally
played in digital player. Please firstly open your Windows Media Player, and in the “Menu”, click
“Open” to firstly open all the WMA music you want to reproduce (If they can be played, you can
download). Connect digital player with computer through the USB cable, and at the same time, the
player monitor will display “Right in the communication”, and it will appear a Removable disc (Like
F:\), and at this moment, on Windows Media Player, press the “Portable equipment” button on the left,
the menu to reproduce music will appear, and at this moment, select the name of music you want to
reproduce on the left, and then, press “Reproduce music” button on the upper left corner, and then you
can correctly reproduce the corresponding music with the license protection into digital player.
2. Requirements for system using flash memory
a. IBM PC and compatible PC, notebook computer and Apple computer, etc.
b. Windows 98 (Needs to install the drive), Windows ME/2000/XP, MAC 9.X or higher version.
c. With the standard USB interface.
3. What to do if unable to play MP3?
a. Confirm the plug of earphone has been fully inserted.
b. Confirm the sound volume has been adjusted higher.
c. Confirm the music file has not been damaged and it’s valid.
d. Confirm the player is in “Play” status.
e. Confirm whether your MP3 file meets the MP3 format.
f. If the above methods are not effective, please use Reset feature to restart MP3 player.
4. When connecting the player with computer, no any response
a. Confirm your computer and software meet requirements. Refer to system requirements for player.
b. Confirm the USB interface of the player is valid
c. Break off the USB connection, and press【 】 button and connect USB cable.
5. Player is unable to be opened or has no response
a. Confirm the batteries have power
b. During the upgrading process of firmware of player, accidental error occurs or the USB cable is
unplugged
c. Flash memory has the physical damage, causing player unable to be correctly started up.
6. What is LRC lyric?
10
The so-called LRC lyric means the lyric synchronously displayed with the MP3 music being played,
which also includes the test synchronously played with the voice in foreign language.
7. When saving the lyric, use the different file name with the MP3 file name, and no lyric
displayed when being played, what is the reason?
LRC file name must be the same as MP3 file name, otherwise when playing it, it cannot be displayed
due to the lyric with the same name cannot be found.
8. Data lost?
Some data lost is caused due to unstable power supply in the downloading process, and our company
takes no responsibility for the loss of any data, and the customer is suggested to back up the important
data.
9. Why different songs have different sound volumes?
Different songs have different sound volumes, because some adjust the electricity of sound volume in
the recording process, it sounds having the higher sound volume than other MP3 files.
10. Why sometimes the size of file smaller than space that can be used in the player cannot be
downloaded into player?
Memory chip in the player sets every 16KB or 32KB as one memory area, and one file with the size for
1Byte will take one memory area, so you maybe see the file with the storage smaller than the residual
capacity cannot be downloaded into player.
X. DRM10
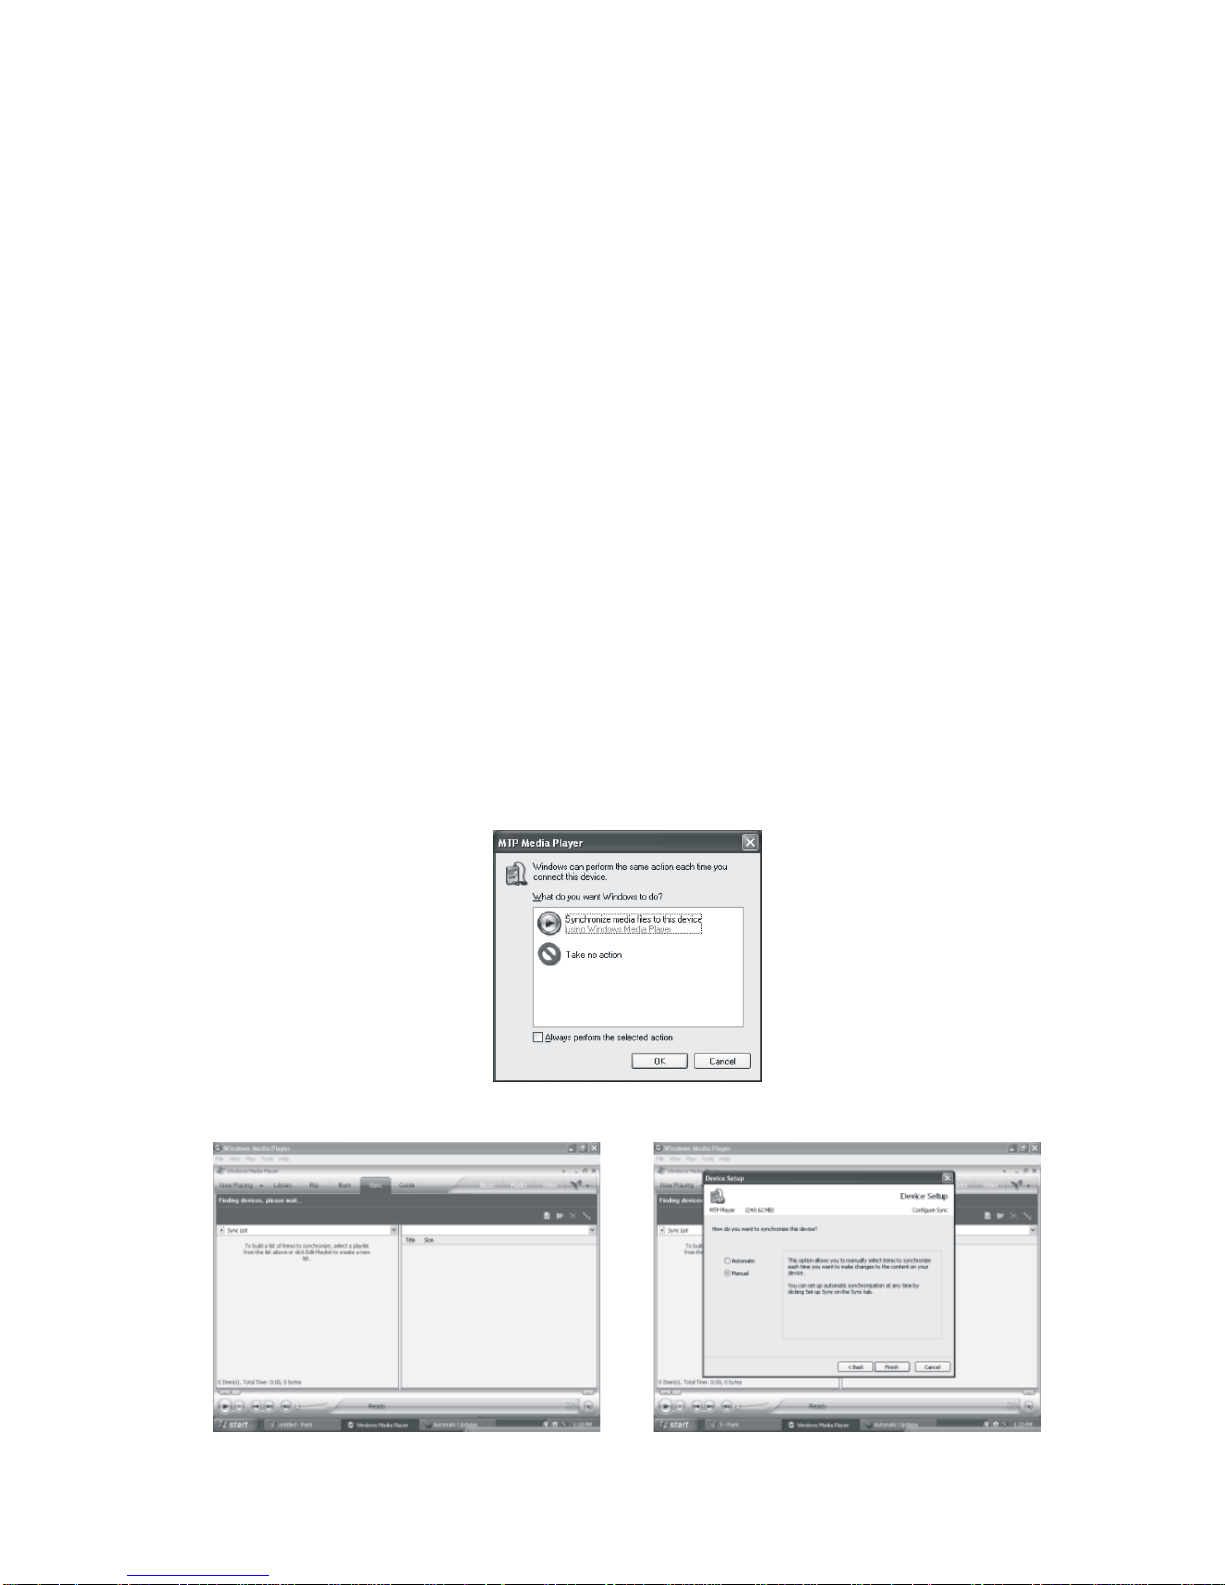
Instruction of DRM10 function: (by using this function, you should install Windows Media Player 10 first)
1.Insert the USB, the dialogue box “MTP Media Player” appears. Select “OK”
2.Searching for device, it enters the interface of Windows Media Player 10. Sometimes
the second dialogue box as below appears. Select “manual” and click “OK”.
11
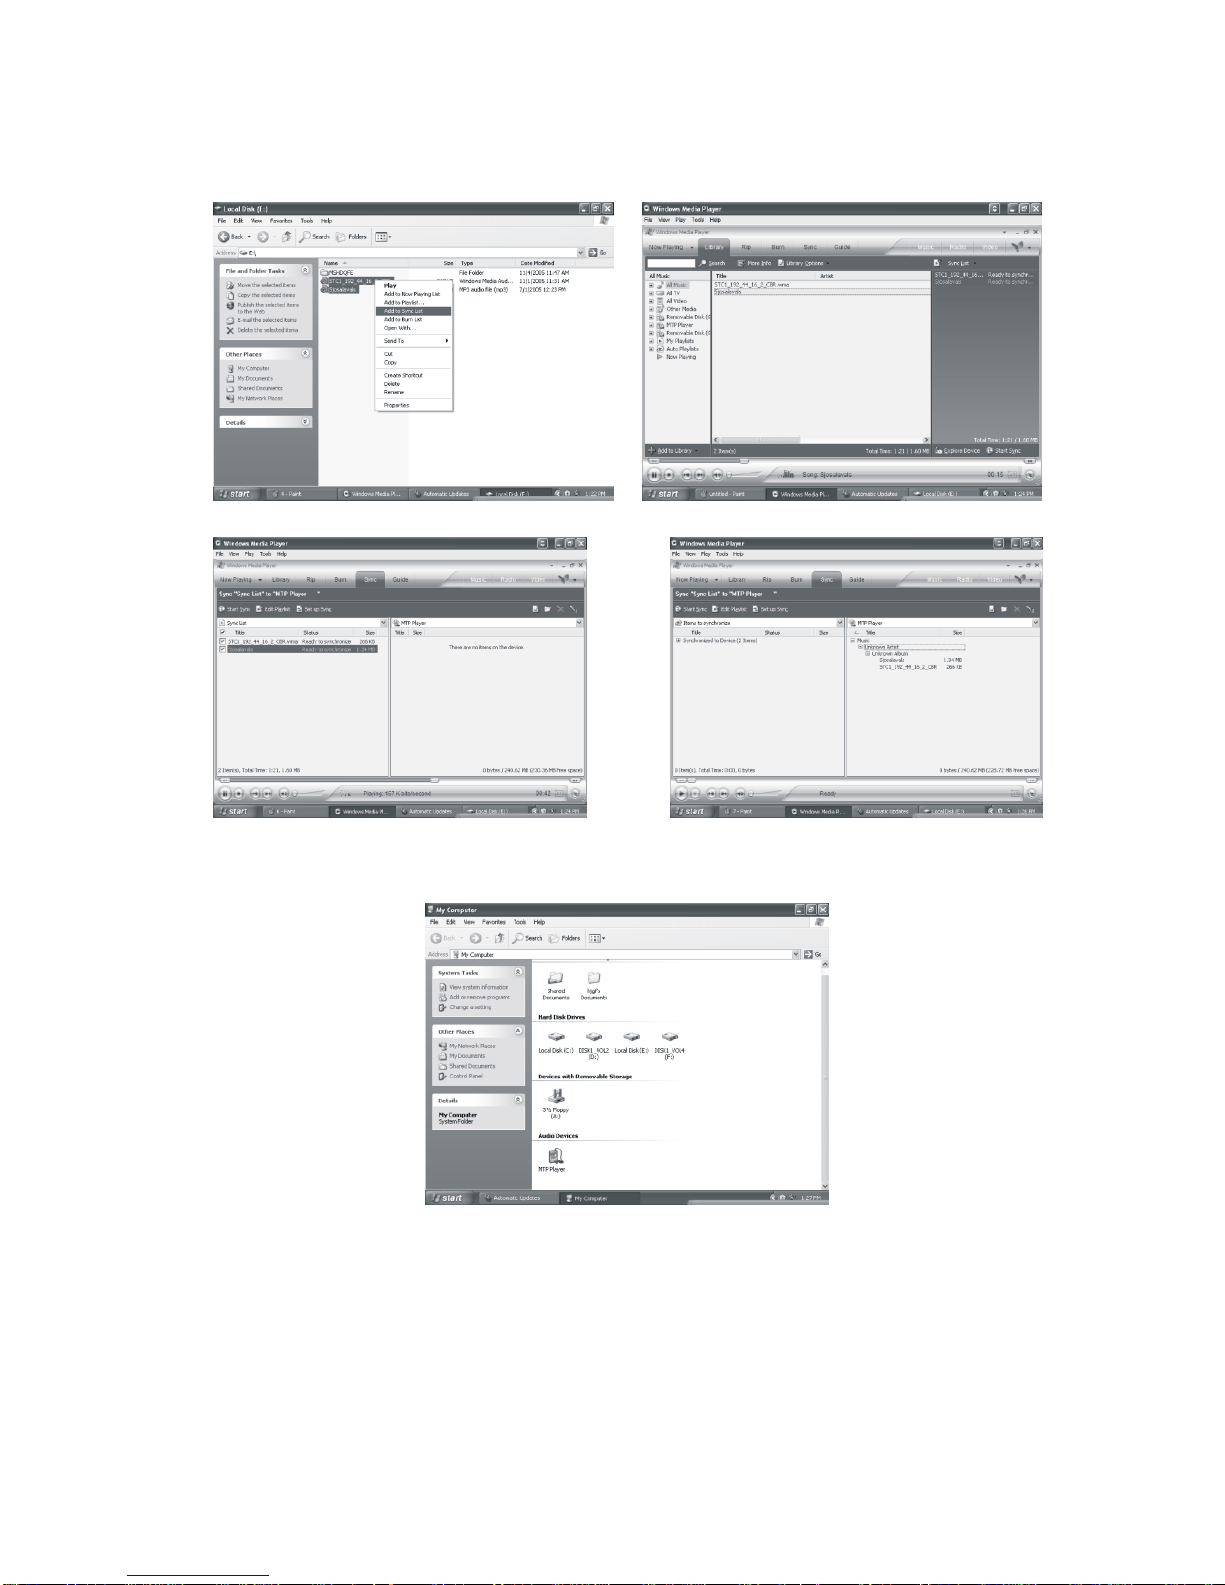
3.Synchronize the downloaded registered music files to the MP3 player. Operations are as below:
a.Select the file, click the right mouse button and select “add to sync list”. Select “sync”
on the pop-up interface, the selected music file is added to the sync list then.
b.Click “start sync”, and the selected file will be synchronized to “MTP Device”.
Instruction of coping files:
1.Open “my computer” and double click “MTP Device”.
2.There are two folders: “media” and “data”. The “media” folder is used for depositing
registered music files and the “data” folder deposit other files. Note: registered music files can only be synchronized
into “MTP Device”. Other files can only by copied into “MTP Device” and cannot be transmitted directly.
12

Note: while upgrading the player, you have to press and hold the “ ” button during the process and initialize the
player once after power it on. It costs about 3 minutes.
For detailed instruction of Windows Media Player 10 please refer to below web sites:
http:// www.microsoft.com/windows/windowsmedia/cn/mp10/readme.aspx
http:// www.mircosoft.com/windows/windowsmedia/knowledecenter/bowto.aspx
13
Table of contents


