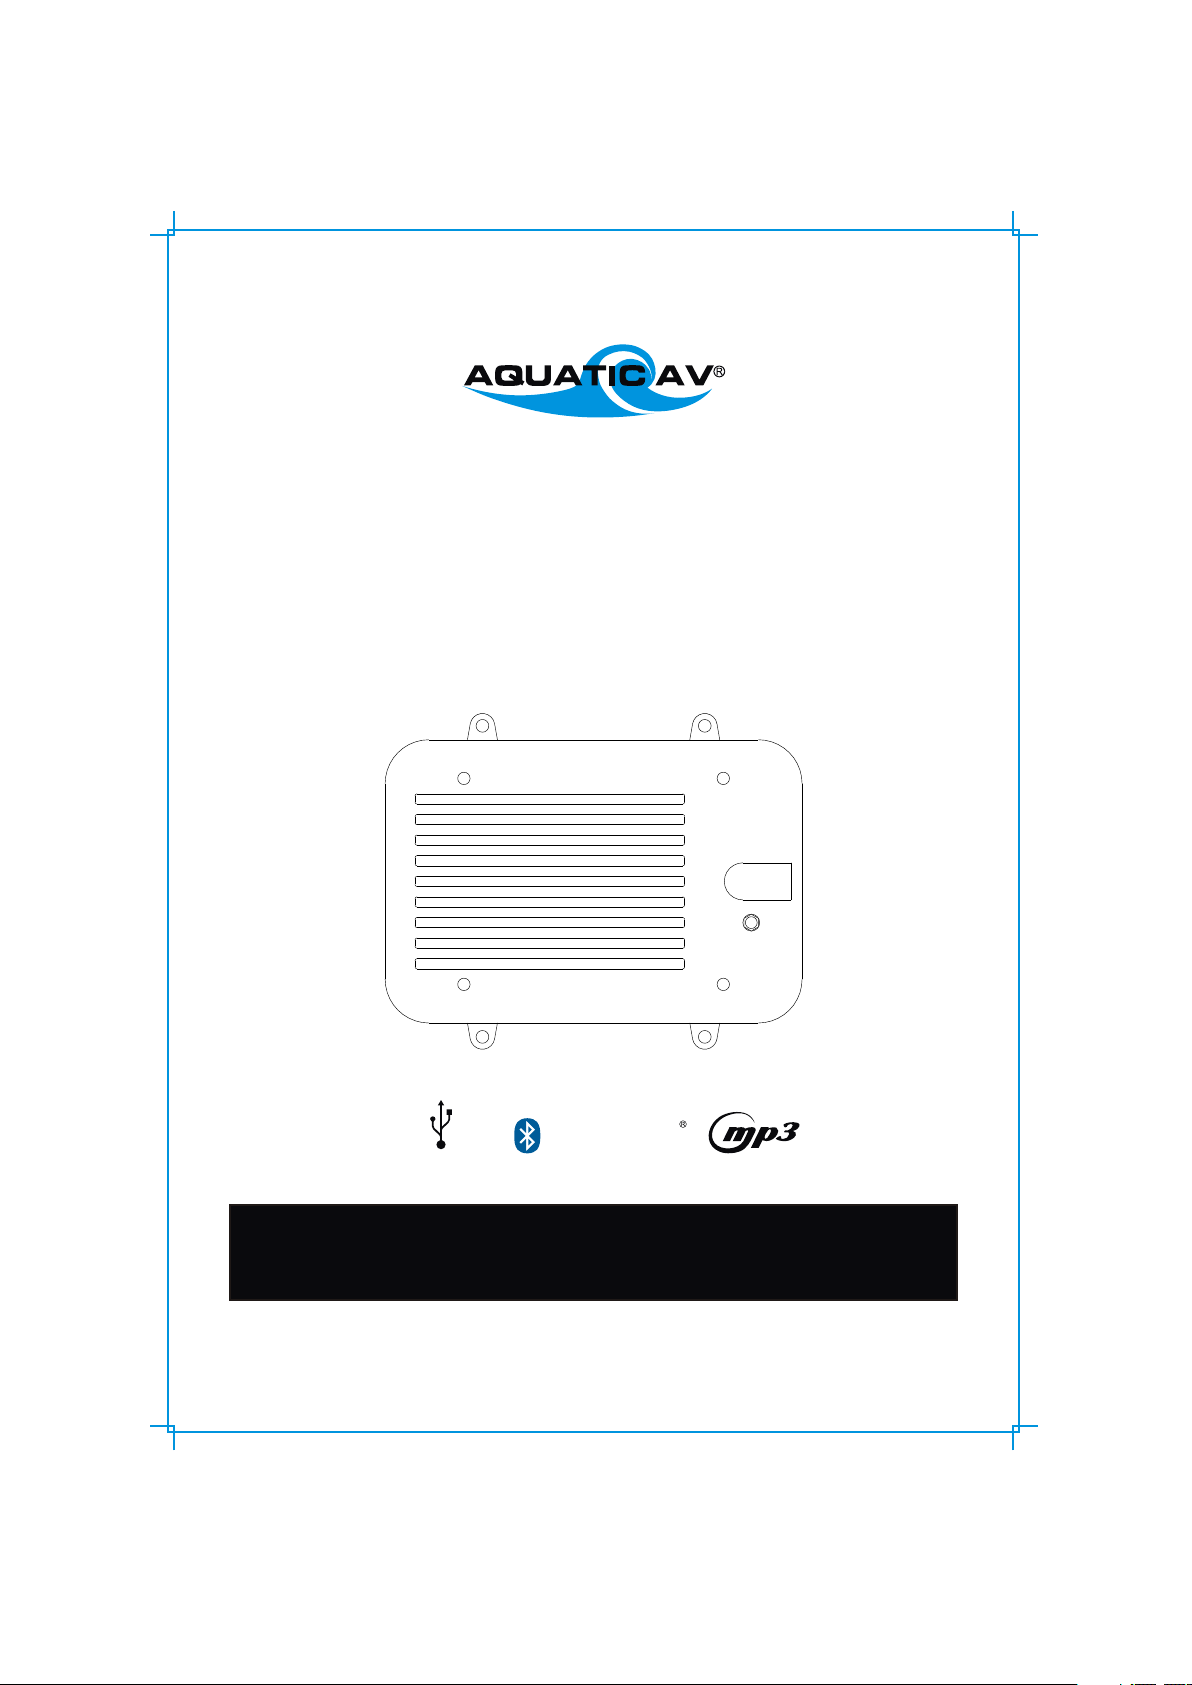
Aquatic AQ-BC-6UBT Guide
products with watertight reputation
BLUECUBE+ AQ-BC-6UBT
'HIDE-AWAY' MEDIA PLAYER
for Bluetooth, USB, iPhone, iPod, MP3 devices, and FM Radio
USER / INSTALLATION MANUAL
PLEASE READ THIS INSTRUCTION MANUAL BEFORE
INSTLAATION AND OPERATION
! !
Bluetooth
USB 2.0
1 Getting Started
1.1 Contents
1.2 Connections
1.3 12-pin Harness Connection
1.4 Mounting the BlueCube Media Player
1.5 Power On
1.6 Handheld Remote Control Charging
1.7 Handheld Remote Control Synchronizing
2 Location of Controls
2.1 Wireless Handheld Remote Control
3. Listening to Devices
3.1 Listening via USB
3.1.1 USB thumb drive
3.1.2 Charging
3.2 Listening via Bluetooth
3.2.1 Pair with Bluetooth Device
3.2.2 Listening via Bluetooth Device
3.2.3 Multi-link
3.3 Listening via Auxiliary Input
3.4 Adjusting Volume Level
4. Listening to FM Radio
4.1 Enter FM Radio Mode
4.2 Scan or Seek FM Radio Channels
4.3 Saving Radio Channel to Memory
4.4 Listening to Saved Radio Memory
4.5 Adjust Volume Level
5 Using Audio Menu on Handheld Remote Control
6 Using VBass
7 Additional Features
5.1 External 12V Trigger
5.4 Connectng Multiple Amplifiers or High Current Draw Lighting Systems
8 Specifications & Dimensions
6.1 Specifications
6.2 Dimensions
9 Warranty Information
10 FCC Statements
3
3
3
4
4
5
5
5
6
6
7
7
7
7
7
7
7
7
7
7
8
8
8
8
8
8
8
8
9
9
9
10
10
10
11
12
Table of Contents Bluecube Media Player AQ-BC-6UBT
www.aquaticav.com 2
Getting Started Bluecube Media Player AQ-BC-6UBT
www.aquaticav.com 3
1.1 Contents
AQ-BC-6UBT BlueCube+ Media Player
2-Way RF Waterproof Remote Control
Wiring Harness (AQ-UNH-2)
Four (4) Staineless Steel Mounting Screws
Owner's Manual
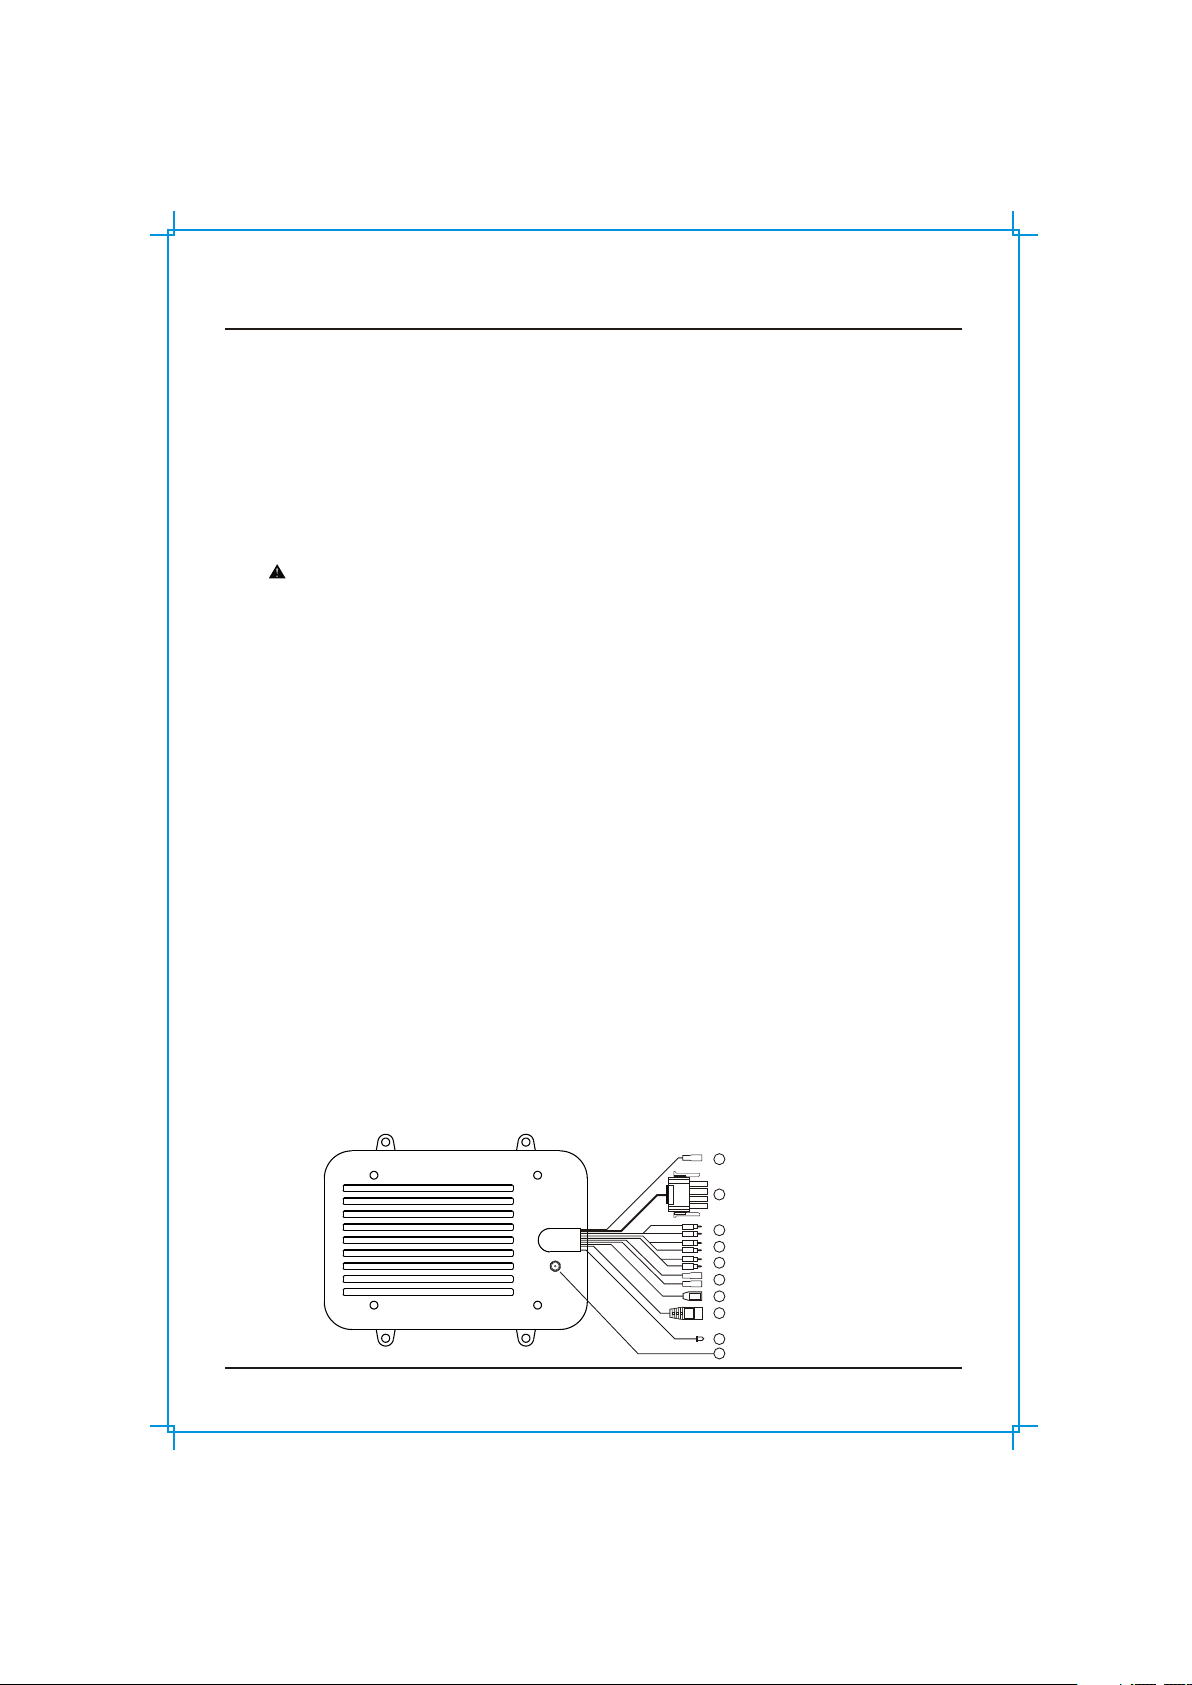
1.2 Connections
1: 12-pin Watertight Harness
The 12-pin harness supplies power and ground connection to the BlueCube+ Media Player and four (4)
speaker channel output connections from the BlueCube+ Media Player.
Do not cut or modify the 12-pin harness on the unit side or warranty will be void.
2: FM Radio Antenna Jack
Connect antenna (AQ-ANT-1 sold separately) to female antenna receptacle. For best FM performance,
make sure the antenna is extended to the highest achievable position.
3: Auxiliary Outputs - Rear
Allows external amplifiers to be connected to power additional speakers.
4: Auxiliary Outputs - Front
Allows external amplifiers to be connected to power additional speakers.
5: Auxiliary Inputs
Connect to a portable audio player through the AUX IN cable on the back of the BlueCube+ Media Player.
6: 12V DC External Trigger
Allows for an external light or relay to be triggered (2A max load). There are two external triggers
7: USB Connector
Connect a USB device play music.
8: Wired Remote 8-pin DIN Connector
Connect to a wired Remote Control
9: Power On LED
When the BlueCube is powered On, the LED will lit.
10: Bluetooth Antenna Connection
Connect to the Male SMA connector of the Bluetooth antenna (AQ-BTANT-1). Do not apply excessive
torque on the SMA connector (no more than 0.5N-m). Use hands to tighten the connection. (No wrench is
used)
12-pin Watertight Harness1
2
3
FM Radio Antenna Jack
RCA Auxiliary Outputs (Rear)
8
6
9
8-pin DIN Cables (Black)
External 12V Trigger wires (Brown)
Power On LED
4RCA Auxiliary Outputs (Front)
5RCA Auxiliary Outputs (Front)
7USB Connector
10 Bluetooth Antenna Connector
Getting Started Bluecube Media Player AQ-BC-6UBT
www.aquaticav.com 4
1.3 12-pin Harness Connection
The AQ-BC-6UBT includes the universal harness AQ-UHN-2 in order to connect the BlueCube to power and
speakers.
All open wire connections should be soldered and protected against water and dust for best long term
performance.
Power Antenna (7)
DC Ground (10)
LR-(2) ACC
LR+(3)
LF-(5)
LF+(6)
RF-(8)
RF+(9)
RR-(11)
RR+(12)
FUS E BOX
Left Rear Speaker
+
-
Left Front Speaker
+
-
+
-
+
-
Right Front Speaker
Right Rear Speaker
Please put a
fuse into the box
(Red color)
(Blue color)
(Green/strip)
(Green color)
(White/strip)
(White color)
(Gray/strip)
(Gray color)
(Purple color)
(Purple/strip)
(Black color)
No lower than 2 Ohm load should be used
or damage may occur to the BlueCube Media
Player.
Make sure the polarity of speakrs are
connected correctly.
(Yellow color)
+12VDC(1)
1.4 Mounting the BlueCube Media Player
1. Make sure the outside surface is clean and clear of
debris
2. The BlueCube Media Player has four (4) front
screws. Drive the screws using a screw driver.
Make sure screws are snug and do not over tighten.
Getting Started Bluecube Media Player AQ-BC-6UBT
www.aquaticav.com 5
1.5 Power On
The AQ-BC-6UBT requires +12V dc to both the red and yellow wires. When both of these wires have power,
the AQ-BC-6UBT is always powered on and is indicated by a red LED coming out of the heatsink of the
stereo. Ground is connected to the Black wire.
In a SPA application, this requires the red and yellow wires to be jumped together and tehn connected to
+12V dc output of the power source. In this set up, the AQ-BC-6UBT will always be on, with a very low
current draw when idle.
In a bot, ATV or other application requiring power from a battery, the yellow wire (constant power) should be
connected to the battery, and the red wire connected to the ignition or a switch.
For detailed instructions, you can check out our online video:
"How to wire your Aquatic AV stereo system"
http://www.aquaticav.com/support/videos
1.6 Handheld Remote Control Charging
The remote has a built-in Polymer Lithium rechargeable battery. It comes with a custom made charging
cable which is used. Connect one end to the blades of the remote control and another to any USB charger
(5V dc) for charging.
Make sure the remote has been charged before used.
1.7 Handheld Remote Control Synchronizing
The remote should already be paired from the factory, but if you need to synchronize the remote, follow
below steps.
1. Make sure BlueCube+ Media Player (AQ-BC-6UBT) is powered ON (red LED lit)
2. Put the remote close to the BlueCube+ Media Player (within 0.5 meter)
2. Press and hold MODE on remote control until the LCD shows "Pairing in Progress". Release the button.
3. WIthin 2 seconds, the LCD will show "Paired". If it fails to pair, the LCD will show "Retry again". If this
happens, wait 5 seconds and repeat the above procedures.
For any additional remote controls, you will also need to synchroize those remote controls to the BlueCube
Media Player (AQ-BC-6UBT).
If the pairing process is not successful, try again to put your remote close to the dongle.
Depending on the frequency of usage, the remote might drain its battery. Please charge the remote before
use. If the LCD shows nothing, it means that the battery has been drained.
If you have lost your remote control and buy a new remote control, please follow the above steps to pair the
remote control

Location of Controls Bluecube Media Player AQ-BC-6UBT
www.aquaticav.com 6
2.1 Wireless Handheld Remote Control AQ-RF6UBT-T (sold separately)
23
1
AUDIO AUDIO
MODEMODE
PAIRPAIR
AUDIO AUDIO
MODEMODE
PAIRPAIR
Buttons Bluetooth FM Radio
Power
Mode/Pair
Volume
Up
Volume
Down
2
3
EXT
Trigger
Audio
VBass
Fast
Forward
Fast
Rewind
Play/
Pause
11
2
3
Volume up
Fast volume up
Volume down
Fast volume down
AUX MP3
Button Action
Press once:
Press and hold:
Press once:
Press and hold:
Press once:
Press and hold:
Press once:
Press and hold:
Press once:
Press and hold:
Press once:
Press and hold:
Press once:
Press and hold:
Press once:
Press and hold:
Press once:
Press and hold:
Press once:
Press and hold:
Press once:
Press and hold:
Press once:
Press and hold:
Press once:
Press and hold:
Change mode
Synchronize remote control
Toggle Operational mode to Standby mode or vice versa
No function
Next track
Fast forward
Previous track
Fast Rewind
No function
No function
No function
No function
Next track
Fast forward
Previous track
Fast Rewind
+0.05kHz
Scan up
-0.05kHz
Scan down
Play / Pause
No function
Play / Pause
No function
Mute / unmute
No function
Mute / unmute
No function
No function
No function
No function
No function
No function
No function
Preset 1
Save to Preset 1
No function
No function
No function
No function
No function
No function
Preset 2
Save to Preset 2
No function
No function
No function
No function
No function
No function
Preset 2
Save to Preset 2
Toggle EXT 1 on/off
Toggle EXT 2 on/off *
Toggle EXT 1 on/off
Toggle EXT 2 on/off *
Toggle EXT 1 on/off
Toggle EXT 2 on/off *
Toggle EXT 1 on/off
Toggle EXT 2 on/off *
Enter Audio Menu
Exit Audio menu
Toggle VBass on/off
No function
Listening to Devices Bluecube Media Player AQ-BC-6UBT
www.aquaticav.com 7
3.1 Listening via USB
3.1.1 USB thumb drive
1. Attach your USB thumb drive to the femal USB socket of the BlueCube+ Media Player.
2. Press MODE on the remote to select USB mode.
3. Press to play or pause the music.
4. Press once / to play previous / next song file.
5. Press and hold / to fast forward / fast rewind the song file.
3.1.2 Charging
The USB socket can deliver 2.1A of current to charge a device battery.
3.2 Listening via Bluetooth
3.2.1 Pair with Bluetooth Device
1. Switch on your Bluetooth device.
2. Select 'AQUATIC AV' from the list of available devices to pair (no password is needed).
3.2.2 Listening via Bluetooth Device
1. Bluetooth mode will be activated once a Bluetooth device is paired in any mode. Use MODE to
change to the Bluetooth mode to listen to music.
2. Play the song from device and the sound will play through the Bluecube Media Player.
3. Press to play/pause the song.
4. Press / to play previous or next song
5. Press and hold / to fast forward / fast rewind the song file.
Track and volume can also be controlled directly from your Bluetooth device or remote control.
3.2.3 Multi-link
A second Bluetooth device an always pair to the BlueCube Media Player even when it has been paired
to another Bluetoot device.
3.3 Listening via Auxiliary Input
1. Connect your MP3 device ot the RCA inputs
2. Press MODE on the remote control to select 'AUX' mode.
IMPORTANT: Only one Auxiliary input (RCA) can be used at any one time.
3.4 Adjust Volume Level
1. Press Volume Up once to increase the volume.
2. Press Volume Down once to reduce the volume.
3. Press and hold either Volume Up or Volume Down to increase or decrease audio volume
continuously.
Listening to FM Radio Bluecube Media Player AQ-BC-6UBT
www.aquaticav.com 8
4.1 Enter FM Radio Mode
1. Press MODE on the remote control to switch to FM radio mode.
2. Press to mute or unmute the audio
4.2 Scan or Seek FM Radio Channels
1. Press and hold / to seek another station
2. Press once / to -0.05kHz or +0.05kHz to the frequency.
4.3 Saving Radio Channel to Memory
To save the current frequency to memory, press and hold 1, 2 or 3 for more than 2 seconds. The
station will be stored into relevant button.
4.4 Listening to Saved Radio Memory
Press the 1, 2, or 3 preset button once to listen to the station stored in that button.
4.5 Adjust Volume Level
1. Press + once to increase the volume one step.
2. Press - once to reduce the volume one step.
3. Press and hold either + or - to increase or decrease audio volume continuously.
If this is the first time you listen to FM radio, the default frequency will be 87.5MHz, as shown on the remote LCD.
FM radio is only available when you are in FM Radio mode.
AUDIO MENU
Short press AUDIO
BALANCE Use +/- to adjust
FADER
ROCK
BASS
TREBLE
Short press AUDIO
Use +/- to adjust
Use +/- to adjust
CLASSIC
POP
Use +/- to adjust
Short press AUDIO
Short press AUDIO
Short press AUDIO
Short press AUDIO
Short press AUDIO
Long press AUDIO
to save and exit
Short press AUDIO
Long press AUDIO
to save and exit
Long press AUDIO
to save and exit
Long press AUDIO
to save and exit
Long press AUDIO
to save and exit
Long press AUDIO
to save and exit
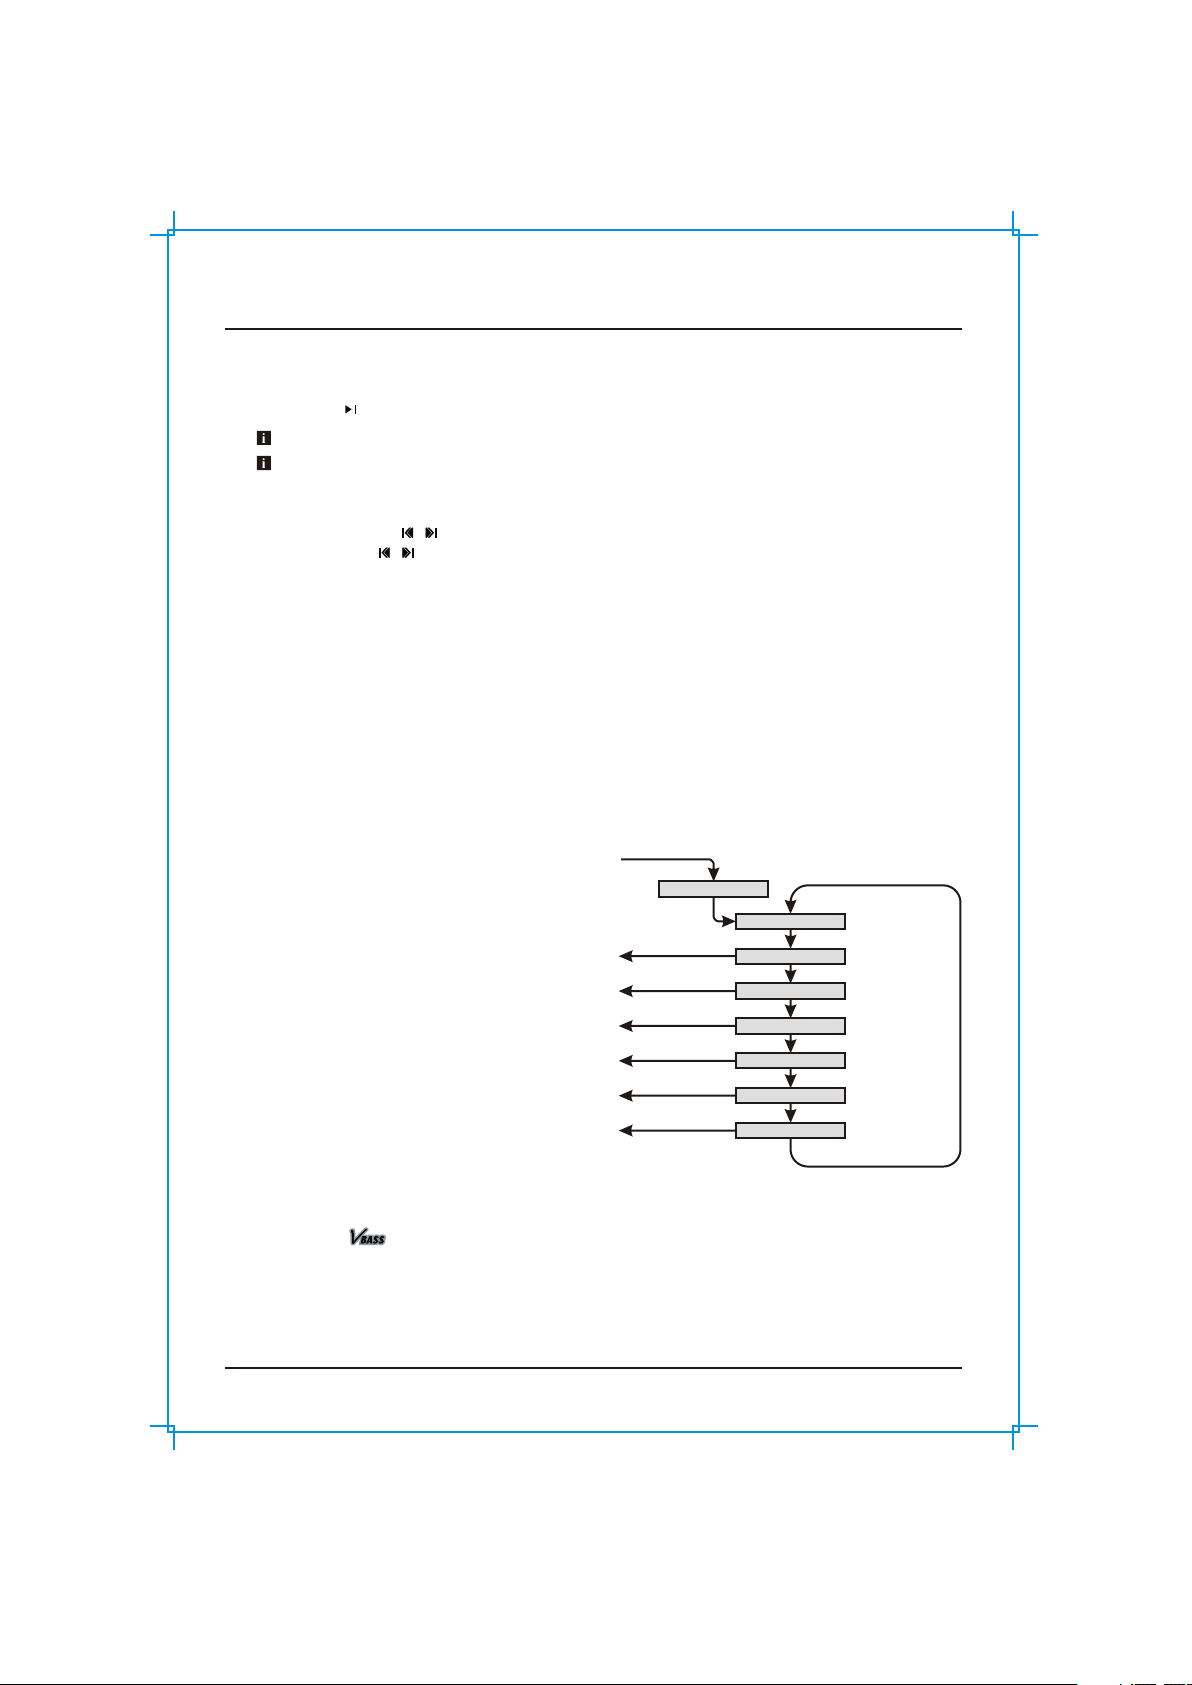
5. Using Audio Menu on Handheld Remote
Control
BlueCube+ Media Player (AQ-BC-6UBT) has
equiped with a audio DSP to meet different
listening experiences.
1. To enter audio menu, press once AUDIO button.
2. Each press of AUDIO button will advance to the
next audio setting as described on the right.
3. In the audio menu, press and hold AUDIO will
save and exit the audio menu to the original
mode.
If you have chosen preset equalizer (Rock,
Classic, or Pop), the previously set Bass, Treble
will be overrided.
6. Using VBass
1. VBass is a features to boost up the bass of the audio using latest DSP technology.
2. Press once to toggle it ON or OFF.
Additonal Features Bluecube Media Player AQ-BC-6UBT
www.aquaticav.com 9
7.1 External 12V Trigger
Aquatic AV understands the need for more flexible remote applications. With the BlueCube+ Media
Player, Auquatic AV has provided an independent 12V 'accessory' trigger, activated from the RF
wireless remote. This could activate any 12V based device like 12V lights or 12V motors.
In any operational mode, press the (12V TRIGGER) button to activate. Press again to deactivate.
Depending on the versions, if there are two external trigger wires, you can also activate the second
external trigger by press and hold for the second external trigger.
7.2 Connecting Multiple Amplifiers or High Current Draw Lighting Systems
Aquatic AV strongly recommend you speak to our technical service staff or your local Aquatic AV dealer if you are
considering this feature.
Load on External Trigger(s) should not exceed 2A.
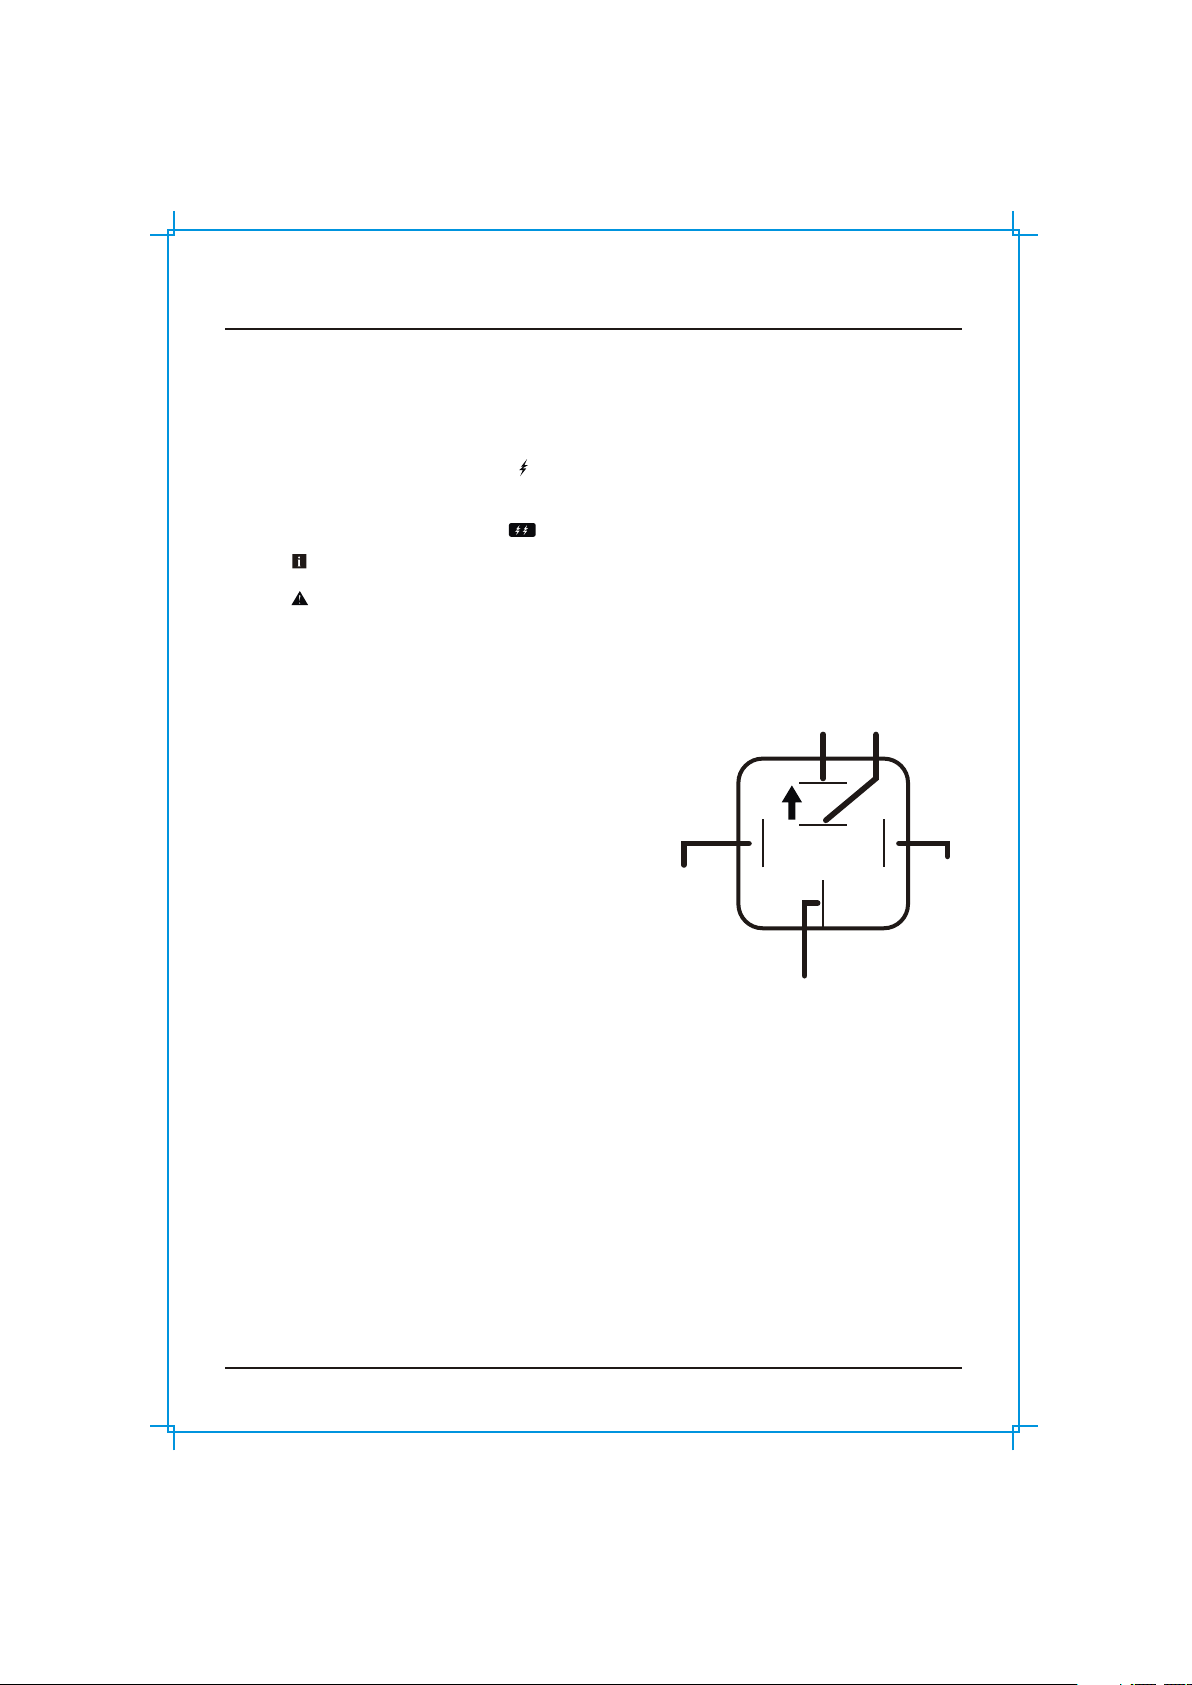
Wiring a Single Pole Single Throw (SPST) Relay
The SPST is necessary to protect the stereo in
systems with multiple amplifiers. The AQ-BC-6UBT
remote and trigger wire provide 2A max current. While
this is enough to power a single amplifier, complex
systems with multiple amplifiers will require a SPST
relay.
Position 30: requires 12VDC from the main power
source (12V battery, power supply etc). This should be
the same power source that is powering your stereo.
Position 85: this is where you connect your ground
from your power source (12V battery, power supply,
etc.) This should be the same ground reference as
your stereo.
Position 86: position 86 is triggered 12V, and is sent
when your stereo is powered on.
87
87
30
8586
Triggered
12V DC from
stereo (Blue or
Brown wire)
Common
ground
12V DC output for amplifier
Triggered
12V DC from
stereo (Blue or
Brown wire)
For Aquatic AV stereos, position 86 can be connected to either the blue remote wire in the harness or
the brown 12V trigger on the rear of the unit. There differences are below:
Blue (recommended): The blue (remote wire) provides a 12V DC output when the stereo is
powered on. Meaning as soon as the stereo is powered on, the blue wire sends 12V DC through th
relay powering on the amplifier.
Brown: The brown (12V Trigger) provides 12V DC output when it is triggered via the lightning bolt
icon on the faceplate or handheld remote. This setup is more advantageous in a more complex
system with several zones, as it gives you control of when an amplifier is on or off.
Position 87: this is 12V DC output that you will provide 12V DC to the remote turn on to the amplifiers
in your system.

Specifications & Dimensions Bluecube Media Player AQ-BC-6UBT
www.aquaticav.com 10
8.1 Specifications
Media
Supported media
Device charging
Device control
Inputs
USB
Auxiliary
Outputs
Pre-Out
Power
Output voltage @2 Ohm
Output voltage @4 Ohm
Operation voltage
Max current draw
Standby current draw
Multi-Environment Certifications
Waterproof / Dustproof
Conformal PCB coating
UV Protection
Salt/Frog protection
Stainless steel mountings
A2DP / USB / iPod / iPhone / MP3 / FM / AUX
via USB (Remote by cable)
via RF Handheld Remote Control or Wired Remote Control
(sold separately)
USB 2.0
1x stereo pair RCA input
2x stereo pair RCA (4V rms)
4x 72W
4x 45W
9.6V - 14.4V
7A
6mA
Yes IP64
Yes
500 hours stable. ASTM D4329 compliant
500 hours stable. ASTM B117 compliant
Yes
Other manuals for AQ-BC-6UBT
1
Other Aquatic Media Player manuals

Aquatic
Aquatic AQ-BC-6BT Guide

Aquatic
Aquatic BLUECUBE AQ-BC-5BT User manual

Aquatic
Aquatic AQ-BC-5UBT Manual

Aquatic
Aquatic AQ-DVD-3 User manual

Aquatic
Aquatic AQ-BC-6BT Guide

Aquatic
Aquatic AQ-MP-5UBT Guide

Aquatic
Aquatic AQ-BC-6BT-X Guide

Aquatic
Aquatic AQ-BC-6UBT Guide

Aquatic
Aquatic AQ-MP-5BT-H Guide

Aquatic
Aquatic AQ-MP-5BT User manual

Aquatic
Aquatic AQ-BC-6BT User manual

Aquatic
Aquatic HS Sport Plus Kit Guide

Aquatic
Aquatic AQ-MP-5UBT-S Guide

Aquatic
Aquatic BLUECUBE6 BC6 MINI Guide

Aquatic
Aquatic AQ-MP-5BT-H User manual

Aquatic
Aquatic AQ-MP-5UBT-H Troubleshooting guide

Aquatic
Aquatic BLUECUBE+ AQ-BC-6UBT-X Guide

Aquatic
Aquatic 6500-915 User manual


