MSI P35D3 Platinum - Motherboard - ATX User manual
C-5
Intel ICH9RSATARAID
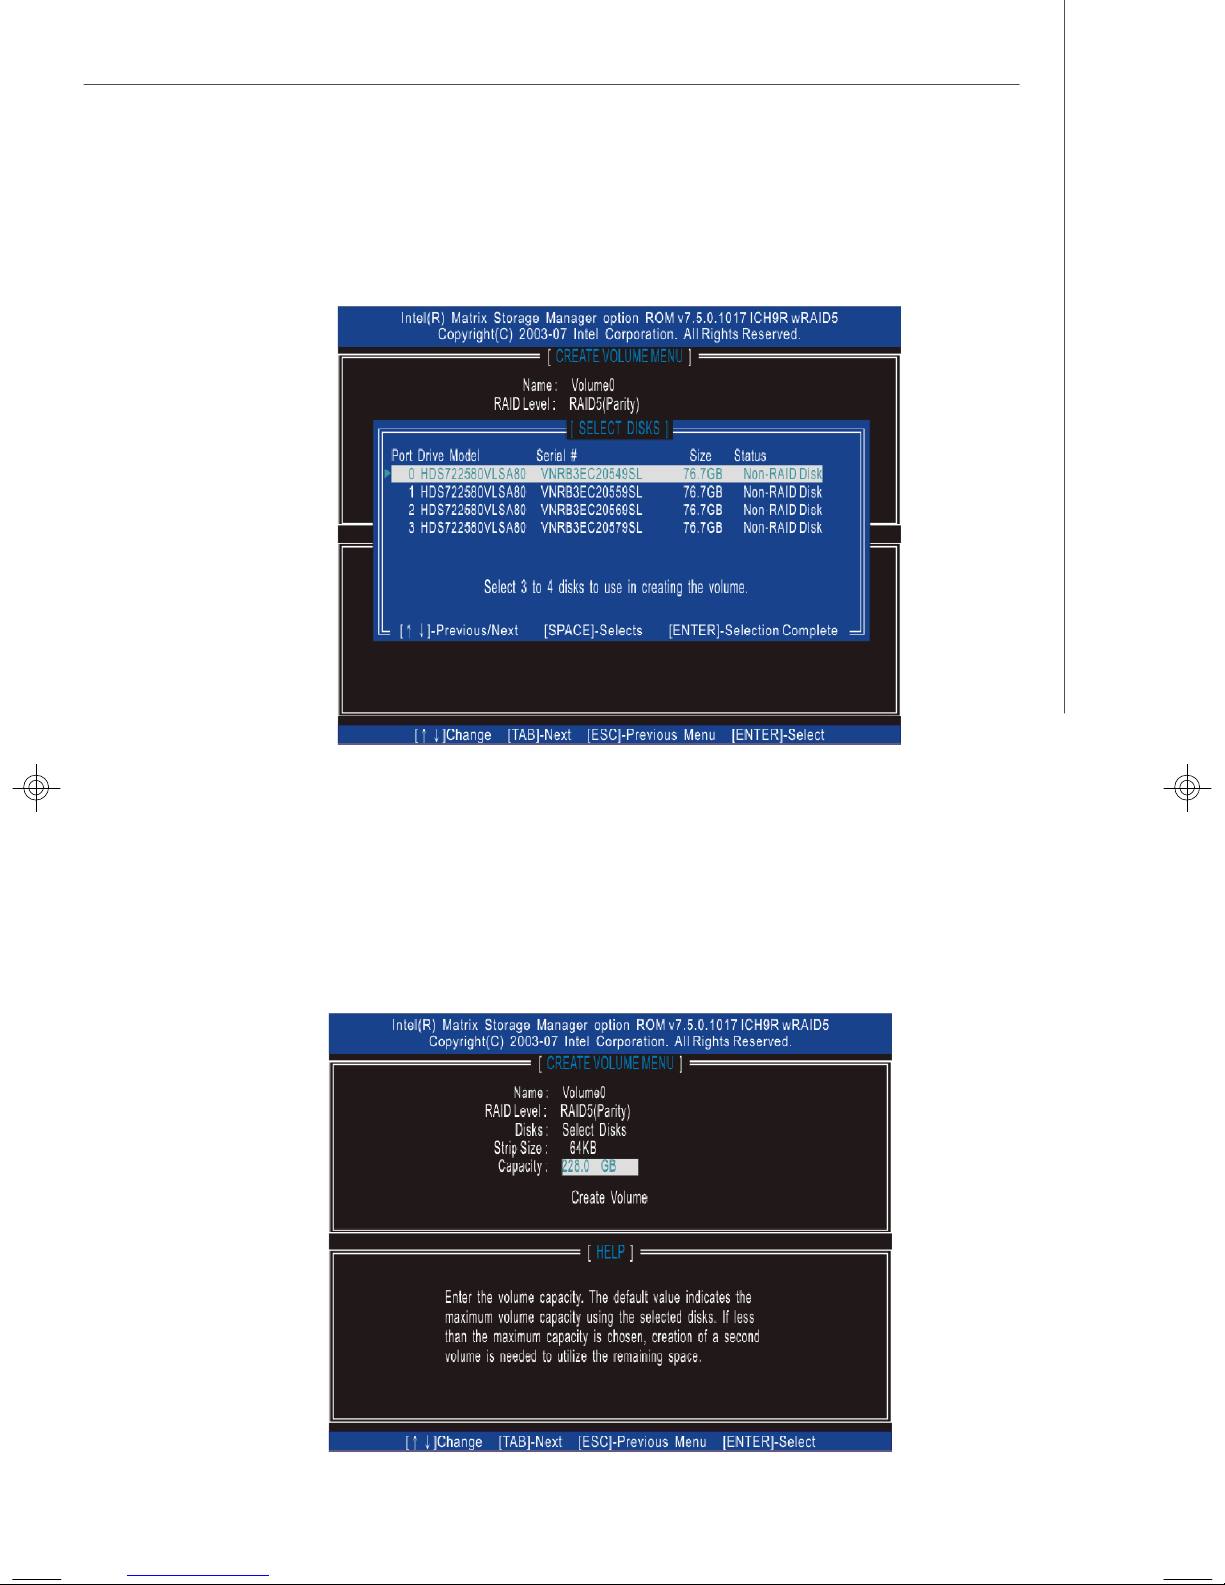
3. Inthe Disk field,press <Enter>keyandthefollowing screenappears. Use
<Space>keytoselectthe disks youwanttocreatefortheRAIDvolume,then
click <Enter>keytofinishselection.
4. Thenselectthestrip valuefortheRAIDarraybyusing the “upperarrow”or
“downarrow”keystoscroll through theavailable values, and pressingthe
<Enter>keytoselectand advancetothenextfield.Theavailablevalues
range from4KBto128KBinpowerof2increments.Thestripvalueshouldbe
chosenbasedontheplanned driveusage.Herearesometypical values:
RAID0 –128KB
RAID10 –64KB
RAID5 –64KB
5. Thenselectthecapacityofthevolumeinthe Capacity field.The default
valueisthemaximumvolumecapacityoftheselecteddisks.
7356v1.0-C_ICH9R RAID.p65 2007/6/13, 午 02:225

MS-7356Mainboard
C-6
6.Thenthefollowing screenappearsforyoutoconfirmifyouaresureto
createtheRAIDvolume.Press<Y>tocontinue.
7.Thenthefollowingscreenappearstoindicatethatthecreationisfinished.
Important
Sinceyou wanttocreatetwovolumes(IntelMatrixRAIDTechnology),this
defaultsize(maximum)needstobe reduced. Type inanewsizeforthefirst
volume.Asanexample:ifyouwantthefirstvolumetospanthefirsthalf ofthe
twodisks, re-type the sizetobe half ofwhatisshownbydefault. The second
volume,when created,will automaticallyspantheremainderoftwohard
drives.
7356v1.0-C_ICH9R RAID.p65 2007/6/13, 午 02:226
C-7
Intel ICH9RSATARAID
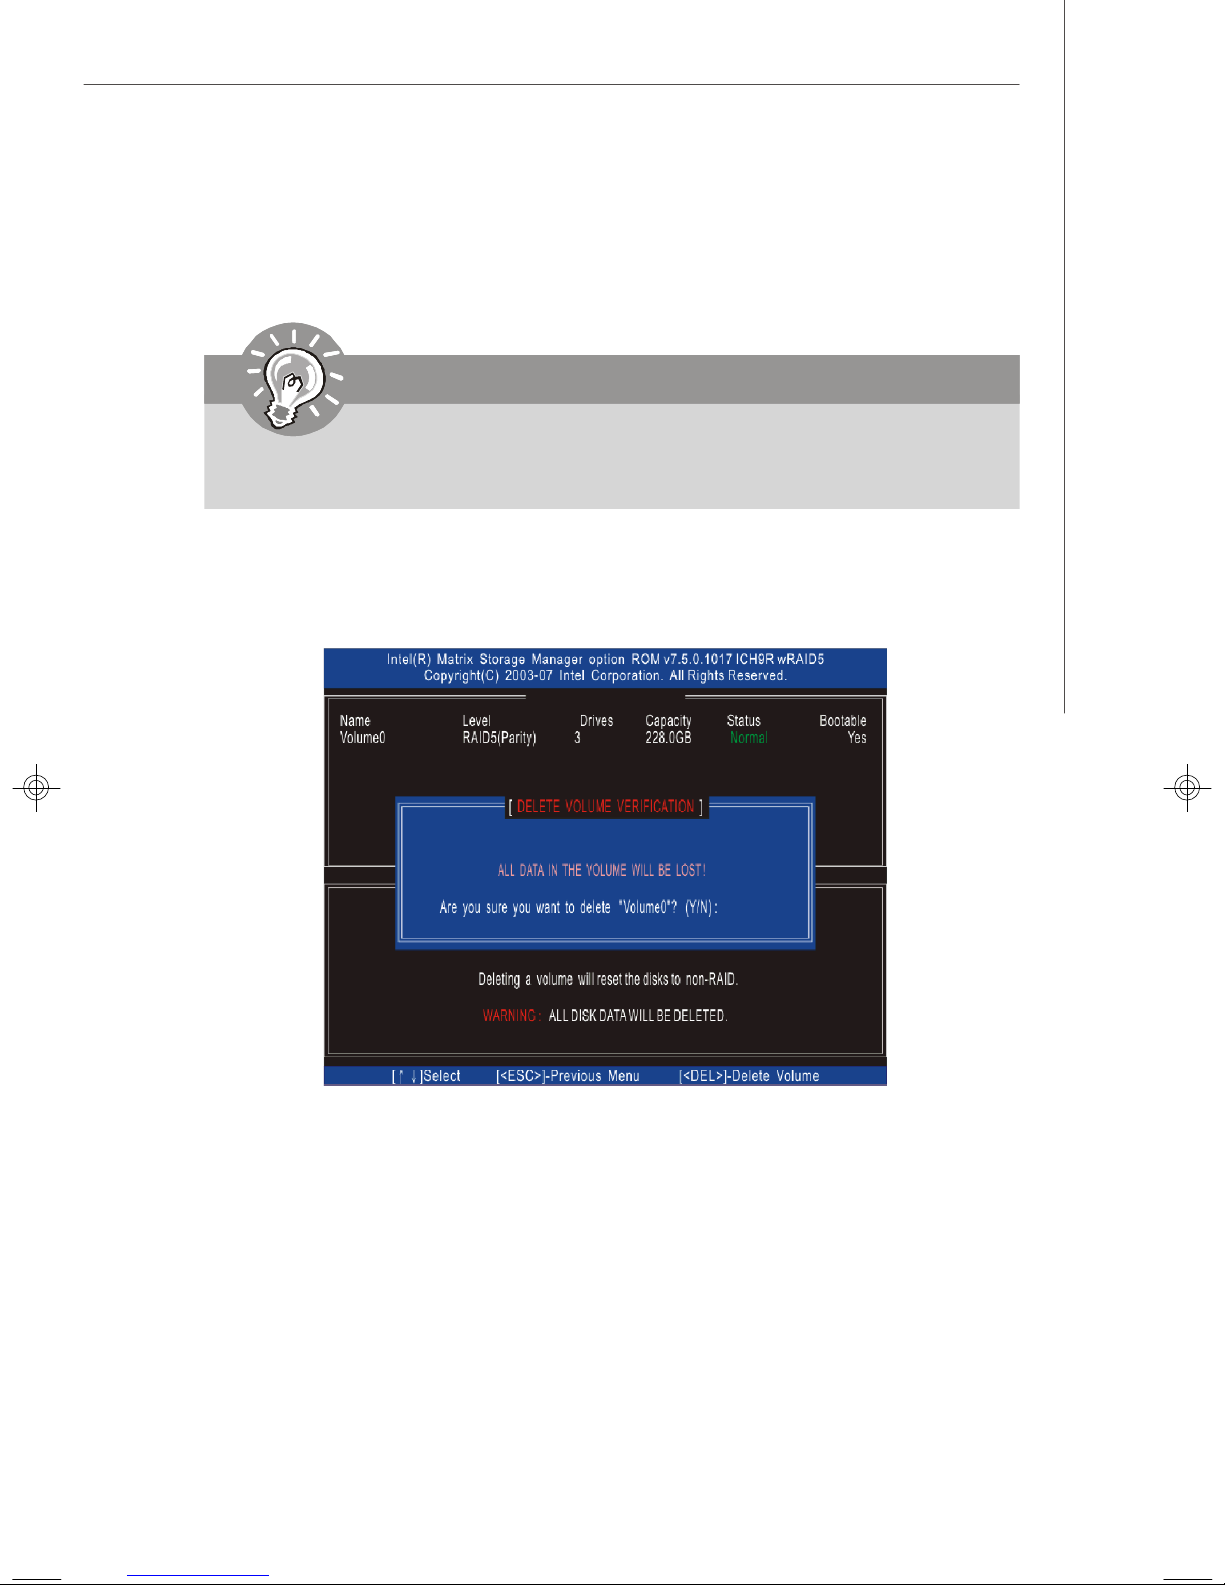
(2) DeleteRAIDVolume
HereyoucandeletetheRAIDvolume,butpleasebe notedthatall dataonRAID
driveswill belost.
Selectoption2 DeleteRAIDVolume fromthemainmenuwindowandpress
<Enter>keytoselectaRAIDvolumefordeletion.Thenpress <Delete>keyto
deletetheselectedRAIDvolume.The followingscreenappears.
Press <Y>keytoacceptthevolumedeletion.
Important
If yoursystemcurrentlybootstoRAIDandyou deletetheRAIDvolumeinthe
IntelRAIDOptionROM,yoursystemwillbecomeunbootable.
7356v1.0-C_ICH9R RAID.p65 2007/6/13, 午 02:227
MS-7356Mainboard
C-8
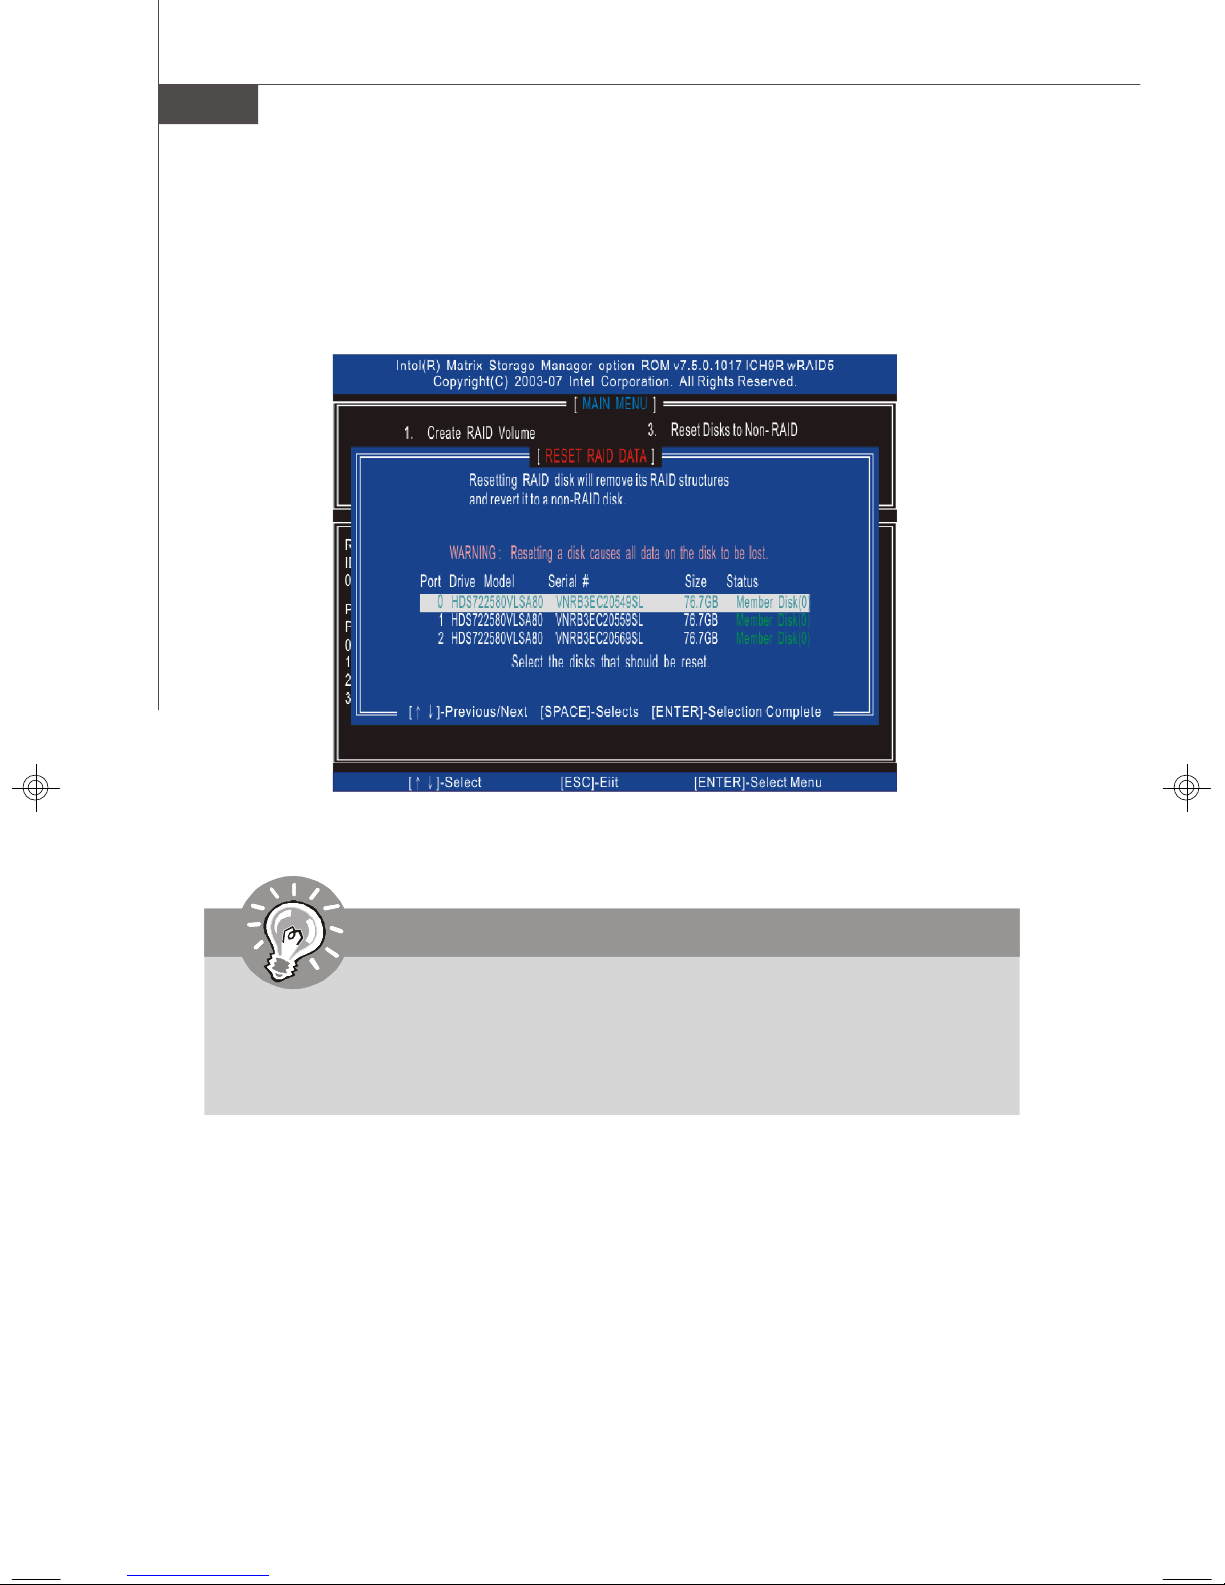
(3)ResetDisks toNon-RAID
Selectoption3 ResetDisks toNon-RAID and press <Enter>todeletetheRAID
volumeand removeanyRAIDstructuresfromthedrives.Thefollowing screen
appears:
Press<Y>keytoaccepttheselection.
Important
1. You will loseall dataon the RAIDdrivesand anyinternalRAIDstructures
when you performthisoperation.
2.Possiblereasonsto ‘ResetDisks toNon-RAID couldinclude issuessuch
asincompatibleRAIDconfigurationsorafailed volumeorfailed disk.
7356v1.0-C_ICH9R RAID.p65 2007/6/13, 午 02:228

C-9
Intel ICH9RSATARAID
InstallingDriver
Install Driver in WindowsVista/ XP/ 2000
†NewWindowsVista/XP /2000 Installation
The followingdetailsthe installationofthe driverswhileinstallingWindowsXP /
2000.
1. Whenyou start installing WindowsXP and olderoperatingsystems,youmay
encounteramessagestating, “Setup could notdeterminethetypeofoneor
moremass storagedevicesinstalledin yoursystem”.If thisisthecase, then
youarealreadyintheright placeand arereadytosupplythedriver.If thisis
notthecase,thenpressF6whenpromptedatthebeginningof Windows
setup.
2. Press the “S”keytoselect “SpecifyAdditionalDevice”.
3. You shouldbepromptedtoinsert afloppydisk containingthe Intel®RAID
driverintotheA:drive.
Note: ForWindowsVistayoucan useFloppy,CD/DVDorUSB.
Important
Pleasefollowtheinstructionbelowtomakean Intel®RAIDDriver”for
yourself.
1.Insertthe MSICD intothe CD-ROMdrive.
2.Click the “BrowseCD”on the Setup screen.
3.Copyallthecontentsin \\IDE\Intel\ICH9R\Floppy toaformattedfloppy
diskette.
4.Thedriverdiskettefor Intel®ICH9RRAIDController isdone.
4. ForWindowsVista:
During the Operatingsysteminstallation, afterselecting the locationtoinstall
Vistaclickon “Load Driver”buttontoinstall athirdpartySCSIorRAIDdriver.
5. When prompted,insertthe floppydisk ormedia(Floppy,CD/DVDorUSB)you
createdinstep3and press Enter.
6. You shouldbeshownalistofavailable SCSIAdapters.Thislistshould
include “Intel(R)82801HEMSATARAIDController(ICH8M-E)”whenthesystem
isinRAIDmodeand “Intel(R)82801HEMSATAAHCIController(ICH8M-E)”or
“Intel(R)82801HBMSATAAHCIController(ICH8M)”whenthe systemisin
AHCI mode.
7. Selectthe appropriateIntelRAIDcontrollerandpress ENTER.
8. Thenextscreenshould confirmthatyouhaveselectedtheIntel®RAID
controller. PressENTERagain tocontinue.
9. YouhavesuccessfullyinstalledtheIntel®MatrixStorage Managerdriver,and
Windowssetup shouldcontinue.
10.Leavethediskinthefloppydriveuntilthesystemrebootsitself. Windows
setup willneedtocopythefilesfromthefloppyagain aftertheRAIDvolume
isformatted,and Windowssetup startscopying files.
7356v1.0-C_ICH9R RAID.p65 2007/6/13, 午 02:229

MS-7356Mainboard
C-10
†Existing WindowsVista/XP/2000 DriverInstallation
1. InserttheMSICDintothe CD-ROMdrive.
2. TheCD will auto-runand thesetupscreenwill appear.
3. UndertheDrivertab,clickon IntelIAA RAIDEdition.
4. Thedriverswill beautomaticallyinstalled.
†ConfirmingWindowsVista/XP/2000DriverInstallation
1. FromWindowsVista/XP/2000,openthe ControlPanel from MyComputer
followedbytheSystemicon.
2. Choosethe Hardware tab,thenclickthe Device Manager tab.
3. Clickthe"+"in frontof the SCSIand RAIDControllers hardwaretype.The
driver Intel(R)ICH9RSATARAIDController shouldappear.
7356v1.0-C_ICH9R RAID.p65 2007/6/13, 午 02:2210

C-11
Intel ICH9RSATARAID
Install Intel MatrixStorageConsole
The Intel ApplicationAcceleratorRAIDEditiondrivermaybeused tooperatethe hard
drivefromwhichthesystemisbooting oraharddrivethatcontainsimportantdata.
Forthisreason,youcannotremoveorun-installthisdriverfromthe systemafter
installation;however,youwillhavetheabilitytoun-install allothernon-driver
components.
InserttheMSICD and clickonthe IntelIAA RAIDEditor toinstall thesoftware.
Clickonthisitem
InstallingSoftware
7356v1.0-C_ICH9R RAID.p65 2007/6/13, 午 02:2211

MS-7356Mainboard
C-12
The InstallShieldWizard willbeginautomaticallyforinstallation showedasfollowing:
Clickonthe Next buttontoproceedtheinstallationin the welcoming window.
7356v1.0-C_ICH9R RAID.p65 2007/6/13, 午 02:2212
C-13
Intel ICH9RSATARAID
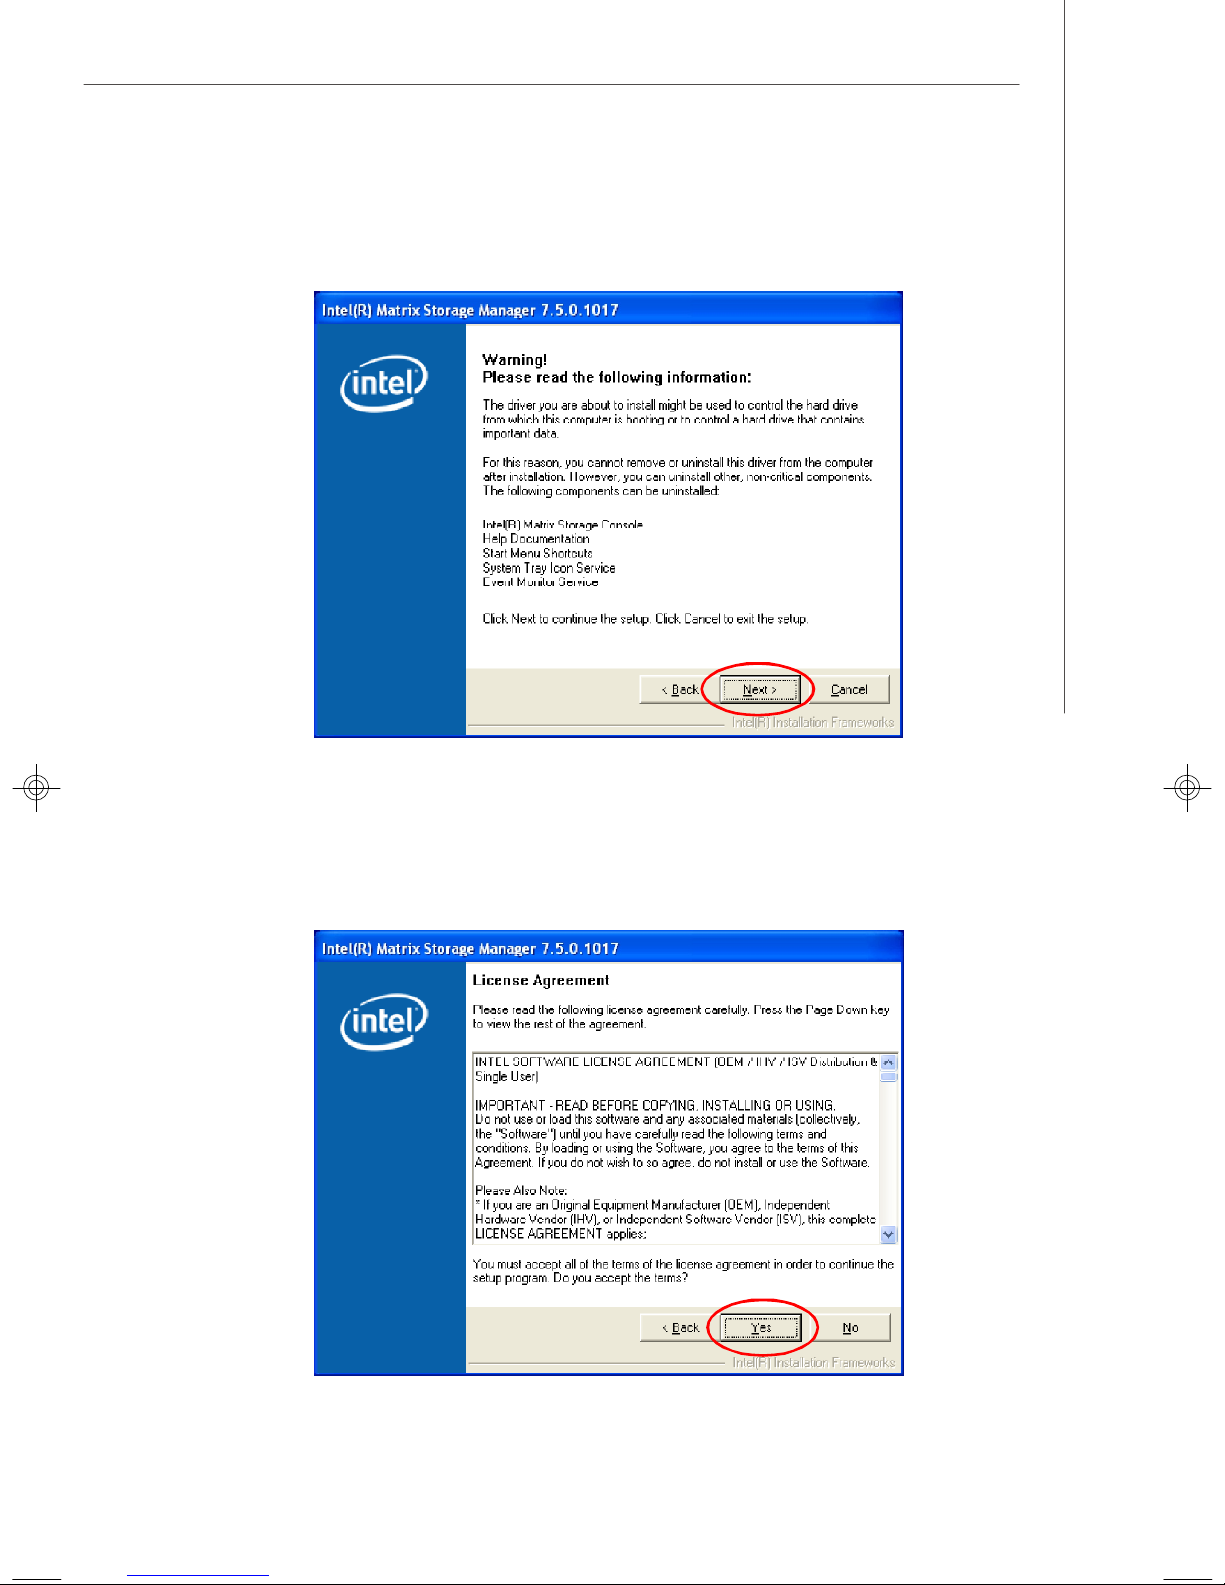
Afterreadingthelicenseagreementinthefollowing window,click Yes buttonto
continue.
Thewindowshowsthecomponentstobeinstalled.Click Next buttontocontinue.
7356v1.0-C_ICH9R RAID.p65 2007/6/13, 午 02:2213

MS-7356Mainboard
C-14
Oncetheinstallationiscomplete,thefollowingwindowappears.
ThefollowingwindowappearstoshowtheReadmeFile Information.Itshowsthe
systemrequirementsand installationinformation.
7356v1.0-C_ICH9R RAID.p65 2007/6/13, 午 02:2214

C-15
Intel ICH9RSATARAID
RAIDMigration Instructions
Important
A CreatefromExisting Disk operationwill deleteallexisting datafromthe
added disk and thedatacannotberecovered.Itiscriticaltobackup all
importantdataontheaddeddiskbeforeproceeding.However,duringthe
migration process,the dataon thesourcedisk ispreserved.
TheIntelMatrixStorageConsoleofferstheflexibilitytoupgrade fromasingle Serial
ATA(SATA) harddrivetoRAIDconfigurationwhenanadditionalSATAharddriveis
added tothesystem.Thisprocesswill createanewRAIDvolumefromanexisting
disk.However,severalimportantstepsmustbefollowed at thetimethesystemis
firstconfiguredinordertotakeadvantageofRAIDwhen upgradingtoasecond
SATAharddrive:
1.BIOSmustbeconfiguredforRAIDbeforeinstallingWindowsonthe single
SATAharddrive.Referto On-Chip ATADevices forproperlysetting of
theBIOS.
2.Installthe IntelApplicationAcceleratorRAIDDriverduringWindowsSetup.
Referto InstallingSoftware forinstructionsoninstalling the driverdur-
ing WindowsSetup.
3.Install theIntelMatrixStorageConsoleafterthe operatingsystemisinstalled.
Tocreateavolumefromanexisting disk, completethefollowing steps:
AftertheIntelMatrixStorageConsolehasbeen successfullyinstalledand the sys-
temhasrebooted,clickon theIntelApplicationAcceleratorshortcut link(Start-->All
Programs -->IntelMatrixStorageManager-->IntelMatrixStorageConsole)
andthe followingwindowwillappear:
7356v1.0-C_ICH9R RAID.p65 2007/6/13, 午 02:2215

MS-7356Mainboard
C-16
CreateRAIDVolumefromExisting Disk
TocreateaRAIDvolumefroman existingdisk,choose Action-->CreateRAID
VolumefromExistingHardDrive.
The CreateRAIDVolume fromExisting HardDriveWizard popsup toleadyou
forthefollowing procedure.Click Next tocontinue.
7356v1.0-C_ICH9R RAID.p65 2007/6/13, 午 02:2216

C-17
Intel ICH9RSATARAID
(1)Step1:ConfigureVolume
Hereyoucan configurethe newRAIDvolumebyentering thevolumename, selecting
theRAIDleveland strip size.
† RAIDVolume Name:
Adesired RAIDvolumenameneedstobetypedin wherethe ‘RAID_Volume1’text
currentlyappearsabove. TheRAIDvolumenamehasamaximumlimitof 16 characters.
The RAIDvolumenamemust alsobeinEnglishalphanumericASCII characters.
† RAIDLevel:
Selectthe desiredRAIDlevel:
RAID0 (Performance) –Avolumeoptimizedforperformancewillallowyou to
access yourdatamorequickly.
RAID1 (Redundancy) –Avolumeoptimizedfordataredundancywillprovide
you witharealtimeduplicatecopyofyourdata.Note:
Onlyhalfoftheavailable volumespacewillbeavail-
ablefordatastorage.
RAID5 (Useful) –RAID5canbeusedonthreeormoredisks,withzero
ormorespare-disks.TheresultingRAID-5devicesize
will be(N-1)*S,whereNisthehowmanydrive,Sisthe
sizeof thesmallest driveinthe array. Ifoneofthedisks
fail,all dataarestill intact. It canrebuildthediskfrom
the parityinformation.If sparedisks areavailable,re-
constructionwill begin immediatelyafterthedevice
failure.Iftwodisks failsimultaneously,all dataarelost.
RAID-5cansurviveonediskfailure,butnottwoor
more.Bothreadand writeperformanceusually
increase,butcanbehardtopredicthowmuch.Reads
aresimilartoRAID-0reads,writescanbeeitherrather
7356v1.0-C_ICH9R RAID.p65 2007/6/13, 午 02:2217

MS-7356Mainboard
C-18
expensive(requiringread-inpriortowrite,in orderto
be abletocalculatethe correctparityinformation),or
similartoRAID-1writes.Thewriteefficiencydepends
heavilyon the amountof memoryin themachine,and
theusagepatternofthearray.Heavilyscatteredwrites
areboundtobemoreexpensive.
RAID10 (MirroredStripes) –ARAID1arrayoftwoRAID0arrays.
† Strip Sizes:
Selectthedesiredstrip sizesetting.Asindicated,theoptimalsetting is128KB.Se-
lecting anyotheroptionmayresultin performancedegradation.Eventhough 128KB
istherecommended setting formostusers,youshould choosethe strip sizevalue
whichisbestsuitedtoyourspecificRAIDusagemodel.Themosttypicalstrip size
settingsare:
4KB:Forspecializedusagemodelsrequiring 4KB strips
8KB:Forspecializedusagemodelsrequiring 8KB strips
16KB:Best forsequentialtransfers
32KB:Goodforsequentialtransfers
64KB:Goodgeneralpurposestrip size
128KB:Bestperformanceformostdesktopsand workstations
(2)Selectthesource disk
Then selectthe sourcediskthatyouwishtouseandthenclick “--->”tomoveittothe
Selected field.Then click Next tocontinue.
It isveryimportanttonotewhichdiskisthesourcedisk(theonecontaining allofthe
informationtobemigrated)and whichoneisthetargetdisk.OnaRAIDReady
system,thiscanbedeterminedbymakinganoteduringPOST ofwhichportthesingle
diskisattachedto.
YoucanalsousetheIntel Application AcceleratorRAIDEditionutilitybeforethe
second diskisinstalledtoverifythePortandserialnumberofthedrivethatcontains
allthedata.
7356v1.0-C_ICH9R RAID.p65 2007/6/13, 午 02:2218

C-19
Intel ICH9RSATARAID
(3)SelectMemberHardDrive(s)
Thenselectthe memberdisk(thetargetdisk)thatyouwishtouseandthenclick “-
-->”tomoveittothe Selected field.Thenclick Next tocontinue.
Pleasenotethattheexisting dataonthe selectedharddrive(s)will bedeleted
permanently.Donotforgettobackup all theimportantdatabeforecontinuing.
7356v1.0-C_ICH9R RAID.p65 2007/6/13, 午 02:2219

MS-7356Mainboard
C-20
(4)SpecifyVolumeSize
Specifytheamount of availablearrayspacetobeusedbythenewRAIDvolume.You
mayentertheamountinthespaceorusetheslidertospecify.Itisrecommendedyou
use100% of theavailablespacefortheoptimizedusage. ForRAID0volume,if you
donotspecify100% ofthe harddrivespace,therestharddrivespacewill be
workedasRAID1volume, whichisthenewtechnologycalledIntelMatrixRAID.Then
click Next tocontinue.
(5)StartCreating RAIDVolume fromExisting HardDrive Wizard
Beforeyoucontinue theprocedureofRAIDvolumecreationfromexisting harddrive,
readthe dialogue boxbelowcarefully.Pleasenotethatonceyouclick Finish,the
existingdataon theselected harddrive(s)willbedeletedpermanentlyand this
operationcannotbeundone.Itiscriticalthatyoubackup all importantdatabefore
selecting Finish tostartthemigrationprocess.
7356v1.0-C_ICH9R RAID.p65 2007/6/13, 午 02:2220

C-21
Intel ICH9RSATARAID
(6)StartMigration
Themigrationprocess maytakeup totwohourstocompletedepending onthesize
of the disksbeing usedandthestripsizeselected.Adialoguewindowwill appear
statingthatthemigration processmaytakeconsiderabletimetocomplete, meanwhile
apopupdialogue at thetaskbarwillalsoshowthe migration status.While you canstill
continueusingyourcomputerduring themigrationprocess,oncethemigrationproc-
ess starts,itcannotbestopped.Ifthemigrationprocess getsinterruptedand your
systemisrebootedforanyreason,itwill pickup themigrationprocess whereitleft
off.Youwillbeprovided withanestimatedcompletiontime(theremaining timewill
depend on yoursystem)oncethemigrationprocessstarts.
Thefollowing screenappearsif the migrationprocessiscompletedsuccessfully.
Then you havetorebootyoursystemtousethefull capacityofthenewvolume.
7356v1.0-C_ICH9R RAID.p65 2007/6/13, 午 02:2221

MS-7356Mainboard
C-22
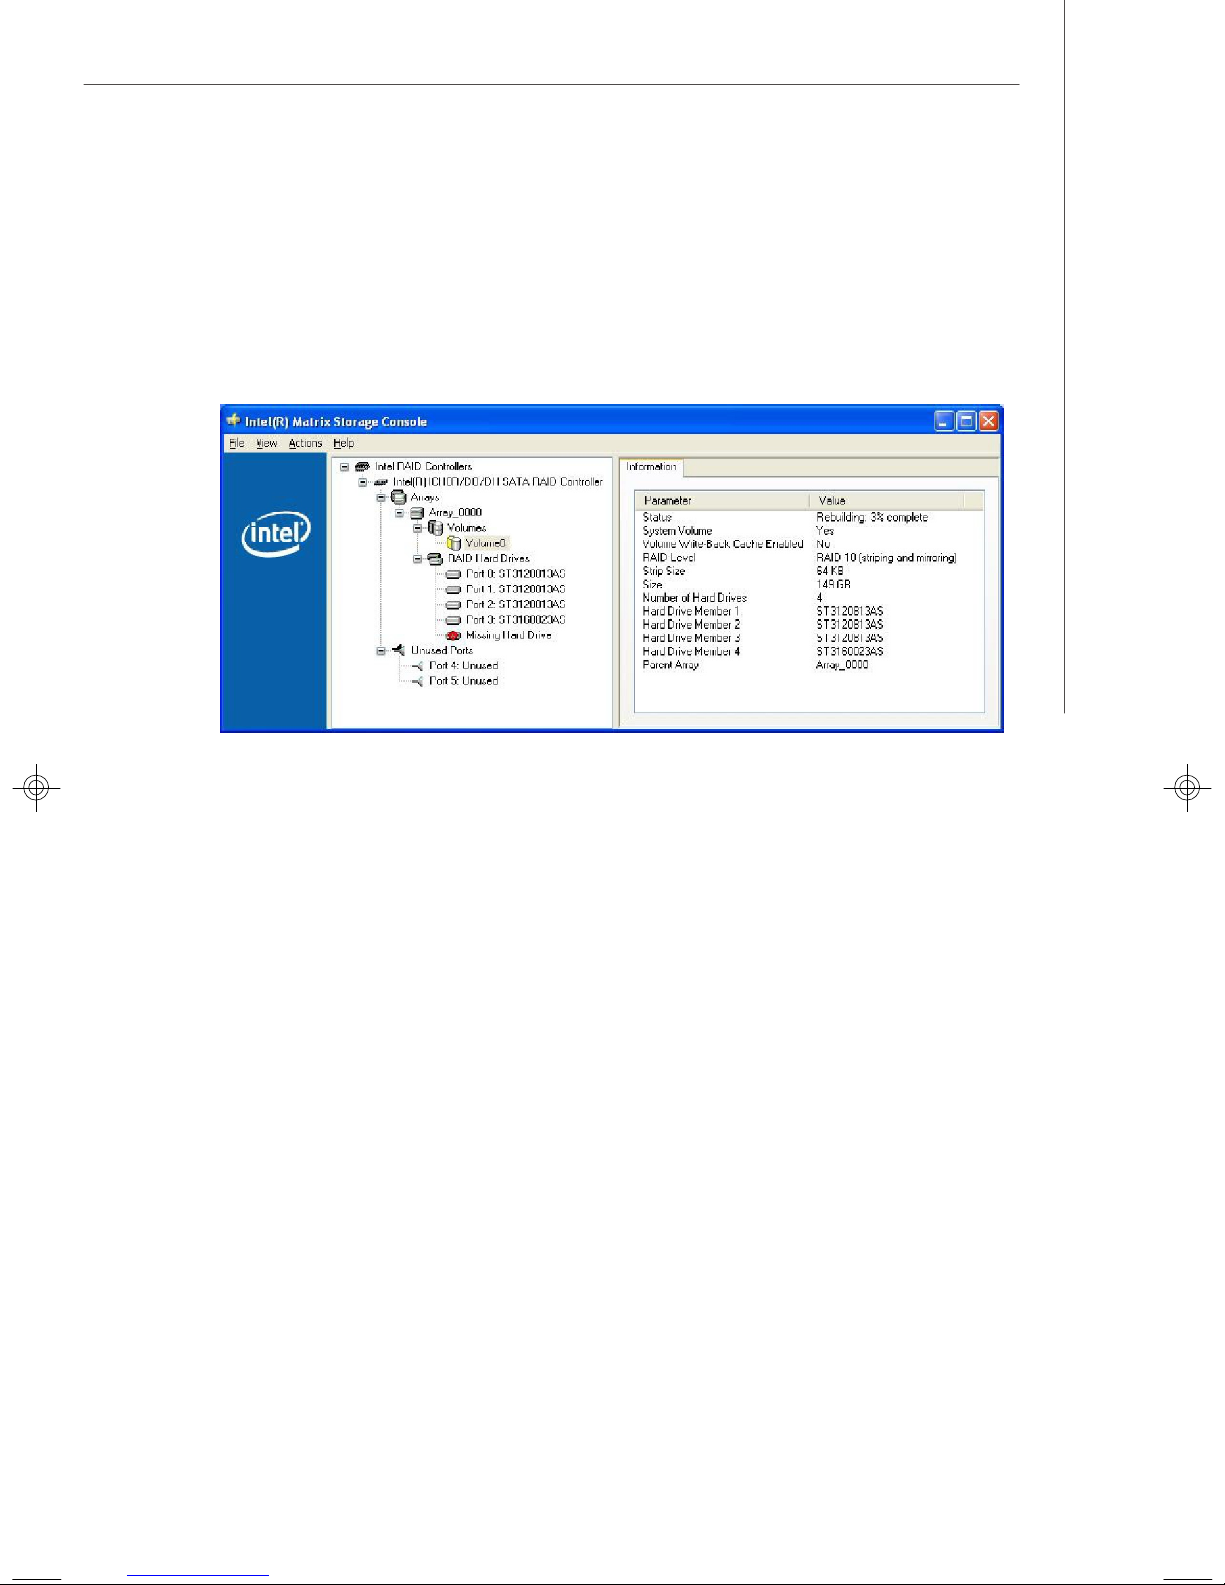
ARAID1,RAID5orRAID10 volumeisreportedasdegradedwhenoneof itshard
drivemembersfailsoristemporarilydisconnected,and datamirroring islost. Asa
result, thesystemcanonlyutilizetheremaining functionalharddrivemember. Tore-
establishdatamirroring andrestoredataredundancy,refertotheprocedurebelow
thatcorrespondstothecurrentsituation.
Missing Hard Drive Member
1.Makesurethesystemispoweredoff.
2.Reconnecttheharddrive.
3.RebootthesystemtoWindows;therebuild willoccurautomatically.
Failed HardDrive Member
1.Makesurethesystemispoweredoff.
2.Replacethefailedharddrivewithanewonethatisofequalorgreater
capacity.
3.RebootthesystemtoIntel RAIDOptionROMbypress<Ctrl> and <I>keys
simultaneouslyduringthePower-OnSelfTest (POST).
DegradedRAIDArray
4. Selecttheport of thedestination diskforrebuilding, and thenpress ENTER.
7356v1.0-C_ICH9R RAID.p65 2007/6/13, 午 02:2222
C-23
Intel ICH9RSATARAID
5.ExitIntelRAIDOptionROM,andthenreboottoWindowssystem.
6. When prompted torebuild theRAIDvolume,click'Yes'.
7.The Intel(R)StorageUtilitywill belaunched. Right-click thenewharddriveand
select'RebuildtothisDisk'.The'Rebuild Wizard' will belaunchedwhichwill
guideyouthrough theprocess ofrebuilding tothenewharddrive.
7356v1.0-C_ICH9R RAID.p65 2007/6/13, 午 02:2223
Other manuals for P35D3 Platinum - Motherboard - ATX
1
Table of contents


