MTD EZ-Stow User manual

MTD LLC, P.O. BOX 361131 CLEVELAND, OHIO 44136-0019
Printed In USA
Safe Operation Practices • Set-Up • Operation • Maintenance • Service • Troubleshooting • Warranty
WARNING
READ AND FOLLOW ALL SAFETY RULES AND INSTRUCTIONS IN THIS MANUAL
BEFORE ATTEMPTING TO OPERATE THIS MACHINE.
FAILURE TO COMPLY WITH THESE INSTRUCTIONS MAY RESULT IN PERSONAL INJURY.
OperatOr’sManual
EZ-Stow™
Form No. 769-10887A
(January 4, 2016)
• Español, P. 13
• Français, P. 19

Customer Support
Please do NOT return the machine to the retailer or dealer without first contacting the Customer Support Department.
If you have difficulty assembling this product or have any questions regarding the controls, operation, or maintenance of
this machine, you can seek help from the experts. Choose from the options below:
◊ Visit us on the web at www.mtdproducts.com
See How-to Maintenance and Parts Installation Videos at www.mtdparts.com/KnowledgeCenter
◊ Call a Customer Support Representative at (800) 800-7310 or (330) 220-4683
◊ Write to MTD LLC • P.O. Box 361131 • Cleveland, OH • 44136-0019
Thank you for purchasing a EZ-Stow™Hauler. It was carefully
engineered to provide excellent performance when properly
operated and maintained.
Please read this entire manual prior to operating the equipment.
It instructs you how to safely and easily set up, operate and
maintain your machine. Please be sure that you, and any other
persons who will operate the machine, carefully follow the
recommended safety practices at all times. Failure to do so could
result in personal injury or property damage.
All information in this manual is relative to the most recent
product information available at the time of printing. Review
this manual frequently to familiarize yourself with the machine,
its features and operation. Please be aware that this Operator’s
Manual may cover a range of product specifications for various
models. Characteristics and features discussed and/or illustrated
in this manual may not be applicable to all models. We reserve
the right to change product specifications, designs and
equipment without notice and without incurring obligation.
If applicable, the power testing information used to establish
the power rating of the engine equipped on this machine can be
found at www.opei.org or the engine manufacturer’s web site.
If you have any problems or questions concerning the machine,
phone your local authorized MTD service dealer or contact us
directly. MTD’s Customer Support telephone numbers, website
address and mailing address can be found on this page. We want
to ensure your complete satisfaction at all times.
Throughout this manual, all references to right and left side of the
machine are observed from the operating position
The engine manufacturer is responsible for all engine-related
issues with regards to performance, power-rating, specifications,
warranty and service. Please refer to the engine manufacturer’s
Owner’s/Operator’s Manual, packed separately with your
machine, for more information.
Thank You
Record Product Information
Before setting up and operating your new equipment, please
locate the model plate on the equipment and record the
information in the provided area to the right. You can locate the
model plate by looking at the bracket between the wheels. This
information will be necessary, should you seek technical support
via our web site, Customer Support Department, or with a local
authorized service dealer.
Model NuMber
Serial NuMber
To The Owner 1
2
Safe Operations....................................................... 3
Assembly & Set-Up .................................................. 5
Controls & Features................................................. 6
Operation................................................................. 7
Maintenance & Adjustment................................... 7
Illustrated Parts List ................................................ 8
Attachments & Accessories ...................................12
Warranty................................................................ 26
Table of Contents

Important Safe Operation Practices 2
3
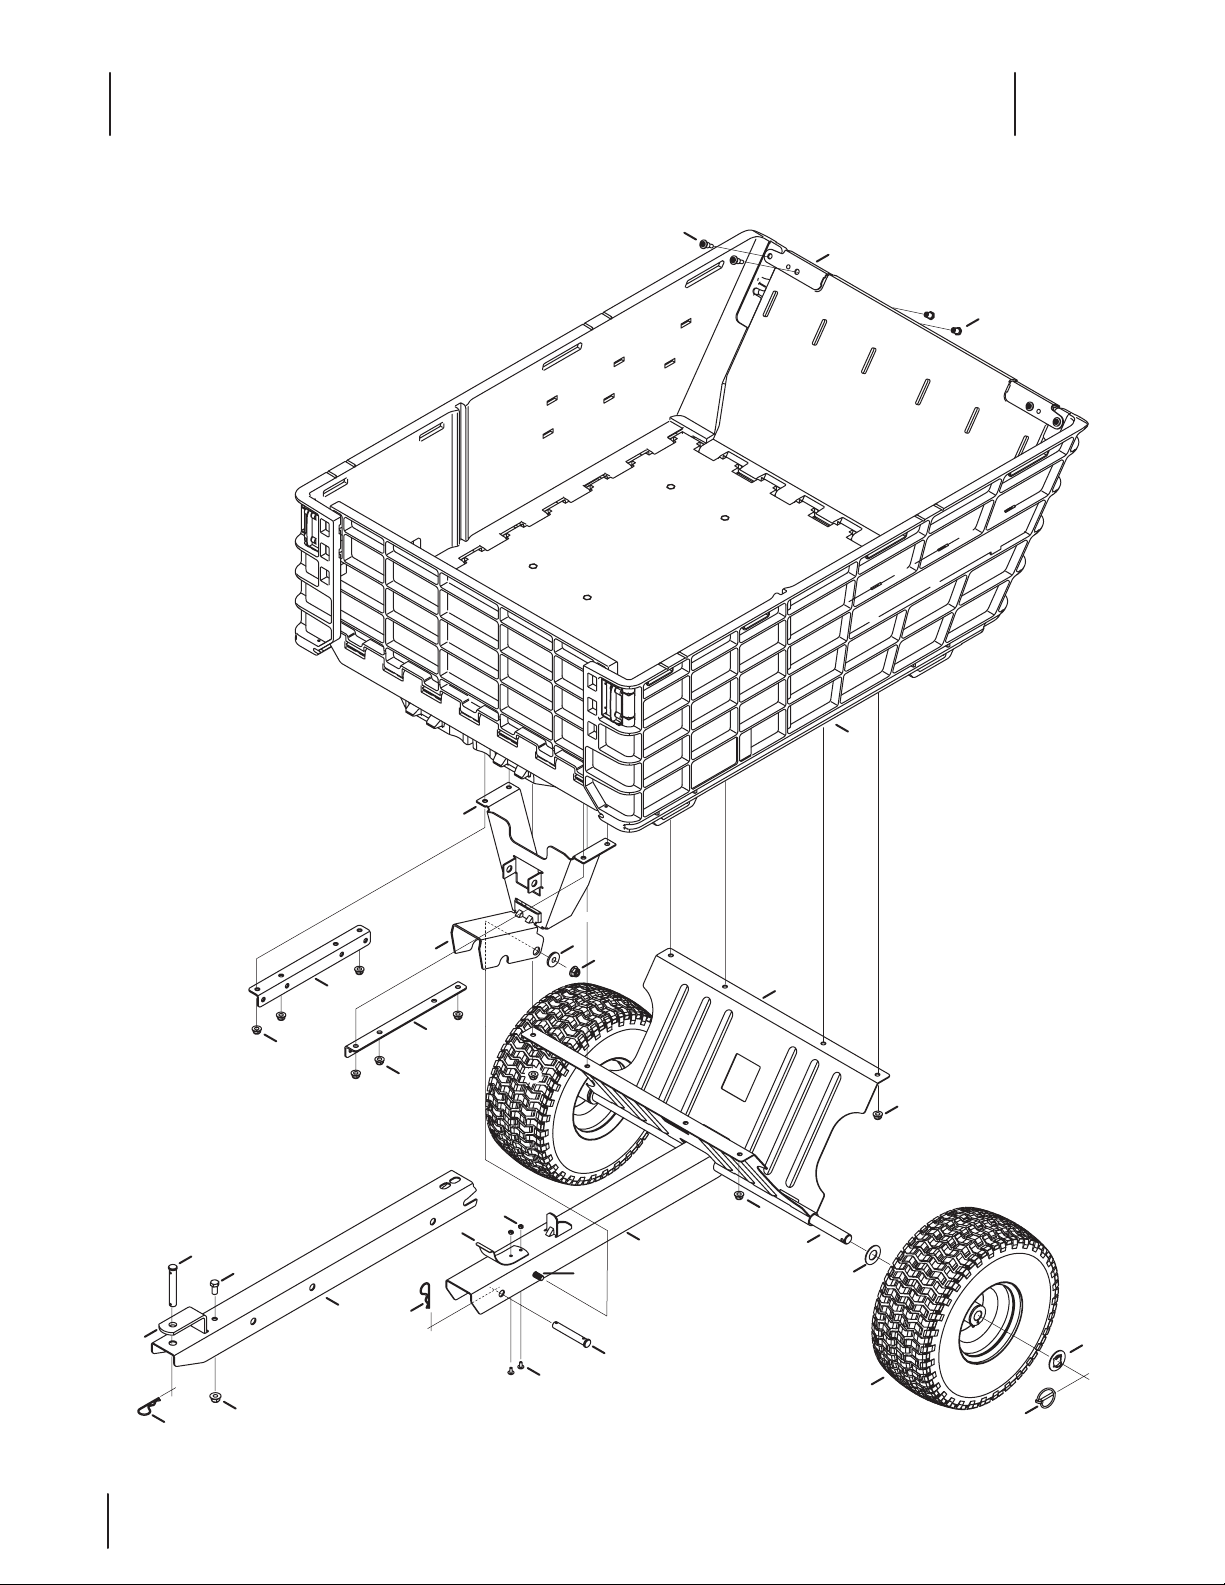
The hauler was designed for hauling activities typically associated with residential lawn and garden
maintenance activities in conjunction with a suitable towing vehicle with a compatible hitch.
General Operation
1. Read, understand, and follow all instructions
on the equipment and in the manual(s)
before attempting to assemble and operate.
Keep this manual in a safe place for future
and regular reference and for ordering
replacement parts.
2. Never carry passengers in or on the hauler.
3. Never allow children less than 14 years
of age to operate the towing vehicle or
hauler. Children 14 and over should read
and understand the instructions and safe
operation practices in this manual, on the
hauler, and the towing vehicle manual and
should be trained and supervised by an
adult.
4. Never allow adults to operate the towing
vehicle or hauler without proper instruction.
5. Check the towing vehicle brake action
before use with the hauler. Adjust or
service the brakes per the manufacturer
instructions as necessary.
6. Keep bystanders, children and pets away
from the towing vehicle and the hauler
while it is in operation.
7. Wear sturdy, rough-soled work shoes and
close-fitting slacks and shirts. Avoid loose
fitting clothes and jewelry which can be
caught in movable parts of the hauler. Never
operate this hauler in bare feet or sandals.
8. Your hauler is not a toy. Use extreme caution
at all times. The hauler’s purpose is to
haul material. Do not use it for any other
purpose.
9. Make sure you have control of the towing
vehicle and hauler at all times. Do not
rush. Take your time. When in doubt about
the towing vehicle and hauler or your
surroundings, stop and take time to look
things over. Make sure you are able to
proceed in a safe manner.
10. Watch for traffic when operating near or
crossing roadways.
11. Go slow. The hauler is not intended for use
on any public roadway or highway use.
12. Do not operate hauler while under the
influence of alcohol or drugs.
13. Operate only in daylight or good artificial
light.
14. Always look down and behind before and
while backing the tow vehicle and hauler to
avoid a back-over accident.
15. Slow down before turning. Operate the
towing vehicle smoothly. Avoid erratic
operation and excessive speed particularly
when carrying a full or heavy load or on
slopes.
16. Never leave a loaded cart unattended.
17. Use only accessories and attachments
approved for your hauler by the hauler
manufacturer. Read, understand and follow
all instructions provided with the approved
accessory or attachment.
18. If situations occur which are not covered
in this manual, use care and good
judgment. Contact your customer service
representative for assistance.
Towing, Loading and Unloading Safety
1. Do not exceed the 1000 lb. load capacity
of the hauler or the limits of the towing
vehicle.
2. Exceeding stated load capacity can lead
to loss of traction needed for slowing the
vehicle down and stopping.
3. Reduce towed weight when operating on
slopes.
4. Operate this hauler with towing vehicles
designed with a compatible tow hitch for
this hauler.
5. Do not allow riders on or in this hauler.
6. Make sure dump latch is securely latched
before loading or operating the unit.
7. Spread load evenly in bed. Secure load to
prevent movement. Avoid top-heavy loads
which could cause hauler to tip.
8. Go slow. Avoid sudden starts and stops
which could cause load to shift and loss of
control.
9. Use towing vehicle parking brake while
loading and unloading this hauler. When
lowering dump bed, keep hands and other
body parts from between bed and frame.
Keep bystanders away.
10. Unload dump bed before disconnecting
hauler from towing vehicle. Keep body parts
from under hauler tongue.
Slope Operation
Slopes are a major factor related to loss of control
and tip-over accidents which can result in severe
injury or death. All slopes require extra caution. If
you cannot back up the slope or if you feel uneasy
on it, do not.
Do not tow heavy loads on slopes greater than 5
degrees. When going downhill, the extra weight
tends to push the tow vehicle and may cause you
to lose control (e.g. tow vehicle may speed up,
braking and steering ability are reduced, hauler
may jack-knife and cause tow vehicle to overturn.)
For your safety, use the slope gauge included
as part of this manual to measure slopes before
operating hauler on a sloped or hilly area. If the
slope is greater than 5 degrees as shown on the
slope gauge, do not operate hauler with a heavy
load on that area or serious injury could result.
Do:
1. Operate up and down slopes, not across.
Exercise extreme caution when changing
direction on slopes.
2. Reduce speed, especially when going
downhill, to avoid loss of control.
3. Watch for holes, ruts, bumps, rocks, or other
hidden objects that could cause the hauler
to tip over.
4. Go slow. Choose a low enough tow vehicle
speed setting so that you will not have to
stop or shift while on the slope. Tires may
lose traction on slopes even though the
brakes are functioning properly. Always
keep tow vehicle in gear when going down
slopes to take advantage of engine braking
action.
5. Follow the tow vehicle manufacturer’s
recommendations for towing operations.
Do not exceed the hauler recommendations
regardless of tow vehicle capabilities.
6. Keep all movement on the slopes slow and
gradual. Do not make sudden changes in
speed or direction. Rapid acceleration or
braking could cause the towing vehicle,
hauler, and load to become unstable which
could cause serious injury.
7. Avoid starting or stopping on a slope.
Do Not:
1. Do not turn on slopes unless necessary;
then, turn slowly and gradually downhill, if
possible.
2. Do not drive near drop-offs, ditches or
embankments. The tow vehicle and hauler
could suddenly turn over if a wheel is over
the edge of a cliff, ditch, or if an edge caves
in.
3. Do not the towing vehicle and this hauler on
steep slopes.
4. Do not operate towing vehicle and hauler
on wet grass or loose ground surfaces.
Reduced traction could cause sliding.

4Section 2 — important Safe operation practiceS
5. Do not shift to neutral and coast downhill.
Over-speeding may cause the operator to
lose control of the towing vehicle and hauler
resulting in serious injury or death.
6. Do not tow loaded hauler on slopes greater
than 5 degrees. When going downhill, the
extra weight tends to push the towing
vehicle and may cause you to lose control
(e.g. towing vehicle may speed up, braking
and steering ability are reduced, attachment
may jack-knife and cause towing vehicle to
overturn).
7. Do not make sudden changes in speed or
direction.
Children
1. Tragic accidents can occur if the operator
is not alert to the presence of children.
Children are often attracted to the towing
vehicle and hauler. They do not understand
the dangers. Never assume that children will
remain where you last saw them.
a. Keep children out of the operating
area and in watchful care of a
responsible adult other than the
operator.
b. Be alert and turn the towing vehicle
off if a child enters the area.
c. Before and while backing, look
behind and down for small children.
d. Never carry children on the towing
vehicle or hauler. They may fall off
and be seriously injured or interfere
with safe hauler operation.
e. Use extreme care when approaching
blind corners, doorways, shrubs,
trees or other objects that may block
your vision of a child who may run
into the path of the towing vehicle
and hauler.
f. Keep children away from hot or
running engines. They can suffer
burns from a hot muffler.
g. Remove key when a towing vehicle is
unattended to prevent unauthorized
operation.
2. Never allow children less than 14 years
of age to operate the towing vehicle or
hauler. Children 14 and over should read
and understand the instructions and safe
operation practices in this manual, on the
hauler, and the towing hauler manual and
should be trained and supervised by an
adult.
Safety Symbols
This page depicts and describes safety symbols that may appear on this product. Read, understand, and follow all instructions on the machine before
attempting to assemble and operate.
Symbol Description
READ THE OPERATOR’S MANUAL(S)
Read, understand, and follow all instructions in the manual(s) before attempting to assemble and operate.
DANGER — Do not carry children or passengers.
This symbol points out important safety instructions which, if not followed, could endanger the personal
safety and/or property of yourself and others. Read and follow all instructions in this manual before
attempting to operate this machine. Failure to comply with these instructions may result in personal injury.
When you see this symbol. Heed its warning.
WARNING! Your Responsibility—Restrict the use of this power machine to persons who read, understand and follow the warnings and
instructions in this manual and on the machine.
SAVE THESE INSTRUCTIONS!

Assembly & Set-Up 3
5
NOTE: All references to LEFT, RIGHT, FRONT, and
REAR indicate the hauler position when seated in
the tractor’s operator seat and facing forward.
Hardware Pack
1
2
3
4
Figure 3-1
The contents of the hardware pack are listed below
and referenced in Figure 3-1.
1. Two (2) Flat Washers, .760 x 1.490 x .060
(736 -0351)
2. Two (2) Flange Washers, .781 x 1.590
(736-04228A)
3. Two (2) Lynch Pins, .1875 (714-0220A)
4. One (1) Lithium Grease (737-04085)
Hauler Preparation
1. Carefully unpack the contents of the carton
and unwrap and cut any cable ties securing
the contents in the carton.
2. Carefully stand the hauler up as shown in
Figure 3-2.
Figure 3-2
3. Before installing the wheels, the axles and
the inside of the rims should be greased
with the packet of grease shipped with your
hauler. Approximately half of the package
should be used on each side. Apply some
grease to the exposed portion of the axle
and coat the axle completely. Squeeze a
small amount of grease into the rim.
4. Slide the inner flat washer from the
hardware pack, the tire and outer flanged
washer from the hardware pack onto the
axle as shown in Figure 3-3. Make sure the
valve stem on the tire rim is facing outward.
Figure 3-3
5. Install the lynch pins from the hardware
pack through the holes in the axles. Flip the
lynch pin down over the axle to secure the
tires in place. See Figure 3-4.
1
2
Figure 3-4
6. Carefully set the hauler down onto its
wheels.
7. Locate the panel latch on the front of the
hauler. Push the panel latch inward and raise
the sides of the hauler bed. See Figure 3-5.
1
2
Figure 3-5
8. Repeat Step 7 on the other side of the bed.
9. With both sides now raised, lift the front
panel up and insert the front panel into the
side panels pull outward on the tabs until
they click into place. See Figure 3-6.
1
1
2
Figure 3-6
10. Lift the tailgate latches and then lift the
tailgate into place. See Figure 3-7.
1
1
2
Figure 3-7
Contents of Carton
• One Hauler Assembly • One Tongue Assembly • Two Wheel Assemblies
• One Hardware Pack • One Operator’s Manual
Table of contents
Languages:
Popular Outdoor Cart manuals by other brands

Carts Vermont
Carts Vermont 20 manual

Westward
Westward 2CZY4 Operating instructions and parts manual

Numatic
Numatic EcoMatic EM-5 Assembly

Bosch
Bosch XL-Cart Operating/safety instructions

Tennsco
Tennsco Modular Cart Top Component Assembly Assembly Instructions/Parts Manual

Clam
Clam POLAR TRAILER HD MAX manual