Mubea U-MOBILITY User manual

U-Mobility XBoard vehicle instruction V1 August 23 Seite 1 von 3
Confirmation vehicle instruction and test drive Mubea U-Mobility XBoard
Herewith I confirm that I am at least 14 years old and that an employee of Mubea (a nominated
employee) has instructed me in the functions of the U-Mobility XBoard.
Notice: Driving the XBoard requires a certain amount of practice. Due to the three wheels and the tilting
mechanism, the vehicle takes some time to get used to, especially when entering curves. Please approach the
driving style slowly and drive with foresight.
Get used to the functions and the position of the operating elements.
❑Handlebar adjustment: The handlebar height is pre-set.
Notice: Please do not adjust the height of the handlebar during the test ride.
❑Steering: The entire range of possible steering angle can be used.
Notice: Please keep both hands on the handlebars at all times.
❑Tilt: The tilt angle of the chassis is mechanically limited. Tilting beyond the limit will cause one of the front
wheels to lift off the road.
Notice: Please avoid lifting one of the front wheels.
❑Bell: It is located on the left handlebar.
❑Rear wheel cover: The rear wheel cover (see Fig. 1) has no braking function.
Notice: Please do not step on the wheel cover.
❑Splash guard: If required, push the splash guard 2(see Fig. 2) with the slider 1(see Fig. 2) to the rear up
until it stops.
Notice: Always push the splash guard 2(see Fig. 2) back to its basic position after driving.
Figure 1: Rear wheel cover Figure 2: Splash guard
❑Power on / power off: Briefly press the On / Off button 1(see Fig. 3) to switch the XBoard on.
To switch it off, press and hold the On / Off button 1(see Fig. 3) for about 3 seconds.
Figure 3: Switch On / Off

U-Mobility XBoard vehicle instruction V1 August 23 Seite 2 von 3
❑Starting and accelerating: Pull both brake levers 1and 2(see Fig. 4) and place one foot on the board.
Release the brakes and push off with the other foot to get the XBoard rolling. Then carefully activate the
acceleration lever 3(see Fig. 4) and place the second foot on the board.
❑Mechanical brakes: Release accelerator lever 3(see Fig. 4) and pull brake lever 1(see Fig. 4; front brake)
and brake lever 2(see Fig. 4; rear brake) simultaneously.
Notice: Never simultaneously activate accelerator lever 3(see Fig. 4) and brakes 1and 2(see Fig. 4).
❑Energy recuperation: To recuperate energy, you can carefully activate the recuperation lever 4(see Fig. 4)
while driving.
Figure 4: Starting and braking
❑Parking brake: To secure the XBoard against rolling away, pull the brake lever 1(see Fig. 5) and wrap the
fastening strap 2 (see Fig. 5) attached to the handlebar around the brake lever 1(see Fig. 5). This will
permanently lock the front brake.
Figure 5: Locking the brake
❑Setting the support level: Three support levels (driving modes) are available (see Fig. 6), which can be
changed at any time, even while driving. Press key 1(see Fig. 7) to switch between the support levels.
The selected support level is shown on the display (see Fig. 8 9).
Figure 6: Support levels Figure 7: Setting support level
❑Display: The display (see Fig. 8) shows you all the relevant information.
Figure 8: Display
1 Unit of speed
2 Current speed
3 Lighting status
4 Right indicator (currently without function)
5 Lighting status (currently without function)
6 Battery charge status
7 Settings (currently without function)
8 Bluetooth status
9Support level
10 Maintenance mode/error code
11 Right indicator (currently without function)
12 Lock mode

U-Mobility XBoard vehicle instruction V1 August 23 Seite 3 von 3
❑Unfold the folding mechanism:
❑Step : Push the step fin 1(see Fig. 9). The folding mechanism is unlocked and the rear wheel jumps
back a few centimeters.
❑Step : Pull down the rear part of the board 2(see Fig. 9) by hand.
Notice: Danger of crushing. Do not hold your fingers between the board and the folding mechanism.
❑Step : Press the foot from above onto the board 2(see Fig. 9) until it audibly clicks into place.
Figure 9: Unfold the folding mechanism
❑Close the folding mechanism:
❑Step : Set the handlebar 2(see Fig. 10) straight and ensure that the
splash guard (see Fig. 2 2or Fig. 10) is pushed to its basic position.
❑Step : Press the step fin 1with your foot (see Fig. 10) without holding the handlebars.
❑Step : The XBoard folds up automatically. When it audibly clicks into place, the XBoard is locked.
Notice: The process must be repeated if needed until the XBoard audibly clicks into place. For example, if the
surface is uneven.
Figure 10: Close the folding mechanism

U-Mobility Cargo Training guideline V1 May 23 Seite 1 von 2
Vehicle Instruction Confirmation and Test Drive Mubea U-Mobility Cargo
I hereby confirm that I have been instructed in the functions of the U-Mobility Cargo by an employee of
Mubea (a designated employee) and that I am at least 16 years old.
Specialty: Due to the upright driving position, the two-lane design creates an unusual feeling of being pushed
outward when cornering. Because of its size and dimensions, one can drive the U-Mobility Cargo more like a
car. It is prohibited to go faster than 30 km/h.
Driving the U-Mobility Cargo takes some getting used to. Always be aware of the following:
•the vehicle length/width,
•the turning circle (min. 5,5 m),
•Blind spots next to and behind the pedelec.
Make sure that the U-Mobility Cargo is adjusted to your body height.
•Seat adjustment: Loose the handle on the seat mount counter clockwise until you hear a click. Pull out the
handle, stand next to the U-Mobility Cargo and move the saddle up or down to hip height. Let the handle click
into place and turn it clockwise hand-tight.
•Mirror: Adjust the mirrors only while sitting on the bike and with seat position already set.
Observe the blind spot while driving!
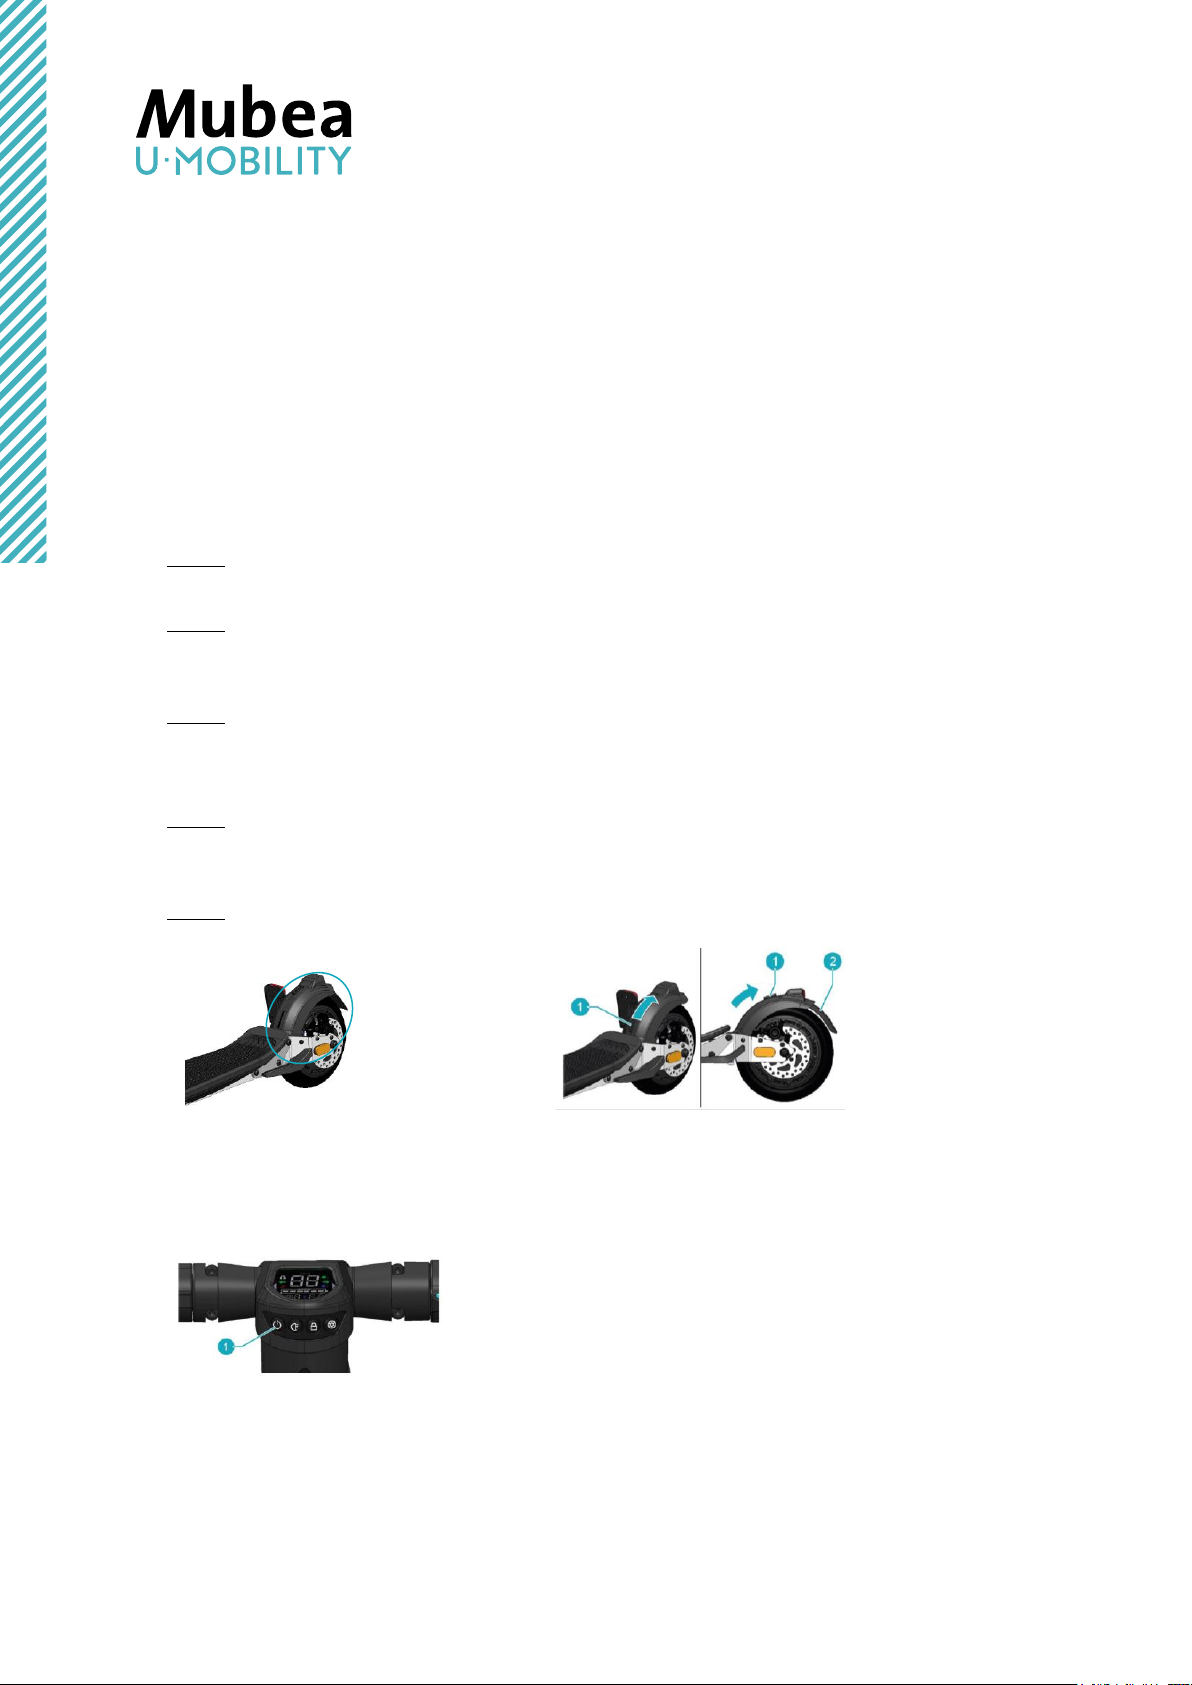
Get familiar with the functions and position of the control elements (Figure 1):
•Steering: The entire range of the possible steering angle can be used. When stationary, the steering is more
sluggish than when driving.
•Brakes: Left lever: front wheel brake, right lever: rear wheel brake. Always apply both brakes simultaneously.
•The parking brake must always be applied when leaving the vehicle and rereleased before driving off. The
parking brake must not be used when the pedelec is in motion.
•Bell: Located on the right side of the handlebar.
•Turn signal: Operate the turn signal switch to signal that you want to change the direction of travel. Set the
turn signal switch back to the middle position to stop the blinking.
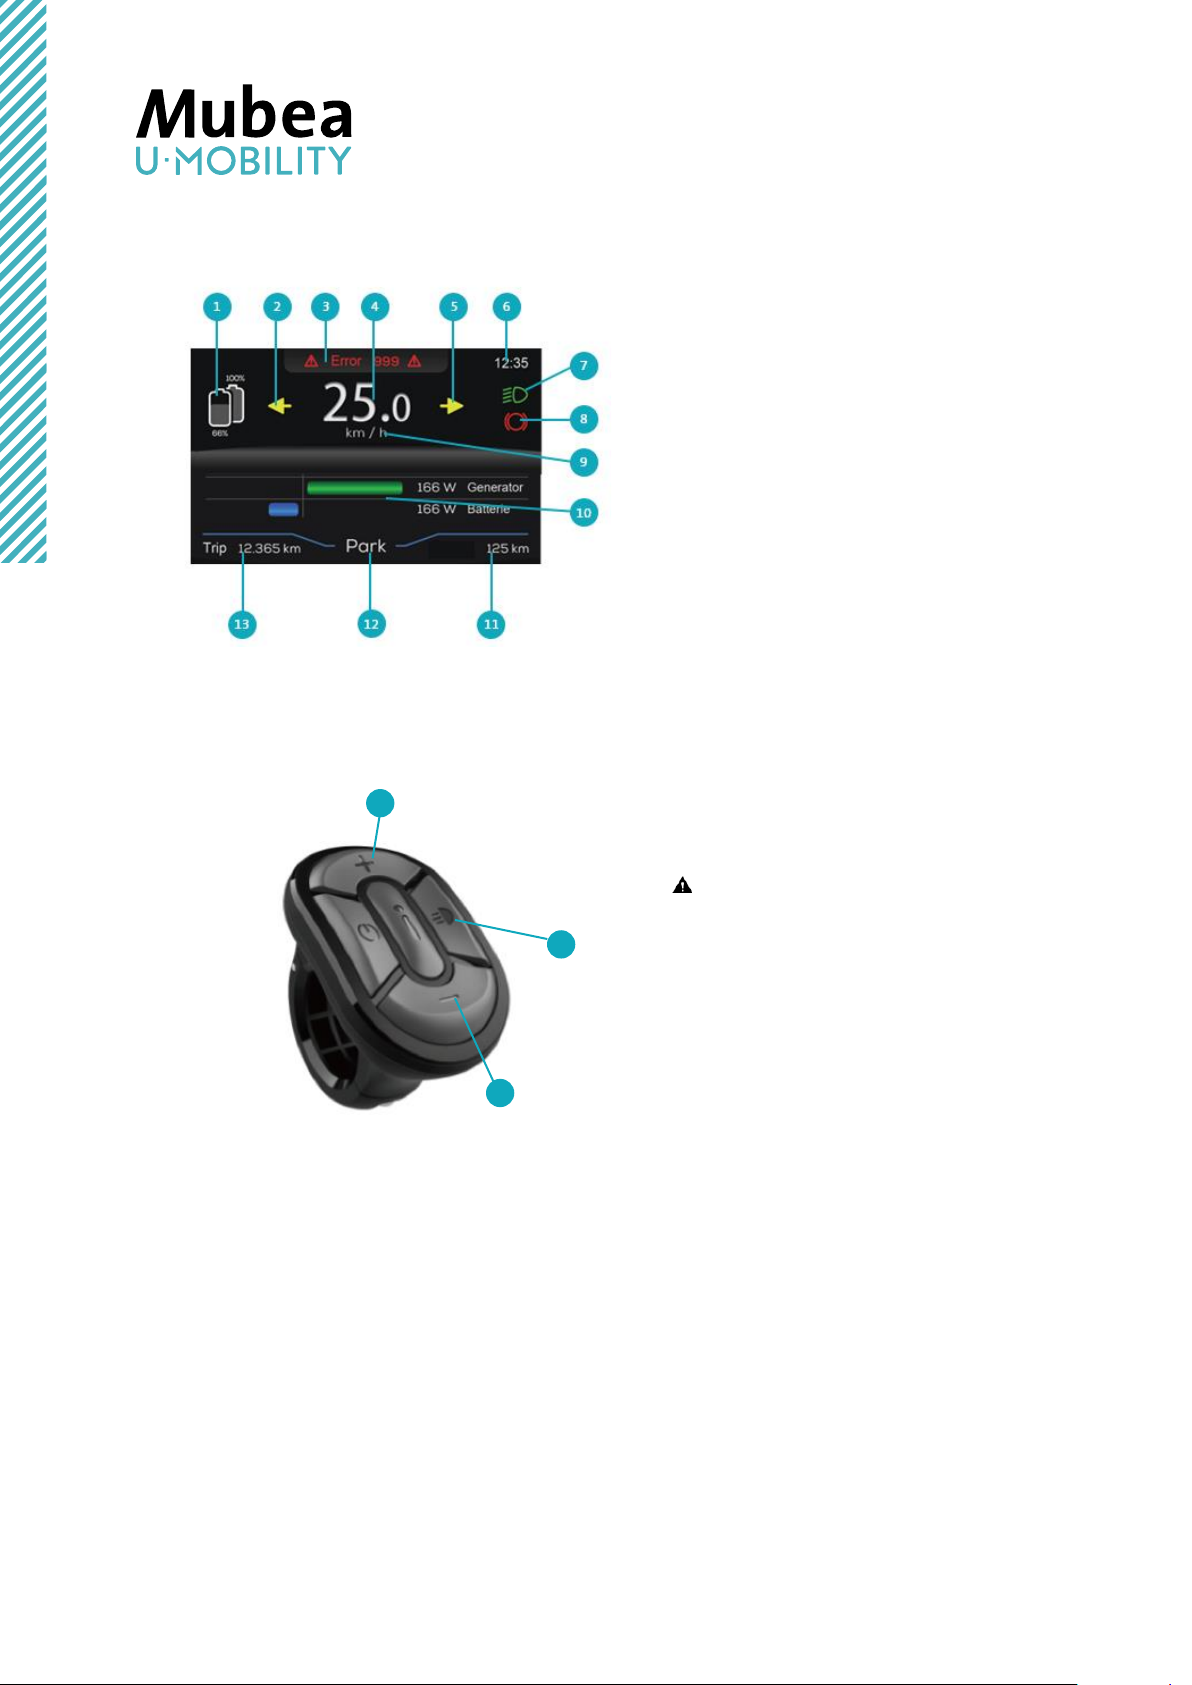
Figure 1: Display elements and control element
1On/Off switch
(Long press: anti-theft function (“lock-mode”)
2Light (press and hold: changeover range,
daily distance or total distance)
3USB-C port (for charging mobile phones 5 V max. 2 A;
connecting diagnostic tool)
4Setting support level (no assist, eco level, predict level,
turbo level)
5Gearbox mode (automatic - manual)
Press and hold: manoeuvring aid reverse
6Shifting a gear up (in manual mode)
7Shifting a gear down (in manual mode)
8Start and push assistance (forwards and backwards)
•Switch on: press button 1for approx. 1 s. Switch off: press button 1briefly.
1
2
4
3
5
6
7
8

U-Mobility Cargo Training guideline V1 May 23 Seite 2 von 2
•Assist levels: The level of assistance determines how strongly the drive supports you when pedalling (see Figure 2).
The assist level can also be selected during the ride using button 4. The drive is activated as soon as you start
pedalling (unless the assistance mode is switched off).
•Gearshift: The U-Mobility Cargo has an automatic and a manual gearbox. Press button 5to select the gearbox. To
change gear in manual mode, press buttons 6(upshift) or 7(downshift).
•Manoeuvring aid reverse: Press and hold button 5on the control element until “R” appears on the display to switch
to reverse mode, return to normal mode by briefly pressing button 5. Lightly press lever 8to drive backwards.
Observe clear road behind the vehicle, use reverse gear only as pushing aid, and do not exceed slow walking speed!
•Start and push assist: The push assist (lever 8) makes it easier to push the U-Mobility Cargo, both forwards and
backwards. To activate the push assistance, press down lever 8on control element (thumb throttle). As soon as you
release the lever, the push assistance stops. The push assist is limited to 6 km/h (4 mph).
The display (see Figure 3) shows you all relevant information.
Figure 3: Display
1Current speed
2Display the total distance ridden, the trip distance or
the range
3Gear engaged
4Starting Aid and push assist
5Assist level
6Unit of speed
7Battery charge level
8Status of lights
9Maintenance mode
10 Lock mode
11 Bluetooth status
Figure 2: Assist levels
1
2
3
4
5
8
9
10
11
7
6

U-Mobility Cargo Vehicle Briefing SHPB Aug 23 Page 1 of 3
Vehicle instruction and test-drive confirmation for the Mubea U-Mobility Cargo SHPB
I hereby confirm that an employee of Mubea (a designated employee) has instructed me in the functions
of the U-Mobility Cargo and that I am at least 14 years old.
Special feature: The two-track design creates a unique feeling of being pushed outward when cornering,
due to the upright driving position. With its size and dimensions, the U-Mobility Cargo can be driven
similarly to a car. Please do not drive faster than 30 km/h.
Driving the U-Mobility Cargo requires some familiarization. Consider the following points:
•the length/width of the vehicle,
•the turning circle (min. 5.5 m),
•and the blind spot on the sides and behind the vehicle.
Make sure that the U-Mobility Cargo is adjusted to your height.
•Seat adjustment: Loosen the handle on the seat mount counterclockwise until you hear a click. Pull the handle
out, stand next to the U-Mobility Cargo and move the seat up or down to hip height. Let the handle click into its
place and turn it clockwise until hand-tight.
•Mirror: Adjustments should be made only after mounting with the seat position already set.
Note: Observe the blind spot when driving!
The pedelec is mainly operated using the controls on the handlebars. Familiarize yourself with the functions and
position of the controls (Figure 1):
1 Brake lever for braking the front wheels
2Turn the signal switch
3 Switch for hazard warning lights (right switch without
function)
4Display
5 Bell
6 Control element
7Brake lever for braking the rear wheels
8Parking brake lever
Figure 1: Handlebars as seen by the driver
•Steering: The entire range of the possible steering angle can be used. When stationary, the steering is more
sluggish than when driving.
Note: Avoid erratic steering movements.
•Brakes: Left lever: front brake, right lever: rear brake.
Note: Always apply both brakes at the same time.
•Parking brake: The parking brake must always be utilized when leaving the vehicle; it must be released again
before driving off.
Note: The parking brake must not be applied when the pedelec is in motion.
•Bell: is located on the right side of the handlebar.
•Turn signal: Actuate the turn signal switch to signal that you want to change the direction of travel. Set the turn
signal switch back to the middle position to stop the flashing.
1
2
5
6
4
3
7
8

U-Mobility Cargo Vehicle Briefing SHPB Aug 23 Page 2 of 3
•Display: The display (Figure 2) shows you all relevant information.
Figure 2: Display screen
1Charge status of the/the battery
2Indicator left (blinker flashes)
3Possible error indication
4Current speed
5Indicator right (blinker flashes)
6Time
7Status of lighting
8Parking mode display
9Units of speed
10 Power meter display
11 Total distance traveled display
12 Display of support level or pushing assistance
13 Display of pedelec information: range, daily
kilometers, average power of the motor, average
power of the generator, or average speed
•Control element: The control element (Figure 3) is used to operate the drive system, the system settings and
the light.
Figure 3: Control element
1Switching up the support level
2Switching down the support level
3Switching the light on and off
WARNING - The brake lights function is
linked directly to the light button. Without
brake lights, serious rear-end collisions may
occur if following road users do not
recognize that you are braking.
Always turn the lights on to start the function of the
brake lights.
Note: The pedelec is protected with an electronic
immobilizer/password. Do not switch off the pedelec.
•Assistance levels: The assistance level (Figure 4) determines how strongly the drive supports you when
pedaling. There are 5 support levels available, which can also be changed while riding. To do this, press the keys
1or 2on the control element to switch the levels up or down.
1
2
3

U-Mobility Cargo Vehicle Briefing SHPB Aug 23 Page 3 of 3
Figure 4: Assistance levels
The pedaling resistance of the generator increases as the
level increases. The maximum speed of the pedelec can
be reached in each stage.
If the Park function is set, pedaling will have no effect.
Note: This function does not replace the parking brake.
•Gear shift: The U-Mobility Cargo SHPB has a 2-speed transmission. The gear is selected via the gear lever on the
left side of the steering column (Figure 5).
Figure 5: Gear shift lever
1Gear 1, lever position down: Normal operation
(fast)
2Gear 2, lever position up: Boost mode (slow)
Note: Use gear 2 exclusively to cope with steep
inclines.
Note: Only shift the gear lever when the pedelec is at
a standstill.
•Maneuvering aid: The maneuvering aid provides electric motor assistance when starting, pushing or turning the
pedelec. With the maneuvering aid, it is possible to move the pedelec forward and backward without pedaling
power. The speed in maneuvering mode is limited to a maximum of 4 km/h.
1. Switch on the hazard warning lights with switch
3.
2. Use the 1and 2keys to select any assistance
level.
Figure 6: Operating the maneuvering aid
Maneuvering aid forward:
3. Press and hold the button 2
−✓The drive is switched on after approx. 1 s.
−As soon as key 2is released, the drive switches
off.
Maneuvering aid backward:
3. Pedal backwards.
WARNING –Risk of accident when reversing due
to restricted visibility. Check the travel path.
✓The reversing light is switched on, a warning
tone sounds and the pedelec reverses.
−As soon as you stop pedaling, the pedelec stops,
the reversing light and the warning sound are
switched off.
1
2
1
2
3
Table of contents