manuals.online logo
Brands
  1. Home
  2. •
  3. Brands
  4. •
  5. Multico
  6. •
  7. Switch
  8. •
  9. Multico EW-K1302DPC4K User manual

Multico EW-K1302DPC4K User manual

Quick Installation Guide
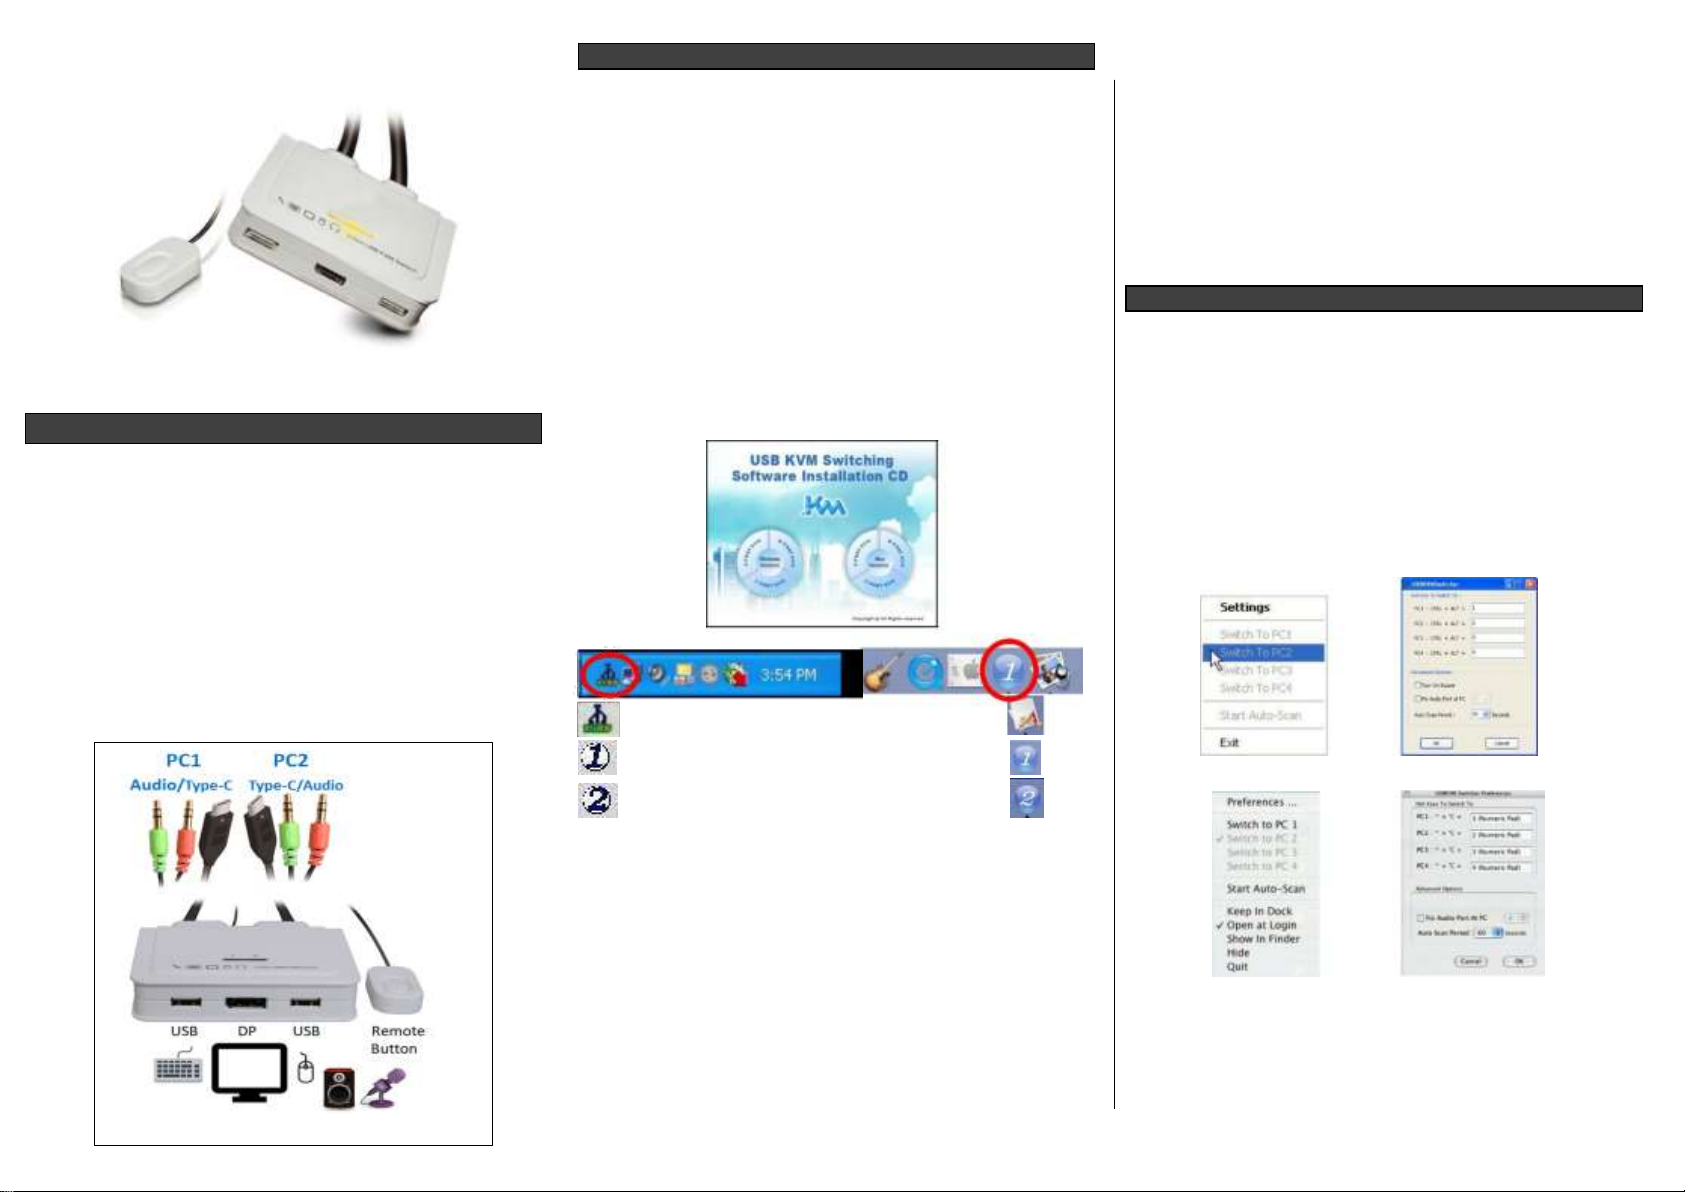
2-Port type C USB Cable KVM Switch
w/ DP1.2,USB, Audio&Mic console port
EW-K1302DPC4K
INTRODUCTION
The EW-K1302DPC4KCable KVM Switch offers a two PC port
Type-C interface with 2 sets of fixed KVM cables Type-
C/Audio/Mic combo cable so that you no longer have cable
troubles. The console port offers for instant switching
action, it has got a wired Quick Switch ! Button -- just a mere
flip on the button and it switches to the other computer. The
type C cable KVM supports DP port resolution 3840x2160 /
4K 60Hz.
The two USB 2.0 keyboard and mouse ports are actually
transparent USB hub ports that feature full driver support for
advanced keyboard/mouse. In addition, they can also be
connected to other high-speed USB devices such as USB
disk storage, etc.
INSTALLATION
Take the support CD and the cable KVM switch out of the
box and follow the steps below for installation.
1. Insert the support CD into your CD drive, and the installation
interface will pop up (If the Autorun feature has not been
enabled on your computer. Just find the Autorun.exe in the
support CD and double-click it to start).
2. For Windows/Mac: Just click the “Software Installation for
Window” to start Windows Switching Software installation. To
install Mac version, please copy the file (*.pkg format) to the
local hard disk and install it from there. Follow the instructions
to completion. If the installation is completed, you will see a
KVM Switching Software icon on the system tray of your
desktop. Right-click on this icon to evoke the operation menu
and double-click to evoke configuration box. For operation
details of the KVM Switching Software, please refer to the
following sections.
Windows Mac OS
No live connection detected
Current active computer channel is on port 1
Current active computer channel is on port 2
Note: The Mac version of the KVM Switching Software
supports only Mac OS 10.4 (Tiger) and later. Earlier versions
of the Mac OS might or might not work well with it.
Note: The KVM Switching Software supports both the
Windows and the Mac OS operating systems. For other OS
platforms such as Linux, you can still use the universal
keyboard hotkey –Scroll Lock + Scroll Lock- to switch
computer. However, this switching hotkey is not available on
non-computer platform such as Mac OS.
3. Repeat step 1 and 2 to install Switching software on the
second computer.
4. Connect a set of monitor, USB keyboard, and USB mouse to
respective consoles port on KVM front panel.
1
EW-K1302DPC4K 2-Port Type C USB Cable KVM Switch w/ Audio & Mic
5. Connect a set of the fixed KVM/ audio&mic cables to a
computer’s connectors. Connect another set of cables to the
other computer.
Installation is completed. Now you can operate the KVM switch
immediately.
Note: Some older computers with USB interface might need to
manually enable the USB option in the BIOS settings before you
can use any USB devices. If your USB interface does not work,
please check the USB option status in the BIOS.
OPERATION
There are three methods to control your KVM switch for
computer and audio/mic port selection: using (1) QuickSwitch
Button (a wired remote control), (2) KVM Switching Software, or
(3) Keyboard hotkeys.
(1) QuickSwitch Button (a wired remote control)
The QuickSwitch button is a wired remote control that
allows you a direct switching control. Simply press the
button to toggle between two computers.
(2) KVM Switching Software (Windows & Mac platform)
For KVM Switching Software operation, please refer to
the “Quick Reference Sheet”.
Windows: Operation Menu Configuration Dialog Box
Mac: Operation Menu Configuration Dialog Box
(3) Keyboard Hotkeys
For keyboard hotkey operation, please refer to
“Quick Reference Sheet”.
Quick Installation Guide EW-K1302DPC4K 2-Port Type C USB Cable KVM Switch w/ Audio &
Mic
Quick Reference Sheet
Command
QuickSwitch Button
Switching Software
Keyboard Hotkeys1
Description
Select PC Port
Press the button to toggle
between the two
computers.
Right-click the KVM Switching Software icon to
evoke the operation menu, then select
whichever computer that is available for
switching.
Scroll Lock + Scroll Lock
Select PC port
Next lower PC Port
---
Right-click the KVM Switching icon to evoke the
operation menu, then select whichever
computer that is available for switching.
---
Next lower PC port
Next higher PC Port
---
Right-click the KVM Switching icon to evoke the
operation menu, then select whichever
computer that is available for switching.
---
Next higher PC port
Define Hotkey Preceding
Sequence
---
Right-click the KVM Switching icon to evoke the
operation menu, and then select Settings
(Windows) / Configuration Dialog Box (Mac
OS).
---
User–definable hotkeys sequence for computer
selection is “Ctrl +Alt+ [command key]”.
For Mac, instead of Scroll Lock key, you may
use User-definable hotkey sequence to switch.
Autoscan
---
Right-click the KVM Switching Software icon to
evoke the operation menu, then select Start
Auto-Scan to activate autoscanning.
---
Starts Autoscan
Autoscan with Programmable
Delay Time
---
Right-click the KVM Switching Software icon to
evoke the operation menu, then select a range
of Auto-Scan Period.
---
Autoscan duration adjust to (10 ~ 60 seconds)
Stop Autoscan
---
While autoscanning, right-click the KVM
Switching Software icon to evoke the operation
menu, and then select Stop Auto-Scan to de-
activate autoscanning.
---
Stop Autoscan during scan mode
Beeper
---
Right-click the KVM Switching Software icon to
evoke the operation menu, then check the box
“Turn on Buzzer”.
---
Toggle Beeper on/off
Keep in Dock (Mac only)
---
Right-click the KVM Switching Software icon to
evoke the operation menu, and then select
“Keep in Dock”.
---
KVM switching icon will be on the system tray
of your desktop
Open at Login (Mac only)
---
Right-click the KVM Switching Software icon to
evoke the operation menu, then select “Open at
login”.
---
Operate Switcher Software and login
Fix Audio Port
---
Right-click the KVM Switching Software icon to
evoke the operation menu, then check the box
“Fix Audio Port at PC” and select the desired
PC port.
---
Check this option and then select the computer
to fix the audio/mic port to the selected
computer. Once this option is checked, the
audio/mic port will be fixed and become
Select P Notes:
1. Each keystroke in hotkey sequence should be pressed within two seconds. Otherwise, the hotkey sequence will not be validated.
.
Rev.1.0 Copyright© All rights reserved.

Other Multico Switch manuals

Multico EW-70244 User manual

Multico

Multico EW-70244 User manual

Multico EW-K1302DPUC4K User manual

Multico

Multico EW-K1302DPUC4K User manual

Popular Switch manuals by other brands

ABB IS/S 8.1.1 product manual

ABB

ABB IS/S 8.1.1 product manual

Hall Technologies EMCEE200 user manual

Hall Technologies

Hall Technologies EMCEE200 user manual

ATEN US3310-AT user manual

ATEN

ATEN US3310-AT user manual

Veto NIVOCONT user manual

Veto

Veto NIVOCONT user manual

Siemens SITRANS LVL200S operating instructions

Siemens

Siemens SITRANS LVL200S operating instructions

ipf WR-3 instruction manual

ipf

ipf WR-3 instruction manual

Allnet ALL-SG8926PM user manual

Allnet

Allnet ALL-SG8926PM user manual

Balluff BNI IOL-727-S51-P012 Assembly instructions

Balluff

Balluff BNI IOL-727-S51-P012 Assembly instructions

Pilz PSEN 1.1p-23 ATEX operating manual

Pilz

Pilz PSEN 1.1p-23 ATEX operating manual

H3C S12500 Series manual

H3C

H3C S12500 Series manual

AVCOMM 616TX Quick installation guide

AVCOMM

AVCOMM 616TX Quick installation guide

TRENDnet TPE-T160 Specifications

TRENDnet

TRENDnet TPE-T160 Specifications

H3C S9810 Hardware Installation Quick Guide

H3C

H3C S9810 Hardware Installation Quick Guide

Kramer VP-770 user manual

Kramer

Kramer VP-770 user manual

inogeni CAM230 user guide

inogeni

inogeni CAM230 user guide

HP 5920 Configuration guide

HP

HP 5920 Configuration guide

DigitaLinx DL-S41-H2 owner's manual

DigitaLinx

DigitaLinx DL-S41-H2 owner's manual

Helios FWS 2 Installation and operating instructions

Helios

Helios FWS 2 Installation and operating instructions

manuals.online logo
manuals.online logoBrands
  • About & Mission
  • Contact us
  • Privacy Policy
  • Terms and Conditions

Copyright 2025 Manuals.Online. All Rights Reserved.