User Manual: CoboPin-VT3001C(-I/-T)
V1.00 (10-2013) 6
■LED Lifetime advice
LED lifetime is determined by the gradually declining brightness of a LED over time,
with a point of 50% brightness reduction marking the defined end of its lifetime. The
driving factor of this effect is the heat that the chip inside the LED is exposed to. While
a chip may under ideal circumstances reach to more than 100000 hours of lifetime, the
real-world lifetime may only be 30000 to 50000 hours or less if the LED is exposed to
excessive heat, which can be caused by continuously running all LEDs inside this
device at full power and operating the unit in high environmental temperatures. If
improving the lifespan expectancy is a priority, take care of providing for lower
operational temperatures. This may include forced external cooling and/or the reduction
of overall projection intensity.
■Unpacking
Please check that the box contains the following items, and contact your dealer
immediately for replacement if any part is missing:
Main parts: 1 pc. CoboPin-VT3001C fixture
1 pc. Power cord
1 pc. Operation manual
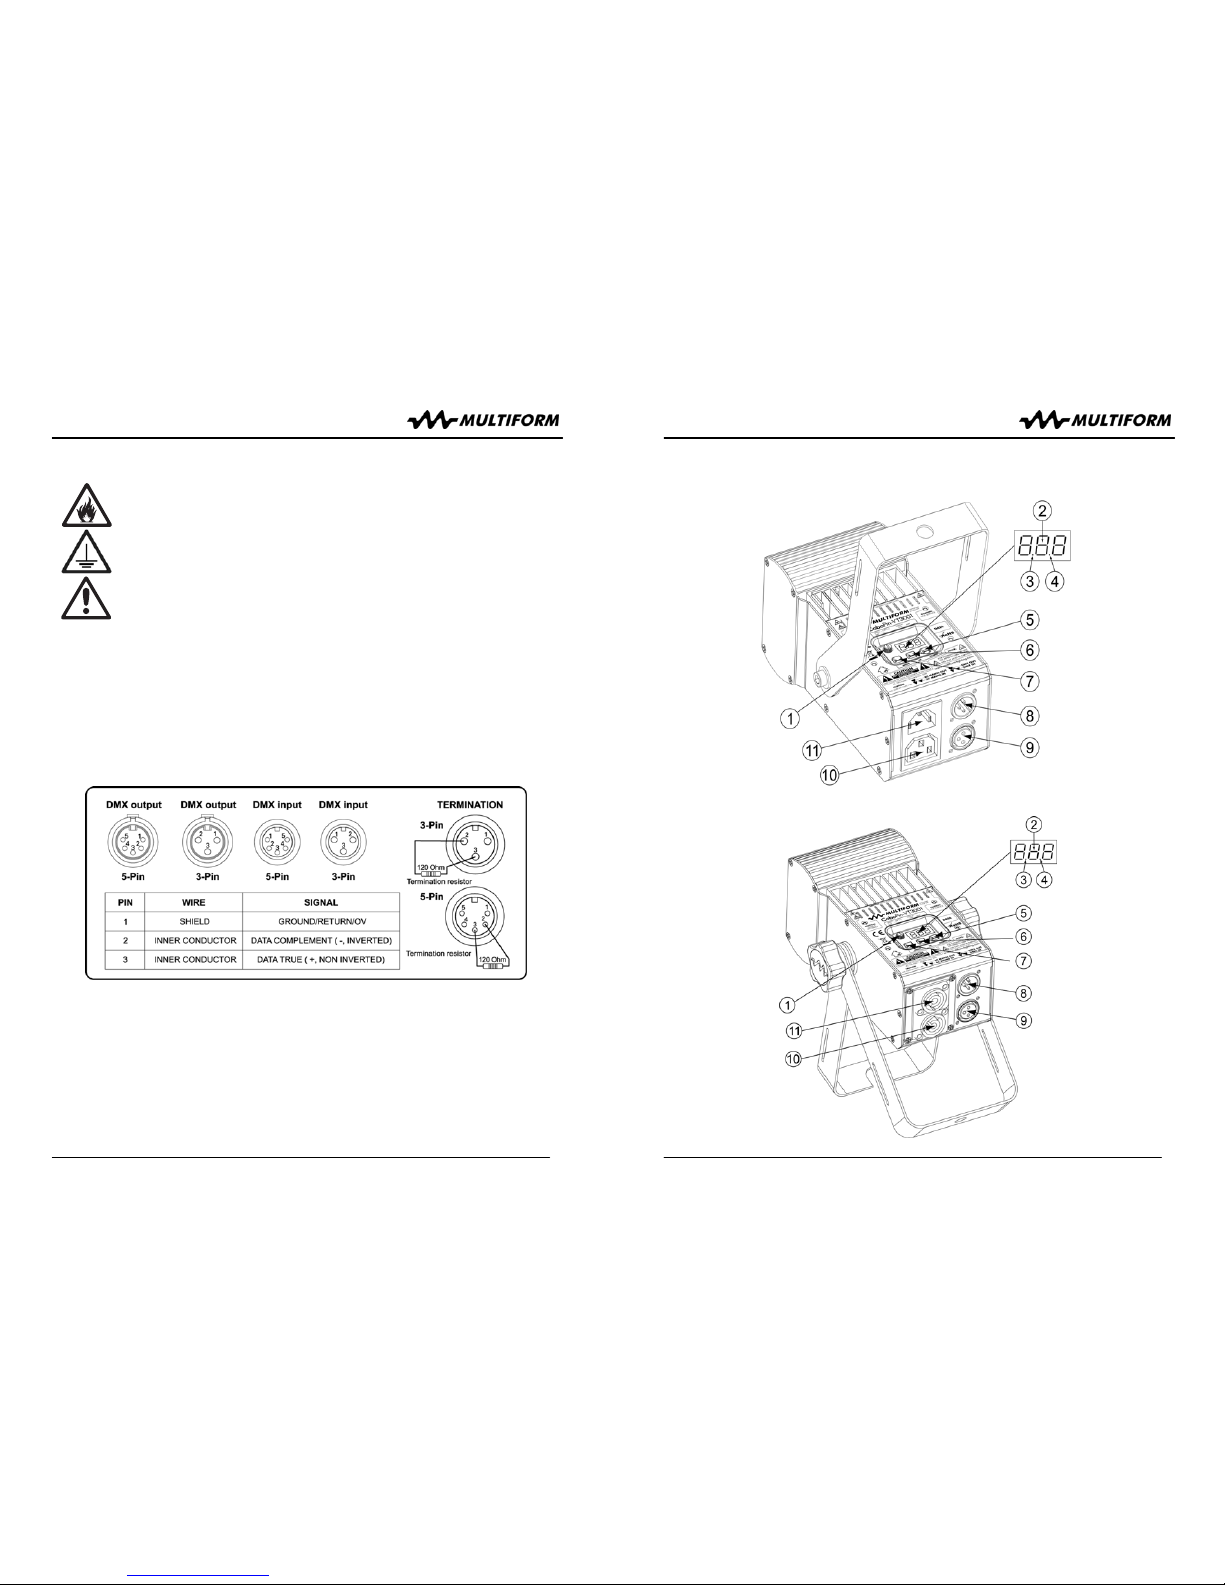
■Getting started: choosing a location
Risk of fire: The CoboPin-VT3001C has been designed to work in dry
indoor environments at environmental temperatures up to 35 degrees
Celsius. For proper operation, the unit must be operated with its
heatsink side of the power supply up, and unobstructed air convection
to the heatsink.
Note:
- Do not operate the CoboPin-VT3001C in environments with more than 35
degrees environmental temperature or more than 75% relative humidity.
- Do not operate the CoboPin-VT3001C in any position inclined or reclined
more than 45 degrees from being upright (heatsink on top).
- Do not operate the CoboPin-VT3001C in any closed environment smaller than
10cbm, unless forced air convection is provided.
User Manual: CoboPin-VT3001C(-I/-T)
V1.00 (10-2013) 11
# Description Function of Knob (1)
A 0 All off none
A 1 Static scene Colour
A 2 Soft fade red-green Speed
A 3 Soft fade green-blue Speed
A 4 Soft fade red-blue Speed
A 5 Soft fade red-yellow Speed
A 6 Soft fade candy-lime Speed
A 7 Soft fade pink-blue Speed
A 8 Soft fade turquoise-pink Speed
A 9 Soft fade red-green-blue (RGB) Speed
A10 Hard switch red-green Sound-to-light, Speed
A11 Hard switch green-blue Sound-to-light, Speed
A12 Hard switch red-blue Sound-to-light, Speed
A13 Hard switch red-yellow Sound-to-light, Speed
A14 Hard switch candy-lime Sound-to-light, Speed
A15 Hard switch pink-blue Sound-to-light, Speed
A16 Hard switch turquoise-pink Sound-to-light, Speed
A17 Hard switch red-green-blue Sound-to-light, Speed
A18 Hard switch red-yellow-green-turquoise-blue-pink Sound-to-light, Speed
A19 Random speed red-yellow (Fire) Base speed
A20 Random speed green-blue (Ocean) Base speed
A21 Random speed red-blue (Plush) Base speed
A22 Random speed red-green-blue (RGB Burst) Base speed
A23 White strobe Sound-to-light, Speed
A24 Red strobe Sound-to-light, Speed
A25 Green strobe Sound-to-light, Speed
A26 Blue strobe Sound-to-light, Speed
A27 Strobe chase red-green-blue Sound-to-light, Speed
“C” Colour Mode
Press the MODE button (7) until the first digit on the display shows “C”, indicating
operation in “C” mode. Then choose by using the UP/DOWN buttons (5/6) one of the
19 presets as shown in the list below. Changing the setting becomes effective directly.
Knob (1) determines the output level.
In “C” mode, the unit does not receive any values from the DMX input but generates
related DMX values on the output according to the selected pattern, so that other
similar units can show the same behaviour if they are connected by DMX signal cables
and set to mode “d3”.
NOTE: The “C” Mode is automatically disabled and cannot be chosen when an external
DMX signal is received [DMX indicator LED (3) is lit].
If you leave mode “C” for any reason and come back later into mode “C”, the unit will
recall the last chosen mix (even if the unit was switched off in between).