User Manual: LS1195 DMX-controlled RGB LED Light Source
V1.00 (09-2008) © Multiform, Leigh-on-Sea, UK 4
Protection from fire:
1. Take care of not placing the unit near sources of heat (e.g.
powerful amplifiers, fog machines).
2. Take always care of sufficient air convection in the unit’s
environment to avoid overheating, especially when mounting in a
closed environment. Make sure air convection slots are not
blocked. Do not operate this unit in environmental temperatures
exceeding 35 degrees Celsius.
3. Check the total maximum power of your AC wall outlet if you
connect several units to one wall outlet and avoid any overloading.
Protection from injury and damage:
1. Never use any accessories or modifications not authorized by the
manufacturer of this unit.
2. Choose a location for operation where the unit is protected from
vibration and where a fixed mounting position is provided. In case
of overhead-mounting, follow appropriate rigging rules and your
country’s regulations for rigging safety. See appendixes if any.
3. Before plugging the AC cord in the wall outlet, check whether the
AC mains voltage and frequency is the same as this product is
specified for. Whenever your AC plug should not match the wall
outlet, contact you dealer immediately.
4. If fluids have spilled into the unit or small parts have intruded the
unit, immediately switch off the unit and hand it over to the
authorized service for a security check.
5. Disconnect the unit from AC supply by pulling the AC plug out of
the wall outlet or the unit’s AC socket during a thunder-storm in
order to avoid any damage on the unit due to AC voltage peaks.
6. In cause of not correct function of this unit or damaged AC cord or
other damaged parts, pull immediately the AC plug out of the wall
outlet and hand the unit over to the authorized service for a
security check.
7. To meet all aspects of functionality and security during
maintenance work to be performed on this unit, all parts should be
replaced by genuine spare parts. Consequently, take care of your
dealer or maintenance company to be authorized by the
manufacturer.
■Health advice
This unit produces and absorbs electromagnetic radiation. The strength of radiation and
the sensitivity for disturbing interference matches the CE and FCC requirements. A
corresponding sign is printed on the backside of the unit. Any change or modification
may affect the behavior of the unit concerning electromagnetic radiation, with the CE
requirements eventually not to be met any more. The manufacturer takes no
responsibility in this case.
User Manual: LS1195 DMX-controlled RGB LED Light Source
V1.00 (09-2008) © Multiform, Leigh-on-Sea, UK 25
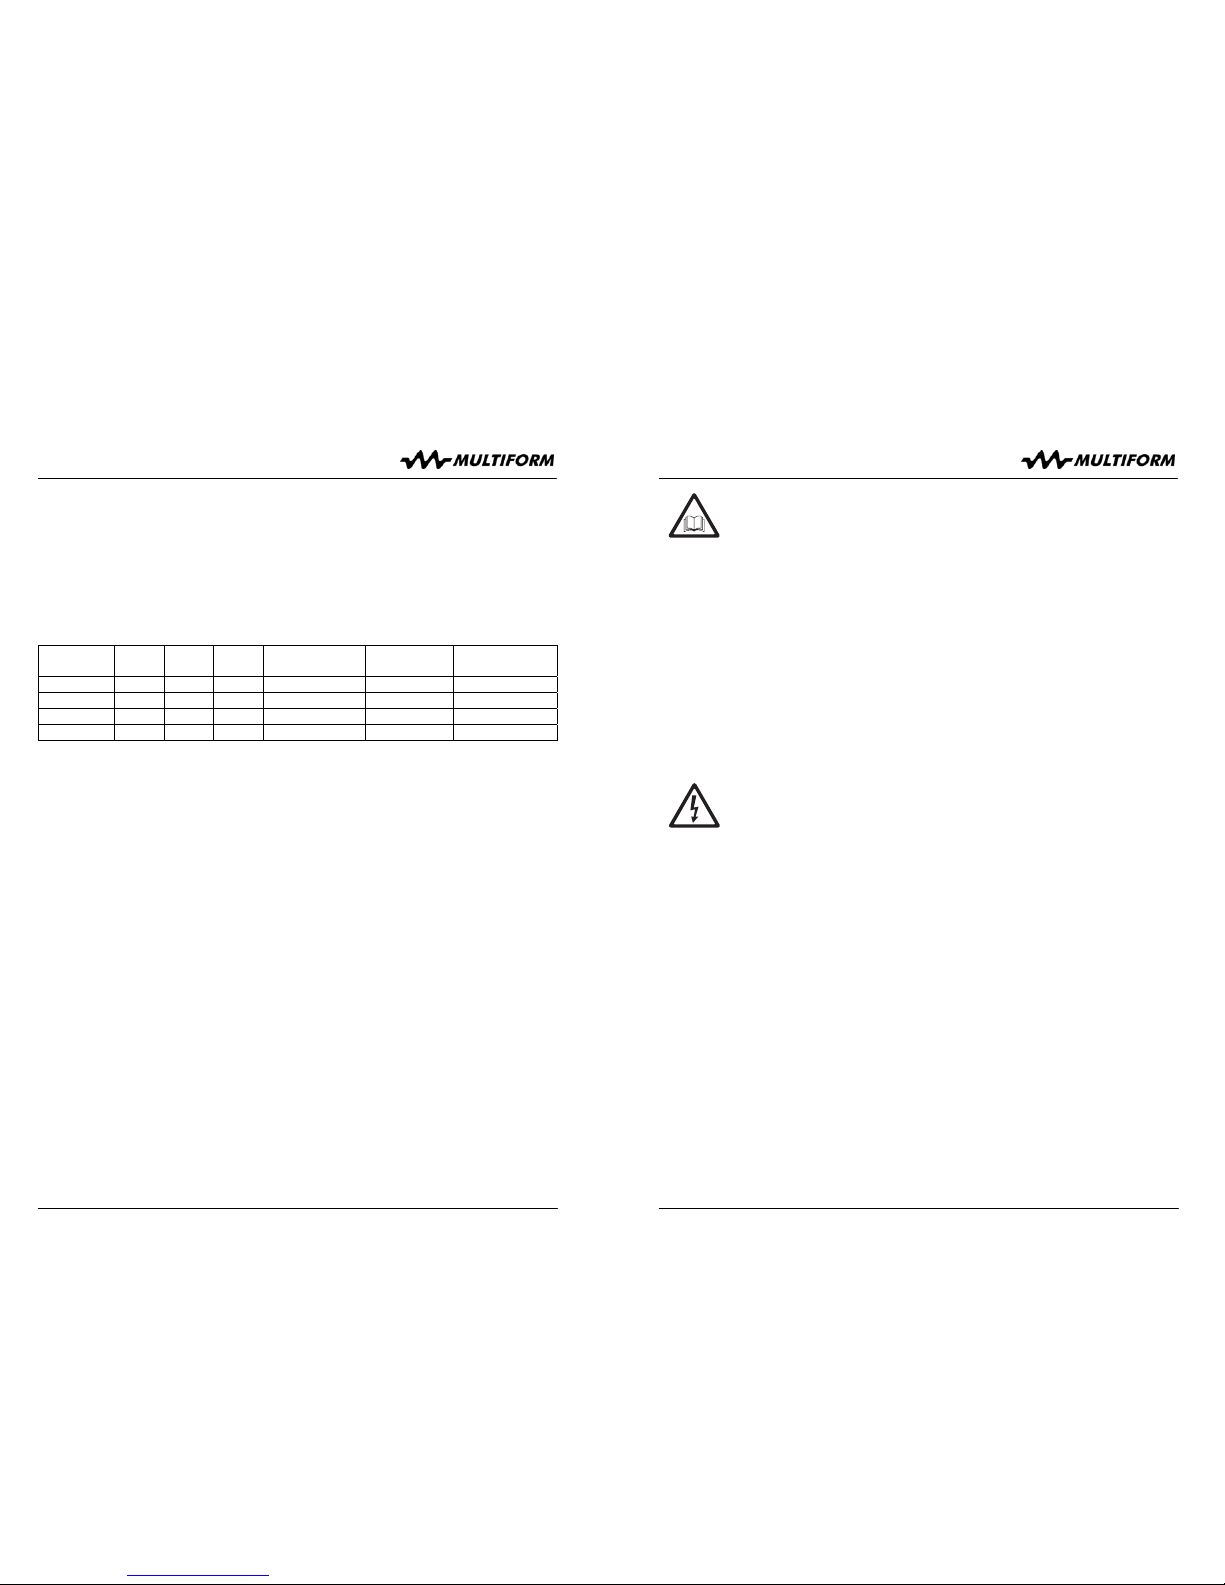
DMX Kanal Werte-Intervall Funktion
2 000-255 Helligkeit / Dimmer
3 050-255 Geschwindigkeitseinstellung
4 000-049 Stroboskop aus
050-255 Stroboskop ein (050= min. / 255= max. 23 Hz)
Die vorprogrammierten Farbwechsel können über die DMX-Werte des 1. Kanals
abgerufen werden während die Helligkeit über die DMX-Werte des 2. Kanals eingestellt
wird. Über die DMX-Werte 50 – 255 des 3. Kanals wird die Geschwindigkeit des
Farbwechsels gewählt und die DMX-Werte 50 - 255 des 4. Kanals bestimmen die
Frequenz des überlagernden Strobeeffektes.
Bitte beachten: Ob das Gerät im festen Farbwahlmodus oder im Programmmodus
arbeitet, hängt einzig davon ab, welchen Wert Kanal 3 hat. Stellen Sie also sicher, dass
der DMX-Wert von Kanal 3 kleiner 50 ist, um im festen Farbwahlmodus zu sein.
Andernfalls befindet sich das Gerät im Programmmodus.
Der Drehregler (1) ist in diesem Modus ohne Funktion.
Die Adressierung muss wie folgt vorgenommen werden:
1 erstes Gerät (Kanäle 1-4) *Werkseinstellung*
5 zweites Gerät (Kanäle 5-8)
9 drittes Gerät (Kanäle 9-12)
13 viertes Gerät (Kanäle 13-16) usw.
Die DMX-Adressierung bleibt auch bei Stromunterbrechung erhalten.
Funktionssperre / Tastensperre
Das Gedrückthalten des MODE Tasters (4) für länger als 3 Sekunden bewirkt eine
Funktionssperre der Tasten (4-6) und des Drehreglers (1). Das Display zeigt ca. alle 2
Sekunden abwechselnd “LOC” und den gewählten Modus an. Um die Sperre
aufzuheben, muss der MODE Taster (4) erneut für mindestens 3 Sekunden gedrückt
werden.
Einschaltbedingungen
Das Gerät wird beim Einschalten immer die Funktion ausführen, die vor dem letzten
Ausschalten aktiv war. Im SLAVE “SLA” oder DMX “d” oder Preset “P” Mode werden
beim Ausschalten alle DMX-Werte gelöscht (alle LED's aus).