Muskoka EST-425T-50 User manual

1
PLEASE READ THIS MANUAL BEFORE
INSTALLING AND USING APPLIANCE
WARNING!
IF THE INFORMATION IN THIS MANUAL IS NOT FOLLOWED
EXACTLY, AN ELECTRICAL SHOCK OR FIRE MAY RESULT
CAUSING PROPERTY DAMAGE, PERSONAL INJURY OR LOSS OF LIFE.
Retain this manual for future use.
VEUILLEZ LIRE CE MANUEL AVANT L’INSTALLATION
ET L’UTILISATION DE VOTRE FOYER
AVERTISSEMENT!
SI LES RENSEIGNEMENTS DE CE MANUEL NE SONT PAS EXACTEMENT
SUIVIS, UN CHOC ÉLECTRIQUE OU UN INCENDIE PEUT SURVENIR, ET
CAUSER DES DOMMAGES, DES BLESSURES OU LA PERTE DE VIE
Conserver ce manuel pour une utilisation ultérieure.
Français p. 14 | Español p. 2620-10-303
POR FAVOR LEA LAS INSTRUCCIONES DE
INSTALACIÓN Y DE OPERACIÓN ANTES DE
USAR ESTE CAJA DE FUEGO
¡ADVERTENCIA!
SI NO SIGUE EXACTAMENTE LA INFORMACIÓN EN ESTE MANUAL, PODRÍA
RESULTAR EN CHOQUES ELÉCTRICOS O INCENDIO QUE PUEDEN CAUSAR
DAÑOS A LA PROPIEDAD, LESIONES PERSONALES O LA PÉRDIDA DE LA VIDA.
Guarde este manual para futuras referencias.
EST-425T-10 / EST-425T-50
USE AND CARE GUIDE | GUIDE D’UTILISATION ET D’ENTRETIEN | GUÍA DE USO Y CUIDADO
LEGION PANORAMIC INFRARED STOVE
FOYER INFRAROUGE PANORAMIQUE LEGION
ESTUFA INFRARROJA PANORÁMICA LEGION
IMPORTANT:
SAVE THESE
INSTRUCTIONS.
IMPORTANTE :
CONSERVER CES
INSTRUCTIONS.
IMPORTANTE:
GUARDE ESTAS
INSTRUCCIONES.

Table of Contents ......................................................... 2
Safety Information ........................................................ 3
Warranty ........................................................................ 5
Pre-Installation .............................................................. 6
Stove Dimensions........................................................... 6
Tools Required............................................................... 7
Package Contents....................................................... 7
Installation....................................................................... 8
Operation........................................................................9
Care and Maintenance..............................................10
Electric Wiring Diagram..............................................11
Troubleshooting............................................................12
Replacement Part.......................................................13
IMPORTANT: Read all instructions and warnings carefully before starting installation.
Failure to follow these instructions may result in a possible electric shock, injury to persons,
re hazard and will void the warranty.
Please read the Installation & Operating Instructions before using this appliance.
CAUTION: PRODUCT DAMAGE MAY OCCUR.
Never attempt to disassemble or alter the product in any way not instructed by this manual.
Table of Contents
WARNING
This Product can expose you to chemicals including Diisononyl
phthalate (DINP) which is known to the State of California to cause
cancer and Di-isodecyl phthalates (DIDP) which is known to the
State of California to cause developmental harm.
For more information go to www.p65Warnings.ca.gov
2

Safety Information
Please read and understand this entire manual before attempting to assemble, operate or install the product.
1. Read all instructions before using this appliance.
2. This appliance is hot when in use. To avoid burns, do not let bare skin touch hot surfaces. If provided, use
handles when moving this appliance. Keep combustible materials, such as furniture, pillows, bedding,
papers, clothes and curtains at least 3 ft. (914 mm) from the front of this appliance and keep them away
from the sides and rear.
3. If possible, always unplug this appliance when not in use.
4. Do not operate any heater with a damaged cord or plug or after the appliance malfunctions, has been
dropped or damaged in any manner.
5. Any repairs to this appliance should be carried out by a qualied service person.
6. Under no circumstances should this appliance be modied. Parts having to be removed for servicing
must be replaced prior to operating this appliance again.
7. Do not use outdoors.
8. This heater is not intended for use in bathrooms, laundry areas and similar indoor locations. Never place
this appliance where it may fall into a bathtub or other water container.
9. Do not use this heater in elevated locations, such as on shelves, raised platforms, etc.
10. Do not run the cord under carpeting. Do not cover the cord with throw rugs, runners or the like. Arrange
the cord away from trafc areas and where it will not be tripped over.
11. To disconnect this appliance, turn the controls to the off position, then remove the plug from the outlet.
12. Connect to properly grounded outlets only.
13. This appliance, when installed, must be electrically grounded in accordance with local codes, with the
current CSA C22.1 Canadian Electrical codes or for USA installations, follow local codes and the National
Electric Code, ANSI/NFPA No. 70.
14. Do not insert or allow foreign objects to enter any ventilation or exhaust opening, as this may cause an
electric shock, re, or damage to the appliance.
15. To prevent possible re, do not block air intakes or exhaust in any manner. Do not use on soft surfaces,
like a bed, where openings may become blocked.
16. This appliance has hot and arcing or sparking parts inside. Do not use it in areas where gasoline, paint, or
ammable liquids are used or stored. This appliance should not be used as a drying rack for clothing, nor
should Christmas stockings or decorations be hung on or near it.
17. Use this appliance only as described in this manual. Any other use not recommended by the
manufacturer may cause re, electric shock, or injury to persons.
18. Always plug heaters directly into a wall outlet/receptacle. Always plug the unit into a wall outlet/
receptacle. An extension cord or re-locatable power tap, (outlet/power strip), should never be used.
19. Do not use this heater with missing, damaged, or broken legs.
20. “SAVE THESE INSTRUCTIONS FOR FUTURE USE”
CAUTION: Extreme caution is necessary when any
heater is used by or near children or invalids and
whenever the heater is left operating unattended.
3

DANGER
GROUNDING
PIN
METAL SCREW
GROUNDING
MEANS
COVER OF GROUNDED
OUTLET BOX
ADAPTER
(A)
(B)
(C)
(D)
Figure 1
GROUNDING
PIN
ELECTRICAL CONNECTION
GROUNDING INSTRUCTIONS
This heater is for use on 120 volts. The cord has a plug as shown at (A) in Figure 1. An adapter as shown at (C) is
available for connecting three-blade grounding-type plugs to two-slot receptacles. The green grounding lug
extending from the adapter must be connected to a permanent ground such as a properly grounded outlet
box. The adapter should not be used if a three-slot grounded receptacle is available.
NOTE: Adapters are NOT
for use in Canada.
A 15-Amp, 120-Volt, 60 Hz circuit with a properly grounded outlet is required. Preferably, the
item will be on a dedicated circuit as other appliances on the same circuit may cause the
circuit breaker to trip or the fuse to blow when the heater is in operation. The unit comes stan-
dard with a 6 ft. (1.8 m) long three wire cord, exiting the right side of the item. Always plug the
unit into a wall outlet/receptacle. An extension cord or re-locatable power tap, (outlet/power
strip), should never be used.
Electrical outlet wiring must comply with local building codes and other
applicable regulations to reduce the risk of re, electrical shock and injury
to persons.
Do not use this item if any part of it has been under water. Immediately
call a qualied service technician to inspect the item and replace any part
of the electrical system which has been under water.
Safety Information (continued)
4

WHAT IS COVERED
The manufacturer warrants that your new electric stove is free from manufacturing and material defects for a
period of one year from date of purchase, subject to the following conditions and limitations.
This electric stove must be installed and operated at all times in accordance with the instructions furnished
with the product. Any alteration, willful abuse, accident, or misuse of the product shall nullify this warranty.
This warranty is non-transferrable, and is made to the original owner, provided that the purchase was made
through an authorized supplier of the manufacturer. This warranty is limited to the repair or replacement of
part(s) found to be defective in material or workmanship, provided that such part(s) have been subjected
to normal conditions of use and service, after said defect is conrmed by the manufacturer’s inspection. The
manufacturer may, at its discretion, fully discharge all obligations with respect to this warranty by refunding the
wholesale price of the defective part(s).
WHAT IS NOT COVERED
Any installation, labor, construction, transportation, or other related costs/expenses arising from defective part(s),
repair, replacement, or otherwise of same, will not be covered by this warranty, nor shall the manufacturer
assume responsibility for same. Further, the manufacturer will not be responsible for any incidental, indirect, or
consequential damages, except as provided by law.
All other warranties - expressed or implied - with respect to the product, its components and accessories, or any
obligations/liabilities on the part of the manufacturer are hereby expressly excluded. The manufacturer neither
assumes, nor authorizes any third party to assume, on its behalf, any other liabilities with respect to the sale of this
product. The warranties as outlined within this document do not apply to nonmanufacturer accessories used in
conjunction with the installation of this product.
This warranty does not cover the light bulb(s) included with the replace.
This warranty is void if: the replace has been operated in atmospheres contaminated by chlorine, uorine, or
other damaging chemicals; the replace is subjected to prolonged periods of dampness or condensation; the
replace is altered, willfully abused, damaged by accident, or misused in any way.
Make sure you have your warranty, your sales receipt, and the model/serial number of your product.
DO NOT ATTEMPT TO DO ANY SERVICE WORK YOURSELF. PLEASE CONTACT CUSTOMER SERVICE AT:
1 Year Warranty
1-877-447-4768 Monday to Friday from 8:30AM to 4:30PM (EST),
Web: www.ghpgroupinc.com
Email: [email protected]
USA: 6440 W. Howard Street, Niles, Illinois 60714
Canada: 271 Massey Road, Guelph, Ontario, N1K 1B2
5

Ref. EST-425T-10
A 12.72 in. (32.3 cm)
B 28.32 in. (71.94 cm)
C 25 in. (63.5 cm)
Technical Specicationstions
Voltage
Frequency
Amps
Rating
120V AC
60HZ
12.5A
1500W
STOVE DIMENSIONS
Pre-Installation
A
B
C
6

Part Description Quantity
TOOLS REQUIRED
Phillips
screwdriver
(not included)
Open the unit and check carefully for visible damage. If you have any problems with installation,
operation, missing parts, or damage, please contact the Customer Service Team at 1-877-447-4768.
DO NOT dispose of packaging until you are satised with your stove.
DO NOT return the unit to the store before calling 1-877-447-4768 for service.
A
B
C
Pre-Installation (continued)
Package Contents
A Electric Stove 1
B Leg 4
C Screw 8
7

1. Out of direct sunlight
2. Not susceptible to moisture
3. Away from uninsulated outside wall
The stove should be located in an area:
ASSEMBLY INSTRUCTIONS
1. Lay the stove (A) upside down on a padded surface with the underside accessible. Attach the leg (B) to
the stove by inserting the tab on the top of each leg (B) into the corresponding slot on the bottom of the
stove (A). Insert two screws (C) into predrilled holes and tighten securely for each leg (B).
2. Carefully position the stove against a wall.
3. Plug the power cord into the 15-amp, 120-volt outlet. Use an extension cord rated for a minimum of 1,875
watts if necessary.
CAUTION:
Make sure that the unit is installed so that the power cord is not compressed against or caught on the stove and
that it has an unobstructed path to the grounded outlet.
WARNING
The stove is heavy and should be
assembled near its desired location.
It is recommended that two people move
the assembled
stove to prevent injury.
Installation
Clearance to Combustibles
Sides 4 in. (101.6 mm)
Floor 0 in. (0 mm)
Top 36 in. (914 mm)
Front 36 in. (914 mm)
Rear 0 in. (0 mm)
WARNING
Do not install the unit on shelves, raised platforms, beds, blankets, pillows etc. Keep combustible
materials such as furniture, bedding, papers, clothes and curtains at least 3 ft. (914 mm) from the stove.
8

Read All Instructions Before Use
Check that the heater outlet grill is not covered or obstructed in anyway, and make sure the power to the
unit is switched on.
Operation
NOTE:
When the heat function is used for the rst time, a slight odor may be present. This is normal and
should not occur again unless the heater is not used for an extended period of time.
Using the Control Panel
The control panel is located behind the door of the stove.
1. Main Power Switch: The Power Switch
supplies power to all of the functions of
the stove. This switch must be in the ON
position for any functions to work.
2. Flame Effect: Toggle the Power Switch
ON. The Power indicator light will glow.
The ame effect will be visible through the
front glass.
3. Temperature Knob: Toggle the
Temperature Switch ON, the
Temperature control knob regulates
the temperature level of the room. The
further the knob is rotated clockwise, the
higher the temperature setting. Turning
the knob counterclockwise will lower the
temperature setting. Use this function to
help regulate the ambient temperature
level.
4. Temperature Limiting Control: This heater
is equipped with a Temperature Limiting
Control. Should the heater reach an
unsafe temperature, the heater will
automatically turn off. To reset: Unplug
the power cord from the outlet. Wait 5
minutes. With the Power switch in the OFF
position, plug the power cord back into
the outlet.
9

GLASS INFORMATION
MOTOR MAINTENANCE
1. Under no circumstances should this product be operated with broken glass.
2. Do not strike or slam the glass.
3. Do not use abrasive cleaners to clean the glass.
4. This product uses tempered glass. Replacement of the glass supplied by the manufacturer should be done
by a qualied service person.
Always disconnect the appliance from the main power supply and allow it to cool before any servicing operation.
The motors used on the fan heater and ame blower are pre-lubricated for extended bearing life and require no further lubrication. Howev-
er, periodic cleaning/vacuuming of the appliance around the air intake and exhaust, as well as the fan heater is recommended. For heavy
or continuous use, periodic cleaning must be done more frequently. If the heater blows alternating cold and warm air, check the fan for free
movement and for debris restricting air ow. If the fan does not move freely, the unit must be turned off and the fan replaced immediately in
order to prevent further damage to the unit.
LIGHT BULB INSPECTION AND REPLACEMENT
The ame effect is created by two 40-Watt light bulbs with an E-12 (small) socket base. Use only this type of light
bulb. If the ame effect does not work, the bulbs may have come loose or been damaged during shipping.
To inspect or replace the bulbs, rst unplug the power cord from the outlet. Locate the access panel on the back
of the stove. Remove the screws and the panel. Check the bulbs to be sure they are nger tight and in working
order. Replace any damaged or faulty bulbs. Reattach the access panel. Do not operate this heater without the
access panel in place. Do not remove the back cover of this heater. There are no serviceable parts inside.
Maintenance
Care & Cleaning
Always turn the stove OFF and unplug the power cord from the outlet before cleaning. Use a vacuum or duster
to remove dust and dirt from the heater and vent areas. To maintain the nish, clean with a soft, slightly damp
cloth and buff with a dry cloth. Never use abrasive cleansers, liquid sprays, or any cleaner that could scratch
the surface.
CAUTION: Light bulbs become very hot during use. Allow at least 10 minutes for the bulbs to cool
before touching.
WARNING: Do not exceed 40 watts per bulb. Use of higher rated bulbs may result in a re, causing
property damage or personal injury.
10

CIRCUIT DIAGRAM
Electric Wiring Diagram
Disconnect power before servicing.
Any electrical re-wiring of this appliance must be done by a qualied electrician. This
wiring must be done in accordance with local codes and/or in Canada with the current
CSA C22.1 Canadian Electrical Code, and for US installations, the National Electrical
Code ANSI/NFPA NO 70.
If repairing or replacing any electrical component or wiring, the original wire routing,
color coding and securing locations must be followed.
DANGER
WARNING: Disconnect power before servicing.
11

PROBLEM POSSIBLE CAUSE CORRECTIVE ACTION
The stove does
not operate.
The power light is ON
but the ame effect is
not visible.
There is excessivee
noise when the heater
is operating.
The heater is not
operating.
The stove is not plugged in.
A circuit breaker is tripped or a
fuse blown.
The ON/OFF switch is defective
There is loose wiring.
The stove is not operating
correctly.
There are loose light bulb(s).
There are burnt out light bulb(s).
The fan is defective.
The heater assembly is defective.
The stove is not operating
correctly.
The heater switch is defective.
The heater assembly is defective.
There is loose wiring.
The vents are dirty or clogged.
Make sure the replace is plugged in
to a standard 120V outlet.
Check additional appliances on the
circuit; ideally the replace should be
on a dedicated 15-amp circuit.
Call customer service.
Refer to the operating instructions.
Tighten the light bulb(s).
Replace the light bulb(s).
Call customer service.
Refer to the operating instructions.
Call customer service.
Unplug the unit. Clear the vent area of
dust and debris. Wait ten minutes, plug
the unit in again and turn on the heater.
Troubleshooting
12

Some parts and specications may change without notice.
Replacement Parts
Ref. Description Part No.
EST-425T-10 EST-425T-50
1 Back Panel EFEST425001ST
2 Screen EFEST425002ST
3 Flame Panel EFEST425003ST
4 Log Set EFEST425004ST
5 Top Panel EFEST425005ST EFEST425031ST
6 Access Panel EFES323008ST
7Flame
Reector EFEST425006ST
8 Cabinet Panel EFEST425007ST EFEST425030ST
9 Bottom Panel EFEST425008ST EFEST425029ST
10 Glass EFEST425009ST
11 Door EFEST425010ST EFEST425028ST
12 Side Glass EFEST425011ST
13 Handle EFES323012ST-14 EFEST425027ST
14 Hinge Pin EFES323013ST EFEST425026ST
15 Leg (Design 3) EFEST333T003ST EFEST425025ST
16 Switch EFES323017ST
17 Fan Heater Box EFES323015ST EFEST425024ST
18 Heater (IR) EFES322007ST-14
19 Motor EFES323020ST
20 Power Cord
& Connector EFEST425012ST
21 Lamp Socket
& Bracket EFES323021ST
22 Thermostat EFES322006ST
Muskoka® is a registered trademark of GHP Group Inc.
1-877-447-4768 • www.ghpgroupinc.com
13

Table des matières....................................................... 14
Measures de sécurité................................................. 15
Garantie.......................................................................17
Pré-Installation............................................................18
Dimensions du foyer.................................................... 18
Outils requis................................................................. 19
Contenu de l’emballage.......................................... 19
Installation.................................................................... 20
Utilisation....................................................................... 21
Maintenance................................................................ 22
Schéma de câblage électrique............................... 23
Dépannage.................................................................. 24
Pièces de rechange.................................................... 25
IMPORTANT : Lisez attentivement toutes les instructions et mises en garde avant de commencer
l'installation.
Le non-respect de ces instructions peut entraîner un choc électrique, des blessures, un risque
d'incendie et annuler la garantie.
Lisez les instructions d'installation et d'utilisation avant d'utiliser cet appareil.
Table des matières
MISE EN GARDE: LE PRODUIT PEUT ÊTRE ENDOMMAGÉ.
N'essayez jamais de démonter ou de modier l'appareil d'une manière non indiquée dans ce manuel.
AVERTISSEMENT
Ce produit peut vous exposer à des agents chimiques, dont le phtalate
de diisononyle (DINP), reconnu par l’État de Californie comme pouvant
causer le cancer, ainsi que les phtalates diisodécyle (DIDP) reconnus
par l’État de Californie comme pouvant causer des troubles de
croissance.
Pour plus de renseignements, visitez le www.p65Warnings.ca.gov
14

Mesures de sécurité
1. Lisez toutes les instructions avant d’utiliser cet appareil.
2. Cet appareil devient chaud lorsqu'il est utilisé. An d’éviter les brûlures, faites en sorte que la peau nue
n'entre pas en contact avec les surfaces chaudes. Si l'appareil est muni de poignées, utilisez-les pour
le déplacer. Gardez les matériaux combustibles tels que les meubles, les oreillers, la literie, le papier, les
vêtements et les rideaux à une distance d'au moins 914 mm (3 pi) du devant de l'appareil.
3. Si possible, débranchez toujours cet appareil lorsqu'il n'est pas utilisé.
4. N'utilisez pas un appareil de chauffage dont le cordon d’alimentation ou la che est endommagé(e)
ou encore si l'appareil ne fonctionne plus correctement, s’il a été échappé ou s’il est endommagé de
quelque manière que ce soit.
5. Toute réparation de cet appareil doit être conée à un technicien qualié.
6. En aucun cas cet appareil ne peut être modié. Les pièces qui doivent être retirées pour assurer
l'entretien doivent être remises en place avant toute réutilisation de cet appareil.
7. Ne l’utilisez pas à l’extérieur.
8. Cet appareil de chauffage n'est pas conçu pour être utilisé dans les salles de bain, les buanderies ou
dans tout autre endroit intérieur similaire. Ne placez jamais cet appareil là où il pourrait tomber dans une
baignoire ou tout autre contenant rempli d’eau.
9. Ne placez jamais cet appareil en position élevée, par exemple sur une étagère, une plate-forme
surélevée, etc.
10. Ne faites pas passer le cordon d’alimentation sous une moquette. Ne recouvrez pas le cordon
d’alimentation de carpettes, tapis de couloir ou autres objets semblables. Placez le cordon
d'alimentation à l’écart des endroits passants, là où il sera impossible de trébucher dessus.
11. Pour débrancher cet appareil, mettez d’abord les commandes en position d'arrêt, puis retirez la che de
la prise de courant.
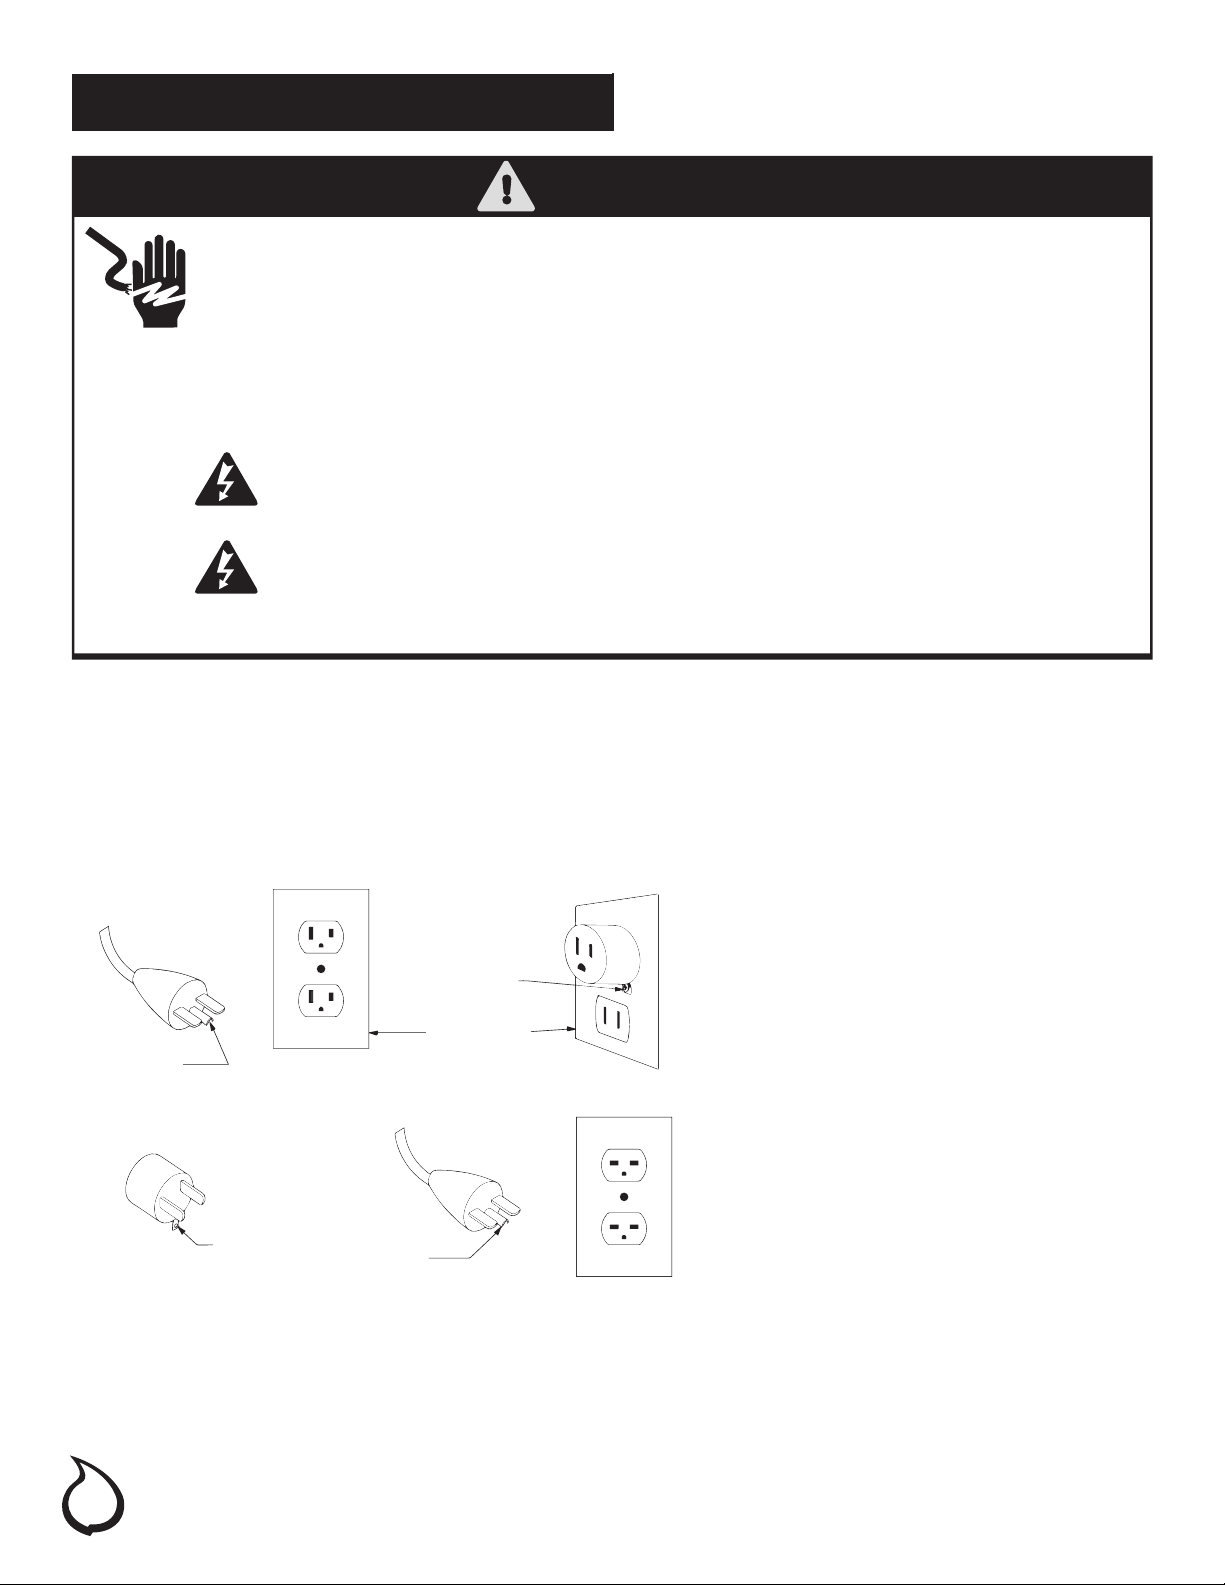
12. Branchez uniquement sur des prises de courant correctement mises à la terre.
13. Lors de l’installation, veillez à ce que le foyer soit mis à la terre conformément aux codes locaux, à la plus
récente version du Code canadien de l’électricité, CSA C22.1 ou, dans le cas des installations aux É.-U.,
aux codes locaux et au code national de l’électricité, ANSI/NFPA Nº 70.
14. N'insérez ou ne laissez aucun objet pénétrer dans les bouches d’aération ou de sortie d'air de l'appareil,
car ceci pourrait entraîner un choc électrique, un incendie ou endommager l'appareil.
15. An de prévenir les risques d'incendie, n'obstruez d'aucune manière les prises ou les sorties d'air. Évitez
d'utiliser l'appareil sur une surface molle, comme un lit, où les ouvertures pourraient être obstruées.
16. Cet appareil comporte des pièces chaudes produisant des décharges électriques ou des étincelles
à l'intérieur. Évitez d'utiliser cet appareil dans un endroit où sont entreposés ou utilisés des liquides
inammables tels que de l'essence, de la peinture ou autres. Cet appareil ne doit pas être utilisé comme
un séchoir pour le linge, et ni bas de Noël, ni décorations ne peuvent y être accrochés ou placés tout
près.
17. Utilisez cet appareil en vous conformant strictement aux instructions contenues dans ce guide. Toute
autre forme d'utilisation non conforme aux instructions du fabricant pourrait entraîner des incendies, des
chocs électriques ou des blessures corporelles.
18. Branchez toujours les appareils de chauffage directement dans une prise de courant murale.
Branchez toujours l’appareil sur une prise murale. N’utilisez jamais de rallonge ni de prise mobile (barre
d’alimentation).
19. N'utilisez pas cet appareil si des pieds manquent, sont endommagés ou cassés.
20. «CONSERVEZ CES INSTRUCTIONS»
MISE EN GARDE : Faites preuve d’une extrême prudence lorsqu’un radiateur
est utilisé par ou à proximité des enfants ou des personnes handicapées et
lorsque vous laissez le radiateur en fonction sans surveillance.
15

BROCHE DE
MISE À LA
TERRE
VIS MÉTALLIQUE
COSSE DE MISE
À LA TERRE
COUVERCLE DE LA BOÎTE DE
SORTIE
MISE À LA TERRE
ADAPTATEUR
(A)
(B)
(C)
(D)
Figure 1
BROCHE DE
MISE À LA
TERRE REMARQUE :
les adaptateurs NE doivent PAS
être utilisés au Canada.
DANGER
BRANCHEMENT ÉLECTRIQUE
DIRECTIVES DE MISE À LA TERRE
Ce radiateur est conçu pour être utilisé sur un circuit de 120 volts. Le cordon est doté d’une che (illustration A,
gure 1). Un adaptateur illustré en C permet de brancher les ches à trois broches avec mise à la terre sur des
prises femelles à deux fentes. La cosse de mise à la terre verte de l’adaptateur doit être branchée à une mise
à la terre permanente comme une boîte de sortie correctement mise à la terre. N'utilisez pas l'adaptateur si
une prise à trois fentes mise à la terre est disponible.
Un circuit de 15 A, 120 V, 60 Hz correctement mis à la terre est requis. Il est préférable de
réserver un circuit à l'appareil, car d’autres appareils alimentés par le même circuit pourraient
causer le déclenchement du disjoncteur ou faire griller le fusible lorsque le radiateur est en
fonction. L'appareil est muni d’un cordon trilaire de 1,8 m (6 pi) qui se trouve du côté droit
du foyer. Branchez toujours l'appareil directement sur une prise murale. N’utilisez jamais de
rallonge ni de prise mobile (barre d’alimentation).
Le câblage de la prise électrique doit être conforme aux codes du bâtiment locaux et
à toute autre réglementation applicable an de réduire le risque d’incendie, de choc
électrique ou de blessure.
N’utilisez pas ce foyer si une partie a été immergée. Appelez immédiatement un
technicien qualié qui inspectera le foyer et remplacera toute pièce du circuit
électrique qui a été immergée.
Information de sécurité (suite)
16

CE QUI EST COUVERT
Le fabricant garantit que votre nouveau foyer électrique est exempt de défauts de matériau et de fabrication
pour une période d'un an à compter de la date d'achat, sous réserve des conditions et limitations suivantes.
Les variations dans la couleur bois et nitions qui peut résulter de caractéristiques naturelles du bois, tels que
les dessins du grain, les traînées minérales, ainsi de suite, ne sont pas considérées comme des défauts. Comme
le bois continue de se déplacer et de vieillir, vous remarquerez peut-être ces légères différences de couleur,
même sur différentes parties de toute unité individuelle. Les nœuds et de légères ssures supercielles sont la
véritable personnalité d'une pièce de qualité de mobilier en bois.
Ce foyer électrique doit être installé et fonctionner en tout temps conformément aux instructions fournies avec
le produit. Toute altération, abus volontaire, accident ou mauvais usage du produit annulera cette garantie.
Cette garantie n'est pas transférable et est faite au propriétaire d'origine, à condition que l'achat a été
effectué par l'intermédiaire d'un fournisseur agréé du fabricant. Cette garantie est limitée à la réparation ou
au remplacement de la pièce qui comporte un défaut de matériel ou de fabrication, à condition que cette
pièce ait été soumise à des conditions normales d'utilisation et de service, après que ledit défaut soit conrmé
par l'inspection du fabricant. Le fabricant peut, à sa discrétion, assumer pleinement toutes ses obligations à
l'égard de cette garantie en remboursant le prix de gros de la pièce défectueuse.
CE QUI N’EST PAS COUVERT
Tous frais d’installation, de main-d’œuvre, de fabrication, de transport ou tous frais ou dépenses connexes
occasionnés par des pièces défectueuses, leur réparation, leur remplacement ou toute autre action de nature
similaire, ne sont pas couverts par cette garantie, et le fabricant ne peut en aucun cas en être tenu responsable.
En outre, le fabricant ne pourra être tenu responsable de tous dommages immatériels ou indirects, sauf dans les
cas prévus par la loi.
Toutes les autres garanties - expresses ou implicites - en ce qui a trait au produit, ses composants et accessoires,
ou toutes les obligations ou responsabilités de la part du fabricant sont expressément exclues. Le fabricant
n’assume, ni n’autorise aucun tiers à assumer en son nom toute autre passif à l’égard de la vente de ce produit.
Les garanties décrites dans le présent document ne s’appliquent pas aux accessoires, autres que ceux du
fabricant, utilisés en conjonction avec l’installation de ce produit.
Cette garantie ne couvre pas les ampoules incluses avec le foyer.
Cette garantie est nulle si : le foyer a été utilisé dans une atmosphère contaminée par du chlore, du uor, ou
autres produits chimiques nuisibles; le foyer est soumis à des périodes prolongées d’humidité ou de condensation;
le foyer est modié, sciemment abusé, endommagé par accident, utilisation abusive de quelque façon.
Assurez-vous d’avoir votre garantie, votre reçu de vente et le modèle/numéro de série de votre produit.
NE PAS TENTER DE FAIRE TOUT TRAVAIL D’ENTRETIEN VOUS-MÊME. COMMUNIQUEZ AVEC LE SERVICE À LA CLIENTÈLE
AU NUMÉRO SANS FRAIS SUIVANT :
Garantie Limitée D’un An
1-877-447-4768 Du lundi au vendredi, de 8:30 à 4:30 h (HNE),
Site web : www.ghpgroupinc.com
Aux États-Unis : 6440 W. Howard Street, Niles, Illinois 60714
Au Canada : 271 Massey Road, Guelph, Ontario, N1K 1B2
17

Ref. EST-425T-10
A 32.3 cm (12.72 po)
B 71.94 cm (28.32 po)
C 63.5 cm (25 po)
Caractéristiques techniques
Tension
Fréquence
Intensité max
Puissance nominale du
chauffage
120V AC
60HZ
12.5A
1500W
DIMENSIONS DU FOYER
Pré-installation
A
B
C
18

Pièce Description Quantité
OUTILS REQUIS
Tournevis
cruciforme
(non compris)
Ouvrez le foyer et vériez soigneusement s'il présente un dommage visible. En cas d'un problème quelconque
d'installation, d'utilisation, ou de pièces manquantes ou endommagées, veuillez communiquer avec l'équipe du
service à la clientèle au 1-877-447-4768.
NE JETEZ PAS l’emballage tant que vous n’êtes pas satisfait de votre foyer.
NE RETOURNEZ PAS l'appareil au magasin avant d'avoir communiqué avec le service à la clientèle au 1-877-447-4768.
A
B
C
Pré-installation (suite)
Contenu de l’emballage
A Foyer électrique 1
B Pied 4
C Vis 8
19

1. Non exposé à la lumière directe du soleil
2. Protégé de l'humidité
3. Éloigné de tout mur extérieur non isolé.
Le foyer devrait être situé dans un endroit :
INSTRUCTIONS D’ASSEMBLAGE
1. Posez le foyer (A) à l'envers sur une surface rembourrée de manière à rendre le dessous accessible. Fixez
le pied (B) sur le foyer en insérant la languette en haut du pied (B) dans l'encoche correspondante sur le
dessous du foyer (A). Insérez deux vis (C) dans les trous pré-percés et serrez bien. Faites de même pour les
trois autres pieds.
2. Positionnez le foyer contre le mur avec précaution.
3. Branchez le cordon d'alimentation dans la prise de courant de 15 A, 120 V. Utilisez une rallonge
homologuée pour une puissance nominale minimum de 1875 watts si nécessaire.
ATTENTION :Veillez à ce que l'appareil soit installé de telle sorte que le cordon d'alimentation ne soit pas comprimé contre
le foyer ou pincé par le foyer et que son cheminement jusqu'à la prise de courant mise à la terre ne soit pas obstrué.
Installation
Écart aux combustibles
Côtés 101,6 mm (4 po)
Sol 0 mm (0 po)
Dessus 914 mm (36 po)
Avant 914 mm (36 po)
Arrière 0 mm (0 po)
MISE EN GARDE : N'installez pas cet appareil sur une étagère, une plate-forme surélevée, un lit, des
couvertures, des oreillers, etc. Gardez les matériaux combustibles comme les meubles, les oreillers, la
literie, le papier, les vêtements et les rideaux à une distance d'au moins 914 mm (3 pi) du foyer.
MISE EN GARDE
Le foyer est lourd et devrait être assemblé près
de son emplacement.
Il est conseillé de se mettre à deux pour
déplacer le foyer assemblé an d'éviter les
blessures.
LANGUETTE
(TAB)
ENCOCHE
(SLOT)
20
This manual suits for next models
1
Table of contents
Languages:
Other Muskoka Stove manuals
Popular Stove manuals by other brands

Accont
Accont SAHARA Type I. Operation manual and warranty

AGA
AGA Ludlow Installation & user manual

EdilKamin
EdilKamin CELIA Air Tight Installation, use and maintenance

Palazzetti
Palazzetti ECOFIRE JULIE US OLLARE instruction manual

Brunton
Brunton Svea manual

Blaze King
Blaze King SIROCCO 30.1 Operation & installation manual