Muza GP300 User manual

Instruction Manual

Introduction
Important Notes
Power Supply Handling and Transporting
Location
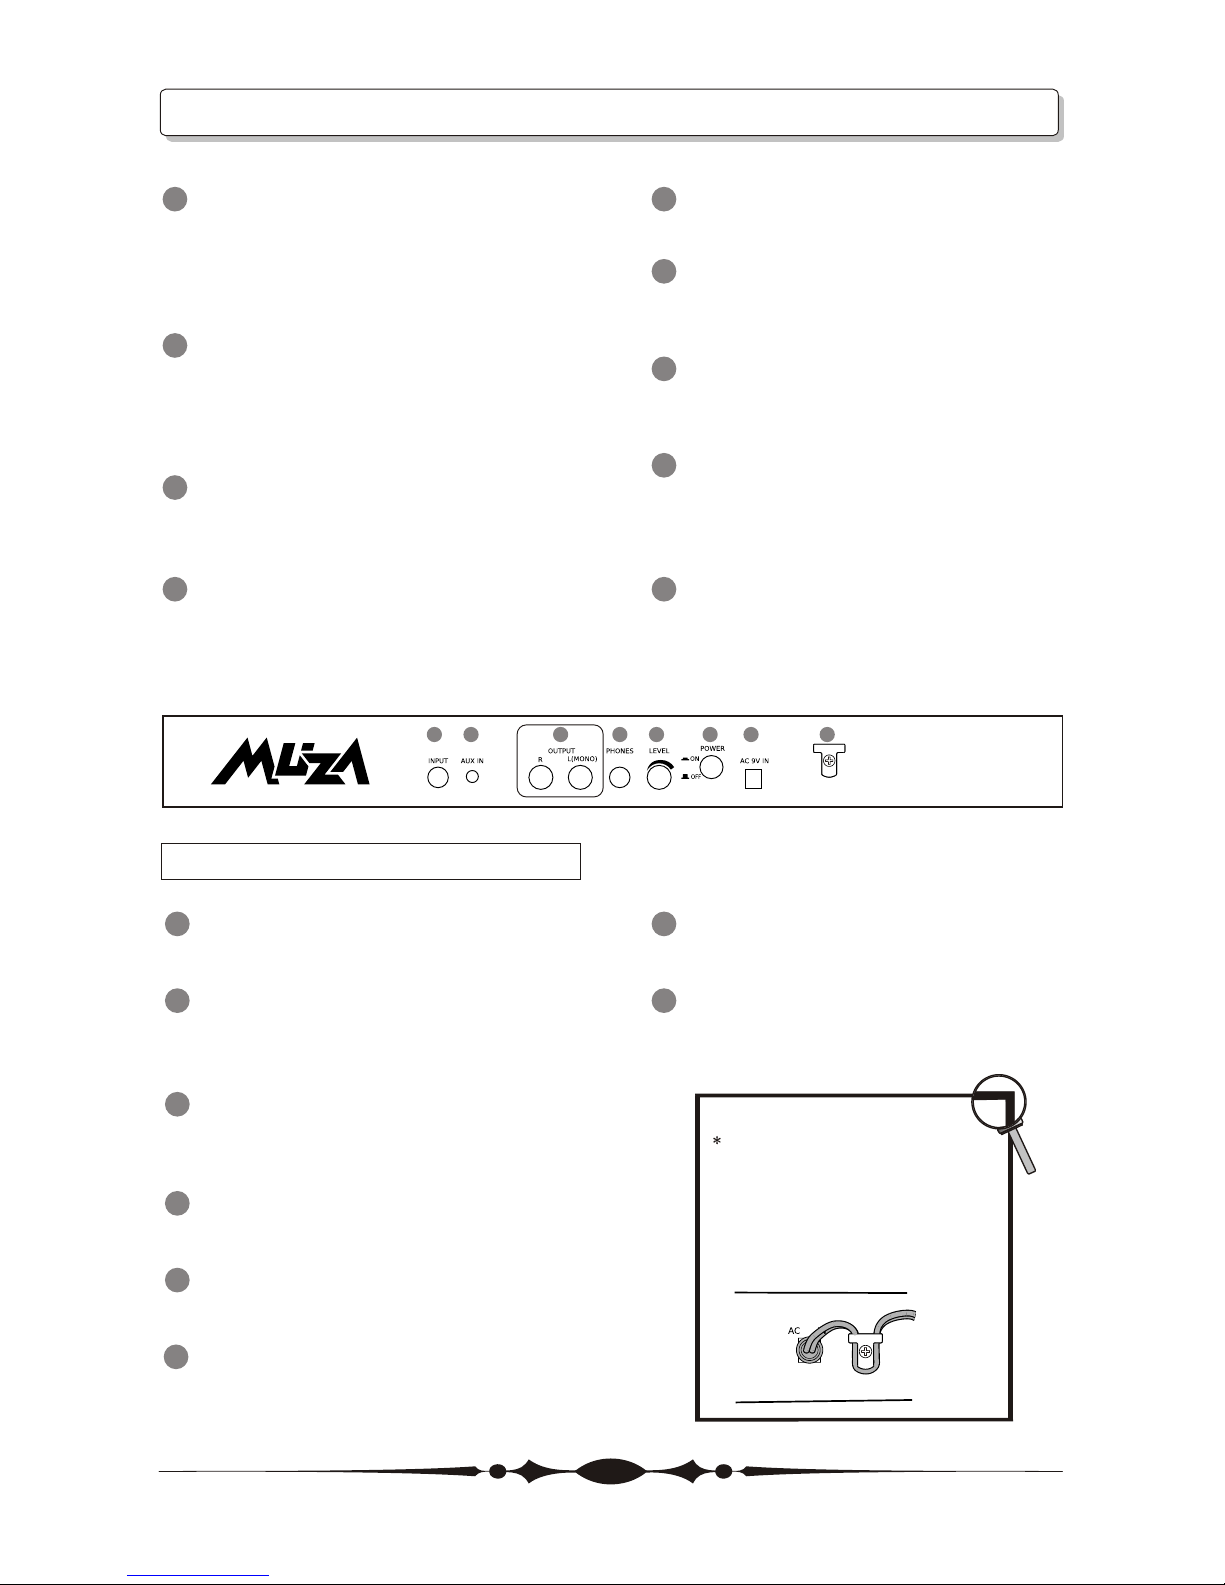
Before connection, please ensure all power
devices such as amplifiers must first be
turned off, in order to avoid any damages.
Avoid using this unit together with
same circuit of electronic products that
will generate line noises.
If an AC adapter is used, it should be
unplugged from the AC outlet if the
instrument is not to be used for an
extended period of time.
Unplug the AC adapter during electric
storms.
Do not place this unit too close to heat
sources such as radiators and amplifiers
in order to prevent damages like
interference.
Do not expose this unit under excessive
sunlight, water and moisture.
Strong vibration and shocks will damage
this unit.
Clean this unit with a soft and dry cloth.
A slightly dampened cloth with mild
detergent might remove stubborn dirt.
Never use thinners and alcohol for
cleaning the unit.
Grab the unit firmly while unplugging
the cables, never pull the audio cables
with stress.
Disconnect all cables before moving the
instrument.
Physical shocks caused by dropping ,
bumping the instrument, or placing
heavy objects on top of it, can result in
scratches and even more severe damages.
Never apply excessive force to the
controls, connectors or other parts of
the instrument.
Thank you very much for purchasing this Guitar Effects Processor. This processor is
designed for you with a variety of wonderful guitar voices including distortion, wahwah,
delay, compressor, EQ, reverb, amp simulation, speaker simulation and more.
You can create your own voices easily and conveniently through the user-friendly interface
and parameter adjustment functions.
You are recommended to study this manual carefully before using the unit.
Cleaning
2

Main Features
Super user-friendly operation.
60 user patches and 60 default settings.
Foot switches for easy patch changing and other operations.
Excellent simulation of 11 famous Stomps, 11 Amplifiers as well as 5
professional pedal tones.
Delay's hold function with 4000 ms times delay.
11 effects for serial use.
Excellent tones for both practice and performance purpose.
3

4
Index
General Guide
Front Panel
Rear Panel
Connection
Power Supply
Volume Adjustment
Operation
Patch
Select a Patch
Edit a Patch
PRE-PROCESS
NG(Noise Gate)
STOMP
AMP SIM
EQ(Equalizer)
SPEAKER
MODULATION
DELAY
REVERB
Store a Patch
Rename a Patch
Exit Edit Status
Factory Settings
Pedal
Utility
User Mode/Hold Tuner
User Mode
Bypass
Mute
Specifications
5-6
5-6
6
7
8
8
7-8
9
18
23
19
22
19
23
20
10-17
11
13
12-13
17
10
11-12
14-15
15-16
14
9-20
20
21
22-23
24

10
EQ(Equalizer) ON/OFF Button
Press to change the equalizer of a
tone.
9
AMP ON/OFF Button
Press to change settings.
Select the amp type.
AMP Knob
A variety of information about the unit
appears here.
The left display shows the bank number.
1
Use for changing the 60 user patches
name.
2
3
Select the PEDAL function, volume
control global or local and the CONTROL
effect.
4
Use to save the settings you have
created.
5
Use this to undo operations.
7
Press to change settings.
NG ON/OFF Button
6
Press to change the settings.
Select the pre-process type.
PRE-PROCESS ON/OFF Button
PRE-PROCESS Knob
8
STOMP ON/OFF Button
Press to change settings.
Select the stomp type.
STOMP Knob
1
2 3 4 5
6 87 10
911 20
21
12 13 14
15
17
19
16
18
12
Press to change settings.
Select the modulation type.
MODULATION ON/OFF Button
MODULATION Knob
11
SPEAKER ON/OFF Button
Press to change settings.
Select the speaker type.
SPEAKER Knob
5

1 2 3 45 6 7 8
General Guide
Value knobs 1-3
19
To adjust the parameters of the effects
or amp model.
Expression Pedal
20
Controls volume when the light is off
and the other functions of expression
when the light is on.
Expression Pedal LED
21
Lights when the effect being controlled
with the Expression Pedal is on, and
goes out when the effect is off.
BANK Switches
15
Switching bank numbers upwards or
downwards.
USER MODE/HOLD TUNER Switch
16
Press to enter user mode and the tuner
and bypass functions.
Number Switches
17
To select a desired patch.
CONTROL Switch
18
You can use value knob 3 to edit the
control pedal setting.
1INPUT Jack
Connect your guitar to this jack.
2AUX IN Jack
Connect an external effect processor or
other audio source to this jack.
3OUTPUT R/L(MONO) Jack
Connect to an amp, mixer, mixer or
similar devices.
4PHONE Jack
Connect your headphones to this jack.
5LEVEL Knob
Adjust the volume level of the unit.
6POWER Switch
Turn the power on and off .
7AC IN Jack
Connect an AC adapter to this jack.
8Cord Hook
Hook the AC adapter cord to prevent
the adapter for disconnection.
Rear Panel
6
13 DELAY
Press to change settings.
Select the delay type and time.
DELAY ON/OFF Button
DELAY Knob
14 REVERB
Press to change settings.
Select the reverb effect.
REVERB ON/OFF Button
REVERB Knob
Fasten the cord of the AC adapter
around the hook as shown in the
diagram before connecting it to
the AC IN jack. This will prevent
the plug from being disconnected
if the cord is accidentally pulled.

Operation
Connecting a Guitar
Plug an audio cord into the INPUT jack.
Then plug the other end of the cord
into LINE OUT of a guitar.
1
Connecting an Audio Source
Plug an audio cord into the AUX IN jack.
Then plug the other end of the cord
into the LINE OUT or the AUX OUT of
a CD or similar devices.
2
Connecting Guitar Amplifier
Plug two audio cords into the OUTPUT
jack, then plug the other end of the
cords into the AUX IN jack of the two
amplifiers.
3
Connecting Headphone
Plug a pair of headphone into the
PHONES jack to monitor the sound.
4
Connecting Power Adapter
To power the unit from the AC adapter,
insert the small plug of the adapter
cable into the AC IN jack. Then plug
the adapter into an outlet.
5
7
Connection
To prevent malfunction and/or
damaging the speakers or other
devices, always turn down the
volume, and turn the power of
all devices off before making any
connection.
When outputting in mono, connect
the cord to the OUTPUT L(MONO)
jack.
If you turn on the unit while the
amplifier is already powered up,
damages to the speaker may result.
Always turn the power of the amplifier
off before making any connection.

Operation
Power Supply
Volume Adjustment
Once the connections have been
completed, turn the power of the
various devices on in the order
sequence as below.
Press the POWER ON/OFF button to
turn on the unit.
After the power is on, the LCD will
proceed to the main operation menu.
The LCD displays current patch's
name and the LED displays the BANK
number. The LED lights turn on or off
according to each effect's status.
1
2
3
4
MUZA GP300
_
MUZA2006
8
Adjust the output volume of the unit
with the LEVEL knob on the rear panel.

Patch
Select a Patch
The patches are the combination of effects
in different types and parameters.
The unit has up to 120 patches: 60 user
patches (01-A~15-D) and 60 default
settings (16-A~30-D).
You can use BANK+ and BANK-
footswitches for changing a Bank.
Press and hold the BANK to change
a bank consecutively. The LED
displays the bank number (01~30).
Then, you can press the foot switches
of the other 4 Patches (PATCH A,
PATCH B, PATCH C and PATCH D)
to switch between the four patches in
the current bank. The LCD displays the
current patches' name.
The LED will go on flashing until you
have chosen one patch.
1
2
3
MUZA2006
Storm II
bank number
(01~30)
Flashing
patch name
9

Edit a Patch
Patch
Light Compress
Threshold 55
Release 25
Level 12
11 effects can be used for the unit
simultaneously.
Choose each type of effect by pressing its
corresponding button. If the LED light is
on, it indicates the effect is on, when it is
off, it indicates a bypass and if it is
flashing, it means you are now editing
this effect.
Press PRE-PROCESS on/off button,
LCD displays the parameters for the
selected effect.
Rotate the value knobs1- 3, LCD displays
THRESHOLD 0 - 63, RELEASE 0 - 63,
LEVEL 0 - 63.
Here are 4 types of WAH:
Auto Touch Wah
Inversed AutoWah
Auto Sweep Wah
MUZA Pedal Wah
They can all be combined with
Compression. By tuning KNOB 1,
KNOB 2 and KNOB 3, you can adjust
THRESHOLD,RATIO,RELEASE. Or
POLARITY, Sens or Speed.
PRE-PROCESS
1
Pre-process table
Number Name
Light Compress
Normal Compress
Deep Compress
Limiter
Touch Wah
Inversed Wah
Sweep Wah
Pedal Wah
Compress+Auto Wah
Compress+Up Wah
Compress+Sweep Wah
Expression
Some light compress
Ordinary compress
Very deep compress
Limit the input
Wah according to the velocity
Change up and down polarity
Auto sweep wah
Wah controlled by pedal
Compress plus auto touch wah
Compress plus auto touch inversed wah
Compress plus auto frequency sweep wah
1
2
3
4
5
6
7
8
9
10
11
Flashing
KNOB 1
Rotate Knob 1
Rotate Knob 2
Rotate Knob 3
KNOB 2 KNOB 3
10

Patch
NG (Noise Gate)
STOMP
2
3
NOISE GATE can reduce the noise caused
by an output audio signal. You could
choose your preferred Threshold level
while using this function.
Use KNOB 1 and KNOB 2 to adjust
Threshold and Release. Range:0 - 63.
LCD displays: Threshold 0 - 63,
Release 0 - 63.
When STOMP button is pressed, KNOB 1,
KNOB 2 and KNOB 3 are used to adjust
DRIVE (distortion drive), TONE (bright-
ness of the tone) and LEVEL (volume
level) respectively.
LCD displays DRIVE 0 - 63, TONE 0 - 63
and LEVEL 0 - 63.
Some voices do not contain a TONE; you may
adjust the tone by using the EQ button.
Noise Gate
Muza Preamp
Flashing
Flashing
Threshhold 55
Release 25
KNOB 1
Rotate Knob 1
Rotate Knob 2
KNOB 2
Drive 55
Tone 25
Level 12
KNOB 1
Rotate Knob 1
Rotate Knob 2
Rotate Knob 3
KNOB 2 KNOB 3
11

If ACOUSTIC is selected, the knobs are
referred to BODY, TOP and LEVEL.
Acoustic
Flashing Body 55
Top 25
Level 12
Rotate Knob 1
Rotate Knob 2
Rotate Knob 3
KNOB 1 KNOB 2 KNOB 3
Number Name
MUZA PREAMP
MUZA TUBE
CLASSIC OD
US OD
MUZA DS
CLASSIC DS
SUPER DS
UFO FUZZ
MUZA FUZZ
MUFF FUZZ
MOUSE DS
GRUNGE DS
SMASH DS
HEAVY METAL
DEATH METAL
ACOUSTIC
Expression
Clean tone ,enhance the high frequency
Warm distortion produced by a valve tube
®
Simulate IBANEZ TS808 stomp
®
Simulate DIGITECH BAD MONKEY™stomp
Produce a special distortion
®
Simulate MXR M104 stomp, classic distortion
®
Simulate BOSS DS-1
®
Simulate DUNLOP FUZZFACE™
Produce a cracking Fuzz sound
®
Simulate ELECTRO-HARMONIX BIG MUFF ™
Simulate PROCO™VINTAGE RAT™
®®
Simulate DOD FX69 GRUNGE
®®
Simulate IBANEZ SM7 SMASH BOX
®®
Simulate BOSS MT-2 METAL ZONE
®
Simulate DOD FX86 DEATH METAL™
Simulate acoustic guitar sound
1
2
3
4
5
6
7
8
9
10
11
12
13
14
15
16
12
MUZA is a trademark of MEDELI ELECTRONICS CO., LTD. Other product names used in this
document are trademarks of their respective companies and are not associated or affiliated with
MEDELI ELECTRONICS CO., LTD. They are trademarks of other manufacturers and were used
merely to identify whose sounds were reviewed in the creation of this product.
4
When AMP button is pressed, KNOB 1,
and KNOB 3 are used to adjust DRIVE
(distortion drive) and LEVEL (volume
level) respectively.
LCD displays: Gain 0 - 63, Level 0 - 63.
Jazz Clean
Flashing

Patch
EQ (Equalizer)
5
Press the AMP button to turn the effect
on and off.
Equalizer can be used to adjust the input
audio frequency. Three band EQ is
commonly used for adjusting BASS,
MIDDLE and TREBLE.
When EQ button is selected and pressed,
KNOB 1, KNOB 2 and KNOB 3 will be used
to adjust BASS, MIDDLE and TREBLE
respectively. Range: -31 - 31.
LCD will display Bass -31 - 31, Middle
-31- 31, Treble -31 - 31.
(The efficient range is +/- 12dB)
Gain 55
Level 25
KNOB 1
Rotate Knob 1
Rotate Knob 3
KNOB 3
AMP simulation table
Number Name
JAZZ CLEAN
DELUXE
MODERN BLUES
MODERN CLASS
CLASS A
CLASSIC BLACK
BRITISH CLASS
MUZA HI GAIN
HI GAIN
MODERN HI GAIN
RECTIFIER
Expression
®
Simulate Roland JC-120 Amp
®®
Simulate Fender Tweed Deluxe Reverb Amp
®®
Simulate Fender Bassman Amp
®
Simulate Matchless Chieftain Amp
®
Simulate VOX AC-30 Amp
®®
Simulate Fender BlackFace Deduxe Reverb Amp
®
Simulate Marshal JTM-45 Amp
Special kind of HI-GAIN Amp
®
Simulate Marshall JCM-800 Amp
®
Simulate Soldano Super Lead Overdrive Amp
®®
Simulate MesaBoogie Dual Rectifier Amp
1
2
3
4
5
6
7
8
9
10
11
13
EQ
Flashing
Bass - 3
Middle -21
Treble 2
KNOB 1
Rotate Knob 1
Rotate Knob 2
Rotate Knob 3
KNOB 2 KNOB 3
MUZA is a trademark of MEDELI ELECTRONICS CO., LTD. Other product names used in this
document are trademarks of their respective companies and are not associated or affiliated with
MEDELI ELECTRONICS CO., LTD. They are trademarks of other manufacturers and were used
merely to identify whose sounds were reviewed in the creation of this product.

Patch
SPEAKER
MODULATION
6
7
When SPEAKER button is pressed,
KNOB 1,KNOB 2 and KNOB 3 are not
activated.
Press SPEAKER button to turn on or off
the function.
1x10
Flashing
Speaker simulation table
Number Name
1x10
1x12 A
1x12 B
1x12 C
2x12 A
2x12 B
4x12 A
4x12 B
4x12 C
4x12 D
4x12 E
Expression
Simulate 1x10 speaker
Simulate 1x12 A speaker
Simulate 1x12 B speaker
Simulate 1x12 C speaker
Simulate 2x12 A speaker
Simulate 2x12 B speaker
Simulate 4x12 A speaker
Simulate 4x12 B speaker
Simulate 4x12 C speaker
Simulate 4x12 D speaker
Simulate 4x12 E speaker
1
2
3
4
5
6
7
8
9
10
11
Classic Chorus
Flashing
Rate 55
Depth 25
Effect Level 2
KNOB 1
Rotate Knob 1
Rotate Knob 2
Rotate Knob 3
KNOB 2 KNOB 3
When MODULATION button is selected
and pressed, KNOB 1, KNOB 2 and
KNOB 3 will be used to adjust RATE,
DEPTH and EFFECT LEVEL respectively.
Range:0 - 63.
LCD will display Rate 0 - 63, Depth
0 - 63, Effect Level 0 - 63.
Press the MODULATION button to turn
the effect on and off.
14

Patch
Modulation table
Number Name
CLASSIC CHORUS
STEREO CHORUS
FLANGER
STEP FLANGER
PHASER
RANDOM PHASER
TREMOLO
PITCH SHIFTER
VIBRATO
SLICE
OCTAVE
AUTO RIFF
RING MOD
AUTO RING
SLOW ATTACK
RANDOM FLANGER
Expression
(Rate / Depth / Effect Level)
(Rate / Depth / Feedback)
(Flange Rate / Step Rate / Flange Mix)
(Rate / Depth / --)
(Phaser Rate / Depth / Step Rate)
(Rate / Depth /--)
(Pitch / Direct Level / Effect Level)
(Rate / Depth /--)
(Slice Type / Speed /--)
(Direct Level / Oct1 Level / Oct2 Level)
(Riff Type / Speed / Loop)
(Frequency / Direct Level / Effect Level)
(Rate / Direct Level / Effect Level)
(Attack / -- / --)
(Rate / -- / Feedback)
1
2
3
4
5
6
7
8
9
10
11
12
13
14
15
16
15
DELAY
8
65ms Delay
Flashing
Delay Time 65
Feedback 48
Delay Level 4
KNOB 1
Rotate Knob 1
Rotate Knob 2
Rotate Knob 3
KNOB 2 KNOB 3
Press the DELAY button to enter the
DELAY menu, and the LCD displays the
name of the current Delay type.
Use KNOB 1, KNOB 2 and KNOB 3 to
adjust DELAY duration, FEEDBACK and
LEVEL respectively.
LCD displays DELAY TIME: 10-4000ms,
FEEDBACK: 0 - 63, DELAY LEVEL: 0 - 63
Press the DELAY button to turn the effect
on and off.
Each Delay type has different delay times.
Delay time displays: 2ms - 65ms; 48ms -
300ms; 296ms - 800ms and 775ms -
2350ms for the first four type of delay.
And the Reversed delay time is: 10ms -
2000ms. The others: 10ms - 4000ms.

When the delay has set to the maximum
level time of 4000ms, you can use the
delay tap function.
When you change the delay type, the
CONTROL light will turn off and stop
flashing from the flashing status.
Patch
16
Full Range Delay
Digital Delay
Delay Time 4000
KNOB 1
Number Name
65ms
300ms
800ms
2350ms
FULL RANGE
DIGITAL
TWO HEAD
MULTI HEAD
FOUR TAP
WEAK START
REVERSE
Expression
Max 65ms delay
Max 300ms delay
Max 800ms delay
Max 2350ms delay
Max 4000ms delay, can hold.
Stereo digital delay
Two-sound delay
Delay of multi head
4 times repeated delay
Weak start delay
Reversed delay, can be used to simulate the strings
1
2
3
4
5
6
7
8
9
10
11
Delay table

Patch
17
REVERB
9
Spring Reverb 1
Flashing
Revb Time 63
Revb Density 48
Revb Level 19
KNOB 1
Rotate Knob 1
Rotate Knob 2
Rotate Knob 3
KNOB 2 KNOB 3
Press the REVERB button to enter the
REVERB menu and the LCD will display
the name of the current Reverb type.
Use KNOB 1, KNOB 2 and KNOB 3 to
adjust REVERB TIME, DENSITY and
LEVEL. Range:0 - 63.
LCD displays: TIME 0 - 63, DENSITY
0 - 63, LEVEL 0 - 63.
Press the REVERB button to turn the
effect on and off.
Number Name
SPRING 1
SPRING 2
CHAMBER 1
CHAMBER 2
ROOM 1
ROOM 2
HALL 1
HALL 2
PLATE 1
PLATE 2
REVERSED
Expression
Classic spring reverb
More density spring reverb
Acoustic chamber reverb
More density acoustic chamber reverb
Small room reverb
Big room reverb
Hall reverb
Huge hall reverb
Small plate reverb
Plate reverb with more bright voice
Reversed reverb
1
2
3
4
5
6
7
8
9
10
11
Reverb table

Patch
Store a Patch
After you edited a patch and want to
store it, press the STORE button; the
LED of the BANK and the PATCH will
flash.
Next, select the bank and patch you want
to store into.
If you want to cancel your operation,
press the CANCEL button.
When you have selected the Bank and
Patch, press the STORE button again to
confirm your operation.
Only Bank 01 - 15 could be
chosen.
If the current bank is between
the range of 16 - 30, the LED
will display 01 automatically.
1
2
3
4
Revb Level 19
Complete
Purple
Flashing
Flashing
18

Patch
Rename a Patch
Exit Edit Status
You can rename the 60 user patches
upon your preferences.
Press the RENAME button, the LCD
name characters will flash.
Use KNOB1 and KNOB2 to choose a
character; use KNOB 3 to change the
position.
Names can be stored with a maximum
of 8 characters.
Under the RENAME status, press
RENAME button again to confirm your
operation and press CANCEL to cancel
the former operation.
1
2
3
4
Purple
jurple
Flashing
19
Ourple
jurple
Purple
KNOB 1
Rotate Knob 1
Rotate Knob 2
Rotate Knob 3
KNOB 2 KNOB 3
-
-
-
-
Character table
KNOB1:
A 5 6 7 8 9 abc
defgh i j k
lm n o p q r s
tu v w x y z
B C D E F G H
I L K L M N O P
Q R S T U V W X
Y Z 0 1 2 3 4
KNOB 2:
Press CANCEL button when you are
editing the type and the LCD will return
back to the patch name's display.

Patch
Factory Setting
1
1
2
2
3
3
4
20
MUZA2006
The 60 user patches are the same as
the 60 default patches before storing
your own patches.
Press STORE, CANCEL and UTILITY
simultaneously and then power on.
The 60 user patches can be restored.
Aware while using this feature since the
user data will not be remained after
editing and restoration.
Pedal
The unit has one expression pedal.
It can be used to control the volume
when the light is off; when the light is
on, you could use it to control other
functions of expression.
It can be defined in the UTILITY menu.
You must turn it on if you would like to
use its expression function by pressing
the button in the pedal front.
Move back and forth
to control volume
Pressed them
simultaneously.
Move back and forth to control
other functions of expression.
The light is off
The light is on.
Push strongly, so that
pedal touches here.
Table of contents
Popular Recording Equipment manuals by other brands

TCS
TCS FBO1100-0400 Product information

Murphy
Murphy CANdrive Module CDV100F Installation and operation manual

Evco
Evco EPJcolor quick start guide

J-Tech Digital
J-Tech Digital JTD4KATSW operating instructions

Carrier
Carrier DLS VRF Installation and operating instructions

HELVAR
HELVAR SCENESET HES91010 installation instructions