Radio Shack Digital Recorder User manual

©2002 RadioShack Corporation. All Rights Reserved.
RadioShack and RadioShack.com are trademarks used
by RadioShack Corporation.
OWNER’S MANUAL —
Please read before using this equipment.
14-1197
www.radioshack.com™
#"+/2146#06"#
If an icon appears at the end of a paragraph, go to the box on that
page with the corresponding icon for pertinent information.
Rý— Warning #— Important .
..
.— Caution
°
°°
°— Hint ±— Note
&KIKVCN"4GEQTFGT
YKVJ"%COGTC
+0641&7%6+10
Your RadioShack 130-Minute Digital Recorder with
Camera is ideal for quick note taking. Its light weight
and ultra-small size make it easy to slip into a pocket,
briefcase, or purse. You can use it at school, at
business conferences, or anywhere on the go. You
can start recording manually, set the recorder so
sound activates recording, or program delayed
recordings. With 8 MB of built-in memory, the recorder
provides up to 130 minutes of recording time in SP
(Standard Play) mode and 30 minutes in HQ (High
Quality) mode. The built-in digital camera lets you
take pictures and transfer them to your PC.

2
PC Data Transfer Kit —
included USB PC link lets you
upload or download recorded
voice and image files to and
from a PC.
Built-in Mic — eliminates the
need to carry an additional
microphone.
1/3” CMOS Image Sensor
(326,688 pixels) — saves VGA
(640 ×480) images using
Wavelet, the latest
compression algorithm.
VIP (Voice In Picture)
Recording — records voice
into picture data.
Automatic Focus and
Exposure — lets you easily
take pictures.
Flash Memory — retains all
data even without power.
Level 2 Heading
%106'065
Preparation ............ 7
Installing
Batteries ............ 7
Setting the
Clock ................. 8
Connecting
Earphones ......... 8
Connecting an
External
Microphone ..... 11
Attaching the
Wrist Strap ...... 11
Locking the
Recorder’s
Controls ........... 12
Recorder
Operation ............. 12
Setting the
Recording
Options ............ 13
Recording
Messages ........ 15
Using
Voice-Operated
Recording System
(VOS) .............. 17
Locking Message
Files ................. 18
(Continued)

3
Repeat Play — plays a
message or a part of a
message as often as desired.
Scan Play — plays the
beginning of each message for
5 seconds successively.
Automatic Power Off —
automatically turns off the
power if you do not press any
button.
Stereo Phone Jack — lets you
use an optional earphone or
headphone to listen to
messages privately.
Built-In Speaker — lets you
play back notes anywhere.
6*'"(%%"9#065";17"
61"-019
This equipment has been
tested and found to comply with
the limits for a Class B digital
device, pursuant to Part 15 of
the
FCC Rules
. These limits
Displaying
Recording
Information ........ 19
Editing
Messages .......... 19
Dividing a Message
File .................... 20
Playing Back
Messages .......... 22
Camera
Operation ............... 26
Setting the Image
Compression
Mode ................. 26
Taking a
Picture ............... 27
Locking
Images .............. 28
Adding a Message
to an
Image File ......... 28
Erasing Files .......... 30
Erasing a
Single File ......... 30
Erasing All Files in a
Folder ................ 30
Erasing All
Files .# .............. 31
Using the Recorder
with a PC ............... 31
(Continued)

4
are designed to provide
reasonable protection against
harmful interference in a
residential installation. This
equipment generates, usesand
can radiate radio frequency
energy and, if not installed and
used in accordance with the
instructions,maycause harmful
interference to radio
communications.
However, there is no guarantee
that interference will not occur
in a particular installation. If this
equipment does cause harmful
interference to radio or
television reception, which can
be determined by turning the
equipment off and on, the user
is encouraged to try to correct
the interference by one or more
of the following measures:
• Reorient or relocate the
receiving antenna.
System Require-
ments ................ 31
Installing PVR Man-
ager .................. 32
Connecting the
Recorder to Your
PC ..................... 34
PVR Manager
Structure ........... 39
Running PVR Man-
ager .................. 43
Using the Image
Window ............. 47
Using the Image
Viewer ............... 48
About V.I.P.
Files .................. 52
Using the Voice
Player ............... 52
Sending an
E-mail ............... 53
Trouble
shooting ................. 55
Care ....................... 56
Service and Repair 57
Specifications ........ 58
5
• Increase the separation
between the equipment
and receiver.
• Consult your local
RadioShack store or an
experienced radio/TV
technician for help.
• If you cannot eliminate the
interference, the FCC
requires that you stop
using your recorder.
Changes or modifications not
expressly approved by
RadioShack may cause inter-
ference and void the user’s au-
thority to operate the equipment.
You must use shielded
interface cables with this
equipment.
Material you record is for your
personal use or pleasure only.
It is prohibited to record copy-
righted material without per-
mission of the copyright holders
according to copyright law.

6
(%%"&'%.#4#6+10"1("
%10(14/+6;
This device complies with Part
15 of the
FCC Rules
. Operation
is subject to the following two
conditions: (1) this device may
not cause harmful interference,
and (2) this device must accept
any interference received,
including interference that may
cause undesired operation.
Product: Digital Recorder
with Camera
Model: 14-1197
Respon-
sible
Party:
RadioShack
100 Throckmorton
Fort Worth, TX
76102
Phone: 817-415-3200

7
24'2#4#6+10
+056#..+0)"$#66'4+'5
Yourrecorderrequirestwo AAA
batteries (not supplied) for
power. For the best
performance and longest life,
we recommend RadioShack
alkaline batteries. .
1. Slide the battery cover in
the direction of the arrow.
2. Place the batteries in the
compartment as indicated
by the polarity symbols (+
and –) marked inside the
compartment.
3. Replace the cover.
When the batteries are low,
appears and the recorder
automatically shuts off.
Replace the batteries. Rý.
."%#76+105"."
• Use only fresh
batteries of the
required size
and
recommended
type.
• Do not mix old
and new
batteries,
different types
of batteries
(standard,
alkaline, or
rechargeable),
or rechargeable
batteries of
different
capacities.
(continued)
R"9#40+0)"R"
Dispose of old
batteries promptly
and properly. Do not
burn or bury them.

8
5'66+0)"6*'"%.1%-
1. Press POWER to turn on
the recorder. ±
When you turn on the
recorder for the first time,
#ý#ýO
#ý#ýO#ý#ýO
#ý#ýO flashes for about 20
seconds. If it disappears
after the 20 seconds or if
you want to reset the clock,
hold down MENU until &&O
&&O&&O
&&O
(year digits and Y) flashes.
2. While #ý#ýO
#ý#ýO#ý#ýO
#ý#ýO (or &&O
&&O&&O
&&O) is
flashing, repeatedly press
(or hold down) #
##
##
##
#
or ý
ýýý,
,,
,#
##
#
to
set the year, then press
MENU to store the setting.
3. Repeat Step 2 to set the
month, day, and time.
%100'%6+0)"
'#42*10'5
You can use an optional mono
earphone or headphones with a
1/8-inch (3.5-mm) mini-plug for
."%#76+105"."
(continued)
• If you do not
plan to use the
recorder for a
month or
longer, remove
the batteries.
Batteries can
leak chemicals
that can destroy
electronic parts.
±"016'"±"
If you do not press
any button for 30
seconds in camera
mode or 3 minutes in
recorder mode, the
recorderautomatically
shuts off to save
battery power. If this
occurs during time
setting, your setting is
not saved.

9
private listening. You can also
use an earphone to monitor a
recording in progress. Your
local RadioShack store carries
a wide selection of earphones.
Insert the earphone's plug into
the recorder's V
VV
Vjack. The built-
in speaker automatically
disconnects.
.KUVGPKPI"5CHGN[
To protect your hearing, follow
these guidelines when you use
earphones.
• Set the volume to the
lowest setting before you
begin listening. After you
begin listening, adjust the
volume to a comfortable
level.
• Do not listen at extremely
high volume levels.
Extended high-volume
listening can lead to
permanent hearing loss.
±"016'5"±"
• Hoursareshown
in 12-hour for-
mat. For ex-
ample, set 1 AM
as '0&&
'0&&'0&&
'0&& and 1PM
as Fý'0&&$ý
Fý'0&&$ýFý'0&&$ý
Fý'0&&$ýYou
can change to
the 24-hour
format by press-
ingtheclockicon
in the PVR Man-
ager. (See “PVR
Manager Icons”
on Page 40.)
• The time ap-
pears briefly
each time you
turn the recorder
on. To read the
time while the
recorder is on,
hold down
POWER for 2
seconds.
Holding down
POWER after
the time appears
turns the
recorder off.

10
• Once you set the volume,
do not increase it. Over
time, your ears adapt to
the volume level, so a
volume level that does not
cause discomfort might still
damage your hearing.
6TCHHKE"5CHGV[
• Do not wear earphones
while operating a motor
vehicle or riding a bicycle.
This can create a traffic
hazard and could be illegal
in some areas.
• Even though some
earphones let you hear
some outside sounds
when listening at normal
volumelevels,theystill can
present a traffic hazard.

11
%100'%6+0)"#0"
':6'40#."
/+%412*10'
You can use an optional
microphone with a 1/8-inch (3.5-
mm) plug to extend the
recording range. Your local
RadioShack store carries a
wide selection of microphones.
Insert the microphone’s plug
into the recorder’s MIC jack.
The built-in microphone
automatically disconnects.
#66#%*+0)"6*'"94+56"
564#2
Thread the strap’s small loop
through the holes on the bottom
of the recorder. Slip the larger
end of the strap through the
smaller loop. Pull the larger
loop to tighten it.

12
.1%-+0)"6*'"
4'%14&'4N5"
%10641.5
You can lock the recorder’s
controls so you do not
accidentally change any
settings. To lock the recorder’s
controls, slide HOLD in the
direction of the arrow. >EB:
>EB:>EB:
>EB:
briefly appears and
appears at the bottom of the
display. To unlock the
recorder’s controls, slide HOLD
in the opposite direction of the
arrow.
4'%14&'4"
12'4#6+10
The recorder has one folder for
image files and two folders (A
and B) for message files. The
folder for images can store up to
250 standard image files and
the folders for messages can
store up to 100 messages each.
To select message folders, see
±"016'"±"
If you try to record
more than 100
message files or 250
image files in one
folder, <KBB
<KBB<KBB
<KBB appears.

13
“Setting the Recording Options”
on Page 13. ±
To turn on the recorder, press
POWER. If ®
®®
®ý
ýýýappears, the
recorder is in camera mode. To
select voice recorder mode,
press POWER again. ®
®®
®
disappears
5'66+0)"6*'"
4'%14&+0)"126+105"
The recorder’s special features
and file organization tools are
accessed through the options
menu. These options include
Folders, Recording Mode,
Microphone Sensitivity, Voice-
Operated Recording System,
Programmed Recording, File
Lock, and Continuous Play.
1. Repeatedly press MENU
while the recorder is
stopped to cycle through
the options menu. ±
±"016'5"±"
• If you do not
press any button
for about 5
seconds, the
recorder
automatically
exits the options
mode.
• Image and
message files
share the same
memory. The
maximum
number of image
files changes
depending on
how many
message files
are in the
memory.

14
2. While <EB:ý
<EB:ý<EB:ý
<EB:ý(Folders)ý
ýýý
appears, press #
##
#ý
ýýýor ,
,,
,to
select Folder or Folder
.
3. While CE:
CE:CE:
CE: (Recording
Mode) appears, press #
##
#
or ,
,,
,to select IF
IFIF
IF or >G
>G>G
>G. You
can record up to 130
minutes in SP mode and
30 minutes in HQ mode.
4. While C?9
C?9C?9
C?9 (Microphone
Sensitivity) appears, press
#
##
#or ,
,,
,to select >?
>?>?
>? or BE
BEBE
BE.
5. While LEI
LEILEI
LEI (Voice-Operated
Recording System)
appears, press #
##
#or ,
,,
,to
select ED
EDED
ED or E<<
E<<E<<
E<<. (See
“Using Voice-Operated
Recording System (VOS)”
on Page 17.)
6. While FHE#H
FHE#HFHE#H
FHE#H (Programmed
Recording) appears,
repeatedly press #
##
#or ,
,,
,
to select E<<
E<<E<<
E<<
, +C
+C+C
+C, '&C
'&C'&C
'&C, '+C
'+C'+C
'+C
A
B

15
or (&C
(&C(&C
(&C.(See “Programmed
Recordings” on Page 18.)
7. While E<<ýBE9A
E<<ýBE9AE<<ýBE9A
E<<ýBE9A (File Lock)ý
ýýý
appears, press #
##
#or ,
,,
,to
select ED
EDED
ED or E<<
E<<E<<
E<<.
8. While 9edj_ý
9edj_ý9edj_ý
9edj_ý(Continuous
Play) appears, press #
##
#orý
,
,,
,to select ED
EDED
ED or E<<
E<<E<<
E<<.
4'%14&+0)"/'55#)'5
1. Press POWER to turn on
the recorder. The current
date and time briefly
appear.
2. If the camera icon appears
at the upper left corner of
the display, press POWER
(PAUSE/DISPLAY) to select
the recorder mode. The
number at the top line
indicates the current
message file number and
the number at the bottom
line indicates the recording

16
time of the current
message.
3. Press REC/STOP.
Recording begins. The
display shows the current
folder name( or ), the
current message number,
the recording mode (>G
>G>G
>G or
IF
IFIF
IF), and the elapsed
recording time.
4. To temporarily stop
recording, press PAUSE/
DISPLAY. F7KI;
F7KI;F7KI;
F7KI; appears.
To resume recording,
press PAUSE/DISPLAY
again. ±
5. During recording, you can
press #
##
#sothe recording
starts from the next file
number.
6. Press REC/STOP to stop
the recorder.
AB
±"016'"±"
The recorder
automatically turns off
if it is set to pause for
more than 30
minutes.

17
7. Hold POWER until the
display disappears to turn
off the recorder.
75+0)"81+%'/
12'4#6'&"4'%14&+0)"
5;56'/"*815+
1. Turn on the voice-operated
recording system. (See
“Setting the Recording
Options” on Page 13.) ±
2. Set the mic sensitivity if
necessary. (See “Setting
the Recording Options” on
Page 13.)
3. Press REC/STOP.
When the recorder detects a
voice input, it automatically
starts recording. When the
voice input stops, the recorder
automatically stops recording
within 1 second and enters
standby mode.
±"016'"±"
If you set the mic
sensitivity to >?
>?>?
>?,
ambient noise might
causetherecordingto
continue.

18
2TQITCOOGF"
4GEQTFKPIU
1. Turn on programmed
recording. (See “Setting
the Recording Options” on
Page 13.)
2. Hold down REC/STOP until
FHE#H
FHE#HFHE#H
FHE#H appears. The
recorder starts recording
after the preset time.
3. To cancel the programmed
recording,press REC/STOP
again.
.1%-+0)"/'55#)'"
(+.'5
To prevent messages from
being accidentally erased:
1. Select the message you
want to lock.
2. Repeatedly press MENU
until E<<ýBE9A
E<<ýBE9AE<<ýBE9A
E<<ýBE9A appears,
press #
##
#or ,
,,
,to select ED
EDED
ED
or E<<
E<<E<<
E<<.

19
&+52.#;+0)"
4'%14&+0)"
+0(14/#6+10
While the recorder is stopped,
hold down PAUSE/DISPLAY until
the current date and time
appear.
To display the recorded date
and time of a file, select the file
and press PAUSE/DISPLAY
while the current date and time
appear.
To display the remaining
available recording time, press
PAUSE/DISPLAY again while the
recorded date and time
appears.
'&+6+0)"/'55#)'5
#FFKPI"VQ"VJG"'PF"QH"C"
/GUUCIG
1. Select the message you
want to add to.

20
2. Press PLAY/STOP to play
the message.
3. Hold down REC/STOP for
more than 1 second. 7ZZ#H
7ZZ#H7ZZ#H
7ZZ#H
appears briefly. Recording
starts immediately from the
end of the selected
message.
&+8+&+0)"#"/'55#)'"
(+.'
1. During play, press PAUSE
at the point where you
want to divide the
message.
2. Hold down MENU until E<<ý
E<<ýE<<ý
E<<ý
Z?L
Z?LZ?L
Z?L appears.
3. Press #
##
#or ,
,,
,so E<<
E<<E<<
E<<
changes to ED
EDED
ED.
4. Press MENU. The next
number and IJEF
IJEFIJEF
IJEF appear.
For example, when file 4 is
successfully divided, &+ý
&+ý&+ý
&+ý
IJEFý
IJEFýIJEFý
IJEFýappears. ±
Other manuals for Digital Recorder
1
This manual suits for next models
1
Table of contents
Other Radio Shack Recording Equipment manuals

Radio Shack
Radio Shack 1500474 User manual

Radio Shack
Radio Shack 44-233A User manual

Radio Shack
Radio Shack Micro-43 User manual

Radio Shack
Radio Shack Modem I TRS-80 User manual

Radio Shack
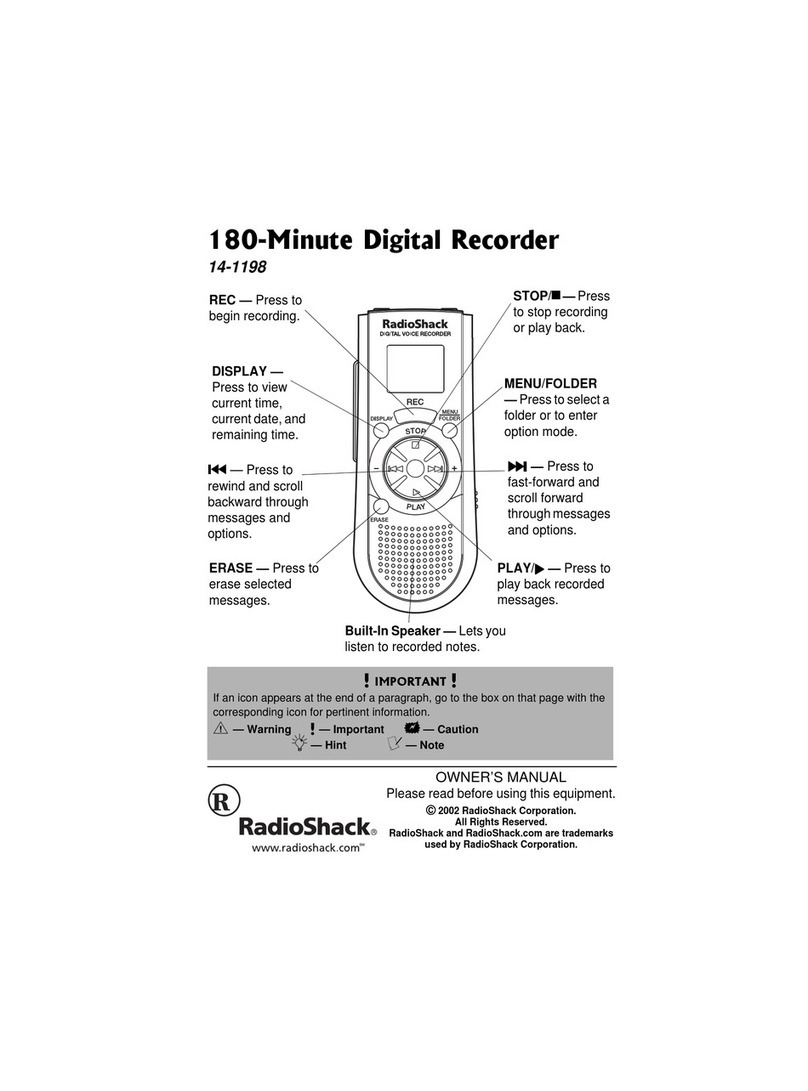
Radio Shack 180-minute digital recorder User manual

Radio Shack
Radio Shack 20-second digital Recording Pen User manual

Radio Shack
Radio Shack Modem I TRS-80 User manual

Radio Shack
Radio Shack 43-2208 User manual

Radio Shack
Radio Shack TRS-80 User manual

Radio Shack
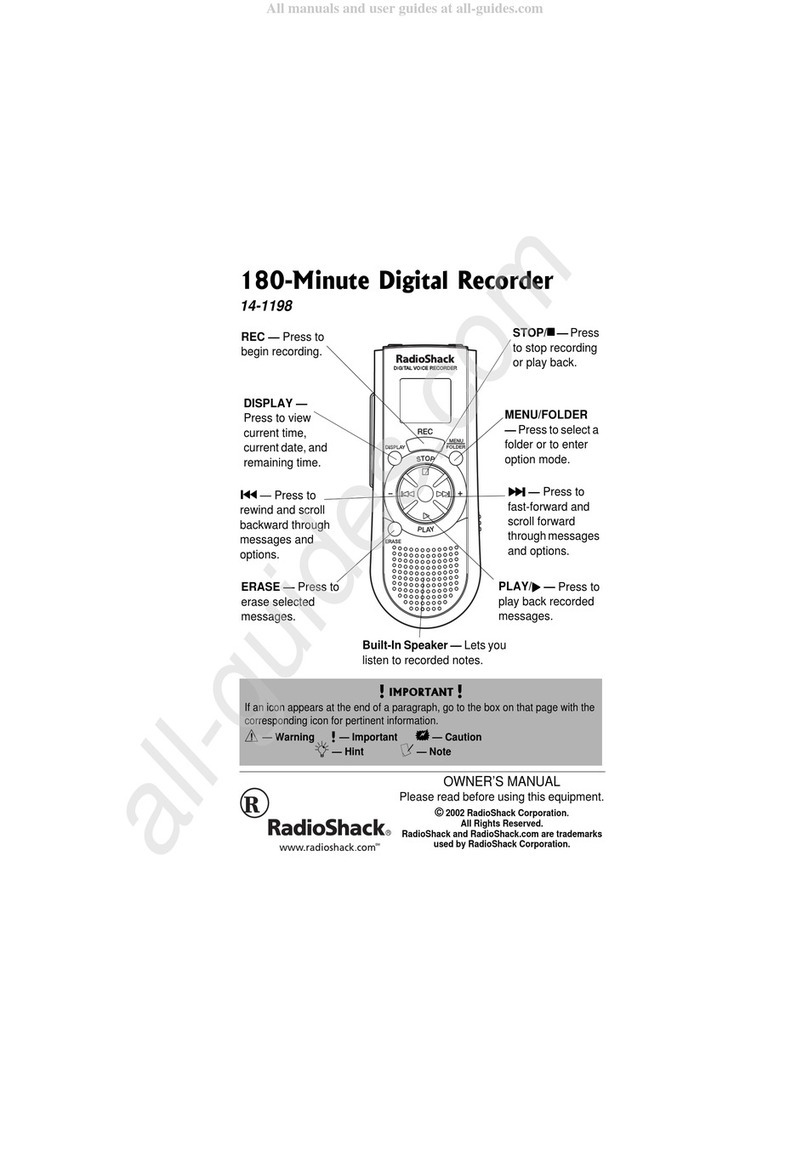
Radio Shack 14-1198 User manual