MV LINE LATERAL IRENE User manual

LATERAL IRENE
INSTALLATION INSTRUCTIONS
The installation of the flyscreen should be made by qualified personnel following the instructions listed below. Use screws or
anchors suitable for the type of wall on which the flyscreen will be installed. Make sure that the jambs are parallel and at right-
angle; in case of out of square walls make the necessary adjustments to ensure parallelism to the profiles of the flyscreen.
Fix the compen-
sating profile to
the wall
Fix the com-
pensating
profile.
Screw the grub screws
on the upper compensa-
ting profile to adjust the
possible irregularities of
the wall.
Insert the compensating profile in the
box first, then in the closure profile.
4
10
11 13
9
Fix one of the two head-caps
to the wall.
Please note: pictures
shown are simulating
inner room view.
1 3 Fix the other head-cap to the
wall.
6
7
Insert the clorure profile in
the compensating one.
Screw the
grub-screws on
the closure pro-
file to adjust
the possible
irregularities of
the wall.
Warning: drill the compensating profile ma-
king holes in line with the regulators located
onto telescopic profile.
Hook the box to the head-cap. Hook the other
head-cap to the box and apply into the window
recess.
2
Insert the top guide in the
latch-guide of the box: with
the help of the paper tab, be
sure that the latch for mesh
enters the cylindrical seat of
the slider.
Use the paper tab to enter it.
12
Insert the bottom guide in the latch-guide of the box:
with the help of the paper tab, be sure that the latch
for mesh enters the cylindrical seat of the slider. Insert
the closure profile. Insert the opposite side of the bot-
tom guide in the closure profile and block it with the
appropriate latch-guide.
8
Verify the proper operation. If the insect screen doesn’t
flow, please repeat the procedure to insert the guides.
ATTENTION! To open the insect screen, turn the handle in
the direction indicated by the arrow.
Let the handlebar flowing and return the handle to its po-
sition to lock it.
Insert the latches-guide in the
closure profile and fix them.
5
DOWN
UP
REGULATOR HOLE
compensating
profile
in the case in which closing is too
fast, turn the wrench towards the
«-» sign.
in the case in which the screen
door closes too slowly or does not
close completely, turn the wrench
towards the «+» sign.
-+
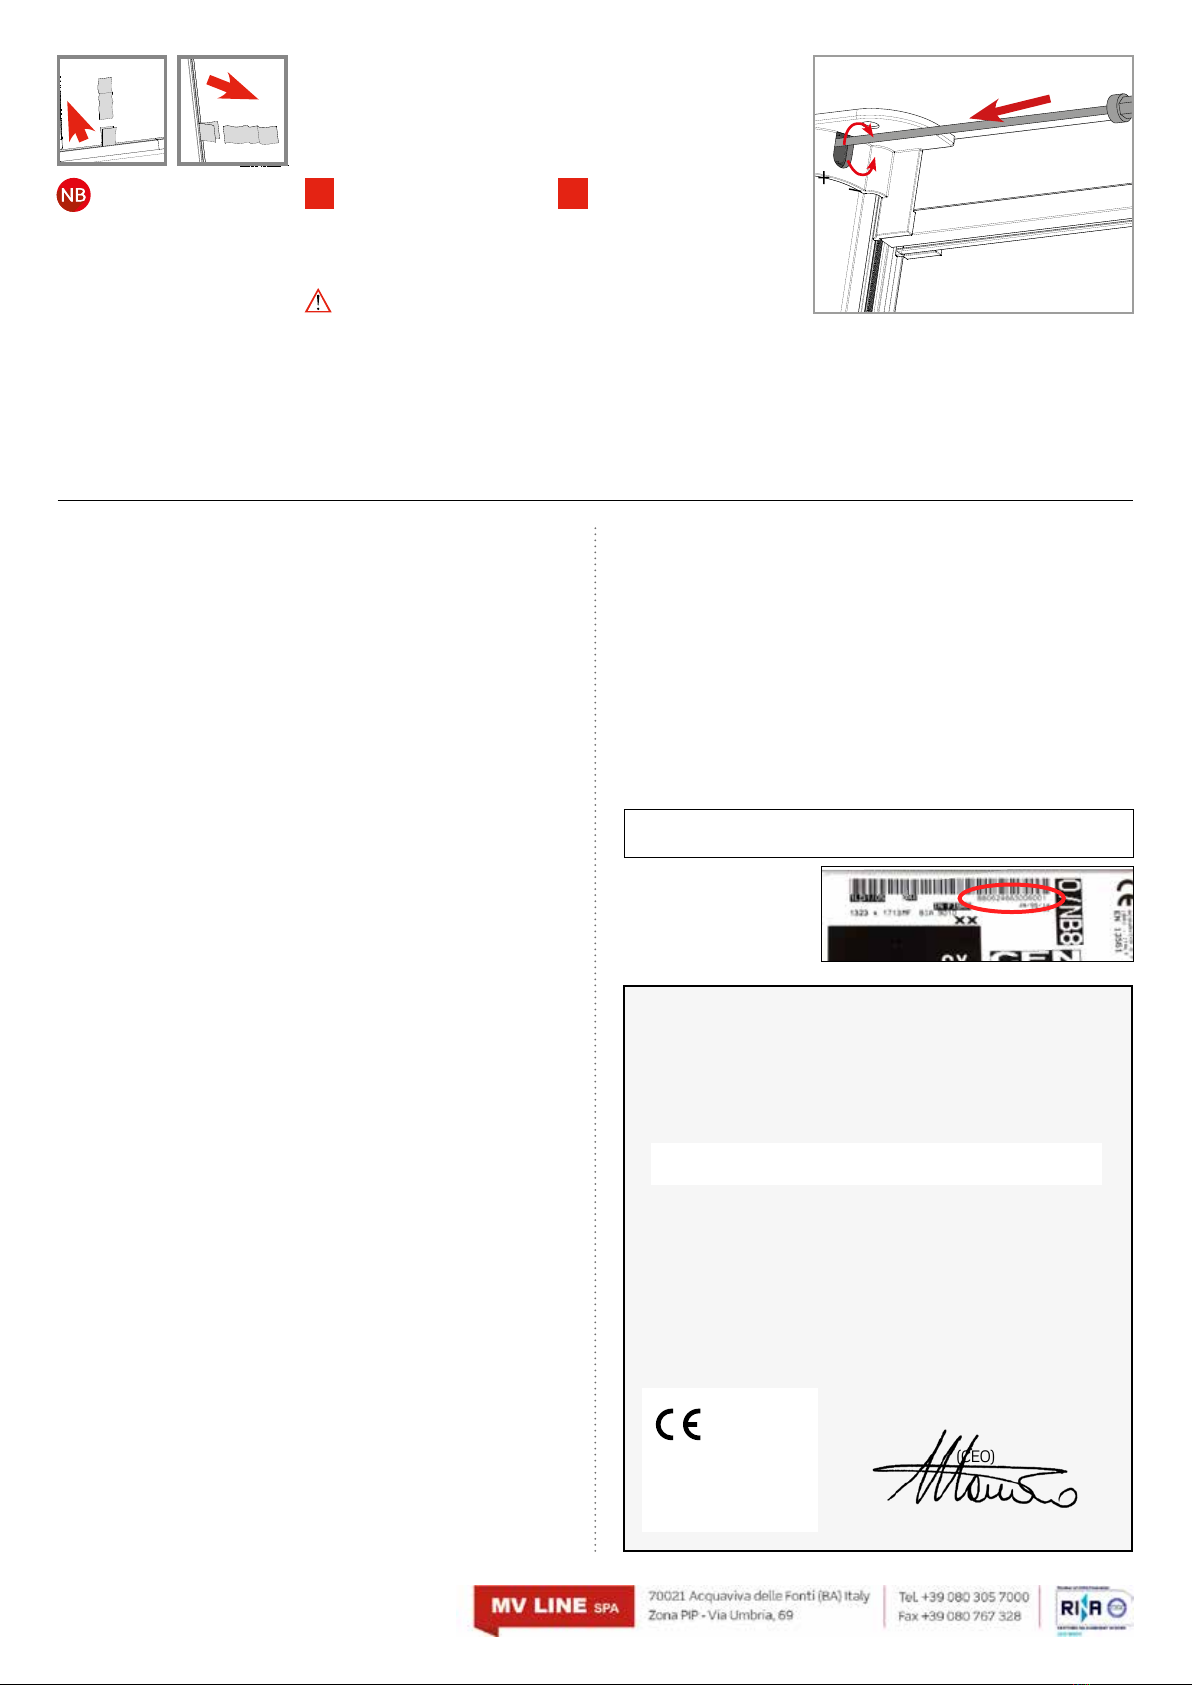
The sliding fluidity of the handle bar during automatic re-closing is adjusted at the factory itself,
by loading the traction spring to a predetermined number of revolutions.
After installing the insect screen, if the sliding stops before total closing, or in the case where
closing is too fast, it’s possible to setup spring tension manually, by adjusting the loading
strength using the wrench supplied as standard, inserted into the housing of the upper head
cover as shown in the picture:
While turning the wrench in the hole, it is recommended to perform a full fifteen rounds per
time and then gradually check the operation again.
In the case of using an electric screwer, please set a reduced speed.
PLEASE NOTE: The operation must be carried out only by technical personnel, qualified in
installing the product.
LOADING THE SPRING
Insert the wrench into the
hole to adjust the charging
of the spring.
This document is an integral part of the product and is intended for the ben-
efit of all persons using the screen (users + installation and maintenance
operators).
All the instructions listed in this document comply with the EU Machinery
Directive and provides for the correct use, installation and maintenance of
the screen, with the aim of avoiding damage to persons and to the product.
MV LINE would like to congratulate you on your purchase of this insect
screen.
This guide will help you appreciate the advantages of this screen
and assist you during the use, installation and maintenance phas-
es. The company reserves the right to implement partial or com-
plete modifications without prior notice and declines any responsibil-
ity in relation to any possible inaccurate or incomplete information.
This guide is the property of MV LINE.
Reproduction (even partial) of this document is expressly prohibited with-
out prior authorisation from MV LINE.
INTENDED USE
The insect screen is intended, as its name would suggest, to act as a protec-
tive screen against intrusive insects in the room or area where it has been
located. Any other use shall be considered improper. The manufacturer will
not be held responsible for damage arising from improper, erroneous and ir-
rational use.
PACKAGING, MOVEMENT AND TRANSPORT
• The screens are packaged in transparent bags, cardboard and polyethyl-
ene wrapping which protect the unit during transport.
• The screen can be moved by hand and does not require any special equip-
ment to facilitate movement.
• Please take every precaution to avoid any possible damage to the screen.
• After removing the packaging, check that the screen is in perfect condi-
tion and that there are no visibly damaged parts.
If in doubt, do not use the screen and contact the supplier.
ATTENTION!!!
Packaging materials must not be left within the reach of children.
USE
Avoid use (opening and closing of the screen) by children.
MAINTENANCE
Regularly clean the magnetic parts using a damp cloth.
• In the case of wear and tear, lubricate the bearings using a silicone spray.
• All extraordinary maintenance operations must be carried out by suitably
qualified personnel.
• Spare-parts are available from retailers or directly from MV LINE.
DISASSEMBLY AND DECOMMISSIONING
Before disassembling the screen, please consult the instructions manu-
al. The screen does not contain dangerous materials. There are no specific
guidelines for decommissioning or disposal.
GUARANTEE
Do not disassemble apparently malfunctioning parts or accessories on your
own initiative, please contact the retailer who shall organise technical sup-
port and spare-parts, failure to do so will aect the conditions of the guaran-
tee. The guarantee includes the complete or partial replacement of the unit
or parts in the case of functional issues arising from manufacturing defects
and is exempt from damage and deterioration caused by the customer.
In order to use the guarantee you must copy the INSECT SCREEN CODE as
displayed on the label attached to the screen housing into the white space
below (see fac-simile fig. 1) and attach the relevant proof of purchase (re-
ceipt or invoice).
This screen is guaranteed by MV LINE for a period of 24 months.
Code:
PRODUCT INFORMATION
USE • MAINTENANCE • GUARANTEE
Find and copy the code
displayed on the label
attached to the screen
housing as shown here.
Declaration of Performance
The undersigned MV LINE s.p.a.
Via Umbria - Lotto 69 70021 Acquaviva delle Fonti (BA), Italy
Hereby declares that the product:
Wind resistance: Class 4
Complies to the following EU directives (including all applica-
ble modifications):
Machinery Directive 89/392/CEE and Norm UNI EN 13561 Ap-
pendix ZA.1
Year of CE marking: 2014.
Acquaviva delle Fonti, 01.01.2014
Signature
Paolo Montanaro
(CEO)
LATERAL IRENE
EN 13561
06
MV LINE s.p.a.
Via Umbria - Lotto 69 70021
Acquaviva delle Fonti (BA), Italy
Product: FLYSCREEN
Class: 4
Tear o the paper tabs
only after making sure
that the insect screen is
properly flowing.
Other MV LINE Insect Control Equipment manuals


