My Child Lovely World User manual

Lovely World
Activity Centre
V1
Suitable for children who can sit up unaided, approximately
from 4 months. It is not intended for children who can walk by
themselves and weigh more than 11kg/25lbs.
INSTRUCTIONS: Read the instructions carefully before use and
keep them for future reference. The child may be hurt if you
do not follow these instructions.

page 2
Safety instructions
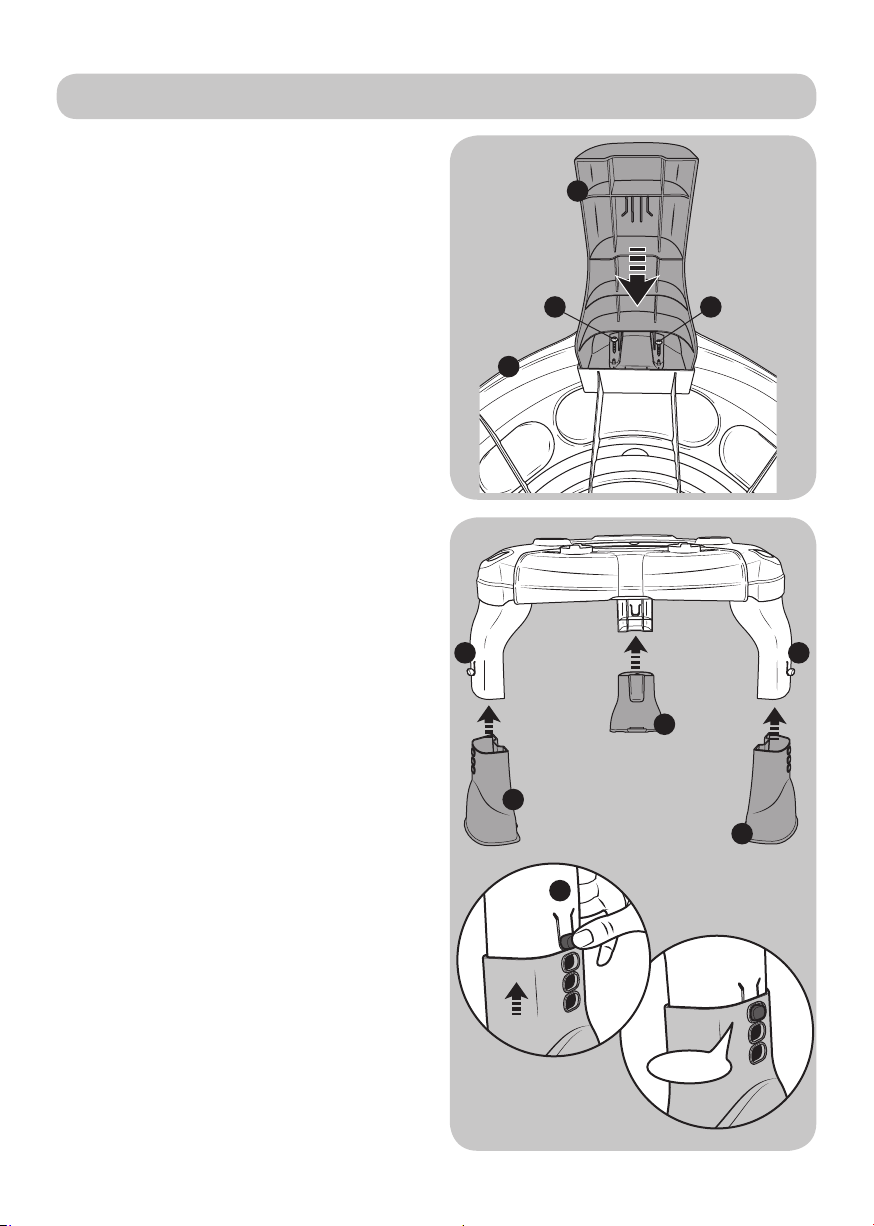
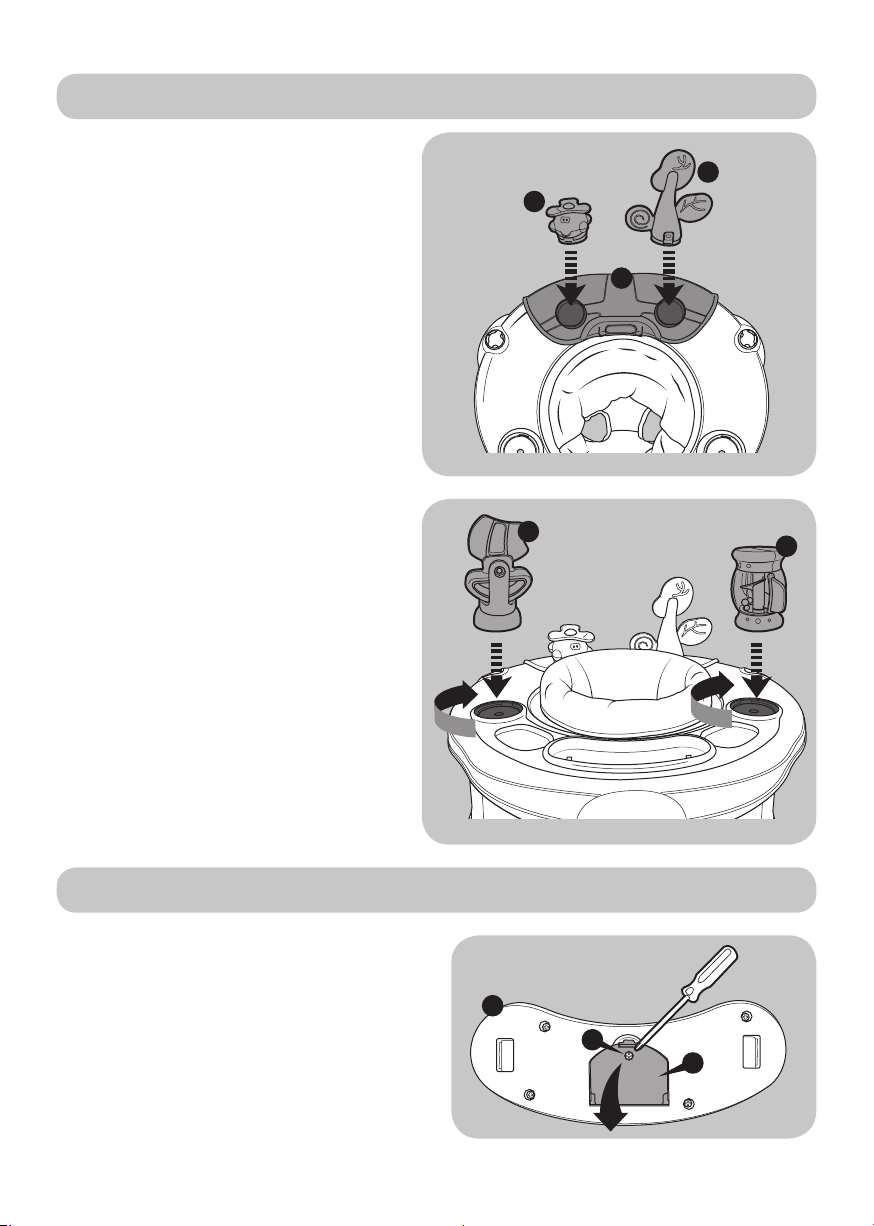
Warning: Adult assembly required.
Warning: Use the activity centre only if your child meets all of the following conditions:
• Your child is at least 4 months old.
• Your child can sit up unaided.
• Your child is less than 76.2cm (30 inch) tall.
• Your child weighs less than 11kg (25lbs).
Warning: DO NOT place children who can stand or walk on their own in the activity centre.
Warning: Do not use the activity centre in dangerous conditions or situations.
Warning: NEVER leave the child unattended in the activity centre. ALWAYS keep child in view
while child is in the product.
Warning: NEVER move the activity centre while the child is in the seat.
Warning: It can be dangerous to allow other children to play near the activity centre.
Warning: Strings can cause strangulation! DO NOT place items with string around child’s neck,
such as hood strings or dummy cords. DO NOT suspend string over the product or attach
strings to toys or place near curtain blinds cords or other hanging cords. Do not add any
strings or straps to any part of the activity centre.
Warning: DO NOT use any parts other than those supplied or recommended by the
manufacturer.
Warning: Only seat your child in the activity centre if the jump platform is attached.
Warning: DO NOT place the activity centre on an elevated surface or near steps or stairs. A
child’s movement can slide the activity centre.
Warning: To avoid the activity centre toppling over, place it on a at, level oor. Adjust legs to
same height so that the tray is level before placing child in the product.
Warning: For INDOOR use only.
Warning: Do not use the product if any of the toys, seat or structural parts are damaged.
Remove the child immediately if you nd any small loose parts or sharp/broken parts.
Important: Care should be taken in unpacking and assembly.
Important: Examine product frequently for damaged, missing, or loose parts.
Battery warnings
– batteries should always be changed by an adult;
– follow the assembly instructions carefully and always take care to insert your batteries
correctly, observing the plus and minus marks on the battery and appliance;
– non-rechargeable batteries are not to be recharged [never attempt to re-charge ordinary
(non-rechargeable) batteries];
– rechargeable batteries are only to be charged under adult supervision;
– rechargeable batteries are to be removed from the toy before being charged;
– different types of batteries or new and used batteries are not to be mixed;
– batteries are to be inserted with the correct polarity;
– exhausted batteries are to be removed from the toy;
– the supply terminals are not to be short-circuited;
– keep batteries out of reach of children;
– always remove batteries if you are not going to use the product for long periods (as batteries
may leak and cause damage);
– exhausted batteries should be removed from the product and disposed of in accordance
with the makers recommendations;
– never dispose of batteries in a re as this may cause them to explode;
– children can choke on batteries. If swallowed seek medical advise immediately.

page 3
Welcome
Battery disposal
Exhausted batteries should be removed from the product and taken to
a recycling facility. You can place batteries marked alkaline in normal
household waste, but these are better taken to a recycling facility.
Please follow these symbols on batteries, which contain harmful substances:
Pb = Battery contains Lead
Cd = Battery contains Cadmium
Hg = Battery contains Mercury
Batteries should not be considered
regular waste. Empty batteries
should be returned to a recycling
facility
Cd HgPb
Thank you for purchasing the MyChild Lovely World Activity Centre.
Please read the instructions and warnings carefully before use to ensure safe and
satisfactory operation of this product.
Your child’s safety is your responsibility. If you have a query with this product or require
replacement parts, please contact the MyChild Helpline on 0161 335 2508.
Lay out the parts on a soft level surface and compare to the part/xings checklist
below. Do not discard any packaging until you are sure that you have all the parts.
WARNING! Assembly by an adult. Keep away from children until fully assembled. Keep
children clear during assembly as pack contains small parts which may present a
choking hazard.
Your 3 year warranty
Whilst we make and test our products to the highest standards of durability there’s
always a small chance of a hiccup! Our promise is to repair, replace or refund a
MyChild product that has an identied manufacturing defect from the date of
purchase for a full 3 years thereafter at no extra cost.
However, you must register within 28 days of the date of purchase to receive the full 3
years guarantee!
To receive your full guarantee you can register your product by:
visiting https://mychild.co.uk/pages/warranty and complete the warranty form,
or by telephone on 0161 335 2508.

page 4
Parts List You will require one Phillips screwdriver (not supplied)
1
4
3
6
7
8
2
9
10
11 12 13 14 15 16
17 18 19
5
Contained in your carton are:
NoPart Qty
1 Legs 3
2 Feet 3
3 Screws 6
4 Activity Centre Top 1
5 Removable Toy Mount 1
6 Seat Ring 1
7 Seat Fabric 1
8 Flying Car Toy 1
9 Tree Teether 1
10 Candy Jar Toy 1
11 Boat Toy 1
12 Musical Play Tray 1
13 Sun Mirror 1
14 Cloud 1
15 Teethers 2
16 Toy Bar End Mounts 2
17 Toy Bar 1
18 Stool 1
19 Footplate 1

page 5
Attaching Legs and Feet
1
33
4
1. Place the Activity centre top (4) face-
down on the oor and insert the three
legs (1) into the their xing points. Secure
all legs using screws (3). Ensure all screws
are tightened correctly using a Phillips
screwdriver (not supplied).
2.Press in button (A) on the leg and
push the foot onto the leg ensuring the
button ‘clicks’ into place.
Repeat until all three legs are attached
and are at the same height.
2
2
2
A
click
A A

page 6
Assembling and attaching the jump platform
1. Ensure the stool (18) is folded down (see “Converting the stool” on page 11).
Attach the footplate (19) to the stool (18) and lock it in place
2. Place the jump platform under the
activity centre and attach the three
stool legs (i, ii, iii) to the feet of the
activity centre.
WARNING! Children MUST NOT be
seated in the activity centre unless the
jump platform is attached.
Unlocked Locked
19
18
i
ii
iii

page 7
WARNING! Children MUST NOT be seated in the activity centre unless the jump
platform is attached.
Seat assembly
1. Place the seat fabric (7) into the seat
unit (6).
2. Fold the seat fabric over the seat unit.
3. Hook the 8 webbing strips on the
underside of the seat fabric over the tabs
(B) on the seat unit.
4. Insert the assembled seat unit into the
seat tray, pressing it down until it ‘clicks’
into place.
5. Check the seat unit is able to rotate
fully 360 degrees in both direction.
6
B
7

page 8
Musical play tray assembly
Toys assembly
1. Using a Phillips screwdriver remove
screw (A) from battery compartment
on the underside of the musical play
tray (12).
Open the battery compartment (B).
WARNING: Assembly by an adult.
1. Insert the Flying car toy (8) and Tree
Teether (9) into the sockets located on
the removable toy mount (5).
Note: Toys (8) and (9) can be put in
either socket.
2. Insert the Candy jar toy (10) and
Boat toy (11) into the sockets located
on the activity centre top and turn the
toys clockwise to lock them in position.
Note: Toys (10) and (11) can be put in
either socket.
8
9
5
10
11
A
B
12

page 9
Musical toy assembly (continued)
3. Insert the musical toy (12) into the large
recess at the front of the activity centre.
4. With the musical play tray seated in the
recess, locate the white plastic tabs on
the underside of the large recess.
Push the two plastic tabs up and rotate
clockwise to lock the musical play tray in
place.
2. Insert 2 x 1.5V AA batteries (not
supplied) ensuring the correct
battery orientation is observed and
then reattach the cover, replacing
the screw and ensuring it is not over
tightened.
ATTENTION: Refer to ‘Battery warnings’
on page 2.
12

page 10
Toy bar assembly
1. Insert the end mount (16) marked “L” into the mounting hole on the left hand side of
the activity centre ensuring button (A) is facing outwards away from the activity centre
and that locator slot (B) matches up with the locator tab (C) on the activity centre.
Insert the end mount (16) marked “R” into the mounting hole on the right hand side of
the activity centre ensuring button (A) is facing outwards away from the activity centre
and that locator slot (B) matches up with the locator tab (C) on the activity centre.
2. Insert both ends of the toy bar (17)
into the two end mounts (16).
WARNING! NEVER use the toy bar
to lift or carry the activity centre.
IMPORTANT! Take care when attaching the Left and Right toy bar end mounts.
The Toy Bar will not work correctly if the end mounts are incorrectly attached.
front
back
left right
C C
B
A
16 16
B
A
click click
17
16 16

page 11
click
Converting the stool
Toy bar assembly (continued)
3. Attach the sun mirror (13) and
cloud (14) in your desired location on
the toy bar using the velcro tabs and
hook the teethers (15) through the
loops on the toy bar.
To convert from the jump board mode
to a stool:
1. Unlock and remove the jump
platform (19).
2. Pulll the stool legs outwards and rotate them
downwards.
3. Push all three legs upwards till
they “click” and lock into place.
13
14
15
UnlockedLocked
1919
clickclick
To convert from a stool to jump board mode: Reverse the above steps.

page 12
1. Remove the seat unit from the
activity centre by pressing the four
clips (A) on the underside of the seat
unit whilst lifting and rotating the seat
unit.
2. With the seat upside down;
i. Push the crotch part of the fabric with leg holes (B) down out of the way.
ii. Release ap (C) from it’s velcro tab.
iii. Fold ap (C) over to cover the leg holes and attach the ap to velcro tab.
iv. Push the seat fabric down through the ring to form a basket.
3. Attach the basket into the
activity centre from below ensuring
all four clips “click” into position.
Converting the seat into a storage basket
i ii iii iv
B
C
C
A
click click
click
click

page 13
Converting activity centre to a play table
1. Remove all the plastic toys from the
activity centre top.
Unclip the ying car toy (8), tree
teether (9) and remove.
Turn the boat toy (11) and candy jar
toy (10) anti-clockwise to unlock them
and remove.
Release the plastic tabs on the
underside of the activity centre holding
the musical play tray (12) in place and
remove.
2. Fold the toy bar down by pressing
and holding in both buttons (A) and
at the same time rotate the toy bar
downwards.
Note: The toys on the toy bar can be
left in place or removed if you wish.
10
11 89
12
AA
3. Remove the seat unit from the seat
tray by pressing the four clips (A) on
the underside of the seat unit whilst
lifting and rotating the seat unit.
A

page 14
Converting activity centre to a play table (continued)
6. Finally place the footplate (19) into the
centre of the activity centre to form the
table top.
4. Squeeze the release clip on the
top of the removable toy mount
and pull the mount up by approx
1cm.
5. Squeeze the release clip on the
underside of the removable toy
mount and remove the toy mount.
If the toy mount will not remove
check that the rst clip is fully
released.
19

page 15
Care and maintenance
• To prolong the life of your nursery product keep it clean and do not leave it in direct sunlight
for extended periods of time.
• Plastic parts can be wiped clean with a damp cloth and mild soap then allowed to air dry.
• DO NOT immerse plastic parts in water.
• Clean toys before use. NOT dishwasher safe.
• Removable fabric covers and trims may be machine washed in cold water on a delicate
cycle. Use a low heat for tumble drying.
• Do not dry clean, or use bleach.
• Non removable fabric covers and trims may be cleaned using a damp sponge with soap or
mild detergent. Allow it to dry completely before folding or storing it away.
• In some climates the covers and trims may be affected by mould and mildew. To help
prevent this occurring, do not fold or store the product if it is damp or wet. Always store the
product in a well ventilated area.
• Always check parts regularly for tightness of screws, nuts and other fasteners - tighten if
required. To maintain the safety of your nursery product, seek prompt repairs for bent, torn,
worn or broken parts.
• Regularly clean parts that have been mouthed by your child.
Height adjustment
1. Press in the button on each leg and
raise or lower the leg until it clicks into
place.
Note: Ensure all legs are set at the same
height before using.
WARNING: DO NOT adjust the height whilst
a child is seated in the activity centre.
A. Activity centre at correct height.
B. Activity centre too high (child is on tip-toes).
C. Activity centre too low (child has bent knees).
WARNING: If your child is too small or too big to stand with their legs straight and feet
at on the jump platform, then this product is no longer suitable for your child and your
child should not use it. If your child is not standing correctly then this could lead to
posture problems/discomfort or create a potential tipping hazard.
A B C
Table of contents
Other My Child Stroller manuals