Myryad MXV4000 User manual

1
MXV4000
Remote Controlled
DVD / SACD Player
Owner’s Manual

page 2 of 28
CONTENTS
INTRODUCTION................................................................................................................................................................. 2
ACCESSORIES .................................................................................................................................................................. 2
INSTALLATION AND SAFETY ........................................................................................................................................... 3
DVD REGION CODE ..........................................................................................................................................................3
PATENT INFORMATION .................................................................................................................................................... 3
SETTING UP YOUR SYSTEM............................................................................................................................................ 4
REAR PANEL CONNECTIONS .......................................................................................................................................... 4
Power ............................................................................................................................................................................. 4
Video Outputs................................................................................................................................................................. 4
Audio Outputs................................................................................................................................................................. 5
Control inputs/outputs etc............................................................................................................................................... 6
OPERATING YOUR SYSTEM ............................................................................................................................................ 7
FRONT PANEL CONTROLS .............................................................................................................................................. 7
SYSTEM OPERATION WITH SMART MY-LINK ................................................................................................................ 8
REMOTE CONTROL OPERATION .................................................................................................................................... 9
1.
ESSENTIAL SETUP ........................................................................................................................................... 10
3.
PLAYING A CD................................................................................................................................................... 15
4.
PLAYING AN SACD ........................................................................................................................................... 15
5.
PLAYING AN MP3/WMA/ DivX/XviD/JPEG (PICTURE CD)............................................................................... 16
6.
SETUP MENUS .................................................................................................................................................. 17
USE OF MX-700 REMOTE (as supplied with MXD4000/7000 etc.).................................................................................. 22
CARE AND HANDLING OF DISCS .................................................................................................................................. 22
TROUBLE-SHOOTING ..................................................................................................................................................... 23
APPENDIX 1 Table of Alternative Languages............................................................................................................. 24
APPENDIX 2 Glossary................................................................................................................................................ 26
SPECIFICATIONS ............................................................................................................................................................ 27
TECHNICAL DATA ........................................................................................................................................................... 27
INTRODUCTION
The Myryad MXV4000 DVD Player has been designed
to offer a combination of high quality sound and video
reproduction together with elegant styling in keeping with
other Myryad MX products. It is a full-function remote-
controlled DVD player that will play a wide variety of
silver disc types. Playback formats accepted include:
DVD-Video, VCD, SVCD, DVD-R/-RW, DVD+R/+RW,
CD, CD-R, CD-RW, HDCD, MP3, WMA, SACD multi-
channel, SACD stereo, JPEG (picture CD), JPEG with
MP3, Xvid and DivX.
The MXV4000 has composite, s-video and component
analogue video outputs, plus an HDMI digital video
output with upscaling available to 720p or 1080i formats
using a Faroudja DCDi de-interlacer/upscaler. It has
fixed-level low-impedance audio outputs – both 5.1
channel and a separate stereo downmix which is always
present and can be used to feed sound to a second
room/zone if desired. The composite and s-video outputs
are also permanently present so they too can be used
for a second room/zone. Built-in Dolby Digital and DTS
decoding is provided, together with Dolby Pro Logic II
and Virtual Surround options.
The MXV4000 has coaxial and optical digital audio
outputs to feed a surround processor or receiver. In
addition it has a Smart My-Link® control input and output
and an RS232 control port.
The MXV4000 offers a range of expansion possibilities:
• The Smart My-Link® input can be connected to a
Myryad surround preamp-processor or integrated
amplifier or so that the MXV4000 will automatically
be switched on or off when the amplifier is switched
on or off.
• The Smart My-Link® input/output can be coupled to
other Myryad products that can then be remote-
controlled via the MXV4000 's infra-red receiver - or
vice-versa.
• The MXV4000 can be controlled from a remote
room via its Smart My-Link® input.
• When linked via the Smart My-Link® to a
compatible Myryad surround preamp-processor or
integrated amplifier a number of extra features
become available which make the system as a
whole easier and quicker to operate.
• The RS232 port can be used for control of the
MXV4000 in a home automation system.
ACCESSORIES
Your MXV4000 is supplied complete with the following
accessories:
•Separate mains power cord to suit country of sale.
•My-Link interconnect (0.5m RCA-RCA)
•Myryad MSR2 System Remote Control handset.
•Two AAA batteries for handset (not in some
countries)
•Myryad MSR2 System Remote Control Owner’s
Manual

page 3 of 28
INSTALLATION AND SAFETY
This DVD player generates very little heat but still
requires some ventilation. Do not place it on a rug or
other soft surface into which it could sink, obstructing the
air inlets in its underside. Do not allow any obstruction to
block the ventilation slots in the rear panel. The DVD
player should not be installed in a built-in situation such
as a bookcase or rack unless proper ventilation is
provided.
CAUTION: THIS APPARATUS MUST NOT BE
EXPOSED TO DRIPPING OR SPLASHING. OBJECTS
FILLED WITH LIQUIDS SUCH AS VASES MUST NOT
BE PLACED ON THE APPARATUS.
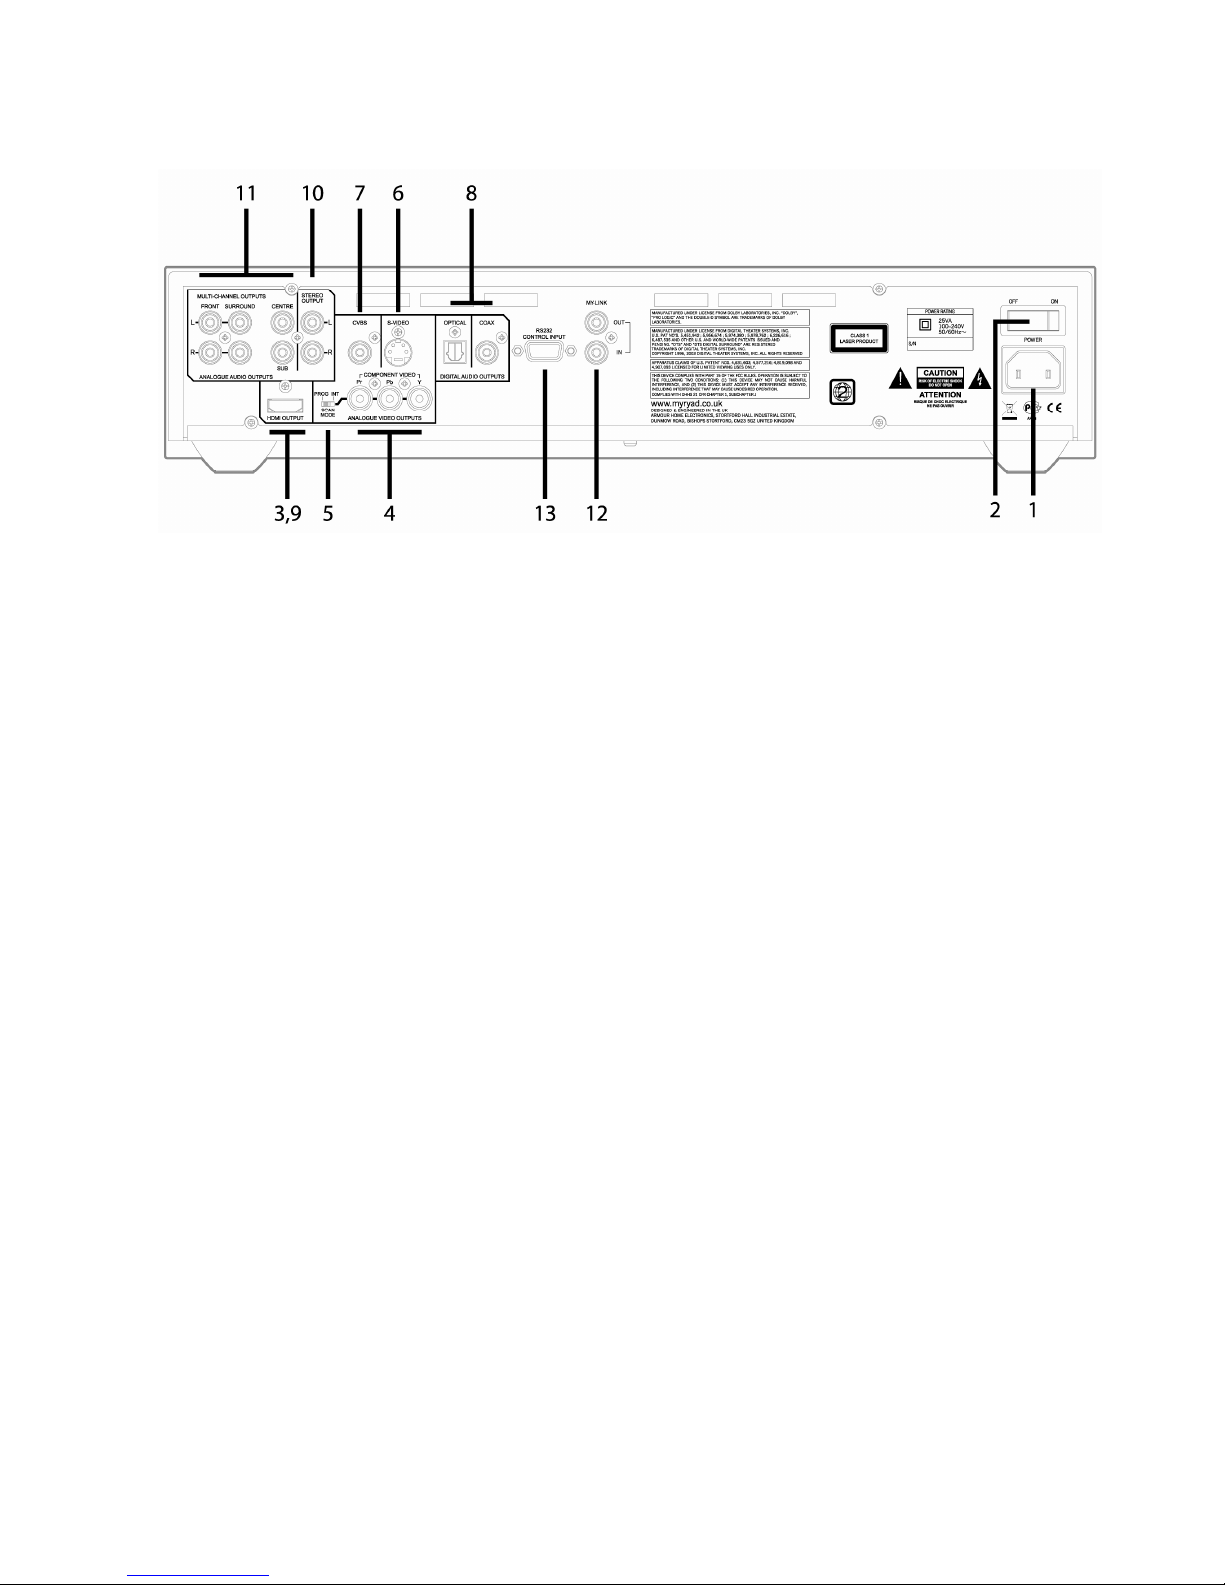
THE REAR PANEL POWER SWITCH DISCONNECTS
MAINS LIVE ONLY. THE POWER CORD MUST BE
DISCONNECTED FROM THE REAR OF THE
APPARATUS, OR THE WALL SOCKET, TO PROVIDE
TOTAL ISOLATION. ONE OR OTHER OF THESE
CONNECTIONS MUST BE READILY ACCESSIBLE
WHEN THE APPARATUS IS IN USE.
Do not remove the cover, or attempt to modify or repair
the DVD player yourself. Refer all servicing to a qualified
technician. The DVD laser radiation is Infra-Red, so you
cannot see it. If the cover is removed for any reason, you
MUST pay attention to the following warning.
CAUTION - INVISIBLE LASER RADIATION WHEN
OPEN. DO NOT STARE INTO BEAM OR VIEW
DIRECTLY WITH OPTICAL INSTRUMENTS.
ATTENTION - RADIATION INVISIBLE DU LASER
QUAND OUVERT. NE PAS REGARDER FIXEMENT LE
RAYON OU DIRECTEMENT AVEC DES
INSTRUMENTS D’OPTIQUE.
WARNUNG - UNSICHTBARE LASERSTRAHLEN IN
GEÖFFNETEM ZUSTAND VORHANDEN. NICHT IN
DEN STRAHL BLICKEN ODER DIREKT MIT
OPTIKINSTRUMENTEN ANSEHEN.
ADVARSEL - USYNLIG LASERSTRÅLING VED
ÅBNING. SE IKKE IND I STRÅLEN - HELLER IKKE
OPTISKE INSTRUMENTER.
ADVARSEL - USYNLIG LASERSTRÅLING NÅR
DEKSEL ÅPNES. STIRR IKKE INN I STRÅLEN ELLER
SE DIREKTE MED OPTISKE INSTRUMENTER.
VARNING - OSYNLIG LASERSTRÅLNING NÄR
DENNA DEL ÄR ÖPPNAD. STIRRA EJ IN I STRÅLEN
OCH BETRAKTA EJ STRÅLEN MED OPTISKA
INSTRUMENT.
VAROI AVATAESSA OLET ALTTIINA NÄKYMÄTÖNTÄ
LASERSÄTEILYLLE. ÄLÄ TUIJOTA SÄTEESEEN
ÄLÄKÄ KATSO SITÄ OPTISEN LAITTEEN LÄPI.
This product complies with DHHS 21 CFR Chapter 1,
Subchapter J.
DVD REGION CODE
DVD discs and players are manufactured under the
worldwide agreed DVD Regional Code System. This
player will operate only with a corresponding disc of the
same Region Code as that marked on the rear panel
Region
code Region
1 USA, Canada
2 Europe (incl. Poland, Romania, The Czech
Republic), Japan, Middle East (incl. Saudi
Arabia, Egypt, Iran), South Africa
3 East Asia (incl. Hong Kong, Taiwan,
South Korea), South-East Asia
4 Australia, Caribbean, Central & South
America, Mexico, New Zealand
5 Africa, Former Soviet Union, India, Pakistan,
Turkmenistan, North Korea
6 China
PATENT INFORMATION
Manufactured under license from Dolby Laboratories. “Dolby”,
“Pro Logic” and the double-D symbol are trademarks of Dolby
Laboratories.
Manufactured under license under U.S. Patent #’s: 5,451,942;
5,956,674; 5,974,380; 5,978,762; 6,487,535 & other U.S. and
worldwide patents issued & pending. DTS and DTS Digital
Surround are registered trademarks and the DTS logos and
Symbol are trademarks of DTS, Inc. © 1996-2007 DTS, Inc. All
Rights Reserved.
“DivX”, “DivX Certified”, and associated logos are trademarks
of DivXNetworks, Inc and are used under license.
“DCDi” is a trademark of Faroudja, a division of Genesis
Microchip, Inc.
HDMI, the HDMI logo and High Definition Multimedia Interface
are trademarks or registered trademark of HDMI Licensing LLC.
This product incorporates copyright protection technology that is
protected by method claims of certain U.S. patents and other
intellectual property rights owned by Macrovision Corporation
and other rights owners. Use of this copyright protection
technology must be authorized by Macrovision Corporation, and
is intended for home and other limited viewing uses only unless
otherwise authorized by Macrovision Corporation. Reverse
engineering or disassembly is prohibited.

page 4 of 28
SETTING UP YOUR SYSTEM
REAR PANEL CONNECTIONS
Power
1. Power Inlet
The MXV4000 will operate directly from any line voltage
from 100V to 240V AC, 50 or 60Hz without adjustment.
Plug the female (socket) end of the power cord into the
power inlet on the rear of the unit. Plug the male (plug)
end of the cord into a "live" wall socket or a suitable
heavy-duty extension cable.
2. Power Switch
Press one side of this rocker switch (the side nearer the
edge of the rear panel) to switch the MXV4000 ON and
the other side (towards the output sockets) to switch it
OFF. When the POWER switch is in the OFF position all
power is disconnected from the MXV4000. In this
condition the MXV4000 cannot be powered up from the
front panel or the remote control. When the POWER
switch is in the ON position (and the power cord
correctly inserted and plugged in to a live wall socket)
the unit will power up in standby mode (see FRONT
PANEL CONTROLS, STANDBY, page 7).
It is recommended that the POWER switch is turned
OFF if the MXV4000 is not going to be used for an
extended period of time.
Video Outputs
Make the video connection between the MXV4000 and
your TV first - either direct as described below or via the
video inputs on your surround processor (or AV
receiver). A video connection is required to view the
MXV4000’s setup menu on your TV.
The MXV4000 includes four different types of video
outputs. Choose the best quality video output for which
your TV has a matching input.
- HDMI provides the best picture quality. Only High
Definition or “HD ready” TVs include an HDMI input.
- Component video is the next best and consists of three
separate cables.
- S-video is next, but it’s a big step down in picture
quality from component video.
- Composite video is the lowest quality but is the most
common type of connection, can easily be routed to a
second room, and it is recommended for use during
setup.
Apart from when setting up, connect only one of the
video outputs for your primary viewing area, or “main
zone”. The composite video and s-video outputs are
always active so one of these may be used for a second
TV or second zone.
3. HDMI
(see page 20 for HDMI video setup)
Connect the HDMI output connector of the MXV4000 to
the HDMI input connector on your TV (or to a DVI input
using an adaptor) using a high quality HDMI-certified
cable. If your TV does not have an HDMI or DVI
connector you should skip to “Component video” below.
Note: If connecting to a DVI input, it must support
HDCP (High-bandwidth Digital Content Protection),
otherwise it will not be compatible with the MXV4000.
Some earlier model TVs with DVI inputs are not HDCP-
compliant. DVI inputs carry digital video only – the audio
must be connected separately.
4. COMPONENT VIDEO outputs
The three component video jacks are identified with
green, red and blue inserts for Y, Pr and Pb respectively.
Use a high-quality component video cable of 75 ohm
impedance. The cable’s plugs will usually be colour-
coded to match the coding on the MXV4000 and your
TV.
Note: The component video output is automatically
switched off when HDMI video signals are being output.

page 5 of 28
5. SCAN MODE selector switch (Interlaced
/ Progressive)
This switch selects between Interlaced (INT) and
Progressive (PROG) Scan for the component video
outputs only.
Select PROG if your TV accepts progressive scan video.
The PROG SCAN icon on the VF display will illuminate
when progressive scan is set. The states of the various
analogue video outputs will be as summarized in the
table below.
Output Format
(Progressive scan mode)
Disc
Format
TV Type
setting Component
S-video/CVBS
NTSC PAL 576p 480i
NTSC 480p 480i
MULTI 480p 480i
PAL PAL 576p 576i
NTSC 480p 576i
MULTI 576p 576i
Notes:
* Some TVs and projectors are not compatible with
progressive scan. If you notice picture distortion
when outputting the progressive signals, switch the
SCAN MODE selector to INT.
* The SCAN MODE switch only affects the
component video outputs, not the HDMI output.
* When SCAN MODE is set to progressive the
s-video and composite video outputs still deliver their
normal interlaced outputs (suitable for sending to a
second TV set), but they will not be affected by the
“TV Type” setting in the Video Setup menu – see
pages 11 and 19.
6. S-VIDEO
The s-video (separated video) connector carries the
colour information separately from the black-and-white
(luminance). It should be connected via a suitable 75
ohm s-video interconnect to the s-video input of an A/V
preamplifier or amplifier – or direct to the s-video input of
a TV.
7. Composite video (CVBS)
This output (also called CVBS) carries the composite
video signal and should be connected via a suitable 75
ohm video interconnect to the composite video input of
an A/V preamplifier or amplifier – or direct to the
composite video input of a TV (sometimes simply called
the VIDEO input).
Note: The composite video and s-video outputs are
active under all conditions – whatever the
interlaced/progressive switch setting and irrespective of
the HDMI output. Either may therefore conveniently be
used to feed a second TV or, a second zone (via the
MXD4000 processor for example).
Audio Outputs
8. DIGITAL - COAX and OPTICAL
Connect either the Digital COAX jack or the OPTICAL
connector (Toslink) to one of the coaxial or optical inputs
on your surround processor or receiver. When using the
coaxial output, make sure to use a digital cable that is
made for this purpose and is of 75 ohms impedance.
Toslink cables are fragile; be very careful not to bend the
fibre optic cable sharply.
Note: The coaxial and optical digital outputs do not carry
SACD digital audio signals – whether from stereo or
multi-channel discs. To play SACDs you must also
connect the 5.1 channel or stereo analogue audio output
jacks.
9. HDMI
The HDMI digital video output also carries digital audio.
Some surround processors and receivers can decode
the audio in the HDMI signal and therefore no other
audio connection is necessary for main zone audio.
When using a surround processor or receiver which
does not have an HDMI input or does not decode HDMI
audio, always connect the Digital Coaxial or Optical
outputs and/or the 5.1 channel analog audio outputs.
Notes:
* The MXV4000 supports HDMI 1.1 which does not
include playback of SACD audio over HDMI.
* HDMI audio can be switched off via the setup
menu – see page 19.
* When HDMI audio is switched On and audio
signals are being set to an HDMI compatible
component (e.g. a TV), the coax and optical digital
audio outputs will be muted.
* The HDMI interface can add significant jitter to
audio signals. For the best audio quality it is often
considered best to carry the audio over a separate
digital cable – coax or optical.
10. STEREO ANALOGUE OUTPUT
The stereo output always carries a down-mixed version
of a multi-channel audio sound track – or a direct stereo
output of any 2-channel sound track (e.g. from a CD).
This output may be used for a stereo main room, or it
can be used to feed audio to a second room or zone.
11. MULTI-CHANNEL ANALOGUE
OUTPUTS
Connect these jacks to the corresponding multi-channel
input jacks of a surround processor or AV receiver.
If you want to reproduce high resolution multi-channel
SACD recordings you must connect these outputs –
there will be no signal on the HDMI or Digital Coaxial or
Optical outputs. If you do not plan on listening to SACD
discs, and your processor or receiver has a digital input
and can decode Dolby Digital and DTS sound tracks,
then you do not need to use these jacks.
It is a special feature of the MXV4000 that both the
Stereo and Multi-channel analogue outputs use high
quality DACs and identical audio circuitry, so the sound
quality will be the same across all the audio outputs.

page 6 of 28
Control inputs/outputs etc.
12. MY-LINK input/output
When this DVD player is used in a system with other
Myryad MX-Series products (or Z-Series), all may be
joined together via My-Link. My-Link is a
communications bus that allows all the linked
components to operate together as a system and
distributes the remote commands received by any one to
each of the others.
The simplest function provided by the My-Link bus is that
all linked units will switch into or out of standby mode
when the processor or amplifier’s front panel or remote
control standby key is pressed.
The My-Link bus allows any linked product to be remote-
controlled via the MXV4000’s infra-red receiver - or vice-
versa.
The MXV4000 (or any other product on the My-Link bus)
can be controlled from a remote room via a suitable
interface to the My-Link bus.
Use a short RCA-to-RCA (phono-to-phono) interconnect
cable to connect from the MY-LINK IN socket on the
MXV4000 to the MY-LINK OUT socket on the processor
or amplifier. A second cable may then be run from the
MY-LINK OUT socket on MXV4000 to the MY-LINK IN
socket on, for example, a Myryad tuner – “daisy-chain”
fashion. Further compatible Myryad products can be
linked in the same way, running from the MY-LINK OUT
socket on the tuner. Inexpensive interconnects may be
used as the My-Link bus carries only control signals, not
audio, as these cables have no effect on sound quality.
The MXV4000 is Smart My-Link® compatible. When it is
linked to a Myryad Smart My-Link® Processor,
Preamplifier or Integrated Amplifier many more powerful
system features are available (see page 8).
13. RS232 CONTROL input
The MXV4000 can be connected to a home automation
system through this interface. Contact your Myryad
dealer or Armour Home Electronics Ltd. for details or
visit the Myryad website at www.myryad.co.uk.

page 7 of 28
OPERATING YOUR SYSTEM
FRONT PANEL CONTROLS
1. Standby
When the MXV4000 is plugged into a live wall socket
and the POWER switch is turned ON, it will power up in
"standby" mode and the LED (Light Emitting Diode) in
the display will glow red. In this mode most of the
internal circuitry of the MXV4000 is switched off so that it
consumes very little power. Only the IR receiver, My-
Link and RS232 interface function in standby.
Touch the STANDBY ellipse to turn on the MXV4000
and, after a few seconds delay, the audio and video
outputs will be enabled. During this delay period the LED
in the display will flash blue. When the outputs are un-
muted it will glow blue continuously. The blue-coloured
display will illuminate, briefly showing “MXV4000”
followed by “READ”, and then “NO DISC“.
Touch the STANDBY ellipse again - for longer than 2
seconds - to return to standby mode. The drawer, if
open, will close, the LED in the display will glow red
again and the VF display will be extinguished.
CAUTION: WHEN IN STANDBY MODE SOME
INTERNAL CIRCUITRY OF THE MXV4000 IS STILL
LIVE, SO ALL SAFETY PRECAUTIONS MUST BE
FOLLOWED.
2. Infra-red receiver
The infra-red (IR) remote control receiver is mounted
behind the window, just above the left hand end of the
VF display. It must not be obscured when the DVD
player is to be operated using the remote control
handset. The IR receiver should be in "line-of-sight" of
the remote handset.
3. Display
The operation of the player is indicated on a high quality
blue Vacuum Fluorescent Display (VFD) - see below.
4. Disc drawer
The OPEN/CLOSE button controls the drawer. The
drawer will close automatically if left open for two
minutes or more. It will accept either normal 120mm
discs, or small 80mm discs.
5. OPEN/CLOSE
Press this button to open or close the disc drawer. When
the drawer is open the display will read “OPEN”. When
the drawer is closed the display will indicate “CLOSE”
followed by “READ” and then “NO DISC“. The tray will
close automatically if left open for two minutes.
When a disc is inserted and the drawer closed the
display will indicate “READ” briefly and then the disc will
play automatically. The display will briefly indicate the
disc type and default “Sound Mode” (see page 13)
before showing the disc play status. The read process
takes a few seconds while the player assesses what
type of disc has been inserted.
Pressing OPEN/CLOSE cancels SHUFFLE and
REPEAT modes.
6. PLAY/PAUSE
When a disc is present and the player is in STOP mode,
a single press of the PLAY/PAUSE key will start the disc
playing from the first track, and illuminate the symbol
in the VF display. When the disc is playing, pressing
PLAY/PAUSE will put the player in PAUSE mode and
illuminate “
” symbol and the VF display will read
“PAUSE”. When playing a DVD the TV will show a still
frame. In PAUSE mode the disc is still spinning and the
laser head is kept at the same location, so that if
PLAY/PAUSE is pressed yet again the disc will re-start
from exactly the same point in the movie/music at which
it was originally paused.

page 8 of 28
7. STOP
When the STOP button is pressed the disc stops
playing, and the player goes into “Resume Stop” mode –
with the TV displaying “PRESS PLAY KEY TO
CONTINUE” and the VF display reading “STOP”. If
PLAY/PAUSE or PLAY is pressed in Resume Stop
mode the disc will start playing from the same point at
which STOP was pressed.
A second press of STOP will put the player into STOP
mode. After a short time the disc will stop spinning and
the laser head will be returned to the beginning of the
disc. In stop mode the display continues to read “STOP”.
When the player is in “stop” mode, a single press of the
PLAY/PAUSE button will start the disc playing from the
beginning. The player automatically returns to STOP
mode when a disc has finished playing.
There is no Resume Stop mode when playing CDs.
When STOP is pressed the VF display immediately
changes to read the Table of Contents – the total
number of tracks and total playing time of the disc
If the player is left in Stop, Resume Stop, or Pause mode
for more than about 30 minutes, it will automatically
switch to standby to save power.
8. VIDEO OFF
Pressing the VIDEO OFF button when a CD is loaded
and playing will switch off all the analogue video outputs
to provide the best possible audio quality. The VIDEO
OFF icon in the VF display will be illuminated. A second
press will restore the video outputs. The HDMI output is
not affected.
VIDEO OFF only functions with CDs – and can only be
changed when a disc is actually playing. The video state
will be remembered when changing CDs (although the
video output switches on temporarily whilst the drawer is
open), but the video outputs will automatically switch
back on permanently when a DVD or other video disc is
loaded, or when the unit is switched on from Standby.
9. SKIP/SCAN
The SKIP/SCAN keys are used to select the chapter or
track, or section within a chapter/track, to be played. A
brief press of one of these keys invokes the SKIP
function. Pressing the key and holding it down
continuously invokes the SCAN function.
While a disc is playing, pressing SKIP/SCAN briefly
will cause the player to skip to the beginning of the next
chapter or track. If SKIP/SCAN is pressed once, the
player will skip to the beginning of the current
chapter/track. If SKIP/SCAN is pressed twice in quick
succession the player will skip to the beginning of the
previous chapter/track. Repeated pressing of
SKIP/SCAN or will make the player skip forward or
back over any number of chapters/tracks. The SKIP
keys have the same function in PAUSE mode, but
automatically return the player to PLAY mode.
Press and hold SKIP/SCAN or until “SCAN“ is
displayed on the VF display (and “x2” on the TV) and
then release to enter fast reverse/forward play at twice
normal speed. Further shorter presses of the same key
will then increase the scan speed to x4, x8, x16 and x32.
One further press will return to normal speed forward
play. Pressing PLAY/PAUSE at any time during high
speed scan will return to normal speed forward play.
SYSTEM OPERATION WITH
SMART MY-LINK
When used as a linked system (which must include a
Smart My-Link® equipped Preamplifier Processor,
Stereo Preamp or Integrated Amplifier) Myryad products
equipped with Smart My-Link® have a number of extra
features that make the system as a whole easier and
quicker to use than a normal hi-fi. These include:
Start-on-Play (DVD)
Press play on the DVD player (or the remote control)
and both the DVD player and amplifier will switch out of
standby (if necessary) and play the DVD. The amplifier
will automatically select the DVD source.
Start-on-Open (DVD)
Press open/close on the DVD player (or the remote
control) and both the DVD player and amplifier will
switch out of standby and the DVD drawer will open. The
amplifier will automatically select the DVD source.
Intelligent Input Selection (Amplifier)
Press a source select button on the remote control and
the system will awaken (if in standby) only the amplifier
and the selected source.
Mute/Pause Control (Amplifier/DVD)
When using the DVD player, selecting mute from the
remote control will mute the amplifier and pause the
DVD. When the amplifier mute is cancelled, the DVD will
continue playing.
Power-Saving Mode (Amplifier)
The amplifier can switch the DVD Player, Tuner or CD
player into standby if that source remains unselected for
more than ten minutes.
Automatic Switch-On (DVD/Tuner/CD)
If the standby button on the DVD player, Tuner or CD
player is pressed, the amplifier will also awaken and
select the correct source.

page 9 of 28
REMOTE CONTROL OPERATION
The Myryad MSR2 System Remote handset supplied with the MXV4000 has been ergonomically designed to be easy
and comfortable to use. It duplicates all the controls featured on the front panel, and has others required for setup and
more advanced operation. It may also be used to control Myryad Integrated/Pre amplifiers. CD players and Tuners as
described in the separate MSR2 Owner’s Manual supplied with this unit. Please note, The “DVD/Amplifier Mode” section
of the MSR2 Manual does not apply to the MXV4000.
MSR2 System Remote – DVD/Amplifier mode for MXV4000
Important: To control the MXV4000 first press the “DVD” key to switch the remote to “DVD/Amplifier” mode. It will
remain in this mode until either the TUN or CD key is pressed to change to Tuner/Amp or CD Amp mode. When in
“DVD/Amplifier” mode the remote operates as shown below.
Note: The DVD functions marked “1” (SOUND MODE, ZOOM, SUBTITLE, AUDIO, VIDEO OFF and ANGLE) are
printed on a transparent self-adhesive overlay label supplied with this unit, which may be stuck onto the remote if
desired.
Switches off/dim/on front
panel display DIM
Enter setup menu SETUP
Selects line direct input DIR
Select TV input (or Video or
DVD on some models) TV
Navigate and select
from DVD menus
(and SEL also have
various secondary functions)
SEL
Stop
Scan Forward
Scan Back
Open/Close disc drawer
Go to DVD menu MENU
Go to DVD title menu TITLE
VIDEO OFF
1
EXIT
ANGLE
1
PROG
Access On Screen Display TIME
Enter shuffle play mode SHUFFLE
STANDBY
Switches preamp-processor or
integrated amp into/out of
standby. Press and hold down
DVD select key and then press
STANDBY to switch just DVD
player into/out of standby.
0-9
Digit keys 0-9 for direct
track/chapter access
≮
≮≮
≮
Volume up/down and Mute on
Myryad preamp-processors and
integrateds
TP1 Tape 1 input select
TP2 Tape 2 input select
AUX Aux or Phono input select
TUN Tuner input and mode select
DVD DVD input and mode select
CD CD input and mode select
Note: The CD, DVD and TUN
keys also change the operating
mode of the remote control.
Play
Skip forward to next chapter
Skip back to previous chapter
Pause / step single frame
MONO Select SOUND MODE
1
ZOOM
1
SUBTITLE
1
BAND AUDIO
1
– select soundtrack
A-B Repeat A–B
REPEAT Repeat chapter/title/disc

page 10 of 28
1. ESSENTIAL SETUP
This section describes the basic system setup necessary
for operation in the majority of home cinema systems.
The remaining setup menu details are described in
pages 17-21
For system setup a TV or monitor must be connected to
one of the MXV4000’s video outputs. A composite video
(CVBS) or s-video connection is recommended for initial
setup because these outputs remain active with
interlaced video in all modes. With the exception of the
Progressive/Interlaced switch on the rear panel (see
page 5), all of the setup procedure is carried out using
the remote control handset and On-Screen-Displays.
Press the SETUP key on the remote control to access
the setup menu. Any disc playing will pause and the
setup menu will appear as below.
The five icons at the top of the screen represent, from
left to right General Setup, Audio Setup, Video Setup,
Preferences and Exit. When Setup is first pressed the
menu opens at the General Setup Page with the leftmost
icon illuminated at the top of the screen.
Note: the Preferences menu is only accessible when the
unit is the player is in STOP mode (not Stop-Resume),
or with no disc or with the disc drawer open.
The setup menus are navigated using the navigation
keys and SEL. Use the and keys to
highlight the desired setup menu. Press once to
choose the Audio Setup Page and then SEL or to
select this menu.
Within each setup menu page, use the
and
keys to
choose the desired option, followed by SEL to confirm
selection of that option. The
key is used to access
each item’s sub-menu, and the
key to go back to the
previous menu level. Select the “X” icon at the top right
of the screen, or press the Setup key at any time within a
menu, to exit the Setup menu system and return to
normal operation.
As an example, the selection of the Analog Output is
described below in detail.
1.1 Audio Setup Page
As soon as the audio setup page is selected ANALOG
OUTPUT is automatically chosen (indicated by white
lettering) with the three parameter options shown to the
right of the screen. The current parameter setting (e.g.
MULTI-CHANNEL) appears in yellow, the others in blue.
Press SEL or to make a change to the ANALOG
OUTPUT. The current parameter will change to white
text and the and keys may be used to choose an
alternative setting (e.g. STEREO). Press SEL to confirm
this selection and exit the parameter setup or press at
any stage to return without change. The chosen setting
will always be shown in yellow.
The same procedure is used to navigate and change
settings in all the setup menus.
ANALOG OUTPUT
This function changes what appears at the 5.1 channel
analogue audio outputs and duplicates the remote
“SOUND MODE” key. Whatever the sound track; the
STEREO analogue audio output always carries a 2-
channel downmix. When the sound track is in stereo it is
sent unchanged to the Front Left and Right 5.1 outputs
and to the stereo output.
The parameter options are:
STEREO Multi-channel sound tracks are mixed
down to stereo on the Front Left and Right outputs.
Two channel sound tracks will be output unchanged
from Front Left/Right. Use this setting if the system
connected to Front Left/Right has only two
loudspeakers.
VIRTUAL SURR Generates a “virtual” surround
effect through two loudspeakers, via the Front Left
and Right outputs. Use this setting if the system
connected to FL/FR has only two loudspeakers in
order to get a spacious sound effect.
MULTI-CHANNEL In this mode 5.1 channel Dolby
Digital or DTS soundtracks will be decoded and sent
to the 5.1 channel outputs. Two channel soundtracks
will be processed using Dolby Pro Logic II to deliver
surround sound. Use this setting when the multi-
channel outputs are connected to a 5.1 channel
playback system.
The default setting is MULTI-CHANNEL.

page 11 of 28
DIGITAL AUDIO
Choose DIGITAL AUDIO and press SEL to access the
digital audio setup page.
The first menu item is DIGITAL OUTPUT which selects
the signal delivered to the coax and optical digital
outputs (it does not affect the HDMI audio output). The
parameter options are:
OFF Coax and Optical digital outputs switched
off.
ALL All sound tracks types, PCM, Dolby Digital
and DTS, sent to digital outputs. Use this setting if
the digital output is fed to a receiver or processor
which has Dolby Digital and DTS decoding.
PCM ONLY Only PCM (2-channel stereo) sound
tracks are sent direct to the digital outputs. Multi-
channel sound tracks are downmixed to stereo. Use
this setting if the digital output is fed to a receiver or
processor or TV which cannot decode Dolby Digital
or DTS sound tracks.
The default setting is ALL.
The second menu item is LPCM OUTPUT which can be
set to 48 or 96kHz. This only affects certain discs which
have 24bit 96kHz soundtracks. Only set to 96kHz if your
receiver or processor can accept 96kHz PCM inputs.
Otherwise set to 48kHz and the MXV4000 will down-
sample to 48kHz when necessary.
The default setting is 48kHz
HDMI AUDIO
This allows the audio in the HDMI output to be set On or
Off. Set to Off if you do not want to use the audio from
the HDMI output. When the HDMI AUDIO output is set
On, and audio signals are being set to an HDMI
compatible component (e.g. a TV), the other digital audio
outputs will be muted. The default the HDMI AUDIO
output setting is OFF.
Notes:
– When DIGITAL AUDIO is set to OFF, but HDMI
AUDIO is set to ON and an HDMI connection is
established between the monitor and processor/
receiver, digital audio signals will still be present on
the HDMI output.
– When DIGITAL AUDIO is set to ALL, PCM digital
audio signals will be sent to the HDMI output if the
monitor/ processor/receiver only supports PCM
format.
For details of the other Audio Setup menu items, see full
setup section on page 18.
1.2 Video Setup Page
Use the and keys to highlight the video setup page
icon and press SEL or to select the page as below
(region 1 version shown).
TV TYPE
Set this parameter to PAL, NTSC or MULTI to suit your
television. Before making any change ensure that your
TV supports the TV system to be selected.
PAL Select this if the connected TV is a “PAL
system only” TV. The MXV4000 will process video
signals from NTSC discs and output them in PAL
format.
NTSC Select this if the connected TV is an
“NTSC system only” TV. The MXV4000 will process
video signals from PAL discs and output them in
NTSC format.
MULTI Select this if the connected TV is
compatible with both NTSC and PAL formats (a
multi-system TV). The output format will be in
accordance with the video signals from the disc.
Notes:
1. If, when “TV TYPE” is changed, the picture does not
display properly on your TV, wait 15 seconds for auto
recover to activate. If the picture is OK, select the “OK”
box and press SEL (twice) to confirm the new setting.
2. If you have a PAL/NTSC compatible TV always set to
MULTI to get the best picture quality with all discs.
3. The default TV TYPE setting depends upon the
region code setting of the MXV4000.
TV DISPLAY
Set this parameter to 4:3 PAN SCAN, 4:3 LETTER BOX,
or 16:9 to suit the aspect ratio of your TV screen.
4:3 PAN SCAN Select this if you have a normal
TV. It will increase the picture height of a widescreen
video to fill the screen, and selectively cut off the
sides to fit your screen. This is only effective when
Pan-Scan information is recorded on the disc.
Otherwise the playback will by displayed in Letter
Box mode.
4:3 LETTER BOX Select this if you have a
normal TV. It will display widescreen pictures with
black margins above and below.
16:9 Select this if you have a widescreen
TV. Note: depending on the DVD disc format, e.g.
2.35:1, there may still be narrow black margins
above and below the picture.
For details of all other setup menu items, see full setup
section on pages 17-21.

page 12 of 28
2. PLAYING A DVD
Insert a DVD disc as described on page 7. The VF
display will briefly read “DVD”, followed by the default
Sound Mode (see page 13) and the “DVD” icon will be
illuminated. The TV screen will briefly read “DVD-
VIDEO” at the top, and the disc will play - usually starting
with the disc menu. Use the cursor keys to
select the desired feature from the disc menu, followed
by SEL to confirm the selection.
Make sure that the regional code number on your disc (if
present) is the same as the regional code number on the
printed label on the rear panel of the MXV4000. If a disc
with the wrong regional code is inserted the VF display
will show “DVD” after the disc is loaded and there will be
no picture on the TV screen, just the text “WRONG
REGION”. The disc will not play. Press OPEN/CLOSE
and remove the disc. Each MXV4000 is pre-set with the
correct regional code for the country in which it is sold. If
you are in any doubt about the setting of your player
please consult your dealer. See page 3 for more
information about regional coding.
The other remote control functions available during
playback of a DVD are described below. Many of these
functions apply equally to CDs, SACDs and other disc
types.
Note: when playing a DVD the time display in the right
hand section of the VF display shows hours and minutes
only – not seconds.
2.1 PLAY
The remote PLAY key, together with the PAUSE key,
replaces the PLAY/PAUSE button on the front panel.
Press PLAY to start playing from STOP or PAUSE
mode. The PLAY key can be used instead of SEL in the
setup menu or to select the highlighted option in a disc’s
root or title menu. Also the SEL key functions as PLAY
during normal play (when not within a menu).
2.2 PAUSE/Still Frame
Press PAUSE when in Play mode to Pause the disc. The
TV will display a still frame. If PAUSE is pressed again
the movie will step forward frame by frame. Press PLAY
again to exit Pause mode and play the disc once more.
2.2 SKIP
/
and SCAN
/
These keys duplicate the front panel SKIP/SCAN
functions (page 8), but using separate keys for each
function.
In play mode press SKIP
or
and the movie will
jump to the next or previous chapter.
In play mode press SCAN
or
to play fast forward
or fast backward. The TV screen will show “
x2” or
“
x2” in the upper left corner and the video will play
forward/backward 2 times faster than normal speed.
Press the same key again and the speed will increase to
4 times faster than normal. Further presses will increase
the speed to x8, x16 and then to x32. One further press
will return to normal playback speed. Alternatively
pressing PLAY at any time will return to normal play.
The and navigation keys also work as Scan keys
during normal play (and the Scan keys work as
navigation and keys when in a menu).
There is no audio output during SCAN forward/backward
with DVDs.
2.3 STOP
, OPEN/CLOSE
and VIDEO
OFF
These keys function exactly as their equivalent front
panel buttons.
2.4 Navigation keys and SEL.
When in the disc or setup menu, use the cursor keys
to select the feature desired, followed by SEL to
confirm the selection. In play mode these cursor keys
have other functions (see below).
2.5 Slow Play Forward/Reverse
When in play mode press the cursor down key to play
forward in slow motion at half speed. A second press will
slow playback to ¼ speed, further presses slowing to 1/8
and then 1/16. Pressing again will return to normal
speed play.
The cursor up key operates in a similar way, but plays
in slow reverse motion.
Press PLAY at any time to change back to normal speed
forward play.
2.6 Alternative Scan Forward/Reverse
When in play mode press the cursor left or right (or )
key to play fast reverse or forward – in exactly the same
way as the
and
keys.
2.7 Number keys 0-9
Direct access to any chapter/track is possible using the
numbered keys on the remote handset. To play a
specific chapter (e.g. chapter 13) press the key “1” then
“3”. After the second key is pressed the player will play
chapter 13. If only one key (e.g. key “5”) is pressed, the
player will pause briefly before playing chapter 5
Single digit tracks may be accessed instantly by
pressing a “0” before the single digit. Or press PLAY or
SEL after the single digit.
2.8 DIM
Press the DIM key once to reduce the brightness of the
front panel VF display. Press once more to turn the VF
display off. Press DIM a third time to return the display to
full brightness once more.
When the display is switched off, pressing any other key
will cause the display to illuminate at full brightness for
about 2 seconds. If the disc is then put into Stop mode
the display will illuminate at full brightness continuously,
until the disc is played once more.
2.9 SETUP
Press the SETUP key to enter the setup menu. Use the
navigation keys (2.4) to make any desired changes and
exit by pressing SETUP once more. See more details on
pages 10 and 17-21.
Note: If the player is left in Stop, Resume Stop or Pause
mode for more than 30 minutes it will automatically
switch into standby to save power. In order to take a
longer break from watching a movie, press the MENU
key on the remote to return to the root menu. When Play
is pressed again the movie will resume from where it
was left. This technique may not work with all DVDs.
Normal (x1) x1/2 x1/4 x1/8 x1/16

page 13 of 28
2.10 MENU
Press MENU to access the DVD’s menu (usually the
“root” menu) if it is available.
2.11 TITLE
Press TITLE to access the DVD’s “Title” menu (only
applies to certain multi-title discs).
2.12 SOUND MODE
Press the SOUND MODE key to change the processing
applied to sound tracks and delivered to the multi-
channel analogue outputs. A two channel (stereo) sound
track (e.g. from a CD) can be changed from stereo to
either Dolby Pro Logic II or Virtual Surround. The sound
mode will be displayed briefly, only on the front panel VF
display, as “STEREO”, “V SURR” or “DOLBY PLII”.
Multi-channel sound tracks (Dolby Digital or DTS) can be
played back in Multi-channel (default), Virtual Surround
or stereo.
The table below summarizes the Sound Mode options
and displays for various types of sound track. Once one
of the three Sound Mode options has been selected, the
setting is memorized until it is changed again. Thus if
option 1 (DTS5.1) were chosen when playing a DTS
sound track, the next CD would also be played back with
option 1 – Dolby Pro Logic II processing. The Sound
Mode can also be changed via the Audio Setup “Analog
Output” menu - see page 18 for more details of the
processing options.
Sound
track Sound mode options Temporary VF
display
1. Dolby Pro Logic II DOLBY PLII
2. Virtual Surround V SURR
Stereo
PCM
(e.g. CD) 3. Stereo STEREO
1. Dolby Pro Logic II DOLBY D / +PLII
2. Virtual Surround V SURR
Dolby
Digital 2.1 3. Stereo DOLBY D
1. Dolby Digital 5.1 DOLBY D /
MULTI-CH
2. Virtual Surround V SURR
Dolby
Digital 5.1 3. Dolby Digital
downmixed to stereo DOLBY D
1. DTS 5.1 DTS
2. Virtual Surround V SURR
DTS (5.1) 3. DTS downmixed to
stereo STEREO
Meanings of Sound Mode options:
1. Dolby Pro Logic II: processes 2-channel sound
tracks to produce multi-channel sound from five
loudspeakers (5.0).
1. Dolby Digital 5.1 or DTS 5.1: six channel digital
sound recordings are decoded to produce multi-channel
surround sound from five loudspeakers plus a sub-
woofer (5.1).
2. Virtual Surround: the original sound track
(whether 2.0 or 5.1) is processed to drive two
loudspeakers and produce a simulated surround effect.
3. Stereo: original 2-channel sound tracks are played
back unchanged. Dolby Digital or DTS 5.1 channel
sound tracks are mixed down to stereo via the Front Left
and Right outputs.
Note: The Sound Mode setting does not affect the
digital audio outputs.
2.13 ZOOM
Press the ZOOM key to magnify the size of the TV
image. The first press will enlarge x2, the next x3 then
x4, then reduce to x½, x⅓, x¼ and finally back to normal
size.
Normal (x1) x2 x3 x4 x½ x⅓x¼
While the picture is magnified, the navigation
keys may be used to pan around the video image so that
any part can be viewed.
2.14 VIDEO OFF
The VIDEO OFF key functions exactly as its equivalent
front panel button (see page 8).
2.15 ANGLE
When playing a disc which has the angle feature, press
ANGLE key to view the scene from different angles.
2.16 AUDIO
Press the AUDIO key to select between the different
sound tracks on a disc if more than one is available.
These may be different language soundtracks, or
different encodings such as Dolby Digital 2.1, Dolby
Digital 5.1, or DTS.
2.17 SUBTITLE
Press the SUBTITLE key to select between different
language subtitles on a disc when these are available.
For example, with subtitles off, the first press of
SUBTITLE will show the current subtitle setting, which is
“SUBTITLE OFF”. If there are two alternative subtitle
languages, say French and German, the next press will
select the French subtitles and the TV will briefly read
“SUBTITLE FRA 1/2”, the third press will select German
subtitles and “SUBTITLE DEU 2/2” and finally on the
fourth press the subtitles will be switched off again – the
TV showing “SUBTITLE OFF”.

page 14 of 28
2.18 ON SCREEN DISPLAY (“TIME” key on
remote)
When the TIME key is pressed the TV picture will be
reduced in size and the bottom half of the TV screen will
display a menu of disc play parameters as shown in the
example below (only half the list is displayed at one
time).
The navigation keys and SEL may be used to
select any of these parameters and edit them. For
instance, if the “TIME DISP” is edited then the VF
display’s time display will also change through TITLE
ELAPSED, TITLE REMAIN, CHAPTER ELAPSED and
CHAPTER REMAIN.
Press TIME again to exit the OSD menu and return to
normal play.
Explanation of display information
MENU - Disc state – Play mode
TITLE 01/06 - Title 1 of 6
CHAPTER 04/18 - Chapter 4 of 18
AUDIO 5.1CH ENG - 5.1 channel English soundtrack
SUBTITLE OFF - Subtitles off
ANGLE 1/1 - Angle 1 of 1 (i.e. no angle options)
TT TIME 1:04:35 - Total Time of this Title 1hr, 4min 35sec
CH TIME 0:04:10 - Total Time of this chapter 4min 10sec
REPEAT OFF - Repeat State - off
TIME DISP. TITLE ELAPSED - Time display (on VFD and OSD) is title elapsed
BITRATE 72 IIIIIIIIIIII TITLE ELAPSED 0:12:07 - Audio data rate off disc / time display
--------------------------------------------------------
2.19 SHUFFLE
Press the SHUFFLE key to turn on Shuffle mode. The
chapters (tracks on CD) will be played in random order
until all have been played and the disc stops. A second
press of the SHUFFLE key will invoke Shuffle Repeat
mode; after all the tracks have been played in random
order they will be shuffled and played again in a different
order, and so on ad infinitum. A third press will switch
shuffle mode off and return to normal play. At each press
of the key the VF display will give a temporary display of
the current state: SHUFFLE, SHUFF RPT or SHUFF
OFF.
2.20 REPEAT
A single press of the REPEAT key puts the player into
Repeat Chapter mode. The display will briefly read “RPT
CHAPT” and the “REPEAT” icon will be illuminated at
the left of the VF display. The currently playing chapter
will play to the end and then be repeated - ad infinitum.
When the REPEAT key is pressed a second time,
Repeat Title mode is engaged. The display will briefly
read
“RPT TITLE” and the “REPEAT” icon will remain
illuminated. The current title will then be repeated.
When the REPEAT key is pressed a second time,
Repeat Disc mode is engaged. The display will briefly
read
“RPT DISC” and the “REPEAT ALL” icon will illuminate.
The whole disc will then be repeated.
A fourth press of the REPEAT key returns the player to
normal operation. The display will briefly read “RPT
OFF” and the REPEAT ALL icon will be extinguished.
2.21 REPEAT A-B
This key allows a specified section of a track or disc to
be repeated.
First play the disc until it reaches the desired start point
and press the “A-B” key. The VF display will read “SET
A” briefly and a small icon will illuminate reading
“REPEAT A-“. Continue to play the disc until the desired
end point is reached and press the “A-B” key again. The
VF display will then read “RPT AB” briefly, the icon will
change to “REPEAT A-B“ and the desired selection will
be played repeatedly. The TV will display a repeat AB
icon whilst this mode is engaged.
To cancel A-B repeat mode, press the “A-B” key once
more, the “REPEAT A-B” icon will be switched off, the
VF display will read “RPT OFF” briefly and normal play
will resume.
Pressing either SKIP
or
will automatically exit
REPEAT A-B mode.
Pressing STOP will exit any Shuffle or Repeat mode.

page 15 of 28
3. PLAYING A CD
In most respects playing a CD is exactly the same as
playing a DVD. This section therefore just describes the
main differences in operation.
When a CD is inserted and the disc drawer closed the
VF display will briefly read “CDDA” followed by the
current Sound Mode (see page 13), the “CD” icon will be
illuminated and the disc will start playing automatically.
3.1 PAUSE
When playing a CD the PAUSE key will only pause disc
playback. A second press of PAUSE, or pressing PLAY,
will return to normal play.
3.2 SCAN /(remote and front panel)
The same scan speeds, from x2 to x32 are available as
when playing DVDs. When the or key is pressed
the scan speed is changed and the VF display briefly
shows SEARCH, before showing the track number and
time data as before. The audio output is present whilst
scanning a CD to facilitate cueing.
3.3 Slow Forward/Reverse ()
Slow Forward and Reverse (using the cursor up/down
keys) are not available with CDs.
3.4 SOUND MODE
Stereo, Virtual Surround and Dolby Pro Logic II modes
are available when playing CDs (see page 13).
3.5 ON SCREEN DISPLAY (“TIME” key on remote)
When playing a CD the TIME key is used to change the
time displayed on the VFD – and the same time display
will be shown on the TV display if it is switched on. The
VF display normally shows track number and the
elapsed track time. Pressing the TIME key changes this
to remaining track time. Further key presses change to
total elapsed disc time and then total remaining disc
time, finally returning to the elapsed track time.
3.6 REPEAT
The REPEAT function when playing a CD is similar to
with a DVD, except that there are only two repeat modes
available: Repeat Track (with “REPEAT 1” icon lit on VF
display) and Repeat Disc (with “REPEAT ALL” icon lit
on VF display).
4. PLAYING AN SACD
The SACD (Super Audio CD) standard is based on DSD
(Direct Stream Digital) technology. The DSD format is a
1-bit system that has a digital sampling frequency 64
times higher than that of conventional audio CDs. There
are three types of SACD discs: single-layer, dual-layer
and hybrid discs. An SACD may contain up to two areas
of recorded information: a High Quality Stereo area and
a High Quality Multi-channel area.
– A single layer disc can contain both information areas.
– A dual layer disc can contain both information areas,
but double the information can be stored on the disc.
– A hybrid disc can contain both information areas, and
also a second, “CD” layer, so it can be played on
standard CD players.
When an SACD is loaded, the VF display will briefly read
“SACD”, the SACD icon will be illuminated, playback will
start automatically and the TV screen will display the
current playing status and track list for the current
playback area.
Playing an SACD is almost identical to playing a CD, but
there can be the additional facility to choose the
information area. When playing the CD layer of a hybrid
SACD, operation is exactly the same as with a
conventional CD.
Changing the SACD playback area and layer
To change the SACD playback (information) area
between 6 channel and 2 channel, press SOUND
MODE. To change between SACD and CD layers, press
AUDIO when in Stop mode.
• On hybrid discs (with SACD and CD layers), the
player will always start playing the SACD layer (multi-
channel area).
• Switch between the SACD multi-channel and SACD
stereo areas (if available) by pressing SOUND MODE
or, when the TV display is on, select the desired folder
using and press SEL to confirm. Then press to
select a track and press SEL to confirm. The VF display
will briefly read “SACD 6” for multi-channel and “SACD
2” for stereo.
• To switch between the SACD layer and the CD layer,
press AUDIO while playback is stopped. The selected
SACD layer will also be indicated by the “SACD” or “CD”
icon being illuminated at the left of the VF display.
Notes:
– SACD Text is not supported.
– If SOUND MODE is pressed while an SACD is
playing, the disc will restart from track 1 of the new area.
– There is no digital audio output (coax, optical or
HDMI) when playing the SACD layer.

page 16 of 28
5. PLAYING AN MP3/WMA/
DivX/XviD/JPEG (PICTURE CD)
When the disc is loaded reading time may exceed 30
seconds depending upon the complexity of the
directory/file configuration.The VF display will briefly
read “DATA CD” and the “CD” icon will be illuminated.
Playback should start automatically but, if it does not,
press PLAY. When the disc is loaded a folder display will
appear on the TV so that the desired folder and track
can be chosen for playback.
During playback, you can:
Press
/
to select another track/file in the current
folder.
Press PAUSE to pause playback and PLAY to
restart.
Notes:
There is no SCAN function available with MP3 discs.
It may not be possible to play certain MP3/WMA/
JPEG/DivX discs owing to the configuration and
characteristics of the disc or condition of the recording.
See page 21 for changing MP3/JPEG navigator
menu setting.
Special Picture Disc Features
Load the picture disc (Kodak Picture CD or JPEG).
For Kodak discs, the slide show begins.
For JPEG discs, the picture menu appears on the TV
screen. Press PLAY to start the slide-show.
Preview function (JPEG)
This function displays the content of the current folder or
the entire disc.
Press STOP during playback and 12 thumbnail pictures
will appear on the TV screen.
Press
/
to display the other pictures on the next/
previous page.
Use to highlight one of the pictures and press
SEL to start playback.
OR
Move the cursor to highlight on the bottom of the page to
start playback from the first picture on the current page.
Press MENU to return to the picture CD menu.
Zooming pictures
During playback, press ZOOM repeatedly to display the
picture at different scales. Use to choose the
area shown in the zoomed picture.
Playback orientation
During playback, press to manipulate the
picture on the TV screen.
rotates the picture anti-clockwise
rotates the picture clockwise
mirrors the picture vertically
mirrors the picture horizontally
Wipe Effect
Press the ANGLE repeatedly to choose amongst a
variety of wipe effects (how the screen wipes from one
picture to the next). The wipe effect name appears
briefly in the top left corner of the TV screen.
Playing MP3 music and JPEG pictures
simultaneously
When a disc that contains both music and picture data is
loaded the disc menu will appear on the TV screen.
Select an MP3 track and, when the MP3 music track is
playing, select a picture from the TV screen and press
PLAY. The picture files will be played back one after
another until the end of the folder. To quit simultaneous
playback, press MENU, then STOP.
Note: Some files on Kodak or JPEG discs may be
distorted during playback owing to the configuration and
characteristics of the disc.

page 17 of 28
6. SETUP MENUS
This section describes how the setup menu and its sub-
menus can be used to customize the MXV4000 to suit
individual systems and tastes. The Essential Setup
section on page 10 describes how to navigate of the
menus – and some of the basic setups. This section
describes all parts of all the menus.
6.1 General Setup Page
DISC LOCK
The disc lock feature allows the locking of specific discs
to prevent playback. Up to 40 discs can be locked on
this player.
Set disc lock to LOCK to block playback of the
current disc. The disc will continue to play, but
subsequent access to a locked disc requires a six-
digit password. The default password is ‘000 000’
(see “Changing the password” on page 21).
Select UNLOCK to unlock the disc and allow future
playback.
PROGRAM
The MXV4000 can be programmed to play some or all of
the contents of a disc in any desired order. Up to 20
tracks/chapters can be programmed in this way.
Highlight INPUT MENU and then press SEL. This
brings up the PROGRAM menu
Program step 1 (top left) will automatically be
highlighted. Use the numeric keypad to enter title
and chapter; two digits are required in each case, so
title 1 chapter 6 must be entered “0”, “1”, “0”, “6”. The
highlight will then automatically move on to program
step 2 for the next chapter to be programmed. To
move on to the second batch of ten chapters press
- and press
to return to the first ten.
Remove any chapter from the program by first using
the cursor keys to highlight it and then press SEL to
delete.
Highlight START and press SEL to start playback of
the program. Highlight EXIT and press SEL to leave
the programming menu without playing the program.
A similar process is used with CDs, but only track
numbers are required by the program menu.
Note: The last ten programs entered are stored in the
MXV4000’s memory and can be recalled when the same
disc is loaded by entering PROGRAM mode.
OSD LANGUAGE
This function allows the choice of the language for the
Setup Menus and On Screen Display. The OSD
language setting will be remembered by the system
once selected.
The range of OSD language options available depends
upon the region code setting of the MXV4000. The
default setting in each case is ENGLISH.
Note: Audio, Subtitle and Disc Menu languages are
chosen in the Preferences menu, only accessible in Stop
mode, see page 21.
SCREEN SAVER
This function allows the screen saver to be switched on
or off.
ON When disc playback is stopped or paused for
more than 15 minutes the TV picture will turn off to
prevent screen burn, leaving a moving screen saver
in place.
OFF Select this to disable the screen saver
function.
The default setting is ON.
SLEEP
This function sets the sleep timer, which will
automatically switch the MXV4000 into standby after the
period set has elapsed. The sleep timer can be set to 15,
30, 45 or 60 minutes or OFF.
The default setting is OFF.
DIVX(R) VOD CODE
Myryad provides you with the DivX® VOD (Video On
Demand) registration code that allows you to rent and
purchase videos using the DivX® VOD service. For
more information visit http://vod.divx.com/.
Highlight “DIVX(R) VOD CODE” and then press SEL.
The registration code will appear. Press SEL again to
exit.
Use the registration code to purchase or rent the videos
from DivX® VOD service at http://vod.divx.com/. Follow
the instructions and download the video onto a CD-R for
playback on this player.
Notes: – Any videos downloaded from DivX® VOD can
only be played back on this player. The time search
function is not available

page 18 of 28
6.2
Audio Setup Page
ANALOG OUTPUT
This function changes what appears at the 5.1 channel
analogue audio outputs and duplicates the remote
“SOUND MODE” key. Whatever the sound track; the
STEREO analogue audio output always carries a 2-
channel downmix. When the sound track is in stereo it is
sent unchanged to the Front Left and Right 5.1 outputs
and also to the stereo output.
The parameter options are:
STEREO Multi-channel sound tracks are mixed
down to stereo on the Front Left and Right outputs.
Two channel sound tracks will be output unchanged
from Front Left/Right. Use this setting if the system
connected to Front Left/Right has only two
loudspeakers.
VIRTUAL SURR Generates a “virtual” surround
effect through two loudspeakers, via the Front Left
and Right outputs. Use this setting if the system
connected to FL/FR has only two loudspeakers in
order to get a spacious sound effect.
MULTI-CHANNEL In this mode 5.1 channel Dolby
Digital or DTS soundtracks will be decoded and sent
to the 5.1 channel outputs. Two channel soundtracks
will be processed using Dolby Pro Logic II to deliver
surround sound. Use this setting when the multi-
channel outputs are connected to a 5.1 channel
playback system.
The default setting is MULTI-CHANNEL.
DIGITAL AUDIO
Choose DIGITAL AUDIO and press SEL to access the
digital audio setup page.
The first menu item is DIGITAL OUTPUT which selects
the signal delivered to the coax and optical digital
outputs (it does not affect the HDMI output). The
parameter options are:
OFF Coax and Optical digital outputs switched
off.
ALL All sound tracks types, PCM, Dolby Digital
and DTS, sent to digital outputs. Use this setting if
the digital output is fed to a receiver or processor
which has Dolby Digital and DTS decoding.
PCM ONLY Only PCM (2-channel stereo) sound
tracks are sent direct to the digital outputs. Multi-
channel sound tracks are downmixed to stereo. Use
this setting if the digital output is fed to a receiver or
processor or TV which cannot decode Dolby Digital
or DTS sound tracks.
The default setting is ALL.
The second menu item is LPCM OUTPUT which can be
set to 48 or 96kHz. This only affects certain discs which
have 24bit 96kHz soundtracks. Only set to 96kHz if your
receiver or processor can accept 96kHz PCM inputs.
Otherwise set to 48kHz and the MXV4000 will down-
sample to 48kHz when necessary.
The default setting is 48kHz
SPEAKER SETUP (5.1 ch analogue outputs only)
Choose SPEAKER SETUP and press SEL to enter the
Speaker Setup menu page. The Speaker menu setup
allows optimisation of the bass management and the
adjustment of individual speaker volumes and delays.
Note: Speaker settings are only available for the multi-
channel analogue audio output.
The bass management settings set up the system to
distribute the audio optimally to your specific speakers.
When any speaker is set to “Small”, bass frequencies
below 120Hz in that channel are re-directed to the
subwoofer.
FRONT SPEAKER Set to LARGE if Front Left
and Right speakers can reproduce frequencies
below 120Hz. Otherwise set to SMALL.
CENTER SPEAKER Set to LARGE if Centre
speaker can reproduce frequencies below 120Hz.
Otherwise set to SMALL. Set to OFF if there is no
Centre speaker; centre channel information will then
be sent to the Front Left and Right speakers.
SURROUND SP Set to LARGE if Surround Left
and Right speakers can reproduce frequencies
below 120Hz. Otherwise set to SMALL. Set to OFF if
there are no Surround speakers; surround
information will then be sent to the Front Left and
Right speakers.
SUBWOOFER Set to ON if a Subwoofer is
installed, to OFF if there is no Subwoofer. Do not set
all other speakers to Small if there is no subwoofer or
bass information will be lost.
SPEAKERS VOLUME
Note: Speakers Volume can only be adjusted when
no disc is loaded or if the drawer is open.
Choose this option and press SEL to bring up the
SPEAKERS VOLUME SETUP screen. Each
channel’s volume level, FRONT LEFT, FRONT
RIGHT, CENTER, SUBWOOFER, SURROUND L,
and SURROUND R, can be individually trimmed over
the range -6dB to +6dB in 1dB steps, using the
and navigation keys, to ensure a balanced sound
stage. A test tone is automatically generated to aid
correct level setting. When all the levels have been
set, press SEL to return to the previous menu.
Note: The LFE (“0.1”) channel is only routed to the
subwoofer. LFE channel information will be lost when
using the 5.1 channel analogue outputs if no
subwoofer is connected.

page 19 of 28
SPEAKERS DELAY
Choose this option and press SEL to bring up the
SPEAKERS DELAY SETUP screen. The audio
delays to the, CENTER, SURROUND L and
SURROUND R speakers can be adjusted as
necessary over the range 0 to 15 milliseconds (ms)
in 1ms steps, using the and navigation keys.
The correct delays can be calculated by measuring
the distance from the listening position to each of the
speakers. The distances to the Centre, Surround Left
and Surround Right speakers should then each be
subtracted from the Front Left/Right distance. If the
distance is measured in feet, multiply this difference
figure by 0.9 to get the required delay in milliseconds
– if in metres, multiply by 2.9. For example:
With the Front Left and Right speakers 3.0m from the
listener, delays should be set as in the table below.
Speaker Distance
3m minus
Distance x 2.9 Delay
setting
Centre
2.7 m 0.3 m 0.87 ms 1 ms
Surround L
1.9 m 1.1 m 3.19 ms 3 ms
Surround R
1.0 m 2.0 m 5.8 ms 6 ms
When all the delays have been set, press SEL to
return to the previous menu.
Note: The Left and Right Front speakers should
normally be positioned equally distant from the
listening position and further away than the other
speakers.
The default SPEAKER SETUP settings are: all speakers
Large, Subwoofer on, volumes all 0dB, delays 0 ms.
CD UPSAMPLING
This feature allows a music CD to be converted to a
higher sampling rate for better sound quality, using
sophisticated digital signal processing. When the
upsampling function is activated, the player will
automatically switch to stereo mode. The sample rate
can be converted to 88.2kHz (x 2) or 176.4kHz (x4).
Setting upsampling to OFF returns the data rate to the
CD standard of 44.1kHz. The default setting is
UPSAMPLING OFF.
Notes:
- CD UPSAMPLING can only be set when a CD is
loaded.
- This setting only affect signals at the analog
outputs.
- Upsampling is automatically reset to OFF when
the disc tray is opened.
NIGHT MODE
This feature is only available for movies with Dolby
Digital sound tracks. When NIGHT MODE is switched
ON it compresses the dynamic range of the audio by
automatically increasing the volume in quiet passages,
and reducing it when loud. Switching NIGHT MODE OFF
returns the audio to its full dynamic range.
The default setting is NIGHT MODE Off.
HDMI AUDIO
This allows the audio in the HDMI output to be set On or
Off. Always set to Off if you do not want to use the audio
from the HDMI output.
The default the HDMI AUDIO output setting is OFF.
Notes:
– When the HDMI AUDIO output is set On, and
audio signals are being set to an HDMI compatible
component (e.g. a TV), the other digital audio
outputs will be muted.
– When DIGITAL AUDIO is set to OFF, but HDMI
AUDIO is set to ON and an HDMI connection is
established between the monitor and processor/
receiver, digital audio signals will still be present on
the HDMI output.
– When DIGITAL AUDIO is set to ALL, PCM digital
audio signals will be sent to the HDMI output if the
monitor/ processor/receiver only supports PCM
format.
6.3
Video Setup Page
TV TYPE
Set this parameter to PAL, NTSC or MULTI to suit your
television. Before making any change ensure that your
TV supports the TV system to be selected.
PAL Select this if the connected TV is a “PAL
system only” TV. The MXV4000 will process
video signals from NTSC discs and output
them in PAL format, but there may be some
jerkiness of motion.
NTSC Select this if the connected TV is an “NTSC
system only” TV. The MXV4000 will process
video signals from PAL discs and output them
in NTSC format, but there may be some
jerkiness of motion.
MULTI Select this if the connected TV is compatible
with both NTSC and PAL formats (a multi-
system TV). The output format will be in
accordance with the video signals from the
disc.
Notes:
1. If, when “TV TYPE” is changed, the picture does not
display properly on your TV, wait 15 seconds for auto
recover to activate. If the picture is OK, select the “OK”
box and press SEL (twice) to confirm the new setting.
2. If you have a PAL/NTSC compatible TV always set to
MULTI to get the best picture quality with all discs.
3. The default TV TYPE setting depends upon the
region code setting of the MXV4000.

page 20 of 28
TV DISPLAY
Set this parameter to 4:3 PAN SCAN, 4:3 LETTER BOX,
or 16:9 to suit the aspect ratio of your TV screen. The
default setting is 4:3 PAN SCAN.
4:3 PAN SCAN Select this if you have a normal TV. It
will increase the picture height of a
widescreen video to fill the screen, and
selectively cut off the sides to fit your screen.
This is only effective when Pan-Scan
information is recorded on the disc. Otherwise
the picture will be in Letter Box mode.
4:3 LETTER BOX Select this if you have a normal TV.
It will display widescreen pictures with black
margins above and below.
16:9 Select this if you have a widescreen TV. Note:
depending on the DVD disc format, e.g.
2.35:1, there may still be narrow black
margins above and below the picture.
BLACK LEVEL (Region 1 units only)
When TV TYPE is set to NTSC, setting BLACK LEVEL
enhancement ON should improve the colour contrast
during playback making blacks darker. The black level
setting has no effect when TV TYPE is set to PAL. The
default BLACK LEVEL enhancement setting is OFF.
CLOSED CAPTION (Region 1 units only)
Closed captions are data hidden in the video signals of
specific discs, and are invisible without the use of a
special decoder. The difference between subtitles and
captions is that subtitles are intended for hearing
persons and captions are for the hearing impaired.
Subtitles rarely show all of the audio. For example,
captions show sound effects (e.g., “phone ringing” and
“footsteps”), while subtitles do not. Before you select this
function, please ensure that the disc contains closed
caption information and your TV set also supports this
function. The CLOSED CAPTION option may be set ON
or OFF- the default setting is OFF.
PICTURE SETTING
The MXV4000 has three predefined picture settings and
one personal setting that you can define yourself. This
function is available for interlaced analogue video
outputs only. The options are:
STANDARD: Select for standard picture setting.
BRIGHT: Select to make the TV picture brighter.
SOFT: Select to make the TV picture softer.
PERSONAL: Select to enter the PERSONAL PICTURE
SETUP menu which allows you to adjust
the brightness, contrast, tint and colour
(saturation).
BRIGHTNESS: Adjust to optimise the dark areas of
the picture. The range is ±20.
SHARPNESS: Increase the value to sharpen the
picture or vice versa. The range is ±7.
CONTRAST: Adjust to optimise the bright areas
of the picture. The range is ±16.
TINT: Adjust this value to change the hue
of the picture. The range is ±9.
COLOR: Increase the value to increase the
colour saturation in the picture or vice versa. The
range is ±9.
In each case, zero (0) is the normal setting value.
After making adjustments press SEL to store this
Personal Setup and return to the Video Setup menu.
The default PICTURE SETTING is STANDARD.
ADV PICTURE
The Advanced Picture settings allow fine-tuning of
various video parameters.
The ADV PICTURE SETUP menu includes:
DCDI (HDMI only): DCDi® (Directional Correlational
Deinterlacing) eliminates the jagginess that conventional
upscalers and de-interlacers introduce to diagonal edges
in video. DCDi’s unique algorithm identifies all the
moving edges in a scene and adjusts the angle of
interpolation at each pixel so that the interpolation
always follows the edge instead of crossing it,
eliminating staircasing or jagged edge artifacts. This
function is available for HDMI progressive scan only and
can be set ON or OFF. The default setting is ON.
GAMMA (Component video output only):
Changing GAMMA affects the intensity of the picture
non-linearly. A positive value brings out low level detail
in dark scenes, while a negative value emphasizes
contrast. The range of settings is ±7 and the default is 0.
CHROMA DELAY (Component video output only):
The chroma (colour) and luminance (brightness) signals
are not always perfectly synchronized. The Chroma
Delay setting allows you to adjust the advance delay of
the chroma signal to yield a perfectly clear picture. The
range of settings is ±3 and the default is 0.
PSCAN FORMAT (HDMI only): This function sets
the aspect ratio of screen images. It is only available for
the HDMI video output.
SUPERWIDE: Select this for display of 4:3 image
on a 16:9 screen with non-linear stretching (centre
portion of screen is stretched less than the sides).
4:3 PILLAR BOX:Select for display of a 4:3 image on
a 16:9 screen without stretching (a black pillar will be
applied to both left and right).
OFF: No aspect ratio adjustment is made
when this option is selected.
The default setting is OFF.
HDMI VIDEO: Enables you to adjust the HDMI output
resolution to 480p, 576p, 720p, 1080i or AUTO to suit
the monitor you are using.
480P: 480 line progressive-scan video
576P: 576 line progressive-scan video
720P: 720 line progressive-scan video
1080i: 1080 line interlaced video
AUTO: Setting is automatically optimized to suit the
HDMI screen in use.
The default setting is AUTO.
Notes:
– Some screens may not be compatible with the AUTO
setting. In this case, connect analogue video (e.g.
composite) to access the Video Setup menu and set
HDMI VIDEO to 720p.
– For settings other than [AUTO], the HDMI video output
may not display properly if you set an output resolution
that is not supported by your HDMI-compatible monitor.
To return to the initial setting:
1 Press OPEN/CLOSE to open the disc drawer.
2 Press (cursor left key).
3 Press AUDIO.
– While HDMI video signals are being output, the
component video output is switched off.
Table of contents
Other Myryad DVD Player manuals